manuals.online logo
Brands
  1. Home
  2. •
  3. Brands
  4. •
  5. Creative
  6. •
  7. Medical Equipment
  8. •
  9. Creative POD-1 User manual

Creative POD-1 User manual

Fingertip Oximeter
User Manual
(Model: POD-1, POD-1W)
Website: getwellue.com
Contact us: service@getwellue.com
Shenzhen Creative Industry Co., Ltd.
Floor 5, BLD 9, Baiwangxin High-Tech Industrial Park, Songbai Road,
Xili Street, Nanshan District, 518110 Shenzhen, P. R. China
Manufacture date: See the label on the product
Revision Date:Jan, 2021
Manual Version:V1.1 PN:3502-1290221
Note:
It's not a medical device. This device is for Sports and Aviation use
only and not intended for medical use.
Notes
Please read the manual very carefully before using this device.
Failure to follow these instructions can cause measuring
abnormality or damage to the Oximeter.
The contents contained in this manual are subject to change
without notice.
Information furnished by our company is believed to be accurate
and reliable. However, no responsibility is assumed by us for its
use, or any infringements of users or other rights of third parties
that may result from its use.
Instructions for Safe Operation
Make sure that there is no visible damage that may affect user’s
safety or measurement performance with regard to sensors and
clips. It is recommended that the device should be inspected
minimally before each use. If there is obvious damage, stop using
the device.
Special attention should be paid while the oximeter is used
constantly under the ambient temperature over 37°C, burning hurt
may occur because of over-heating of the sensor at this situation.
Necessary maintenance must be performed only by qualified
service technicians. Users are not permitted to service this device.
The oximeter must not be used with devices and accessories not
specified in User Manual.
Warnings and Cautions
Explosive hazard—DO NOT use the Oximeter in environment with
inflammable gas such as some ignitable anesthetic agents.
DO NOT use the Oximeter while the user is under MRI or CT
scanning. This device is NOT MRI Compatible.
Discomfort or pain may appear if using the Oximeter continuously
on the same location for a long time, especially for user with poor
microcirculation. It is recommended that the Oximeter should not
be applied to the same location for longer than 2 hours. If any
abnormal condition is found, please change the position of
Oximeter.
The light (the infrared light is invisible) emitted from the device is
harmful to the eyes. Do not stare at the light.
The Oximeter is not a treatment device.
Local laws and regulations must be followed when disposing of the
device.
Keep the Oximeter away from dust, vibration, corrosive substances,
explosive materials, high temperature and moisture.
The device should be kept out of the reach of children.
If the oximeter gets wet, please stop using it and do not resume
operation until it is dry and checked for correct operation. When it
is carried from a cold environment to a warm and humid
environment, please do not use it immediately. Allow at least 15
minutes for Oximeter to reach ambient temperature.
DO NOT operate the button on the front panel with sharp
materials or sharp point.
DO NOT use high temperature or high-pressure steam disinfection
on the Oximeter. Refer to Chapter 8 for instructions regarding
cleaning and disinfection.
Pay attention to the effects of lint, dust, light (including sunlight),
etc.
1 Overview
1.1 Intended Use
This Fingertip Oximeter is intended for measuring the pulse rate and
functional oxygen saturation (SpO2) through a user’s finger.
1.2 Views
2 Battery Installation
1. Refer to Figure 2, insert two AAA
size batteries into the battery
compartment properly, and note
the polarity markings.
2. Replace the cover.
Attentions:
• Make sure that the batteries
are correctly installed. Incorrect installation may cause the
device not to work.
• Remove batteries if the device is not being used for more than 7
days to prevent and avoid potential damage from the battery
leaking. Any such damage is not covered under the product
warranty.
3 Start/Stop Measuring
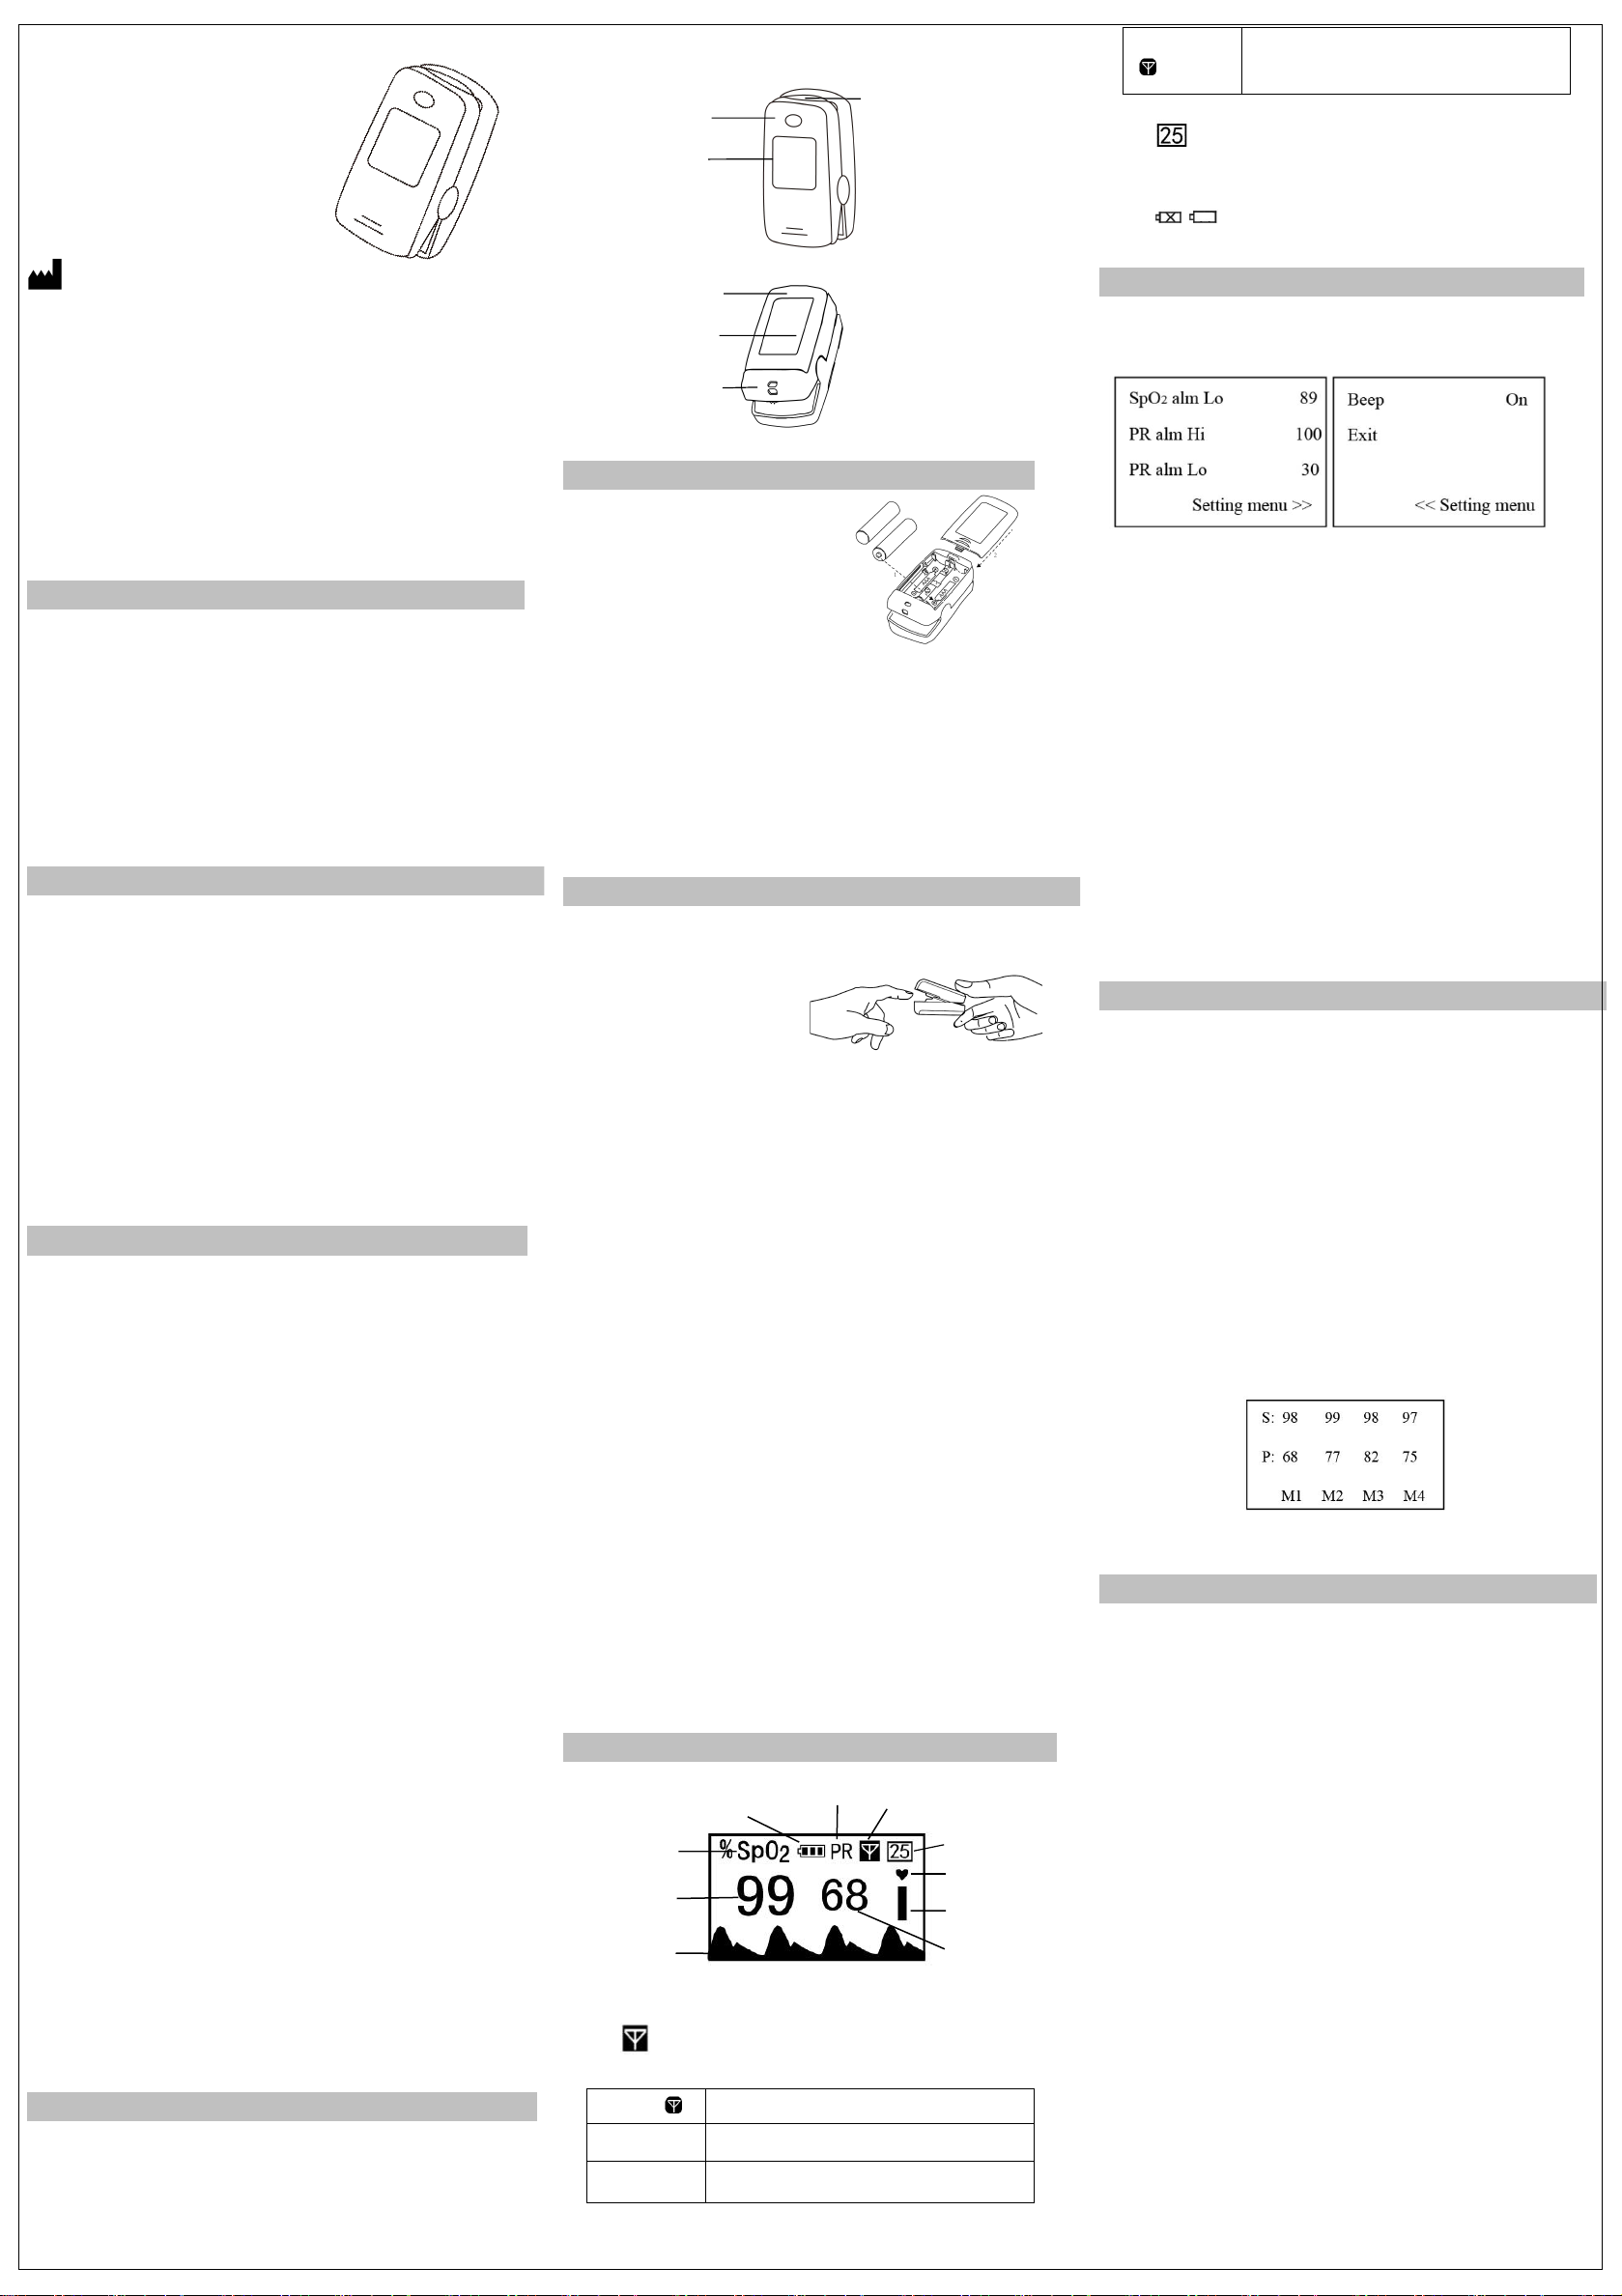
1. Open the clip and put finger inside the clip (make sure the finger is
in the correct position), and then release the clip.
2. Wait for 2 seconds, the
oximeter will power on
and start to measure.
3. The display screen shows
the measurement.
4. Get the finger out, and the device will automatically power off.
Attentions for measuring:
Do not shake the finger and relax during measurement.
Do not put wet finger directly into sensor.
Avoid placing the device on the same limb which is wrapped with a
cuff for blood pressure measurement or during venous infusion.
Do not let anything block the emitting light from device, i.e. do not
use finger nail polish/paints.
Existence of high intensive light sources, such as fluorescence light,
ruby lamb, infrared heater or strong sunshine, etc. may cause
inaccuracy of measurement result. Please put an opaque cover on
the sensor or change the measuring site if necessary.
Vigorous exercise and electrosurgical device interference may
affect the measuring accuracy.
Nail polish may affect the measuring accuracy, and too long
fingernail may cause failure of measurement or inaccurate result.
If the first reading appears with poor waveform (irregular or not
smooth), then the reading is unlikely true, the more stable value is
expected by waiting for a while, or a restart is needed when
necessary.
If the measurements over the limits, there is a reminder sound. You
can press the Display key to mute it, or wait for 10 seconds till the
sound disappears by itself.
4 Screen
4.1 Indications and Icons
Figure 4 Measuring Screen
Icon : indicates the wireless connection is set up between the
mobile device and oximeter. Only POD-1W has this function.
Status of
Definition
Flashing in blue
The oximeter is connecting with the mobile devices.
Blue on
The connection between the oximeter and mobile
devices is established.
No display of
“ ” icon
1. The oximeter fails to set up wireless connection
with mobile device within 3 minutes.
2. Hardware failure of wireless function.
Icon : indicates the counting-down time if the oximeter works
at Spot check mode. The total measuring time for Spot check
mode is 30 seconds.
Icon / : low battery voltage.
5 Menu Setup
During measuring, long pressing Display key can enter the setup
menu screen.
Figure 6 Menu
Menu operating procedures:
1. Shortly press Display Key to choose the setting item;
2. Long press Display Key to active the setting item, then shortly press
it to modify the setting parameter;
3. Long press Display Key to confirm the modification and exit from
this setting item.
4. Move the setting item to “Exit”, and long pressing Display Key to
store the modification and exit from the setup menu.
“Beep”:Pulse beep option. If it is set to on, every pulse beat makes a
beep.
Spot check mode: the measuring time lasts 30 seconds with a
counting-down indication. The SpO2and PR readings will freeze at the
end of 30 seconds, the analysis result for the pulse rhythm will be
displayed on the screen as well.
6 Record List
A single group of stable readings will be recorded in the record list
each time when the oximeter shuts down regardless of spot-check
or continuous mode. However, if the time from displaying valid
readings to the end of measurement is less than 5 seconds, then no
recording will be done.
Up to 12 groups of records can be stored in the record list, the
newest record is marked as M1, and the oldest record is marked as
M12. The new record will override the previous record.
When batteries are removed from the device all readings will be
deleted.
On power off status, long pressing the Display key shows the
record list screen. On record list screen, a short pressing on the
Display key can shift the records display, and if there is no key
operation for 6 seconds, then the oximeter will power off
automatically again.
7 Technical Specifications
A. SpO2Measurement
Sensor: dual-wavelength LED sensor with wavelength:
Red light: 663 mm, Infrared light: 890 mm.
Maximal average optical output power: ≤2mW
SpO2display range: 35% - 100%
SpO2measuring accuracy: ≤ 2% for SpO2range from 70% to 100%
B. Pulse Rate measurement
PR display range: 30 bpm – 240 bpm
PR measuring accuracy: ±2bpm or ±2% (whichever is greater)
C. Power supply requirement
2 x LR03 (AAA) alkaline batteries
Supply voltage: 3.0VDC,Operating current: ≤40mA
D. Environmental Conditions
Operating Temperature: 5°C - 40°C
Operating Humidity: 30% - 80%
Atmospheric pressure: 70kPa - 106kPa
E. Low Perfusion Performance
The accuracy of SpO2and PR measurement still meet the precision
described above when the modulation amplitude is as low as 0.6%.
F. Ambient Light Interference
The difference between the SpO2value measured in the condition
of indoor natural light and that of darkroom is less than ±1%.
G. Dimensions: 56 mm (L) × 34 mm (W) × 30 mm (H)
Figure 3 Finger Placement
Figure 7 Record List
Figure 2 Battery Installation
Pulse symbol
SpO2value
PR label
Pulse strength
bar
PR value
Pleth wave
SpO2symbol
Wireless icon (POD-1W only)
Time
countdown
Battery voltage
Rubber Cushions
Display Key
Nameplate
Lanyard Hole
Battery Cover
Display Screen
Net Weight: approx. 60g (including batteries)
H. Classification
The type of protection against electric shock: Internally powered
equipment.
The degree of protection against electric shock: Type BF applied
parts.
The degree of protection against harmful solid foreign objects
and ingress of liquid:
The equipment is IP22 with protection against harmful solid
foreign objects and ingress of liquid.
Electro-Magnetic Compatibility: Group I, Class B
8 Maintenance and Cleaning&Disinfection
8.1 Maintenance
The expected service life (not a warranty) of this device is 5 years. In
order to ensure its long service life, please pay attention to the
maintenance.
Please change the batteries when the low-voltage indicator
lightens.
Please clean the surface of the device before using, with 75%
alcohol wipes, then let it air dry or wipe it dry. Do not allow liquid
to enter the device.
Please take out the batteries if the Oximeter will not be used any
more than 7 days.
The recommended storage environment of the device:
ambient temperature: -20 ºC - 60 ºC, relative humidity 10% - 95%,
atmospheric pressure: 50 kPa - 107.4 kPa.
The Oximeter is calibrated in the factory before sale, so there is no
need to calibrate it during its life cycle.
Caution:
High-pressure sterilization cannot be used on the device.
Do not immerse the device in liquid.
It is recommended that the device should be kept in a dry
environment. Humidity may reduce the life of the device, or
even damage it.
8.2 Cleaning and Disinfecting Instruction
Surface-clean sensor with a soft cloth damped with a solution such
as 75% isopropyl alcohol, if low-level disinfection is required, use a
mild bleach solution.
Then surface-clean with a cloth damped ONLY with clean water
and dry with a clean, soft cloth.
Caution:
Do not sterilize by irradiation steam, or ethylene oxide.
Do not use the Oximeter if it is damaged.
9 Troubleshooting
Problem
Solution
The SpO2and Pulse
Rate value are
unstable
Place the finger correctly inside and try again.
Keep calm.
Cannot turn on the
device
Change or re-install the batteries.
No display
Change the battery.
10 Symbols
Symbol
Description
Symbol
Description
CE mark
Authorised
representative in the
European community
SN
Serial number
Manufacturer (including
address)
Date of manufacture
BF type applied part
Attention ─ refer to
User Manual
Follow WEEE
regulations for disposal
UK Responsible Person
Appendix EMC
The equipment meets the requirements of IEC 60601-1-2:2014.
Table 1
Guidance and manufacturer’s declaration-electromagnetic emission
The Fingertip Oximeter is intended for use in the electromagnetic environment
specified below. The customer or the user of the Fingertip Oximeter should assure
that it is used in such an environment.
Emissions test
Compliance
Electromagnetic environment-guidance
RF emissions
CISPR 11
Group 1
The Fingertip Oximeter uses RF energy only
for its internal function. Therefore, its RF
emissions are very low and are not likely to
cause any interference in nearby electronic
equipment.
RF emissions
CISPR 11
Class B
The Fingertip Oximeter suitable for use in all
establishments, including domestic
establishments and those directly network
that supplies buildings used for domestic
purposes.
Harmonic emissions
IEC61000-3-2
N/A
Voltage
fluctuations/flicker
emissions
IEC61000-3-3
N/A
Table 2
Guidance and manufacturer’s declaration-electromagnetic emission
The Fingertip Oximeter is intended for use in the electromagnetic environment
specified below. The customer or the user of the Fingertip Oximeter should assure
that it is used in such an environment.
Immunity test
IEC60601 test level
Compliance
level
Electromagnetic
environment -guidance
Electrostatic
discharge(ESD)
IEC61000-4-2
±8 kV contact
±15kV air
±8 kV
contact
±15kV air
Floors should be wood,
concrete or ceramic tile.
if floors are covered
with synthetic material,
the relative humidity
should be at least 30%
Electrical fast
transient/
burst
IEC61000-4-4
±2kV for power
Supply lines
±1 kV for input/output
lines
N/A
N/A
Surge
IEC 61000-4-5
±1kV line (s) to line(s)
±2kV line(s) to earth
N/A
N/A
Voltage dips,
short
interruptions and
voltage
variations on
power supply
input lines
IEC61000-4-11
<5% UT
(>95% dip in UT) for 0.5
cycle
<40% UT
(60% dip in UT) for 5
cycles
<70% UT
(30% dip in UT) for 25
cycles
<5% UT
(>95% dip in UT) for 5 s
N/A
N/A
Power frequency
(50Hz/60Hz)
magnetic field
IEC61000-4-8
3A/m
3A/m
Power frequency
magnetic fields should
be at levels
characteristic of a
typical location in a
typical commercial or
hospital environment.
NOTE: UTis the a.c. mains voltage prior to application of the test level.
Table 3
Guidance and manufacturer’s declaration – electromagnetic immunity
The Fingertip Oximeter is intended for use in the electromagnetic environment
specified below. The customer or the user of The Fingertip Oximeter should assure
that it is used in such an electromagnetic environment.
Immunity test
IEC60601 test
level
Compliance
level
Electromagnetic environment
-guidance
Conducted RF
IEC61000-4-6
Radiated RF
IEC61000-4-3
3 Vrms
150 kHz to 80
MHz
3 V/m
80 MHz to 2.5
GHz
N/A
3 V/m
Portable and mobile RF
communications equipment should
be used no closer to any part of The
Fingertip Oximeter, including cables,
than the recommended separation
distance calculated from the
equation applicable to the
frequency of the transmitter.
Recommended separation distance
d=1.2
P
d=1.2
P
80MHz to 800MHz
d=2.3
P
800MHz to 2.5GHz
Where Pis the maximum output
power rating of the transmitter in
watts (W) according to the
transmitter manufacturer and dis
the recommended separation
distance in metres (m). b
Field strengths from fixed RF
transmitters, as determined by an
electromagnetic site survey ,ashould
be less than the compliance level in
each frequency range .b
Interference may occur in the
vicinity of equipment marked with
the following symbol.
NOTE 1: At 80 MHz and 800 MHz, the higher frequency range applies.
NOTE 2: These guidelines may not apply in all situations. Electromagnetic
propagation is affected by absorption and reflection from structures, objects and
people.
a: Field strengths from fixed transmitters, such as base stations for radio (cellular /
cordless) telephones and land mobile radios, amateur radio, AM and FM radio
broadcast and TV broadcast cannot be predicted theoretically with accuracy. To
assess the electromagnetic environment due to fixed RF transmitters, and
electromagnetic site survey should be considered. If the measured field strength in
the location in which The Fingertip Oximeter is used exceeds the applicable RF
compliance level above, The Fingertip Oximeter should be observed to verify
normal operation. If abnormal performance is observed, additional measures may
be necessary, such as re-orienting or relocating The Fingertip Oximeter.
b: Over the frequency range 150 kHz to 80 MHz, field strengths should be less than
3V/m.
Table 4
Recommended separation distances between portable and mobile RF
communication the equipment
The Fingertip Oximeter is intended for use in an electromagnetic environment in
which radiated RF disturbances are controlled. The customer or the user of The
Fingertip Oximeter can help prevent electromagnetic interference by maintaining a
minimum distance between portable and mobile RF communications equipment
(transmitters) and the Fingertip Oximeter as recommended below, according to the
maximum output power of the communications equipment.
Rated maximum
output power of
transmitter
W(Watts)
Separation distance according to frequency of transmitter
M(Meters)
150kHz to 80MHz
d=1.2
P
80MHz to 800MHz
d=1.2
P
80MHz to 2,5GHz
d=2.3
P
0,01
N/A
0.12
0.23
0,1
N/A
0.38
0.73
1
N/A
1.2
2.3
10
N/A
3.8
7.3
100
N/A
12
23
For transmitters rated at a maximum output power not listed above, the
recommended separation distance in metres (m) can be determined using the
equation applicable to the frequency of the transmitter, where P is the maximum
output power rating of the transmitter in watts (W) according to the transmitter
manufacturer.
NOTE 1: At 80 MHz and 800 MHz, the separation distance for the higher frequency
range applies.
NOTE 2: These guidelines may not apply in all situations. Electromagnetic
propagation is affected by absorption and reflection from structures, objects and
people.

This manual suits for next models

1

Other Creative Medical Equipment manuals

Creative OXY-11 User manual

Creative

Creative OXY-11 User manual

Creative PC-68B User manual

Creative

Creative PC-68B User manual

Creative PC-60N User manual

Creative

Creative PC-60N User manual

Creative PC 66B Instruction Manual

Creative

Creative PC 66B Instruction Manual

Creative PC 66B User manual

Creative

Creative PC 66B User manual

Creative OXY-110 Instruction Manual

Creative

Creative OXY-110 Instruction Manual

Creative PC-66A User manual

Creative

Creative PC-66A User manual

Creative PC-68A Instruction Manual

Creative

Creative PC-68A Instruction Manual

Creative PC-60NW-1 User manual

Creative

Creative PC-60NW-1 User manual

Creative PC-60NW User manual

Creative

Creative PC-60NW User manual

Popular Medical Equipment manuals by other brands

Welch Allyn TM 262 Operating instructions manual

Welch Allyn

Welch Allyn TM 262 Operating instructions manual

KLS Martin diomax MDL20 Service manual

KLS Martin

KLS Martin diomax MDL20 Service manual

Promolife ARC O3ARC operating manual

Promolife

Promolife ARC O3ARC operating manual

Eizo RadiForce RX560 MammoDuo Additional information

Eizo

Eizo RadiForce RX560 MammoDuo Additional information

Gima 27401 quick start guide

Gima

Gima 27401 quick start guide

BRASSELER USA Carbide burs Instructions for use

BRASSELER USA

BRASSELER USA Carbide burs Instructions for use

DS Maref Doctor Life MK400L user manual

DS Maref

DS Maref Doctor Life MK400L user manual

Kartsana TGM-241 Series instruction manual

Kartsana

Kartsana TGM-241 Series instruction manual

Essilor CS pola 600 user manual

Essilor

Essilor CS pola 600 user manual

GIBAUD MALLEOGIB Instructions for use

GIBAUD

GIBAUD MALLEOGIB Instructions for use

baxter TruLight 5000 Instructions for use

baxter

baxter TruLight 5000 Instructions for use

Apollo Healthcare Technologies Limited Apollo 5 Plus APHos2 user manual

Apollo Healthcare Technologies Limited

Apollo Healthcare Technologies Limited Apollo 5 Plus APHos2 user manual

Zimmer Biomet Zimmer Natural Nail manual

Zimmer Biomet

Zimmer Biomet Zimmer Natural Nail manual

ulrich medical Obelisc CS 2931 Series Assembly and disassembly instructions with special cleaning instructions

ulrich medical

ulrich medical Obelisc CS 2931 Series Assembly and disassembly instructions with special cleaning instructions

FUTURA MOBILITY ST7 Quick Resource Guide

FUTURA MOBILITY

FUTURA MOBILITY ST7 Quick Resource Guide

Storz Rectal Speculum Instructions for use

Storz

Storz Rectal Speculum Instructions for use

Derma Sciences TCC-EZ instructions

Derma Sciences

Derma Sciences TCC-EZ instructions

CoaguSense Coag-Sense Professional Users Manual

CoaguSense

CoaguSense Coag-Sense Professional Users Manual

manuals.online logo
manuals.online logoBrands
  • About & Mission
  • Contact us
  • Privacy Policy
  • Terms and Conditions

Copyright 2025 Manuals.Online. All Rights Reserved.