manuals.online logo
Brands
  1. Home
  2. •
  3. Brands
  4. •
  5. Crestron
  6. •
  7. Network Hardware
  8. •
  9. Crestron Zūm User manual

Crestron Zūm User manual

ZUMMESH-NETBRIDGE
Zūm™ Network Bridge
Installation Guide
Description
The Crestron®ZUMMESH NETBRIDGE enables Zūm device setup from a mobile app and
integrates a stand-alone Zūm lighting control system with the Zūm hub (sold separately)
for a centrally managed, enterprise-wide lighting control system. Attach the Network
Bridge to a Zūm J-box device (sold separately) to use the mobile app to set up the Zūm
devices in the room. Adding the Zūm hub to the centrally-managed lighting system
enables all of the network bridges to interface for centralized monitoring, management,
and control of the lighting systems throughout an entire building.
A basic single-room Zūm system consists of Zūm mesh devices, i.e., dimmers, switches,
keypads, and sensors. The Zūm mesh devices in the room communicate directly with each
other without the need for a centralized gateway or processor.
Additional Resources
Visit the product page on the Crestron website (www.crestron.com)
for additional information. Use a QR reader application on your
mobile device to scan the QR image.
Installation
WARNING: To avoid re, shock, or death, turn off the power at the circuit breaker or
fuse and test that the power is off before wiring!
NOTE: Install and use this product in accordance with appropriate electrical codes and
regulations.
NOTE: Ensure that the ZUMMESH-NETBRIDGE is installed within range of the
ZUMNET-GATEWAY.
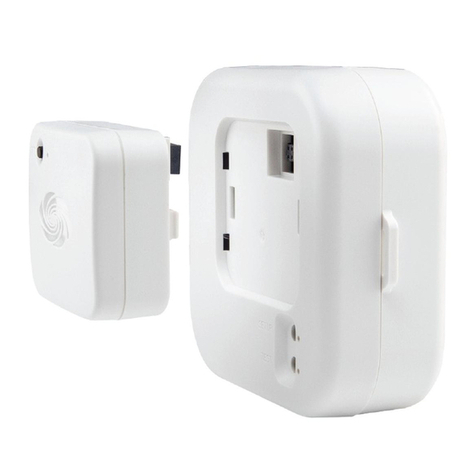
Mount the ZUMMESH-NETBRIDGE to any J-box device.
1. Use a at-head screwdriver to remove the cover on the J-box device.
2. Align the ports on the ZUMMESH-NETBRIDGE and the J-box device, and then
insert the network bridge into the J-box device. The network bridge snaps into
place.
Neutral (white)
Hot (black)
100-277 Vac power
from breaker
Remove the network bridge.
1. Place your thumb on the side of the network bridge that is nearest the J-box.
2. Press the network bridge away from the J-box. While pressing on the side of the
network bridge, slightly lift your thumb up. The network bridge should easily detach
from the J-box device.
Using the Zūm App
The Zūm app is available for download from the App Store®app in iTunes®software. The
Zūm app provides quick and easy setup of a Zūm network.
SPECIFICATION DETAILS
Power Requirements
Average Draw 60 mA, 3.3 Volts
Peak Draw 250 mA, 3.3 Volts
Power provided via the ZUMMESH-JBOX or
ZUMMESH-JBOX-PSU (sold separately)
Enclosure
Housing Plastic, white
Mounting Mounts to a Zūm J-Box Zone Controller or a Zūm
Network Bridge Power Supply (sold separately);
Plenum rated for mounting in air-handling space
Environmental
Temperature 32° to 104 °F (0° to 40 °C)
Humidity 10% to 90% RH (noncondensing)
Dimensions
Height 1.66 in (42 mm)
Width 1.94 in (49 mm)
Depth 0.76 in (20 mm)
Weight 3 oz (85 g)
This product is Listed to applicable UL®Standards and requirements tested by Underwriters
Laboratories Inc.
Ce produit est homologué selon les normes et les exigences UL applicables par Underwriters
Laboratories Inc.
Federal Communications Commission (FCC) Compliance Statement
This device complies with part 15 of the FCC Rules. Operation is subject to the following two
conditions: (1) This device may not cause harmful interference, and (2) this device must accept any
interference received, including interference that may cause undesired operation.
CAUTION: Changes or modications not expressly approved by the manufacturer responsible for
compliance could void the user’s authority to operate the equipment.
NOTE: This equipment has been tested and found to comply with the limits for a Class A digital
device, pursuant to part 15 of the FCC Rules. These limits are designed to provide reasonable
protection against harmful interference when the equipment is operated in a commercial environment.
This equipment generates, uses, and can radiate radio frequency energy and, if not installed and used
in accordance with the instruction manual, may cause harmful interference to radio communications.
Operation of this equipment in a residential area is likely to cause harmful interference in which case
the user will be required to correct the interference at his own expense.
Industry Canada (IC) Compliance Statement
CAN ICES-3(A)/NMB-3(A)
The product warranty can be found at www.crestron.com/warranty.
The specic patents that cover Crestron products are listed at patents.crestron.com.
Certain Crestron products contain open source software. For specic information, please visit
www.crestron.com/opensource.
Crestron, the Crestron logo, and Zūm are either trademarks or registered trademarks of Crestron
Electronics, Inc. in the United States and/or other countries. App Store and iTunes are either
trademarks or registered trademarks of Apple, Inc. in the United States and/or other countries. UL and
the UL logo are either trademarks or registered trademarks of Underwriters Laboratories, Inc. in the
United States and/or other countries. Other trademarks, registered trademarks, and trade names may
be used in this document to refer to either the entities claiming the marks and names or their
products. Crestron disclaims any proprietary interest in the marks and names of others. Crestron is
not responsible for errors in typography or photography.
This document was written by the Technical Publications department at Crestron.
©2017 Crestron Electronics, Inc.
Crestron Electronics, Inc. Installation Guide - DOC. 7955A
15 Volvo Drive Rockleigh, NJ 07647 (2048126)
Tel: 888.CRESTRON 02.17
Fax: 201.767.7576 Specications subject to
www.crestron.com change without notice.
Connect the Network Bridge to the Zūm System
Adding the network bridge converts a stand-alone Zūm lighting control system for a
single room into a centrally controlled, networked system.
The ZUMMESH-NETBRIDGE communicates with the ZUM-FLOOR-HUB via a
ZUMNET-GATEWAY. This connection is made via a wireless communications protocol.
To join or leave the ZUM-FLOOR-HUB system, use the procedures outlined below.
Connecting the ZUMMESH-NETBRIDGE to the ZUMNET-GATEWAY
In order for the ZUM-NETBRIDGE to communicate to the ZUM-FLOOR-HUB, it must rst
connect to a ZUMNET-GATEWAY.
NOTE: The ZUM-NETBRIDGE can be acquired by only one ZUMNET-GATEWAY.
1. Press the ACQUIRE button on the ZUMNET-GATEWAY to allow the
ZUMMESH-NETBRIDGE to join the system. Refer to the ZUMNET-GATEWAY’s
manual at www.crestron.com/manuals for details.
NOTE: In an environment where multiple ZUMNET-GATEWAYs are installed,
only one should be in Acquire mode at any time.
2. Connect the ZUMMESH-NETBRIDGE to the ZUMNET-GATEWAY.
a. Tap the SET button on the ZUMMESH-NETBRIDGE three times, and then press
and hold it down (tap-tap-tap-press+hold) until the red LED on the device blinks
once (this can take up to 10 seconds).
2s or 10s
b. Release the SET button to start the acquire process. The red LED blinks slowly to
show that the device is attempting to connect to the ZUMNET-GATEWAY.
• The LED turns on for 5 seconds to show that the ZUMMESH-NETBRIDGE has
joined the network.
• The LED blinks fast to indicate that the ZUMMESH-NETBRIDGE failed to join
the network. Press the SET button to acknowledge the failure. Make sure that
the ZUMNET-GATEWAY is within range and repeat steps 1 and 2.
3. Once all ZUMMESH-NETBRIDGE has been acquired, press the ACQUIRE button to
take the ZUMNET-GATEWAY out of Acquire. Refer to the ZUMNET-GATEWAY’s
manual for details.
Disconnecting the ZUM-NETBRIDGE from the ZUMNET-GATEWAY
To leave the network, put the ZUM-NETBRIDGE into Acquire mode, as described in the
section above, when no ZUMNET-GATEWAY is in Acquire mode.
Verifying Communications Status
To check the communications status of the device, tap the SET button three times, and
then press and hold it down (tap-tap-tap-press+hold) for up to 2 seconds. The LED blinks
to indicate the communications status. Refer to the following table for details.
LED COMMUNICATIONS STATUS
Turns on for 5 seconds The device is communicating with the
ZUMMESH-FLOOR-HUB.
Blinks three times The device is communicating with the gateway, but the
gateway is not communicating with the
ZUMMESH-FLOOR-HUB.
Blinks twice The device was previously joined to the network but is
not communicating with the gateway.
Blinks once The device is not joined to the network.

Other manuals for Zūm

2

Other Crestron Network Hardware manuals

Crestron Network Device PWE-4803RU User manual

Crestron

Crestron Network Device PWE-4803RU User manual

Crestron CEN-NVS200 How to use

Crestron

Crestron CEN-NVS200 How to use

Crestron QM-WMIC Quick start guide

Crestron

Crestron QM-WMIC Quick start guide

Crestron HDMI Input Card DMC-HD User manual

Crestron

Crestron HDMI Input Card DMC-HD User manual

Crestron 8 Channel Dimmer Module CLX-1DIM8 User manual

Crestron

Crestron 8 Channel Dimmer Module CLX-1DIM8 User manual

Crestron 4 Channel Dimmer Module CLX-1DIM4 User manual

Crestron

Crestron 4 Channel Dimmer Module CLX-1DIM4 User manual

Crestron C2N-NPA8 User manual

Crestron

Crestron C2N-NPA8 User manual

Crestron C2N-HBLOCK User manual

Crestron

Crestron C2N-HBLOCK User manual

Crestron ST-MB User manual

Crestron

Crestron ST-MB User manual

Crestron AV2 User manual

Crestron

Crestron AV2 User manual

Crestron QM-WMC Quick start guide

Crestron

Crestron QM-WMC Quick start guide

Crestron STIRP User manual

Crestron

Crestron STIRP User manual

Crestron QM-FTMC Quick start guide

Crestron

Crestron QM-FTMC Quick start guide

Crestron SP-MB User manual

Crestron

Crestron SP-MB User manual

Crestron DM-NUX-L2 User manual

Crestron

Crestron DM-NUX-L2 User manual

Crestron 4 Channel Fan Speed Control Module CLX-1FAN4 User manual

Crestron

Crestron 4 Channel Fan Speed Control Module CLX-1FAN4 User manual

Crestron NAT User manual

Crestron

Crestron NAT User manual

Crestron CEN-IO User manual

Crestron

Crestron CEN-IO User manual

Crestron QM-IEM User manual

Crestron

Crestron QM-IEM User manual

Crestron Zum ZUMMESH-NETBRIDGE User manual

Crestron

Crestron Zum ZUMMESH-NETBRIDGE User manual

Crestron UC-CAM-UPGRD-300 User manual

Crestron

Crestron UC-CAM-UPGRD-300 User manual

Crestron 2 Channel Inductor Module CLX-2IND User manual

Crestron

Crestron 2 Channel Inductor Module CLX-2IND User manual

Crestron DigitalMedia DM-RPP-K24 User manual

Crestron

Crestron DigitalMedia DM-RPP-K24 User manual

Crestron CNXLIR User manual

Crestron

Crestron CNXLIR User manual

Popular Network Hardware manuals by other brands

Kontron TRACe-LP1 Addendum to Users Guide

Kontron

Kontron TRACe-LP1 Addendum to Users Guide

Huawei CR52-4xPOS/STM1-SFP Specifications

Huawei

Huawei CR52-4xPOS/STM1-SFP Specifications

Sierra Wireless AirPrime MiniCard MC73xx/8805 Series AT Command Reference

Sierra Wireless

Sierra Wireless AirPrime MiniCard MC73xx/8805 Series AT Command Reference

HP Edgeline EL1000 user guide

HP

HP Edgeline EL1000 user guide

Axis StorPoint HD Quick installation guide

Axis

Axis StorPoint HD Quick installation guide

Safety Vision OBSERVER 4116 Hardware user's guide

Safety Vision

Safety Vision OBSERVER 4116 Hardware user's guide

3Com 3C16075 installation guide

3Com

3Com 3C16075 installation guide

Microsemi SyncSystem 4380A Operation and maintenance manual

Microsemi

Microsemi SyncSystem 4380A Operation and maintenance manual

Salicru CS141 Quick start manual

Salicru

Salicru CS141 Quick start manual

NetApp ASA C Series Install

NetApp

NetApp ASA C Series Install

Mircom TX3 Series Installation quick reference

Mircom

Mircom TX3 Series Installation quick reference

Cisco Firepower 9300 Hardware installation guide

Cisco

Cisco Firepower 9300 Hardware installation guide

Panasonic Switching Diodes MA6X128 (MA128) Specifications

Panasonic

Panasonic Switching Diodes MA6X128 (MA128) Specifications

CP TECHNOLOGIES NVR-0204 Quick installation guide

CP TECHNOLOGIES

CP TECHNOLOGIES NVR-0204 Quick installation guide

TRENDnet TPE-111GI - Gigabit Power Over Ethernet... Quick installation guide

TRENDnet

TRENDnet TPE-111GI - Gigabit Power Over Ethernet... Quick installation guide

D-Link GO-PLK-200 Quick installation guide

D-Link

D-Link GO-PLK-200 Quick installation guide

Idis DR-8516 installation manual

Idis

Idis DR-8516 installation manual

Wendeng Etl Machinery TPA3116 quick start guide

Wendeng Etl Machinery

Wendeng Etl Machinery TPA3116 quick start guide

manuals.online logo
manuals.online logoBrands
  • About & Mission
  • Contact us
  • Privacy Policy
  • Terms and Conditions

Copyright 2025 Manuals.Online. All Rights Reserved.