Crosswater MPRO Series User manual

1 - 6
MPRO One-piece Single-flush Toilet
US-PRO9005-SF
US-PRO9005-SF
Finished Wall
Finished Floor
12"~11"
16-1/2"
28"
7-1/4"
29-1/2"
14-1/2'"
11"
2-1/4"
1-1/2"
3-1/4"

Installation Instructions
PARTS SUPPLIED:
Check to make sure that all these parts are included in the package:
TOOLS REQUIRED:
• 12” pipe wrench
• 10” adjustable wrench
• Carpenter’s level
•Tape measure
• For wood floor installation:
-11/64” drill bit for mounting block
• For concrete/tile installation:
-11/32” drill bit for mounting block
MATERIALS REQUIRED:
(Not Included)
• Flexible supply tube/connector
• Supply stop valve
2 - 6
Nut - qty. 2
Washer - qty. 2 Cap - qty. 2
Bolt - qty. 2Clip - qty. 2
Screw - qty. 2
BEFORE INSTALLATION:
• Screwdriver
• Putty knife
• Drill
• Pliers
• Mounting (T) bolts & nuts (2pc)
•Wax ring/seal
•Check for any damage that may have occurred during transport. Note: Damage claims cannot be made
during or after installation.
• Read these instructions thoroughly before beginning work and retain for future reference.
• Please leave instructions for customers. These instructions contain maintenance and warranty information.
•Remove the existing toilet. If new construction, purge the supply line.
12"
In order to fit correctly, please check the following dimensions:
1) The distance between the finished wall and the center of
the closet flange must be 12”. Water supply should be
approximately 8” to 10” to the left
2) The water supply should be approximately 8” to 10” to
the left (facing the bowl) from the center line of the closet
flange, and approximately 6” above the finished floor.
Supply
Valve
Finished Wall
12”
C/L
Closet
Flange
Protector sleeve
qty. 2
8" to 10"

3 - 6
1) Clean any debris out of the closet flange (not supplied),
then install the mounting bolts into the slot of the flange
head down with the threaded shank of the bolt pointed
upward as shown (See figure 1).
Slide each bolt until the end of slot.
2) Firmly press a new wax seal onto the circular recess around
the outlet opening (See figure 2).
Figure 1
Figure 2
Figure 3
3) Place the toilet bowl over the socket and mounting blocks
(See figure 3).
CAUTION:
●To prevent water and odor leakage, please ensure that
the wax seal is fitted properly between the socket and the
flange. Do not overtighten the nuts, as damage to the
plastic parts may result.
Figure 4
4) Fit protector sleeves and install side screws.
Cover the screw head with the provided screw-cap
(See Figure 4).
CAUTION:
● In order to prevent leakage, be sure to insert the
toilet all the way into position.
5) Carefully place the lid on top of the tank.

4 - 6
After Installation/Adjustment
Flush the toilet two to three times to confirm there is no
water leakage and that the lever mechanism is working
properly.
6) Connect the opposite end of the water supply hose to
the angle stop (See figure 5). A flexible supply hose is
recommended. Hand tighten only - do not use plumbers
putty or other sealants. Open the supply valve and flush
the toilet several times. Check all the connections for leaks
and periodically afterwards following the installation.
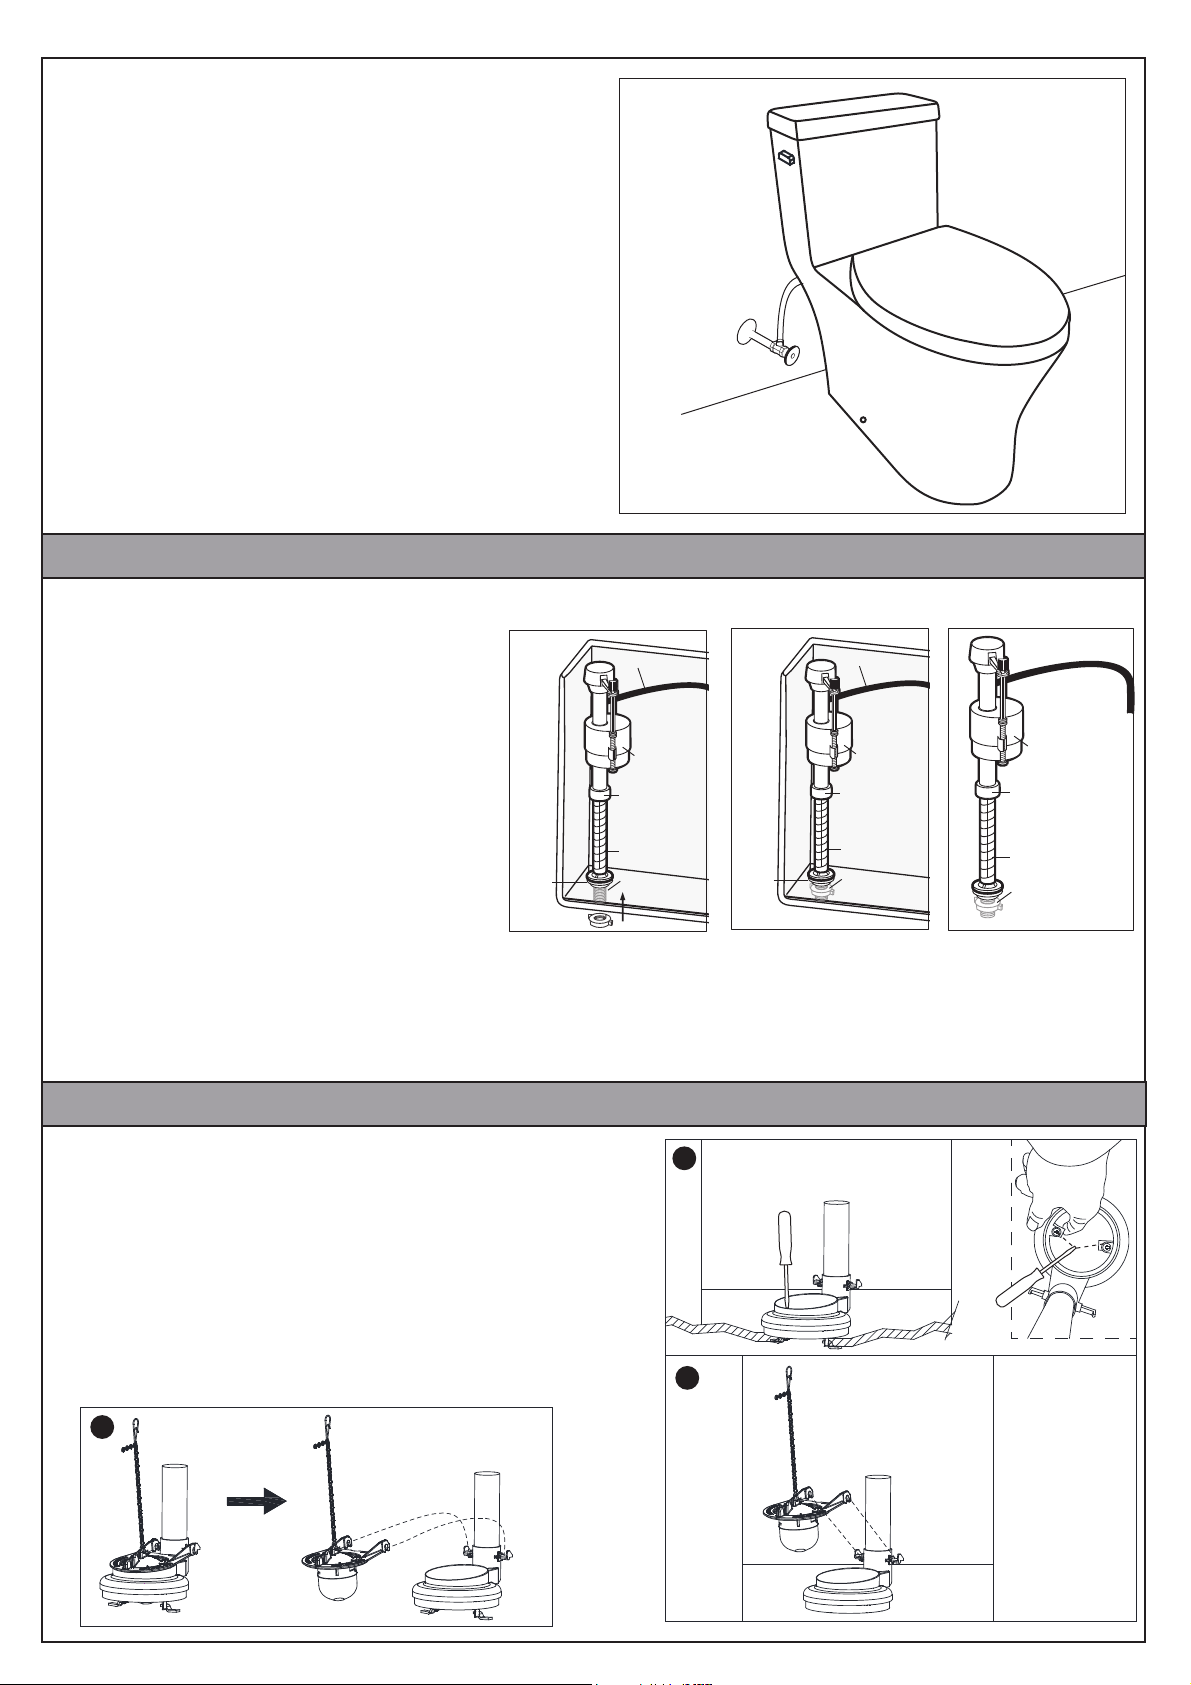
Figure 5
FLOAT
CUP
LOCK
RING
REFILL TUBE
FILL
VALVE
SHANK
WASHER
FLOAT
CUP
LOCK
RING
REFILL TUBE
FILL
VALVE
SHANK
WASHER
Fill Valve Installation Instruction
Replacement Installation
1) Shut off the water supply. Flush the toilet and
remove any remaining water from the tank.
Remove the old fill valve.
2) Install new fill valve by sliding the threaded
portion of the shaft through the hole in the
bottom of tank.
3) Thread mounting nut onto exposed shaft under
the tank/bowl and tighten nut.
WARNING! Do not over-tighten.
4) Connect the water supply.
FLOAT
CUP
LOCK
RING
FILL
VALVE
Water Level Adjustment
1) Loosen the lock ring (see figure 3)
Pull up the valve and set it to the desired water level, then turn it clockwise until the valve snaps into the locked position.
2) Turn on the water supply.
Figure 1 Figure 2 Figure 3
A
1) Turn off water supply and flush the toilet.
2) Remove the tank lid and place it upside down on a clean surface.
3) Note the orientation of the flush valve for reassembly.
4) Remove the flapper from flush valve by pulling up frame of
flapper one side at a time.
5) With a screw driver to loosen the two screws & metal plates
holding the valve, then remove the flush valve from the tank.
6) Install a new flush valve into the tank.
Flush the toilet several times using side lever to proper operation.
Check for leak
Replacement Installation
Flush Valve Installation Instruction
B
C

5 - 6
Place the Refill Clip on the side of overflow pipe
furthest away from fill valve and slide it down with
metal tab on the outside and plastic clip on inside
of overflow pipe.
Attach one end of refill hose to nipple on fill valve.
Attach other end of hose to refill clip. You may need
to trim the hose so it has a slight arch.
Refill Clip Install
Troubleshooting guide
Problem Possible cause Corrective action
a. Water supply valve closed.
b. Supply line blocked.
c. Flush valve chain too loose or
disconnected.
d. Sand or debris lodged in water
control.
a.
b.
gaskets and washers. Reassemble.
c. Readjust chain length as required.
d.
a. Bowl water level too low.
b. Supply valve partially closed.
c. Partially clogged trapway and/or
drain pipe and/or vent.
d. Supply pressure too low.
a.
b. Open supply valve fully. Be sure that proper supply tube size is
used.
c. Remove obstruction. Consult a plumber if necessary.
d. Normal supply pressure must be at least 20 psi.
Toilet leaks. a. connection. a. Review step 1 through 5 of installation instruction
a. Flush valve chain too tight,
b.
worn or deformed.
c. Sand or debris lodged in water
control.
a. Readjust chain length as needed.
b.
c.
Connect the flapper chain to the tank lever.
Allow for 1/2” of slack in the chain when flapper
is closed.
Rubber washer
white washer
Lever
Reconnect water supply line to the bottom of the fill
valve. Hand tighten plastic nut of supply line to fill
valve shank. DO NOT OVER TIGHTEN.
(1). Turn on the water supply and check for
any leaking.
(2). If no leaks appear perform test flush.
If leak appears tighten nut just enough
to stop leak.

Issue date: 11122019
Warranty - Chinaware - Limited lifetime. Commercial: 1 year. Mechanical parts: 5 years, Commercial: 1 year. Seat: 1 year, Commercial: 1 year.
For further information contact: Crosswater London, 393 Fortune Blvd., Milford, MA 01757
Toll free number: 844-XWATER-1 (844-992-8371) tel: 508-381-0433 fax: 508-381-6068
www.crosswaterlondon.com
email: [email protected]
CLEANING INSTRUCTIONS
A mild detergent, warm water and a soft cloth will remove normal dirt and soap accumulations from surfaces. Soft abrasive
cleaners may be used on vitreous china. Never use abrasive cleaners without water. Do not use caustic cleaners or
disinfectants as they can alter the surface finish and void the warranty.
Use toilet bowl cleaners on the inside of the bowl only. Remove any splashes of cleaner solution from plastic or plated
surfaces immediately.
Do not use in-tank cleaners as they can seriously damage the fittings in the tank. This damage could cause leakage and result
in property damage. Crosswater London shall not be responsible or liable for any damage that occurs as a result of the use
of in-tank cleaners.
Do not allow certain materials such as toothpaste, cologne, shaving cream, nail polish remover, vinegar, wine, drain and glass
cleaners to remain on the surface. Prolonged contact can alter surface finishes and void the warranty.
CARE OF TOILET SEATS
Use a soft, damp cloth and a mild soap such as dishwashing liquid to clean the seat. Rinse the seat and dry with a soft towel.
Do not use abrasive cleaners as they will scratch and dull the surface. Do not allow cosmetics or abrasive chemicals to come in
contact with the toilet seat.
6- 6
Table of contents
Other Crosswater Toilet manuals