Crosswater Ressa X1 User manual

Thank you for your purchase of the Ressa Spa Toilet. We are committed to providing
exceptional service. Please contact us at any time should you have questions about your
products.
Please read the instructions carefully before installation and keep available for future
maintenance or reference.
Ressa Spa Toilet
US-RS100W
INSTALLATION MANUAL

Content
Maintenance Other
Safety instructions
Technical specification
List of materials
Technical drawing
Parts identification
Installation of ceramic toilet
Preparation
01
06
07
08
09
10
13
aintenance
Main unit care and maintena ce
Spray nozzle maintenance
14
aintenance 16
15
Troubleshooting
17
18
Description of the knob function
Remote control illustration
uide 20
Installation
5. Battery replacement
6. Replacing the deodorant box

WARNING – To reduce the risk of burns, electrocution, fire, or injury to persons:
Use this product only for its intended use as described in this manual. Do not use
attachments not recommended by the manufacturer.
DANGER – Réduire le risque d’électrocution:
1. Ne pas utiliser pendant le bain.
2. Ne pas placer ou stocker le produit dans un endroit où il pourrait tomber ou être tiré dans une
baignoire ou un évier.
3. Ne pas placer ou laisser tomber le produit dans l'eau ou tout autre liquide.
4. Ne tendez pas la main pour obtenir le produit tombé dans l'eau. Débranchez immédiatement la prise.
5. Ne lavez pas l'unité principale ou les prises électriques avec de l'eau ou des détergents.
6. Ne pas manipuler la prise électrique avec les mains mouillées.
7. Ne jamais obstruer la sortie du sécheur d'air.
8. Ne jamais démonter, réparer ou modifier ce produit.
9. À l'occasion de l'installation, du démontage, de la réparation et de l'entretien du produit, la prise de
courant doit être coupée et l'alimentation en eau doit être interrompue.
DANGER –To reduce the risk of electrocution:
Do not use while bathing.
Do not place or store product where it can fall or be pulled into a tub or sink.
Do not place in or drop into water or other liquid.
Do not reach for a product that has fallen into water. Unplug immediately.
Do not wash the main unit or electrical plug with water or detergent.
Do not handle the electrical plug with wet hands.
7. Do not put a hand or other over the outlet of air dryer or block the outlet of air
dryer.
8. Never disassemble, repair or modify this product.
9. During installation and repair and maintenance of the product, the power plug must be
switched off and water supply be shut off.
IMPORTANT SAFEGUARDS
READ ALL INSTRUCTIONS BEFORE USING
When using electrical products, especially when children are present, basic safety
precautions should always be followed, including the following:
The appliance is not to be used by persons (including children) with reduced physical,
sensory or mental capabilities, or lack of experience and knowledge, unless they have
been given supervision or instruction.
This appliance can be used by children aged from 8 years and above and persons with
reduced physical, sensory or mental capabilities or lack of experience and knowledge if
they have been given supervision or instruction concerning use of the appliance in a safe
way and understand the hazards involved.
Children shall not play with the appliance.
Cleaning and user maintenance shall not be made by children without supervision.

02
Pour réduire les risques de brûlure, d'électrocution, d'incendie ou de
blessure.
1. Ce produit doit être surveillé de près lorsqu'il est utilisé par, sur ou à proximité d'enfants ou de
personnes handicapées.
2. N'utilisez ce produit que pour l'usage auquel il est destiné, tel qu'il est décrit dans ce manuel. N'utilisez
pas d'accessoires non recommandés par le fabricant.
3. N'utilisez jamais ce produit si le cordon ou la fiche est endommagé, ne fonctionne pas correctement,
tombe ou est endommagé, ou tombe dans l'eau. Retourner le produit au centre de service pour
inspection et réparation.
4. Gardez le cordon loin des surfaces chaudes.
5. Ne jamais utiliser pendant le sommeil ou la somnolence.
6. Ne laissez jamais tomber ou n'insérez jamais d'objet dans une ouverture ou un tuyau.
7. Ne pas utiliser à l'extérieur ou dans des endroits où des aérosols (sprays) ou de l'oxygène sont utilisés.
8. Connectez ce produit uniquement aux prises correctement mises à la terre. Voir les instructions de mise
à la terre.
9. Ne jetez pas de cigarettes et autres substances brûlées dans les toilettes, sinon cela pourrait provoquer
un incendie.
10. Ce produit est un appareil électrique et doit donc être placé loin de l'eau et d'autres liquides.
11. Dans le circuit, ne pas allonger le produit sur le côté ou à l'envers.
12. L'utilisation d'autres appareils électriques dans la même prise est interdite.
13. Il est interdit d'utiliser des rallonges d'alimentation ou des prises lâches instables.
14. Ne réutilisez pas les tuyaux d'alimentation existants, car ils pourraient provoquer une fuite, un
incendie ou une électrocution. L'installation doit inclure les composants spécifiés et un nouveau tuyau
d'alimentation en eau.
AVERTISSEMENT –
Never operate this product if it has a damaged cord or plug, if it is not working properly, if
it has been dropped or damaged, or dropped into water. Return the product to a service
center for examination and repair.
Keep the cord away from heated surfaces.
Never use while sleeping or drowsy.
Never drop or insert any object into any opening or hose.
Do not use outdoors or operate where aerosol (spray) products are being used or where
oxygen is being administered.
Connect this product to a properly grounded outlet only. See Grounding Instructions.
It is prohibited to use other electric appliances in the same socket.
It is forbidden to use a power extension or unstable loose outlet.

IMPORTANT SAFETY INSTRUCTIONS
CAUTION –
Indicates that failure to follow the instruction may cause bodily injury or
property damage.
1. N'installez pas ou n'utilisez pas le produit dans un endroit humide, tel qu'une chambre à vapeur, etc.
2. Il est recommandé d'utiliser une prise de courant étanche, qui doit être installée dans un endroit où elle
ne risque pas d'être mouillée.
3. Ce produit doit être utilisé avec un courant électrique de 110V-120V, 60Hz uniquement, le courant
de charge étant d'au moins 15A. La fiche d'alimentation doit être munie d'un disjoncteur de défaut de
mise à la terre ou d'un protecteur de fuite de défaut de mise à la terre ou d'un interrupteur de fuite de
type rapide de haute sensibilité similaire (courant sensible nominal inférieur à 6 ma).
4. En cas de tonnerre, il est fortement recommandé de débrancher la prise électrique.
5. Ne vous tenez pas debout sur les toilettes en céramique.
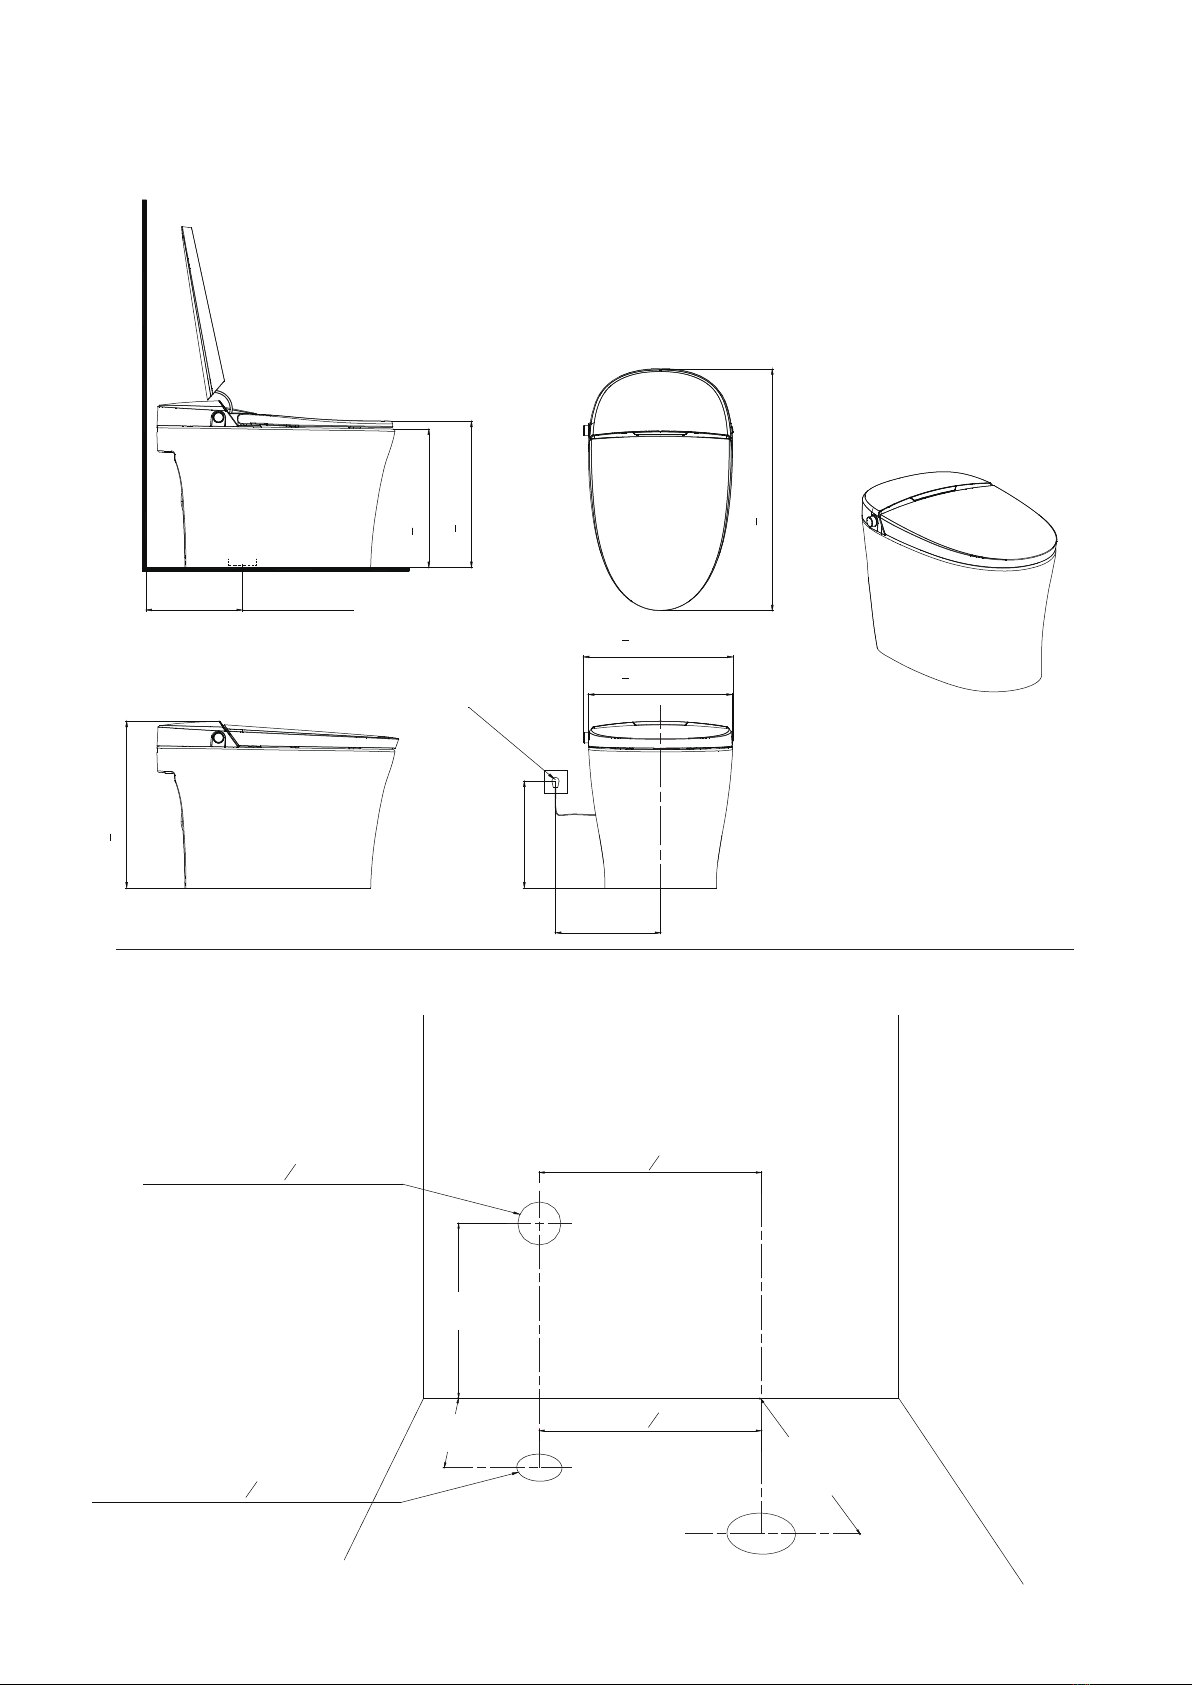
6. Les toilettes en céramique doivent être équipées de boulons de fixation au sol.
7. Ne pas se tenir debout sur l'unité de produit, le siège et le couvercle.
8. Ne vous appuyez pas sur le couvercle du siège lorsque vous utilisez le produit, afin d'éviter de
l'endommager.
9. Le produit est équipé d'un couvercle de siège à fermeture douce. Ne fermez pas le siège de toilette, il
pourrait causer des dommages.
10. N'utilisez pas de produits chimiques agressifs ou de brosses pour nettoyer ce produit.
Indique que le non-respect de l'instruction peut entraîner des blessures
corporelles ou des dommages matériels.
ATTENTION –
Do not install or use the product in wet places as steam room etc.
It is recommended to use a waterproof electrical outlet which should be nstalled in a place
where is not wet.
This product should be used with 110V-120V, 60Hz electrical current only,load current
is at least 15A. Power plug must be equipped with ground fault circuit interrupter or ground
fault electrical leakage protector or similar high sensitive, rapid type leakage switch
(Rated sensitive current under 6mA).
When it thunders, it is strongly recommended to pull out the power plug.
Do not stand on ceramic toilet.
Ceramic toilet must install floor fixing bolts.
Do not stand on product unit, seat and cover.
Do not lean against the seat cover when using the product to damage.
This product is equipped with soft-closing seal cover. Heavy pressing or pushing may
damage the soft-closing damper.
Do not use lacquer thinner, petrol, liquid medicine, detergent, insecticide, toilet cleanser
or scrubbing brush to clean the product.
Exposure to direct sunlight is prohibited.
Only use tap water or potable water as it may cause chafing.
Do not connect water supply to heater outlet. Make sure inlet water temperature is at
When the room temperature is under zero degree , please
dr the water tank to avoid freezing.
Raise room temperature to prevent the toilet from damage due to freezing.
When mov the product from cold or wet environment into normal room temperature,wait
for 2 hours until the condensation water is fully volatilized. Doing so can prevent the product
from electrical short-circuit.
When not using the product over three (3) days, drain the water out of the and pull the
electrical plug from the wall outlet.
Stop using the product and shut off the power product malfunction
3~35℃.
/37.4~95 F
。
03

SAVE THESE INSTRUCTIONS
Si vous avez besoin de réparer ou de remplacer un fil ou une fiche, ne connectez pas le câble de mise à la
terre à une borne de type lame plate. Les fils avec une couche isolante dont la surface extérieure est verte
et avec ou sans bandes jaunes sont des fils de terre.
Ce produit est équipé en usine d'un cordon électrique et d'une fiche spécifiques permettant de le connecter
à un circuit électrique approprié. Assurez-vous que le produit est branché sur une prise ayant la même
configuration que la fiche. Aucun adaptateur ne doit être utilisé pour ce produit. Ne modifiez pas la fiche
fournie — si elle n'est pas adaptée à la prise, faites installer la prise adéquate par un électricien qualifié.
Si le produit doit être reconnecté pour être utilisé sur un autre type de circuit, il doit être reconnecté par
un personnel de service qualifié.
DANGER - une mauvaise utilisation de la prise de terre peut entraîner un risque d'électrocution.
GROUNDING INSTRUCTIONS
This product should be grounded. In the event of an electrical short circuit, grounding reduces
the risk of electric shock by providing an escape wire for the electric current. This product is
equipped with a cord having a grounding wire with a grounding plug. The plug must be plugged
into an outlet that is properly installed and grounded.
If repair or replacement of the cord or plug is necessary, do not connect the grounding wire to
either flat blade terminal. The wire with insulation having an outer surface that is green with or
without yellow stripes is the grounding wire.
This product is factory equipped with a specific electric cord and plug to permit connection to a
proper electric circuit. Make sure that the product is connected to an outlet having the same
configuration as the plug. No adapter should be used with this product. Do not modify the plug
provided — if it will not fit the outlet, have the proper outlet installed by a qualified electrician. If
the product must be reconnected for use on a different type of electric circuit, the reconnection
should be made by qualified service personnel.
DANGER –Improper use of the grounding plug can result in a risk of electric shock.
11. L'exposition directe au soleil est interdite.
12. Utilisez uniquement de l'eau du robinet ou de l'eau potable, sinon vous risquez de causer des éraflures.
13. Ne raccordez pas l'alimentation en eau à la sortie de l'appareil de chauffage. S'assurer que la
température de l'eau d'entrée est comprise entre 3~35℃/37.4~95℉.
14. Lorsque la température ambiante est inférieure à zéro degré, veuillez vidanger le réservoir d'eau afin
d'éviter le gel.
15. Augmentez la température de la pièce pour éviter que les toilettes ne soient endommagées par le
givrage.
16. Lorsque le produit passe d'un environnement froid ou humide à une température ambiante normale,
attendre 2 heures jusqu'à ce que l'eau de condensation soit entièrement volatilisée. Ce faisant, vous
évitez les courts - circuits électriques du produit.
17. Lorsque le produit n’est pas utilisé pendant plus de trois (3) jours, videz l’eau des toilettes et
débranchez la prise électrique de la prise murale.
18. Cessez d'utiliser le produit et éteignez l'alimentation lorsque le produit tombe en panne. Appel à un
service professionnel.
04

05

Technical Specifications
Model US-RS100W
Rated power
Main Unit
Toilet
Rated voltage
Electrical wire
Flush volume
Flushing mode
Rough-in distance
Heating power
Water temperature
Water volume
Cleansing mode Rear cleaning / Oscillating
Front cleaning / Oscillating
Over 0.2m /min
3
250W
Spray cleansing position
Warm air volume
Warm air temperature
Heating power
Cleaning
device
Drying
device
Overall unit Waterproof
Water pressure range
Heating mode
Siphonic jet
3
1400W
12"
865W
110V-120V, 60Hz
IPX4
1.28G 4.8L
0.18MPA - 0.8MPA (static pressure)
Instant
Heated seat
Features
Surface temperature
Heating power
Open and close device
Night light assembly
User ID setting
Automatic flushing
50W
Quiet
Intelligent
Self-cleaning Deodorizer
Power off flush
Rated power: Under the condition of ambient temperature 23℃/73℉, water static pressure
0.18MPa±0.02MPa, water temperature 15℃/59℉, power toilet on, set water pressure, seat
temperature, water temperature to the highest level in turn and perform one rear washing
cycle.
Toilet can be flushed manually after power
failure (Please install the battery before use.)
Two kinds of User ID settings
Toilet will automatically flush as user
walks away from bowl
06

List of materials
Main Unit Remote control components
Wax Sealing Flange
Warranty card
Battery Box
(battery not supplied)
Installation Manual
Floor fixing kit x 2
SPA TOILET WARRANTY
Exclusi ve North Amer ican
distributo r for Crosswa ter London
Forte B rands
393 Fortu ne Blvd, Milf ord, MA, 0175 7 USA
1.844.99 2.8371
fortebr ands.co m
Angle Valve
Thank you for your purchase of the Ressa Spa Toilet. We are committed to providing
exceptional service. Please contact us at any time should you have questions about your
products.
Please read the instructions carefully before installation and keep available for future
maintenance or reference.
Ressa Spa Toilet
US-RS100W
INSTALLATIONMANUAL
07

Technical drawings
1. Recommended power outlet location
2. Recommended water supply location
161
8"(410mm)
163
4"(425mm)
271
8"(690mm)
183
4"(476mm)
151
2"(395mm)
16 3
8"(417mm)
12"(305mm)
recommended power
outlet location
12"(305mm)
12"(305mm)
Rough in
12"
(305±10mm)
9
78
"
6-7/8"
(175±10mm)
2-3/8"
(60±10mm)
9
78"
(250±10mm)
Water supply
12
"-14 NPT
For water supply from the wall
Water supply
12
"-14 NPT
For water supply from the floor
(250±10mm)
08

Left side
Right side
Parts identification
Bumper
Seat
Ceramic toilet
Lid
Sensor
Drying
shield
Rear
cleaning
Spray
nozzle
Knob
Front
cleaning
09

Installation of ceramic toilet
Angle valve
Precaution before installing
Minimum static working water pressure:
0.18MPa (5.81Gal(22.0L)/min), failure to
meet this pressure will not achieve the best
flushing function.
Remark: Apply the methods below if you
don’t have a water pressure testing device.
Hose
Water storage
barrel
Open the angle valve to check the water
volume. If the water volume 10
seconds is greater than 0.97gal (3.7L), then
it is OK to proceed installation.
Draw drain outlet centerline on the floor
Important:
Please use the angle valve supplied with
Ressa toilet. Other valve might cause
internal component block up then effect
the normal use of toilet.
If needed, please have a suitable
qualified person to replace the angle
valve in case that an old valve is
pre-installed.
Install angle valve at proper
position on wall according to
dimension of toilet.
1. Installation of the equipped angle valve
Line
Drain outlet
angle valve
Note:
a. This should be installed by a suitable
qualified person.
b. A 9V alkaline battery is required (for
example 6LR61 or 6F22).
c. Battery not supplied.
2. Installation of battery box
Before activating the power-off flushing
function, install a 9V alkaline battery (not
supplied) into the battery box in advance.
Take out the battery connection cable from
the rear side of seat cover. And connect it
to the battery box properly.
Remove the sticker on the velcro at the
bottom of the battery box and place it in
the proper position of the ceramic back
for easy maintenance.
battery
Velcro
46.4mm
48.5mm
17.5mm
26.5mm
Female
buckle (-)
Male
buckle (+)
10

3. Hose
Connect the water inlet and angle valve
of the toilet with the matching hose and
tighten it
Note:
Please use this supplied water supply hose,
to ensure optimal flushing performance.
Nut
Bolt
4. Mounting bracket installation
Assemble the mounting bracket with bolts
and then install them to the pre-installed
flange plate on the ground and lock tight
with nuts.
Mounting bracket
Washer
Angle valve connector Inlet connector
Flexible hose
Important:
Two people are required to carry the toilet.
Toilet drain
outlet
Sealing flange
5. Ceramic toilet installtion
6. Screw installation
Fixing sleeve
Screw
Decorative cap
11

Don't install and use the product in damp places such as shower room.
7. Remote control installation
Step 3: Put remote control into the holder.
Step 2: AAA batteries
into the remote control.
Notice:Do install and use the product in damp places such as shower room.
Do place the product in a place where it is easily exposed to water.
Step 1: Fix the holder onto the wall by using screws or tape as shown in below diagrams.
Don't install and use the product in damp places such as shower room.
12

RESET
REMETTRE
TEST
TEST BEFORE EACH USE
1. PLUG INTO RECEPTACLE
2. PRESS RESET BUTTON:
VISUAL INDICATOR APPEARS.
3. PRESS TEST BUTTON:
VISUAL INDICATOR DISAPPEARS.
4. PRESS RESET FOR USE.
DO NOT USE IF ABOVE TEST FAILS.
WARNING:
1. Turn on the angle valve
Preparation
Angle valve
3. Self-inspection
1. Once power is connected, the seat beeps. The knob lights up in white, and the
self-inspection starts.
2. The seat beeps again, then the self-inspection completes.
3. The product is ready to use.
Tips:
Press electric leakage test button prior to
usage, the reset switch pops up indicating
that the leakage protection function is normal.
Press the TEST button (then RESET button)
every month to assure proper operation.
Electric leakage
test button
Reset switch
Indicator light
Don't install and use the product in damp places such as shower room.
13

aintenance
Main unit care and maintenace
1. Shut off power supply before
doing maintenance.
2. Wipe with a soft damp cloth. Use
warm water only.
3. Safety self- inspection
After cleaning, re-connect the power plug.
Spray nozzle
1. Nozzle self-cleaning
2. Spray nozzle disassemble
When the nozzle moves forward, the
nozzle
To start the manual cleaning function,
when not seated, rotate the knob clockwise.
The nozzle will automatically extend out.
head can be to clean.
3. Use soft cloth to clean
Do not pull or push the wand, to avoid
damage.
4. Nozzle retraction
Put the nozzle head back on and press
the “Stop” button on the remote control to
automatically retract the nozzle.
14

Filter Cleaning
Turn off power and the angle valve
2. Unscrew angle valve nut
3. Remove filter net
Use brush to clean filter net
inse under flowing water.
Re install filter and angle valve
nut urn on the angle valve and
connect power.
When the product is left unused for a
long time
1.
2.
3. Disconnect the hose from angle valve,
drain the water and reconnect.
4. If needed, seek assistance from a
professional plumber for anti-freezing
process.
15

Replac deodorant box
the seat from the toilet. eodorant
box is at the bottom of seat base. Follow
below steps to replace a new deodorant
box.
Loose the screw and the
deodorizer from the seat.
Replace a new deodorizer, and tighten
the screw.
the seat
deodorant box
screw
battery
Battery replacement
1. Unplug DC connector and remove the
battery box.
2. Install a new 9V alkaline battery.
3. Reconnect battery box and put it back.
Note:
a. This should be installed by a suitable
qualified person.
b. A 9V alkaline battery is required (for
example 6LR61 or 6F22).
c. Battery not supplied.
46.4mm
48.5mm
17.5mm
26.5mm
Female
buckle (-)
Male
buckle (+)
16

Description of the knob function
Knob operation instructions
When seated, the knob rotates clockwise to start rear cleaning function, and
rotates counterclockwise to start front cleaning function ear and front cleaning
function will automatically enter into the drying function after completion.
(Note: default water pressure, water temperature, air temperature, seat temperature,
rod position are intermediate)
After starting the drying function, clockwise rotation increase
8. When the power is off, press the knob to flush the toilet. (Battery box must be
connected with battery fitted)
air temperature
and counterclockwise rotation decrease air temperature.
Under normal working mode, press the button at any time to flush the toilet when
cleaning and drying functions are not in use. Otherwise, it will stop cleaning or drying
function first, then press the button again to flush the toilet.
Tips:Below shows the indicator light status:
Light off
Flickering
White light
Standby mode
Energy saving mode
Normal function mode
17

Remote control illustration
Rear cleaning /
Oscillating
Water increasing
Front cleaning /
Oscillating
Water reducing
Drying
Auto mode 1
Indicator light
(only visible when
the light is on)
Dryer temperature
Water temperature
Night light
Nozzle moving forward
Nozzle moving backward
Auto mode 2
Stop/Energy saver
Seat temperature
Flush
When seat temperature is set to Level 2, 3, 4 or 5, press the “STOP” button
18
This manual suits for next models
1
Table of contents
Other Crosswater Toilet manuals
Popular Toilet manuals by other brands

DURAVIT
DURAVIT ME by Starck 280931 Series operating instructions

Teka
Teka Strohm FORMENTERA BTW installation guide

DURAVIT
DURAVIT SensoWash 2129590000 Mounting instructions

American Standard
American Standard Champion PRO 211BA Series INSTALLATION INSTRUCTIONS CARE AND MAINTENANCE

Rubi
Rubi RKN219BL Installation

Toto
Toto UT105U installation manua