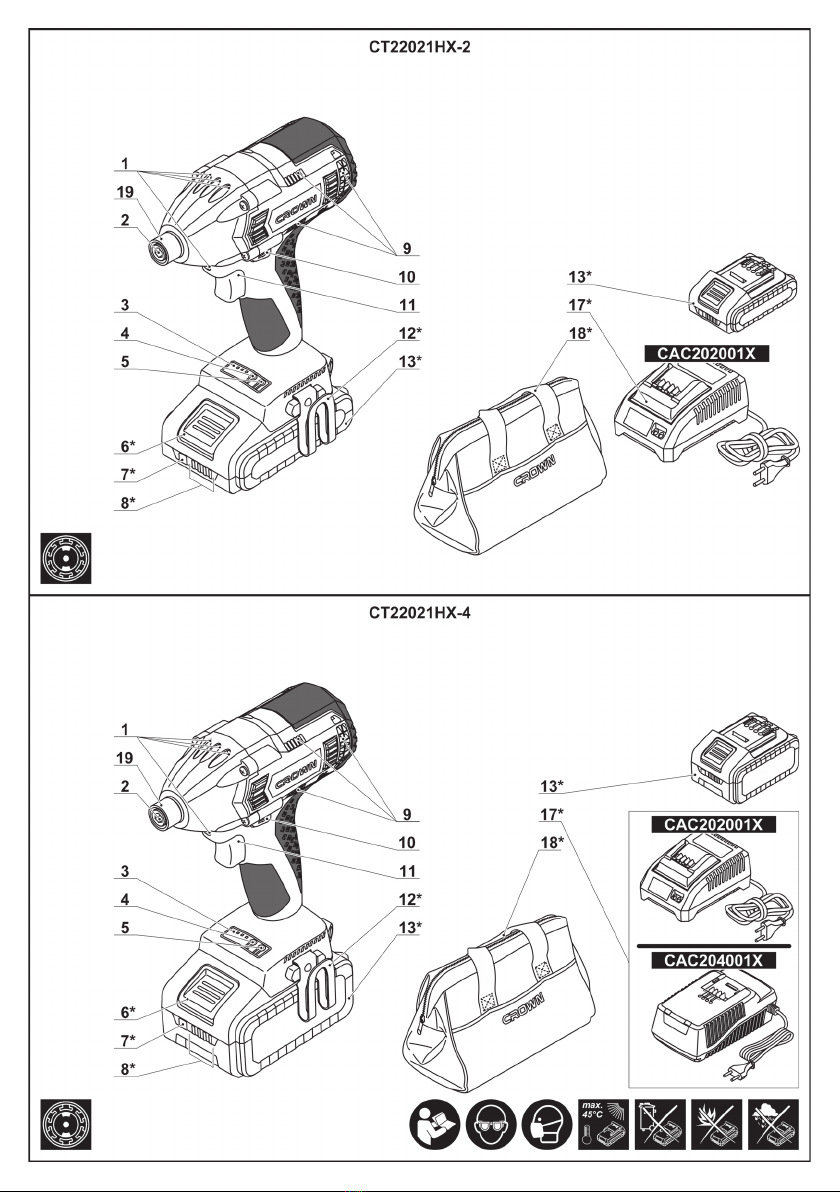
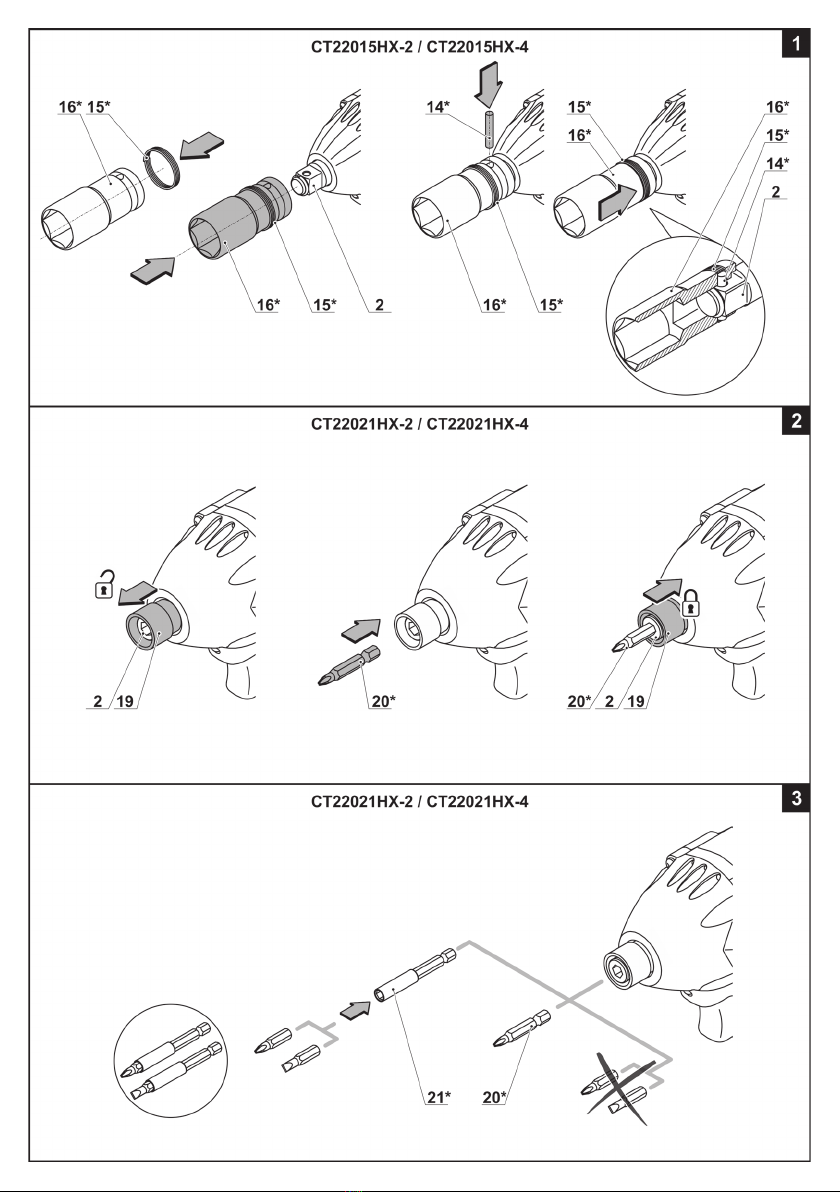
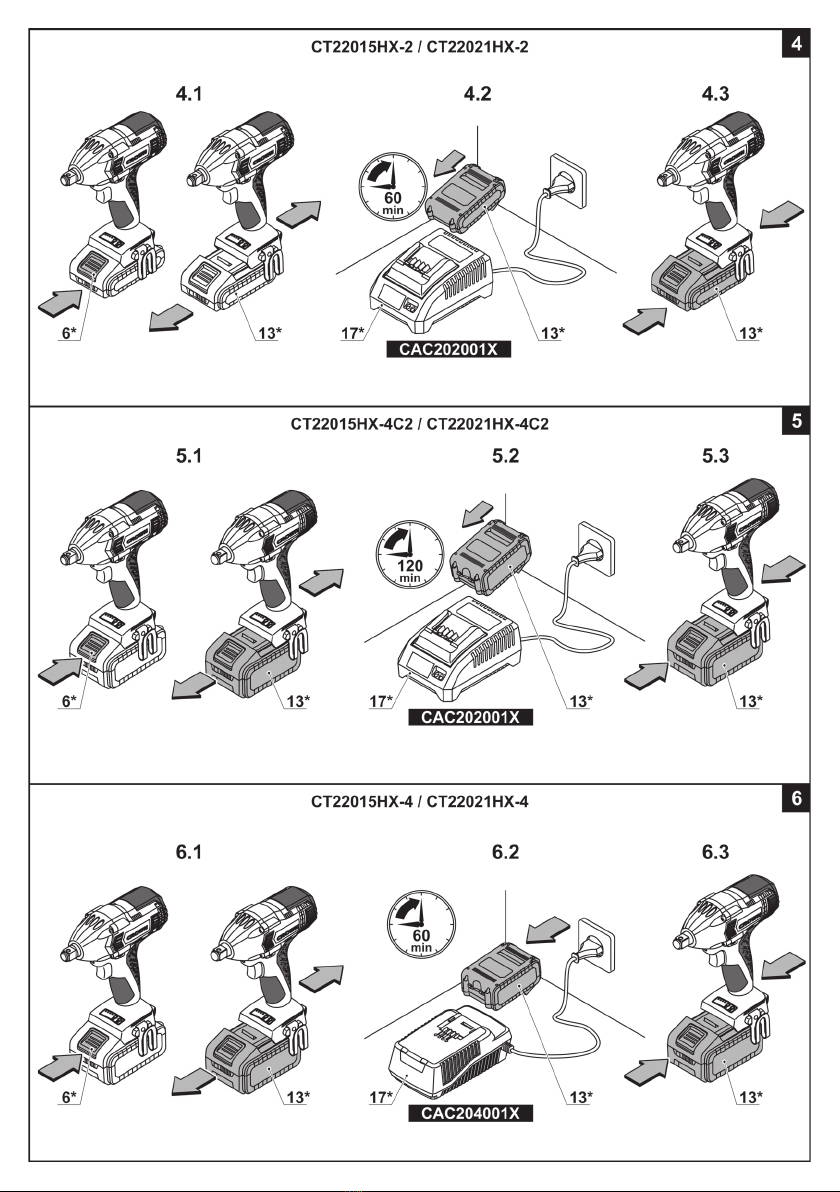
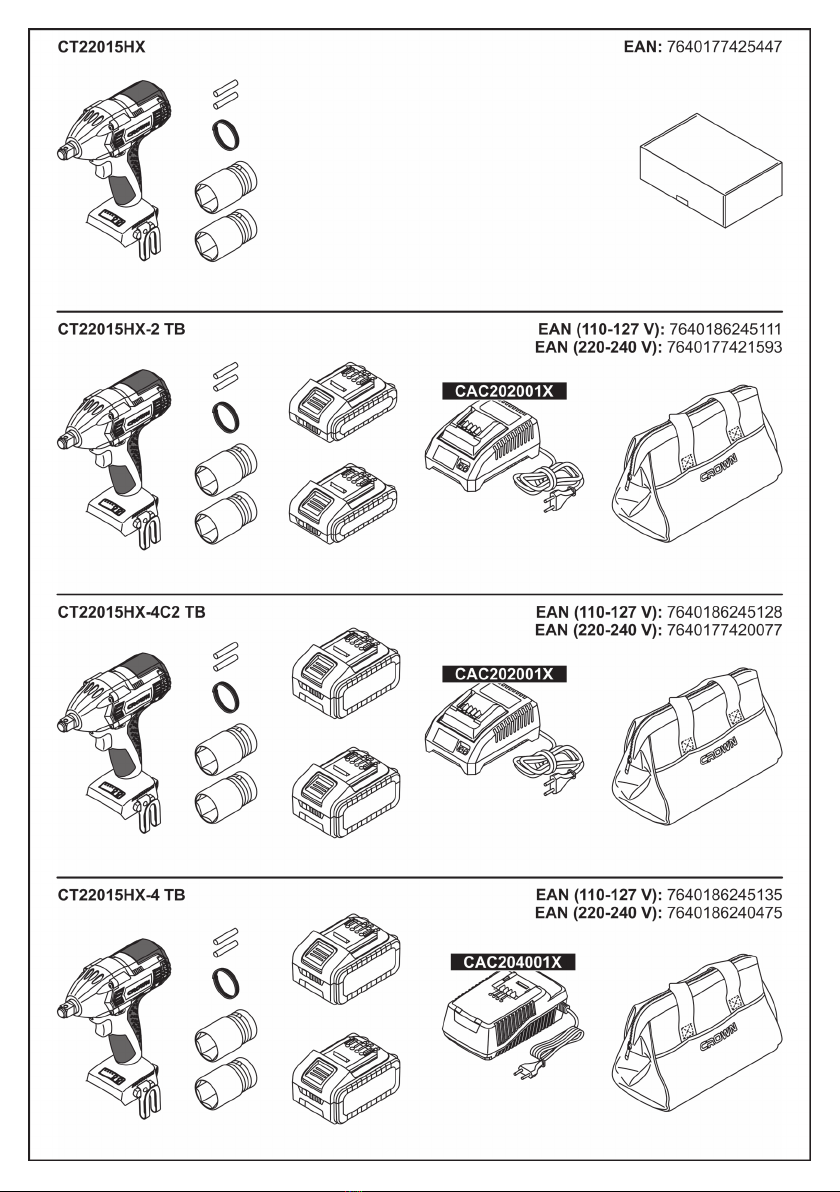
Crown CT22015HX User manual


2
Content / Contenido / Содержание / Зміст / Мазмұны / /
English
Explanatory drawings ������������������������������������������������������������������������������������������������������������ pages
General safety rules, instructions manual ����������������������������������������������������������������������������� pages
3 - 12
13 - 19
Español
Dibujos explicativos ������������������������������������������������������������������������������������������������������������ páginas
Recomendaciones generales de seguridad, manual de instrucciones ������������������������������ páginas
3 - 12
20 - 27
Русский
Пояснительные рисунки ������������������������������������������������������������������������������������������������ страницы
Общие указания по ТБ, инструкция по эксплуатации ������������������������������������������������� страницы
3 - 12
28 - 36
Украïнська
Пояснювальні малюнки ��������������������������������������������������������������������������������������������������� сторінки
Загальні вказівки по ТБ, iнструкція з експлуатації ��������������������������������������������������������� сторінки
3 - 12
37 - 44
Қазақ тілі
Түсіндіргіш әлеміштер �������������������������������������������������������������������������������������������������������� беттер
Жалпы қауіпсіздік жөніндегі ұсыныстар, пайдалану нұсқаулығы ���������������������������������������� беттер
3 - 12
45 - 52
�����������������������������������������������������������������������������������������
���������������
3 - 12
53 - 61
����������������������������������������������������������������������������������������������������������������������������
����������������������������������������������������������������������������������������������������
3 - 12
62 - 68
�������������������������������������������������������������������������������������������������������������������������
��������������������������������������������������������������������������������������������
3 - 12
69 - 75

3

4

5

6

7

8

9

10

11

12

13
English
Power tool specications
Cordless impact wrench
Cordless impact screwdriver CT22015HX-2 CT22015HX-4 CT22021HX-2 CT22021HX-4
Power tool code see pages 9-11
Rated voltage [V] 20 * 20 * 20 * 20 *
No-load speed [min-1]0-2100 0-2100 0-2100 0-2100
Impact rate [min-1]0-3200 0-3200 0-3200 0-3200
Battery type Li-Ion Li-Ion Li-Ion Li-Ion
Battery charging time [min] see page 12
Battery capacity [Ah] 2 4 2 4
Max. torque [Nm] 320 320 320 320
Tool holder type [mm]
[inches]
12,7
1/2"
12,7
1/2"
6,35
1/4"
6,35
1/4"
Min. - max. thread Ø of threaded
fastening elements M12-M22 M12-M22 M12-M22 M12-M22
Weight [kg]
[lb]
1,53
3�37
1,8
3�97
1,52
3�35
1,79
3�95
Sound pressure [dB(A)] 71,8 77,7 77,7 77,7
Acoustic power [dB(A)] 82,8 88,7 88,7 88,7
Weighted vibration [m/s2]1,19 1,36 1,36 1,36
* Maximum initial battery voltage (measured without workload) is 20 Volts� Nominal voltage is 18 Volts�

14
English
Noise information
Always wear ear protection if the sound
pressure exceed 85 dB(A).
Declaration of conformity
We declare under our sole responsibility that the prod-
uct described under "Power tool specications" is in
conformity with all relevant provisions of the direc-
tives 2006/42/EC including their amendments and com-
plies with the following standards:
EN 62841-1:2015,
EN 62841-2-2:2014,
EN 55014-1:2017,
EN 55014-2:2015�
Certication Wu Cunzhen
manager
* - for power tools with voltage 220-240 V�
Merit Link International AG
Stabio, Switzerland, 24�11�2021
WARNING - To reduce the risk of injury,
user must read instruction manual!
General safety rules
WARNING! Read all safety warnings,
instructions, illustrations and specica-
tions provided with this power tool. Fail-
ure to follow the warnings and instructions
may result in electric shock, re and / or serious in-
jury�
Save all warnings and instructions for future refer-
ence.
The term "power tool" in the warnings refers to your
mains-operated (corded) power tool or battery-operat-
ed (cordless) power tool�
Work area safety
•Keep work area clean and well lit. Cluttered or
dark areas invite accidents�
•Do not operate power tools in explosive atmos-
pheres, such as in the presence of ammable liq-
uids, gases or dust. Power tools create sparks which
may ignite the dust or fumes�
•Keep children and bystanders away while oper-
ating a power tool. Distractions can cause you to lose
control�
Electrical safety
•Power tool plugs must match the outlet. Never
modify the plug in any way. Do not use any adapter
plugs with earthed (grounded) power tools. Un-
modied plugs and matching outlets will reduce risk
of electric shock�
•Avoid body contact with earthed or grounded
surfaces, such as pipes, radiators, ranges and
refrigerators. There is an increased risk of electric
shock if your body is earthed or grounded�
•Do not expose power tools to rain or wet condi-
tions. Water entering a power tool will increase the risk
of electric shock�
•Do not abuse the cord. Never use the cord for
carrying, pulling or unplugging the power tool.
Keep cord away from heat, oil, sharp edges or
moving parts. Damaged or entangled cords increase
the risk of electric shock�
•When operating a power tool outdoors, use an
extension cord suitable for outdoor use. Use of a
cord suitable for outdoor use reduces the risk of elec-
tric shock�
•If operating a power tool in a damp location is
unavoidable, use a residual current device (RCD)
protected supply. Use of an RCD reduces the risk
of electric shock� NOTE! The term "residual current
device (RCD)" may be replaced by the term "ground
fault circuit interrupter (GFCI)" or "earth leakage circuit
breaker (ELCB)"�
•Warning! Never touch the exposed metal surfaces
on gearbox, shield, and so on because touching metal
surfaces will be interfered with the electromagnetic
wave, thus causing potential injury or accidents�
Personal safety
•Stay alert, watch what you are doing and use
common sense when operating a power tool. Do
not use a power tool while you are tired or under
the inuence of drugs, alcohol or medication. A
moment of inattention while operating power tools may
result in serious personal injury�
•Use personal protective equipment. Always
wear eye protection. Protective equipment such as
dust mask, non-skid safety shoes, hard hat, or hearing
protection used for appropriate conditions will reduce
personal injuries�
•Prevent unintentional starting. Ensure the
switch is in the off-position before connecting to
power source and / or battery pack, picking up or
carrying the tool. Carrying power tools with your n-
ger on the switch or energising power tools that have
the switch on invites accidents�
•Remove any adjusting key or wrench before
turning the power tool on. A wrench or a key left at-
tached to a rotating part of the power tool may result
in personal injury�
•Do not overreach. Keep proper footing and bal-
ance at all times. This enables better control of the
power tool in unexpected situations�
•Dress properly. Do not wear loose clothing or
jewellery. Keep your hair, clothing and gloves
away from moving parts. Loose clothes, jewellery or
long hair can be caught in moving parts�
•If devices are provided for the connection of
dust extraction and collection facilities, ensure
these are connected and properly used. Use of dust
collection can reduce dust-related hazards�
•Do not let familiarity gained from frequent use of
tools allow you to become complacent and ignore
tool safety principles� A careless action can cause
severe injury within a fraction of a second�
•Warning! Power tools can produces an electromag-
netic eld during operation. This eld may under some
circumstances interfere with active or passive medical
implants� To reduce the risk of serious or fatal injury,
we recommend persons with medical implants to con-
sult their physician and the medical implant manufac-
turer before operating this power tool�

15
English
Power tool use and care
•The persons with lowered psychophysical or men-
tal aptitudes as well as children can not operate the
power tool, if they are not supervised or instructed
about use of the power tool by a person responsible
for their safety�
•Do not force the power tool. Use the correct
power tool for your application� The correct power
tool will do the job better and safer at the rate for which
it was designed�
•Do not use the power tool if the switch does not
turn it on and off. Any power tool that cannot be con-
trolled with the switch is dangerous and must be repaired�
•Disconnect the plug from the power source and /
or the battery pack from the power tool before mak-
ing any adjustments, changing accessories, or
storing power tools� Such preventive safety measures
reduce the risk of starting the power tool accidentally�
•Store idle power tools out of the reach of chil-
dren and do not allow persons unfamiliar with the
power tool or these instructions to operate the
power tool. Power tools are dangerous in the hands
of untrained users�
•Maintain power tools. Check for misalignment or
binding of moving parts, breakage of parts and any
other condition that may affect the power tool's op-
eration. If damaged, have the power tool repaired
before use. Many accidents are caused by poorly
maintained power tools�
•Keep cutting tools sharp and clean. Properly
maintained cutting tools with sharp cutting edges are
less likely to bind and are easier to control�
•Use the power tool, accessories and tool bits
etc. in accordance with these instructions, taking
into account the working conditions and the work
to be performed. Use of the power tool for operations
different from those intended could result in a hazard-
ous situation�
•Keep handles and grasping surfaces dry, clean
and free from oil and grease. Slippery handles and
grasping surfaces do not allow for safe handling and
control of the tool in unexpected situations�
•Note that when you operate a power tool, please
hold the auxiliary handle correctly, which is helpful
when controlling the power tool� Therefore, proper
holding can reduce the risk of accidents or injuries�
Battery tool use and care
•Recharge only with the charger specied by the
manufacturer. A charger that is suitable for one type
of battery pack may create a risk of re when used with
another battery pack�
•Use power tools only with specically designat-
ed battery packs. Use of any other battery packs may
create a risk of injury and re.
•When battery pack is not in use, keep it away
from other metal objects, like paper clips, coins,
keys, nails, screws or other small metal objects,
that can make a connection from one terminal to
another. Shorting the battery terminals together may
cause burns or a re.
•Under abusive conditions, liquid may be ejected
from the battery; avoid contact. If contact acci-
dentally occurs, ush with water. If liquid contacts
eyes, additionally seek medical help. Liquid ejected
from the battery may cause irritation or burns�
•Avoid unintentional switching on. Ensure the
on / off switch is in the off position before inserting
battery pack. Carrying the power tool with your nger
on the on / off switch or inserting the battery pack into
power tools that have the switch in accidents�
•Do not open the battery. Danger of circuit�
•In case of damage and improper use of the bat-
tery, vapors may be emitted. Provide for fresh air
and seek medical help in case of complaints. The
vapors can irritate the respiratory system�
•When the battery is defective, liquid can escape
and come into contact with adjacent components�
Check any parts concerned� Clean such parts or re-
place them, if required�
•Protect the battery against heat, e.g., also
against continuous sun irradiation and re. There
is danger of explosion�
WARNING! Read all safety warnings and
all instructions.
•Protect the battery charger from rain and mois-
ture. The penetration of water in a battery charger in-
creases the risk of electric shock�
•Do not charge other batteries. The battery charger
is suitable only for charging lithium ion batteries within
the listed voltage range� Otherwise there is danger of
re and explosion.
•Keep the battery charger clean. Contamination
may cause the danger of electric shock�
•Check the battery charger, cable and plug each
time before using. Do not use the battery charger
when defects are detected. Do not open the battery
charger yourself and have it repaired only by quali-
ed personnel using original spare parts. Damaged
battery chargers, cables and plugs increase the risk of
electric shock�
•Do not operate the battery charger on easily in-
ammable surfaces (e.g. , paper , textiles , etc.) or
in combustible environments. There is danger of re
due to the heating of the battery charger during charging�
Service
•Have your power tool serviced by a qualied re-
pair person using only identical replacement parts.
This will ensure that the safety of the power tool is main-
tained�
•Follow instruction for lubricating and changing ac-
cessories�
Special safety warnings
•Hold power tool by insulated gripping surfaces,
when performing an operation where the cutting
accessory may contact hidden wiring or its own
cord. Cutting accessory contacting a "live" wire may
make exposed metal parts of the power tool "live" and
could give the operator an electric shock�
•Wear ear protectors� Exposure to noise can cause
hearing loss�
Safety guidelines during power tool op-
eration
•When operating the power tool, you should pay at-
tention and remain vigilant� You shall not use the pow-
er tool when you feel fatigue or under the inuence of
anesthesia, alcohol or drugs�

16
English
•You shall not put your ngers on switch button to
avoid starting up the power tool unconsciously when
the tool is moving�
•When mounting screws, you should ensure other
components matching the screws are fully xed and
reliable before operating the power tool� The switch
shall be started on a safety position and the power tool
shall operate for 30 seconds, which shall be stopped
promptly in case of any serious vibration or other prob-
lem; and arrangement shall be made for maintenance�
•Before starting, it is necessary to determine the
location of the concealed wiring, water and gas pipe-
lines� In case of damage of electrical wiring or general
utilities (for example, by a bolt screw being screwed)
severe consequences for life and health of the operat-
ing personnel are likely to occur�
•Do not use the usual socket wrench sleeve, use the
specially designed sleeve for impact wrench� Impact
wrench sleeve is black, hard and don't damage the
screw bolt� The sleeve not for the impact wrench is
easy to be damaged, and easy to cause personal in-
jury� Before use, be sure the sleeve without cracks or
other visible damage�
•Change of the construction of socket wrenches as
well as use of detachable attachments or accessories
not suitable for this power tool is prohibited�
•Recoil (a sudden jerk of the power tool) may occur
during operation; in order to avoid dangerous situa-
tions (for example loss of balance), keep the power
tool in your hands rmly and maintain a rm posture.
•When processing small blank parts, which own
weight is not sufcient to ensure necessary xation,
use special clamp xtures.
Symbols used in the manual
Following symbols are used in the operation manual,
please remember their meanings� Correct interpreta-
tion of the symbols will allow correct and safe use of
the power tool�
Symbol Meaning
Cordless impact wrench
Cordless impact screw-
driver
Sections marked gray - soft
grip (with insulated surface)�
Ser. No: XX XXXXXXX
CT ... Serial number sticker:
CT ��� - model;
XX - date of manufacture;
XXXXXXX - serial number�
Brushless motor�
Read all safety regulations
and instructions�
Symbol Meaning
Wear safety goggles�
Wear a dust mask�
Do not heat the battery
above 45°C� Protect from
prolonged exposure to direct
sunlight�
Do not dispose of the battery
in a domestic waste con-
tainer�
Do not dispose of the battery
in the re.
Protect the battery from the
rain�
min Battery charging time�
Movement direction�
Rotation direction�
Locked�
Unlocked�
Accessories holder with an
external square�
Accessories holder with an
internal hexagon�
Attention� Important�
A sign certifying that the
product complies with es-
sential requirements of the
EU directives and harmo-
nized EU standards�

17
English
Symbol Meaning
Useful information�
Stepless speed control�
Do not dispose of the power
tool in a domestic waste
container�
Power tool designation
The power tool has been designed to unscrew and
to tighten threaded fastening elements (bolts, nuts,
screws, bolt screws, etc�)�
Power tool components
1 LED lamp
2 Tool holder
3 Indicators (torque and speed)
4 Button (torque and speed)
5 On / off switch of the LED lamp
6 Battery lock *
7 Control button of the state of battery charge *
8 Indicators of the state of battery charge *
9 Ventilation slots
10 Reverse switch
11 On / off switch
12 Belt clip *
13 Battery *
14 Pin *
15 Spring *
16 Socket wrench *
17 Charger *
18 Carrying bag *
19 Fixing bush
20 Screwdriver bit *
21 Magnetic holder *
22 Charger label *
23 Indicator (red) *
24 Indicator (green) *
* Optional extra
Not all of the accessories illustrated or described
are included as standard delivery.
Installation and regulation of power tool
elements
Before execution of any procedures, centre the
reverse switch 10.
Mounting / dismounting / setting-up of
some elements is the same for all power
tool models, in this case specic models
are not indicated in the illustration.
Mounting / replacement of accessories (see
g. 1-2)
[CT22015HX-2, CT22015HX-4]
•While mounting, install the socket wrench 16 on the
tool holder 2 as shown on the gure 1.
•Disassembly operations do in reverse sequence�
[CT22021HX-2, CT22021HX-4]
•Move forward the xing bush 19 and hold it in this
position (see g. 2).
•Mount / replace the accessory�
•Release the xing bush 19�
Screwdriver bit / magnetic holder (see g. 3)
[CT22021HX-2, CT22021HX-4]
Use accessories that have circular groove at the stem
end, their use will guarantee safe xation of accessory
in the tool holder 2�
For short screwdriver bits use the magnetic holder 21
for their reliable xing (see g. 3).
A magnetic holder 21 is not needed for extended screw-
driver bits 20 (specially purposed for screwdrivers)�
Charging procedure of the power tool
battery
Initial operating of the power tool
The power tool is supplied with a partially charged
battery 13. Before the rst use, the battery 13 must
be fully charged.
Charging process (see g. 4-6)
•Centre the reverse switch 10�
•Press the battery lock 6and remove the battery 13
(see g. 4.1, 5.1, 6.1).
•Connect the charger 17 to the power supply�
•Insert battery 13 into charger 17 (see g. 4.2, 5.2, 6.2).
•Disconnect the charger 17 from power supply after
charging�
•Remove the battery 13 from the charger 17 and
mount battery 13 in the power tool (see g. 4.3, 5.3, 6.3).
Charger indicators (see g. 7-8)
Charger indicators 23 and 24 inform of the battery 13
charging process� Signals of the indicators 23 and 24
are shown on the label 22 (see g. 7-8).
•Fig� 7�1, 8�1 - (the green indicator 24 is on, the
battery 13 is not inserted in the charger 17) - the
charger 17 is connected to the power network (ready
for charging)�
•Fig� 7�2, 8�2 - (the green indicator 24 is blinking, the
battery 13 is inserted in the charger 17) - the battery 13
is being charged�
•Fig� 7�3, 8�3 - (the green indicator 24 is on,
the battery 13 is inserted in the charger 17) - the
battery 13 is fully charged�

18
English
•Fig� 7�4, 8�4 - (the red indicator 23 is on, the bat-
tery 13 is inserted in the charger 17) - the charging pro-
cess of the battery 13 is terminated due to inappropri-
ate temperature� When the temperature conditions are
normal, the process of charging will resume�
•Fig� 7�5 , 8�5 - (the red indicator 23 is blinking, the bat-
tery 13 is inserted in the charger 17) - the charging pro-
cess of the battery 13 is terminated because of its failure�
Replace the faulty battery 13, its further use is prohibited�
In the process of charging the battery 13
and the charger 17 become hot, it is a
normal process.
Switching the power tool on / off
Make sure that the reverse switch 10 is not cen-
tred, this blocks on / off switch 11.
Switching on:
Press on / off switch 11.
Switching off:
Release the on / off switch 11�
Design features of the power tool
Battery (see g. 9)
The battery 13 is protected by the safety system
against deep discharge� In case of complete dis-
charge, the power tool is automatically switched off�
Attention: do not try to switch on the power tool
when the protection system is activated the bat-
tery 13 can be damaged.
With the push of the button 7the indicators 8show the
state of charge of the battery 13 (see g. 9).
Temperature protection
The temperature protection system enables to auto-
matically deactivate the power tool in case of excess
load or when the temperature of the battery 13 is ex-
ceeding 70°C� The system guarantees protection of
the power tool from damage in case of noncompliance
with the operation conditions�
LED lamp (see g. 10)
•Push the button 5to switch on the LED lamps 1(see
g. 10).
•Push the button 5to switch off the LED lamps 1�
Adjusting of the torque and speed (see g. 10)
Attention: make any adjusting after the
engine fully stops.
When reverse switch 10 installed in left position (clock-
wise rotation), with the button 4possible to change the
torque and speed� Push the button 4to change torque
and speed simultaneously (see g. 10). Indicators 3
shows the selected level�
•1-st level 850 min-1 ≈35 [Nm];
•2-nd level 1250 min-1 ≈130 [Nm];
•3-rd level 1650 min-1 ≈200 [Nm];
•4-th level 2100 min-1 ≈320 [Nm]�
When reverse switch 10 installed in right position
(counter clockwise rotation), this setting does not work,
and loosening occurs at maximum speed and torque�
Stepless speed adjustment
Speed is controlled from 0 to maximum by
pressing force of on / off switch 11� Weak
pressing results in low revolutions, which
enable a smooth power tool switch-on�
Changing the rotational directions (see g. 11)
Change the direction of rotation only after
a full stop of the motor, acting otherwise
may cause damage to the power tool.
Clockwise rotation (tightening of screws, bolts,
nuts) - move the reverse switch 10 to the left as it is
shown in g. 11.1.
Counter clockwise rotation (loosening of the
screws, bolts, nuts) - move the reverse switch 10 to
the right as it is shown in g. 11.2.
Brushless motor
Power tool equipped with a brushless motor that pro-
vides the following advantages (compared to the pow-
er tool having a brush motor):
•high reliability due to the lack of wearing parts (car-
bon brushes, commutator);
•increased operating time on a single charge;
•compact design and light weight�
Recommendations on the power tool op-
eration
Install the accessory (screwdriver bit
or socket wrench) on the fastening
element only when the power tool is
switched off.
Description of the power tool operation
When the power tool is operated, the tightening up
of threaded fastening elements includes two stages:
tightening up and setting-up with the operated im-
pact mechanism� The impact mechanism is activated
as soon as the threaded connection is tightened and
the engine load is increased� In this way, the impact
mechanism is changing the engine torsion torque into
uniform rotary strokes�
In the course of unscrewing of threaded fastening
elements, the processes described above are taking
place in the reverse order�
The torsion torque depends on the operating period
of the impact mechanism� The maximum achievable
torque is equal to the sum of all individual torque val-
ues achieved during strokes� The maximum torque
is attained after the impact mechanism is operated
for 6-10 seconds� After that the tightening torque is in-
creased insignicantly.
Selection of the tightening mode
The operating period of the impact mechanism is se-
lected separately for each type of threaded connec-
tion and depends on the following factors:

19
English
•strength of fastening elements;
•type of support (type of washer);
•strength of twisted materials;
•lubrication of threaded connection�
Variants of use of the power tool can be subdivided in
the following types:
•rigid connection - connection of metal parts with
the help of metal washers;
•spring connection - connection of metal parts
using spring washers, disk springs, fastening
elements with the conical t, etc.;
•soft connection - connection of metal and non-
metal parts, use of soft washers made from lead
or ber.
In case of rigid connection, the maximum torque is
achieved after a short operating period of the impact
mechanism� The longer operating period of the impact
mechanism will not give better results, but may lead to
the damage of the power tool�
In case of spring or soft connection, the maximum
tightening torque is lower in comparison with the rigid
connection; the longer operating period of the impact
mechanism is required�
You can determine the operating period
of the impact mechanism with the help
of the practical testing. After completing
tightening it is recommended to check
the tightening torque with the help of the torque
indicating wrench.
Screwing the screws (see g. 12)
[CT22021HX-2, CT22021HX-4]
•To make fastening of screws easier and in order
to prevent cracking of the work pieces, rst drill a
hole with a diameter equal to 2/3 of a diameter of the
screw�
•If you are connecting work pieces with the help of
screws, in order to achieve durable joint without getting
cracks, fracturing or layering, take actions shown in
gure 12.
Power tool maintenance / preventive
measures
Before execution of any procedures, centre the re-
verse switch 10.
Battery maintenance instruction
•Charge timely before the battery 13 is completely
exhausted� Stop operation in low power and charge it
immediately�
•Do not overcharge when the battery 13 is full, other-
wise it will shorten the life time�
•Charge battery 13 in the room temperature of 10°C
to 40°C (50°F to 104°F)�
•Charge battery 13 every 6 months without operation
for a long time�
•Replace worn out batteries in time� Decline of
production or a significantly shorter runtime of the
power tool after charging indicates aging of the
battery 13 and the need for replacement� It should
be taken into account that the battery 13 may dis-
charge faster if the works take place in the tempera-
ture below 0°С.
•In case of long time storage without use, it is recom-
mended to store the battery 13 at room temperature, it
should be charged to 50%�
Cleaning of the power tool
An indispensable condition for a safe long-term exploi-
tation of the power tool is to keep it clean� Regularly
ush the power tool with compressed air thought the
ventilation slots 9�
After-sales service and application service
Our after-sales service responds to your questions
concerning maintenance and repair of your product as
well as spare parts� Information about service centers,
parts diagrams and information about spare parts can
also be found under: www.crown-tools.com.
Transportation of the power tools
•Categorically not to drop any mechanical impact on
the packaging during transport�
•When unloading / loading is not allowed to use any
kind of technology that works on the principle of clamp-
ing packaging�
Li-Ion batteries
The contained Li-Ion batteries are subject to the Dan-
gerous Goods Legislation requirements� The user can
transport the batteries by road without further require-
ments�
When being transported by third parties (e�g�: air trans-
port or forwarding agency), special requirements on
packaging and labelling must be observed� For prepa-
ration of the item being shipped, consulting an expert
for hazardous material is required�
Dispatch batteries only when the housing is undam-
aged� Tape or mask off open contacts and pack up the
battery in such a manner that it cannot move around
in the packaging� Please also observe possibly more
detailed national regulations�
Environmental protection
Recycle raw materials instead of dispos-
ing as waste.
Power tool, accessories and packaging
should be sorted for environment-friendly re-
cycling�
The plastic components are labelled for categorized
recycling�
These instructions are printed on recycled paper man-
ufactured without chlorine�
The manufacturer reserves the possibility to introduce changes.

20
Español
Especicaciones de la herramienta eléctrica
Llave inglesa de percusión sin cable
Destornillador de percusión sin cable CT22015HX-2 CT22015HX-4 CT22021HX-2 CT22021HX-4
Código de la herramienta eléctrica consulte las páginas 9-11
Tensión de la batería [V] 20 * 20 * 20 * 20 *
Velocidad de giro en vacío [min-1]0-2100 0-2100 0-2100 0-2100
Número de impactos [min-1]0-3200 0-3200 0-3200 0-3200
Tipo de batería Li-Ion Li-Ion Li-Ion Li-Ion
Tiempo de carga de la batería [min] consulte las página 12
Capacidad de la batería [Ah] 2 4 2 4
Torque [Nm] 320 320 320 320
Tipo de soporte para herramienta [mm]
[pulgadas]
12,7
1/2"
12,7
1/2"
6,35
1/4"
6,35
1/4"
Hilo min. - max. Ø de elementos de
sujeción roscados M12-M22 M12-M22 M12-M22 M12-M22
Peso [kg]
[lb]
1,53
3�37
1,8
3�97
1,52
3�35
1,79
3�95
Presión acústica [dB(A)] 71,8 77,7 77,7 77,7
Potencia acústica [dB(A)] 82,8 88,7 88,7 88,7
Vibración ponderada [m/s2]1,19 1,36 1,36 1,36
* La tensión inicial máxima de la batería (medida sin carga de trabajo) es de 20 Voltios� La tensión nominal es de 18 Voltios�
This manual suits for next models
1
Table of contents
Languages:
Other Crown Power Screwdriver manuals
Popular Power Screwdriver manuals by other brands

Ingersoll-Rand
Ingersoll-Rand 5L Series Product information

DS Produkte
DS Produkte EASYmaxx UMMF-1501-18 manual

Metabo
Metabo 602116600 Original instructions

Bosch
Bosch GSR 10,8 V-LI Professional Original instructions

Clas Ohlson
Clas Ohlson PLSL-167A-UK manual

Scheppach
Scheppach 7906100717 Translation of original instruction manual