CRY SOUND CRY2624 User manual

CRY2624 Industrial Acoustic Imager
User Manual V1.3
M e a s u r e B e t t e r S o u n d

User Manual V1.2
M e a s u r e B e t t e r S o u n d
1
Maintenance and Calibration
Within two years from the date of purchase, we provide free warranty
service for abnormal and malfunction caused by product quality. Free warranty
service does not include the non-product quality problems caused by
improper use, accidental drop, etc.
In case of equipment failure caused by improper use or accidental drop,
we promise to provide maintenance service at cost price.
The equipment has been calibrated when delivered to the user. However, in
the long-term use process, we suggest that you send the equipment to our
office every two years for equipment calibration, testing and maintenance.
Contact us
HangZhou Headquarter
Tel:0571-88225198 0571-88225128
E-mail:cry@crysound.com
Address:No.10, Xianqiao Road, Zhongtai Street, Yuhang District, Hangzhou,
Zhejiang Province.
Website:WWW.CRYSOUND.COM
Dongguan Branch
Tel:0769-21688120
Fax:0769-21688120
Address:7th floor,B1 block, Songhu Zhigu Scientific Research Center, Liaobu
Town, Dongguan City, Guangdong Province.

User Manual V1.2
M e a s u r e B e t t e r S o u n d
2
Overview
CRY2624 is the ATEX version anti-explosion hand-held industrial acoustic
imager, support the ultrasonic frequencies, with II 3G Ex ic IIC T5 Gc
explosion-proof grade. The instrument uses the microphone array
beamforming technology to acquire the sound source distribution data and
collects the video images in real time with the high-definition camera. By
integrating the sound source distribution data with the video image, the
changing sound source is dynamically presented on the display screen.
CRY2624 industrial acoustic Imager helps you quickly detect potential
pressurized gas leakage and vacuum leakage in noisy industrial environments.
Used in power systems, it can help you quickly identify potential partial
discharge fault points.
The industrial acoustics imager is made of aluminum alloy shell, which is strong
and durable and can adapt to the complex and changeable working
environment.
The equipment is simple and convenient to operate and can be used quickly. It
only needs to adjust two parameters, the test frequency range and test
dynamic range to meet the vast majority of test requirements. Support camera
mode, video mode, and the data recording on the job site is flexible. Large
capacity TF data memory card can be expanded, and test results can be
exported and reported quickly.

User Manual V1.2
M e a s u r e B e t t e r S o u n d
3
Explosion-proof note clause
This equipment is explosion-proof one, its grade is II 3G Ex ic IIC T5
Gc, please use it in matching with the explosion-proof marks in
explosive environment.
When used in an explosive environment, please do not remove or
replace batteries, not recharge the battery pack.
Do not use USB connector, external power supply, chargers and
other peripherals plug and equipment without explosion-proof
certification in the explosive environment.
Please put the silica gel baseplate well and do not plug the headset
and the TF card under the explosive environment.

User Manual V1.2
M e a s u r e B e t t e r S o u n d
4
Safety instruction
To prevent possible fire or personal injury, please note:
Please read this safety instruction carefully before using the product
Use the product only for the specified usage
Do not disassemble the equipment without authorization
In case of equipment malfunction or abnormal heat, please stop
using
Please contact the manufacturer for maintenance requirement
Do not place the device near heat source, flame or high temperature
environment
Please do not charge the device in a high temperature environment
(over 45℃)
If internal lithium-ion battery leakage occurs, please stop using the
device
If the leakage contaminates eyes, wash with water immediately and
seek medical attention
If the leakage contaminates skins, wash with water immediately and
seek medical attention
If stored time is over 1 month, please keep the product in an
environment where the ambient temperature is below 40 ° C.
Otherwise, battery leakage may cause damage to the device.

User Manual V1.2
M e a s u r e B e t t e r S o u n d
5
Terminology
USB Power Delivery (USB PD)
A power delivery protocol based on USB3.1, which is often used to transmit
more power in USB interface.
Sound Pressure Level (SPL)
A physical quantity used to express the magnitude of sound waves, the unit is
decibels (dB). It is also used as dBSPL.
Audible domain
The frequency ranges of sound that can be perceived by human ears generally
refers to the sound that frequency is in the frequency band of 20Hz-20KHz.
Ultrasonic
Generally, it refers to the frequency of more than 20kHz sound, the human ear
cannot perceive.
Sound image
It refers to the two-dimensional data table representing the intensity
distribution of sound sources in the space plane after the signal collected by
microphone array is calculated by the sound source location algorithm.
Palette
The color data used in the color mapping of a Sound cloud chart.
Sound cloud image
The sound pressure level data of each resolution point on the sound image is
mapped to a certain color number on the palette according to a certain

User Manual V1.2
M e a s u r e B e t t e r S o u n d
6
conversion formula to form a color image, and then it is fused with the visible
image to form a sound cloud image.
Test frequency range
When a frequency range is selected within the full frequency range supported
by the device, the device will only measure and display a sound cloud image
that is within this frequency range. Sound outside this frequency range will not
be displayed.
Frequency peak
A peak in spectrum , it denotes a strong sound energy distribution at this
particular frequency.
Dynamic range
The scale of the intensity of the sound source that can be shown on the sound
cloud image.
Field of view
For camera, it is an angle formed by camera and the two diagonal points of the
rectangular picture which is captured by the camera.
For sound cloud image, it is an angle formed by microphone array and the two
diagonal points of the rectangular sound image which is captured by the
microphone array.

User Manual V1.2
M e a s u r e B e t t e r S o u n d
7
Device and accessories
Protective box
A storage protection box for the
device and its accessories
Description
Name
Used as backup power supply for
device
(Optional)
Apperance
Cable used to charge the device
Charge connector
Power adapter for equipment
charging
Straps accessories, help to
improve the grip feeling
Hand straps
CRY2624
shoulder strap accessories
The industrial acoustic imager
Shoulder strap
Charge cable
Power bank
headphone
Connecting equipment is used to
monitor ultrasonic wave, etc

User Manual V1.2
M e a s u r e B e t t e r S o u n d
8
Battery and charging
Battery information
Charging information:
Please charge the device through the USB Type-C port marked with the
charging logo “ ”.The device supports USB PD quick charging protocol.
It is recommended to use a power adapter or power bank that supports 12V to
20V voltage output and the minimum output power is not less than 15W to
charge the device.
Charging and endurance instructions:
a) After inserting the charger, the charging indicator is always on, indicating
that it is charging; The charging indicator is off, indicating that it is fully
charged; Keep device turn off on charging. Be sure to charge the device when
the device is turned off.
b) When the battery is fully charged, the device displays 4 grids of electricity
and can be used for about 4 hours; 3 grids can be used for about 2.5 to 3 hours;
2 grids can be used for about 1.5 to 2 hours; 1 grid can be used for about half
an hour to 1 hour.
c) When the battery's charge gets low, you'll see the low battery warning on
the screen. Please charge in time.

User Manual V1.2
M e a s u r e B e t t e r S o u n d
9
Once again, please pay attention to the following contents for safe
use
Do not place the device near heat source, flame or high
temperature environment
Do not expose to the sun for a long time or use the equipment in
the sun for a long time
Do not disassemble the equipment without authorization
Please do not charge the device in a high temperature
environment (over 45℃)
If the equipment fails or is abnormal, please stop using it
Please contact the manufacturer for maintenance requirement
In order to extend the battery life, we suggest
Please do not charge the device for more than 24 hours.
If it is not used for a long time, please charge the battery regularly.
It is recommended to store at -20℃ to +40℃
Note: When the battery capacity is low, please contact the
manufacturer to replace the battery. Do not disassemble the device
without permission.

User Manual V1.2
M e a s u r e B e t t e r S o u n d
10
Function
Charging indicator
Monitor
headphone socket
Power Button
Function Button
TF Card
USB Type-C Communication
USB Type-C
charging interface
User Manual V1.2
M e a s u r e B e t t e r S o u n d
11
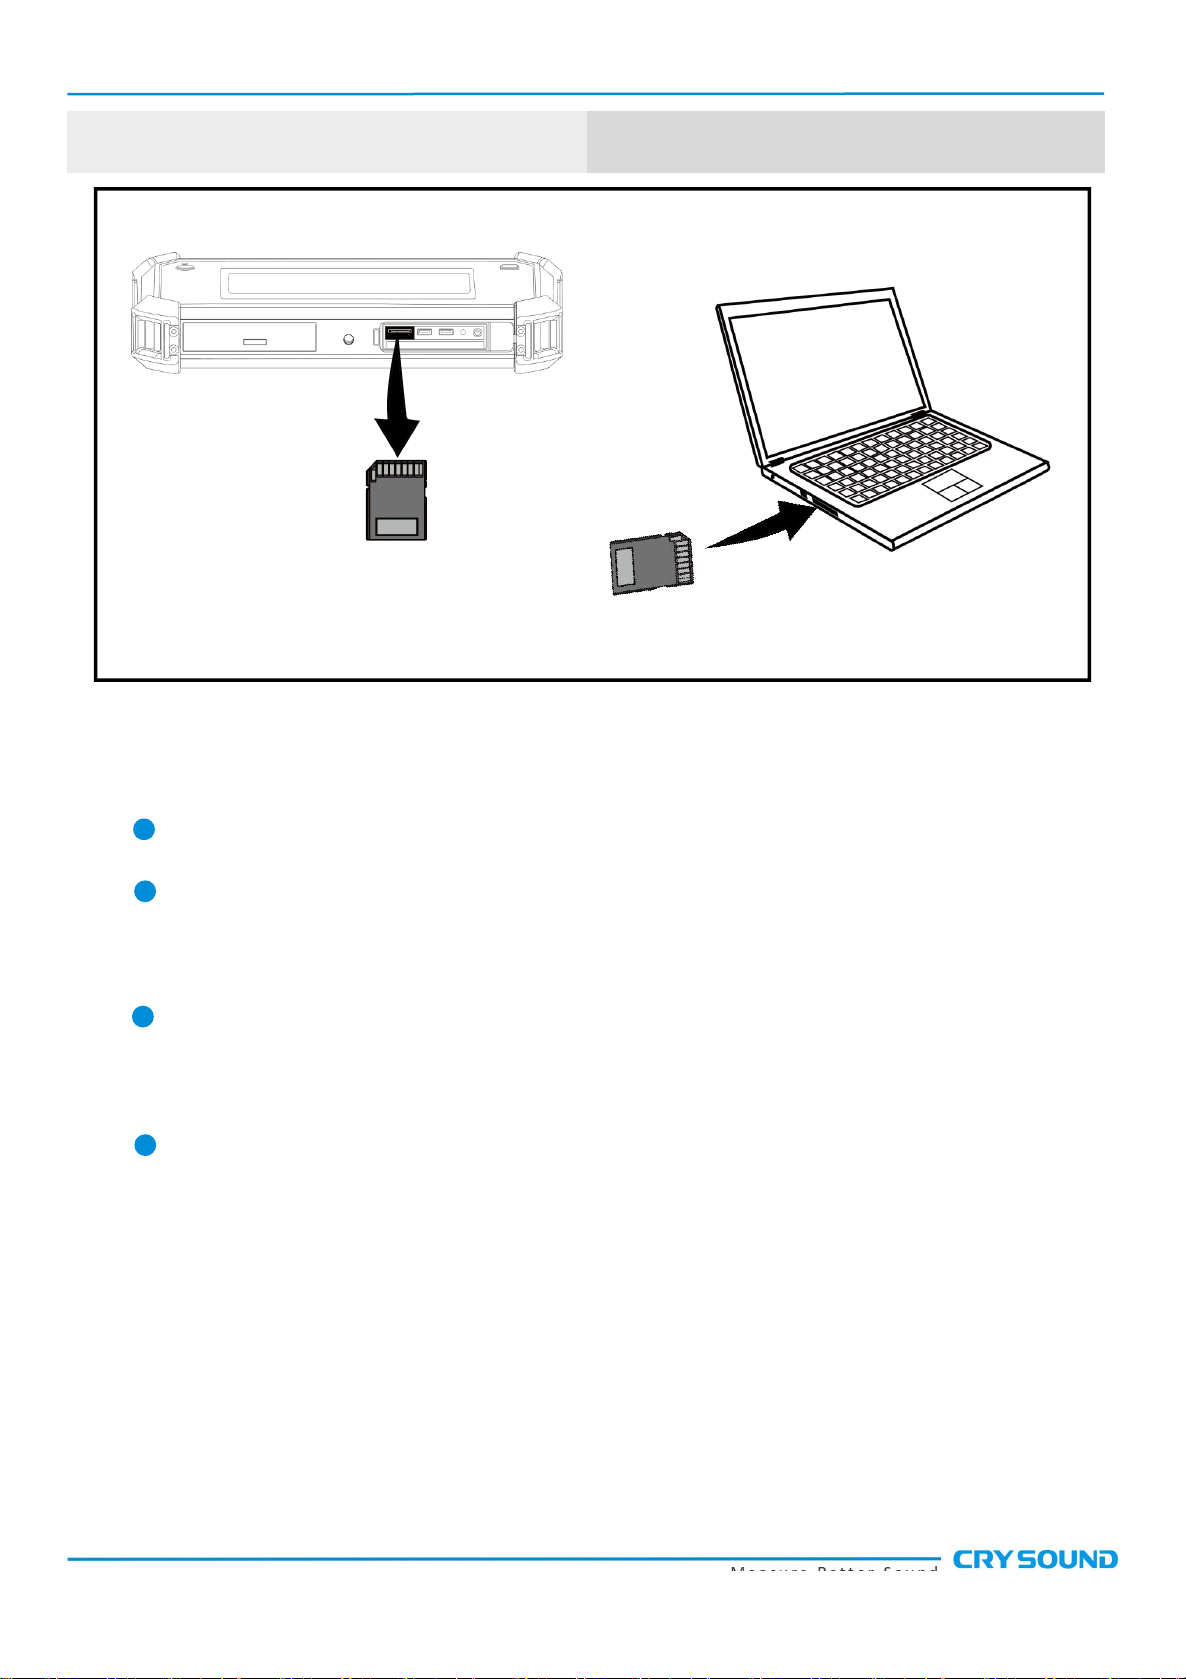
Expand TF card
Notes for the use of TF Card
Do not remove or insert the TF card when video recording.
After taking photos and recording videos, please wait until the data is
saved successfully before inserting and removing the TF card.
Do not remove or insert the TF card when browsing and marking data
under the playback menu.
When reading TF card data on the PC, do not change the names of
files and folders in the TF card, otherwise, test data may not be correctly
identified and displayed in the playback menu.
三脚架

User Manual V1.2
M e a s u r e B e t t e r S o u n d
12
Tripod
Threaded mouth
三脚架
User Manual V1.2
M e a s u r e B e t t e r S o u n d
13
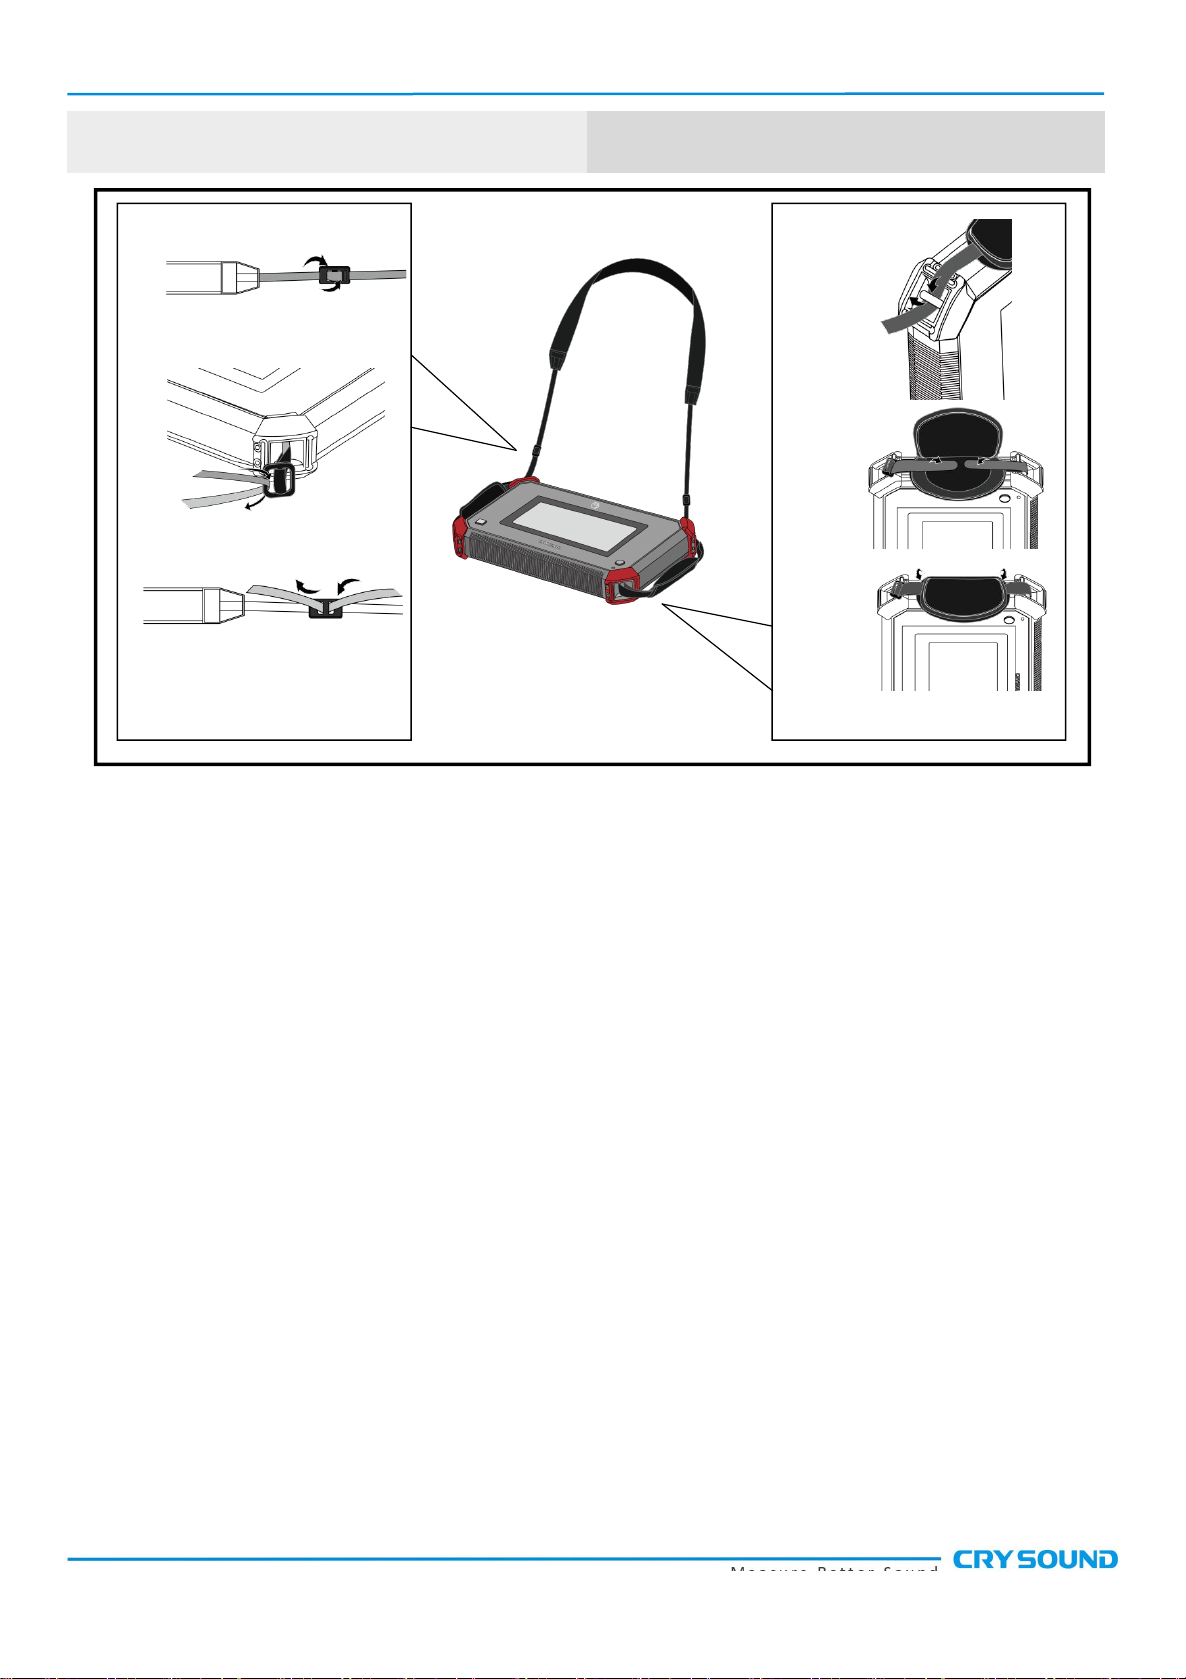
Hand straps and shoulder strap
②
①
③
①
②
③

User Manual V1.2
M e a s u r e B e t t e r S o u n d
14
Software interface
Spectrum and
select box of test
frequency range
Battery
state
Video area
Work mode icon
System time
Function menu
Palette
Dynamic range
quick setup

User Manual V1.2
M e a s u r e B e t t e r S o u n d
15
Function menu
Click in the video area of the screen to call out the menu bar
Click again or do nothing for seconds, the menu will hide
automatically
The Function menu includes
Playback
System
Work mode
switch button
Acoustic
Display
Steady-state

User Manual V1.2
M e a s u r e B e t t e r S o u n d
16
Palette and dynamic range
Click the palette on the main interface to call out the
dynamic range dialog
Click the area outside the dynamic range dialog to hide
Dynamic range parameter can be adjusted into this
dialog
Test frequency range
Press on select box to move it
Press on a single side of select box to adjust up limit or
down limit

User Manual V1.2
M e a s u r e B e t t e r S o u n d
17
Transient and steady state modes
Click the transient / steady state mode button to switch the working mode of
the equipment.
In the transient mode, the equipment has a very fast response speed to the
transient signal and can quickly respond to the change of sound source. It is
suitable for locating rapidly changing sound source models, such as partial
discharge sound source.
In the steady-state mode, the equipment will reduce the response speed to the
signal, and the cloud image will be relatively stable. It is suitable for the
observation of stable signals.
Video and photo
Click the button on the left of the menu bar to switch between camera mode
and video mode.

User Manual V1.2
M e a s u r e B e t t e r S o u n d
18
The icon in the upper right corner of the video area will remind you of the work
mode which the device is currently in.
a. In camera mode, press the function button to take a picture.
b. In video mode, press the function button to start recording, press again to
stop or it will automatically stop when video exceeds 5 minutes.
During video recording, you can know the duration of current recording
through the icon in the upper right corner of the video area.

User Manual V1.2
M e a s u r e B e t t e r S o u n d
19
Playback
Pictures and recorded video data can be viewed in the playback window.
a. Click a picture or video to check full size image or play a video.
b. Click Multiple Selection to select multiple videos or photos
for deletion.
c. Click the select all button to select all.
d. After selecting a video or photo, click the upper right corner“ ”to delete
the data.
e. Press button“ ”to check usage information of current storage space.
Table of contents
Other CRY SOUND Laboratory Equipment manuals

Popular Laboratory Equipment manuals by other brands

VERDER
VERDER Carbolite Gero AX 60 Installation, operation and maintenance instructions

B.A. International
B.A. International BA OPTIMA U-MIX Instructions for use

Tektronix
Tektronix 067-1039-00 instruction manual

Steris
Steris AMSCO 400 Series Operator's manual

Cypress Diagnostics
Cypress Diagnostics CYANSmart Service manual

REITEL
REITEL DUBLIRET operating instructions


