Cuckoo nello ND-A0609F Series User manual

PET DRYROOM
USER MANUAL
ND-A0609F series

2
Thank you for using our Pet Dry Room.
Please keep this instruction manual (including warranty).
It will be very helpful when there is something you do not know during
use of the product or when the product does not function properly.
The product warranty is included in the user manual.
Be sure to read the User Manual before using the product and use it correctly. After reading, keep it in a place where people who use the product can see
it at all times.
Caution: Use of this product for purposes other than home use (commercial use, laboratory use, etc.) is prohibited. To use the product for a long time with-
out any trouble, please read the User Manual.
Dear families!
The advantages of Pet Dry Room.
Perfect Design for pets
- This product is designed to be cozy and peaceful, so pets can feel the dry room as a comfortable resting place without
any stress.
TWIN-FAN TECHNOLOGY
- Developed by Nello's technology, Twin-Pan creates a three-dimensional wind like a tornado by moving two fans at
different rotational speeds. This three-dimensional wind not only dries the wet hair quickly after bathing, but also cleanses
the remaining pollutants and fine dust after daily walks.
Dries twice as fast (three-dimensional wind / 36 vents)
- Powerful three-dimensional wind and 36 air vents on the left and right allow for faster and more detailed drying.
Air Shower without Worrying about Fine Dust
- After a walk, brush off the pollutants and fine dust remaining on your pet through the air shower to keep your pet clean and
healthy every day.
Dust Collecting Filter
- The dust collecting filter located at the top absorbs general dust, hair, as well as fine dust, and the filter part can be
opened even during product operation, so you can give your pet a snack or touch your pet to reassure and
communicate.
Completely Detachable and Washable Structure (excluding the detachable fan component)
- You can completely separate the space where the pets stay and wash it. You can easily disassemble and clean it
whenever you want.
Sleeping Comfortably in Sleep Mode
- It can be used as a comfortable and cozy house by controlling the temperature to be cool in summer and warm in winter.
Easy to Open the Door
- The transparent door made so that the pet does not feel trapped is easily removable and allows the pet to come out on his
or her own at any time.
Internal Cleanliness Check Function
- The LED notifies the indoor air cleanliness by the fine dust sensor installed inside.
Features and Advantages of Pet Dry Room

Before Use
Features and Advantages of Pet Dry Room
Important Safeguards & Warnings
Parts & Accessories
Before Use
Assembly & Disassembly
Product Maintenance
Adapting your Pet to the Product
Control Panel & Digital Display
Error Codes
2
4~8
9
10
11~13
14
15~16
17~18
19
How to Use
Different Operation Modes
Changing System Settings
20~23
24~27
Troubleshooting
Troubleshooting 28~29
Specifications
Product Specifications 30
Contents
사용하기전에
펫드라이룸의 특장점
안전상의 경고
각부분의 명칭/부속품 안내
사용 전 확인사항
제품손질방법 (분해/조립)
제품손질방법(관리방법)
반려동물 적응법
기능 조작부 및 표시부의 이름과 역할
기능 표시부의 이상점검 기능
31
32~36
37
38
39~41
42
43~44
45~46
47
사용할때
운전모드별 안내
동작상태별 안내
기타설정 방법
48~50
51
52~55
고장신고전에
고장신고 전에 확인하십시오 56~57
서비스안내
제품규격 58
목 차

Important Safeguards & Warnings
4
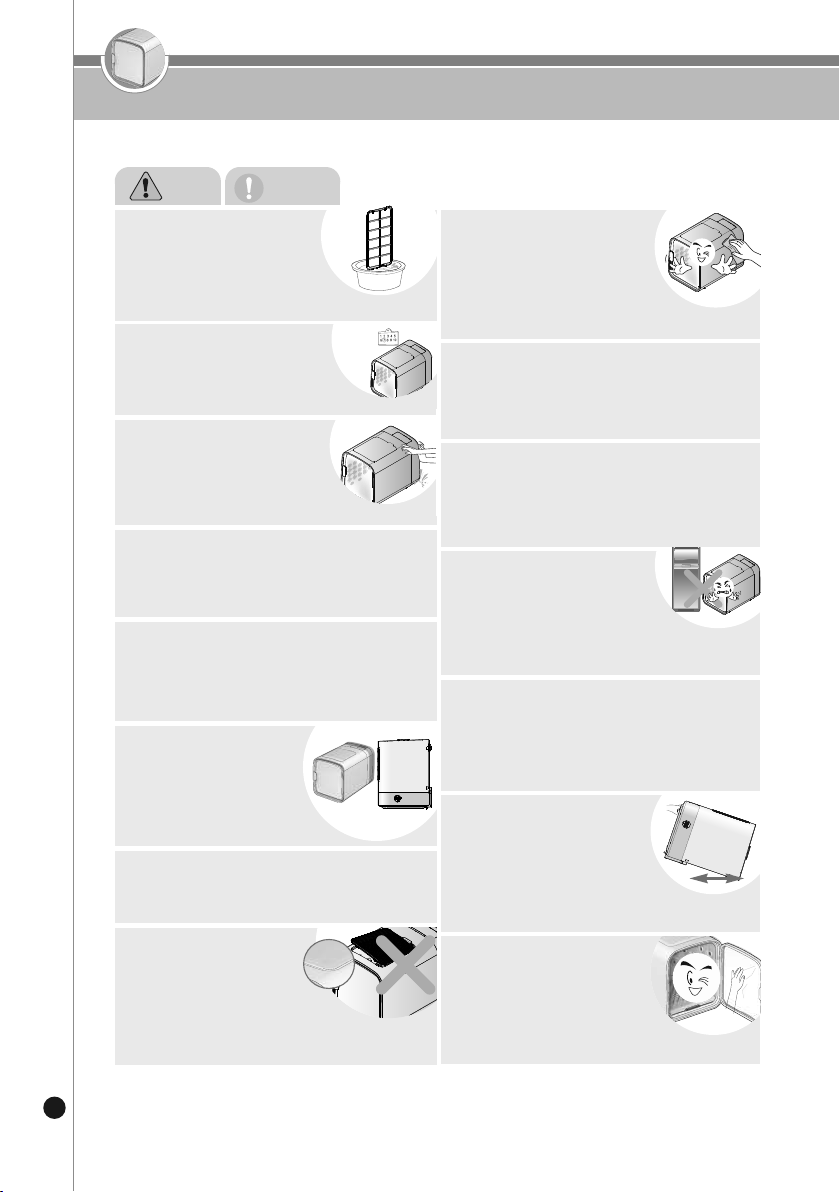
Remove foreign substances from
the power plug with a dry cloth.
• It may cause a fire due to electric
shock or short circuit. Be sure to check
the power cord frequently.
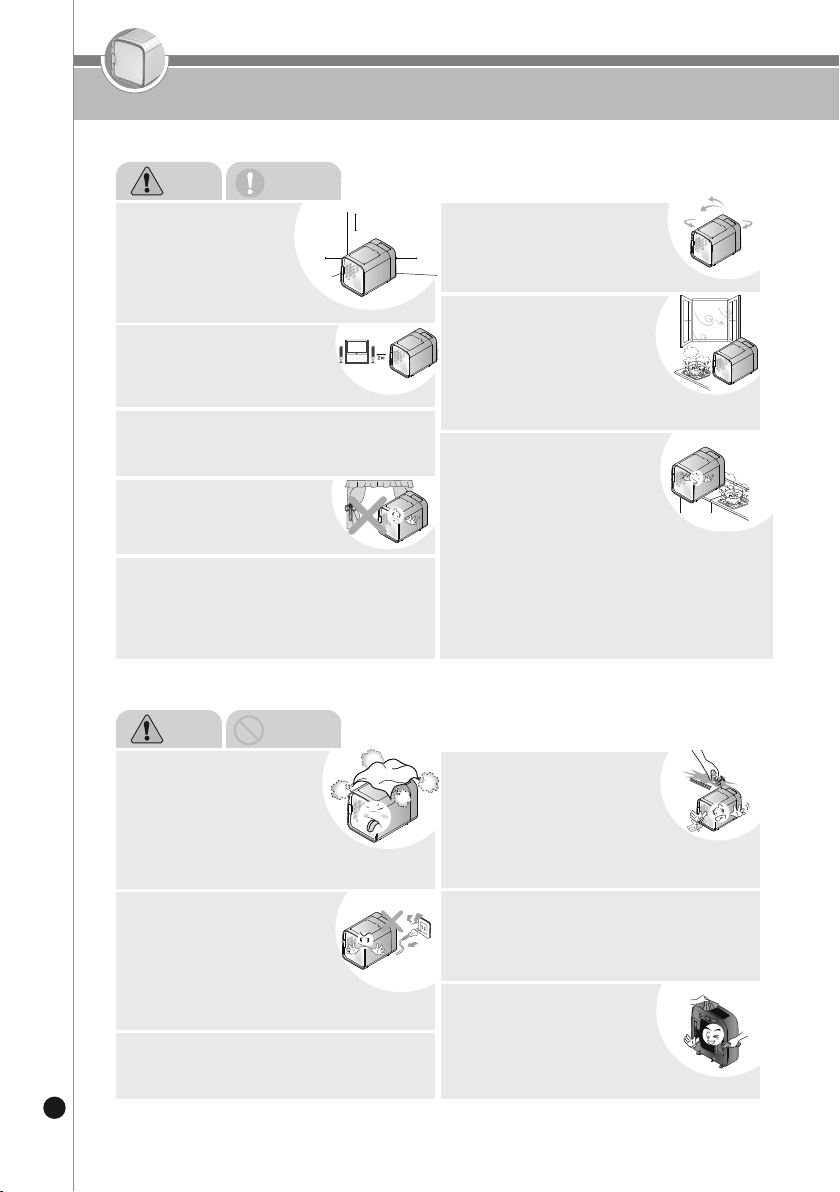
Do not use a power source
other than AC 120 V.
• It may cause electric shock or fire.
• The product may not operate normally.
• Do not use a pressure-reducing transformer
to reduce the 220 V power to 120 V.
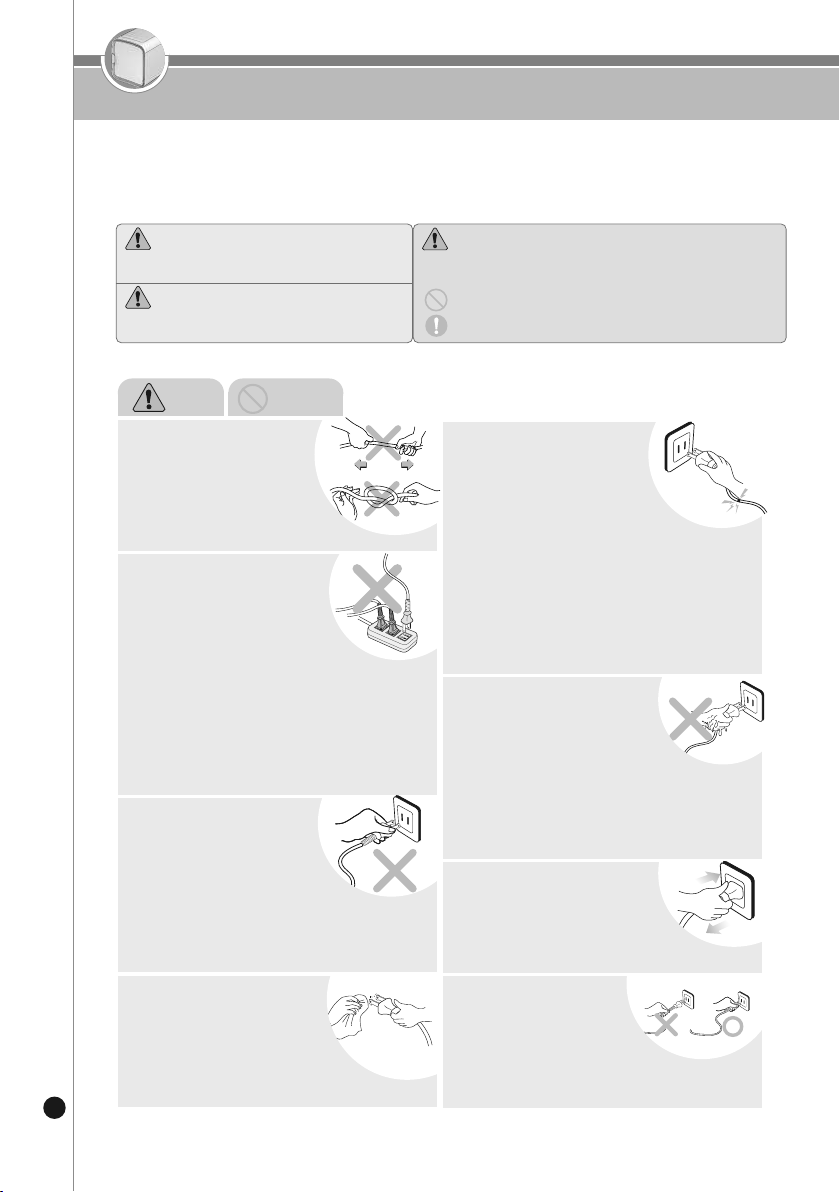
When unplugging the power
plug, be sure to hold the power
plug and not the power cord.
Be sure to use the product only at
an AC 120 V outlet with a rating of
15 A or higher that is grounded, and
do not plug multiple products into
one outlet at the same time.
• If used with multiple products or used with other devices, it
may cause overheating, fire, and electric shock. Be sure to
check the condition of the outlet frequently.
• If the power plug is stained with foreign substances or
moisture, wipe it well before use.
• When using an extension cord, use a cord of 15 A or
higher.
• It may cause a risk of electric shock or
malfunction. Check the status of the
power plug and power cord frequently.
• Shock on the power cord may cause
electric shock and fire. Make sure to check the status of
the power plug and power cord frequently.
“Safety Warning” is intended to prevent accidents or dangers in advance by using the product safely and properly, so be sure to follow it.
“Safety Warning” is divided into “warning” and “caution”, and the meanings of “warning” and “caution” are as follows.
When inserting or unplugging the
power plug from the outlet, be sure to
remove moisture from your hands
before inserting or unplugging the
power plug.
• Unplugging the power plug with wet hands may cause
electric shock.
• If you pull out the plug forcefully, an abnormality may occur
in the power cord, resulting in a short circuit or electric
shock. Make sure to check the status of the power plug
and power cord frequently.
Do not bend, tie, or pull the
power cord forcibly.
• It may cause a fire due to electric
shock or short circuit.
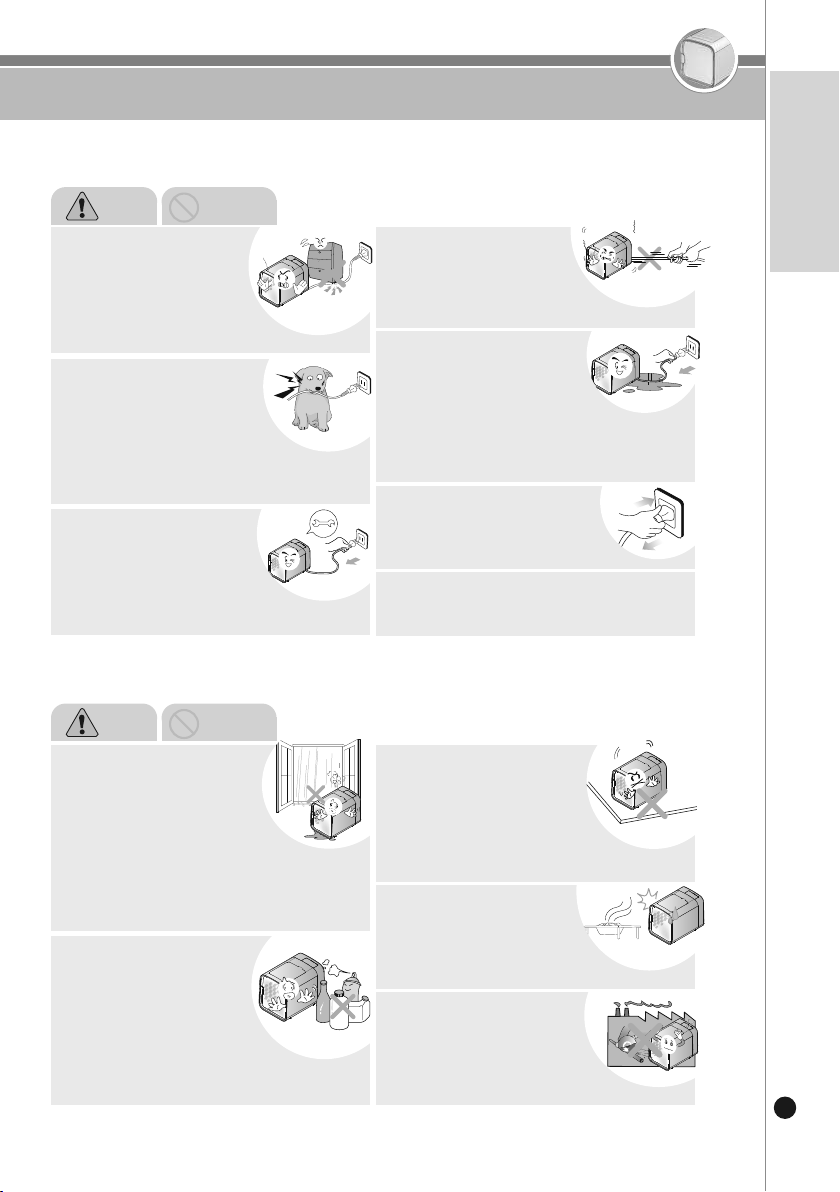
Please check the power cord
frequently.
• If the cover of the power cord is peeled
off or stamped due to careless use of the
product, it may cause fire or electric shock, so make sure
to check the condition of the power cord, power plug, and
outlet frequently.
• If the power cord or power plug is damaged, replace the
cord by the manufacturer, its dealer, or a qualified
technician (service technician) to avoid any danger.
• Please make sure to repair the product at the designated
service center.
• It may cause electric shock or short circuit fire.
If the power cord or power plug is
damaged or the outlet is shaken,
stop using the product and contact
the customer service center.
•
This symbol is a cautionary sign for matters that may pose
risks under certain conditions.
•
Read carefully and use according to instructions to avoid
hazard.
•
This symbol is a sign of "banning" an action.
Potentially dangerous situations that can lead
death or serious injuries if not avoided.
•This symbol is a sign of “directing” an action.
Warning
Potentially dangerous situations that can
lead to minor injuries if not avoided.
Caution
Warning Prohibition
Be sure to unplug the product in case
of water leakage or washing (cleaning).

5
www.cuckoorental.com
www.cuckooamerica.com
Important Safeguards & Warnings
ENGLISH
Do not store or use insecticides,
flammable gases, flammable
substances, or toxic substances
nearby.
• It may cause fire, product deformation,
or malfunction.
Do not use it in outdoor places
where direct sunlight, snow, rain,
etc. directly contact, or in places
such as wet laundry rooms or toilets.
• Do not use this device near water.
• It may cause fire or electric shock due to heating or short
circuit.
Be careful not to place heavy
things on the power cord or
press the cord under the device.
Be careful not to bite the plug and
power cord by pets or damage it
from sharp metal objects such as
nails.
Be sure to unplug the product
during repair, inspection, and part
replacement.
• It may cause a risk of fire, electric
shock, and product collapse due to
cord damage.
• Cord damage may cause short circuit, electric shock,
fire, etc. Be sure to check the status of the power
cord and power plug frequently.
• It may cause a risk of malfunction or
electric shock. Make sure to check the status
of the power plug and power cord frequently.
When moving the product, do
not pull the power cord to move
the product.
If water gets into the power supply,
unplug it and let it dry completely
before use.
Do not plug in and out of the power
plug continuously.
• It may cause product damage, electric
shock, or fire. Check the status of the power cord frequently.
• It can cause electric shock and fire. Make sure to check the
status of the power plug and power cord frequently.
• If used in wet places such as toilets, even if the switch is
off, there may be a risk nearby, so please unplug the cord
after use.
• It may cause electric shock or fire.
Do not connect or process the power cord arbitrarily.
• It may cause electric shock or fire.
Do not install the product in
places with a lot of industrial oil
fumes or metallic dust.
• It may cause fire or product
malfunction.
Do not use in places where odors,
smoke, oil, etc. are generated, such
as restaurants.
• It may cause performance degradation.
Do not install the product on a
bumpy or sloping place, or on a
pallet, cushion, or rug.
• It may cause malfunction, noise, or
injury. Be sure to check the product
status frequently.
Warning Prohibition
Warning Prohibition

Important Safeguards & Warnings
6
Do not install or use near curtains.
• The pollution detection sensor and
humidity sensor may not work properly.
Do not use the product near direct
sunlight, gas stoves, lighters, electric
heaters, portablecookingstoves, etc.
• It may cause electric leakage, electric shock, deformation,
discoloration, and fire.
• Do not place the power cord near a heating device. The
cord coating may melt and cause fire or electric shock. Be
sure to check the status of the power cord frequently.
Install it at least 2 m away from
electronic products such as TVs.
• It may cause electromagnetic interferences.
When using or leaking gas,
combustible, or flammable
materials, make sure to open the
window to ventilate before using.
• It may cause a risk of an explosion or fire.
Use at a distance of at least
6 inches left and right and
12 inches to 24 inches above
the wall and surrounding objects.
• If the product is too close to the wall,
there may be damage to the wallpaper.
Do not use the product in a very hot or cold space.
• The recommended operating temperature for this product
is 18 - 25℃.
Do not use in a dusty place or where chemical
substances are present.
• Do not use flammable gas or flammable substances near
the product.
• It may cause an explosion or fire.
Do not place a fire near the product.
• It may cause product failure, deformation, or fire.
If the product produces a strange
sound, smoke, or smell, unplug the
power plug and contact the service
center.
• It may cause fire, burns, or injury.
Do not place any obstacles around
the air inlet or outlet of the product.
• Be careful that pets do not block the
inlet or outlet.
It may cause performance decrease,
abnormal noise, or malfunction.
Do not directly clean the inside of
the product's detachable fan
component, but ask a service
engineer.
• It may cause a risk of product failure or
electric shock due to water.
Do not inject toxic substances such as cigarette
smoke into the perforated part on the side of the
product or pierce it with a sharp object.
• It may cause product malfunction, fire, or electric shock.
Do not insert stick-shaped foreign
objects such as fingers or chopsticks
into the air inlet or outlet of the
product.
• You can be injured by a fan rotating at high speed.
• It may cause product failure.
6 inches 6 inches
12 inches~24 inches
Warning Instruction
Install the product so that there are no
obstructions on all sides to ensure
good air circulation.
Warning Prohibition

7
www.cuckoorental.com
www.cuckooamerica.com
Important Safeguards & Warnings
ENGLISH
When not in use for a long time, be sure to unplug the
power plug from the outlet and store the product.
• It may cause electric shock or fire.
Do not disassemble or modify the
product.
• It may cause fire or electric shock.
• Do not disassemble or repair by anyone other than
the service engineer. For repair and failure
counseling, please contact the customer service
center.
This device is not intended for
use by persons (including children)
who lack physical, sensory, or
mental abilities or who lack the
experience and knowledge to use
the device safely without supervision or direction.
• Make sure that your children do not play with the device.
• It may cause injuries such as electric shock or burns.
If the detachable fan component of the
product is submerged, be sure to
contact the service center.
• It may cause a risk of electric shock or
malfunction.
Do not use the power plug near
a heating device.
• It may cause fire or electric shock.
Do not go on top of the product or
put heavy objects on it.
• Falling or damage may cause product
failure or injury.
When opening or closing the door of
the product, be careful not to injure
nearby people or pets.
Do not move the product while it
is in operation.
• It may cause fire, electric shock, or
partial damage to the product.
• The hand or foot of a person or pet may be
caught between doors or hurt by corners.
Do not spray flammable substances
such as insecticides or air fresheners
into the inlet.
• It may cause fire or deterioration of
performance.
Do not leave your pet alone while using the product,
and check the condition of your pet frequently.
Do not leave your pet alone while using the product,
and check the condition of your pet frequently.
• Fur may be sucked into the detachable fan component,
causing unpleasant odor or fire.
Do not turn off the product by
unplugging the power plug.
• It may cause electric shock or product
malfunction.
Never spray water on the
detachable fan component of the
product.
• It may cause a risk of electric shock.
Do not spray directly with water to
clean the product, or use benzene
or thinner to clean the product.
• It may cause electric shock or fire.
Do not place a container filled with
water, medicines, food, small metals,
or flammable substances on top of
the product.
• If it flows into the product, it may cause a
risk of electric shock, fire, or damage.
Warning Prohibition

Important Safeguards & Warnings
8
If the button is not pressed or not working before and
after use, please contact the customer service center.
If your pet scratches the door, the product may be
damaged. Please use the product after giving sufficient
adaptation training to your pet.
Do not push or lean on the product.
The product may fall over.
• It may cause personal injury or
product malfunction.
When turning off the product, be sure to press the
power button to turn it off.
• It may cause product malfunction.
When it is time to replace the filter,
replace it with a new filter.
• It may cause performance degradation.
Wash the suction filter periodically
with water and dry it thoroughly
before use.
• It may cause product performance
degradation.
Be careful as fine scratches may
occur while touching or opening the
door. When washing the door,
please use a soft cloth.
When transporting or moving
the product, hold the handle
of the detachable fan
component and lift the rear
using the front wheels.
Do not give severe impact to the product or drop it.
• It may cause product failure and safety problems.
After cleaning, make sure to put the parts back in their
original places.
• It may cause a risk of product malfunction.
Please clean regularly.
Do not place the product in a place
exposed to wind from an air
conditioner or heater or near a
window.
• This may cause inaccurate sensor detection.
Do not lay the product horizontally.
• It may cause product malfunction or failure.
Warning Instruction
When the product is not in use,
it can be stored as shown in the
picture.
Be careful not to fall inside the
product when opening and
closing the discharge filter cover.
Please use the product after
tightening the drain filter cover in the
correct position.
• Please clean according to Cleaning
Method. If the contamination is severe,
it causes mold growth, bad odor, and
deterioration of performance.

9
www.cuckoorental.com
www.cuckooamerica.com
Parts & Accessories
ENGLISH
Filter Cover
Door
Air Vents
Detachable Footboard
Wheels
Air Inlet
(external suction
filter cover)
Internal Light
(3 pcs)
Fine Dust Sensor
Air Inlet
(internal suction
filter cover)
Coupler (4 pcs)
※ The picture may differ from the actual product.
Product Manual Discharge Filter
Accessories
Interior
Exterior
Control Panel &
Digital Display
Dryer Room
Detachable Fan
Component
Filter Cover
Door

Before Use
10
Unplug the power plug when not in use for a long time.
This product is only for voltages of 120 V or higher and a frequency of 60 Hz. Insert the plug into the dedicated outlet.
Before use, we recommend that you complete the “adaptation training” provided in the User Manual and quick guide,
and use it after your pet has sufficiently acclimatized.
For the safety of your pet, this product is designed to open the door when a certain amount of force is applied from the inside.
If the door is opened by the movement of your pet, it is not a defect in the product, so please refer to it for use.
Cautions
Checkpoints Before Use
Open the filter cover, remove the filter, then remove the plastic packaging from the filter.
▶Pull the discharge filter to separate it.
▶Before use, remove the plastic packaging of the discharge filter and assemble it.
▶After all packaging has been removed and discarded, insert the filter back into the unit then place the filter cover on.
* When attaching and detaching the filter, hold the handle and attach it carefully in the direction.
* Be careful not to drop the discharge filter cover into the room.
1
Plug the power cord into an available 120V AC power outlet.
▶This product is only for voltages of 120 V or higher and a frequency of 60 Hz.
▶Be sure to connect to a dedicated outlet with a rating of 15A or higher.
4
Press the Power button for at least 1 second to power the unit on.
5
To turn the unit off, press the Power button again for at least 1 second.
▶After the unit has been powered off, the fan will continue to run for about 10 seconds before shutting off.
▶All the lamps in the function display will be turned off.
6
Before using the dry function, the unit will need to preheat its air supply for about 5 minutes.
▶Drying time may vary depending on the surrounding area's temperature.
7
Ensure the internal suction filter is properly installed.
▶The product will operate correctly if the filter is not installed.
* Be sure to check the front and back sides of the filter before installing.
(You can distinguish the front and back by the color of the filter cover.)
3
Slide the footboard out to remove it from the dryer room
then remove the plastic packaging.
▶After all packaging has been removed and discarded, insert the
footboard back into the dryer room.
* The filter will need to be replaced about every 6 months with regular use.
Make sure to initialize the filter replacement notification after replacement.
(See page 23 for how to initialize the filter replacement notification and purchase filters directly)
2

11
www.cuckoorental.com
www.cuckooamerica.com
Assembly & Disassembly
ENGLISH
How to Separate the Room from the detachable fan component
Disassemble Filter Cover
▶Pull the filter cover to disassemble.
1
Disassemble Footboard
▶Open the door to disassemble the footboard.
2
Disassemble Coupler
▶Rotate the coupler 90 degrees to
disassemble.
3
Separation of the room from the detachable fan component
▶Separate the room from the detachable fan component.
※Assemble in reverse order of disassembly.
4
<Assemble> <Disassemble>

Assembly & Disassembly
12
Detach the Door by following the steps in the images below.
▶After opening the door, hold it as shown in the picture and pull it in the direction of
the arrow to disassemble it.
1
Remove the air vents by following the steps in the images below (both the right and left
vents will be removed in the same manner).
2
Disassembling to Clean

13
www.cuckoorental.com
www.cuckooamerica.com
Assembly & Disassembly
ENGLISH
Slide the air vents back into the dryer room by
following the direction of arrows in the images.
The vents should be placed properly back on
the guide found on the bottom and top of the
dryer room's interior.
1
Ensuring the vents are on the guide, push it back into the back
of the dryer room until a "click" sound is heard.
2
3
Repeat with the remaining air vent.
* Ensure the right air vent is always in the right side of
the dryer room, and the left air vent is in the left side
respectively.
How to Reassemble
How to DIstinguish Left and
Right Covers The left cover has two locking parts, and the right cover has one locking part.
<LEFT> <RIGHT>

Product Maintenance
14
Remove all fur, debris, and dust from the filter using a tape cleaner,
a clean cloth, or your hand.
▶After removing all debris, reassemble the filter.
1
Remove the suction filter by following the steps in the
images then remove all fur, debris, and dust using a
tape cleaner, a clean cloth, or your hand.
▶Remove the suction filter as shown in the picture.
▶Remove the collected fur or dust using a tape cleaner.
▶Reassemble and install the filter.
* Ensure the filter cover is properly placed back on after
replacing the filter.
* The detachable fan component has two suction filters:
one found on the front of the part, and one found on the back.
* The two suction filters are not interchangeable—the front
suction filter will always need to be placed in the front and the
back suction filter will always need to be in the back. You can
distinguish the filters by noting the color of the filter cover.
2
How to replace filter
Separate the dryer room from the detachable fan component by rotating the four couplers found on
the interior of the dryer room clockwise until completely loosened.
1
Wet a soft cloth with water and a mild detergent then wipe down the interior and exterior of
the dryer room thoroughly.
▶Wipe the water with a soft cloth and dry it in a shaded place.
▶Never wash the detachable fan component.
NOTE: The detachable fan component should never come into contact with water or any other liquid.
Always remove it from the dryer room before cleaning.
NOTE: Do not use abrasive cleaners or roughly textured cloths to clean or dry the unit.
2
Allow the dryer room to air dry in a cool area.
▶It may cause performance degradation or malfunction.
3
In particular, if the stool of the pet on the footboard is not removed, it may cause a bad odor, so wash
it immediately after use.
4
Cleaning the Dryer Room
Using a small amount of room temperature water on a cotton swab,
wipe the lens of the dust sensor clean. Then, rid the lens of any
moisture by wiping with a dry cotton swab.
NOTE: If the dust sensor is not cleaned regularly, the sensor may not
operate properly and negatively affect the unit's longevity.
Cleaning the Dust Sensor
OPEN

15
www.cuckoorental.com
www.cuckooamerica.com
Adapting your Pet to the Product
ENGLISH
Preparation
Prepare snacks or treats for your pet before beginning. For large dogs, we recommend cutting the treats into 2-inch
pieces. For small and medium-sized dogs, we recommend cutting the treats into 1-inch pieces. Ideally, the training
process would begin 2-3 days before regularly using the product.
1
Remove the product from its box and allow your pet to acquaint themselves with it at their own pace.
▶If your pet is timid or nervous in new situations, be sure to remove the product from its box while your pet is not
present.
- When your pet approaches the product, offer a treat in order to create a positive perception of the pet dryer.
2
Separate the detachable fan component from the drying room then place each part to again allow your
pet to acquaint themselves.
▶Further disassemble the parts until the dryer room resembles a tunnel that your pet can pass through.
3
Lay the drying room and detachable fan component on top of a blanket in an open space (in an area
large enough to accommodate your pet moving in and out of the drying room). Encourage your pet to
walk in and out of the drying room, rewarding them with a treat once they make it through to the other
side.
4
NOTE: Do not move to the next step in the training process until your pet can go in and out of the drying room on
their own.
Once your pet is able to enter the dryer room on their own, narrow the gap between the dryer room
and the detachable fan component to about 12 inches apart.
5
Plug the power cord into an available 120V AC power outlet then initiate Training mode on the
detachable fan component.
▶Training mode will automatically end after 9 minutes of operation.
6
While Training mode is on, continue encouraging your pet to walk in and out of the dryer room,
rewarding them with treats as necessary. Encourage them to sit or lay down in the dryer room.
7
After your pet has been properly acclimated to sitting in the dryer room with the fans on,
combine the detachable fan component and the dryer room.
▶If your pet is timid or nervous in new situations, be sure to reassemble the product while your pet is not present.
8

Adapting your Pet to the Product
16
After the product has been reassembled, place the same blanket that you used during training inside of
the dryer room. If your pet is not entering/exiting the dryer room on their own, we recommend placing
treats in the dryer room until they're entirely acclimated.
9
Once your pet can withstand being in the dryer room with the Door closed for extended
periods of time, initiate Training mode on the control panel. Be sure to reward your pet by
giving them a treat through the top cover of the dryer room.
12
After your pet is comfortable while Training mode is in operation, run Dry mode on its default
settings. Provide treats to your pet through the top cover of the dryer room as you see necessary.
13
Congratulations! Your pet has been properly accustomed to dryer room and is now ready for regular use.
14
Once your pet has adapted to entering and exiting the dryer room on their own, attach the Door to the
dryer room.
▶If your pet is timid or nervous in new situations, be sure to assemble the Door while your pet is not present.
▶After the Door has been installed, repeat Step 11 with the Door open.
10
As your pet continues to grow more comfortable with going in and out of the dryer room, close the Door
while your pet inside then be sure to open the door after a few seconds to give them a treat.
Gradually increase the amount of time the door is closed as the training process progresses.
11

17
www.cuckoorental.com
www.cuckooamerica.com
Control Panel & Digital Display
ENGLISH
Control Panel
• POWER: Press and hold for 1 second to turn the product on or to enter sleep mode.
• AIR SHOWER: Initiates an air shower or initiates cool sleep mode (sleep mode while a
steady cool air is released throughout the interior) by pressing and holding for 2 seconds
while the unit is in standby mode.
• DRY: Initiates drying or initiates warm sleep mode (sleep mode while a steady warm
air is released throughout the interior) by pressing and holding for 2 seconds while the unit
is in standby mode.
• TEMPERATURE: Adjusts the air drying temperature with each press (adjust from 20-30℃,
each press will increase the temperature by 2 degrees). Press and hold for 2 seconds to
enter the system settings.
• TIME: Adjusts the amount of drying time (adjust from 5-90 minutes, each press will
increase the time by 5 minutes).
• 3D AIR: Press while the unit is in air shower or dry mode to initiate a three-dimensional
airflow. Press and hold for 2 seconds to enter training mode.
• LIGHT: Turns the interior LED light on or off. Press and hold for 2 seconds to lock the
control panel buttons.

Control Panel & Digital Display
18
Display Panel
<In Standby Mode><In Sleep Mode> Press for 1 second
• (
) - Indicates that the fans are currently running.
• COOL SLEEP/WARM SLEEP: Cool sleep or Warm sleep mode is initiated
• (
) - Displays the current wind speed (1 space is displayed for low air, 4 spaces are displayed for high air,
etc.)
• ( ) - Indicates that the voice guide is on
• (
) - Indicates that training mode is initiated
• HEATER: Displays when the heater is operating
• AIR CARE: Displays when the cleanliness of the internal air is in good condition
• INNER TEMP.: Displays the current internal temperature (C°)
• SET TEMP.: Displays the input temperature (C°)
• FLTR CHANGE: Indicates that the filter needs to be replaced or cleaned
• LOCK: Indicates the buttons on the control panel are temporarily locked
• Sleep mode - Displayed during sleep mode operation.
• REMAINING TIME: Displays the remaining time (minutes) left of any currently running operation

19
www.cuckoorental.com
www.cuckooamerica.com
Error Codes
ENGLISH
Appears when the unit does not detect an internal suction filter. To correct the error, properly install a
filter. If the error code persists, contact our customer service center.
Appears when there is an internal issue with the memory of the unit's microcomputer. If this error code
appears, contact our customer service center for repair.
Appears when there is an internal issue with the unit's temperature
sensor. If this error code appears, contact our customer service
center for repair.
If errors codes are shown on the display during operation, please refer below for the potential issue and its
corrective action.
●
The AirCare LED light indicates the real-time air quality inside the dryer room
Blue →Clean
Purple →Neutral
Red →Poor
AirCare Display
Appears when there is an internal issue with the unit's fan motor.
If this error code appears, contact our customer service center for repair.
Appears when there is an internal issue with the unit's heater. If this error code
appears, contact our customer service center for repair.
※ AirCare indicator is only displayed when the unit is in Air Shower mode.
※ The AirCare indicator may be affected by the external air if the door is opened and closed often.
※ The AirCare indicator may be affected by pet movement inside the dryer room.
※ For the most accurate indicator, clean the surrounding area, the unit, and the filter periodically.
※ If the AirCare indicator is consistently inaccurate, we recommend adjusting the dust sensor sensitivity
(page 27).

Different Operation Modes
20
• To enable or disable Clean mode, press the AIR SHOWER button while the unit is in standby mode.
NOTE: If Clean mode has never been initiated, it will operate at its default settings. If it has been initiated before
with custom settings, it will operate with the custom settings from its previous operation.
• You may adjust the wind speed, temperature, and operation time of Clean mode by following the steps below:
• To change the temperature, press the TEMPERATURE button while in Clean mode (20-30°C, each button press
will increase the temperature by 2 degrees)
• To change the operation time, press the TIME button while in Dry mode (5-90 minutes, each button press will in-
crease the time by 5 minutes)
Clean Mode
※ Default Settings
Wind Speed: Level 3
Temperature: 26°C
Operation Time: 5 minutes
Wind Speed
(level 1 - 4)
<Air Shower Display>
<Dry Mode Display>
Internal Temperature
(20-30°C)
Remaining Time
(1-90 minutes)
• To enable or disable Dry mode, press the DRY button while the unit is in standby mode.
NOTE: If Dry mode has never been initiated, it will operate at its default settings. If it has been initiated before with
custom settings, it will operate with the custom settings from its previous operation.
• You may adjust the wind speed, temperature, and operation time of Dry mode by following the steps below:
• To change the temperature, press the TEMPERATURE button while in Dry mode (30-40°C, each button press will
increase the temperature by 2 degrees)
• To change the operation time, press the TIME button while in Dry mode (5-90 minutes, each button press will
increase the time by 5 minutes)
Dry Mode
※ Default Settings
Wind Speed: Level 3
Temperature: 36°C
Operation Time: 30 minutes Wind Speed
(level 1 - 4) Internal Temperature
(30-40°C)
Remaining Time
(1-90 minutes)
3D Air Mode
- If enabled, the fans will use both the left and right fans for a three-dimensional experience
- To enable, press the 3D AIR button while the unit is in Air Shower or Dry mode
TIP
This manual suits for next models
1
Table of contents
Popular Pet Care Product manuals by other brands

juwel
juwel Trigon 190 instruction manual

ICE HORSE
ICE HORSE IHF9000PX Care Instructions

Zoofari
Zoofari HG07376 Operation and safety notes

LUXURY DogHouse
LUXURY DogHouse SANTORINI 010L Assembly instructions

Applica
Applica LitterMaid Elite LME5000 Use & care book

Petsafe
Petsafe Stay & Play PIF00-14288 product manual