Cuisinart CBM-20C User manual

CBM-20C
Deluxe Grind Conical Burr Mill
®

32
IMPORTANT SAFEGUARDS
When using electrical appliances, basic safety precautions
should always be taken, including the following:
1. Read all instructions.
2. Unplug from outlet when not in use, before putting on or taking
off parts, and before cleaning.
3. To protect against risk of electrical shock, do not immerse
cord, plug or grinder in water or other liquids.
4. Close supervision is necessary when any appliance is used by
or near children, or individuals with certain disabilities.
5. Avoid contact with moving parts.
6. Do not operate any appliance with a damaged cord or plug, or
after the appliance malfunctions, or is dropped or damaged in
any manner. Return appliance to the nearest authorized
Cuisinart service facility for examination, repair, or mechanical
or electrical adjustment.
7. The use of attachments not recommended or sold by Cuisinart
may cause fire, electrical shock, or risk of injury.
8. Do not use outdoors.
9. Do not let cord hang over edge of table or counter,
or touch hot surfaces.
10. Before using, check hopper for the presence of
foreign objects.
11. Use this appliance to grind roasted coffee beans only. Grinding
other substances, such as nuts, spices or unroasted beans,
may dull the blade and cause poor grinding or injury.
12. Do not use appliance for other than its intended use.
13. Do not place this appliance on or near a hot gas or electric
burner, or in a heated oven.
14. Do not operate your appliance in an appliance garage or under
a wall cabinet. When storing in an appliance garage, always
unplug the unit from the electrical outlet. Not doing so could
create a risk of fire, especially if the appliance touches the
walls of the garage or the door touches the unit as it closes.
SAVE THESE INSTRUCTIONS
FOR HOUSEHOLD USE ONLY
1. Hopper Lid
2. Bean Hopper
3. Conical Burr Grinder
(not shown)
4. Grind Selector
5. LCD Display
6. Start/Stop Button
7. Cup Selector
8. Manual Button
9. Grind Outlet
10. Grind Chamber Lid
11. Grind Chamber
12. Shelf with Filter Clips
(not shown)
13. Scoop Brush in holder
(on back, not shown)
14. Cord Storage (not shown)
15. BPA Free (not shown)
All parts that come in contact
with coffee are BPA free
5.
1.
9.
2.
6.
4.
7.
8.
11.
10.

54
OPERATING INSTRUCTIONS
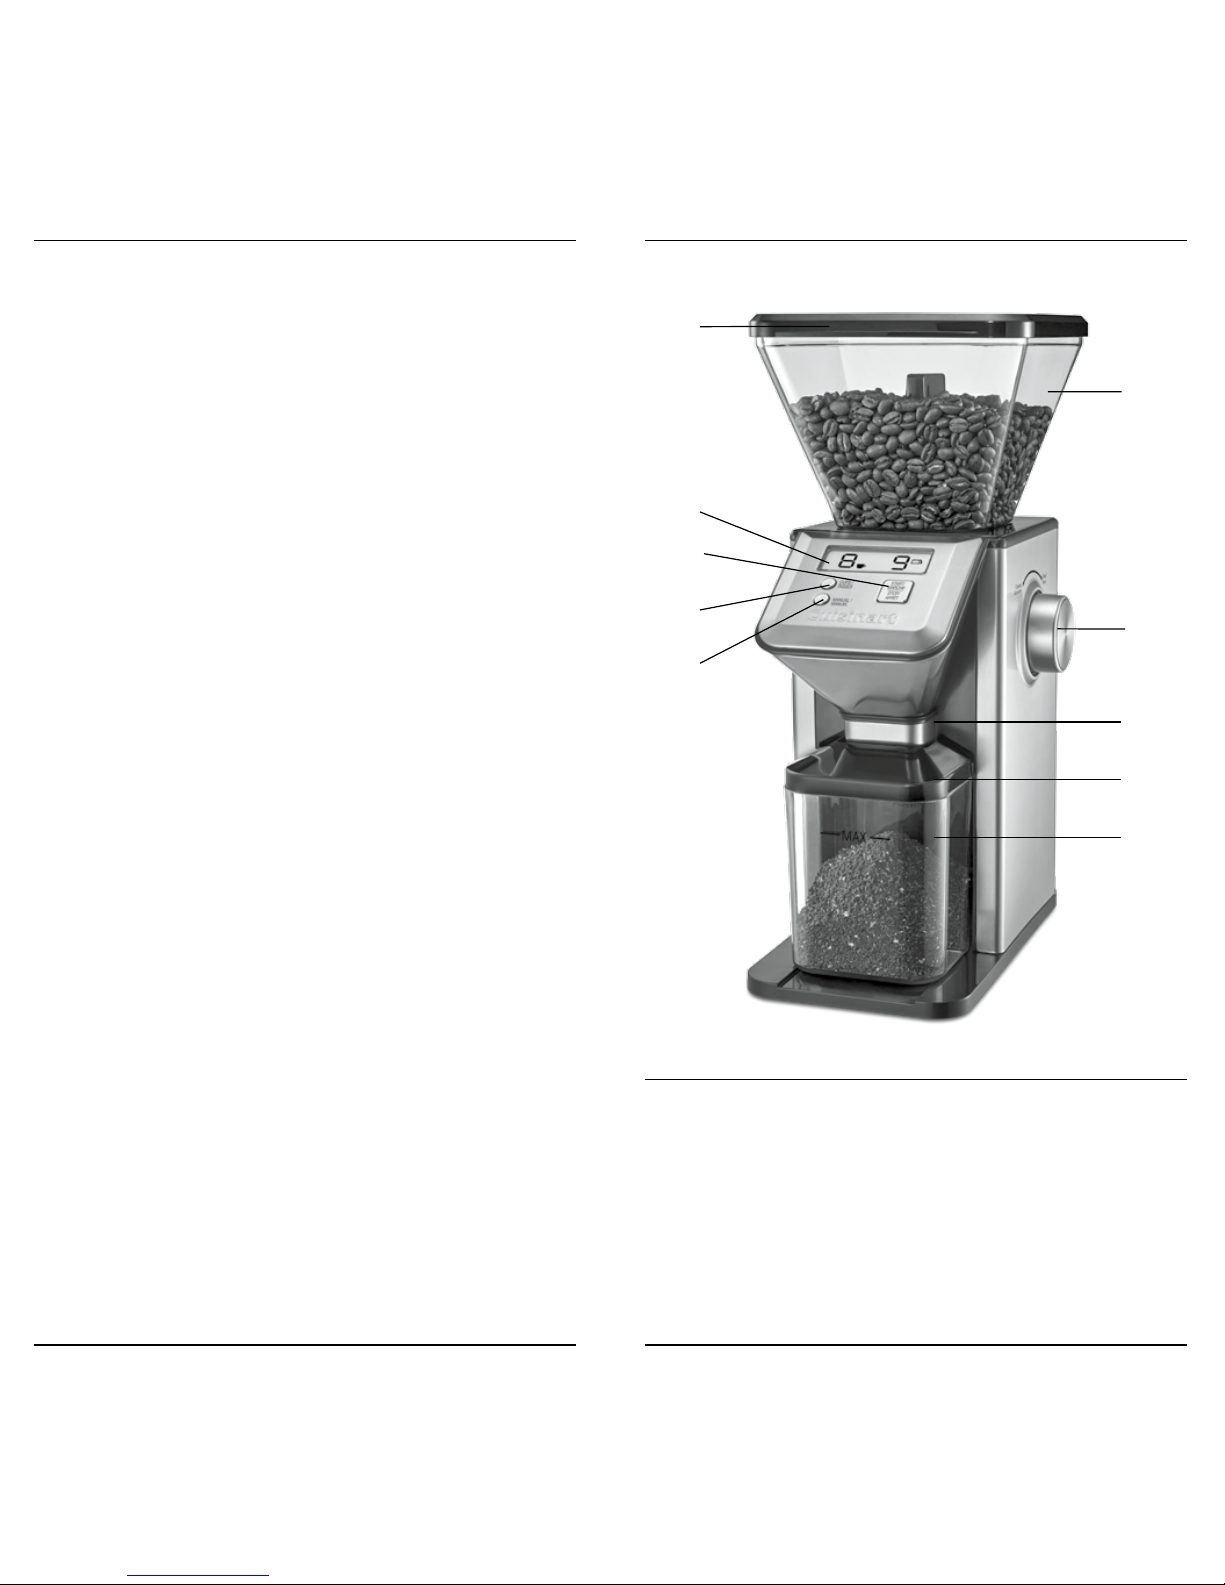
1. Remove bean hopper lid.
2. Fill bean hopper, making sure that the lid closes securely.
Maximum capacity is 16 oz (450 g); be sure you have enough
beans to grind your desired amount of coffee.
3. Plug cord into outlet.
4. Select grind setting – rotate the grind selector dial to choose
desired grind size. The higher the number, the coarser the
grind. Use 1–6 for espresso, 7–12 for auto drip, 13–18 for
French press. Your current selection will be displayed on the
LCD.
5. Select cup setting – press the CUPS button repeatedly until
your desired number of cups is displayed on the LCD, from 1 to
14 cups.
6. Place your preferred grounds container under grind outlet. (see
page 4 for different grounds collection recepticles).
NOTE: Use care when grinding into filters as some grinds may
escape to your counter. To help alleviate - we suggest always
using the grind chamber lid as a guard (see photo page 7)
except when using the HomeBarista™or other single serve
reusable capsule. See specific filter use directions on pages
7-8.
7. Press the Start/Stop button to begin grinding. A safety interlock
system prevents the unit from operating unless the hopper is
properly in place.
NOTE: If the grind chamber is overfilled, the chute can get
clogged and the unit will not work. The LCD will flash. To
unclog, first unplug your grinder and then use the scoop brush
to clear out the chute of excess grounds.
Also note: If the grinder stops and displays EE in the LCD
screen at any point, the motor has likely overheated. Unplug
the grinder and wait for it to cool off (up to 30 minutes); when
the EE is no longer displayed, resume use.
8. Grinding will automatically stop upon completion.
NOTE: To pause or cancel operation during use, see page 6.
9. Pull the grind chamber toward you or slide your preferred
grounds container out to remove from unit.
NOTICE
This appliance has a polarized plug (one blade is wider than the
other). To reduce the risk of electric shock, this plug will fit in a
polarized outlet only one way. If the plug does not fit fully in the
outlet, reverse the plug. If it still does not fit, contact a qualified
electrician. Do not modify the plug in any way.
INTRODUCTION
The next generation of coffee grinders has arrived to deliver the new
standard in home-ground coffee! The conical burr grinds the beans
with precise uniformity while maintaining the full flavor of the coffee
bean. Whether you’re using a French press, auto drip or espresso
machine, you’ll always start with the best, most precise grind. This
grinder is fully automated – just choose your number of cups and
grind setting, push Start, and the LCD with countdown timer lets
you know how soon you’ll have your perfectly ground coffee!
GETTING STARTED
When you open your new grinder, you will notice it must be
assembled before use.
Take all the parts out of the box and remove plastic and packaging.
1. Place bean hopper on top of unit making sure
it aligns correctly.
2. Remove lid from bean hopper and locate the lock/unlock knob
and rotate clockwise into lock position and
replace lid.
3. Place grind chamber lid on grind chamber and insert into unit
(as pictured on page 3).
4. Insert scoop brush into holder on the base of the unit. Your unit
is now ready to be used.
GRIND DIRECTLY INTO:
• Grind chamber (included)
• Gold-tone filter (cone or basket style)
• Paper filter (cone or basket style)
• Portafilter
• Cuisinart®HomeBarista™Reusable Filter Cup or most single
serve reusable capsules

76
Grinding Into Filters
Paper Filters
1. Flip shelf up to locate the two sets of clips.
2. Slide filter into the clips.
3. Slide the grind chamber lid into grind outlet.
NOTE: For cone shaped filters (a), use top clips. For basket style
filters (b), use bottom clips.
TIP: When grinding over 10 cups of coffee into a paper filter, use
hands to support filter to avoid the weight of the grinds from pulling
the filter out of the clips.
To Pause or Cancel Grinding
1. To pause the grinding, press the Start/Stop button. The grinder
will stop and the countdown timer will flash. Press the Start/
Stop button again to resume.
2. To cancel the grinding, press and hold the Start/Stop button for
2–3 seconds.
NOTE: The unit will pause for up to 5 minutes before canceling
the grind.
Manual Grind
If you prefer, after selecting your grind setting, you have the option of
manually controlling how much coffee the unit will grind. To do so,
follow steps 1–4 on previous page. Then press and hold the manual
button until the desired amount of coffee has been ground. The LCD
will display M.
NOTE: To avoid overflow when using the manual feature, the grinder
will turn off automatically after approximately 1 minute.
Grinding Settings
When selecting your grind setting, remember that the higher the
number the coarser the grind. Use 1–6 for espresso, 7–12 for auto
drip, and 13–18 for French press.
NOTE: If you meet resistance when going from coarse to fine, a
bean may be stuck. Re-insert grounds container or filter, then simply
press the manual button while turning the grind dial towards fine.
shelf with filter
clips (underneath)
grind
chamber lid
a. b.

98
Gold Tone Filters
1. Slide the grind chamber lid into grind outlet.
2. Place gold tone filter (c) into position under
the grind outlet and proceed with grinding.
NOTE: For basket style filters you can pull
down the shelf and rest filter on top for
easy grinding.
Cuisinart®HomeBarista™Reusable Filter Cup
1. Flip shelf down.
2. Slide filter cup onto shelf (d), lining up
the top of the filter cup with the grinder spout,
and guiding the bottom into the shelf’s
grooved opening.
TIP: Select either 1 or 2 cups on your grinder.
Selecting a larger number may cause the filter
cup to overflow. The recommended grind setting for auto drip
coffee makers is 7-12, depending on preference of coarseness.
NOTE: When using a single-serve filter-cup
other than a Cuisinart HomeBarista™Reusable Filter Cup, you
may need to hold the filter cup under the grinder spout to fill.
CLEANING/MAINTENANCE
INSTRUCTIONS
NOTE: If your unit stops grinding, the chute may be clogged. To
unclog, first unplug your grinder and then use the scoop
brush to clear out the chute of excess grounds.
HOPPER
1. Unplug unit.
2. Beans can be removed from the hopper by lifting off
the lid and rotating the knob to the "unlock" position. Once
unlocked, the hopper can be removed to pour out remaining
beans.
BURR GRINDER
1. After removing hopper, if some beans remain in the grinder,
put hopper back on, re-insert the grind container or filter and
run a grind cycle for 8 cups on any grind setting. Once fin-
ished, you can continue cleaning as instructed.
2. Rotate the grind selector dial counterclockwise until dial
stops. OFF will be indicated on LCD.
3. Unplug unit.
4. Remove the bean hopper lid and turn the
lock/unlock dial counterclockwise to release the
bean hopper. NOTE: You will notice the release arrow and
arrow on the burr on the inside of unit are now aligned. They
must be aligned in order to re-insert the hopper.
5. Once the bean hopper has been removed, remove
the burr grinder by grasping the metal handle and lifting up.
Use the brush to remove grinds or wash by hand. Replace
the burr grinder on the unit and rotate until the piece is fully
inserted. Push handle down, replace and lock hopper.
Note: The hopper will not attach to the unit if the grinder has
not been fully inserted. The brush on the measuring scoop is
only for cleaning purposes.
6. Wipe body of grinder with a damp cloth.
NOTE:The bean hopper, bean hopper lid, grind chamber, and grind
chamber lid can be washed by hand with hot, soapy water or
placed in the top shelf of a dishwasher. Dry thoroughly.
MAINTENANCE
Any other servicing or maintenance should be performed by an
authorized service representative.
WARNING: NEVER IMMERSE UNIT IN WATER.
c.
d.

10 11
WARRANTY
LIMITED THREE-YEAR WARRANTY
(U.S. and CANADA only)
We warrant that this Cuisinart product will be free of defects in
materials or workmanship under normal home use for 3 years from
the date of original purchase. This warranty covers manufacturer’s
defects including mechanical and electrical defects. It does not cover
damage from consumer abuse, unauthorized repairs or modifications,
theft, misuse, or damage due to transportation or environmental
conditions. Products with removed or altered identification numbers
will not be covered.
This warranty is not available to retailers or other commercial
purchasers or owners. If your Cuisinart product should prove to be
defective within the warranty period, we will repair it or replace it if
necessary. For warranty purposes, please register your product online
at www.cuisinart.ca to facilitate verification of the date of original
purchase and keep your original receipt for the duration of the limited
warranty. This warranty excludes damage caused by accident, misuse
or abuse, including damage caused by overheating, and it does not
apply to scratches, stains, discolouration or other damage to external
or internal surfaces that does not impair the functional utility of the
product. This warranty also expressly excludes all incidental or
consequential damages.
Your Cuisinart product has been manufactured to the strictest
specifications and has been designed for use only in 120 volt outlets
and only with authorized accessories and replacement parts. This
warranty expressly excludes any defects or damages caused by
attempted use of this unit with a converter, as well as use with
accessories, replacement parts or repair service other than those
authorized by Cuisinart.
If the appliance should become defective within the warranty period,
do not return the appliance to the store. Please contact our Customer
Service Centre:
Toll-free phone number:
1-800-472-7606
Address:
Cuisinart Canada
100 Conair Parkway
Woodbridge, Ont. L4H 0L2
Email:
consumer_Canada@conair.com
Model:
CBM-20C
To facilitate the speed and accuracy of your return, please enclose:
• $10.00 for shipping and handling of the product
(cheque or money order)
• Return address and phone number
• Description of the product defect
• Product date code*/copy of original proof of purchase
• Any other information pertinent to the product’s return
* Product date code can be found on the underside of the base of the
product. The product date code is a 4 or 5 digit number. Example,
90630 would designate year, month & day (2009, June 30th).
Note: We recommend you use a traceable, insured delivery service for
added protection. Cuisinart will not be held responsible for in-transit
damage or for packages that are not delivered to us.
To order replacement parts or accessories, call our Customer Service
Centre at 1-800-472-7606. For more information, please visit our
website at www.cuisinart.ca.

IB-13463-CAN
©2016 Cuisinart Canada
100 Conair Parkway,
Woodbridge, ON L4H 0L2
Printed in China
16CC023518
Trademarks or service marks
of third parties referred to
herein are the trademarks
or service marks of their
respective owners.
®
CuisinartTM offers an extensive assortment of top quality
products to make life in the kitchen easier than ever. Try
some of our other countertop appliances and cookware, and
Savor the Good Life®.
www.cuisinart.ca
Coffeemakers Blenders Juicers
IB-13463-CAN
©2016 Cuisinart Canada
100 Conair Parkway,
Woodbridge, ON L4H 0L2
Imprimé en Chine
16CC023518
Toutes les autres marques
de commerce ou de service
utilisées dans le présent
document sont les marques de
leurs propriétaires respectifs.
MD
CuisinartMC offre une vaste gamme de produits de grande
qualité qui facilitent la vie dans la cuisine comme jamais
auparavant. Essayez nos autres appareils de comptoir, nos
ustensiles de cuisson et nos outils et accessoires de cuisine.
www.cuisinart.ca
Cafetières Mélangeurs Presse-
agrumes
Table of contents
Popular Power Tools manuals by other brands

Hitachi Koki
Hitachi Koki CE 16SA Handling instructions

kincrome
kincrome K12091 Owner's assembly and operating manual

iroda
iroda Solderpro 150 instruction manual

Maasdam
Maasdam Pow’R-Pull Operation and safety instructions

Wolf
Wolf NEW PACER 100 Series Parts and service manual

Vaniman
Vaniman Mobile Problast 80017 manual