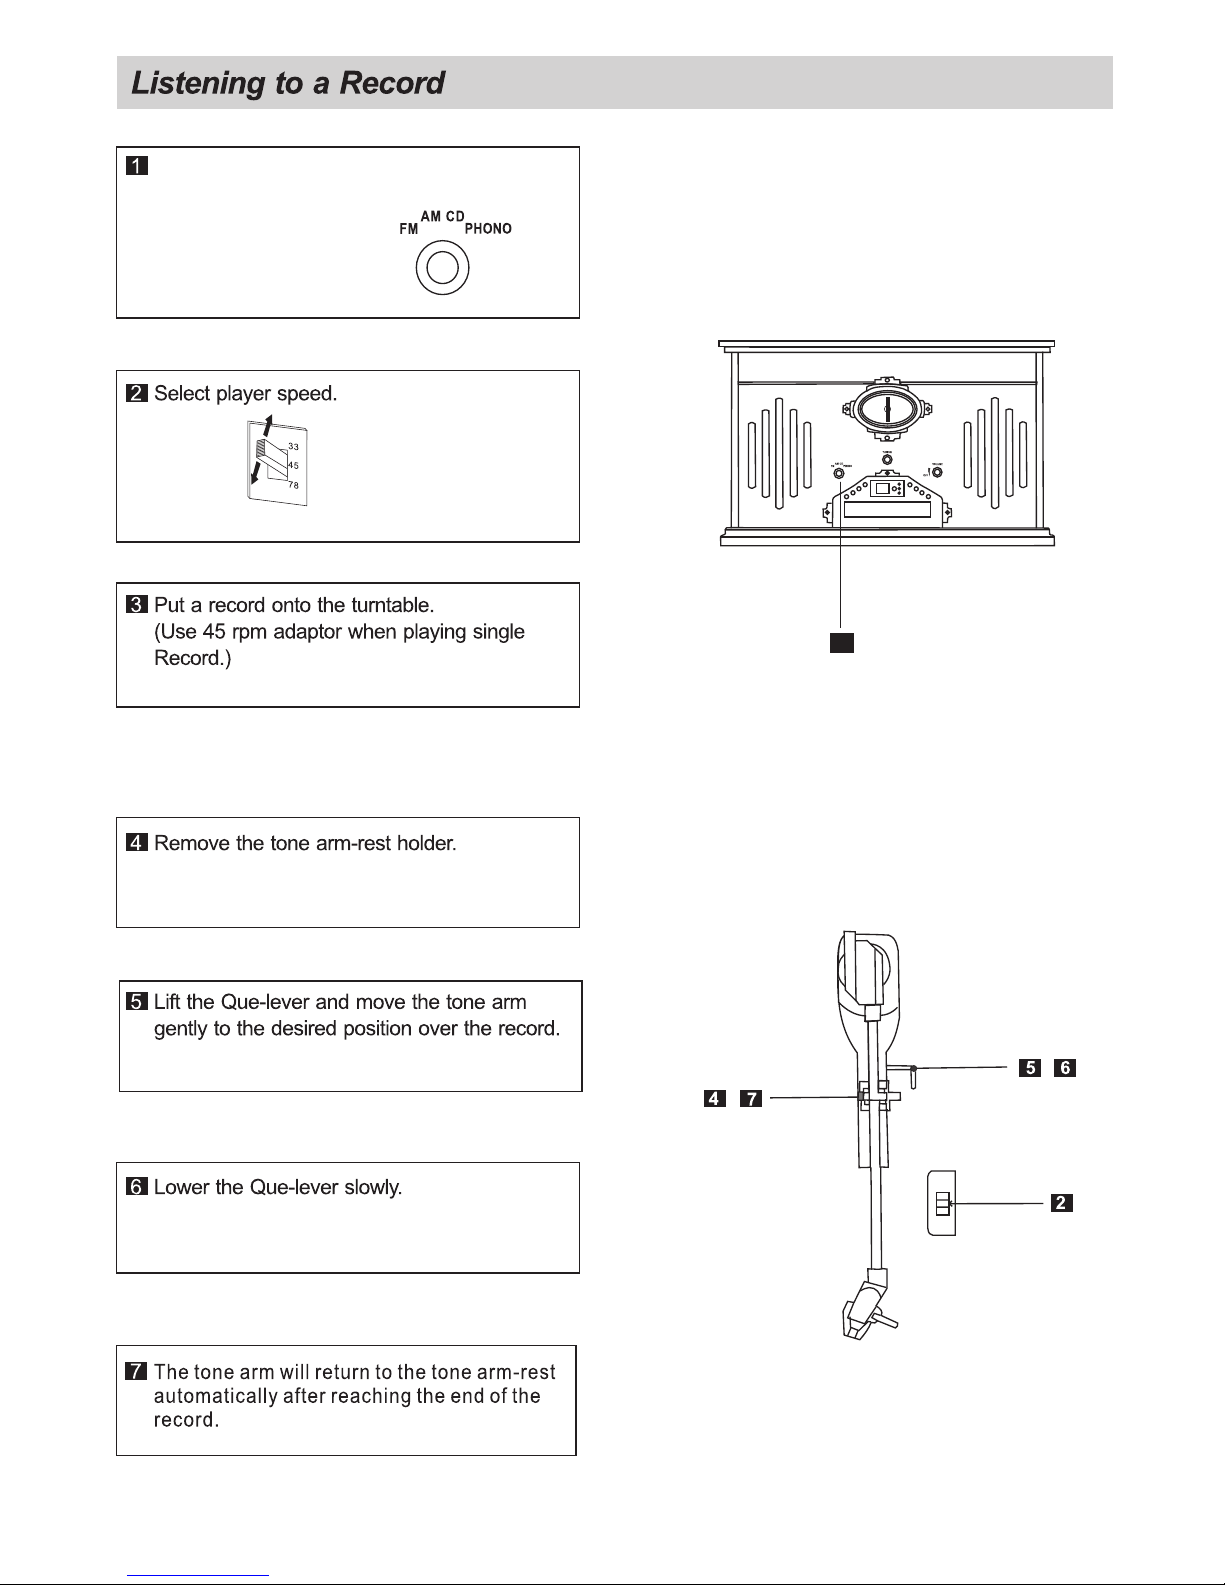
Curtis RCD817 User manual

MODEL: RCD817
PHONOGRAPH WITH AM FM
RADIO & CD PLAYER
/

1
When using electrical products, basic precautions should always be followed including:
1. Read these Instructions - All the safety and operating instructions should be read before
the product is operated.
2. Keep these Instructions - The safety and operating instructions should be retained
for future reference.
3. Heed All Warnings - All warnings on the product and in the operating instructions
should be adhered to.
4. Follow all Instructions - All operating and use instructions should be followed.
5. Do not use this apparatus near water.
6. Clean only with a dry cloth.
7. Do not block any ventilation openings, install in accordance with the manufacturer s
instructions.
8. Do not install near any heat sources such as radiators, heat registers, stoves, or
other apparatus (including amplifiers) that produce heat.
IMPORTANT SAFETY INSTRUCTIONS FOR
AUDIO PRODUCTS - READ CAREFULLYALL
THE FOLLOWING IMPORTANT SAFEGUARDS
11. Only use attachments/accessories specified by the manufacturer.
12. Use only with a cart, stand, tripod, bracket, or table specified
by the manufacturer, or sold with the apparatus. When a
cart is used, use caution when moving the cart/apparatus
combination to avoid injury from tip-over.
13. Unplug this apparatus during lightning storms or when unused
for long periods of time.
9. Do not defeat the safety purpose of the polarized or grounding-type plug. A polarized
plug has two blades with one wider than the other. A grounding type plug has two blades
and a third grounding prong. The wide blade or the third prong is provided for your safety.
If the provided plug does not fit into your outlet consult an electrician for replacement of
the obsolete outlet.
10. Protect the power cord from being walked on or pinched particularly at plugs,
convenience receptacles, and the point where they exit from the apparatus.
14. Refer all servicing to qualified service personnel. Servicing is required when the
apparatus has been damaged in any way, such as when the power-supply cord or plug is
damaged, liquid has been spilled or objects have fallen into the apparatus, the apparatus
has been exposed to rain or moisture, does not operate normally, or has been dropped.

17. Power Lines - An outside antenna system should not be located in the vicinity of
overhead power lines or other electric light or power circuits, or where it can fall into such
power lines or circuits. When installing an outside antenna system, extreme care should be
taken to keep from touching such power lines or circuits as contact with them might be fatal.
18. Overloading - Do not overload wall outlets, extension cords, or integral convenience
receptacles as this can result in a risk of fire or electric shock.
19. The apparatus shall not be exposed to dripping or splashing and no objects filled
with liquids, such as vases, shall be placed on the apparatus.
Caution - Do not attempt to service this product yourself as opening or removing
covers may expose you to dangerous voltage or other hazards. Refer all servicing
to qualified service personnel.
Replacement Parts - When replacement parts are required, be sure the service
technician has used replacement parts specified by the manufacturer or have the
same characteristics as the original part. Unauthorized substitutions may result in
fire, electric shock, or other hazards.
Safety Check - Upon completion of any service or repairs to this product, ask
the service technician to perform safety checks to determine that the product is in
proper operating condition.
Wall or Ceiling Mounting - The product should be mounted to a wall or ceiling
only as recommended by the manufacturer.
16. Power Source - This product should be operated only from the type of power source indicated
on the marking label. If you are not sure of the type of power supply to your home, consult
your product dealer or local power company. For products intended to operate from battery
power, or other sources, refer to the operating instructions.
15. Warning - To reduce the risk of fire or electric shock, do not expose this apparatus to
rain or moisture.
2
20.
21.
22.
23.


Basic Operation
Power on.
Connect the power plug into the wall
outlet.
Select the source.
Adjust the volume.
Preparation of Use
1
2
3
5
23
There is a screw to protect the phonograph chassis
during transportation.
Turn the screw clockwise with a coin to its lowest
position before you use the phonograph for the
first time.

1
6
Rotate the FM/AM/CD/PHONOknob to
select PHONO.

1
A
2 3
C
B
Listening to CD
2Open the tray, and place the CD on the tray.
OPEN / CLOSE
3 Close the tray and start playing the CD.
OPEN/CLOSE
The CD will start playing from the first track.
A Stopping the CD play.
STOP
B Pausing the CD play.
Flash
Pressing the PLAY/PAUSE button will restart
playing the CD.
Do not switch off the unit during CD-function, because
it
will damage the unit.
PLAY/PAUSE
PLAY/PAUSE
7
Lights
Rotate the FM/AM/CD/PHONOknob
to select CD.
1
CD s should be placed in their trays with the label side up.
C Press the F.F button once to go the start of the
next track.
F.R
F.R
F.F
F.F
Press the F.R button once to go back to the start of
the current track. Press the F.R button twice to go
back to the start of the previous track.
,
DE
FGH

Listening to CD
REPEAT
8
Torepeat a singleor the entiredisc.
Press the REPEAT button once. The
Repeat indicator flashes.Press the
F.R or F.F buttons to selectthe desired
track, then pressthe PLAY/PAUSE
button to beginrepeat Playback ofthe
selected track.
F
Flash
Press the REPEAT button twice. The
repeat indicator remains'on' . Press
the PLAY/PAUSE button to begin
repeat Playback ofthe entire disc.
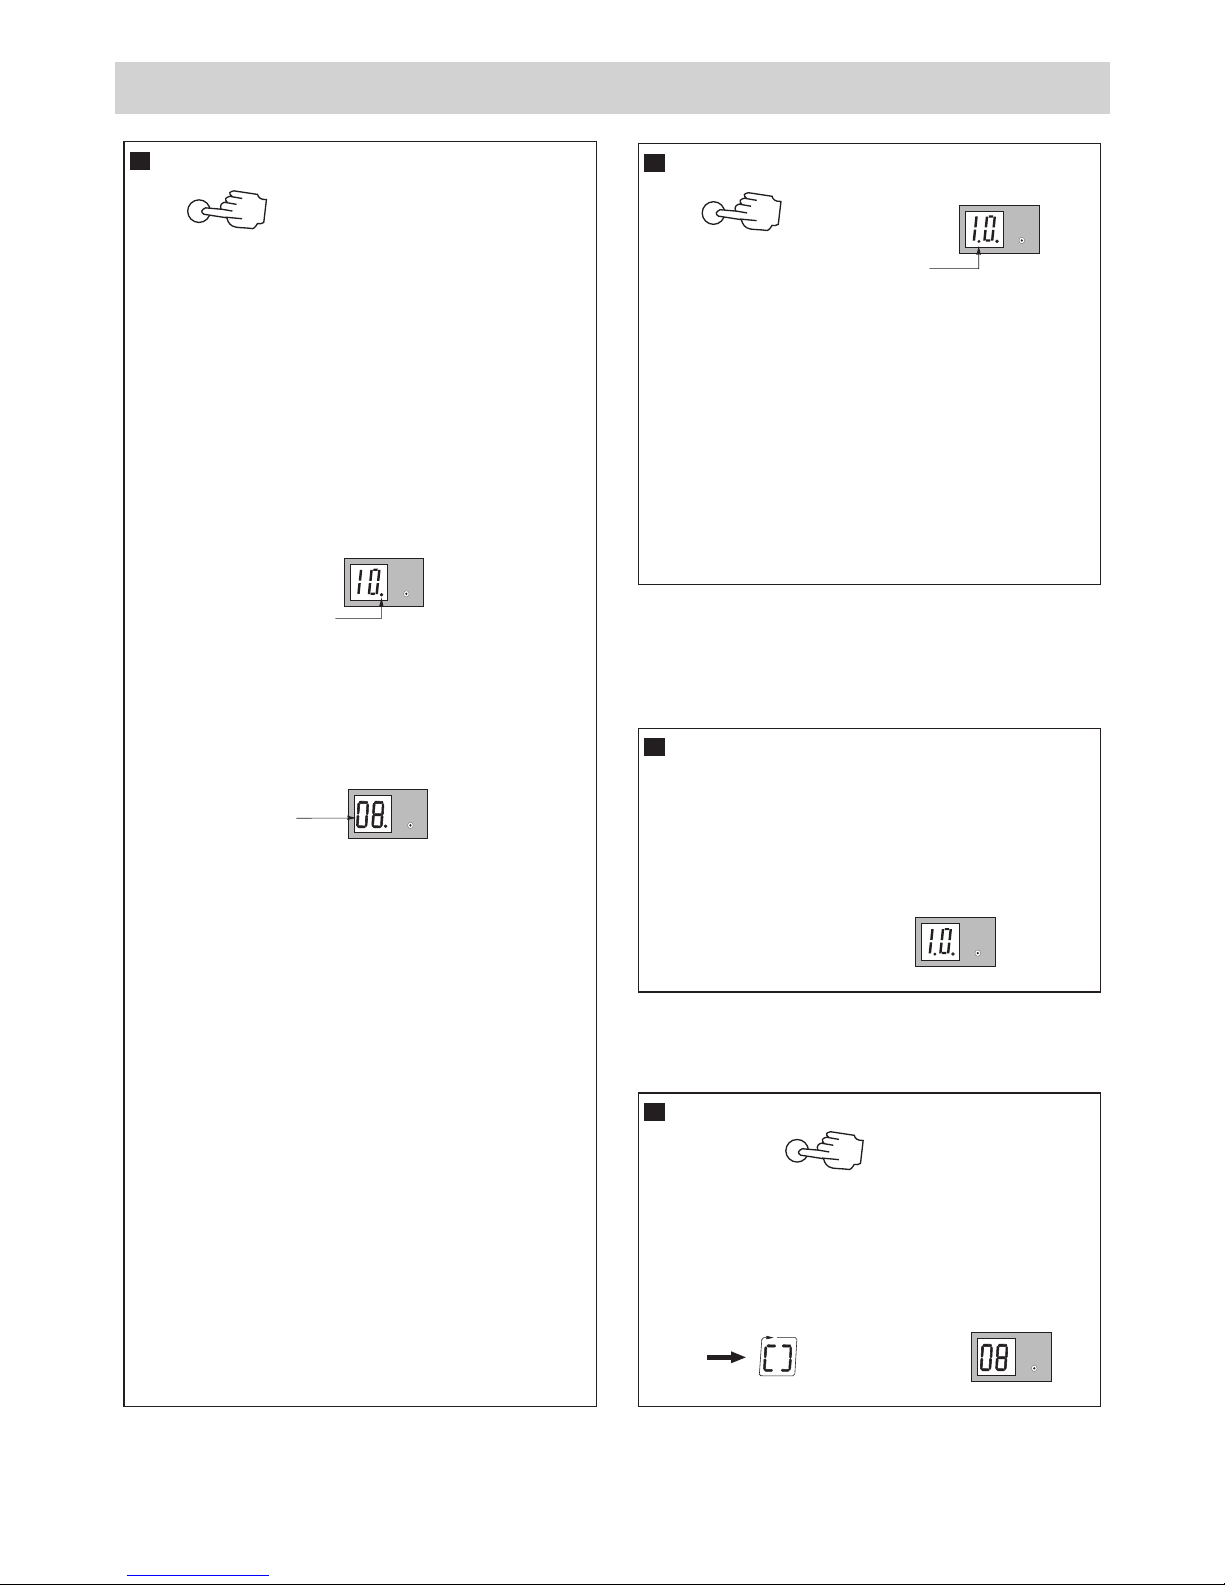
Tocancel Repeat Playback press theREPEAT
button until the Repeat Indicatorgoes 'off ' .
Repeat Playback is also cancelledby pressing
the STOP button, or setting the Functionselector
to the AM , FM or PHONO position.
PROGRAM
Programmed playback.
E
This feature allows you toprogram up to 32
tracks on a disc forplayback in any desired
order.
Note: You cannot programtracks while a disc
is playing. If the discis playing press the STOP
button first before beginning theprogramming
steps below:
1.) Press the PROGRAM button to enter the
Program Mode. The Program number briefly
shows '0 1', then the Program indicator flash.
Flash
2.) Press the F.R or F.F buttons to select the first
track number you wish to enter in the program
memory, the track number will flash.
Example: Track Number '08'.
Flash
3.) When the desiredtrack number appears
on the display, press the PROGRAM button
again to enter thattrack in memory. The
Program number will shows'0 2'.
4.) Repeat Steps 2-3, selecting a different track
number each time until you have entered up to
32 tracks in the program memory.
Note: You may program the same track number
to play multiple times in the program sequence
if desired.
5.) Press the PLAY/PAUSE button to begin
Programmed playback. The Program indicator
stops flashing and remains 'on'. Playback will
begin with the first track you programmed and
will continue until the last programmed track
has played.
6.) After the last track has played the player
stops and the display shows the total number
of tracks on the disc. However the program
sequence remains in the memory.
The programmed sequence may be cancelled by,
Pressing the open button, STOP button, switching to
the AM, FM or PHONO or shutting the system 'off '.
When Programmed Playback begins press the
REPEAT button twice to activate the all tracks
repeat feature.
Program Repeat Playback
The Repeat Indicator lights and all the tracks in
your programmed sequence will be repeated
continuously.
To cancel Programmed Repeat Playback press the
STOP button until both the Program and Repeat
Indicators go 'off '.
G
Random Playback.
H
RANDOM
In playing or STOP mode, press the RANDOM
button, a cycle mark will be showed, when the
display shows a random tack number, playback
will begin automatically.
To cancel Random Playback press the STOP button.

Listening to the Radio
1
Antenna
DOWN
UP
9
++++++++
++++++++
++++++++
++++++++
Rotate the FM/AM/CD/PHONOknob to
select FM orAM.
Tune to the desired frequency.2
For optimal FM reception be sure to stretch the built-in
FM antenna wire located at the lower back of the unit
and move it around until the station you have tuned in
is being received clearly.
140
A
1
Specifications
Output Power : 2.0W + 2.0W
FM frequency Range : 87.5 to 108.5MHz
AM frequency Range : 525 to 1710KHz
SPEAKER : Impedance: 8 ohms
Input power: Max.3W
Power source :120V AC, 60Hz
Power Consumption :14W
Dimension(W X H X D) :19 X 13.9 X 11.9 (approx.)

Troubleshooting guide
In case of trouble with the unit, please look through this chart and see if you can solve the problem by yourself before calling
your dealer.
Problem Cause Solution
Power does not come on when the
power switch is pressed
No sound comes out of the speakers
The sound is noisy
Can not listen to any station, or signal
appears weak
The sound is distorted
Play stop immediately after starting to
play the CD, or play pauses or stops
during play
No sound
Specific CD is noisy, or playback stops
or skips
Unit is unplugged
The volume is turned down(to MIN)
The input selector does not match the
playback source
The unit is too close to a TV set or
another similar appliance
The station is not tuned in properly
A TV set is being used nearby
The antenna is not oriented properly
The CD is inserted upside down
The CD is dusty or dirty, or there is
condensation on the CD
The CD player is paused
The CD is scratched, damaged or
warped
The disc is very dirty
Connect the unit to the AC power
supply
Adjust the volume
Re-select the input source
Turn off the TV or other appliance, and
relocate the unit
Tune in the station correctly
Turn off the TV set
Re-orient the antenna until reception
improves
Insert the CD with the printed side
upper most
Clean and dry the CD
press the PLAY/PAUSE button
The CD should be changed
Clean the CD
10
Fingerprints and dust shouldbe carefully wiped off the disc's recordedsurface with a softcloth. Unlike
conventional records, compact discs have no groovesto collect dust andmicroscopic debris, so gently wiping
with a soft clothshould remove most particles.Wipe in a straightline from the insideto the outside ofthe disc.
Small dust particles andlight stains will haveabsolutely no effecton reproduction quality.
B
E
E
N
E
N
Z
C
R
L
E
E
A
N
Clean the discperiodically with asoft, lint-free, drycloth. Never usedetergents or abrasive cleaners to clean
the disc. Ifnecessary, usea CD cleaningkit.
Never write onor affix labelsto the surfaceof compact discs.
CARE OF THECABINET
You should care forthe cabinet asyou would care for any pieceof fine furniture.When the cabinet becomes dusty
wipe it witha soft, non-abrasivedust cloth. If the cabinet becomessmudged with fingerprintsyou may use any
good quality commercialdusting and polishingspray cleaner, however avoid spraying the plastic ormetal parts of
this system. Werecommend that you spray the cleaneron your dustcloth, not directly on the cabinet,to avoid
getting any ofthe spray onthe plastic or metal parts.
Care and Maintenance
Toremove a discfrom its storagecase, press downon the center of the caseand lift thedisc out, holding it
carefully by theedges.
COMPACT DISC CARE
Other manuals for RCD817
1
Table of contents
Other Curtis Media Player manuals