CUSTOMGADZ mimicsG4 User manual

1
CUSTOMGADZ
MimicsG4
Manual v1.0.1
Note:
The Android operating device requires MHL/HDMI/SLIMPORT video streaming/mirroring capabi ity in
order to disp ay video to an externa monitor. Optiona y you can a so use a WIFI to HDMI adapter to
project the devices screen onto an externa touchscreen.
iOS devices require a AV/HDMI/VGA/WIFI (Airp ay) to disp ay video externa y.
** Its high y recommended that you use origina video conversion cab es and adapters.
** If using the MimicsG4 in a vehic e, you car might require an additiona video converter.

2
UM-MM12-8W
Table of Contents
1. Overview
2. What's in the Box
3. Connection Overview
4. Quick start uide - First time Pairin Android
5. Quick start uide - First time Pairin iOS
6. Updatin The Firmware
7. Connectin to a vehicle WITHOUT a factory touchscreen installed.
8. Connectin to a vehicle WITH a factory touchscreen installed.
9. Usin the touchscreen switcher
10. Additional Information
Release Notes:
v1.0 - Initial Release Dec-07-2016

3
1. Overview
The MimicsG4 (4th eneration) is a device that allows an external touchscreen display to control the
operation of an Android/iOS device remotely. This module uses a unique technique to achieve this
without any modifications (root access or custom ROMs) of the Android device. However, iOS devices
currently are required to be Jailbroken (for our driver to be installed). When connected and confi ured,
this system will allow you to access all your Android/iOS devices features and functions when connected
to an external display such as an in-car display/monitor. The MimicsG4 supports resistive, I2C, UART and
USB touchscreen protocols. The MimicsG4 uses a low bandwidth connection that allows simultaneous
use with other Bluetooth connections such as hands free or A2DP. The MimicsG4 module is a fully
embedded module that allows very fast startup times, hi h reliability and automotive rade performance.
Android:
• Download the "MimicsG4:" application from the Goo le play store, this enables simple device
calibration and setup and other key features
iOS
• MimicsX2 Driver - Software driver interface for MimicsG4 module
• SBRotator (or equivalent) - Enables landscape sprin board .Not required if usin iPads

4
2. What's in the Box
The MimicsG4 is avai ab e as a standa one unit, and an optiona touchscreen switcher kit is a so avai ab e
For interfacing to a vehic e fitted with a factory touchscreen, the MimicsG4 current y on y supports 4-wire
and 8-wire resistive OEM touchscreens.
MimicsG4 Basic kit components
MimicsG4 Optional Touchscreen switcher add-on
MimicsG4
Bluetooth dongle Included
Touchscreen
switcher
MimicsG2 to touchscreen
adapter connecting cable
4-pin SUB Board
8-pin SUB Board
Switching
trigger cable
4
-
pin Ribbon
x 2", x 8" For OEM touch
board connection.
8
-
pin Ribbon
x 2", x 8" For SUB board
to switcher connection.

5
. Connection Overview
How it's a connected.
Notes:
** Power consumption wi vary depending on the devices connected and how much power they
consume. Minimum consumption is 0.08Amp. When USB devices are used current consumption can
reach up to 1Amp.
SUB Board
Can adapt to various
touchscreens.
OEM
board
connection.
Touchscreen
Connection.
SUB Connect
Connecting cable for
switcher and SUB board.
Supplied in two lengths.
Switcher
Allows one touchscreen to
switch between two target
devices. i.e OEM system and a
Smartphone.
MimicsG4 Connect
Connects the G4 to
optional touchscreen
adapters.
Bluetooth
Dongle used to pair to
Smartphone/tablet.
USB Touchscreen
port
Use this port if you are using a
USB type touchscreen.
Alternative touchscreen port
Used to connection to non
USB touchscreens.
Micro USB Power
Powered from a single 5v.
General power consumption is
approximately 0. 5A.
Tri mode switching input
Used to switch between mimics and
OEM touch mode.
MimicsG4
Main controller
Multimedia Port
Standard 3.5mm steering
wheel control input set to
SONY protocol by default.

6
4. Quick start guide - First time Pairing Android
• Ensure you have the atest Firmware insta ed. If not see "Section 6"
• Down oad the "MimicsG4" app ication from the Goog e P ay store
• Connect your device so its mirroring on your externa touchscreen monitor. This is either done
via cab e or a WIFI connection. If you are unsure how to do this see "section X"
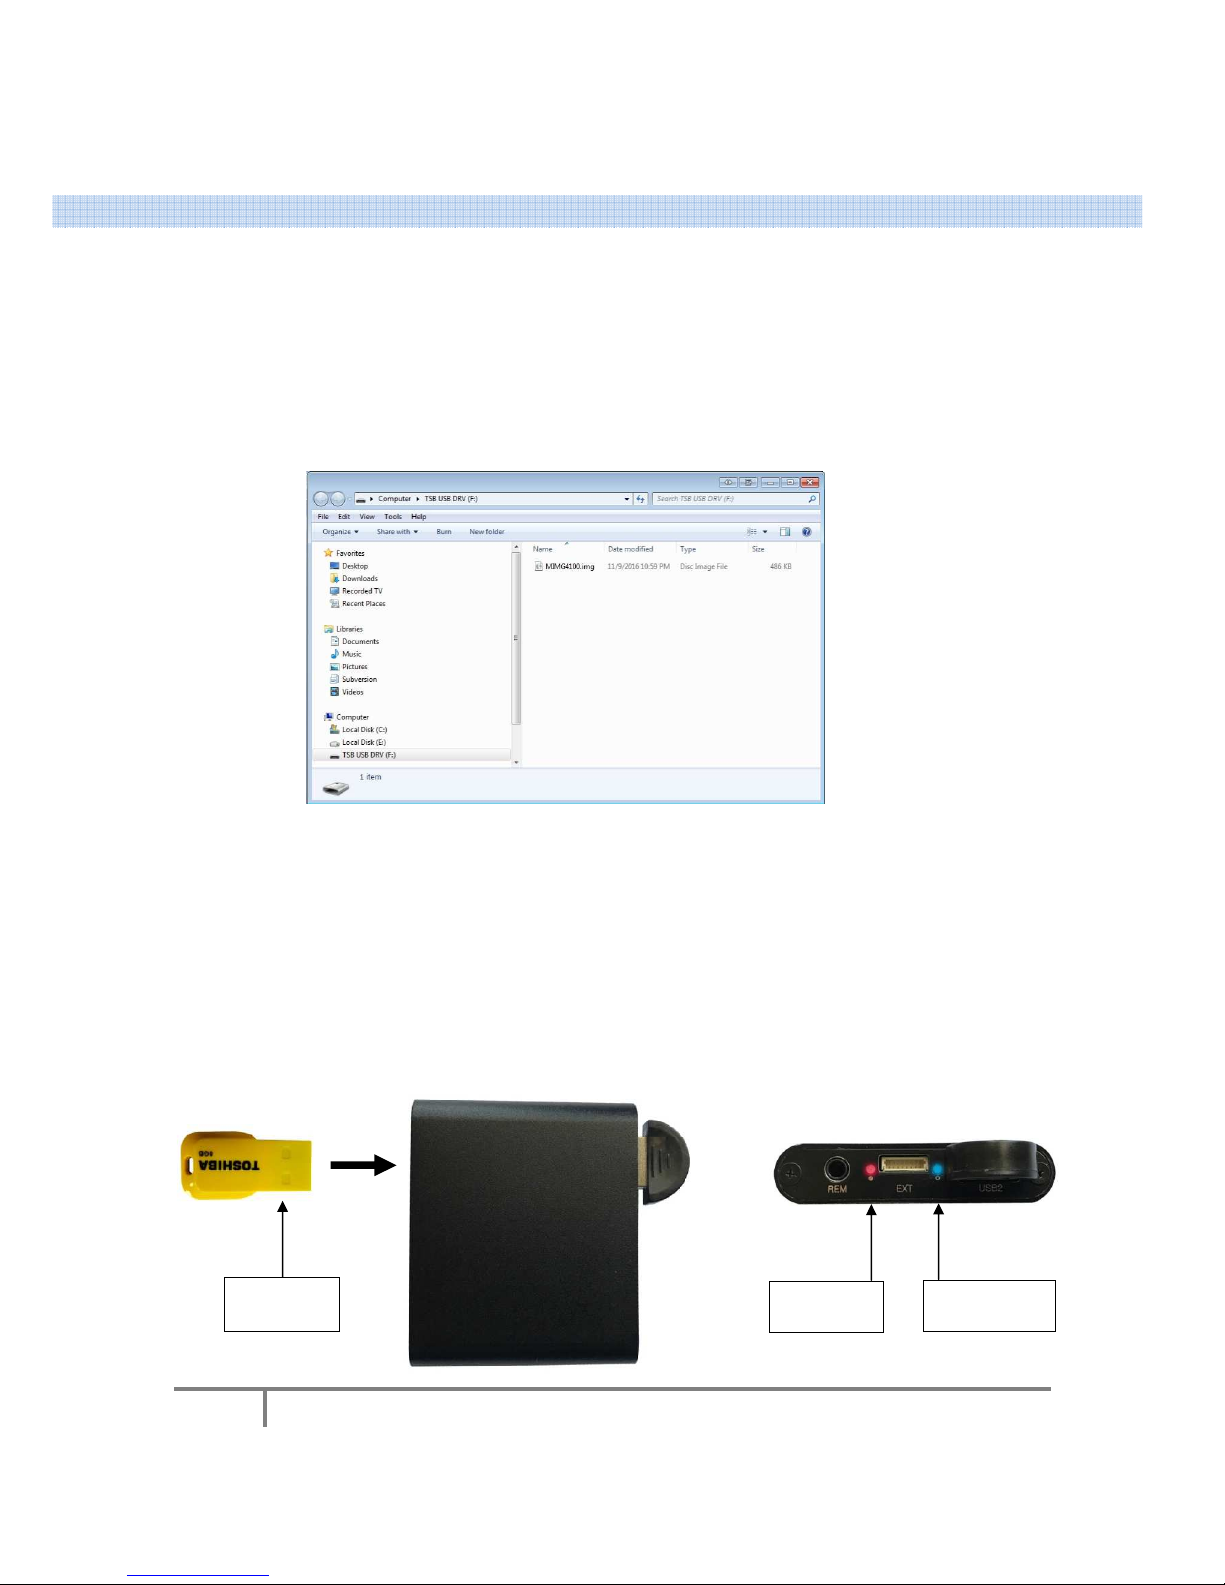
• Connect the supp ied B uetooth dong e and either a USB touchscreen or the 8-pin cab e
connected to a touchscreen adapter (such as the switcher board)
• Turn on the MimcisG4 by p ugging in a micro USB cab e into the power port and after a few
moments you shou d see a RED ight f ashing. If you don't see this, press and ho d the capacitive
button (between the PWR and USB1 connector) and ho d it for approximate y 10 seconds. As you
press this button, the touch indicator wi ight.
• Go into Settings > B uetooth and make sure the MimicsG4 is "Un-paired" or "forgotten" before
attempting to connect it to a new Android device. If you see a settings icon next to "MimicsG4"
as shown be ow, it means that you have previous y setup a device before. As we are starting
fresh, we want to unpair any previous devices.
•
• Assuming that the RED ight is sti f ashing, press on 'MimicsG4' in B uetooth. If for some reason
you don't see it, c ick on scan or refresh the check nearby devices again.
• Open up the MimicsG4 app and you wi be presented with a ca ibration screen ash shown be ow.
If you see this icon
press it to 'un-pair'
the MimicsG4
Press here to
'un-pair' device
MimicsG4 is
now 'un-paired'.
We want to
'MimicsG4'
without any
icon next to it

7
Calibratin .. Complete!
• Now simply press each of the 4 calibration markers as they appear usin your external
touchscreen.
• After you have completed calibratin the screen your will be prompted with messa e so simply
press "OK" usin the external touchscreen.

8
5. Quick start guide -
First time pairing
•
Ensure you have the latest Firmware installed. If not see "Section
•
Download the "MimicsX2 Driver" from Cydia
•
After installin make sure you
'Slide to power off' then
•
Connect your device so its mirrorin on your external touchscreen monitor. This is either done via
cable or a WIFI connection. If you are unsure how to do this see "section X"
•
Connect the supplied Blue
connected to a touchscreen adapter (such as the switcher board)
•
Turn on the MimcisG4 by plu in in a micro USB cable into the power port and after a few
moments you should see a RED li ht flashi
button (between the PWR and USB1 connector) and hold it for approximately 10 s
press this button, the touch indicator will li ht
•
Go into Settin s > Bluetooth and make sure the Mimics
connect it to a new iOS device
If you see this icon
press it to 'un-pair'
the MimicsX2
First time pairing
iOS
Ensure you have the latest Firmware installed. If not see "Section
6"
Download the "MimicsX2 Driver" from Cydia
After installin make sure you
''Reboot' your device. Press and hold the power button to see an
turn you phone of. Press the power button to restart.
Connect your device so its mirrorin on your external touchscreen monitor. This is either done via
cable or a WIFI connection. If you are unsure how to do this see "section X"
Connect the supplied Blue
tooth don le and either a USB touchscreen or the 8
connected to a touchscreen adapter (such as the switcher board)
Turn on the MimcisG4 by plu in in a micro USB cable into the power port and after a few
moments you should see a RED li ht flashi
n . If you don't see this, press and hold the capacitive
button (between the PWR and USB1 connector) and hold it for approximately 10 s
press this button, the touch indicator will li ht
.
Go into Settin s > Bluetooth and make sure the Mimics
G4 is "Un-
paired" before attemptin to
connect it to a new iOS device
Press here to
'forget' or 'un-pair'
''Reboot' your device. Press and hold the power button to see an
turn you phone of. Press the power button to restart.
Connect your device so its mirroring on your external touchscreen monitor. This is either done via
cable or a WI I connection. If you are unsure how to do this see "section X"
tooth dongle and either a USB touchscreen or the 8
-pin cable
Turn on the MimcisG4 by plugging in a micro USB cable into the power port and after a few
ng. If you don't see this, press and hold the capacitive
button (between the PWR and USB1 connector) and hold it for approximately 10 s
econds. As you
paired" before attempting to
MimicsX2 is
now 'un-paired'

9
•
Assumin that the RED li ht is still flashin , press on 'MimicsG4' in Bluetooth. If for some reason
you don't see it, click on scan or refresh the check nearby devices a ain.
• Open up the MimicsX2
app and you will be presented with a calibration screen ash shown below.
Assumin that the RED li ht is still flashin , press on 'MimicsG4' in Bluetooth. If for some reason
you don't see it, click on scan or refresh the check nearby devices a ain.
app and you will be presented with a calibration screen ash shown below.
Assuming that the RED light is still flashing, press on 'MimicsG4' in Bluetooth. If for some reason
app and you will be presented with a calibration screen ash shown below.

10
6. Updating The Firmware
Firmware updates a ows easy and rapid turnaround ow eve changes to the core MimicsG4 operating
system. Updates can inc ude support for more devices, touchscreens and bug fixes.
To upload new firmware.
• Down oad the atest firmware from the customGadz website. The fi e down oaded wi be named
"MIMG4100.img"
• Copy the fi e into the root directory of a USB f ash disk as shown in diagram be ow.
Firmware update file
• Turn off the MimicsG4 by either unp ugging the Micro USB power cab e or if you have insta ed
this into a vehic e, simp y turn the car off.
• P ug in the USB f ash disk pre- oaded with the firmware fi e and power the MimicsG4 back on.
• You wi notice the touch status indicator ight up and then a few moments ater the Bluetooth
status indicator wi start f ashing for about 10 seconds.
** Note: If after attempting to update the firmware you see the Red/b ue ight f ashing a ternative y,
make sure the fi e is correct y oaded on the f ash disk. If your f ash disk is brand new you can try to
reformat the f ash disk and try again.
Touch status
Indicator
Bluetooth status
Indicator
Pre-Loaded
USB Flash disk

11
7. Connecting to a vehicle WITHOUT a factory touchscreen installed.
In the case where you a ready have your device disp ayed and mirroring on your OEM screen, adding a
touchscreen to your factory disp ay wi a ow you to contro your Smartphone via the touchscreen you
are going to fit to give you a factory ook finish!
What you wi need:
1. MimicsG4
2. Touchscreen over ay to fit in between your OEM beze and disp ay. It's important that the "active
area" (AA) of the externa touchscreen at east covers the disp ay area of your OEM screen.
3. Compatib e USB adapter to convert touchscreen signa s to USB.
Example of touchscreen with USB adapter
Where to fit touchscreen
Tips:
** Touchscreens are genera y quite thin so you shou dn't have much troub e fitting it in.
** One face of the touchscreen is the touch sensitive area. Make sure it's facing towards you.
4
-
wire
touchscreen
4
-
wire touchscreen
to USB adapter
USB output
This end plugs directly into the MimicsG4
Touchscreen is fitted
between OEM Bezel and
display
This end
plugs directly
OEM Bezel
OEM LCD
Display

12
8. Connecting to a vehicle WITH a factory touchscreen installed.
In the case where your vehic e a ready has an OEM touchscreen fitted in your dash, you can use the
existing touchscreen to contro your Smartphone. You can a so switch the touchscreen to togg e between
your OEM touch functions and contro ing your Smartphone. What you wi need:
1. MimicsG4
2. customGadz touchscreen switcher adapter. The switcher kit comes with two SUB adapters, one
8-pin and one 4-pin. You on y need to use the one that matches your OEM touchscreen cab e.
Connecting the 4 or 8-pin SUB board
Tips:
** Make sure that the SUB board is he d secure y in p ace to avoid movement. There is a mounting ho e
provided or a ternative y you can use doub e sided tape with a thickness of at east 1mm.
Find the mating connector where the OEM
touchscreen cable connects to.
If there is a clip on the mating connector, try
to release it gently. If there is no sign of a
clip you can pull it out gently.
It should look like this
once its released.
Now check to see which SUB adapter fits the
OWM cable, It will either be a 4-pin or 8-pin
cable.
TOUCH]
OEM]
Connect the appropriate
adapter to the touchscreen
and plug it into the connector
labeled TOUCH.
Plug in the supplied ribbon
cable to the connector labeled
OEM.

13
Finishing up the setup.
Tips:
** Fee free to re ocate the SUB board and switcher in a area where it's not going to obstruct anything
when assemb ing the OEM screen back into the vehic e. The switcher kit a so comes with onger ength
cab es that can assist with the insta ation.
Plug the other end of the supplied cable
back into the OEM connector.
The end result should look
something like this.

14
9. Using the touchscreen switcher
The optiona touchscreen tri-mode trigger inputs are used to force the OEM touchscreen to be used in
MimicsG4 mode. i.e. contro ing your Smartphone/Tab et. Our atest version of the switcher is now fu y
iso ated for increased protection for your OEM system.
There are two inputs (Red and B ack). The Red cab e is a positive switching input and the B ack is a
negative switching input. App ying a vo tage between 1.5 and 16v to the Red wire wi activate a "switch".
Connecting the b ack wire to 0v (GND) wi a so cause a switch. There is one more mode when you can
touch (short) the Red and B ack wires together to a so activate a switch. This mode is great for testing and
button contro .
Touchscreen switcher
Tips:
** It's possib e to uti ize any of the 3 switch modes to automatica y "switch" to mimics mode. However,
you wi need to find a constant signa that is active on y when the mimics mode video source is se ected.
** The switcher a so has a feature that in the event that the MimcisG4 ma functions or is disconnected,
the switcher wi automatica y defau t to OEM touch operation without requiring any power!
Negative Trigger
Connect this wire to a GND (Ov) source to
trigger Mimics mode.
Positive
Trigger
Connect this wire to a voltage between
.5 & 6v to trigger Mimics mode.
Button Trigger
Short these two wires
together to trigger
mimics mode.
To MimicsG4 via black
cable.
To 8Pin or 4
-
Pin SUB
Board.
Red "switch" indicator.
Lights up when in Mimics Mode

15
10. Additional Information
General
• Not many headunits or vehicles have a direct HDMI connection to allow your Android
device to be directly connected to display video on your external monitor. In this case
you will require a HDMI to A/V converter to interface the video to another screen.
• Some vehicles have video interface kits that allow you to interface with HDMI directly.
• WIFI to HDMI, and WIFI enables mirrorin video interface devices are also supported.
Benefits
• With this system properly confi ured and setup, you will be able to easily control/view
your mobile Smartphone on a lar er easier to read display.
Audio/Phone calls
• The MimicsG4 can support multiply Bluetooth connections, i.e. MimicsG4 and a
Bluetooth headset can be paired to the iOS/Android device simultaneously.
Landscape/Portrait Apps
• Android - The MimicsG4 android application automatically force rotates and locks your
device to landscape orientation.
• iOS devices - SBRotator (or equivalent) is required to enable landscape mode for
homescreen and various apps. .Not required if usin iPads
More info/technical support
Contact us at www.customGadz.com
www.customGadz.com
2017
Table of contents