CYP WPS-QPL01 User manual

Operation Manual
Operation Manual
UHD+HDMI/DP over Fiber Transceiver
(10Gbit/s SFP+)
WPS-QPL01


DISCLAIMERS
The information in this manual has been carefully checked and is believed
to be accurate. Cypress Technology assumes no responsibility for any
infringements of patents or other rights of third parties which may result from
its use.
Cypress Technology assumes no responsibility for any inaccuracies that
may be contained in this document. Cypress also makes no commitment to
update or to keep current the information contained in this document.
Cypress Technology reserves the right to make improvements to this
document and/or product at any time and without notice.
COPYRIGHT NOTICE
No part of this document may be reproduced, transmitted, transcribed,
stored in a retrieval system, or any of its part translated into any language
or computer le, in any form or by any means—electronic, mechanical,
magnetic, optical, chemical, manual, or otherwise—without express written
permission and consent from Cypress Technology.
© Copyright 2018 by Cypress Technology.
All Rights Reserved.
TRADEMARK ACKNOWLEDGMENTS
All products or service names mentioned in this document are trademarks of
the companies with which they are associated.

SAFETY PRECAUTIONS
Please read all instructions before attempting to unpack, install or operate
this equipment and before connecting the power supply. Please keep the
following in mind as you unpack and install this equipment:
• Always follow basic safety precautions to reduce the risk of re,
electrical shock and injury to persons.
• To prevent re or shock hazard, do not expose the unit to rain, moisture
or install this product near water.
• Never spill liquid of any kind on or into this product.
• Never push an object of any kind into this product through any openings
or empty slots in the unit, as you may damage parts inside the unit.
• Do not attach the power supply cabling to building surfaces.
• Use only the supplied power supply unit (PSU). Do not use the PSU if it
is damaged.
• Do not allow anything to rest on the power cabling or allow any weight to
be placed upon it or any person walk on it.
• To protect the unit from overheating, do not block any vents or openings
in the unit housing that provide ventilation and allow for sucient space
for air to circulate around the unit.
• Please completely disconnect the power when the unit is not in use to
avoid wasting electricity.
VERSION HISTORY
REV. DATE SUMMARY OF CHANGE
V1.0 2020/12/30 Preliminary release

CONTENTS
1. MAIN FEATURES ............................................. 1
2. OPERATION CONTROL AND FUNCTIONS .... 1
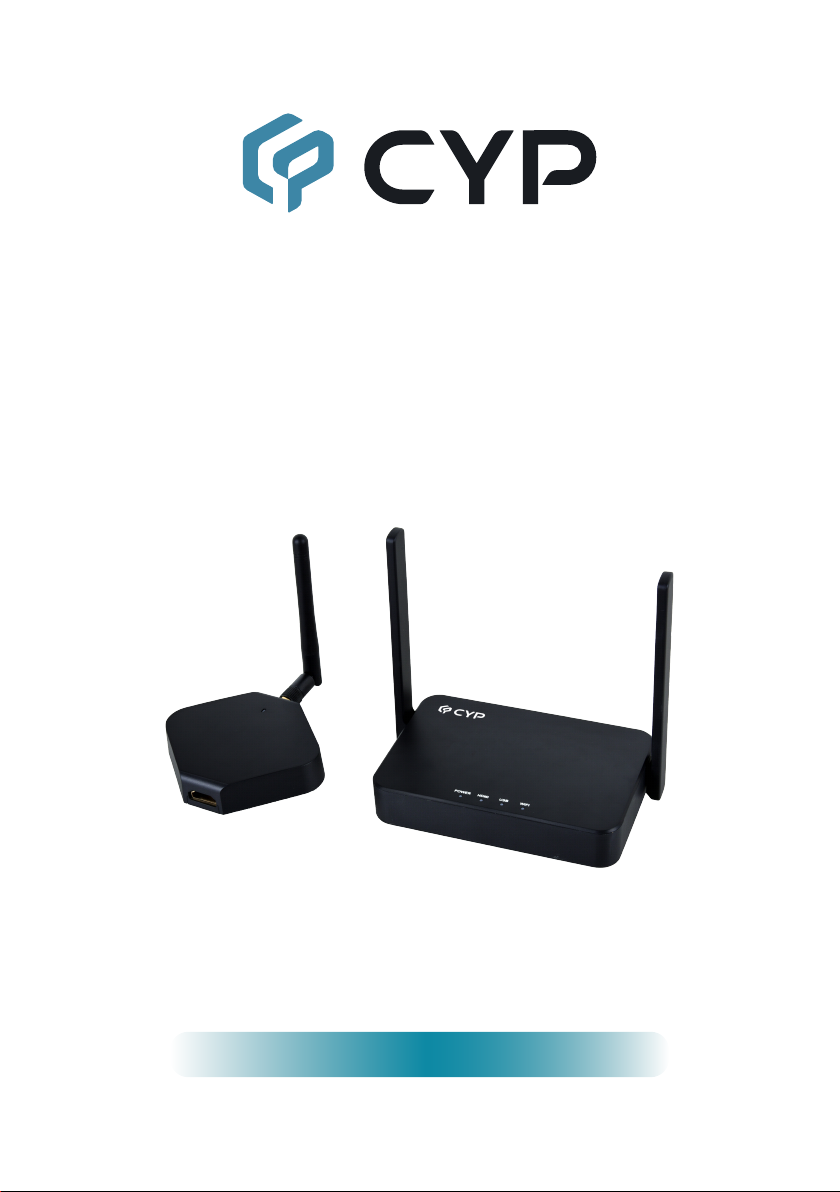
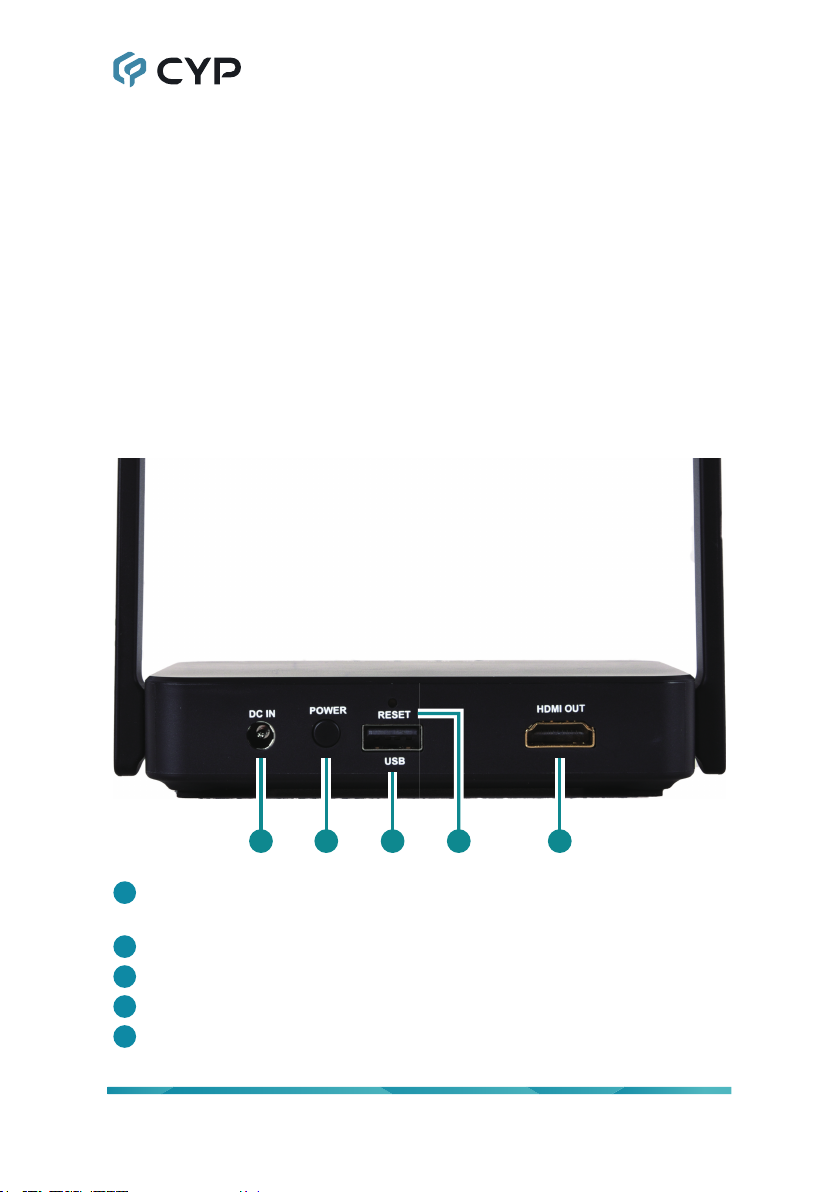
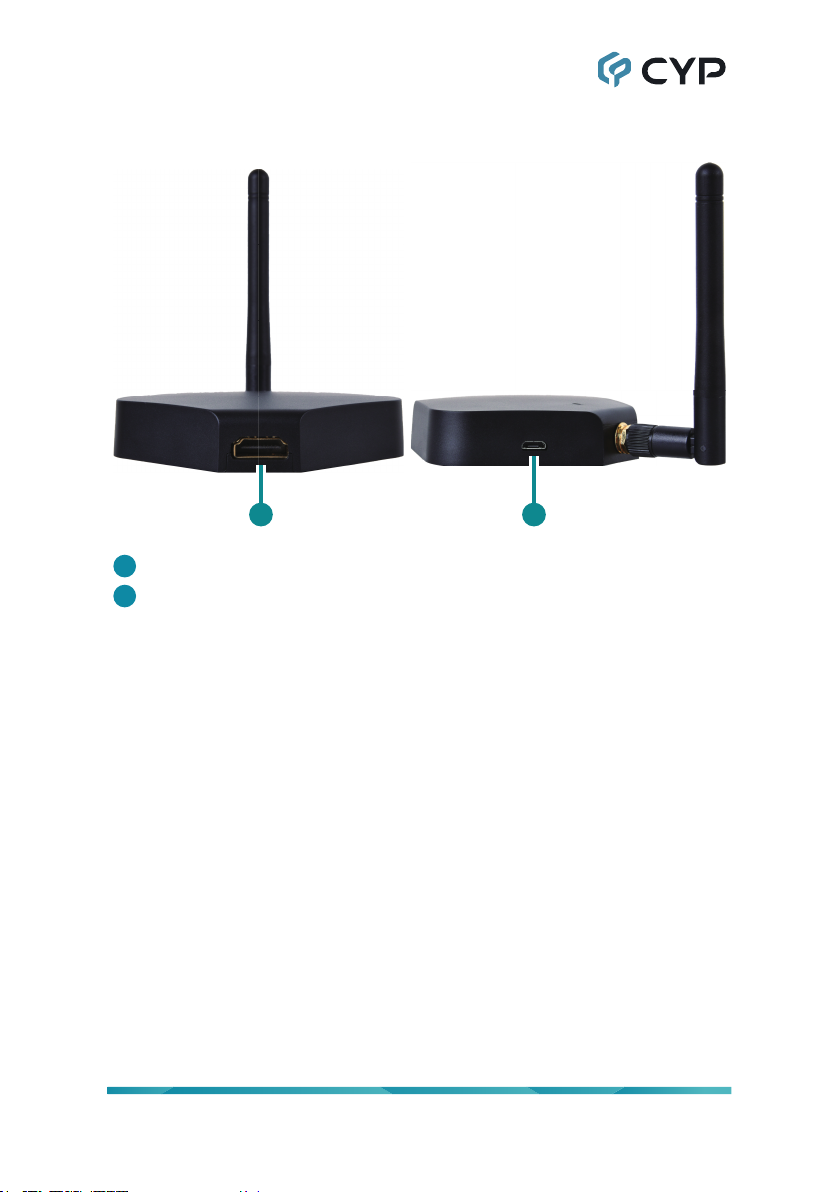
2.1 Receiver ...................................................... 1
2.2 Transmitter................................................... 2
3. CONFIGURING YOUR HYSHARE VIA WEB... 2
4. BEGIN TO CAST WITH HYSHARE.................. 3
5. USER LOGIN .................................................... 4
6. NETWORK MANAGEMENT............................. 5
7. DEVICE MANAGEMENT.................................. 6
7.1 Language..................................................... 6
7.2 Resolution.................................................... 7
7.3 Display Mode............................................... 8
7.4 Reboot Timer............................................... 8
7.5 One Touch Play ........................................... 9
8. ADMIN SETTINGS.......................................... 10
8.1 Wi-Fi Channel............................................ 10
8.2 SSID .......................................................... 11
8.3 Password................................................... 12
8.4 My Screen ................................................. 12
8.5 Dynamic Wallpaper ................................... 13
8.6 Admin Password........................................ 14
8.7 Screen Saver............................................. 14
8.8 Upgrade..................................................... 15
8.9 Reboot....................................................... 16
8.10 Reset to Factory Default.......................... 16
9. ABOUT DEVICE ............................................. 17

1
1. MAIN FEATURES
1.1 No App required, just press one key to work with projector.
1.2 High compatibility with iOS, Android, Windows and MacOS.
1.3 Supports 1080p input resolution.
1.4 Supports output resolution up to 3840x2160@30Hz.
1.5 5GHz Wi-Fi transmission.
1.6 Support touch back, Chromecast and AirPlay.
2. OPERATION CONTROL AND FUNCTIONS
2.1 Receiver
53 421
1DC IN: Plug the DC power adapter into this port and connect it to an AC
outlet for power.
2POWER: Power button.
3USB: USB port, transmitter connects it for pairing.
4RESET: Reset the unit.
5HDMI OUT: Connect to the display.

2
2.2 Transmitter
1 2
1HDMI Input: Connect to the source.
2USB: Connect to the USB port to get the power.
3. CONFIGURING YOUR HYSHARE VIA WEB
With Hyshare, the user may congure their device via a web browser
interface instead, which greatly enhances the user experience.
In Hyshare’s Web Setting sections, customers may do custom settings
including output resolution, preferred language, max connections, etc, based
on dierent needs and usage scenarios.

3
4. BEGIN TO CAST WITH HYSHARE
Before casting with Hyshare, please follow the below instructions, and
connect your phone or laptop to Hyshare. We provide the user with two
connecting methods: Direct Link or Through Wi-Fi.
4.1 Connecting through Direct Link
4.1.1 Connecting Hyshare to an external power supply.
4.1.2 Connecting Hyshare to an external display via HDMI port.
Once the above steps are done, the user will see the below standby
screen on the external display
4.1.3 SSID and Password: The user may see the required information for
connection at the upper middle of the standby screen.
SSID: Selecting the correct SSID in the device’s Wi-Fi list.
Password: Entering the password to connect your device with
Hyshare.
4.1.4 IP Address: Once connected, open your web browser, entering the IP
address at the URL bar. You may see the IP address at the bottom left
corner. Please note that the below IP is for reference only, which may
vary depending on the device.
4.1.5 You may see the Main Menu once successfully connected.

4
4.2 Connecting Through Wi-Fi or External AP
4.2.1 If Hyshare is connected to the internet, the Wi-Fi icon will be displayed
at the upper right corner of the standby screen.
4.2.2 Entering the IP address at the URL bar. You may see the IP address
at the bottom left corner. Please note that Hyshare and mobile devices
must facilitate the same network.
4.2.3 You may see the Main Menu once successfully connected.
5. USER LOGIN
5.1 Non-Admin User
A user is provided with normal access control rights, including Device
Management, Network Management, etc.
5.2 Admin User
The rst time login as an admin user, entering the default password
“000000”. To provide better security for Hyshare, the user must modify
the default admin password. An admin user is provided with the
completed access control rights.

5
6. NETWORK MANAGEMENT
Connecting Hyshare to the internet through external Wi-Fi or LAN.
6.1 Connect to 5GHz Wireless Access Point: Once your device is
connected to Hyshare, entering the required password to access an
external Wi-Fi.
6.1 Remember Wi-Fi: The user can choose to remember the Wi-Fi or not.

6
7. DEVICE MANAGEMENT
Hyshare provides users with the following conguration options, including
Language, Resolution, Maximum Connections, and so on.
7.1 Language
Supporting mainstream languages, and auto language translation.

7
7.2 Resolution
Hyshare will select proper output resolution automatically. The user may
switch to other options based on dierent usage scenarios.
The default output resolution is 1920 x 1080_60P. Hyshare can support up to
3840 x 2160_30P.

8
7.3 Display Mode
Choose the display default to t to screen or stretch to full screen.
7.4 Reboot Timer
The system will reboot after 8 hours of inactivity to release the temporary le.

9
7.5 One Touch Play
If the display supports HDMI CEC, Hyshare Receiver will turn on the display
when it is power on.

10
8. ADMIN SETTINGS
Admin Settings is designed for advanced users, including MIS Engineer,
IT specialist, Network admin, etc. In the Admin Settings sections, Hyshare
provides various custom congurations.
8.1 Wi-Fi Channel
Setting up Wi-Fi Channel. Hyshare provides three options: Country, Channel
and Bandwidth.
Please note that the user can only congure Wi-Fi Channel while Hyshare is
not connected to Wi-Fi.

11
8.2 SSID
Custom setting for SSID, including renaming, hide SSID or turn o SSID.
8.2.1 Hide SSID: Hide SSID from the standby screen. Please make sure
you’ve written it down.
8.2.2 Turn O SSID: Deactivating Hyshare’s SSID function. Please make
sure that the device is already connected to LAN.

12
8.3 Password
Change Hyshare’s Wi-Fi connection password.
8.4 My Screen
The user may replace the default theme of the standby screen by uploading
photos. Please make sure the image format is PNG format in 1920 x 1080
and smaller than 2MB.

13
8.5 Dynamic Wallpaper
Custom setting for dynamic wallpaper, upload the le through URL or USB
disk.

14
8.6 Admin Password
To provide better security, we suggest that the user may change an Admin
Password regularly.
8.7 Screen Saver
Species how much user idle time must elapse before the screen saver is
launched.

15
8.8 Upgrade
Upgrade your Hyshare Receiver and Transmitter’s rmware to the latest
version. Please make sure Hyshare is connected to the internet during
the updating process. To better enhance the user experience, it is highly
recommended that maintaining the consistency of devices’ rmware version,
both Hyshare Receiver and Transmitter.
8.8.1 Please make sure Hyshare Receiver is connected to the internet.
8.8.2 Connect Hyshare Transmitter to an external power supply. Please
make sure your Transmitter has been paired with the Receiver.
8.8.3 Click “Select All”, allowing the user to update all Hyshare devices at
once.
8.8.4 Press the “Update” button to activate the download process. The whole
process will be done within a few minutes.
Table of contents
Other CYP Projector Accessories manuals
Popular Projector Accessories manuals by other brands

Barco
Barco wePresent WiPG-1600W user manual

Navitar
Navitar 486MCZ500 installation instructions

Barco
Barco R817211K installation manual

Da-Lite
Da-Lite Tensioned Advantage Deluxe Electrol Instruction book

Sapphire Audio
Sapphire Audio SSM-BR instruction manual for Ceiling Installation Parts

LUMENE
LUMENE Majestic Premium 200V user manual