manuals.online logo
Brands
  1. Home
  2. •
  3. Brands
  4. •
  5. D-Link
  6. •
  7. Media Player
  8. •
  9. D-Link MovieNite DSM-310 User manual

D-Link MovieNite DSM-310 User manual

DSM-310
Quick Install Guide
MovieNite
Streaming Media Player
Thank you for purchasing the DSM-310 MovieNite Streaming Media Player. Follow
the easy steps in this guide to properly set up your media player. Please verify that
all the package contents listed below are available.
Package Contents
If any of the above items are missing, please contac t your reseller. Note that this product does not include an
Ethernet or HDMI cable. For the best quality video and audio, it is recommended to purchase an HDMI cable.
DSM-310 MovieNite Streaming Media Player
Remote Control (includes 2 AAA batteries)
Composite Audio/Video Cable
Power Adapter
Port Description
AV
Firmly connect the supplied composite A/V cable here and
the other end into your TV or home theater receiver. If you
are using an HDMI connection, you do not have to connect
this cable.
HDMI Connect an HDMI cable (not included) here and the other
end into your TV or home theater receiver.
LAN
Connect an Ethernet cable (not included) here and the
other end to your network (router/gateway or switch). If you
would like to connect using a wireless connection, do not
connect an Ethernet cable.
Power Receptor Connect the supplied power adapter here and the other
end into an outlet or surge protector.
Hardware Overview
HDMI LAN DC 12V
AV
Installation
Follow the steps below to connect and install your MovieNite Media Player. Once
you connect, you may be prompted to update the rmware. Press OK on the
remote. Once the rmware is nished updating, the unit will reboot automatically.
Warning: Do not turn o the DSM-310 during the update process.
Step 1
Connect an HDMI cable (not included) to the HDMI port on the DSM-310 and
the other end into the HDMI input port on your TV or receiver. Note that HDMI is
required for HD resolution.
HDMI LAN DC 12V
AV
HDMI
Step 3
Connect an Ethernet cable (not included) to the LAN port on the DSM-310 and
other end into your network (via router, gateway, or switch).
If you want to use the built-in wireless adapter, do not connect the Ethernet cable.
The on-screen setup wizard will allow you congure your wireless settings (refer to
Step 6 for wireless setup information).
Step 4
Connect the supplied power adapter to the power receptor on the DSM-310 and
plug it into a power outlet or surge protector. The device will power on.
HDMI LAN DC 12V
AV
Step 5
You will see the MovieNite screen appear. Follow the on-screen setup (if any) to
congure your DSM-310 media player. You may manually change your settings by
clicking the gear icon from the Home page.
If you connected an Ethernet cable and you cannot connect, please refer to
Ethernet Setup on the back page.
Wireless users continue to Step 6.
If you do not have an HDMI cable or a TV with an HDMI port, connect the supplied
A/V cable into the AV port on the DSM-310 and the other end into the correct
matching input ports on your TV or home theater receiver (yellow is for video, red
and white are for audio).
HDMI
HDMI LAN DC 12V
AV
Step 2
Power on your TV (and your receiver if you have connected the media player to
it). Select the correct video input (or source) on your TV (and correct input on your
receiver).
Remote Control
1Press to turn the DSM-310 on and o
2Stop
3Previous Button (function depends on app)
4Forward Button (function depends on app)
5Rewind Button
6Play/Pause Button
7Fast Forward Button
8Directional Pad to navigate menus
9OK/Enter Button
10 Press to go to the home page
11 Back Button
12 Options Button (function depends on app)
13 Press to launch Vudu
14 Press to launch Netix
15 Press to launch Pandora
16 Press to launch YouTube
1
4
7
3
2
5
6
9
11
8
12
13
15
10
14
16
HDMI LAN DC 12V
AV
5V---3A
1 2 LAN 3 4 INTERNET USB
RESET
Wireless Setup
Note: You can also use WPS (useful if you do not remember your wireless
password). Skip to the WPS Setup section on the back of this install guide.
A list of wireless networks in your area will appear. Select the
network you want to connect to and press the OK button on
your remote.
If you do not see your network displayed in the list, you can
scroll down and select Manually Connect to manually enter
your wireless network name (SSID) and security settings.
Note that your wireless network will not be displayed if
your router is out of range or the SSID broadcast is disabled.
Remember that the SSID and security password must match
your wireless router or access point exactly (case-sensitive).
Step 6 - If you did not connect an Ethernet cable, the DSM-310 will attempt to
connect to a wireless network.
Step 7 - If the network you want to connect to is secure (encrypted), you will be
prompted to enter the security password.
DSM-310
Troubleshooting
If you are unable to see a picture on your TV:
• Verify that your TV is turned on and set to the correct video input. Usually
pressing the input or source button on your TV or TV remote will allow you to
change the video input. Please refer to your TV user manual if you are unsure
how to change the input/source.
• Ensure that the power adapter is connected properly to your MovieNite and
that it is plugged in to a working power source.
• Verify that the cables for your Media Player and your TV are pushed in all the
way and in the correct ports.
• Make sure the volume on your TV is not on mute or low.
• If your MovieNite is connected to a receiver, verify if the receiver is turned on
and if the cables are pushed in all the way.
• Verify that the input on your TV or receiver matches the output of your
MovieNite player.
If you are having problems connecting to your wireless network
during setup:
• If your wireless signal is weak, change the location of your MovieNite or your
router. Additionally, ensure that there are limited obstructions between your
MovieNite and wireless router. For best results, place the DSM-310 in an open
area/shelf. Do not put it inside a cabinet or entertainment center.
• Temporarily disable your wireless security/encryption on your wireless router
or access point and try connecting again.
• Verify that you entered the correct password for your wireless network.
• Make sure that you selected the correct router/access point on your Auto
Search settings.
If the sound is not working properly:
The MovieNite remote is not working :
• Point the remote directly at the DSM-310, not the TV. If it is still not working,
check if the batteries are inserted correctly and working properly.
• Make sure nothing is blocking the front of the DSM-310.
Step 2 - Within 2 minutes, press the WPS button on your router or access point, or
launch WPS from its web UI. Please wait about 2 minutes to congure.
D-Link does not guarantee access to or the availability of particular websites or Internet services. Some online services may not be available
in some countries and may require a paid subscription/membership. 24/7 Basic Installation Support is available for the rst 30 days from
date of original purchase. 1-Year Limited Warranty. Latest software and documentation are available at http://support.dlink.com. Product
specications, size, and shape are subject to change without notice, and actual product appearance may dier from that depicted on the
package. Refer to the other side of this install guide for warranty details.
©2012 D-Link Corporation/D-Link Systems, Inc. All rights reserved. D-Link, the D-Link logo, MovieNite and the D-Link RoHS logo are
trademarks or registered trademarks of D-Link Corporation or its subsidiaries in the United States and/or other countries. Other trademarks
or registered trademarks are the property of their respective owners.
Version 1.1 | May 17, 2012
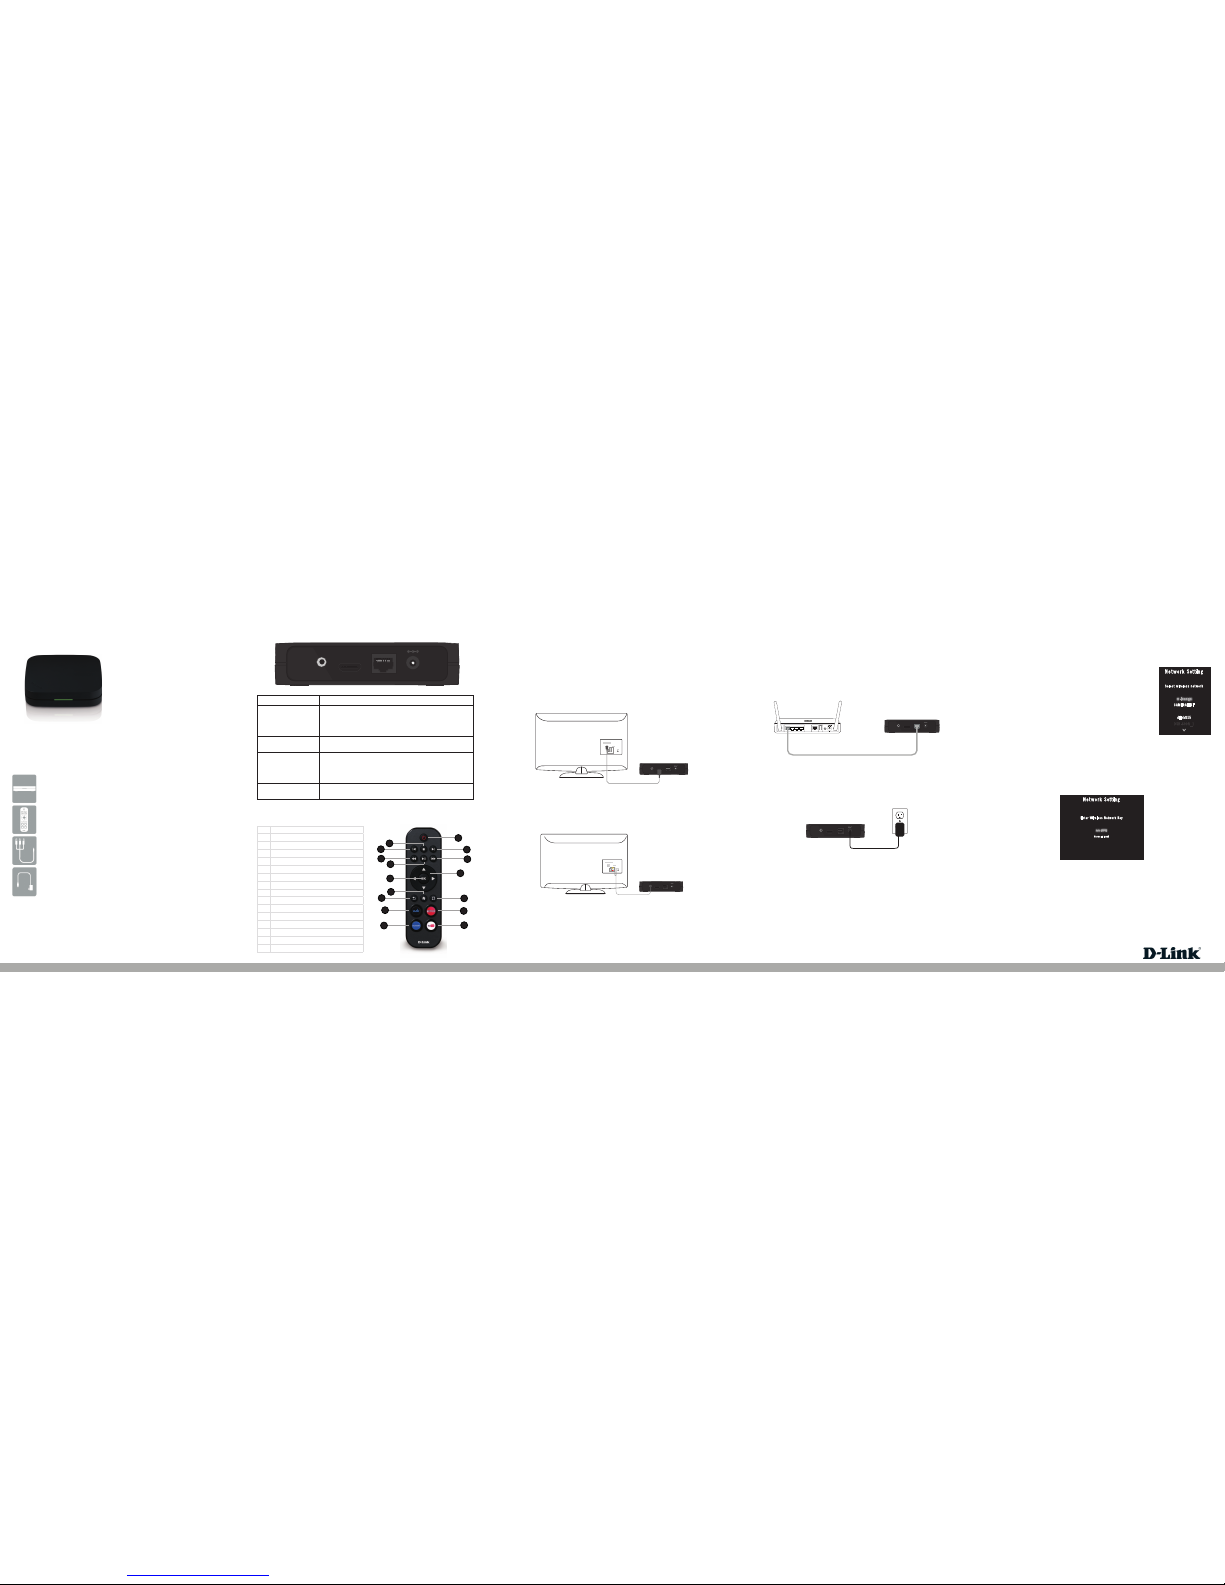
If connected directly to your TV
• Verify that the cables for your DSM-310, TV, and receiver are pushed in all the
way and in the correct ports.
• If you are using an HDMI cable, verify that the cable is rmly connected to both
your DSM-310 and the HDMI port on your receiver. Additionally, you should
connect an HDMI cable from your receiver to your TV.
• Verify that the video input on your receiver matches the same output used with
the DSM-310, and that your TV is set to the correct video input. Usually pressing
the input or source button on your TV or TV remote will allow you to change
the video input. Please refer to your TV and/or receiver user manual if you are
unsure how to change the input.
If connected to your home theater receiver
Ethernet Setup
If you have connected an Ethernet cable to the DSM-310 and either DHCP is not
enabled on your router or the DSM-310 cannot obtain an IP address, the Network
Setting error message will appear.
Verify that your Ethernet connection is good. Check the link light on your router
(or switch) is lit in the port that the DSM-310 is connected to. Select Retry and
press the OK button. If you still get an error message, select OK and press the OK
button on your remote.
If DHCP is disabled on your router, you will see the Select Connection Mode
screen. Select Manual IP and press OK to enter the IP settings manually (see
below).
Step 1 - Select the IP box and press OK on your remote. Use the on-screen
keyboard to enter an IP address for the DSM-310. Select Enter and then press the
OK button on your remote.
Step 2 - Repeat step 1 for (subnet) mask, gateway (usually the LAN IP address of
your router), and primary DNS server (usually the LAN IP address of your router).
Step 3 - Select Connect and press the OK button to save your settings and
connect to your network.
Network Setting
Please press WPS button on the AP within 120 seconds...
Please wait
Technical Support
Having trouble installing your new product? D-Link’s website contains the latest
user manual for D-Link products. U.S. and Canadian customers can contact D-Link
Technical Support through our website or by phone. You may register your product
with D-Link at http://registration.dlink.com.
United States
Telephone: (877) 453-5465
Internet: http://support.dlink.com
Canada
Telephone: (800) 361-5265
Internet: http://support.dlink.ca
If you still cannot connect and your Ethernet or wireless connection is good,
check your settings in your router. Possibly MAC address ltering may be enabled
on your router and you will need to add the LAN MAC address of the DSM-310 to
the lter list.
Step 8 - Use the on-screen keyboard to enter the wireless security password. Select
Enter and then press the OK button on your remote.
Note: The password is case-sensitive and must be entered the same as on your router
or access point.
Step 1 - If you have a WPS-enabled wireless router or access point, you can use
the WPS (Wi-Fi Protected Setup) option to congure your wireless settings
automatically. If you do not know how to start WPS on your router or access point,
please refer to its user manual.
After you select your wireless network (from Step 7), select WPS (Auto) and then
press the OK button on your remote.
If DHCP is disabled on your router, from the Select Connection Mode screen, select
Enter Static IP to manually enter the network settings for your DSM-310 (refer to
the If DHCP is disabled on your router section in this guide).
You should now be connected to your wireless network and the Home page will be
displayed on your TV.
Note: If for some reason the DSM-310 does not connect to your network, it may be
out of range. Move the DSM-310 closer to your router or access point (in the same
room) and repeat the setup steps. Once connected, try moving the DSM-310 back
near your TV.
WPS Setup
Step 3 - Your DSM-310 should now be connected to your wireless network.
Note: If for some reason the DSM-310 does not connect to your network, it may be
out of range. Move the DSM-310 closer to your router or access point (in the same
room) and repeat the setup steps. Once connected, try moving the DSM-310 back
near your TV.
The WPS process will begin.
If DHCP is disabled on your router

Other manuals for MovieNite DSM-310

2

Other D-Link Media Player manuals

D-Link DivX Connected DSM-330 User manual

D-Link

D-Link DivX Connected DSM-330 User manual

D-Link MediaLounge DSM-320RD User manual

D-Link

D-Link MediaLounge DSM-320RD User manual

D-Link MediaLounge DSM-320 User manual

D-Link

D-Link MediaLounge DSM-320 User manual

D-Link DSM-260 User manual

D-Link

D-Link DSM-260 User manual

D-Link MediaLounge DSM-520 User manual

D-Link

D-Link MediaLounge DSM-520 User manual

D-Link MediaLounge DSM-520 User manual

D-Link

D-Link MediaLounge DSM-520 User manual

D-Link MediaLounge DSM-320RD User manual

D-Link

D-Link MediaLounge DSM-320RD User manual

D-Link MediaLounge DSM-320 User manual

D-Link

D-Link MediaLounge DSM-320 User manual

D-Link DSM-120 User manual

D-Link

D-Link DSM-120 User manual

D-Link MediaLounge DSM-320 User manual

D-Link

D-Link MediaLounge DSM-320 User manual

D-Link DivX Connected DSM-330 User manual

D-Link

D-Link DivX Connected DSM-330 User manual

D-Link DSM-312 User manual

D-Link

D-Link DSM-312 User manual

D-Link DAP-1562 User manual

D-Link

D-Link DAP-1562 User manual

D-Link Boxee Box User manual

D-Link

D-Link Boxee Box User manual

D-Link MediaLounge DSM-320 User manual

D-Link

D-Link MediaLounge DSM-320 User manual

D-Link MediaLounge DSM-320 User manual

D-Link

D-Link MediaLounge DSM-320 User manual

D-Link DSM-312 User manual

D-Link

D-Link DSM-312 User manual

D-Link MediaLounge DSM-520 User manual

D-Link

D-Link MediaLounge DSM-520 User manual

D-Link DSM-312 User manual

D-Link

D-Link DSM-312 User manual

D-Link MyChannel DSM-350 User manual

D-Link

D-Link MyChannel DSM-350 User manual

D-Link DSM-380 User manual

D-Link

D-Link DSM-380 User manual

D-Link DPG-1200 - PC-on-TV Media Player User manual

D-Link

D-Link DPG-1200 - PC-on-TV Media Player User manual

D-Link DSM-120 User manual

D-Link

D-Link DSM-120 User manual

D-Link MovieNite DSM-310 User manual

D-Link

D-Link MovieNite DSM-310 User manual

Popular Media Player manuals by other brands

Hama PN40HD manual

Hama

Hama PN40HD manual

Denon DNHD2500 - Dual DJ MP3 Player operating instructions

Denon

Denon DNHD2500 - Dual DJ MP3 Player operating instructions

Sony DSX-A410BT operating instructions

Sony

Sony DSX-A410BT operating instructions

Logitech Squeezebox Boom quick start guide

Logitech

Logitech Squeezebox Boom quick start guide

Sony RSX-GS9 operating instructions

Sony

Sony RSX-GS9 operating instructions

Widex TV Play User instructions

Widex

Widex TV Play User instructions

IBASE Technology Signature Book SI-102-424 Series user manual

IBASE Technology

IBASE Technology Signature Book SI-102-424 Series user manual

Sony DFP-R2000 user guide

Sony

Sony DFP-R2000 user guide

NetUP Streamer HDMI 1x v2 user manual

NetUP

NetUP Streamer HDMI 1x v2 user manual

Philips Streamium NP3300 user manual

Philips

Philips Streamium NP3300 user manual

DAPAudio TCD-100 Product guide

DAPAudio

DAPAudio TCD-100 Product guide

DANE-ELEC SO SPEAKY - datasheet

DANE-ELEC

DANE-ELEC SO SPEAKY - datasheet

ViewSonic NMP620-P10 quick guide

ViewSonic

ViewSonic NMP620-P10 quick guide

AMX IS-SPX-1000 - SCHEMA Operation/reference guide

AMX

AMX IS-SPX-1000 - SCHEMA Operation/reference guide

Elo TouchSystems Elo Backpack Quick installation guide

Elo TouchSystems

Elo TouchSystems Elo Backpack Quick installation guide

Fantec XMP600 + WiFi manual 

Fantec

Fantec XMP600 + WiFi manual 

RTI MS-1 quick start guide

RTI

RTI MS-1 quick start guide

Fiio X5 user guide

Fiio

Fiio X5 user guide

manuals.online logo
manuals.online logoBrands
  • About & Mission
  • Contact us
  • Privacy Policy
  • Terms and Conditions

Copyright 2025 Manuals.Online. All Rights Reserved.