manuals.online logo
Brands
  1. Home
  2. •
  3. Brands
  4. •
  5. D-Link
  6. •
  7. Network Router
  8. •
  9. D-Link DSL-2880AL User manual

D-Link DSL-2880AL User manual

ENGLISH
DSL-2880AL
If any of the above items are missing, please contact your reseller/retailer.
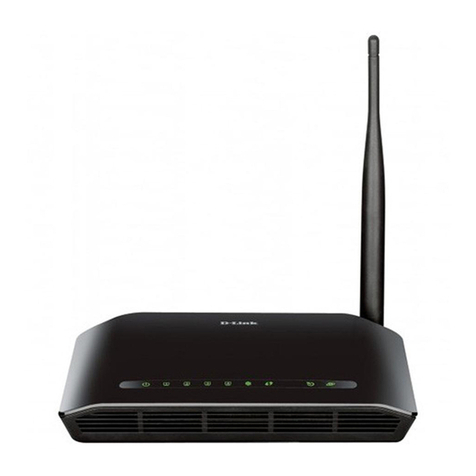
Dual Band Wireless AC1200 Gigabit ADSL2+ Modem Router (DSL-2880AL)
Power Adapter
Ethernet Cable
ADSL2+ Microlter/Splitter
Quick Install Guide
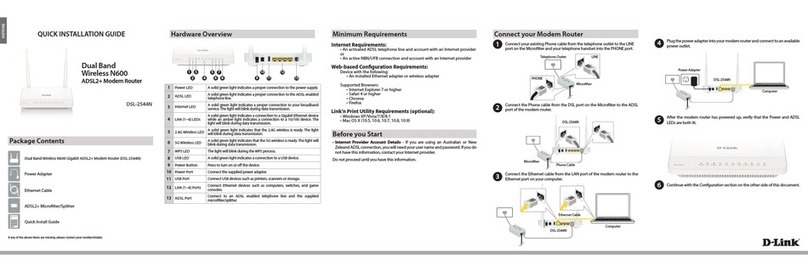
1Power LED A solid green light indicates a proper connection to the power supply.
2LAN (1~4) LEDs
A solid green light indicates a connection to a Gigabit Ethernet device
while an amber light indicates a connection to a 10/100 device. The
LED will blink during data transmission.
3Wireless LED
A solid green light indicates that the 2.4G wireless segment is ready
while an amber light indicates that the 5G wireless segment is ready.
The light will blink during data transmission.
4WPS LED The light will blink during the WPS process.
5USB LED A solid green light indicates a connection to a USB device.
6WAN LED
A solid green light indicates a WAN connection to a Gigabit Ethernet
device, an amber light indicates a connection to a 10/100 device and
both green and amber indicates a connection to a 10Mbps device . The
LED will blink during data transmission.
7ADSL LED A solid green light indicates a proper connection to the ADSL enabled
telephone line.
8Internet LED A solid green light indicates a proper connection to your broadband
service. The light will blink during data transmission.
9ADSL Port Connect to an ADSL enabled telephone line and the supplied
microlter/splitter.
10 WAN Port Connect to an Ethernet WAN service (e.g. NBN/UFB). The LED will blink
during data transmission.
11 LAN (1~4) Ports Connect Ethernet devices such as computers, switches, and game
consoles.
12 USB Port Connect USB devices such as printers, scanners or storage.
13 WiFi Buttons Press for three seconds to enable/disable 2.4G or 5G wireless networks.
14 Reset Button Press and hold the reset button with a paper clip for ten seconds to
reset the router to the factory default settings.
15 Power Button Press to turn on or o the device.
16 Power Port Connect the supplied power adapter.
1 3 5 7
9
10 11 12 14 16
13 15
1Connect your existing Phone cable from the telephone outlet to the LINE
port on the Microlter and your telephone handset into the PHONE port.
2Connect the Phone cable from the DSL port on the Microlter to the ADSL
port of the modem router.
3Connect the Ethernet cable from the LAN port of the modem router to the
Ethernet port on your computer.
4Plug the power adapter into your modem router and connect to an available
power outlet.
5
6
After the modem router has powered up, verify that the Power and ADSL
LEDs are both lit.
Continue with the Conguration section on the other side of this document.
Microlter
Telephone Outlet
Package Contents
QUICK INSTALLATION GUIDE Hardware Overview Minimum Requirements Connect your Modem Router
•Internet Provider Account Details - If you are using an Australian or New
Zeleand ADSL connection, you will need your user name and password. If you do
not have this information, contact your Internet provider.
Do not proceed until you have this information.
Before you Start
Internet Requirements:
• An activated ADSL telephone line and account with an Internet provider
Web-based Conguration Requirements:
Device with the following:
• An installed Ethernet adapter or wireless adapter
Supported Browsers:
• Internet Explorer 7 or higher
• Safari 4 or higher
• Chrome
• Firefox
Link’n Print Utility Requirements (optional):
• Windows XP/Vista/7/8
• Mac OS X (10.5, 10.6, 10.7, 10.8)
2
Dual Band
Wireless AC1200
ADSL2+ Modem Router 4 6 8
Power Adapter
DSL-2880AL
Computer
LINE
PHONE
Phone Cable
DSL-2880AL
Microlter
Ethernet Cable DSL-2880AL
Computer
ENGLISH
Version 1.0 | August 15, 2013
Conguration
Web Browser Setup
Enter a new Password and Verify Password to secure your modem router,
click Next to continue.
Select the security method that you wish to use for your wireless networks,
click Next to continue. D-Link recommends that you select BEST.
Enter a Wireless Security Password (also known as a passphrase or Wi-Fi
Password) for each wireless network, click Next to continue.
Click Next to nish setting up your router.
3 7
8
Copyright ©2013 D-Link Corporation/D-Link Australia Pty Ltd. All rights reserved. D-Link and the D-Link logo are registered trademarks
of D-Link Corporation or its subsidiaries in Australia and other countries. iPhone, iPad, and iPod touch are registered trademarks of Apple
Inc. Android is a trademark of Google, Inc. Other trademarks are the property of their respective owners. Maximum wireless signal rate
derived from IEEE Standard 802.11g and 802.11n specications. Actual data throughput will vary. Network conditions and environmental
factors, including volume of network trac, building materials and construction, and network overhead, lower actual data throughput
rate. Environmental factors will adversely aect wireless signal range. Product specications, size and shape are subject to change
without notice, and actual product appearance may dier from that depicted on the packaging. Visit www.dlink.com.au for more details.
Having trouble installing your new product? D-Link’s website contains the latest
user documentation and software updates for D-Link products. Australian and New
Zealand customers can contact D-Link Technical Support through our website.
Australia
Internet: http://support.dlink.com.au
New Zealand
Internet: http://support.dlink.co.nz
How do I connect my wireless devices to the DSL-2880AL modem router?
1. Open your wireless network utility that displays available wireless networks.
2. Select the Wi-Fi Network name you assigned in the wizard and connect.
Note: If you did not run the setup wizard or you reset the router to its default
settings, refer to the label on the router for the default Wi-Fi Network Name and Wi-
Fi Password.
You can also connect using WPS:
1. Press the WPS button on the DSL-2880AL for three seconds.
2. Within one minute press the WPS button on your wireless device.
3. Allow up to two minutes to connect.
Note: Some devices may require you to log in to a utility to start the WPS process.
Refer to the user manual of the device you want to connect to the router if you do
not know how to start the WPS process.
How do I change the wireless settings on the DSL-2880AL modem router?
1. Open a web browser (e.g. Internet Explorer, Chrome, Firefox, or Safari) and
enter the IP address of the router (http://192.168.1.1).
2. At the login screen, type in admin for the user name and enter the router
password you created in the wizard (admin by default).
3. Go to Setup > Wireless Settings > Manual Wireless Network Setup to
create a new Wi-Fi network name (SSID) and Wi-Fi password.
Documentation available at http://www.dlink.com.au/DSL-2880AL
Troubleshooting
Technical Support
Link’n Print Utility
The Link’n Print allows you to share USB devices such as external storage drives and
multifunction printers with other users across your network by simply connecting
the device to your modem router This allows you to use an external storage drive
or printer located across your network as if it were connected to your local PC.
Download the application for your operating system from the below link
or by visiting the D-Link Support website as shown on the last page of this
guide and selecting the DSL-2880AL from the list:
Extract and Run the Setup/Installer that you have just downloaded.
When completed the Link’n Print utility will be installed and run on your
computer. Now you can Insert a USB device to your modme router.
Simply right click on the USB device you wish to use and click Connect, this
will now establish a direct connection to the USB device for your computer.
http://www.dlink.com.au/tech/download/download.aspx?product=DSL-2880AL
1
2
3
4
Select your Time Zone from the list, click Next to continue.
Select your Country and Internet Provider from the list, click Next to
continue.
Now enter your User Name and Password as provided by your Internet
Provider, click Next to continue.
4
5
Enter a new Wireless Network Name (SSID) for both the 2.4G and 5G
networks available in this modem router, click Next to continue.
6
Congratulations! You have completed the modem router installation.
Conguration
Open a web browser (e.g., Internet Explorer, Chrome, Firefox, or Safari)
and enter the IP address of the router (http://192.168.1.1). The default
username and password will be admin and admin respectively.
1
Note: If you want to congure your modem router from a wireless computer or
mobile device, connect to the router wirelessly by going to your wireless utility
on your device. The default Wi-Fi Networks are D-Link DSL-2880AL and D-Link
DSL-2880AL 5Ghz. Select one and then continue to step 2.
When the Welcome screen appears, click Next to start the wizard.
2
Other manuals for DSL-2880AL

3

Other D-Link Network Router manuals

D-Link DGS-1224T - Web Smart Switch User manual

D-Link

D-Link DGS-1224T - Web Smart Switch User manual

D-Link DES-802 - Switch User manual

D-Link

D-Link DES-802 - Switch User manual

D-Link SharePort DIR-825 User manual

D-Link

D-Link SharePort DIR-825 User manual

D-Link DES-1024DG User manual

D-Link

D-Link DES-1024DG User manual

D-Link EBR-2310 - EN Broadband Router User manual

D-Link

D-Link EBR-2310 - EN Broadband Router User manual

D-Link DSL-2640BT User manual

D-Link

D-Link DSL-2640BT User manual

D-Link DIR-451 User manual

D-Link

D-Link DIR-451 User manual

D-Link DIR-X5460 User manual

D-Link

D-Link DIR-X5460 User manual

D-Link DSL-504T User manual

D-Link

D-Link DSL-504T User manual

D-Link DSL-2520U User manual

D-Link

D-Link DSL-2520U User manual

D-Link dir-600m User manual

D-Link

D-Link dir-600m User manual

D-Link Express EtherNetwork DI-604 User manual

D-Link

D-Link Express EtherNetwork DI-604 User manual

D-Link COVR- C1203 User manual

D-Link

D-Link COVR- C1203 User manual

D-Link DWR-932C User manual

D-Link

D-Link DWR-932C User manual

D-Link DI-707PD User manual

D-Link

D-Link DI-707PD User manual

D-Link DGS-3700-12 Manual

D-Link

D-Link DGS-3700-12 Manual

D-Link DSL-504 User manual

D-Link

D-Link DSL-504 User manual

D-Link COVR DKT-883 User manual

D-Link

D-Link COVR DKT-883 User manual

D-Link DGS-3224SR User manual

D-Link

D-Link DGS-3224SR User manual

D-Link DSL-2540U User manual

D-Link

D-Link DSL-2540U User manual

D-Link DSL-2640U User manual

D-Link

D-Link DSL-2640U User manual

D-Link SharePort DIR-825 User manual

D-Link

D-Link SharePort DIR-825 User manual

D-Link DES-1016D - Switch User manual

D-Link

D-Link DES-1016D - Switch User manual

D-Link DIR-878 User manual

D-Link

D-Link DIR-878 User manual

Popular Network Router manuals by other brands

H3C S12500R Series Configuration Examples

H3C

H3C S12500R Series Configuration Examples

NETGEAR ProSAFE GS105Ev2 installation guide

NETGEAR

NETGEAR ProSAFE GS105Ev2 installation guide

Cisco 5428 - SN Router Hardware installation

Cisco

Cisco 5428 - SN Router Hardware installation

Black & Decker XTW1500E Original instructions

Black & Decker

Black & Decker XTW1500E Original instructions

Mercusys AC12G user guide

Mercusys

Mercusys AC12G user guide

Aerohive BR200-LTE-VZ quick start

Aerohive

Aerohive BR200-LTE-VZ quick start

Korenix JetNet 5728G-24P Series Quick installation guide

Korenix

Korenix JetNet 5728G-24P Series Quick installation guide

Cisco 7301 Series quick start guide

Cisco

Cisco 7301 Series quick start guide

3Com USB Network Interface datasheet

3Com

3Com USB Network Interface datasheet

StarTech.com DS5105 Spec sheet

StarTech.com

StarTech.com DS5105 Spec sheet

Draytek Vigor2135 Series quick start guide

Draytek

Draytek Vigor2135 Series quick start guide

WM Systems M2M Router PRO4 user manual

WM Systems

WM Systems M2M Router PRO4 user manual

Edimax CV-7438nDM user manual

Edimax

Edimax CV-7438nDM user manual

Juniper ERX-1410 Installation and user guide

Juniper

Juniper ERX-1410 Installation and user guide

Cisco Small Business SRP520-U quick start guide

Cisco

Cisco Small Business SRP520-U quick start guide

Edimax BR-6479Gn Quick installation guide

Edimax

Edimax BR-6479Gn Quick installation guide

KYLAND KIEN1005 user manual

KYLAND

KYLAND KIEN1005 user manual

NetComm NB9WMAXX Mac User Guide

NetComm

NetComm NB9WMAXX Mac User Guide

manuals.online logo
manuals.online logoBrands
  • About & Mission
  • Contact us
  • Privacy Policy
  • Terms and Conditions

Copyright 2025 Manuals.Online. All Rights Reserved.