Dacor 65537 User manual

Place Serial Number Label Here
DISHWASHER
USE AND CARE MANUAL
The life of the kitchen TM
Please read this manual completely before operating your dishwasher. Keep it for future reference.
Part No. 65537 Rev. C

To Our Valued Customer:
Congratulations on your purchase of the very latest in Dacor products! Our unique combination of features, style and
performance make us the life of the kitchen TM, and a great addition to your home.
In order to familiarize yourself with the controls, functions and full potential of your new distinctive appliance, we
suggest that you thoroughly read this Use & Care Manual, beginning with the Important Instructions Section.
All Dacor Appliances are designed and manufactured with quality and pride, while working within the framework of
our Company Value. Should you ever experience a problem with your product, please first check the Problem
Solving Section of this manual for guidance. It provides useful suggestions and remedies prior to calling for service.
Valuable customer input helps us to continuously improve our products and services, so please feel free to contact
our Customer Service Team for assistance with any of your product support needs.
Dacor Customer Service
1440 Bridge Gate Drive
Diamond Bar, CA 91765
Telephone:
Fax:
Hours of Operation:
Web Site:
(800) 793-0093
(626) 403-3130
Monday through Friday
6:00 A.M. to 5:00 P.M. Pacific Time
www.dacor.com
Thank you for choosing Dacor for your home. We are a company built by families for families and we are dedicated
to serving yours. We are confident that your new Dacor product will deliver ahigh level of performance and
enjoyment for many years to come.
yl Crowe
Director, Customer Satisfaction

Important Safety Instructions .............................. 4
Symbols in this Manual ........................................... 4
General Safety Precautions ..................................... 4
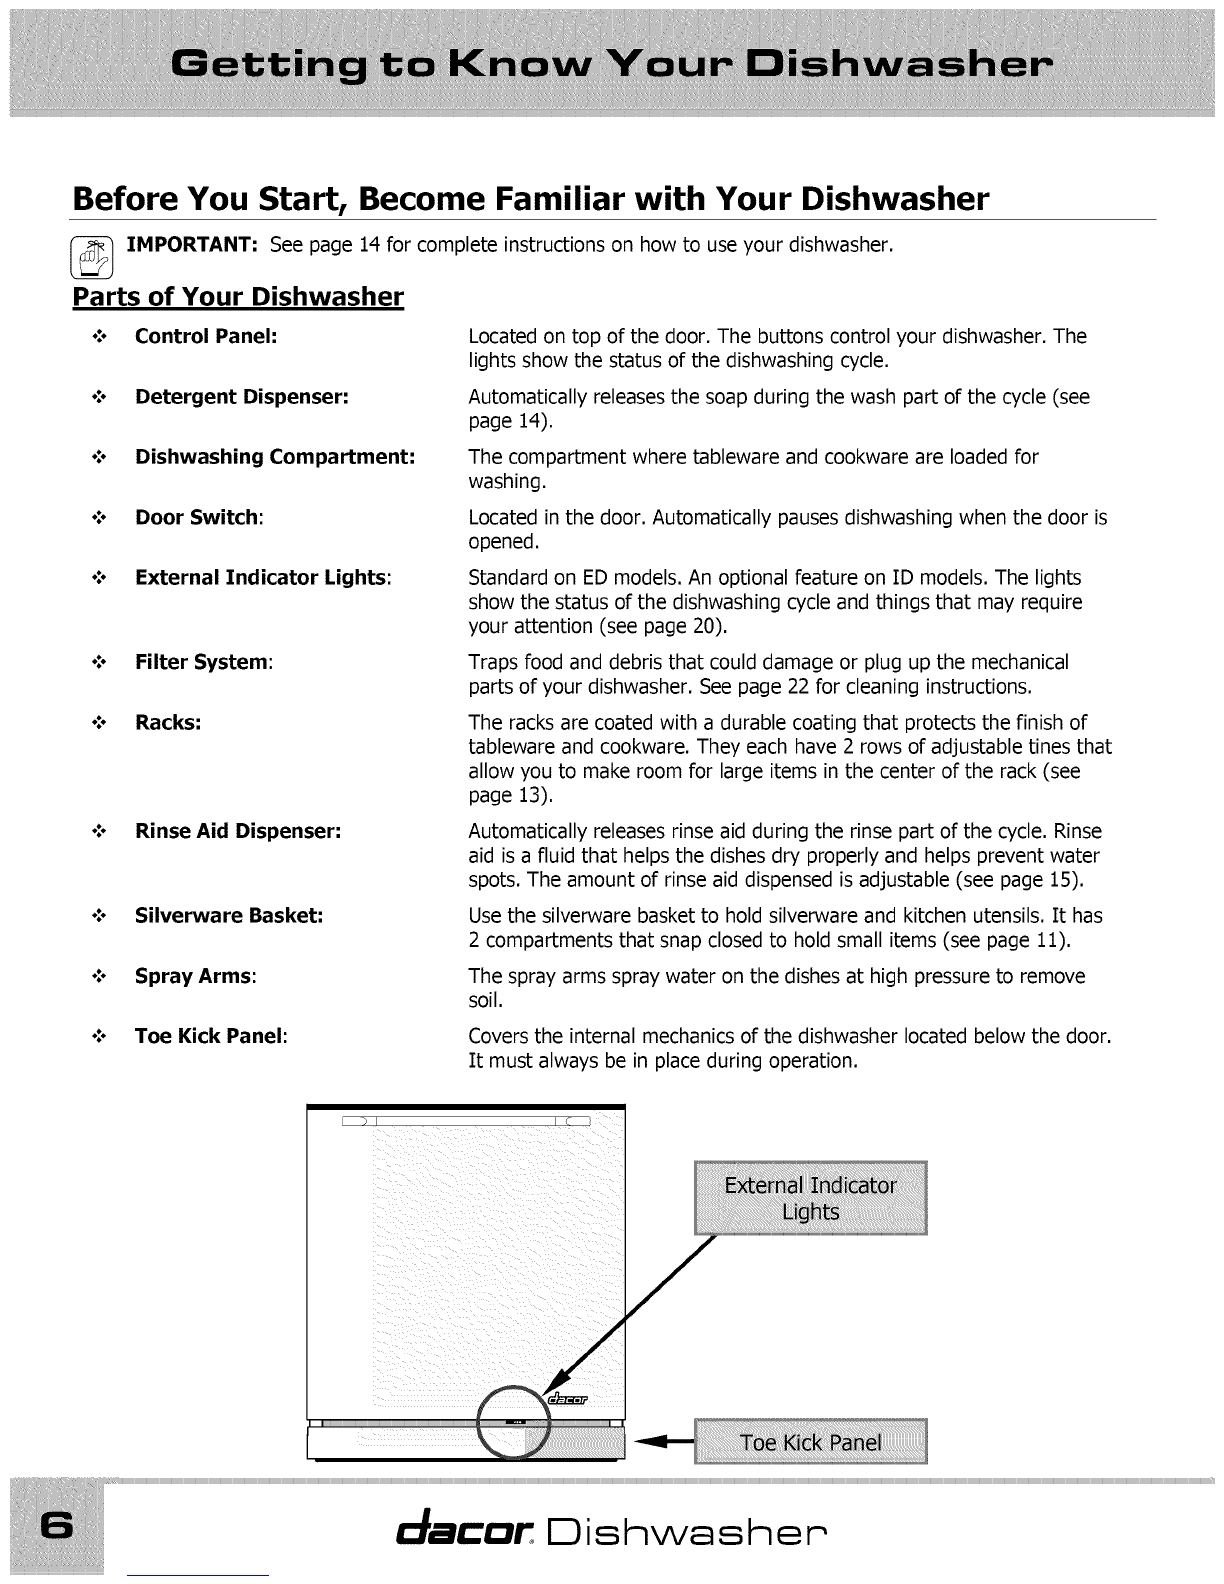
Getting to Know Your Dishwasher ....................... 6
Parts of Your Dishwasher .................................... 6
Parts of the Control Panel ................................ 8
Other features on your dishwasher ....................... 9
Specifications ..................................................... 9
Loading Your Dishwasher ................................... 10
What Can Be Washed ........................................... 10
What Should Not Be Washed ................................. 10
Loading the Silverware Basket ............................... 11
Loading the Racks ................................................ 11
Loading the Racks ................................................ 12
Operating Your Dishwasher ................................ 14
Filling the Detergent Dispenser .............................. 14
Filling the Rinse Aid Dispenser ............................... 15
Adjusting the Rinse Aid Dispenser ...................... 15
Starting Your Dishwasher ...................................... 16
Adding a Dish After You Start ............................ 16
Stopping Your Dishwasher During Operation ....... 16
CANCEL........................................................ 16
Pausing Dishwasher Operation ........................... 17
STOP ........................................................... 17
Sanitizing the Dishes ......................................... 17
SANI-RINSE .................................................. 17
The DELAY Feature ........................................... 18
Changing the Cycle After You Start ..................... 18
The Cycle Memory Feature ................................ 19
Draining Standing Water ................................... 19
The SECUREFeature ........................................ 19
The Control Panel Lights ....................................... 20
WASHING Light ............................................ 20
RINSING Light .............................................. 20
DRYING Light ............................................... 20
CLEAN Light ................................................. 20
SANITIZED Light ........................................... 20
RINSE AID Light ........................................... 20
FLOOR GUARD Light ..................................... 20
DIAGNOSTIC Light ........................................ 20
External Status Lights ....................................... 20
External Sanitized Light (Blue) ........................ 20
External Alarm Light (Red) ............................. 20
External In-Process Light (Green) ................... 20
Cleaning and Maintenance ................................. 22
Cleaning the Interior Surfaces ............................... 22
Filters and Strainer Baskets ............................... 22
Cleaning the Exterior Surfaces ............................... 22
Problem Solving ................................................. 24
Problem Solution Guide ........................................ 24
Getting Help ........................................................ 29
Warranty Information ........................................ 30
Notes .................................................................. 31
Please enter the information requested in the spaces provided below. This information will be required in the unlikely
event that a service call becomes necessary:
Model No. Serial No.
Date Purchased Date Installed
Purchased From
Address
Phone
The model and serial number label is located inside the dishwasher's left door jam. Open the door to expose it.
Use and Oare Manual

Safety is everyone's responsibility. All Dacor appliances are designed and constructed to
give you many years of safe operation. Operation is further enhanced if proper care and
judgment are exercised in the use and maintenance of this appliance.
Symbols in this Manual
WARNING
Alerts you to a hazardous situation, that if not avoided, may cause death or injury to you
or others. Property damage, including damage to the dishwasher, may also result.
OAUTION
Alerts you to a situation, that if not avoided, may cause property damage, including
damage to the dishwasher.
IMPORTANT
Tips that help you to get the most out of the dishwasher.
General Safety Precautions
_WARNING:
• Read all instructions before using the dishwasher.
Use and care for the dishwasher only as instructed
in this manual.
Keep this manual for future reference.
If you receive a damaged product, immediately
contact your dealer or builder. Do not install or use a
damaged appliance.
To avoid electrical shock, make sure that the
dishwasher has been properly installed and
grounded by a qualified installer according to the
accompanying installation instructions. The
dishwasher must be mounted in a completely
enclosed cabinet. Have the installer show you where
the fuse or junction box is located so that you know
where and how to turn off the power.
Do not repair or replace any part of the dishwasher
unless specifically recommended in the literature
accompanying it. A qualified service technician
should perform all other service.
Make sure individuals who use the dishwasher are
able to operate it properly.
Do not leave children alone or unattended in the
area around the dishwasher. Do not allow children
to play with the controls or other parts of the
dishwasher.
_] WARNING:
• Never allow anyone, including children, to sit or
stand on any part of the dishwasher. Stepping or
sitting on any part of it may result in tipping,
damage, and serious injury.
Many surfaces within the dishwasher achieve high
temperatures. Do not touch interior surfaces or
items inside the dishwasher during or immediately
after use. Exercise caution when opening the door.
Let hot air and steam escape before looking or
reaching inside.
• Do not operate the dishwasher without the door
completely closed and the toe kick panel in place.
• Do not store or use combustible materials, liquids, or
gases near this or any other appliance.
• Clean only those parts of the dishwasher listed in
this manual. Clean them only in the manner
specified.
Use only the cleaning solutions specified in this
manual to clean the dishwasher. Other cleaning
solutions could produce dangerous fumes, cause
corrosion of the metal parts, and could permanently
damage the finishes.
• Use only detergents and rinse aids designed for use
with a residential dishwasher.
• Store all detergents and rinse aids out of the reach
of children.
mcor C)ishwasher

i[V-] WARNING:
• During loading, insert all sharp or pointed objects
with the handles up. Locate these items where they
will not damage the door seal or cause personal
injury.
• Do not tamper with the controls.
Under certain conditions hydrogen gas may be
produced in a hot water system that has not been
used for two weeks or more. Hydrogen gas is
explosive. If the hot water system has not been
used for a period of time, turn on all hot water
faucets and let the water flow for several minutes to
release any accumulated hydrogen gas. Do not
smoke or use an open flame during this process.
• To prevent child entrapment, always remove the
door from an old dishwasher when removing it from
service.
• This dishwasher is not intended for commercial use.
V-] CAUTION:
• Use the dishwasher to wash flatware and cookware
ONLY. Washing other items may damage or discolor
the dishwasher. Wash only the types of dishes and
cooking utensils indicated in this manual.
Do not wash plastic items unless they are marked
"dishwasher safe". Always check the manufacturer's
recommendation before washing plastic items that
are not marked.
To prevent household mold and mildew damage,
periodically check the inlet and drain hoses for leaks.
If the dishwasher outlet is connected to a garbage
disposal, make sure the disposal is completely empty
before running the dishwasher.
Always place large or heavy items in the bottom
rack.
To avoid damage to the racks, do not let sharp
edges come into contact with them.
To avoid breakage, secure all glassware by adjusting
the tines.
Use and (Care Manuel

Before You Start, Become Familiar with Your Dishwasher
_ IMPORTANT: See page 14 for complete instructions on how to use your dishwasher.
Parts of Your Dishwasher
o:o Control Panel:
o:o Detergent Dispenser:
o:o Dishwashing Compartment:
o:o Door Switch:
o:o External Indicator Lights:
•:° Filter System:
o:o Racks:
•:o Rinse Aid Dispenser:
•:° Silverware Basket:
•:o Spray Arms:
Located on top of the door. The buttons control your dishwasher. The
lights show the status of the dishwashing cycle.
Automatically releases the soap during the wash part of the cycle (see
page 14).
The compartment where tableware and cookware are loaded for
washing.
Located in the door. Automatically pauses dishwashing when the door is
opened.
Standard on ED models. An optional feature on ID models. The lights
show the status of the dishwashing cycle and things that may require
your attention (see page 20).
Traps food and debris that could damage or plug up the mechanical
parts of your dishwasher. See page 22 for cleaning instructions.
The racks are coated with a durable coating that protects the finish of
tableware and cookware. They each have 2 rows of adjustable tines that
allow you to make room for large items in the center of the rack (see
page 13).
Automatically releases rinse aid during the rinse part of the cycle. Rinse
aid is a fluid that helps the dishes dry properly and helps prevent water
spots. The amount of rinse aid dispensed is adjustable (see page 15).
Use the silverware basket to hold silverware and kitchen utensils. It has
2 compartments that snap closed to hold small items (see page 11).
The spray arms spray water on the dishes at high pressure to remove
soil.
o:o Toe Kick Panel: Covers the internal mechanics of the dishwasher located below the door.
It must always be in place during operation.
mcor C)ishwasher

Use and Oare Manual

Parts of the Control Panel
4. Control Panel Indicator Lights:
4. Numeric Display:
The lights that show the status of the dishwashing cycle and things that
may require your attention (see page 20).
Displays the approximate number of minutes until the end of the cycle.
If you are using the delay feature, it shows the number of hours before
the dishwasher will start.
BUTTONS
Use this button to start the dishwasher after selecting a wash cycle or
the rinse cycle (see page 16). It can also be used to pause the
dishwasher in the middle of a wash or rinse cycle (see page 17).
This wash setting is best for normal soil.
This wash setting is best for very dirty tableware and cookware.
This wash setting is best for china, crystal, or glass. It is also good for
lightly soiled items that have been pre-rinsed.
Press this button if you want to run the rinse portion of the cycle only.
The dry cycle will not run. Also, use this setting to rinse tableware that
you do not want to wash right away.
This feature allows you to set the dishwasher to start at a later time (see
page 18).
......................................................................................................................................................................................................................................................................................................................................................................................................................................................................................................_W_W__1______
This feature can be used with the normal wash cycle only. It rinses the
dishware with rinse water that is 5 degrees hotter than the regular cycle
rinse water for maximum sanitization and drying (see page 17).
Use this button to stop the dishwasher in the middle of a cycle (see page
16).
A safety feature. This button locks the control panel to prevent children
from tampering with it (see page 19).
Dishwasher

Other features on your dishwasher
4° Turbidity Sensor:
4. Floor Guard:
4° Pressure Sensor System:
•:° Digital Temperature Sensor:
•:° In-line Water Heater:
Specifications
Operating temperature range:
Storage temperature range:
Line voltage and tolerance:
Automatically decreases or increases the wash and rinse time, as well as
water usage, for more consistent cleaning, and energy savings.
A safety feature that prevents the dishwasher from starting if water is
detected in the mechanical system below the dishwashing compartment.
The FLOOR GUARD light on the control panel also comes on.
Senses the water level for consistent and complete draining of the
dishwashing compartment.
Continuously monitors and controls water temperature.
The dual thermal safety in-line water heater is located safely out of the
touch of hands or plastic dishware in the water circulation system. It is
monitored by an automatically resetting thermostat and element, which
protect the heating element against burnout due to operation without
water in the appliance.
50° to 158°F
-4° to 185°F
120VAC (60Hz), + 10% -15%
Use and Oare Mamual

_WARNING: Load all sharp or pointed objects with the handles up.
_ IMPORTANT: If the load will sit for a while before washing, run the
rinse cycle to reduce the chance of food hardening. Doing so will also
reduce the risk of acidic foods damaging metal surfaces.
What Can Be Washed
Items that you can safely wash in your dishwasher:
•Aluminum (except for disposables)
•China (except delicate china)
•Cookware with non-stick coatings
• Crystal (except antique crystal)
• Glass
• Plastic (dishwasher safe only)
• Silver and silver plate
• Stainless Steel
• Stoneware
What Should Not Be Washed
For safety reasons, and to prevent damage, do not wash the following items in your
dishwasher:
• Antique crystal • Flatware with bonded handles
• Brass • Gold
• Bronze • Pewter
• Cast iron • Sharp kitchen carving knives
• Delicate china • Tin
• Disposable aluminum • Wood
• Disposable plastic items
_mcor C)ishwasher

Loading the Silverware Basket
@ IHPORTANT:
•For the best results do not nest utensils in the silverware basket.
• Do not load silver next to stainless steel. Damage to the silver may
result.
To prevent small, light items from falling out of the rack when
sprayed with water:
1. Put small items into a compartment with a hinged cover.
2. Snap the cover shut.
Silverware basket placement:
Put the silverware basket in the bottom
rack near the front, between the tines.
The silverware basket may be split into two
parts for a better fit. To reattach, insert
tabs into holes and snap into place.
Use and Oare Manual

Loading the Racks
IMPORTANT:
•It is best to place sharp objects in the silverware basket
to prevent damage to the rack coating.
The spray arms must spin freely. Do not allow items
sticking out of the racks to block them. Raise the top
rack to prevent objects on the bottom rack from blocking
the upper spray arm (see below).
• Do not load cookie sheets and large platters in the front
of the bottom rack. Doing so will prevent water from
dissolving the detergent in the detergent dispenser.
• After loading, push in firmly on the top rack.
Adjust the top rack
If there are large items in the bottom rack that
could interfere with the upper spray arm, move the
top rack to the high position. Otherwise, put the
top rack in the low position.
To change the top rack position:
1. Pull up on both of the handles on the sides
of the rack.
2. Move the rack to the new position.
3. Release the handles.
mcor C)ishwasher

LoadinQ the Racks
Always use the top rack for delicate items.
Before loading the racks scrape off leftover
food items, and non-food items like
toothpicks and napkins.
Always load large or heavy items (such as
pots, pans, and large dishware) in the
bottom rack.
Do not stack dishes, glasses, or pots and
pans. Stacking will prevent water from
getting to soiled surfaces.
Load all items so that the open ends face
down as much as possible. Good drainage
provides the best drying. It is not necessary
to rinse objects before loading them.
To minimize breakage and chipping, secure
all glassware and china by adjusting the
tines. Do not allow fragile items to touch
each other.
To adjust the tines, push the tine
adjustment lever away from the adjustment
teeth and swivel the tines to the desired
position.
To minimize noise, do not allow pots and
pans to touch and keep large items from
touching the sides of your dishwasher.
Load glasses and cups on the top rack.
Use and (Care Manual

Filling the Detergent Dispenser
IMPORTANT=
•Do not use hand dishwashing detergents. They will create
excessive foaming that interferes with proper operation.
To make sure the detergent dissolves properly, fill the
detergent dispenser just prior to starting your dishwasher.
Detergent will harden if it sits too long.
Store dry detergent in a cool dry place to prevent caking.
Use a liquid rinse aid for best results (See page 15).
If the detergent dispenser lid is closed, press the release
button to open it.
The detergent dispenser has 2 compartments: The
smaller pre-wash compartment, and the main wash
compartment.
The pre-wash compartment empties into the dishwasher
when the door is closed. The main wash compartment
releases detergent automatically during the main wash
cycle.
Fill the pre-wash cup to the top.
See the table below for the amount of detergent to use in
the main wash cup. The amount of detergent required
depends on the hardness of the water in your area.
Harder water requires more detergent. Water hardness is
measured in grains per gallon (gpg). Do not use too little
detergent for your water hardness. Doing so can cause
poorly cleaned dishes, filming, or spotting. If you use too
much detergent, you can cause a permanent film called
etching. To find out the water hardness in your area,
contact your water company.
After loading both compartments, close the dispenser lid.
Detergent alone may not be enough for water hardness
above 12. For maximum cleanness you may need to use
a water softener. Or you may add additional detergent
about 20 minutes after starting your dishwasher. As a
rule, add 1 teaspoon for each grain above 12:
.Open the door. The dishwasher will stop operating.
2. Wait a moment for the steam to clear.
3. Without touching any of the hot surfaces or racks, pour additional
dishwashing detergent into the bottom of the dishwashing compartment.
4. Close the door. Push on the door handle to make sure that the door is
completely shut. After a short pause, operation will resume.
mcor C)ishwasher

Filling the Rinse Aid Dispenser
Rinse aid is important to the drying process of the dishware. It also reduces
spotting. Dacor recommends that you keep the rinse aid dispenser full at all
times.
The rinse aid dispenser must be properly adjusted. Too little rinse aid will
allow spotting and drying problems. Too much rinse aid will cause foaming
and streaking.
A rinse aid containing citric acid may be used to remove the white or gray
film caused by very hard water.
The RINSE AID light on the control panel turns on when it is time for you
to refill the rinse aid dispenser.
To refill the rinse aid dispenser:
1. Turn the rinse aid cap counterclockwise to
the open position and lift it out.
2. Carefully pour the rinse aid into the filler
hole until the rinse aid level is even with the
bottom of the hole. Do not overfill.
3. Wipe up any spillage.
4. Replace the rinse aid cap and turn it
clockwise to the closed position.
I
\
Adjustinq the Rinse Aid Dispenser
The rinse aid setting is located under the rinse aid cap. It is set at
the factory to 4.
To change the setting:
1. Remove the rinse aid cap.
.If you have spotty or improperly dried dishes, move the
rinse aid setting to the next higher number. If you have
streaks on your dishes, move the rinse aid setting to the
next lower number. The harder the water, the more rinse
aid required for acceptable results.
3. Replace the cap.
4. Check the dishes after the next wash load. Continue adjusting the rinse
aid dispenser up or down according to the guidelines above until you
have spot free, streak free, dry dishes.
If you have very soft water and still experience streaking when the dispenser is
set to 1, you can dilute the rinse aid with water before pouring it into the
dispenser to get acceptable results.
Use and Oare Manual

Starting Your Dishwasher
IMPORTANT: See the Getting to Know Your Dishwasher section for a
description of the various wash settings.
To wash or rinse the dishes:
1. Press one of the wash cycle buttons or the rinse button
on the control panel:
2. Press START/STOP. The numeric display will show the
length of the cycle in minutes.
3. Close the door.
4. Push on the door handle to make sure that the door is completely shut.
After a brief pause, the dishwasher will start.
When the wash or rinse cycle is completed, the dishwasher will make 3 short
beeps.
Addinq a Dish After You Start
You can add a dish, if needed, after starting your dishwasher. Dacor
recommends that you only add items during the first 5 minutes of operation to
make sure they get clean.
To add a dish:
1. Open the door. The dishwasher will stop operating.
2. Wait a moment for the steam to clear.
3. Without touching any of the hot surfaces or racks, insert the item into
one of the racks, following normal loading instructions.
4. Close the door.
5. Push on the door handle to make sure that the door is completely shut.
After a short pause, operation will resume.
Stoppinq Your Dishwasher Durinq Operation
CANCEL
To stop the current cycle and drain your dishwasher:
1. Open the door. The dishwasher will stop operating.
2. Press CANCEL.
3. Close the door. After a short pause, you will hear the water in the
dishwasher begin to drain. Once the water is drained, the dishwasher
will stop.
_MPORTANT: If you press the CANCEL button twice, the dishwasher will
stop completely. The water inside the dishwasher will not drain.
mcor C)ishwasher

Pausinq Dishwasher Operation
STOP
To temporarily pause dishwasher operation:
1. Open the door. The dishwasher will stop operating.
2. Press the START/STOP button.
3. The door may be closed and the dishwasher will not
start.
To resume the dishwasher cycle:
1. Open the door.
2. Press the START/STOP button.
3. After a brief pause, the dishwasher will resume the
previous cycle.
Sanitizinq the Dishes
SANI-RINSE
If you want a high temperature rinse after the wash cycle for
maximum sanitization:
1. Press the NORMAL button to select the normal wash
cycle.
2. Press SANI-RINSE. (Pressing SANI-RINSE a second
time will turn sani-rinse off again).
3. Press START/STOP.
4. Close the door. After a short pause, the dishwasher will
start.
_MPORTANT: SANI-RINSE can only be selected when the NORMAL
wash cycle is selected.
Use and Oare Manual

The DELAY Feature
To set your dishwasher to start automatically at a later time:
1. Press one of the wash cycle buttons or the rinse
button:
2. If you have selected NORMAL, you may press the
SANI-RINSE button for maximum sanitization.
3. Repeatedly press the DELAY button until the number
of hours you want to delay operation appears on the
numeric display. You can delay the start of your
dishwasher up to 12 hours.
4. After you select the delay time, press START/STOP.
I_[e]Z_v_P'-'III I=I_-'%vA'd [_]Z_i'i_']lIf-'1! _11_b"]=1
5. Close the door. The dishwasher will start after the
selected number of hours.
To cancel the delay function, open the door and press CANCEL.
Chanqinq the Cycle After You Start
You can change the cycle and option selections after you start your dishwasher.
To change the cycle:
1. Open the door. The dishwasher stops operating.
2. Press the CANCEL button twice.
.I_[0]_v_P'-'111 I;I=P'-'_kvA'd[o,]z,k'Z,,.-,]nnr;'_m z_ll_[,.,-,)=1
.
.
6.
7.
Press the button for the desired wash or rinse cycle
(NORMAL, HEAVY, CRYSTAL, or RINSE).
If you have selected NORMAL, you may press the
SANI-RINSE button for maximum sanitization.
Press the START/STOP button.
Close the door.
After a short pause, operation will resume.
X2
mcor Dishwasher

The Cycle Memory Feature
Your dishwasher remembers the settings for the last cycle it ran.
If you want your dishwasher to run the same cycle as it ran the
previous time:
1, Press the START/STOP button once.
The START/STOP button light will flash and the lights on the
buttons for last cycle and options run will be lit.
2. Press the START/STOP button again to run the
previous cycle (or you may select a different cycle, then
press START/STOP if you don't want to run the
previous cycle).
3. Close the door. After a short pause, the dishwasher will begin to operate.
If the delay feature was used during the previous cycle, your dishwasher will
start after the number of hours originally selected.
Draininq Standinq Water
To drain standing water from the bottom of your dishwasher:
1. Press NORMAL,
2. Press START/STOP.
3, Press CANCEL.
4. Close the door. After a short pause, you will hear the
water in the dishwasher begin to drain. Once the water is drained, the
dishwasher will stop.
_MPORTANT: Your dishwasher also drains the water at the bottom at the
start of each wash and rinse cycle.
The SECURE Feature
To secure the control panel:
1. Pressand hold the SECURE button down for 3
seconds. All control panel lights are deactivated and
none of the buttons operate.
2. To turn off the secure feature, press and hold the SECURE button down
for 3 seconds.
The control panel beeps when you turn this feature on and off.
Use and Oare Manual

The Control Panel Lights
When you open the door of your dishwasher when it is running, it stops
operating, but the lights on the control panel will be lit. The lights indicate the
part of the cycle that is running and the cycle that is selected. The lights may
also alert you to certain problems.
WASHING Liqht
Flashes on and off when the dishwasher is washing the dishes.
RINSING Liqht
Flashes on and off when the dishwasher is rinsing the dishes.
DRYING Liqht
Turns on when the dishwasher is drying the dishes.
CLEAN Liqht
Turns on when a NORMAL, HEAVY, or CRYSTAL wash cycle is completed.
The dishes are ready to be unloaded. The light will turn off when the door is
opened then closed or a button is pressed.
SANITIZED Liqht
Turns on when dishes are sanitized.
RINSE AID Liqht
Turns on when the rinse aid level in the rinse aid dispenser is low.
FLOOR GUARD Liqht
Turns on when water is detected in the mechanical system below the
dishwashing compartment. The dishwasher will not operate until it is
repaired. Call for service.
DIAGNOSTIC Liqht
Turns on when a service technician is running tests on your dishwasher.
External Status Liqhts
Standard on ED models. Optional on ID models. They inform you of the
operating status of your dishwasher or things that may require your attention.
External Sanitized Liqht (Blue)
Turns on when the dishes are sanitized. Turns off when the door is opened
and closed after a complete cycle.
External Alarm Liqht (Red)
Turns on when a computer error is detected. See the Problem Solution
Guide.
External In-Process Liqht (Green)
Flashes when the dishwasher is operating. Turns on solid when a wash or rinse
cycle is completed. Turns off when the door is opened and closed after a
complete cycle.
mcor C)ishwasher
Other manuals for 65537
1
Table of contents
Other Dacor Dishwasher manuals

Dacor
Dacor RDW24 Technical manual

Dacor
Dacor DDW24S Assembly instructions

Dacor
Dacor ED24 User manual

Dacor
Dacor DDW24S User manual

Dacor
Dacor ED 24 User manual

Dacor
Dacor DDWF24S User manual

Dacor
Dacor EDWH24S Technical manual

Dacor
Dacor DDW24T99 Series User manual

Dacor
Dacor Dishwasher User manual

Dacor
Dacor Epicure ED30 User manual

Dacor
Dacor DDW24S User manual

Dacor
Dacor EW User manual

Dacor
Dacor DDWF24S Technical manual

Dacor
Dacor RENAISSANCE RDW24S User manual

Dacor
Dacor DDWF24S User manual

Dacor
Dacor EDWH24S Assembly instructions

Dacor
Dacor Millennia EDW24 User manual

Dacor
Dacor EDWH24S User manual

Dacor
Dacor DDW24S User manual

Dacor
Dacor Millennia MDW24S User manual