Dacor RENAISSANCE RDW24I User manual

®
The Life of the Kitchen. _ US E AND CARE MANUAL
RENAISSANCE ® BUILT-IN DISHWASHER
Models RDW24S and RDW24I
I _)l I(_ I
Style varies, model RDW24S with Epicure ®style handle shown.
Table of Contents
Important Safety Instructions .................................. 1
Getting to Know Your Dishwasher .......................... 3
Loading Your Dishwasher ..................................... 4
Operating Your Dishwasher ................................. 8
Care and Cleaning ........................................... 13
Before You Call for Service ................................ 16
Warranty and Service ........................................ 20
Warranty Card ...................................... Back Cover
Part No. 105672 Rev. B

To Our Valued Customer:
Congratulations on your purchase of the very latest in Dacor ®products! Our unique
combination of features, style and performance make us The Life of the Kitchen TM, and a
great addition to your home.
In order to familiarize yourself with the controls, functions and full potential of your new
Distinctive Appliance, read this use and care manual thoroughly, beginning with the
Important Safety Instructions section.
All Dacor appliances are designed and manufactured with quality and pride, while
working within the framework of our company value. Should you ever experience a
problem with your product, please first check the Before You Call for Service section
of this manual for guidance. It provides useful suggestions and remedies prior to calling
for service.
Valuable customer input helps us to continuously improve our products and services, so
please feel free to contact our Customer Service Team for assistance with any of your
product support needs.
Dacor Customer Service Team
600 Anton Blvd. Suite 1000
Costa Mesa, CA 92626
Telephone: (800) 793-0093
Fax: (626) 403-3130
Hours of Operation: Monday through Friday
6:00 A.M.to 5:00 P.M Pacific Time
Web Site: www.dacor.com
Thank you for choosing Dacor for your home. We are a company built by families for
families and we are dedicated to serving yours. We are confident that your new Dacor
product will deliver a high level of performance and enjoyment for many years to come.
Sincerely,
The Dacor Customer Service Team
©20/:/. Dacor, all rights reserved

! i il¸ L lira
Installer: Leave these instructions with the appliance.
Consumer: Read this use and care manual
completely before using this appliance. Save it for
future reference. It contains important use and care
information. Keep your sales receipt or canceled
check. Proof of original purchase date is required for
warranty service.
For warranty and service information, see
page 20.
If you have any questions (other than warranty
questions), call:
Dacor Customer Service
(800) 793-0093 (U.S.A. and Canada)
Monday - Friday 6:00 AMto 5:00 PMPacific Time
Web site: www.dacor.com
Have the complete model and serial number
identification of your appliance ready. The model
and serial number are on the product data label. See
page 3 for location. Record these numbers below
for easy access.
Model number
Serial number
Date of purchase
Since we continuously improve the quality and
performance of our products, we may make changes
to the appliance without updating this manual. Visit
www.dacor.com to download the latest version of this
manual.
Instructions
The Important Safety Instructions and warnings
in this manual are not meant to cover all possible
problems and situations that can occur. Use common
sense and caution when installing, maintaining or
operating this or any other appliance.
Always contact the Dacor Customer Service
Team about problems or situations that you do not
understand.
WARNING
severe personal injury or death.
WARNING
•Make sure that the dishwasher has been properly installed and
grounded by a qualified installer according to the accompanying
installation instructions. Have the installe r show YOUthe location of the
electrical outlet or circuit bieaker, and the water` supply valve so that You
know where and how to turn off power and the water Supplyl
•prevent child entrapment, always remove the d0or from an old
dishwasher when removing it from service, Leave the racks in placei
cut the prongs off of the power cord. cUt off the power cord completely
and discard.
READ AND SAVE THESE INSTRUCTIONS

Precautions
WARNING - Toreduce the risk of fire, electric shock, serious injury or death when using your appliance, follow
basic safety precautions, including the following:
WARNING
Read all instructions before using the
dishwasher. Use the dishwasher only for its
intended purpose (to wash dishes, flatware,
pots and pans). This appliance is not
intended for commercial use.
•If you receive a damaged product,
immediately contact your dealer or builder.
Do not install or use a damaged appliance.
•The dishwasher must be mounted in a
completely enclosed cabinet.
•Repairs should be performed only by a
qualified technician. Disconnect the power
before servicing.
• Make sure individuals who use the
dishwasher are able to operate it properly.
• Do not leave children alone or unattended
in the area around the dishwasher, even
when it is not in use. Do not allow children
to play with the controls or other parts of the
dishwasher.
• Never allow anyone, including children, to sit,
stand or climb on any part of the dishwasher.
Stepping or sitting on any part of it may result
in tipping, damage, serious injury or death.
• Many surfaces within the dishwasher achieve
high temperatures. Do not touch the interior
surfaces or items inside the dishwasher
during or immediately after use. Exercise
caution when opening the door. Let hot air
and steam escape before looking or reach ng
inside.
•Clean the dishwasher only as instructed in
this manual.
• Do not operate the dishwasher unless all
enclosure panels (guard plate, access panel,
toe kick etc.) are in place.
• Do not store or use combustible materials,
liquids or gases near this or any other
appliance.
• Store all detergents and rinse agents out of
the reach of children.
• Use only detergents and rinse agents
designed for use with a residential
dishwasher.
WARNING
• Do not run the dishwasher when you are out
of the building.
• Under certain conditions hydrogen gas may
be produced in a hot water system that
has not been used for two weeks or more.
Hydrogen gas is explosive. If the hot water
system has not been used for a period of
time, turn on all hot water faucets and let the
water flow for several minutes to release any
accumulated hydrogen gas. Do not smoke or
use an open flame during this process.
CAUTION
Use the dishwasher to wash flatware and
cookware ONLY. Washing other items may
damage or discolor the dishwasher. Wash
only the types of dishes and cooking utensils
indicated in this manual. Take care with
certain materials. Read the Loading Your
Dishwasher section before use.
• To prevent household mold and mildew
damage, Periodically check the inlet and
drain hoses for leaks.
• Turn off the water supply valve if the
appliance will not be used for an extended
period of time.
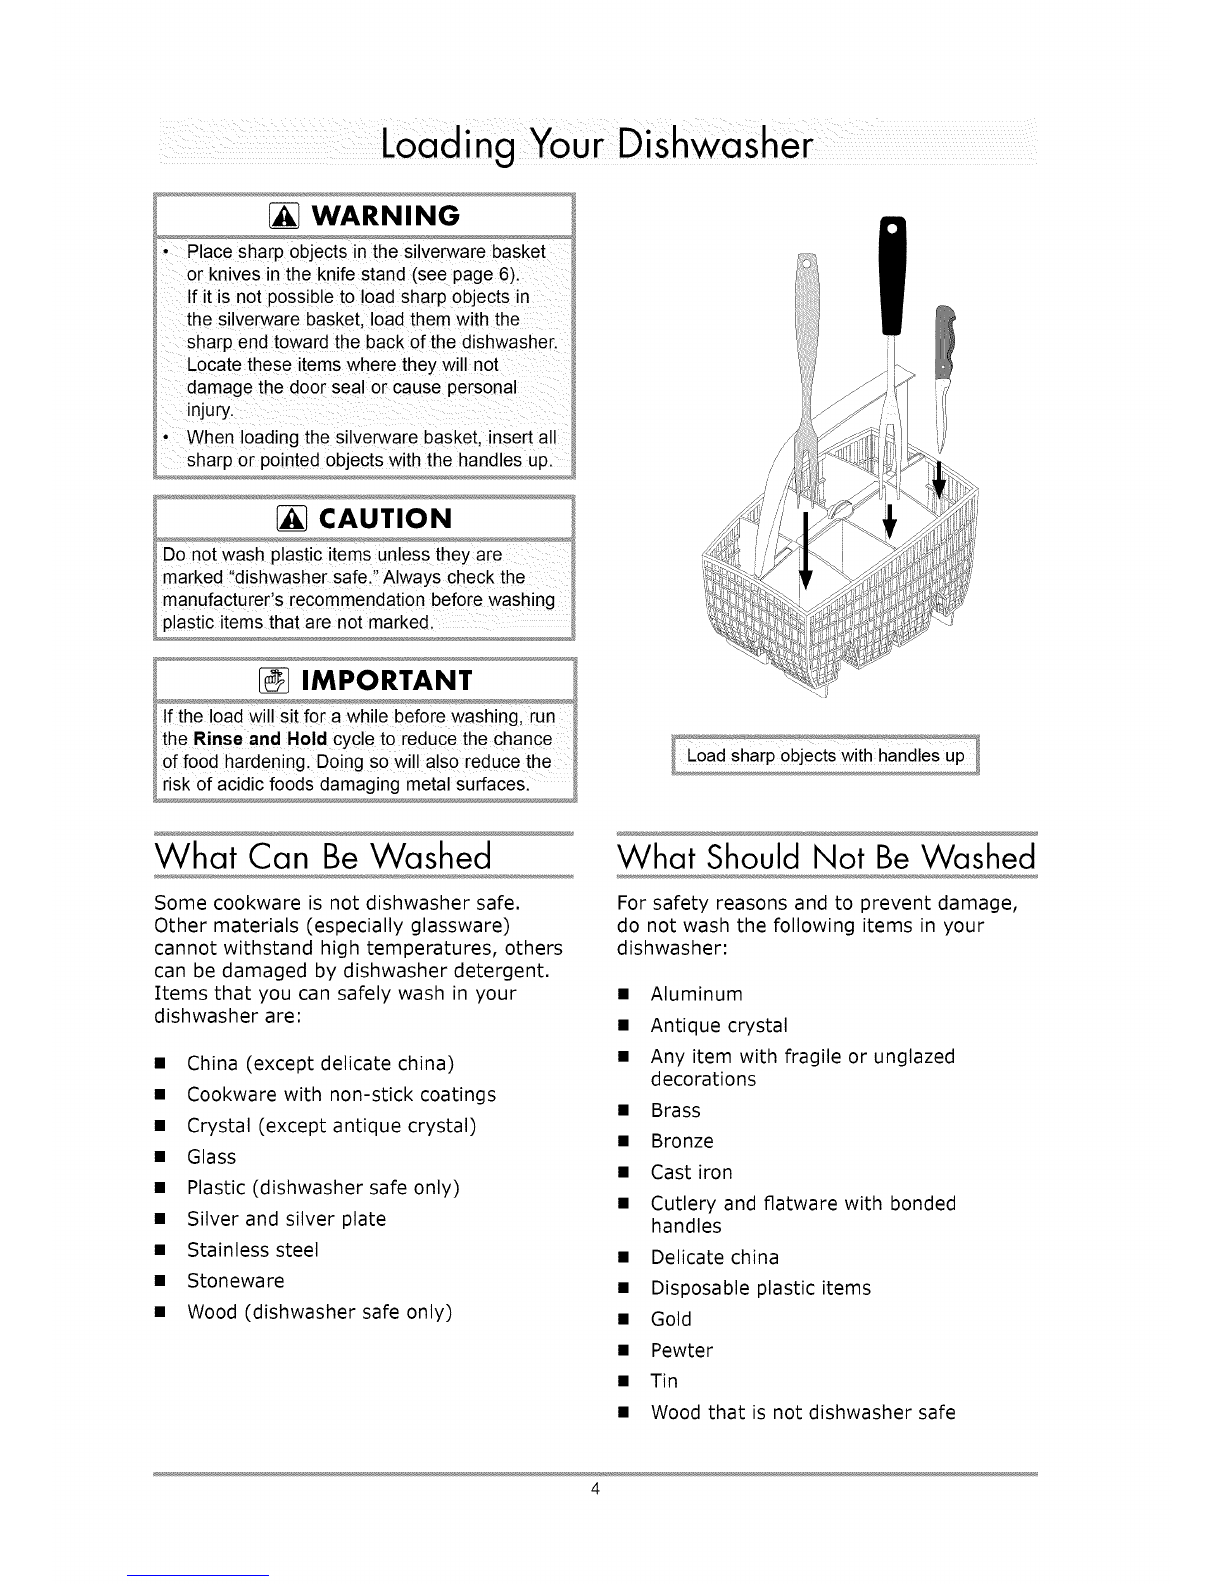
• When loading items to be washed:
0 Locate sharp items so that they are not
likely to damage the door seal.
0 Load sharp knives with the handles up to
reduce the risk of cut-type injuries.
• Store the dishwasher where the temperature
remains above freezing. Avoid long transport
distances in very cold weather.
• Transport the dishwasher only in the upright
position or laying on its back.

Dishwashing
compartment
Silverware basket
it
[ WashTemperatureII Oe,ayS a tI
About the Control Panel
The control panel touch keys only react when the
door is open. It takes a moment for the keys to
reactivate after opening the door.
If no keys are touched for two minutes, the
control panel goes into energy saving mode.
Close and reopen the door, or hold your finger
the main power key to reactivate the panel.
Child Safety Lock
• This dishwasher is equipped with an electronic
child safety lock. When the child lock is engaged,
the control panel keys do not work normally,
making it more difficult to program and start.
If you touch any of the control panel touch keys,
except the main power key when the lock is
activated, "LOC" will appear on the display, with
no other effect on the control panel. See page
12 for child lock activation instructions.
To start the dishwasher while the lock is
activated: Touch the Temperature and Dry
keys at the same time. The child safety lock will
deactivate for two minutes, allowing you to set
and start the dishwasher normally. The lock will
re-engage automatically after two minutes.

i
WARNING
If it is not possible to !cad sharp objects in
the silverware basket, !oad them with the
sharp end toward the back of the dishwasher.
Locate these items where they will not
damage the door Seal or cause personal
njuryl
Whe n loading the sjlve_are basket, insert all
sharp or pointed objects with the handles up.
CAUTION
plastic items that are not marked,
IMPORTANT
If the load wil! sit for awhile before washing, run
the Rinse and Hold cycle to reduce the chance
'_offood hardening, Doing SOwill also reduce the
risk of acidic foods damaging metal surfaces.
What Can Be Washed
Some cookware is not dishwasher safe.
Other materials (especially glassware)
cannot withstand high temperatures, others
can be damaged by dishwasher detergent.
Items that you can safely wash in your
dishwasher are:
• China (except delicate china)
• Cookware with non-stick coatings
• Crystal (except antique crystal)
• Glass
• Plastic (dishwasher safe only)
• Silver and silver plate
• Stainless steel
• Stoneware
• Wood (dishwasher safe only)
What Should Not Be Washed
For safety reasons and to prevent damage,
do not wash the following items in your
dishwasher:
• Aluminum
• Antique crystal
• Any item with fragile or unglazed
decorations
• Brass
• Bronze
• Cast iron
• Cutlery and flatware with bonded
handles
• Delicate china
• Disposable plastic items
• Gold
• Pewter
• Tin
• Wood that is not dishwasher safe

the Silverware Basket
IMPORTANT
,To prevent damage, do not load Utensils and
silverware made of different materia!s(for
example silver and stainless steel)in the
same compartment of the silverware baskeL
' Forbest reSUltsi
Covered Compartment
To prevent small, light items from falling out of the
rack when sprayed with water, put them in the
covered compartment. To cover the compartment:
1. Put small items into one of the middle
compartments of the silverware basket.
2. Lift up on the tab in the center of the basket to
expose the cover.
3. Snap the cover shut over the compartment.
NOTE: For convenience, you may also insert
silverware or small utensils into the slots on top of the
covered compartment. Insert them with the handles
down.
Silverware Basket Placement
Put the silverware basket in the bottom rack in the
front, in the direction shown. It fits over the two front
sets of tines.
Place silverware basket in front of
bottom rack, over tines

J.,.n9 the Racks
CAUTION
, Alway s place large or heavY items (such as
pots, pans and large dishware)in the bottom
rackl
' avoid damage to the racksl donot let
sharp edges come into contact with them.
, minimize breakage and chipping, do not
allow fragile items to toucheach other
IMPORTANT
items sticking out of the racks to block them;
, Donot load Cookie Sheets and laige platteis
in the front of the bottom rackl Doing so will
prevent water from dissolving the detergent n
Top Rack Features

•Place glasses, cups, bowls, small plates and
saucers in the top rack. Put wine glasses on the
wine glass shelf or lean them against it. Place
long knives in the knife stand.
• Scrape off leftover food items and non-food
items, like toothpicks and napkins, before
loading. It is not necessary to rinse items under
running water before loading them.
• Do not stack dishes, glasses or pots and pans.
Stacking will prevent water from getting to soiled
surfaces.
• Load all items so that the open ends face down
as much as possible. Load items that are not
completely face down so that the open end is
toward the center of the rack. Good drainage
provides the best drying.
• Place dinner plates, side plates, serving dishes,
pots and pans on the bottom rack.
• Load crystal and glass so that it does not knock
together during the wash cycle. Use the lowest
wash temperature and shortest wash and dry
cycles possible.
• To minimize noise, do not allow pots and pans to
touch. Also keep large items from touching the
sides of your dishwasher.
Top Rack
Bottom Rack

ent Dispenser
CAUTION
interferes with proper operation.
, Using too much dishwashing detergent, can
IMPORTANT
•Do notuse detergent that is c!umped 0rhas
:been wet, St0re dry detergent in a Co01d_
place to prevent caking:
•Fill the detergent dispenser just pdort0
starting your dishwasher. Detergent wi!l
harden if it sits too long, Also check the
package for detergent that is exp red,
•Dac0r recommends granular(p0wdered),
unscented automatic d sh washing detergent.
AIIqmone, multi,purp0se or complete dish
washing detergents are not recommended.
• If the detergent dispenser lid is closed, press the
(left) release button to open it.
Water hardness is measured in grains per gallon
(gpg). Contact your water company for the water
hardness in your area. 12 gpg and higher is
extremely hard water and detergent alone may
not be enough. You may need to use a water
softener to maximize dishwasher performance
at a water hardness above 12 gpg. Also, in
areas with 9 gpg and higher water hardness,
you may need to wash at a lower temperature to
prevent hard water deposits from forming in the
dishwasher.
• Different brands of dishwasher detergent have
different amounts of phosphorous for softening
water. In some areas with hard water, you may
need to use more detergent if it has less than
an 8.7% phosphorous content or change to
a granular (powdered) detergent with more
phosphorus.
• After loading both compartments according to the
table below, close the detergent dispenser lid.
• The detergent dispenser has two compartments;
the smaller pre-wash compartment, and the
main wash compartment (see diagram at
right). The pre-wash compartment empties into
the dishwasher when the door is closed. The
main wash compartment releases detergent
automatically during the main wash cycle.
NOTE: When running the Quick Wash cycle,
Dacor recommends that you do not add
detergent to the pre-wash compartment.
• See the Detergent Usage Table for the amount
of detergent recommended. The recommended
amounts shown are intended to provide properly
cleaned dishes, free of film and spotting for the
water hardness in your area. You may need to
adjust the detergent by small amounts until you
get the best results. Harder water requires more
detergent.
Soft (0-3)
Medium (4-8)
Hard (9 and over)
Amount 0f Detergent
Pre-wash: 1 teaspoon
Main wash:
1 - 1½ tablespoons
Pre-wash: 1 teaspoon
Main wash: 1 - 2 tablespoons
Pre-wash: 1 teaspoon
Main wash:
2 - 3 tablespoons

Filling the RinseAgent
D !spenser
IMPORTANT
,Rinse agent is important to the drying process
of the dishware. It also reduces spotting.
Dacor recommends that you keep the rinse
agent dispenser full at all time& However,
sorne cUst0mers with soft watei may n0t
need rinse agenL If y0u have soft Water, your
dishes may dry better without rinse agenL
• !f you use a dishwashing detergent containing
a rinse agent additive, don0t fill the rinse
agent dispenser tO avoid afilm on the dishesl
• When the rinse aid dispenser needs to
be refilled, this symbol appears on the
display.
• The rinse agent dispenser must be properly
adjusted. Too little rinse agent will allow spotting
and drying problems. Too much rinse agent will
cause foaming and streaking.
• When the water hardness exceeds 3 gpg, you
should use rinse agent with citric acid (acid rinse
agent).
To refill the rinse agent dispenser:
1. Press the (right) release button to open the rinse
agent compartment lid.
Changing the Amount of Rinse Agent
Dispensed
See page 12 for instructions to change the amount
of rise agent dispensed.
When to increase the amount dispensed:
• When the dishes have water marks.
When to decrease the amount dispensed:
• When the dishes have a sticky white/blue film.
• When the dishes are streaked.
• If heavy foaming occurs.
NOTE: If you have very soft water and still
experience streaking when the dispenser is set to
1, you can dilute the rinse agent with water up to a
50:50 mix before pouring it into the dispenser to get
acceptable results.
2. Carefully pour the rinse agent into the filler hole
,
4.
until the rinse agent
level is even with the
end of the MAX arrow
inside. Do
not overfill.
Wipe up any spillage.
Close the rinse agent
compartment lid firmly.
NOTE: After filling the rinse agent dispenser, it may
take a few washes before the rinse agent indicator
on the display goes off.

Your Dishwasher
,
,
,
,
,
,
Open the door and hold your finger
on the main power touch key until
the control panel lights.
Touch the PROGRAM key
repeatedly until the symbol for the desired wash
cycle appears on the display. See the facing
page for a description of the wash cycles. NOTE:
The estimated wash time will also appear.
If you want to change the wash
temperature setting, touch the Wash
Temperature key repeatedly to
toggle between the "normal" setting
and the "high" setting. The light below the Wash
Temperature key is lit when the temperature
is set to "high." See the facing page for a
description of the temperature settings.
If you want to change the dish drying
time, touch Dry repeatedly to toggle u
between the "normal" and "high"
setting. The light below the Dry
cycle key is lit when the dry time is set to "high."
NOTE: When set to "normal", the rinse water
temperature is lower, causing the dishes to take
longer to dry. Change the setting to "high" if the
dishes do not dry properly. NOTE: This option is
not available for the Rinse and Dry and Rinse
and Hold cycles.
If you want to delay the start of
the dishwasher, touch Delay Start
repeatedly to set the delay time on
the display (in hours). You can select
a delay of up to 24 hours. NOTE: Odd numbered
hours above 10 are not programmable.
To start, hold your finger on the START/STOP
key. The display will flash three times, then the
door open symbol will appear
on the display, indicating that '_' _
the dishwasher is ready to
start. Touching START/STOP Door open
for more than three seconds
a second time will cancel the symbol
delay start option (if it was selected), but the
selected cycle will still run.
Close the door and push in gently on the top
until it clicks shut. If the door is not closed within
two minutes, the display will return to the cycle
setting that was run previously.
During Operation
• During the cycle, the dishwasher's computer
monitors the amount of soil left on the dishes
(by monitoring amount of soil in the water). The
amount of time required for the cycle to complete
varies based on the amount of soil left on the
dishes and the water temperature.
• If power to the dishwasher is turned off at the
main power switch or if there is a power outage
before the wash cycle completes, the selected
cycle will continue when the power is restored.
However, if power is interrupted or the door is
open more than two minutes during drying, the
cycle will end.
Standby Mode
Once the cycle is finished, the dishwasher will beep
and End will appear on the display. When the cycle
completes the dishwasher draws a very small amount
of power. Open the door and hold your finger on the
main power key to turn power off completely.
Saving on Water and Energy Costs
• To save energy, wait to run the wash cycle until
the dishwasher is full.
Use the Rinse and Hold cycle to rinse the
dishes if there are any unpleasant odors while
you wait for the dishwasher to become fully
loaded.
• If the dishes are only lightly soiled, use the
normal temperature and/or dry setting. For best
results after the normal dry cycle, leave the door
open slightly after the end of the cycle.
• Do not rinse dishes under running water. Simply
scrape off large food particles before loading.
Adding a Dish After You Start
You can add a dish, if needed, after starting your
dishwasher. Dacor recommends that you only add
items during the first five minutes of operation to
make sure they get clean.
To add a dish:
1. Slowly open the door. The dishwasher will stop
operating. Wait a moment for the steam to clear.
2. Without touching any of the hot surfaces or
racks, insert the item into one of the racks,
following the normal loading instructions.
3. Close the door. Push on the door handle to make
sure that the door is completely shut. Operation
will resume.
10

Changing the Wash Cycle After You
Start
You can change the cycle, or any of the other settings
after you start your dishwasher.
1. Open the door, then hold your finger on the
8TART/STOP touch key for three seconds. The
dishwasher will stop operating.
2. If the detergent dispenser door has opened, add
more detergent.
3. Touch PROGRAM repeatedly until the symbol for
the desired wash cycle appears on the display.
4. If you want to change the wash temperature
or dry setting or select the delay option, touch
the key for that function repeatedly to toggle
between settings.
5. Hold your finger on START/STOP until the
display flashes, then close the door.
Stopping Your Dishwasher During
Operation
Open the door and touch the 8TART/STOP key for
three seconds. The dishwasher will stop operating.
Heavy Wash 130°F (55°C) 160°F (70°C)
Normal Wash 130°F (55°C) 150°F (65°C)
Daily Wash 140°F (60°C) 150°F (65°C)
Quick Wash 85°F (30°C) * 140°F (60°C)
Super Quick 85°F (30°C) * 140°F (60°C)
Wash
Delicate Wash 105°F (40°C) 120°F (50°C)
..... 120°F (50°C 140°F (60°C
Higher if water supply temperature is above 85°F.
Wash Cycles
Heavy Wash
Normal Wash
Use for heavily soiled dishes like pots, pans, casserole dishes, etc. Additional
smaller items may be added after the larger items if there is still space to
conserve water and energy.
Use for normally soiled plates, glasses, bowls, serving dishes and lightly
soiled pans. This cycle is best for normally soiled mixed loads.
Daily Wash
Quick Wash
Use for dishes that are washed on a daily basis. This cycle can also deal
with dried food, though the short pre-washes are not designed for dishes with
burned on food.
Use for very lightly soiled loads that are washed immediately after use. This
cycle can also be used for lightly soiled glass, coffee cups, china or other
delicate items.
Super Quick A short cycle lasting about 15 minutes. Use for very lightly soiled loads that
Wash are washed immediately after use. This cycle can also be used for very lightly
soiled glass, coffee cups, china or other delicate items.
Delicate Wash Use for glasses and porcelain that have just been used and as such do not
require such a powerful wash cycle. This cycle is also good for fragile dishes.
Select normal dry with this cycle if you want to be especially cautious.
Eco Wash Use when you want to save energy when washing normally soiled loads.
Rinse and Dry This cycle consists of a rinse with heating and drying. It is suitable for rinsing
and heat cleaning glass jars immediately before jam making and similar uses.
Rinse and Hold Use to rinse dishes that you plan to wash later that day or for rinsing the
dishes while waiting for the machine to be filled. The wash temperature
setting cannot be changed for this cycle.
11

_ _ttin
key
Various functions and settings on your dishwasher
can be configured by the user. To change one of the
settings:
1. Open the door slightly. If the display is lit, hold
your finger on the main power key until the
display turns off. After the control panel lights go
out, wait about five seconds.
,
3.
Hold your finger on the main power key until the
display lights up again.
Within five seconds of the display lighting, touch
the PROGRAM and Dry keys at the same time.
Keep your fingers on both keys until the SET
symbol (shown above) appears on the display.
4. Touch START/STOP repeatedly until the menu
number for the desired function appears on the
display (see above).
5. Touch PROGRAM repeatedly until the desired
setting for the function being set appears on the
display (see above).
6. Touch START/STOP repeatedly to save the
setting and exit the menu. Repeat the above
steps to change the settings for a different
function.
FunCtion
Child lock
End beep
volume
Touch key
beep volume
Display
contrast
Rinse aid
dispenser
1
2
3
4
5
0 (off) or
1 (on)
0 (off) to 4
0 (off) to 4
-1 to3
When the child safety lock is engaged, the control panel touch keys do
not work normally, making it more difficult to program and start. See
page 3 for instructions on how to temporarily bypass the child lock.
Changes the volume of the beep used to indicate when a program is
finished or when a fault has occurred.
Changes the volume of the beep emitted each time a touch key on the
control panel is touched.
Not used on this model.
Adjusts the contrast of the display.
Adjusts the amount of rinse aid dispensed during each cycle.
6 0 (off) to 6
12

WARNING
Clean only those parts of the dishwasher listed
in this manuall Clean them only in the manner
nstrUcted. Use only the cleaning Solutions
specified. Other cleaning solutions could produce
dangerous fumes, cause c0rr0sion Of the meta
parts and could permanently damage the
WARNING
•Exercisecautionwhen cleaningaround
the c0ntrol panel and door latch areas, DOnot
spray water or € eaners of any kind around
these areas, Doing s0 may create an electric
shock hazard and damage the electrical parts.
* Always wipe stainleSS steel surfaces with the
grain.
1. Make sure the main power is off to avoid
activating any buttons unintentionally.
2. Wipe the buttons and display clean with a dry or
slightly damp cloth. To prevent scratches, never
use cleaners. Keep the display and touch buttons
clean and free from grease.
3. To clean the rest of the door, use only a soft
cloth dampened slightly with a solution of mild
detergent and warm water. Do not use a spray
bottle especially around the main power switch,
the door latch and the control panel.
4. To prevent odors caused by food build up, gently
clean around the door seal and corners at the
front edge of the dishwashing compartment. Use
a dish brush and a low-lather detergent.
Door seal
• The dishwashing compartment of your Dacor
dishwasher is constructed of high quality
stainless steel. It remains clean during normal
use. However, if you have hard water, a white or
gray film may form inside over time. To remove
these hard water deposits, run a normal wash
cycle with two tablespoons of citric acid or
dishwasher cleaner in the dishwasher detergent
compartment (with no dishes loaded).
• The control panel and the racks may be wiped
clean, if necessary, with a soft damp rag.
• Food particles on the silverware basket can be
rinsed clean under a faucet with warm water.
Strainer Basket and Filter System
WARNING
DO not operate the dishwasher without the
strainer the drain outlet cover and the filter
sYstem completely in place The straineq the
drain outlet cover and filter system are designed
to keep large food particles out of the mechanical
The strainer basket portion of the filter system should
be cleaned whenever food particles begin to build
up. Food that builds up in the other parts of the filter
system is rinsed away during each wash cycle so that
the entire filter system only needs to be cleaned twice
a year.
Cleaning the Strainer Basket
1. Open the door and remove the bottom rack.
2. Lift the strainer basket straight up by the handle.
3. Rinse it out under running water in the sink.
Replace it by pressing it firmly into the hole in
the center of the filter system. The handle goes
toward the door. Replace the rack.
13

Cleaning the Entire Filter System 6. Lift the fine particle filter out of the dishwasher.
1. Disconnect the dishwasher power plug from the
electrical outlet or turn off power at the circuit
breaker panel.
2. Open the door and remove the bottom rack.
3. Turn the handle on the strainer basket once
counter-clockwise.
.Pull the strainer basket and the attached tubular
filter up and out.
.
.
Clean the filters in the kitchen sink with a soft
sponge and mild kitchen detergent under warm
water. Rinse any food particles out of the strainer
basket.
Remove the drain outlet cover located to the
left of the drain bottom (see diagram below). To
remove it, grasp it and pull it to the right, out of
the hole.
Drain outlet
cover
.Pull the strainer basket free
fr°m the tubular filte I
Strainer basket "_
.Insert your finger into the drain outlet hole. Turn
the pump blade inside the hole with your finger
to loosen anything clogging it. Pull out any large
bits of food that are loosened.
14

10.Reinstallthedrainoutletcover.
11.Centerthefineparticlefilterovertheholeinthe
bottomofthedishwasher.
Cleaning the Spray Arms
The holes and bearings on the spray arms can
sometimes become blocked. Clean them as follows
to restore proper operation.
1. Open the door and remove the bottom rack.
2. Pull the bottom spray arm straight up to release.
12. Re-attach the strainer basket to the tubular filter.
13. Insert the tubular filter assembly into the hole
with the handle pointing toward the front of the
dishwasher. Turn the handle once clockwise until
it stops to secure it in place.
14. Replace the bottom rack.
15. Reconnect power to the dishwasher.
.Remove any deposits using a needle or
something similar. The washer arms also have
holes underneath.
4. To reinstall, center the base of the spray arm in
the hole and push straight down until it clicks into
place.
5. Replace the bottom rack.
6. To release the top spray arm, first remove the
top rack. Pull the top rack out until it stops. Turn
both rack stops outwards on the rack mounting
rails (see diagram). Pull the rack toward you to
remove it.
7. Remove the top spray arm in the same way as
the bottom arm and clean it. Reinstall the top
spray arm the same way as the bottom one.
8. Reinstall the top rack by inserting the rollers on
the base of the rack into the slots on the rack
mounting rails. Turn both rack stops inward to
lock the rack into place.
15

Belowisalistofthepossibleerrormessagesthatmayappearonthedisplayinsomecasesandthesuggested
action.
Error Message
F:10
F:11
Overfilling Call Dacor Customer Service.
Water outlet fault See "Water left in bottom of dishwasher" below.
F:12 Water inlet fault Make sure water supply valve is on.
F:40 Inlet valve leakage Turn off the water supply valve and call Dacor
Customer Service.
Problem Solution Guide
_lease review the Problem Solution Guide below.
Before you call for service,
Problem
Dishwasher will not start
(control panel is not lit)
Dishwasher will not start
(control panel is lit)
Control panel keys do
not react when touched
Water backs up in sink
when dishwasher drains
Main power switch is off
Power is disconnected
Blown fuse or tripped circuit
breaker
Open door and turn on main power switch on top
of door before selecting cycle. See page 10.
Make sure power is on at the circuit breaker panel
and that the power plug is properly connected to
electrical outlet (if applicable).
Replace fuse or reset circuit breaker. Remove
other appliances from circuit.
Power failure Contact electric company.
Door not completely closed Gently push in on front of door until you hear a
(horizontal lines appear on click.
display)
Controls not set Make sure dishwasher controls are properly set
and door is closed. See page 10.
Control panel keys dirty Clean keys with soft, slightly damp cloth.
No water supply Make sure water valve is turned on.
Water supply line blocked Make sure water supply line to dishwasher is not
kinked.
Drain pump clogged (loud
buzzing sound)
Child lock activated
You have touched the keys too
soon after opening the door.
Dirt on the keys
Garbage disposal or sink trap
full
Disconnect power and clean entire filter system
and drain pump. See page 14. Reconnect power
and attempt to restart. If problem persists, shut off
the water supply, disconnect power and call for
service.
See page 3 to bypass. See page 12 to
deactivate.
Wait a moment then try again.
Clean with a dry or slightly damp cloth.
Run garbage disposal to eliminate food and
obstructions in sink. Make sure sink drains
properly.
16

Ifor Service
Problem
Water left in bottom of
dishwasher near filters,
dishwasher will not drain
Door will not close
1 minute appears on the
display
Unusual noise
Bad odor in washing
compartment
Detergent left in detergent
compartment (detergent
compartment will not
open)
Dishes not dry
Ma[ Be Caused BX
Dishwashing cycle not
complete
Obstruction in the drain hose
or air gap is plugged
Filter system clogged
Debris in the drain pump
Racks not slid in all the way
The program is taking longer
than estimated.
Improper loading
Spray arms not rotating
properly
Drain pump makes droning
sound that can be heard
from outside dishwasher and
does not stop when main
power switch is turned off
Door seal and surrounding
area (corners) dirty
Low temperature cycles
have been selected for a
prolonged period
Dispenser lid blocked
Old detergent
Spray arms do not rotate
properly
Drying option needed
No rinse agent or rinse
agent dispenser not set
properly
Plastic items
Allow dishwasher to complete cycle.
Check for kinked drain hose. Disconnect end of
drain hose. Check for debris in hose or any other
part of drain/plumbing system. NOTE: Cone-
shaped part of hose must be at least 1/2" (1.3 cm).
Clean the drain pump/filter system. See page 14.
Check to make sure there is nothing blocking the
rack(s) from rolling all the way into the dishwasher.
None. Next time the program is run, the corrected
time will be displayed.
Utensils may not be secure or something small
may have dropped from the rack. Water may cause
utensils to rattle. Make sure dishware is secure.
Make sure that both spray arms rotate freely. Make
sure that items do not obstruct movement of spray
Make sure holes in spray arms are not blocked. If
necessary, clean spray arms. See page 15.
Overflow protection has engaged and is pumping
water out of the dishwasher. Turn off water valve,
disconnect power and call for service.
See instructions for cleaning door on page 13.
Run a cycle with a higher temperature about once
a month.
Detergent lid may not be opening. Check for items
blocking it.
Do not use detergent that is hard or caked inside
box. Use only fresh detergent. Add detergent to
dishwasher just before starting it.
Make sure that both spray arms rotate freely. Make
sure that items do not obstruct movement of spray
arms. If necessary, clear any obstructions.
Make sure holes in spray arms are not blocked. If
necessary, clear holes with a pointed object and
rinse under water.
Select the Drying option for higher temperature
Fill rinse agent dispenser. Rinse agent helps dishes
to dry faster. Check rinse agent dispenser setting.
Certain plastic materials are difficult to dry. Plastics
may need to be towel dried. Also try opening door
after cycle is complete continued ....
17

Problem Solution Guide
Dishes not dry (cont,)
Chipping or breaking
of glassware
Dishes are not clean
Whitish-blue sticky film
on dishes
Distortion of plastics
Marks on melamine
and plastics
May Be Caused By
Improper loading or
unloading
Dry cycle interrupted
Improper loading
Spray arms do not rotate
properly
Incorrect detergent use
Cycle selected is too short
Incorrect loading
Filter system clogged or not
installed properly
Detergent build-up in
dishwashing compartment
Chucks of food left on
dishes or in dishwasher
compartment due to drain
outlet cover being removed
To much rinse agent
Using liquid rinse agent
with a detergent that
already contains rinse
agent
Plastic item not dishwasher
safe
Porous material
Do not overload, under-load or nest items. Make sure
dishwasher is loaded according to instructions starting
on page 6.
Door opened too soon. Make sure dry portion of cycle
is complete before opening door.
Do not overload. Load between rack prongs, not
over them. Glasses loaded over prongs will not be
supported and may chip or break. Make sure glassware
is secure and can't come loose. Always use the top
rack for delicate items.
Make sure that both spray arms rotate freely. Make
sure that items do not obstruct movement of spray
arms. If necessary, clear any obstructions.
Make sure holes in spray arms are not blocked. If
necessary, clean spray arms. See page 15.
Use only correct amount of dishwasher detergent
according to water hardness. See page 8. Fill
dispenser only when ready to start the dishwasher.
Do not use old or caked detergent. Store dishwasher
detergent in dry place and in a closed container.
Change the dishwasher detergent if results are still
3oor.
Select normal or heavy wash cycle.
Make sure dishes and flatware are loaded properly.
See Loading Your Dishwasher section. Make sure
all items are loaded securely and do not tip over. Avoid
placing very tall glasses in the corners of the rack.
Make sure filter system is clean and properly installed.
See page 14.
Pour a teaspoon to tablespoon of citric acid crystals
or white vinegar into the pre-wash compartment in
the detergent dispenser. Run a normal cycle with no
dishes.
Check to make sure drain outlet cover is in place. See
page 14.
See page 12 to change rinse agent dispenser
setting. If water is very soft, you may need to dilute the
rinse agent, see page 9.
Do not use rinse agent with detergent that contains
rinse agent or change detergent type.
Do not wash plastic items in dishwasher that are not
"dishwasher safe."
Use a special cleaner for plastic.
18
This manual suits for next models
1
Table of contents
Other Dacor Dishwasher manuals

Dacor
Dacor DDWF24S Technical manual

Dacor
Dacor Epicure ED30 User manual

Dacor
Dacor DDW24S User manual

Dacor
Dacor Millennia EDW24 User manual

Dacor
Dacor 65537 User manual

Dacor
Dacor EW User manual

Dacor
Dacor ED 24 User manual

Dacor
Dacor EDWH24S Technical manual

Dacor
Dacor DDW24M99 Series User manual

Dacor
Dacor DDWF24S Technical manual

Dacor
Dacor EDWH24S User manual

Dacor
Dacor DDW24M99 Series User manual

Dacor
Dacor DDW24S User manual

Dacor
Dacor EDW24S User manual

Dacor
Dacor DDW24S User manual

Dacor
Dacor EDWH24S User manual

Dacor
Dacor EDWH24S User manual

Dacor
Dacor DDWF24S User manual

Dacor
Dacor DDWF24S Assembly instructions

Dacor
Dacor Epicure ED30 User manual