manuals.online logo
Brands
  1. Home
  2. •
  3. Brands
  4. •
  5. Dadant
  6. •
  7. Farm Equipment
  8. •
  9. Dadant Mini Melter User manual

Dadant Mini Melter User manual

Chico, CA Branch
530-893-0921
1-877-332-3268
Fresno, CA Branch
559-495-0230
1-877-432-3268
Sioux City, IA Branch
712-255-3232
1-877-732-3268
Paris, TX Branch
903-784-6145
1-877-632-3268
Potterville, MI Branch
517-645-7629
1-877-932-3268
Watertown, WI Branch
920-261-5363
1-877-232-3268*
Waverly, NY Branch
607-565-2860
1-877-532-3268
Lynchburg, VA Branch
804-846-0666
1-800-220-8325
High Springs, FL Branch
904-454-0237
1-877-832-3268
51 S. 2nd Street
Hamilton, IL 62341
217-847-3324
1-888-922-1293 *Note: The Wisconsin toll-free number will be answered at the Dadant Corporate Office in Hamilton, IL.
Dadant’s Patented
Mini Melter
“Process Cappings in One-Step”
Description/Function
Assembly
Operating Instructions
Operation
The original Mini Melter was designed as an efficient
cappings processor for hand uncapping operations. Uncap
directly into the unit on a sloped surface. Honey flows from
one outlet while beeswax flows from another outlet.
Capping are processed in one step—nothing extra to do.
The cappings from over 200 pounds of honey per hour were
processed with original melter. Now the unit has been
waterjacketed to increase capacity and improve control.
The new waterjacketed Mini Melters have better control for
processing a smaller volume of cappings and have also been
used successfully under smaller capacity power uncappers.
The unit has now handled the cappings from over 300
pounds of honey per hour. The unit comes complete with
2000 watt immersion heater for water jacket. By warming
the honey, faster separation of honey and cappings wax
occurs, thus increasing melting speed.
An Under grid Melter
Cappings slide down the sloped surface and float up under
the heating coils. The honey settles to the bottom never
being trapped in a hot area and remains "cool."
Dadant Designed Melter Grid
Thermostatically controlled 120 volt all electric melting
grid allows precise control for each individual's operation.
Welded Tank Construction
Made of 20 gauge (.049 inches thick), type 304 satin fin-
ish, food grade stainless steel with MIG welds to provide
superior strength and highest quality inside and out.
Safety Precautions
The Dadant Mini Melter is an electrical heating device
which melts beeswax and requires constant safety precau-
tions. Treat this electrical heating device as you would any
such device. It does produce heat, therefore, if misused or
abused, it can be a hazard. However, for the use intended and
by following normal operating and important safeguards, it
is a very safe unit. (See Important Safeguards.) Keep small
children and inexperienced bystanders away from the
Melter. Check to make sure all connections are secure and in
good condition. Keep floor area in the vicinity of the Melter
clean and free of all obstacles. Be absolutely sure nothing
can fall into the pan causing splashing of hot wax.
Dadant Mini Melter
D/Manuals/Mini Melt/Mini Melt-7/99
Precautions
Double Uncapping Area
Now 24'' x 10''
Electromelt Style Grid
Now It’s Like Its Big Brother
1800 Watt Melting Grid
Thermostat Control
2 Square Feet of Melting Surface
Description/Function
New Improved Design
1. Completely unpack the Mini Melter and identify:
1 melting grid,
1 uncapping cross bar,
1 small perforated screen,
1 large perforated screen,
1 adjustable honey outlet assembly.
1 200OW immersion heater and
1 elbow/nut assembly
2. A third screen should be located in the honey
baffle/honey outlet of the tank.
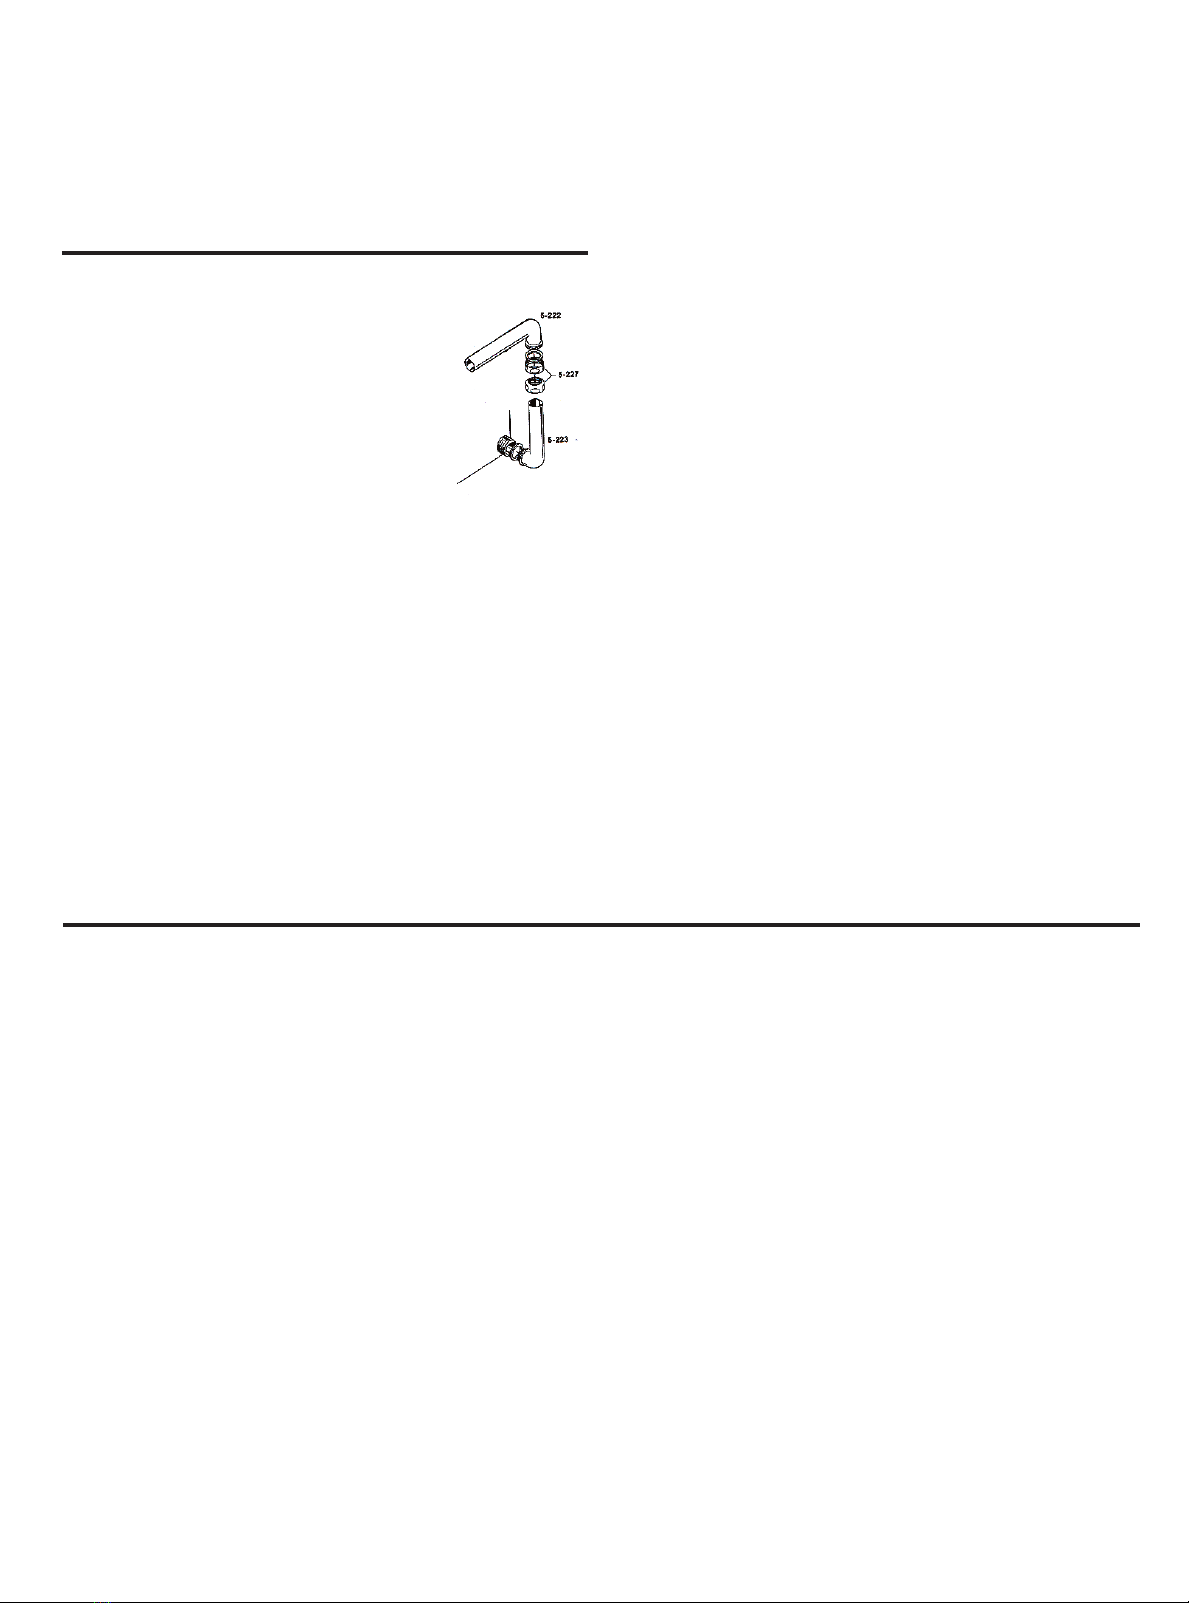
3. Assemble the adjustable honey outlet tube as
shown in the diagram and attach to the tank.
(Refer to photo on cover.)
4. If uncapping with a hand knife, attach the uncap-
ping cross bar to the exposed edges of the tank
and tank baffle respectively. (Bar is not needed if
power uncapping.)
5. Place grid in tank on grid rests (See photo on
cover.)
6. Install small perforated screen over wax outlet.
(This screen prevents foreign material from flow-
ing through wax outlet.)
7. The large perforated screen is for slum removal.
8. In the tank water drain outlet, a 1'' plug has
already been installed.
9. Using a good pipe thread compound, install the
immersion heater in the 1'' female tank port.
10. The elbow/nut assembly with gasket is the water
fill pipe. Attach it to the 1 ½'' pipe thread nipple
extending from the tank and tighten in a vertical
position.
The cappings resulting from frames of honey being uncapped con-
sist of honey, beeswax, and foreign material. Dadant's Mini Melter
was designed to separate these cappings into pure honey, quality
(undamaged) beeswax and foreign material (slum). When properly
operated, best honey experts are unable to determine which honey is
or is not melter honey, and wax tests show the highest quality wax.
The cappings melter is a great labor saving piece of equipment as cap-
pings are continually processed while uncapping is being done. At the
day's end, all the day's cappings have been processed. The pure honey
is in storage, the extra fine beeswax is in cakes, and the slum is bar-
reled. No extra steps are required.
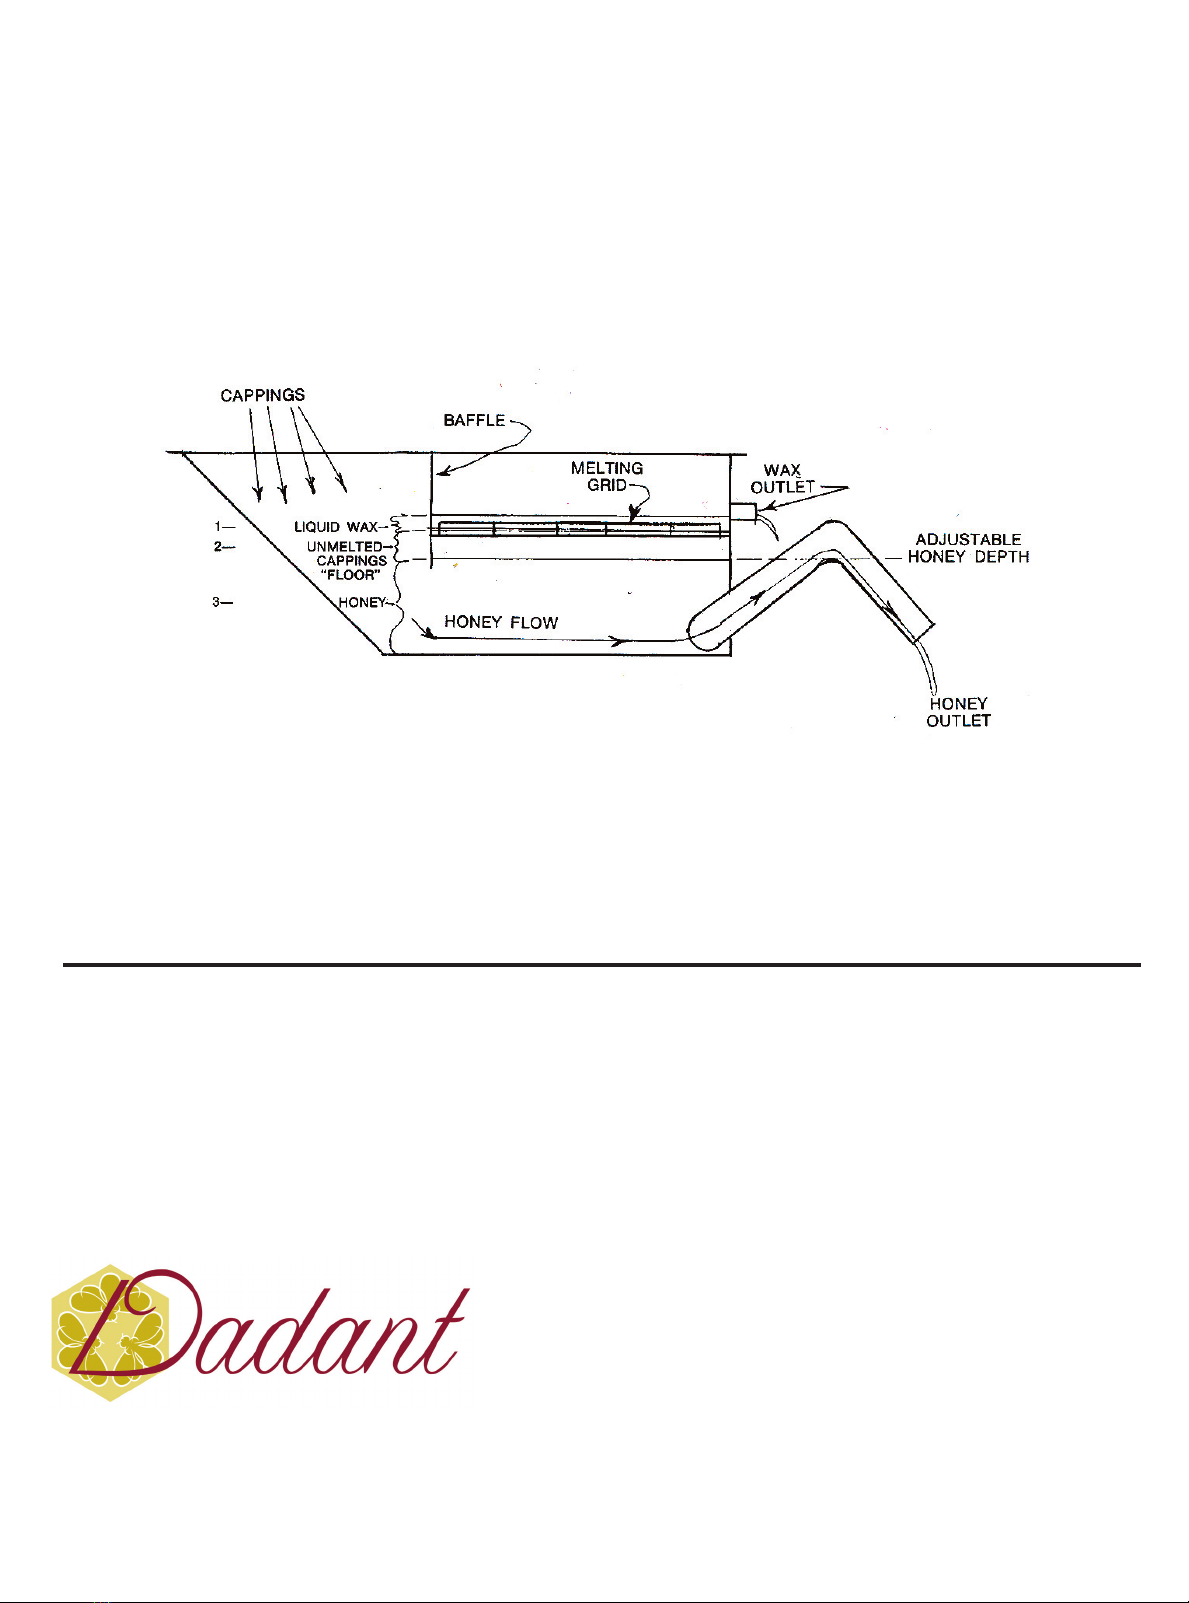
The cappings drop into the hopper area and flow under the melt-
ing grid. When the cappings begin to flow through the melter, separa-
tion of honey and wax occurs. The honey, being the heaviest, settles
to the bottom of the tank and the wax particles and foreign material
float on the honey. On those waterjacketed units, the heat from the
warm water in the waterjacket, speeds this separation process. As the
wax particles float on the honey, they come in contact with the melt-
ing grid and are melted. A pool or layer of melted wax entirely covers
the melting grid. As the cappings float to the surface a great bulk of
the wax particles are now melted by coming into contact with this
layer of melted wax. As the quantity of melted wax increases, it flows
out of a wax outlet. Meanwhile, the honey that has been separating
from the wax flows along the bottom of the tank, under the honey baf-
Assembly
Operation
Dadant Mini Melter
fle, and flows out of the melter through an adjustable honey outlet.
This honey outlet maintains the honey level in the tank, thereby hold-
ing the unmelted wax particles up against the melting grid as they float
on the honey. As the unmelted wax particles continue to rise, the for-
eign material (slum) is carried upward and collects on top of the
unmelted cappings just below or in the melted wax. The slum is peri-
odically removed (usually once an hour) with the larger perforated
screen that was supplied with the Mini Melter. Refer to the diagram
and please note the liquid levels and visualize how the setting of the
adjustable honey tube is the key to maintaining proper operation.
For most operating conditions, the honey outlet tube is adjusted to
a level that allows honey to flow out of the tube when honey level in
the tank is 1'' below the bottom of the melting grid. This 1'' allows for
the layer of unmelted cappings to be maintained which in turn holds
the foreign material (slum) up thus preventing the slum stain from fil-
tering through and discoloring the honey. During operation, it is
important to maintain this "floor" of unmelted cappings. This floor
depth may be "felt" by pushing a thin board between the melting grid
bars down through the liquid levels and "feeling" the depth of unmelt-
ed cappings by noting the resistance to pushing the board. The elec-
tric grids make heat control extremely easy as the electric grid has a
very sensitive thermostat control that is easily adjusted. The heat sup-
ply should be regulated so as to keep a "floor" of unmelted cappings
under the hot liquid wax yet keep the bottom of the tank from plugging
D/Manuals/Mini Melt/Mini Melt-7/99
Chico, CA Branch
530-893-0921
1-877-332-3268
Fresno, CA Branch
559-495-0230
1-877-432-3268
Sioux City, IA Branch
712-255-3232
1-877-732-3268
Paris, TX Branch
903-784-6145
1-877-632-3268
Potterville, MI Branch
517-645-7629
1-877-932-3268
Watertown, WI Branch
920-261-5363
1-877-232-3268*
Waverly, NY Branch
607-565-2860
1-877-532-3268
Lynchburg, VA Branch
804-846-0666
1-800-220-8325
High Springs, FL Branch
904-454-0237
1-877-832-3268
51 S. 2nd Street
Hamilton, IL 62341
217-847-3324
1-888-922-1293 *Note: The Wisconsin toll-free number will be answered at the Dadant Corporate Office in Hamilton, IL.
D/Manuals/Mini Melt/Mini Melt-7/99
with cappings. A continuous steady flow of cappings into the melter
helps any melter work more easily. Jumpy operations are not as good,
but the electric grid makes control of the heat precise and easy.
(Prolonged application of heat with no cappings flow can result in
losing the "floor" of unmelted cappings allowing the slum to pass
down through the honey and darken it. Excessive heat can also dark-
en beeswax and eventually honey.)
By allowing the hot liquid wax to accumulate on top of the melt-
ing grid with a temperature of 170 - 210° F, the liquid wax actually
does most of the melting. The honey never contacts the hot melter
grid, but passes through the melter along the bottom of the tank. As a
general rule, the honey flowing out of the melter should not exceed
125° F and may be as low as 95° F. A greater depth (floor) of unmelt-
ed cappings is obtained by pushing down the honey outlet pipe. This
lowers the honey level in the tank leaving more room on top of the
honey for unmelted cappings. With these new waterjacketed models,
honey temperature can be precisely controlled by regulating water
temperature. To flow all the hot liquid wax out of the tank at the end
of the day's work, raise the honey overflow pipe up about one inch
approximately an hour before uncapping stops, or add honey to bring
up the honey level and flow the wax out of the unit.
By occasionally noting the "floor" of cappings while uncapping,
the relationship between proper heat settings and good melter opera-
tion will be quickly understood. It will also be noted that a rather wide
range exists thus making melting control very easy. Should uncapping
be stopped for an extended period of time, the melting grid and water
immersion heater thermostats may be turned down to prevent the loss
of the "floor" of unmelted cappings. Conversely, if uncapping is at a
very rapid pace, the thermostats may be set at higher temperatures to
increase melting capacity. By noting approximate honey and wax
temperatures and the "floor" of cappings, ultimate melter operation
may be achieved and then maintained with only minimal attention.
Being observant is the greatest asset to operating any piece of equip-
ment, especially a melter.
Operating Instructions
1. On water jacketed models, always be sure the immersion
heater in the water jacket is covered with water.Check Daily.
Set the immersion heater to approximately 140° F and let the
water begin warming.
2. Optional-To prevent cappings from sliding under the honey
baffle during empty tank start-up, pour enough clean honey in
the tank to obtain approximately a 4'' depth of honey in the
bottom of the tank.
3. Adjust the honey outlet to a level that would allow honey to
flow from the unit at a level approximately 1'' below the bot-
tom of the melting grid.
4. Begin uncapping and uncap until the cappings begin to touch
the melting grid.
5. Turn on your melting grid and set thermostat to about 200° F
to begin the melting process.
(Continued On Next Page)
Mini Melt Diagram
Chico, CA Branch
530-893-0921
1-877-332-3268
Fresno, CA Branch
559-495-0230
1-877-432-3268
Sioux City, IA Branch
712-255-3232
1-877-732-3268
Paris, TX Branch
903-784-6145
1-877-632-3268
Potterville, MI Branch
517-645-7629
1-877-932-3268
Watertown, WI Branch
920-261-5363
1-877-232-3268*
Waverly, NY Branch
607-565-2860
1-877-532-3268
Lynchburg, VA Branch
804-846-0666
1-800-220-8325
High Springs, FL Branch
904-454-0237
1-877-832-3268
51 S. 2nd Street
Hamilton, IL 62341
217-847-3324
1-888-922-1293 *Note: The Wisconsin toll-free number will be answered at the Dadant Corporate Office in Hamilton, IL.
Dadant Mini Melter
D/Manuals/Mini Melt/Mini Melt-7/99
USA Parts Orders Only
6. Continue to uncap and build a layer of melted wax. This
accumulation (depth) of melted wax will do most of the melt-
ing and honey will not contact the heating coils. Honey
temperature coming out of the melter should be low enough
to not darken the honey. Specific temperature cannot be given
as nectar source is a factor in determining darkening
temperature. As a general rule, honey temperature should not
exceed 125° F. The honey outlet tube usually works best at
¾'' to 1'' below the bottom of the melter grid elements and can
be adjusted slightly for best operation. As the melter
approaches full operation, honey will flow through the
adjustable honey outlet tube and wax will flow from the wax
outlet.
7. The key to successful operation of the Cappings Melter is to
keep a floor of unmelted cappings under the liquid wax that is
floating about the grid. A layer of slumgum will develop
between liquid wax and the layer of unmelted cappings with
the honey remaining on the cooler bottom of the melter. The
floor of unmelted cappings under the hot liquid wax is neces-
sary to hold up the slumgum accumulation as it melts. The
slumgum accumulation should be scraped from the floor of
unmelted cappings from time to time which will help speed
up the melting. A perforated hand tool (slum rake) is
provided to assist you. Some find it easiest to remove the
melting grid, remove the slum, and replace the grid before the
melted wax solidifies. The cappings floor can be tested
periodically as described in the operation section. If there is
no floor of unmelted cappings, cut back on the heat supply by
turning the thermostat off, or speed up the volume of cappings
entering the melter. If the incoming supply of cappings
decreases, reduce the heat.
8. When uncapping is finished for the day, let the melter "catch
up" and then turn off the melting grid and water jacket
immersion heater. (To quicken start-up on the water jacketed
model, the water jacket immersion heater may be turned on an
hour or two before uncapping begins. Be sure enough water
is in the tank.)
9. Thermostatically controlled electric heaters provide fast start-
up (usually 20-30 minutes). Local weather conditions and the
moisture content of the honey may indicate the best method
of operation.
In summary, the Mini Melter can be easily and precisely con-
trolled. Honey temperature coming out of the melter should be
90°-120° and not over 125° F. Honey temperature is controlled by
water temperature on the water jacketed models. Increasing water
temperature increases melting capacity because honey/wax sepa-
ration is faster. Melting grid temperature determines the beeswax
quality and maintains the "floor" of cappings which floats the
slum. Increasing melting grid temperature increases the melter
capacity and vice-versa. Set grid temperature to corresponding
uncapping speed. The thickness of the "floor of unmelted cap-
pings" indicates the correctness of grid temperature. A rather wide
latitude exists. Frequent slum raking and removal speeds melting.
Monitoring honey temperature, while learning to use the Mini
Melter speeds the learning process and increases understanding
rapidly. After the melting process is understood and initial visual
references are made, the melter can easily be operated with little
attention required.
Precautions
Eleven Important Precautions
1. Read all instructions.
2. Always unplug the unit from the outlet when not in use and
before cleaning.
3. Never have the unit unattended when plugged in or in opera-
tion.
4. Hot wax is always dangerous. Keep children away from unit
during operation and keep floors, benches, and shelves in the
area free from articles.
5. Never attempt to move the unit while wax is liquid. Splashed
melted wax will cause burns.
6. Always use the unit as specified. Never use unit for other than
intended use. Any use not recommended may cause hazards.
7. Never remove the clamps holding the heat sensor to the melt-
ing grid. Overheating could occur.
8. Do not touch the hot grid surfaces.
9. Do not allow the power cord to get pinched, touch hot surfaces
or lay on the floor in a traveled area.
10. Never operate any electrical device with a damaged cord or
plug.
11. Keep foreign material such as rags etc., out of the melter pan.

Other Dadant Farm Equipment manuals

Dadant M59601 User manual

Dadant

Dadant M59601 User manual

Dadant B52601 User manual

Dadant

Dadant B52601 User manual

Popular Farm Equipment manuals by other brands

Indus Neva manual

Indus

Indus Neva manual

Finn HydroSeeder TITAN280 Operating instructions and parts manual

Finn

Finn HydroSeeder TITAN280 Operating instructions and parts manual

MODERN AG PRODUCTS Competitor 4' Operator's manual

MODERN AG PRODUCTS

MODERN AG PRODUCTS Competitor 4' Operator's manual

Landoll ICON AG11 Service and parts manual

Landoll

Landoll ICON AG11 Service and parts manual

Land Pride LR3784 Operator's manual

Land Pride

Land Pride LR3784 Operator's manual

BVL V-MIX DRIVE Maximus Giant 17-2S Cleaning instructions

BVL

BVL V-MIX DRIVE Maximus Giant 17-2S Cleaning instructions

SIP SPIDER 455/4 Mounting instructions

SIP

SIP SPIDER 455/4 Mounting instructions

STEELGREEN SG36 instruction manual

STEELGREEN

STEELGREEN SG36 instruction manual

CrustBuster Speed King 10" BeltVeyor owner's manual

CrustBuster

CrustBuster Speed King 10" BeltVeyor owner's manual

Cumberland PNEG-240 Installation and operation manual

Cumberland

Cumberland PNEG-240 Installation and operation manual

Omarv Torino 160 Use and maintenance manual

Omarv

Omarv Torino 160 Use and maintenance manual

McFarlane FINALIZER 6000 Series Operation and parts manual

McFarlane

McFarlane FINALIZER 6000 Series Operation and parts manual

Nordson AZO E360 Customer product manual

Nordson

Nordson AZO E360 Customer product manual

USC LPV Operator's manual

USC

USC LPV Operator's manual

Allied Systems Freeman 370 OPERATOR’S AND PARTS ADDENDUM

Allied Systems

Allied Systems Freeman 370 OPERATOR’S AND PARTS ADDENDUM

EASY COOPS Chicken Coop Plan 17x6 Assembly instructions

EASY COOPS

EASY COOPS Chicken Coop Plan 17x6 Assembly instructions

Rosensteiner 901557 Operation and maintenance manual

Rosensteiner

Rosensteiner 901557 Operation and maintenance manual

TMG TMG-SG73 manual

TMG

TMG TMG-SG73 manual

manuals.online logo
manuals.online logoBrands
  • About & Mission
  • Contact us
  • Privacy Policy
  • Terms and Conditions

Copyright 2025 Manuals.Online. All Rights Reserved.