DAHON UNIO E20 User manual

www.dahon.com
UNIO E20

01
Introduction
DAHON POWER SUPPORT TECHNOLOGY
Unio E20 (Power Assist Technology) Driving
System for pedal-activated bicycles
Congratulations on your purchase of a DAHON Pedelec, which will give you
many kilometers of cycling pleasure and comfortable riding.
The DAHON Pedelec offers a perfect synergy between the cyclist’s pedal
input and additional motor support.
Please keep in mind that improper installation and operation of the Unio E20
can reduce the performance and the overall enjoyment of this product.
So before you start,please read the instruction manual carefully and
follow each step in order to assure proper fit and installation of your Unio
E20.
Note: DAHON Pedelecs are designed for commuting
/travel/urban area riding, and are not suitable for
very rough or off-road use.
Once again, we thank you for purchasing your DAHON Pedelec.

02
Frame:
Tires:
Gear Ratio:
Lighting System:
Rims:
Motor:
Battery Pack:
Life Cycle:
Charger:
Dalloy Aluminum w/Visegrip Technology
DAHON Tire K-1045, 20"*1.75"
9 speed
6V-48V Headlight 1W , Panasonic
20”lightweight aluminum rims
DAHON super light and powerful version
36V/ 200W 60N.m
Seatpost battery, 36V8.7Ah 15A Samsung
high quality cell
500 charging cycles
100-240V, 50Hz/60Hz, 42V, 2A
Specications
Specifications
Features
Display Instructions
How to Charge the Battery
Maintenance of the Battery
Terms of Warranty
Safety Warnings
---------------------------------------------------------------------------------02
----------------------------------------------------------------------------------------03
-------------------------------------------------------------------------04
----------------------------------------------------------------11
----------------------------------------------------------------12
--------------------------------------------------------------------------12
-----------------------------------------------------------------------------13
Contents

03
Features
• Pedal Assist Concept.
• Motor support only switches on when you start pedaling and switches off
when you stop pedaling.
• Perfect synergy between cyclist’s pedal input & additional motor support.
• Direct relation between pedal force and motor support:
1) Level 0: Normal function.
2) Level 1: 0.3:1
3) Level 2: 0.45:1
4) Level 3: 0.65:1
5) Level 4: 0.8:1
6) Level 5: 1:1
• Very smooth riding feeling.
• High torque (rider’s kick) while starting.
• High torque at low speeds.
• Strong power support during cruising speed (in sports mode).
• Gradual power support decrease at 25 km/hr.
• Complies with a European regulation (EN15194) and is still a bicycle, NOT a
moped!
• Large LCD display with current speed, trip distance, battery life and riding
program.
• The battery can be charged separately after being disassembled.
Sensor: Adjusts the amount of power from the motor in line with the amount of
pressure by the rider, on the pedals.
Range: 60km (36V)
Functions:
• Boost: Long press the “-” assist key for 3 seconds to enter Boost mode. The
pedelec can be ridden without pedaling and can travel at a low speed of 6
Km/h (Boost mode is not available for pedelecs exported to Japan.)
• Normal
• Power assist

04
Display Instructions
Assist level
Battery capacity
1.Frame
2.Mid-motor
3.Control system
(Internal)
4.Seat tube battery
(Internal)
5.Battery switch
6.Charging port
7.Display
24. Saddle
8.Grip
9.Handlebar
10.Brake lever
11.Handlepost
12. Brake
13. Front fork
14. Spokes
15. Rim
17. Air valve
16. Tire
18.Pedal
19.Chain 20.Kickstand
21.Rear derailleur 22. Freewheel
23. Seat tube clamp
Current Speed
Total mileage
Torque sensor
power key
“ + ” key
“ - ” key

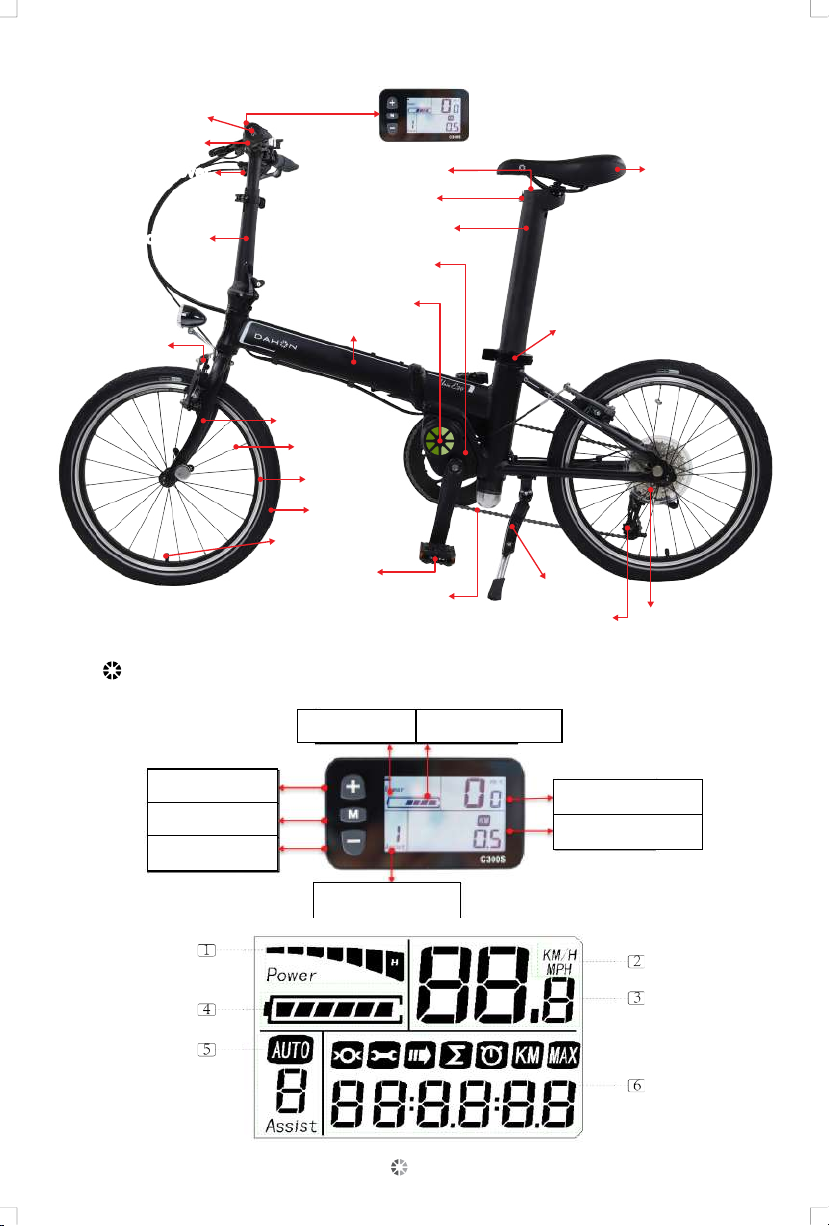
01. Power Button: Power ON/OFF switch function.
• Please confirm the battery is turned on before starting. Press the “M” key for 3
seconds and it will turn on, which means it is in power-on state.
• Press the “M” key for 3 seconds and it will turn off. Then press the battery power key
to disconnect the power.
02. Km/mile
03. Current Speed – Displays current riding speed.
04. Battery Capacity Indicator
• Each block ( ) shows the battery capacity.
• Five blocks ( ) indicates the battery is fully charged.
05. The last block will start blinking when the charge is less than 10%. When the battery
icon is empty ( ), this means the battery has no power remaining, please
charge the battery immediately.
06. Riding information (press M key to display items)
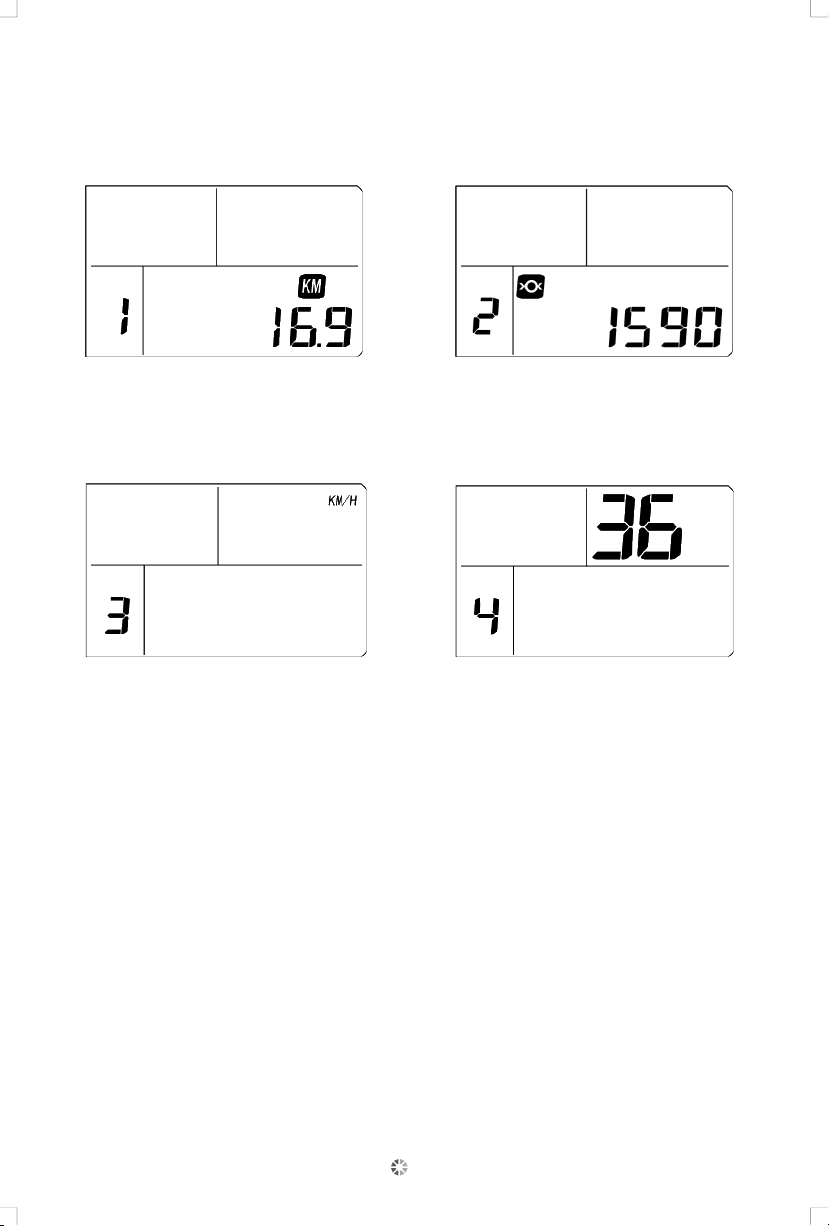
07. Riding time: display the time information of a single ride.
08. Single riding mileage: display the user's single riding mileage information.
09. LCD display backlight: In the power-on state, press and hold the “+” button for 2
seconds to light up the LCD display backlight and the headlights.
10. Maximum speed: When this signal is displayed, it means that the current speed has
reached the maximum speed.
11. Error code: When the system fails, the icon and code will be displayed at a
frequency of 1HZ.
12. Total distance / Trip distance
• Total mileage will show when no speed is detected.
• Trip mileage will show when the bicycle is being ridden.
• When the bicycle is attached to an external charger the trip distance will be reset to 0.
• If the maximum total distance of 65535 km is reached, the total distance will be
reset to zero.
13. Riding information settings:
Press the “+” and “-” keys at the same time for 2S to enter the setting interface,
press the M key to switch, press the “+” and “-” keys to select the parameter, and
press the “+” and “-” keys at the same time to exit setting.
05

• Mileage unit options (KM/H or MPH) • Voltage setting (36V/48V)
14. Normal function / Boost function – Use for normal and flat road surfaces.
15. Power assists function – Use for extra support with hills and/or strong
headwinds/ Use for strong support with very steep slopes.
16. Sleep Mode
• The display will switch to Sleep Mode automatically when the bike is not used
over 5 minutes.
• In the sleep mode, press the M key again to release it.
17. Error Code – The Error Code icon and Service icon will appear on the LCD when
malfunctions are detected. Please refer to the following error code numbers and
descriptions and check with your dealer for more information.
06
• After entering the setting, the
single mileage can be cleared
by pressing the DOWN key.
• Wheel diameter setting

07
Error Code icon
Error Code No. DESCRIPTION
2
Code
Code
3
Code
5
Code
4
Code
6
Code
8
Code
9
Excessive electric current is detected inside the controller, and a
protection mechanism is implemented.
Check whether the three-phase power cable terminal connector is
short-circuited.
If there is no short-circuit, restart it.
If this state still occurs, means the internal power device of the
controller is damaged.
The motor's three-phase power cable has fallen off, loosened, or
the motor has stopped operating for more than 2 seconds, or the
load is too heavy and the motor cannot operate normally, or the
power input isn’t connect properly.
If this state still occurs after restarting, it is the reason for the poor
connection of the three-phase wires of the motor.
The voltage of battery is excessively low; the battery is under
voltage protection.
This error code can detect whether the brake lever is damaged
under normal conditions.
The error code should disappear after the brake is released.
The power system detects whether the torque signal is faulty on the
system.
The electric circuit system detects whether the internal electric
current loop components of the controller are damaged, or the 5V
loop is short-circuited, and if there is, the status will be displayed.
The battery voltage needs to be checked at all times when the
circuit system is operating.
If the battery voltage is >43.5V, it means that high voltage
protection occurs, or the cable sequence of the sensor is
connected incorrectly, and the system will stop operating and
display this status.

Final Check
Folding & Unfolding
After completion of assembly, please perform a final check and make sure that:
1. Every bolt and screw is tightened properly.
2. Tires are inflated to the recommended tire pressure.
3. Brakes are functioning properly.
Note:
1. Fold your DAHON E-bike according to the manual.
2. When folding and unfolding please take care to check that
the internal cables are not caught. Should this occur, simply
push the two cables back inside the frame.
Folding:
(1) Adjust seatpost and crank: loosen seatpost clamp lever, lower the seatpost,
then lock the seatpost clamp, and adjust the left crank to 9 o'clock position.
(2) Folding the handlebar assembly: loosen the safety catch on the stem, pull the
stem hinge handle down, and then fold the stem down to align the whole
handlebar parallel to the front wheel.
(3) Folding the frame: open the frame safety hook, open the frame hinge lever, put
your knees against the frame folding joint, and bring the front and rear wheels
of the pedelec backward to make the front and rear wheels merge and align
parallel.
(4) Please be aware: Do not fold the bike when the battery is removed for charging.
Unfolding:
Reverse the operation sequence from back to front (expand the frame → lift the
folding stem→ raise the seatpost to an appropriate height → tighten relevant
latches and safety hook) to achieve full unfolding.
Lower the seatpost Fold down the stem Fold the frame in half
08

Handlebar adjustment
Seatpost and saddle adjustment
Adjustment of the brakes and derailleur
(1) Loosen the handlepost quick release and adjust the handlepost to an
appropriate height (the safety scale line must not be exposed outside the
tube), and then lock the handle.
(2) Loosen the stem handle and adjust the handlebar to a proper angle.
(1) Loosen the seatpost clamp and adjust the seatpost to an appropriate height
(the safety line should not be visible outside of the pedelec )
(2) Loosen the locking bolt at the bottom of the saddle, adjust the saddle to an
appropriate angle and tighten the bolt (recommended force moment is 18N•m).
(1) Brake adjustment:
Safetyline
Safe position
In the case of improper adjustment of brakes, or serious wearing of brake
pads, it will pose a threat to the safety of riders. Please adjust or replace
relevant accessories on time. The brake on the wheel rim of a pedelec
functions via friction between the brake surfaces. The brake structure
depends on the friction between the brake pad and the wheel rim or disc to
ensure maximum friction. Please keep rims or discs and brake pads clean,
free of dirt, lubricants, waxes or polishing agents that may reduce the
efficiency of friction. The brake is designed to control the speed of the bike,
not just to stop it. Brake pads are fragile parts. Please adjust the brake and
brake pads properly according to wear and conditions.
09

Battery Case Operation
(2) Derailleur adjustment:
Adjust the "H" and" L" corresponding screws of the derailleur. The specific
operation is as follows (loosen "H" screw when the chain can’t reach the
smallest gear. When the smallest gear drops, tighten" H" screw.
Loosen "L" screw when the chain can’t reach the largest gear. When the
largest gear drops, tight" L" screw): adjust the screw according to the
specific conditions, then rotate the gears and adjust the speed until the
chain and freewheel cooperate smoothly, without noise.
WARNING: Make sure no oil or lubricant touches the
surface of the brake pads, discs or wheel
rims.
Micrometric
Regulating
Screws
Micrometric
Regulating
Screws
Seatpost battery:
(1) Disconnect the power cord under the seatpost battery (unscrew
the connector nut under the controller box, and pull out the
connector of the power cord).
(2) Disassemble the seatpost clamp, and gently pull out the whole
seatpost set.
(3) While assembling, open the seatpost clamp, insert the seat battery
into the appropriate position, and lock the seat clamp.
(4) Then insert the power cord below into the connector of the controller
(please align the groove on the joint), and then tighten the nut.
10
Attention: make sure the power is off before taking the
battery out.

How to Charge the Battery
Charging Time
1.Unscrew
2. Then pull down
3. Remove
seatpost
4. Pull up
slowly
1.Slowly
pull down
2. Lock
3. Press tightly
upward
4. Tighten
Remove A ssembl e
Only use the battery charger that was supplied with the Unio E20. Use of any
other battery charger voids your warranty and may result in severe damage
to the battery and electrical system of the bicycle, and may cause a fire hazard.
Make sure the voltage specification of the changer matches your local voltage.
Remove the cover of the connector and connect the battery charger. Fully
charge the battery for at least 12 hours at the first time of purchase.
Charger LCD Indication: The Red light indicates that the battery is charging.
The Green light indicates that the battery is fully charged.
Remove the charger as shown in figure
1. Press the battery switch and turn off the power.
2. Connect the charger directly to the sub-line (both positive and negative
can plug in) as shown in figure.
3. Pull the protective cap off the battery charging port under the rear tube of
the pedelec frame as shown in figure.
4. Insert the charging port into the battery charging port, then insert the power
plug into an electric outlet for charging. (A red indicator light means charging is
in progress. A green indicator light means that it has been fully charged, or
abnormal charging.)
Figure 1 Figure 2 Figure 3
NOTE: While the seatpost battery is removed for charging,
do not fold the Pedelec and use the kickstand to support it.
11

Charger & Battery Protection
Battery Maintenance
Storage Recommendations
Terms of Warranty
The battery and charger unit have a built-in heat sensor. If the heat
rises too much, it will automatically shut down the system before any
damage can occur. The charger unit will automatically cut off the power
supply after 12 hours of charging.
Have you recharged your battery pack lately?
If 3 months have passed without recharging, it’s time to do it again.
Charging your battery will help ensure maximum battery life and
performance and will help to avoid battery damage.
The Dahon Unio E20 warranty period is 2 Years (24 months) according
to the date of purchase.
For all electrical parts including charger, display (console), controller,
BB sensor, electrical cables, carrier and motor, (Note: motor noise is
not covered) the warranty period is 2 Years (24 months).
Batteries must be charged prior to use. Do not incinerate or mutilate
batteries. They may explode or release toxic material. Do not disassemble
the battery. Return the bike to your authorized service dealer for service
or repair.
Store the battery in a cool dry place. Please refer to your dealer regarding
transport of the battery.
Cycle (charge and discharge) the battery every 3-6 months to maintain
battery performance when being stored for an extended period of time.
In the case of any irregular noise, variant temperature, Or leakage from
the battery, please stop using it immediately.
Always store and cool the battery in a well-ventilated place, out of direct
sunlight.
NOTE:
Always remember to press the battery switch to turn
off the power before parking your Unio or taking out
the batterry.
12

Can the motor be overheated?
SAFETY WARNINGS:
Yes. The motor can overheat on very steep hills and under heavy loads,
but the built-in heat sensor will automatically shut down the system
before any damage can occur.
THE PURPOSE OF SAFETY SYMBOLS IS TO ATTRACT
YOUR ATTENTION TO POSSIBLE DANGERS. THE
SAFETY SYMBOLS, AND THE EXPLANATIONS WITH
THEM, DESERVE YOUR CAREFUL ATTENTION AND
UNDERSTANDING. THE SAFETY WARNINGS BY THEM-
SELVES DO NOT ELIMINATE ANY DANGER. THE
INSTRUCTIONS OR WARNINGS THEY GIVE ARE NOT
SUBSTITUTES FOR PROPER ACCIDENT PREVENTION
MEASURES.
WARNING:
Failure to obey a safety warning can result in injury to
yourself or others.
Always follow the safety precautions to reduce the
risk of fire, electric shock and personal injury.
NOTE:
Certain fitted parts of the bicycle can wear out at differ-
ent rates depending on use, road condition, weather and
so on. Typical items include tires, chains, sprockets,
chain wheels, brake pads, grips etc.
13

PRE-OPERATIONAL SAFETY WARNINGS
NOTE:
The Limited Warranty will be void if the product is used
in a manner other than for recreation or transportation,
or modified in any way.
IMPORTANT!
If you experience any problem with your Dahon E-Bike,
please contact your local dealer directly.
01. Read and understand this instruction manual carefully before using this
product. Be thoroughly familiar with the proper use of your Dahon E-Bike.
02. Thoroughly inspect your PST for loose or damaged parts before each use.
If there are any loose or damaged parts, perform the needed adjustments or
repairs before starting your Dahon E-Bike.
03. Some countries require that all bicycle riders wear a safety helmet. It is
recommended that this precaution be followed at all times for maximum
safety and protection.
04. The manufacturer is not liable for incidental or consequential loss nor
damage due directly or indirectly from the use of this product.
05. This Dahon pedelec carrier is not compatible with a rear baby seat.
06. As with all mechanical devices, the bicycle is subjected to wear and high
stresses. Different materials and components may react to wear or stress
fatigue in different ways. If the designated life of a component has been
exceeded, it may suddenly fail, possibly causing injuries to the rider. Any
form of crack, scratches or change of coloring in highly stressed areas
may indicate that the life expectancy of the component has been reached
and it should be replaced.
14

www.dahon.com
Headquarters
Dahon North America INC.
3550 N.Union Dr.,
Olney, IL., USA 62450
Tel: +1 800-442-3511
Dahon China
8th Floor, Brilliance Plaza, Yizhan 4th road, Shapu
Community, Songgang Sub-district, Bao'an district,
Shenzhen , China
+755 36869 788
Table of contents
Other DAHON Bicycle manuals

DAHON
DAHON - 2010 User manual

DAHON
DAHON 16 INCH - 2009 User manual

DAHON
DAHON P User manual

DAHON
DAHON CIAO User manual

DAHON
DAHON 2007 24 inch series User manual

DAHON
DAHON - 2010 User manual

DAHON
DAHON Folder 1987 User manual

DAHON
DAHON 20 INCH VRO - 2009 User manual

DAHON
DAHON FLO - 2009 User manual

DAHON
DAHON - 2010 Operating instructions

DAHON
DAHON - 2010 User manual

DAHON
DAHON Bicycle User manual

DAHON
DAHON PAQ MINI - 2008 User manual

DAHON
DAHON CIAO - 2009 User manual

DAHON
DAHON Bike User manual

DAHON
DAHON 26AXS - 2010 User manual

DAHON
DAHON ESPRESSO - 2009 User manual

DAHON
DAHON PAQ MINI - 2009 User manual

DAHON
DAHON - 2010 User manual

DAHON
DAHON 26 INCH - 2008 User manual