manuals.online logo
Brands
  1. Home
  2. •
  3. Brands
  4. •
  5. Daktronics
  6. •
  7. Stereo System
  8. •
  9. Daktronics Sportsound SSR-200 User manual

Daktronics Sportsound SSR-200 User manual

Sportsound SSR-200 Installation & Commission Work Instructions Page 1 of 2
DD2298507
Rev 03
01 April 2019
201 Daktronics Drive
Brookings, SD 57006-5128
www.daktronics.com/support
800.325.8766
Task (Major Step) Process / Key Points / Reason Why (if applicable) Tools Required / Reference Materials
THESE ARE FIELD SERVICE INSTALLATION INSTRUCTIONS. REFER TO SUBCONTRACTOR SCOPE OF WORK FOR THEIR RESPONSIBILITIES.
1. Receive Equipment
FUnload equipment from truck
FStore control equipment in secure location
a. Receive equipment.
b. Store all front-end control equipment in a secure location
or press box to prevent damage or theft. Control system
should not be left in an outdoor environment.
• Video Playlist: SSR-200 Control System
• SSR-200 Gen II Operation Manual
(DD3159816)
This manual includes all drawings
referenced below.
2. Inspect Equipment
FInspect rack equipment for damage
FReport damage to PM
a. Visually inspect the rack equipment for deep scratches,
dents, chips, etc.
b. Contact PM/PC about any damaged goods.
3. Set up Control System
FRemove front, top, and back covers
FSet antennas at 45° angles
FConnect Announcer’s Interface to rack
FConnect microphone and headphones
FPlug in power for announcer’s interface
a. Remove front, top, and back covers from the rack.
b. With optional wireless receiver(s) installed, position
antennas outward at 45° angles as shown in image 3b.
Optional In-Ear Monitor antenna points straight up.
Optional ADA Hearing Assist antenna is wall mounted;
mount and connect based on manufacturer’s
recommendation (within 25' of control rack).
c. Connect interface cable between announcer’s
interface and MIC 1 and AUX 1 on side of rack.
d. Set up wired microphone w/ stand and plug into
announcer’s interface MIC 1 INPUT jack. Plug
headphones or headset into 1/4" jack.
e. Power announcer’s interface with provided power
supply. Use the outlets in the rack if possible.
• Section 3 of Operation Manual
• SSR-200 Gen II Quick Start Guide
(DD3159573)
4. Plug in and Turn on Rack
FConnect rack to power
FConnect rack to sound system input
FTurn on power to the rack
FTurn AUDIO SIGNAL switch to ON
a. Plug control system into a power receptacle.
Power for the control rack (and ber box) shall NOT be
on the same circuit as the All Sport console.
b. Route the XLR cable from AUDIO OUT on the side of the
rack to a wall plate (or ber conversion box).
c. Switch the power strip to the ON position.
d. Switch the AUDIO SIGNAL to ON.
• Section 3 of Operation Manual
• SSR-200 Gen II Quick Start Guide
(DD3159573)
5. Inspect All Source Equipment LEDs
FVerify mixer POWER LED is on
FVerify Announcer’s Interface POWER LED is
on
FVerify wireless receiver(s) powered on
FVerify CD player is on
FVerify optional Hearing Assist System is on
FVerify optional In-Ear Monitor System is on
a. Verify mixer POWER LED is on.
b. Verify Announcer’s Interface POWER LED is on.
c. Verify one or both wireless receivers (if present) are
powered on.*
d. Verify CD player is on.*
e. Verify optional Hearing Assist power is on.*
f. Verify optional In-Ear Monitor power is on.*
*LCDs display text when powered on.
6. Test Mixer & I/O Panel
FConnect music source into input 2
FSet channel gain
FTurn up channel fader
FTurn up maser fader
FRepeat testing for other inputs
FReset controls back to original settings
a. Connect the LTIBLOX device between input 2 on the
mixer and a laptop/smartphone, and then play an
appropriate song.
b. Verify PFL is enabled only on channel 2, use the GAIN
knob to set channel gain, and then turn off PFL.
c. Turn up channel fader to desired level.
d. Turn up master fader to desired level.
e. Repeat testing for other inputs.
f. Set controls back to original settings unless they were set
improperly.
• Section 3 of Operation Manual
• SSR-200 Gen II Quick Start Guide
(DD3159573)
5a. Mixer Power
3b. SSR-200 Rack 3c. Interface Cable
5b. Announcer’s
Interface Power
5c. Wireless Mic
Power
Products Involved:
SSR-200
3c & 4b. Connections
Announcer’s
Interface (Gen II)
Side View
OR
Fiber Box
(outdoor) Wall Plate
(indoor)
Sportsound SSR-200 Installation & Commission Work Instructions Page 2 of 2
DD2298507
Rev 03
01 April 2019
201 Daktronics Drive
Brookings, SD 57006-5128
www.daktronics.com/support
800.325.8766
Task (Major Step) Process / Key Points / Reason Why (if applicable) Tools Required / Reference Materials
7. Test Announcer’s Interface
FTest MOMENTARY and CONTINUOUS
functionality
FTest headphones
FTest optional headset, if present
a. Talk into the microphone and ensure both MOMENTARY
and CONTINUOUS buttons work properly and audio is
being sent through the speaker system.
b. Plug headphones into rear 1/4" or 1/8" jack and ensure
the audio comes in clearly. The default setting for an SSR-
200 setup is typically “AUX IN”.
c. Some systems may include an optional headset.
Connect the headset in place of the microphone and
headphones and test that the headset works properly.
The headset is a condenser mic and needs phantom
power on. Ensure the phantom (PHTM) power button is
pushed in. DO NOT TOGGLE PHANTOM POWER OR PLUG/
UNPLUG MIC WITH THE MIC ACTIVE.
Sportsound Announcer’s Interface Gen II
Quick Guide (DD3083838)
8. Set up/Check Wireless Mics
FFind clear frequencies for wireless mics
FSet up compatible frequencies for
additional receivers
FSync transmitters to the receivers
FTest wireless systems throughout venue
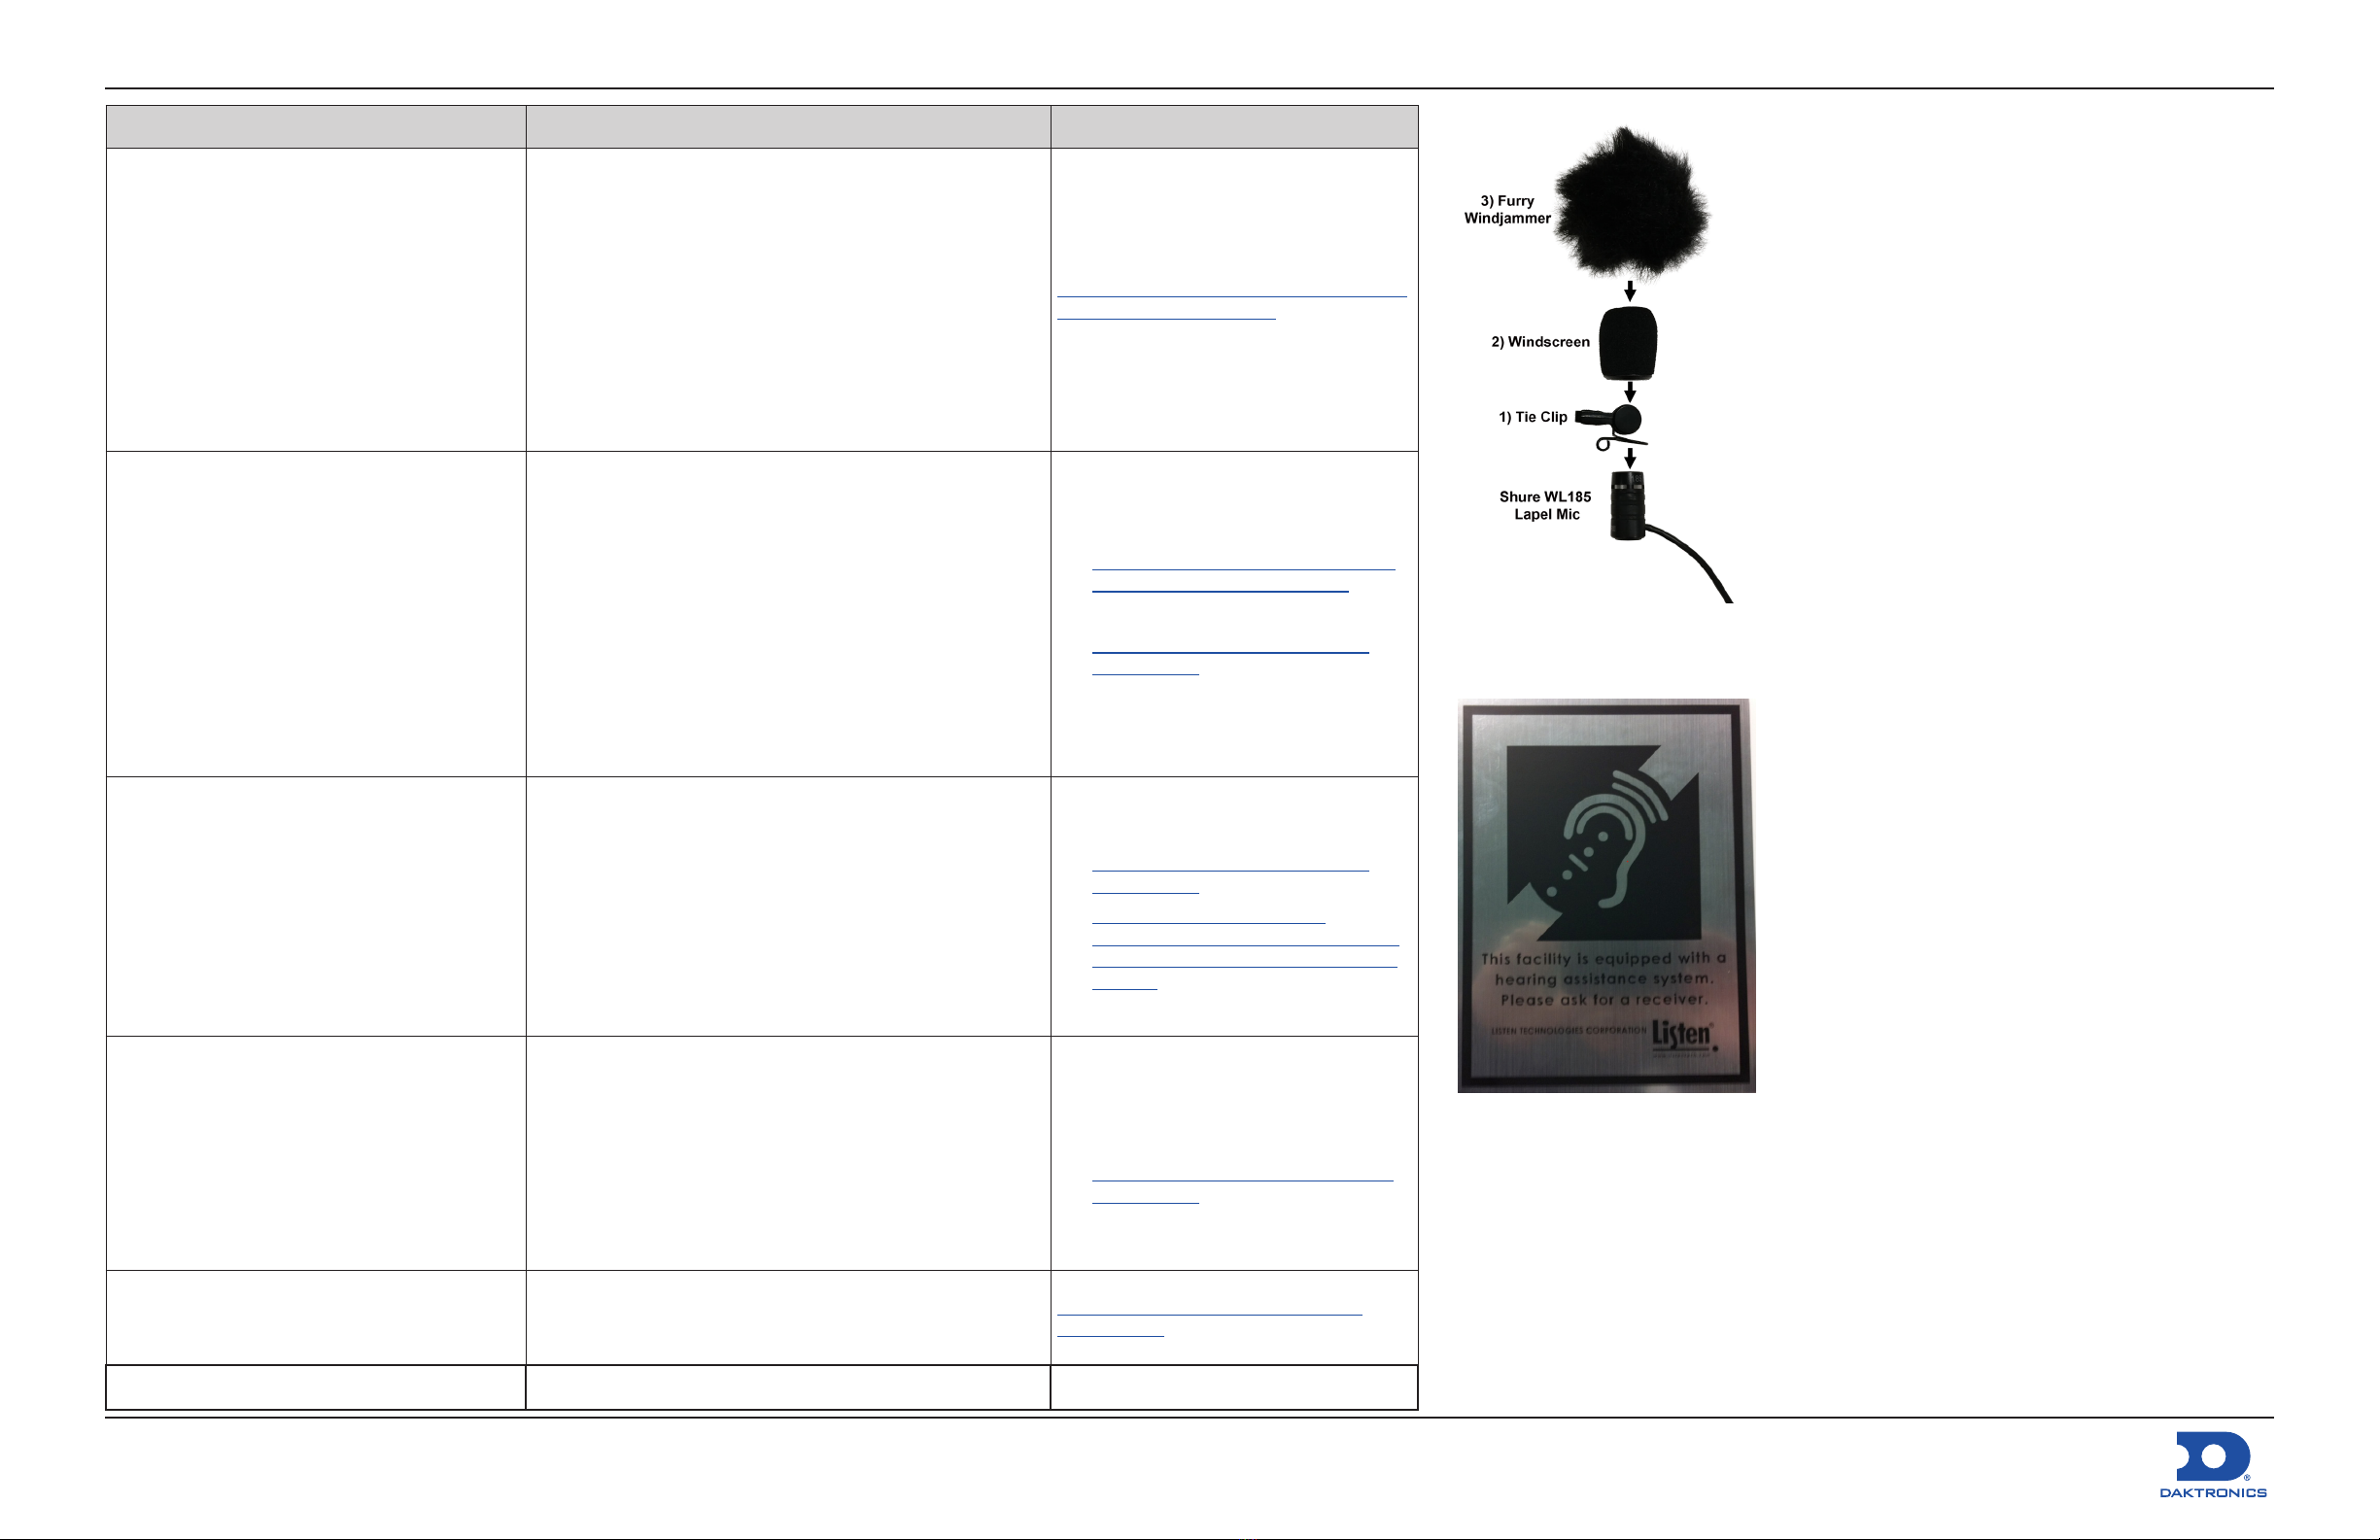
FFor ref mic, install windscreens on WL185
a. Perform a scan using the menu on the receiver.
Alternately, use Shure Frequency Finder to nd channels
available to wireless microphones by location. Using
these frequencies provides minimum chance of
interference.
b. If using multiple wireless receivers, group should be the
same on each, but each channel should be different.
c. Ensure the transmitter group and channel are set the
same as the receiver by using the IR sync function.
d. Test transmitters by walking throughout venue while
talking and ensuring there are no dropouts. Ensure
antennas are in clear line of sight of where transmitters
will be used. If not, a Remote Antenna kit is required.
e. Install fuzzy windjammer on ref mic as shown in image 8e.
• www.shure.com/americas/support/
tools/wireless-frequency-nder
• Section 3 of Operation Manual
• SSR-200 Gen II Quick Start Guide
(DD3159573)
9. Set up/Check Optional In-Ear Monitor
& Hearing Assist Systems
FTest In-Ear Monitor System throughout
venue
FTest Hearing Assist system throughout venue
FHang ADA sign
a. Check optional In-Ear Monitor system and ensure it is
working properly throughout venue. Play a CD or media
source and set mixer levels accordingly. Adjust the AUX
2 knob on mixer for the CD player input 6 and watch the
In-Ear Monitor (WTX1) for signal.
b. Check optional Hearing Assist system and ensure it is
working properly throughout venue. Play a CD or media
source and set mixer levels accordingly. Anything
outputting from main system out is what the hearing
assist system is receiving.
c. Hang ADA sign per customer’s direction.
• Section 3 of Operation Manual
• SSR-200 Gen II Quick Start Guide
(DD3159573)
• https://www.youtube.com/
watch?v=RQw_Q3-4r7c&index=3&lis
t=PLYbXXUEtsf9pdNu4BcZspaDReEQ
2Qu_KX
10. Install and Test Optional Equipment
FInstall any antenna kits, if present
FInstall optional monitor speaker
• High Gain Antenna Enhancement Kit: Two mounting
options are available: ceiling or mic stands. Route
supplied cables to rack.
• Kit, Remote Antennas, 25’ BNC: Mount brackets to wall
or ceiling so antennas will be in clear line of sight with
the eld. Antennas should be perpendicular with eld.
• Monitor Speaker: Plug monitor speaker into power outlet
and plug cable from LINE 2 to MONITOR OUT on mixer.
Ensure speaker is working properly.
• Packet: 0A-1340-0325 (dual)
• Packet: 0A-1340-0326 (single)
• Packet: 0A-1534-0081
• High Gain Antenna Kit Install Guide
(DD2497934)
• Packet: 0A-1340-2037
11. Train Customer on Control Operation
FTrain customer on proper control system
operation
Train the customer on proper operation of the audio control
system. Refer to Customer Training Work Instruction for key/
essential items the customer/operator should be trained on.
Work Instruction - Customer Training
(DD2535122)
SO/Contract #: Technician Name: Date:
8e. Windscreen Installation
9c. ADA Sign

Other manuals for Sportsound SSR-200

3

Other Daktronics Stereo System manuals

Daktronics SPORTSOUND 2000HD Instruction Manual

Daktronics

Daktronics SPORTSOUND 2000HD Instruction Manual

Daktronics SPORTSOUND SSN-250 User manual

Daktronics

Daktronics SPORTSOUND SSN-250 User manual

Daktronics Sportsound SSR-300 User manual

Daktronics

Daktronics Sportsound SSR-300 User manual

Daktronics Sportsound SS-200 User manual

Daktronics

Daktronics Sportsound SS-200 User manual

Daktronics Sportsound SSR-200 User manual

Daktronics

Daktronics Sportsound SSR-200 User manual

Daktronics SPORTSOUND 1500HD GEN II User manual

Daktronics

Daktronics SPORTSOUND 1500HD GEN II User manual

Daktronics SPORTSOUND 500HD User manual

Daktronics

Daktronics SPORTSOUND 500HD User manual

Daktronics SPORTSOUND 2000HD User manual

Daktronics

Daktronics SPORTSOUND 2000HD User manual

Popular Stereo System manuals by other brands

Hama FDA 980 user manual

Hama

Hama FDA 980 user manual

Samsung MX-F730 Service manual

Samsung

Samsung MX-F730 Service manual

Philips F400/P00 Instructions for use

Philips

Philips F400/P00 Instructions for use

Philips FW-C10 Specifications

Philips

Philips FW-C10 Specifications

Panasonic SC-HC302 operating instructions

Panasonic

Panasonic SC-HC302 operating instructions

Sony RDP-X200iPN operating instructions

Sony

Sony RDP-X200iPN operating instructions

Panasonic SA-AK240GCP Service manual

Panasonic

Panasonic SA-AK240GCP Service manual

Samsung MM-KG36 user manual

Samsung

Samsung MM-KG36 user manual

Yamaha MCR-730 Service manual

Yamaha

Yamaha MCR-730 Service manual

Teac GF-480 owner's manual

Teac

Teac GF-480 owner's manual

Parrot ZIKMU SOLO quick start guide

Parrot

Parrot ZIKMU SOLO quick start guide

Sony CMT-CP555 operating instructions

Sony

Sony CMT-CP555 operating instructions

Philips FW-i1000 manual

Philips

Philips FW-i1000 manual

TBProAudio SLM2 manual

TBProAudio

TBProAudio SLM2 manual

Sharp CD-CH1500H Operation manual

Sharp

Sharp CD-CH1500H Operation manual

Tokai LHC-826 user manual

Tokai

Tokai LHC-826 user manual

Pioneer XR-J1500C Service manual

Pioneer

Pioneer XR-J1500C Service manual

Magnavox FW 754P user manual

Magnavox

Magnavox FW 754P user manual

manuals.online logo
manuals.online logoBrands
  • About & Mission
  • Contact us
  • Privacy Policy
  • Terms and Conditions

Copyright 2025 Manuals.Online. All Rights Reserved.