Dali S1.5 User manual

www.dali.dk

anish udiophile oudspeaker ndustries
DALI is renowned among music lovers throughout the world for its
unique speakers and cables, all conceived and built to uncompro-
mising standards of design and sound. Our ultra-modern factory in
Denmark is fully equipped with facilities for development and pro-
duction of quality speakers.
Dali's principal competence is development and optimisation of
known and new technology in the field of audio and acoustics.
The result is continuous development and optimisation of new and
existing models.
We always keep our goal firmly in view for each and every DALI
speaker: To recreate sound experiences in your home that will carry
you away, making you forget time and place...
It is important to us that your new DALI speakers are set up and con-
nected optimally. This manual contains our recommendations for
setup, connection and maintenance.
Enjoy!
2
English
DALI A/S

Congratulations on the purchase of your new DALI S1.5 subwoofer. In this
manual, you can read about set-up, adjustment and maintenance of the
DALI S1.5 subwoofer.
Manual
DALI congratulates you on your purchase of the DALI S1.5 subwoofer.
3
English
Running-in
Like any other mechanical system, a speaker needs to be "run in", so you
can look forward to a gradual improvement in sound quality over the ini-
tial period. Unlike other mechanical systems, a DALI speaker does not wear
out - in fact, regular use will extend its lifetime.
Placement
In addition to correct connection and adjustment, it is also important to
experiment with various subwoofer positions in the listening room, just as
with any other loudspeaker.
Unfortunately, there is no shortcut to finding the optimal placement. You
will discover the best position in your room only by a process of trial and
error. However, we can offer the following suggestions and guidelines to
assist in your experiments.
The S1.5 subwoofer must be placed on an even floor, either directly on
rubber feet (included) or on optional spikes. If using spikes, please make
sure that they do not penetrate loudspeaker cables, power cords, inter-
connects, etc. Make sure that the subwoofer rests evenly on all feet or
spikes and cannot rock back and forth. Uneven footing can result in rat-
tling, buzzing and other noise when playing loud. On an uneven floor, the
subwoofer should be supported, so that it cannot rock back and forth.

Always switch off your amplifier before adjusting any of the cables!
4
English
Placement approximately midway between the left and right front speak-
ers is usually preferable. Placement along a side wall may also yield good
results in certain situations. Please note that it is not necessary to aim the
subwoofer at the listening position.
The S1.5 subwoofer should normally be placed against a wall. If needed,
bass levels can be reduced by moving the subwoofer away from the wall
or increased by placing it in a corner. Note that moving the subwoofer
reduces/increases the level mainly in the midbass region, acting as a kind
of tone control, while the rear panel volume control operates in a linear
manner, reducing or increasing all bass frequencies equally.
In a stereo system with two subwoofers, each subwoofer should be placed
near its corresponding front loudspeaker, for example in the corner behind
the main loudspeaker.
Connection
The addition of the S1.5 with active crossover and amplifier to your stereo
or surround system offers several connection options. If in doubt regard-
ing the best method, please consult your DALI dealer. No matter which
method you select, we recommend the use of high-quality cables such as
DALI Wave 5000.

Ask your DALI dealer for advice on the best connection method.
5
English
Connection to a stereo full-range signal
If the subwoofer is to be used with a preamplifi er without a high-qual-
ity crossover, we recommend connecting the subwoofer LINE IN - LEFT/
RIGHT inputs to the full-range signal from normal preamplifi er outputs.
This allows the subwoofer’s built-in crossover to fi lter the signal, so that
the subwoofer only reproduces the deep bass.
When the subwoofer LINE IN - LEFT/RIGHT inputs are connected to a full-
range stereo signal, a high-pass fi ltered signal (i.e. with the low frequencies
intended for reproduction by the subwoofer removed) will be available at
the subwoofer’s LINE OUT - LEFT/RIGHT outputs.
Connect the high-pass fi ltered signal to the power amplifi er that drives the
main speakers, so that they are relieved of the strain of handling demand-
ing low frequencies. This ensures cleaner, undistorted sound from the
main speakers.
Connection to a stereo full-range signal
LINE IN
POWER AMPLIFIER
LOUDSPEAKER OUTPUT
PRE-AMPLIFIER
LINE OUTPUT

6
English
When adjusting the subwoofer, use a piece of music that you know well.
Connection to a mono full-range signal
LINE IN
POWER AMPLIFIER
LOUDSPEAKER OUTPUT
PRE-AMPLIFIER
LINE OUTPUT
Connection to a mono full-range signal
If the subwoofer is only to be used with a single channel, for instance with
two subwoofers in a stereo system, and you wish to use the subwoofer’s
built-in crossover for frequency division as mentioned on previous page in
the section on stereo connection, the subwoofer’s LINE-IN LEFT input can
be used.
As described in the section regarding stereo connection, the subwoofer’s
built-in crossover will split the audio signal, so that only the deep bass is
directed to the subwoofer. As with stereo connection, a high-pass fi ltered
signal will be available at the LINE OUT - LEFT output. Please note that there
will be no signal at the LINE OUT - RIGHT output.

7
English
The bass must be precise and distinct.
Connection to a low-pass fi ltered mono signal
When using the subwoofer with a surround amplifi er or other equipment
with a low-pass fi ltered subwoofer output, this output should be connected
to the subwoofer’s LFE input. With LFE connection, the signal goes directly
to the S1.5 amplifi er, bypassing the subwoofer’s crossover. No signal is
available at the LINE OUT outputs.
Any crossover adjustments should be made according to the instructions in
the owner’s manual of the surround processor. When using the LFE input,
level and phase controls are active and should be adjusted as described in
the section on adjustment.
Connection to a low-pass fi ltered mono signal
PRE-/SURROUND
AMPLIFIER
SUB OUTPUT
LINE IN
POWER AMPLIFIER
LOUDSPEAKER OUTPUT

8
English
Placing the subwoofer in a corner will increase the bass.
Adjusting the S1.5 Subwoofer
After you have connected the subwoofer using one of the methods
described and have placed it in the optimum position, it is time for the
exciting task of fine-tuning the subwoofer response. Please note that
placement has major impact on the subwoofer’s overall contribution to
system performance. For instance, placement in a corner provides signifi-
cantly louder bass than placement along a wall away from corners.
We recommend the following procedure for fine-tuning bass response.
Use a familiar piece of music with strong rhythmic bass content such as
kettle drum, electric bass, etc.
Start with VOLUME and CROSSOVER
in the center position (12 o’clock). Set
PHASE at 180°. Set the POWER switch
to ON.
Setting volume
Adjust the volume of the S1.5 so that the bass matches the level of the
main speakers. You should be able to appreciate the subwoofer’s contribu-
tion to the sound, without it ever being over-powering. Bass must be tight
and accurate, so that the subwoofer reproduces the bass present in the
music/film - no more and no less. If installing the S1.5 in a surround system,
it is practical to select a fixed level on the subwoofer and adjust subwoofer
output using the surround amplifier's set-up function. If bass levels are set
too high, distortion will reduce the quality of your listening experience.
Please note once again that the position of the subwoofer will have major
influence on its sonic contribution.

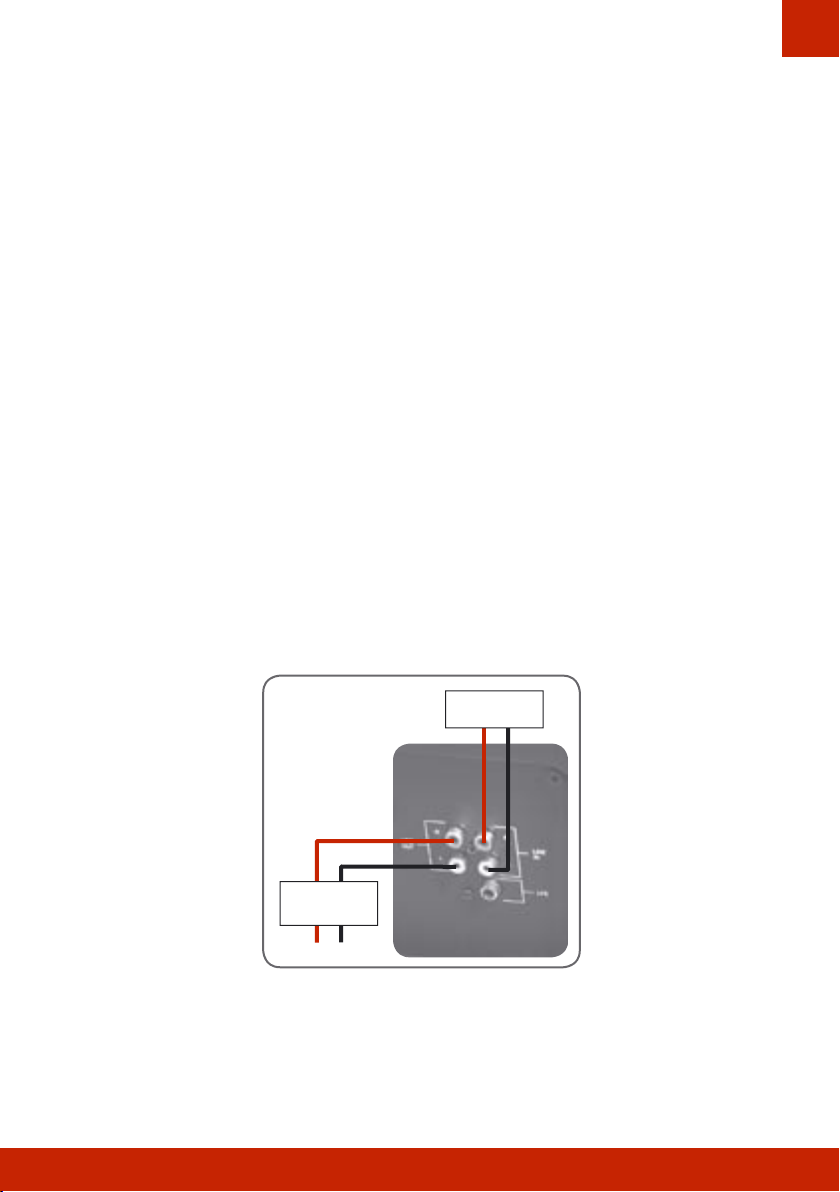
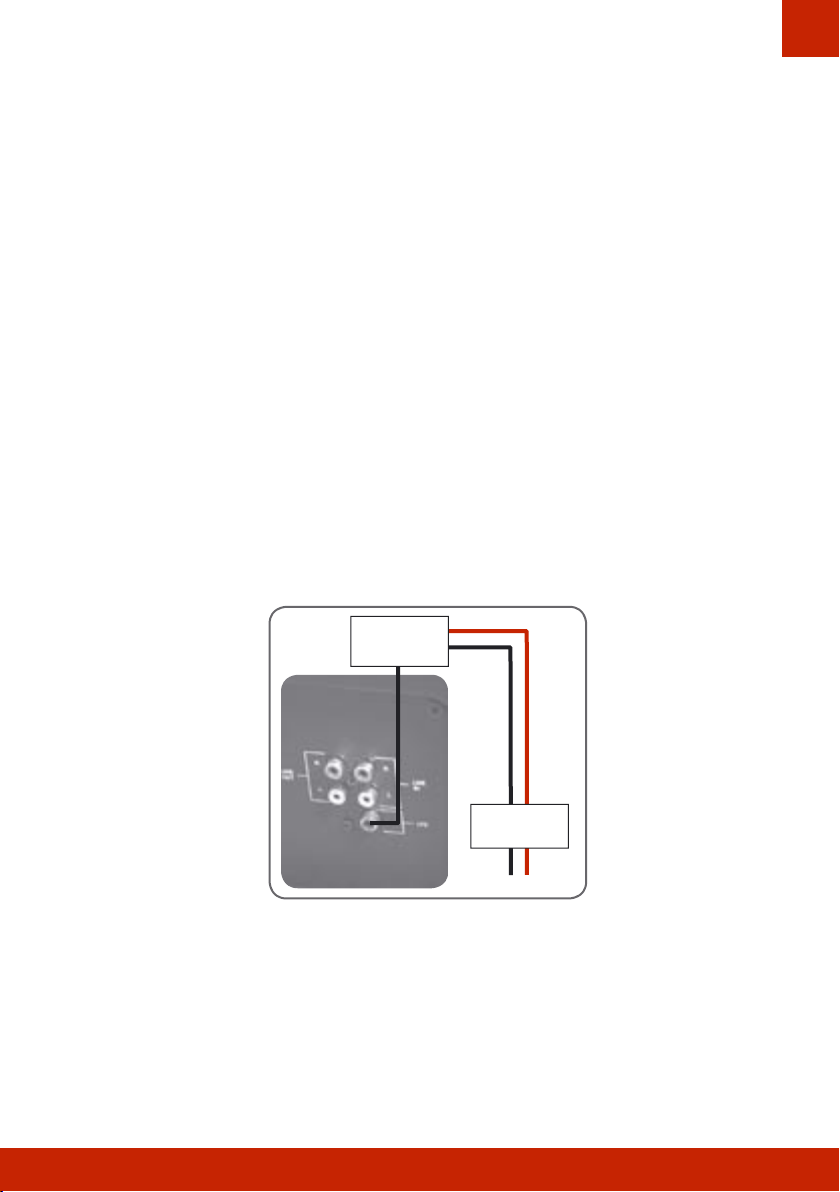
Always use high quality cables like DALI Wave 5000.
9
English
Setting crossover frequency (when connecting via Line In - Left/Right)
With volume correctly adjusted, it is time for the equally important inte-
gration of the transition between the main speakers and S1.5. Simply turn
CROSSOVER up and down until you experience smooth, even bass with no
gaps. It may be necessary to re-adjust volume in connection with selection
of crossover frequency. If you are using the LFE input, this adjustment is
not active and crossover frequency should be adjusted in the set-up menu
of your surround processor.
Setting phase
Experiment with both settings – possibly with new adjustments of volume
and crossover frequency. It is a good idea to listen to the system for a few
days and then adjust again, if needed. The optimal setting for surround
may not be the same as for stereo. Make a note of which setting you prefer
for film and for music.
Setting Auto-function
In the AUTO position, the S1.5 will automatically go into Standby after
approximately 20 minutes without a signal. When the S1.5 detects a signal
again, it will automatically turn on. With the AUTO switch in the ON posi-
tion, the S1.5 will remain fully powered up as long as the main POWER
switch is in the ON position.
The POWER switch is the main On/Off control for the subwoofer. Always
turn off the system, if it is not to be used for an extended period of time.
Always turn the subwoofer completely off, whenever you connect or dis-
connect cables.
Overload
In the event of a major overload of the S1.5, the onboard protection circuit
will shut down the subwoofer. If this occurs, turn the system level all the
way down. To re-set the subwoofer, turn its main power switch off and
then back on.
Beware: The built-in protection circuit CANNOT provide unconditional
protection against damage as a result of overload.

Even small changes in the listening room can affect the sound.
10
English
DALI - More than meets the eye
Maintenance
Clean the cabinets with a soft, dry cloth. If the cabinets are dirty, wipe
with a soft cloth fi rst dipped in a mild all-purpose cleaner and then wrung
out. Be very careful when wiping the speaker cones, as they are very frag-
ile. The grille fronts can be vacuumed and wiped with a well-wrung, lint-
free cloth and mild all-purpose cleaner.
DALI
-
Quality in all aspects
We wish to congratulate you once again on your investment and to inform
you that your authorised DALI dealer will be happy to provide you with
advice on connection, set-up and adjustment of your audio system. Finally,
we would like to invite you to visit us at www.dali.dk for more information
on the technology behind our loudspeakers, for the full DALI story and to
sign up for our free newsletter.

Sign up for free e-mail newsletters at www.dali.dk
11
English
CAUTION:
TO REDUCE THE RISK OF ELRCTRIC SHOCK, DO NOT REMOVE THE BACK PANEL. NO USER-SER-
VICEABLE PARTS INSIDE. REFER SERVICING TO QUALIFIED PERSONNEL.
1. Read Instructions - All the safety and operating instructions should be read before the appliance is operated.
2. Retain Instructions - The safety and operating instructions should be retained for future reference.
3. Heed Warnings - All warnings on the appliance and in the operating instructions should be adhered to.
4. Follow Instructions - All operating and use instructions should be followed.
5. Water and Moisture - The appliance should not be used near water - for example, near a bathtub, washbowl, kitchen sink,
laundry tub, in a wet basement, or near a swimming pool and the like. Do not place anything containing liquids on the appliance.
6. Carts and Stands - The appliance should be used only with a cart or stand if recommended by the manufacturer.
7. Wall or Ceiling Mounting - The appliance should be mounted to a wall or ceiling only as recommended by the manufacturer.
8. Ventilation - The appliance should be situated so that its location or position does not interfere with proper ventilation. For
or placed in a built-in installation, such as a bookcase or cabinet, that mayimpede the flow of air through the ventilation
openings. Do not close or block any ventilation holes. Maintain free space between ventilation holes and wall.
9. Heat - The appliance should be situated away from heat sources such as radiators, heat registers, stoves, or other
appliances that produce heat. Do not place candles or other open flame on the appliance.
1
or as marked on the appliance.
11. Power Cord Protection - Power-supply cords should be routed so that they are not likely to be walked on or pinched by
items placed on or against them, paying particular attention to cords at plugs, convenience receptacles and the point
where they exit from appliance.
12. Cleaning - Do not use any liquid cleaners. Use only a dry cloth to wipe off dust and grease.
13. Non-use Periods - The power cord of the appliance should be unplugged from the outlet when left unused for a long
period of time.
14. Object and Liguid Entry - Care should be taken so that objects do not fall and liquids are not spilled into the enclosure
through openings.
15. Damage Requiring Service - The appliance should be serviced by qualified personnel when:
a. The power-supply cord or the plug has been damaged; or
b. Objects have fallen, or liquid has been spilled into the appliance; or
c. The appliance has been exposed to rain; or
d. The appliance does not appear to operate normally, or exhibits a marked change in performance; or
e. The appliance has been dropped, or the enclosure damaged.
16. Servicing - The user should not attempt to service the appliance beyond that described in the operating instructions.
All other servicing should be referred to qualified service personnel.
The lightning flash within an equilateral
triangle is intended to alert you to the pres-
ence of uninsulated „dangerous voltage“
within the product’s enclosure that may
be of sufficient magnitude to constitute an
electric shock to persons.
The exclamation point within an equila-
teral triangle is intended to alert you to
the presence of important operating and
maintenance (servicing) instructions in the
literature accompanying the appliance.
Safety
CAUTION
RISK OF ELECTRIC SHOCK
DO NOT OPEN

Enjoy your new DALI S1.5!
12
English
Specifications
There are countless methods of
measuring speakers. However, none
of them actually represent how a
speaker really sounds. Only by lis-
tening is it possible to determine
whether one speaker sounds better
than another. So we only give you the
specifications that are of real value
to you. The DALI S1.5 subwoofer has
been designed to reproduce music as
honestly as possible - and we know
we have succeeded. Enjoy your new
speakers!
DALI S1.5
Active Subwoofer
Controls Volume, Crossover
Frequency, Phase
Frequency Range +/- 3dB [Hz] 23 - 140
Crossover Frequencies [Hz] 45 - 120
Phase 0º or 180º
Nominal Impedance 20 kOhm
Minimum Impedance 20 kOhm
Maximum SPL [dB] 119
Amplifier [Watts] 300 (RMS)
600 (Peak)
Inputs (Line Level)
RCA, Stereo (low-pass
filtered)
RCA, Mono (LFE)
Outputs (Line Level) RCA, Stereo (high
pass filtered)
Low Frequency Driver 15" long throw
Auto Power On/Standby Standby after 20 min-
utes without signal
Power Consumption
(Max/Standby On/Standby
Off) [Watts]
450 / 8 / 1.5
Mains Voltage [Volt] * 100, 120, 230 or 240
Available Finishes Golden cherry,
light beech, black
Dimensions (H x W x D) [mm] 560 x 447 x 490
Dimensions (H x W x D) [inch] 22.05 x 17.60 x 19.29
Weight [kg/lbs] 39.9 / 88.0
All specifications are subject to change without notice.
*Dependent on country – please check that mains voltage
corresponds to the mains voltage of your country
Table of contents
Other Dali Subwoofer manuals

Dali
Dali SUB P-10 DSS User manual

Dali
Dali IKON SUB MK2 User manual

Dali
Dali SUB C-8 D User manual

Dali
Dali BASIS 100 User manual

Dali
Dali SUB K-14 F User manual

Dali
Dali SWA 15 User manual

Dali
Dali PHANTOM IW SUB S-100 User manual

Dali
Dali SWA 15 User manual

Dali
Dali SWA 12 User manual

Dali
Dali SUB M-10 D User manual