manuals.online logo
Brands
  1. Home
  2. •
  3. Brands
  4. •
  5. Dangerous Music
  6. •
  7. Recording Equipment
  8. •
  9. Dangerous Music MQ User manual

Dangerous Music MQ User manual

Dangerous Music, Inc.
154 East 2nd Street #4
New York, NY 10009
www.dangerousmusic.com
Dangerous MQ Manual1c.doc 1/9 ©2004 Dangerous Music, Inc.
The Dangerous MQ Manual
Thank you for choosing products from the exciting line of Dangerous Music
recording equipment. Many years of dependable and trouble-free service can be expected
from our gear. This has been made possible by careful design, construction, and top-shelf
component choices by recording industry veterans.
MQ stands for “Meters and Cue system”. It is a multipurpose device designed to
give the recording engineer quick and precise mix level awareness as well as an easy to
use, dual stereo cue system complete with headphone amplifiers and talkback
communications.
The Metering section has a pair of Sifam Clarity Focus VU movements for the
analog inputs. A Prime LED digital meter with custom ballistics is used for the AES
input. These accurately calibrated meters allow for optimum level adjustment for
recording, mixing, mastering, and system calibration. The Cue section consists of a
simple mixer and a talkback system that feeds two built-in power amplifiers. The MQ
hooks up in minutes to become an indispensable component of your recording studio.
Table of contents
Introduction …………………………… 1
Safety review……………………………… 2
Overview………………………………… 3
Hook up…………………………………… 3
MQ front panel…………………………… 4
Calibration and internal jumpers………… 6
Specifications……………………………… 8
Warrantee information ……………………. 9
Dangerous Music, Inc.
154 East 2nd Street #4
New York, NY 10009
www.dangerousmusic.com
Dangerous MQ Manual1c.doc 2/9 ©2004 Dangerous Music, Inc.
Safety Review
Certain precautions should be taken when using electrical products. Please observe the
safety hints by reading the manual and obtaining qualified help if necessary to adhere to
the precautions.
1. Always use a properly grounded power supply cord with this product. Please
do not defeat the ground pin on the mains plug. This connection provides earth to
the chassis and signal grounds inside the device for clean and quiet operation. The
“calibration and internal jumpers” page can help clear up a buzz problem if one
develops.
2. Avoid high temperature operation in equipment racks by providing air
circulation. The number one killer of electronic gear is HEAT. The life
expectancy of electrolytic capacitors (the usual casualty in a heat situation) goes
from 10 or 15 years to 10 or 15 weeks if the temperature inside the box is allowed
to rise beyond 140 degrees F. Vented rack panels may look like wasted space to
an interior decorator, but they look like beauty to a technician or equipment
designer! If the front panel is hot, it is roasting inside the box.
3. Avoid areas of high magnetic fields. The steel chassis of MQ is designed to
shield the circuits from EMI and RFI (magnetic and radio interference). When
installing equipment in racks, it is prudent to put power amplifiers and large
power supplies at least several rack spaces, if not in a different rack, away from
equipment that deals with low level signals. Separation of high level and low level
equipment can pre-empt trouble caused by heat and EMI.
4. Care should be taken to avoid liquid spills around equipment. If a spill occurs,
please shut off the gear. A qualified technician should investigate accidents to
prevent further equipment damage or personnel hazards caused by spills.
5. Every attempt has been made by the designers to provide versatility in the set-
up and calibration of MQ. As such, there ARE user serviceable jumpers and
calibrations inside. If one is uncomfortable with opening gear and changing
jumpers or making adjustments, please seek qualified help.
6. If adjustments or jumper changes are required, please unplug the power before
opening the top. Dropped screws or tools on a live circuit board can ruin your day
and subsequent damage is not covered by the warranty.
Dangerous Music, Inc.
154 East 2nd Street #4
New York, NY 10009
www.dangerousmusic.com
Dangerous MQ Manual1c.doc 3/9 ©2004 Dangerous Music, Inc.
Overview
The MQ is designed to provide accurate metering and mixing for the cue
environment. High quality analog and digital meter movements are fed from the meter
sends of the Dangerous Monitor or other source. There are two headphone amplifiers
that are fed from a simple mixer on the front panel. A talkback microphone with inject
levels rounds out the package. A “Dim” signal is sent back to the Monitor to dim the
control room speakers when the talkback key is pressed if desired. The MQ and Monitor
were made for each other but can also work independently.
Hooking up your MQ
1. The first connector is for the power supply. It is good engineering practice to make all
the other connections to MQ before applying power.
2. The next six connectors are audio inputs that feed the cue mixer and analog meters.
The exact functions of these inputs and usage examples will be explained in the next
section.
3. The talkback switch and cable gets plugged into the “TB REMOTE” jack to activate
the talkback microphone. A regular mic cable or XLR tie line can be used to extend the
talkback switch. A foot-operated switch can also be used (See pg 8 for connector pinout.)
4. The “DIM CMND” jack sends a signal to the Dangerous Monitor to dim the control
room speakers. This prevents feedback and loud music from getting into the cue system
upon talkback activation.
5. When the talkback switch is pressed, the “SLATE OUT” jack provides the talkback
signal for slating mixes, driving a PA system or phone patch.
Dangerous Music, Inc.
154 East 2nd Street #4
New York, NY 10009
www.dangerousmusic.com
Dangerous MQ Manual1c.doc 4/9 ©2004 Dangerous Music, Inc.
6. The “Cue Amp Out” jacks are for feeding two separate sets of headphones. The two
power amplifiers can drive several pairs of medium impedance headphones each (like
Sony MDR series for example). Since the XLR’s are at full amplifier level, they are
designed to drive a headphone level control box like the Redco Little Red Cue Box or
similar devices. Connector pinouts and sources are listed on the “Connector Pinouts”
page of this manual.
7. The “AES IN” jack is for driving the digital meter with a standard AES digital signal.
8. The “VU MTR OFFSET” switch turns the meter sensitivity down if the type of music
worked on warrants it (prolonged meter pinning can damage the movements.) This is
factory set to –4 dBu.
The VU METER INPUT, DIM CMND, and the AES IN signals hook up
seamlessly to the Dangerous Monitor. It is easy to incorporate the MQ into other
systems by buying or making the appropriate cables using the information on the
“Connector Pinouts” page (8.)
MQ front panel
The cue mixer section is next to the right VU meter and has the master level controls
(Cue A Level and Cue B Level) along with the Cue Source selectors. The mono inputs
(Input 1 and Input 2) have level and pan pots along with phase flip and Cue Assign
switches. Setting all the pots to the 12:00 position is a safe place to start when setting up
the MQ for the first time. The engineer’s headphone level usually winds up around 2:00
and the talkback level also runs around 2:00 for most applications.
The cue amps get their source from the VU meter input (Mon) or a separate Cue
input (Cue) that the engineer provides. The mono inputs are to inject click track, vocal, or
whatever is needed into either cue amp as selected by the A/B switch.
On the left side, there are controls for Talkback Level, Headphone Level for the
front panel jacks, and switch to select which cue mix the engineer wants to monitor.
There is also a Peak Hold switch for the digital level meter.
Dangerous Music, Inc.
154 East 2nd Street #4
New York, NY 10009
www.dangerousmusic.com
Dangerous MQ Manual1c.doc 5/9 ©2004 Dangerous Music, Inc.
A powerful feature of this system is the ability to provide a latency free vocal
headphone mix by multing the mic signal just before A/D conversion and patching it into
one of the mono inputs. Adjust Level and Pan controls to taste. This gives the talent a
signal in their cue mix that doesn’t have any delay caused by A/D conversion or signal
processing in the computer. The phase switch is to compensate for polarity reversals
anywhere along the line from the microphone to the headphones. Push the phase switch
while the artist is singing into the mic and select the switch position that produces the
most comfortable mix. The phase switches are also handy to subtract a signal from a cue
mix. It is easy to send the control room mix to a singer and turn down the bass for
instance by assigning the bass to one of the mono inputs, pushing the phase switch, and
adjusting the level control to cancel some of the bass signal in the main mix of the
singer’s headphones. These common tricks of the trade regularly used in recording
studios of the past are once again made available and easy with MQ.
Another good trick of the recording trade that seems to be becoming rare these
days is having really good, accurate meters for proper system calibration and level
setting. The VU movements are top-notch Sifam Clarity Focus movements with
backlighting and an Offset switch to turn the sensitivity down in when listening to high
levels of program modulation (i.e. in mastering). The VU meter sensitivity switch is
located on the rear panel.
The digital meter is a Prime LED set with custom ballistics designed to provide
simultaneous average and peak level indication. An Over Modulation indicator lights
when three consecutive words at full scale are detected to tell you if there is serious
clipping of program material.
Dangerous Music, Inc.
154 East 2nd Street #4
New York, NY 10009
www.dangerousmusic.com
Dangerous MQ Manual1c.doc 6/9 ©2004 Dangerous Music, Inc.
MQ calibration and user configuration
The MQ is carefully calibrated and configured for immediate use right out of the
box. There are meter gain adjustments and jumpers for altering the talkback mode and
cable shielding if desired. This requires opening the top of the case. Please disconnect the
power before removing the top, as mother nature’s way of telling you that you dropped a
screw on a powered motherboard is usually a nice crater. This type of damage tends to be
expensive and is not warranty material. If one is not comfortable with opening
equipment, please seek the help of a qualified technician. The VU movements are also
delicate. They tend to not respond well to physical shock. Dropping an MQ, shipping it
without the proper packing material or prolonged pinning of the meters will damage the
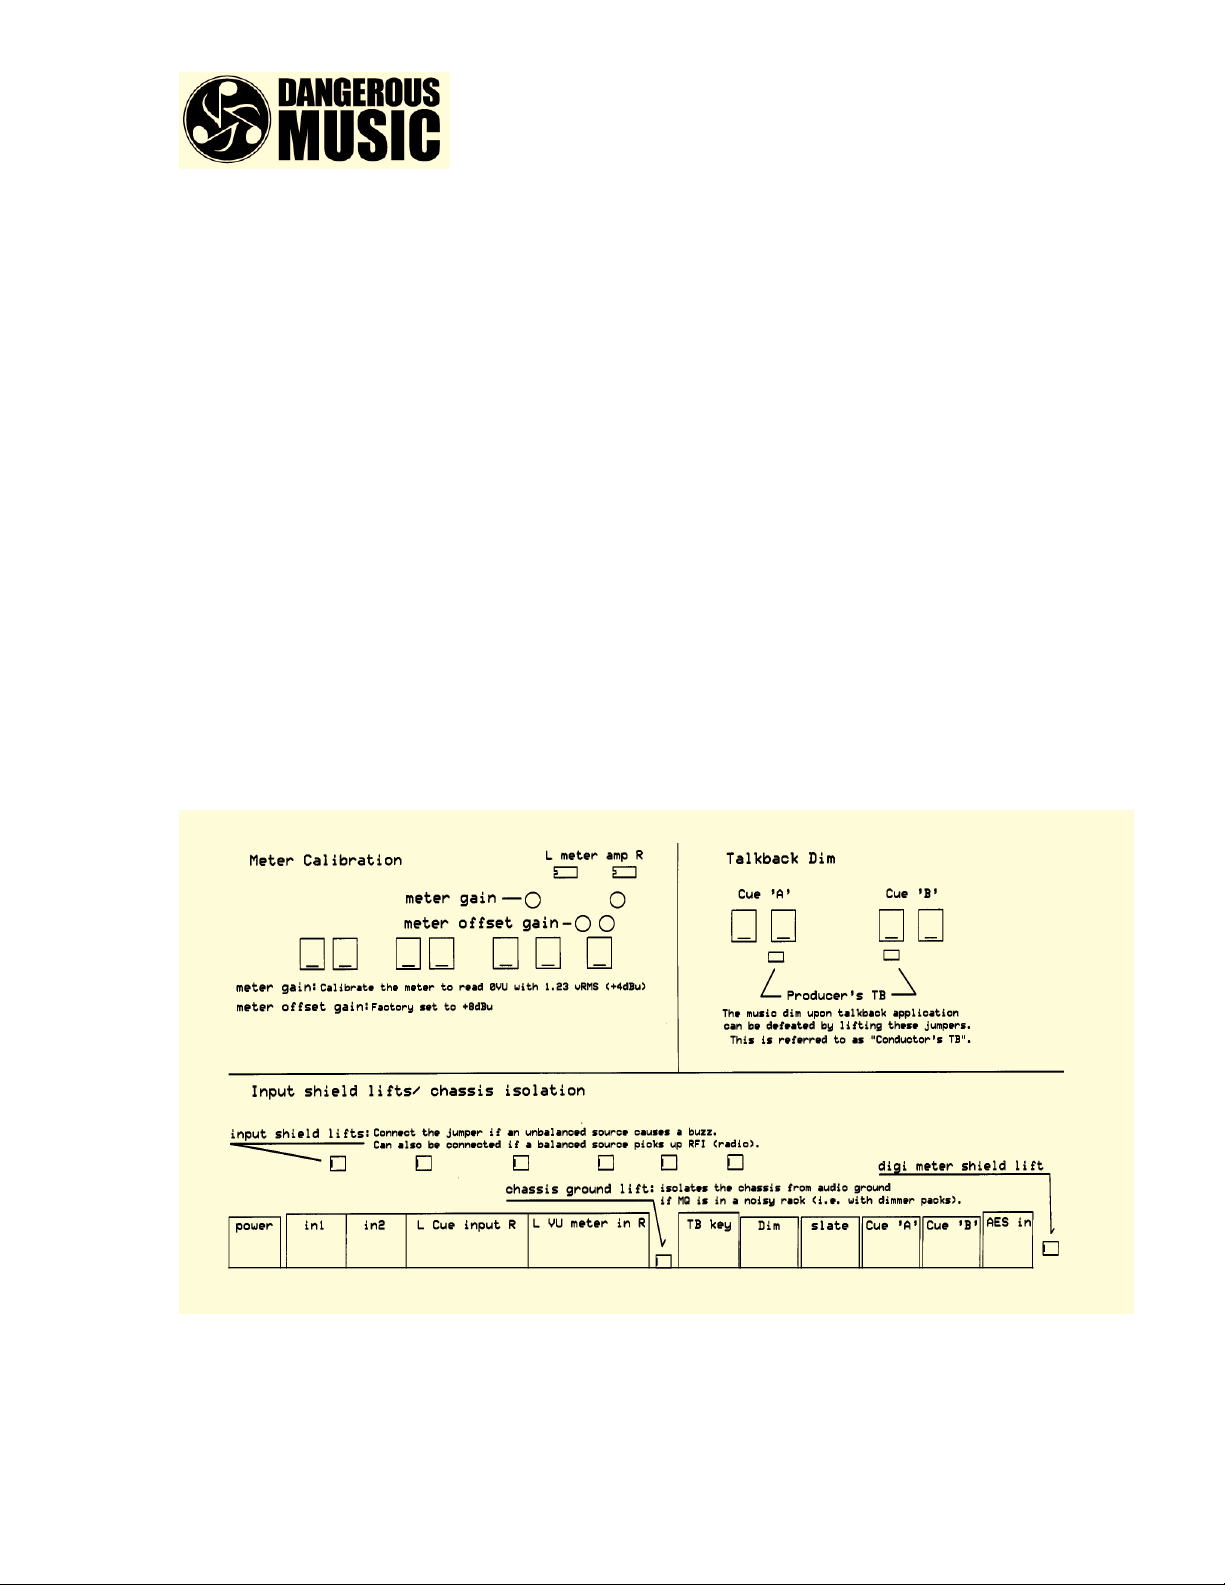
Sifam movements. The next page has a drawing of the MQ main board. There are three
areas of adjustments.
Meter Calibration: The “meter gain” pots are set by running a 1kHz tone at +4dBu into
the “VU Meter” inputs and turning the pots so that the movements read “0VU”. The
“meter offset gain” pots set the sensitivity down to avoid pinning the meters when
running high levels through the system without the benefit of the “-6VU” button on the
Monitor. The factory calibration for this offset is -4dB to accommodate the two most
popular 0VU settings (-14dBfs for mastering = +4dBu, and -14dBfs for recording =
+8dBu). The offset position has several dB of range to accommodate different levels.
Volts AC dBu dBfs (mastering) dBfs(Recording)
9.75 +22 over -0
6.15 +18 -0 -4
1.95 +8 -10 (VU level compressed) -14 0VU
1.23 +4 -14 0VU -18
Why the meters are set the way they are:
VU meters have been historically set up in recording studios to read “0VU” at +4 dBu. It
was found by equipment designers that typical music had around 14 to 18dB peaks above
0VU and that corresponded with peak levels in a system of +18 to +22dBu. When
recording went digital, strict attention to peak levels had to be maintained, as digital
systems do not have wiggle room above full scale. One hits full scale, one records
distorted music. It turns out however, that there are two major kinds of distortion
depending on what one is doing, namely Amplitude and Slew Rate distortion. Amplitude
distortion is the kind most people think of by simply recording at too high a level.
Mastering engineers know of slew rate distortion by having a compressed, bright, hot
signal overload the components in a system even if the level (amplitude) is not at peak.
The two camps tended to pick their maximum voltage levels in their systems to reflect the
different problems they encountered, hence the two different popular A/D alignment
standards. In recording, it is important to not clip the A/D, so the standard alignment
Dangerous Music, Inc.
154 East 2nd Street #4
New York, NY 10009
www.dangerousmusic.com
Dangerous MQ Manual1c.doc 7/9 ©2004 Dangerous Music, Inc.
allows signals to go up to +22dBu. In mastering, it is important to be able to modulate the
A/D to full scale without slew rate distortion so the maximum level has migrated to
+18dBu in many mastering houses. We put a switch on the back of MQ so that either
system could be accommodated without overloading (pinning) the meters. Mastering
compressed material may require the offset even with the maximum system level set to
+18dBu.
Talkback Dim: There are individual jumpers on the headphone amplifiers that enable the
“cue dim on talkback activation” function. The jumpers can be lifted to provide what is
known as “conductor’s talkback” where communication with the artist happens without
dimming the music feed.
Input shield lifts/chassis isolation: These jumpers can correct a buzz or hum problem
with unbalanced sources that don’t have a ground reference by connecting the audio
ground to the input cable shield. If a buzz is encountered with an individual input, change
the jumper setting of that input. This will almost always clear up the problem. The
chassis lift jumper is provided if MQ is bolted in a rack with electrically noisy devices
(light dimmer packs for instance) that cause interference. It is not recommended to lift the
ground on AC plugs of equipment to cure ground buzzes. An in depth treatise of this
subject is available in the Monitor manual at dangerousmusic.com.
This is a view of the MQ main board, connectors towards the reader.
Dangerous Music, Inc.
154 East 2nd Street #4
New York, NY 10009
www.dangerousmusic.com
Dangerous MQ Manual1c.doc 8/9 ©2004 Dangerous Music, Inc.
Connector Pin-outs and Specifications page
All the analog input connectors are 3-pin XLR females wired pin 2 hot. The nominal
level for these inputs is +4dBu.
The AES meter input is also pin 2 hot and will lock to an AES digital input with a sample
rate between 32 kHz and 96 kHz.
DC IN
Shell ground
1,2 common
3 +5v at 5 amps
4 -15v .8 amps
5 +15v .9 amps
Talkback Remote
1 cable shield
2 relay coil
3 relay common
connect pins 2 and 3 to operate the talkback function
Slate Out
1 cable shield
2 audio +
3 audio –
Cue Amp Outputs
1 audio common
2 left power amp +
3 right power amp +
The cue amps are rated for .006% THD+N at 20 watts per channel into 8 ohms. They are
not heat-sinked to drive speaker loads. They can drive several pairs of headphones to way
beyond comfortable levels. Please use caution driving headphones to not damage
equipment or injure the talent! The XLR outputs are designed to feed cue boxes like the
Redco Little Red Cue Box or similar devices available at pro audio dealers or from
Redco.com
Dangerous Music, Inc.
154 East 2nd Street #4
New York, NY 10009
www.dangerousmusic.com
Dangerous MQ Manual1c.doc 9/9 ©2004 Dangerous Music, Inc.
Warrantee information
MQ is warranted from defects of manufacturing for a period of 90 days from purchase,
subject to factory inspection. This increases to two years from date of purchase when the
warranty card is sent back to Dangerous Music, Inc. before the first period is over.
Damage caused by improper shipping, unauthorized repairs or modifications will incur
service charges. DMI reserves the right to update designs at its discretion. Returned
warranty cards help us keep our paperwork straight and alert users to updates.
Information on warranty cards is always treated as confidential and will not be disclosed
to third parties for any reason.

Other Dangerous Music Recording Equipment manuals

Dangerous Music CONVERT-AD Plus User manual

Dangerous Music

Dangerous Music CONVERT-AD Plus User manual

Dangerous Music D-BOX+ User manual

Dangerous Music

Dangerous Music D-BOX+ User manual

Dangerous Music D-Box User manual

Dangerous Music

Dangerous Music D-Box User manual

Dangerous Music Convert-2 User manual

Dangerous Music

Dangerous Music Convert-2 User manual

Dangerous Music Dangerous Monitor User manual

Dangerous Music

Dangerous Music Dangerous Monitor User manual

Dangerous Music D-Box User manual

Dangerous Music

Dangerous Music D-Box User manual

Dangerous Music D-Box User manual

Dangerous Music

Dangerous Music D-Box User manual

Dangerous Music LIAISON User manual

Dangerous Music

Dangerous Music LIAISON User manual

Dangerous Music Convert-8 User manual

Dangerous Music

Dangerous Music Convert-8 User manual

Dangerous Music Master User manual

Dangerous Music

Dangerous Music Master User manual

Popular Recording Equipment manuals by other brands

Harman Lexicon PCM96 Surround owner's manual

Harman

Harman Lexicon PCM96 Surround owner's manual

AMS RMX16 500 Series user manual

AMS

AMS RMX16 500 Series user manual

Renishaw RMI-QE installation guide

Renishaw

Renishaw RMI-QE installation guide

A&D SCE-03 instruction manual

A&D

A&D SCE-03 instruction manual

GRASS VALLEY T2 user manual

GRASS VALLEY

GRASS VALLEY T2 user manual

Enttec DMX USB PRO Mk2 Quick start manual

Enttec

Enttec DMX USB PRO Mk2 Quick start manual

Trycom Technology TRP-C29U user manual

Trycom Technology

Trycom Technology TRP-C29U user manual

PRESONUS Studio 26c owner's manual

PRESONUS

PRESONUS Studio 26c owner's manual

Finhol Accutronics manual

Finhol

Finhol Accutronics manual

Akai SYNTHSTATION49 quick start guide

Akai

Akai SYNTHSTATION49 quick start guide

Lexicon MPX G2 user guide

Lexicon

Lexicon MPX G2 user guide

aci 6N1-ISO-STG Series Installation & operation instructions

aci

aci 6N1-ISO-STG Series Installation & operation instructions

Behringer B-Control Fader BCF2000 quick start guide

Behringer

Behringer B-Control Fader BCF2000 quick start guide

SyxthSense ITPF Product sheet

SyxthSense

SyxthSense ITPF Product sheet

DigiDesign 003 Family Getting started guide

DigiDesign

DigiDesign 003 Family Getting started guide

Tascam HD-R1 release note

Tascam

Tascam HD-R1 release note

Koma Elektronik Field Kit FX user manual

Koma Elektronik

Koma Elektronik Field Kit FX user manual

LD DIO 04 user manual

LD

LD DIO 04 user manual

manuals.online logo
manuals.online logoBrands
  • About & Mission
  • Contact us
  • Privacy Policy
  • Terms and Conditions

Copyright 2025 Manuals.Online. All Rights Reserved.