Neoline WIDE S49 User manual
TWO-CHANNEL DASHBOARD
CAMERA
NEOLINE WIDE S49
User Manual

NEOLINE WIDE 549
T
W
O
-C
HA
NN
E
L
D
A
S
HBOA
RD
C
AME
R
A

2
Dear Purchaser,
Thank you for acquiring NEOLINE Wide S49 dashboard camera.Please carefully
read this manual to the end in order to correctly use the device and extend its
service life. Retain User Manual to consult it if necessary in future.
According to paragraph 2, Article 26.7 of RF Code of Administrative Offences (in
wording of the Federal Law No. 114-FZ of 26.04.2016 ), documents significant for
proceedings on administrative offence shall include still and motion picture
footage, audio and video recordings, information bases and data banks and
other information carriers. Thus, events (including road traffic accidents,
violations of road traffic rules or absence thereof) recorded by this dashboard
camera can be considered by court (in particular) as an evidential basis.
Content
1. Operational conditions ...........................................................................................................3
2. Technical specifications..........................................................................................................4
3. List of Equipment.......................................................................................................................5
4. Description of Device and Indicators ...................................................................................6
5. Installation of Dashboard Camera...........................................................................................8
6. Operation......................................................................................................................................11
7. Troubleshooting.........................................................................................................................23

3
1. Get acquainted with conditions of in-warranty service.
2. Do not install or remove memory card when the dashboard camera is switched on to
avoid damage to the device and recorded video files.
3. Only use high-quality microSD cards not lower than Class 6 to avoid recording dropouts
and delayed images.
4. Use of 8Gb to 32Gb card is recommended.
5. Device should only be used with accessories from the delivery set. NEOLINE disclaims
responsibility for possible damages to the product in case accessories of third-party
manufacturers are used.
6. Do not expose the product to the effect of fire, moisture or chemically active substances
(petrol, solvents, reagents etc.).
7. Disassembly or modification of the product is prohibited.
8. NEOLINE shall not be held responsible for loss of data and/or damage, whether direct or
indirect, caused to the user or to a third party through improper use of the device or
software, incorrect installation, use of accessories not included in the delivery set.
9. Important! In some motor cars, power to 12/24V socket is delivered also with ignition off.
To avoid accumulator discharge, it is recommended to disconnect the dashboard camera
from the vehicle network (remove power adapter from the cigarette lighter socket).
10. Format microSD card not rarer than once in two months to avoid damage of its file
system.
11. Observe temperature conditions of storage and operation (see technical
specifications). Do not allow lasting sun exposure of the device.
12. Do not remove memory card from working device to avoid data loss and breakage.
Manufacturer reserves the right to bring amendments in the equipment list, hardware
and software of the device without prior notification.
1. Operational Conditions

4
2. Technical Specifications
•Video resolution
FHD 1920*1080 (30k/s)
HD 1280*720 (30k/s)
•Viewing angle 155 degrees
•Display: LCD, 3’’
•Video recording format/compression: MOV/H.264
•Bitrate,max.: 16 Мб/с
•Built-in accumulator battery470 мА
•Support of MicroSD memory cards, class 10 + , 8 to 32 GB
•Interval loop recording , min: 1/3/5
•Continuous recording
•Automatic ON/OFF
•Operating temperature: -10°Cto +40 С°
•Number plate stamp
•Date/time stamp
•Audio recording
•Built-in loudspeaker
• G-sensor
•Motion sensor
•Parking mode
•Input voltage DC charger: 12V/24V
•Input voltage of the device : DC 5V/1A
•Bracket, type: suction cup, 3M
•Dimensions: 89*53*28.5 mm
•Weight: 86 g

5
3. List of Equipment
•Car dashboard camera NEOLINE Wide S49
•Rear view camera
•Bracket with suction cup
•Bracket with 3M scotch tape
•Car charger
•Operation manual
•Warranty card
6
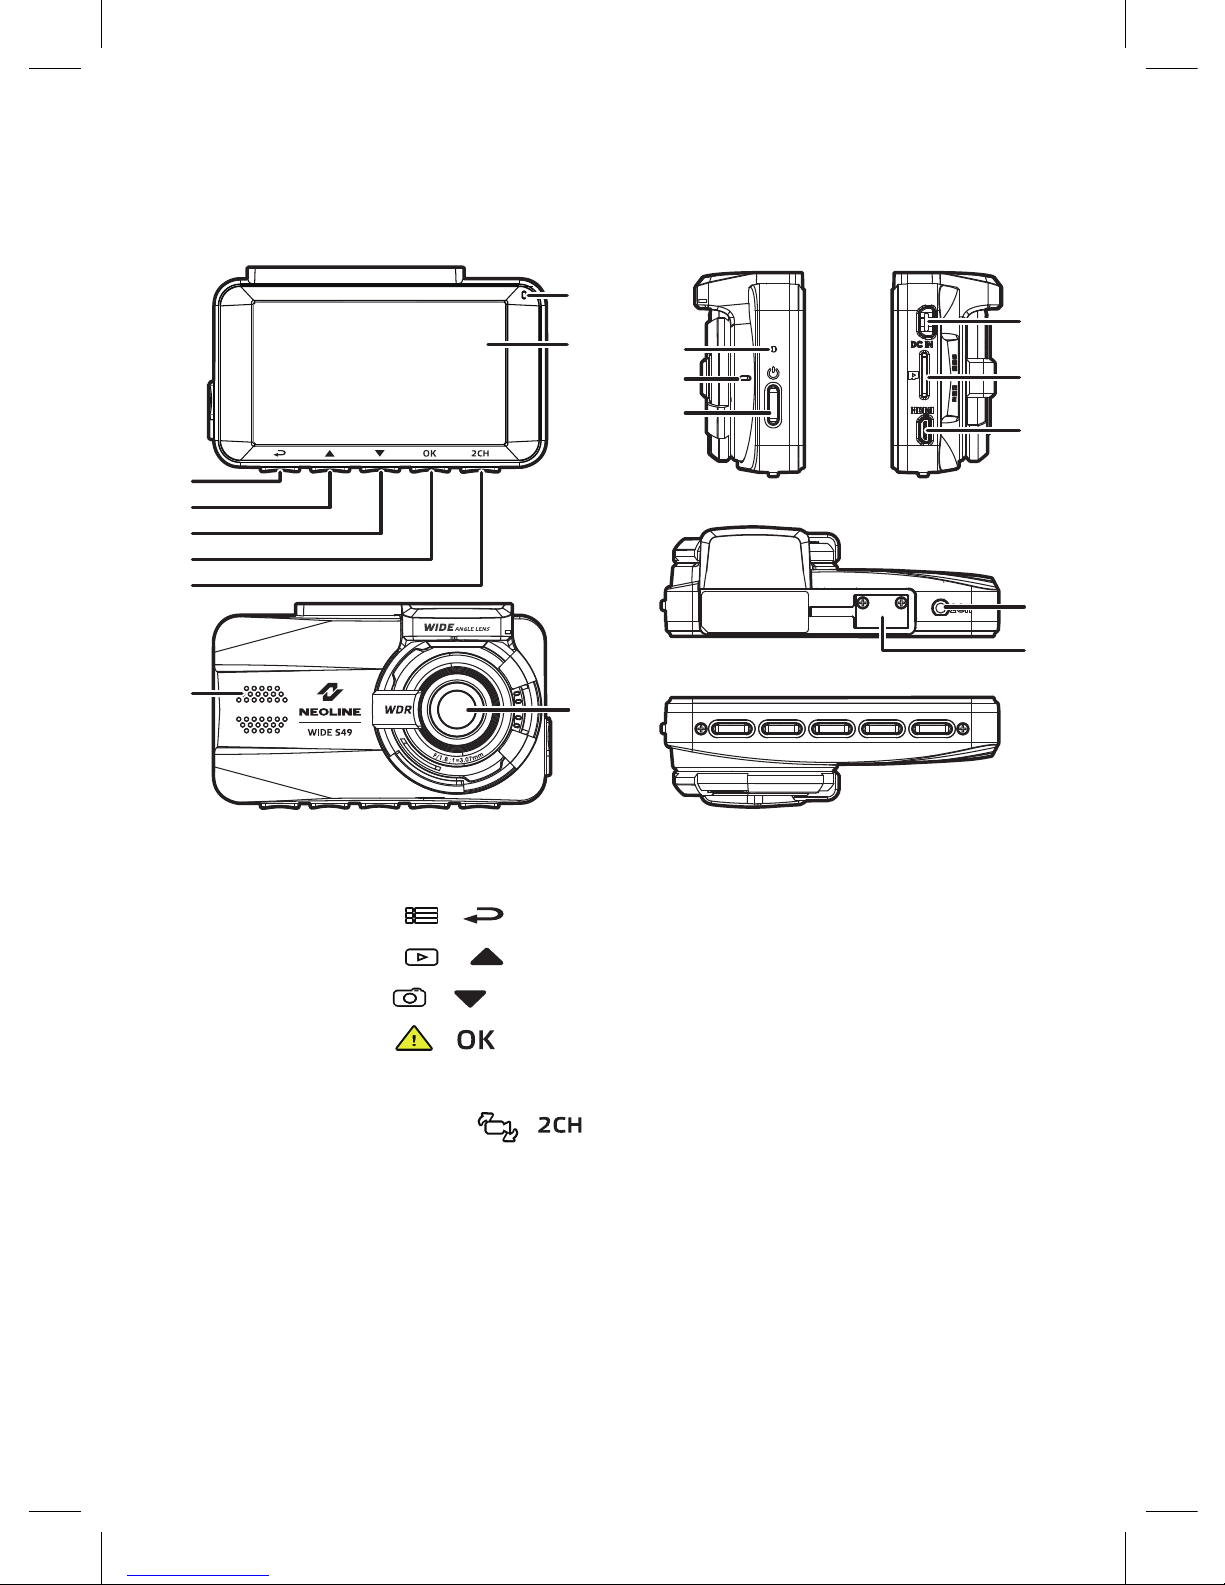
4. Description of Device and Indicators
/ )
/ )
/ )
1) Button “Back” (
2) Button “Up” (
3) Button “Down” (
4) Button “Enter” (
/ )
10) Reset button
11) Microphone
12) Power button
13) mini-USB receptacle
14) Memory card slot
15) HDMI output
16) Rear view camera connector
17) Bracket seat
5) Camera display
switchover button (
6) Indicator
7) Display
8) Lodspeaker
9) Wide-angle lens
/ )
13
14
89
6
7
1
2
3
4
5
17
15
16
10
12
11
7
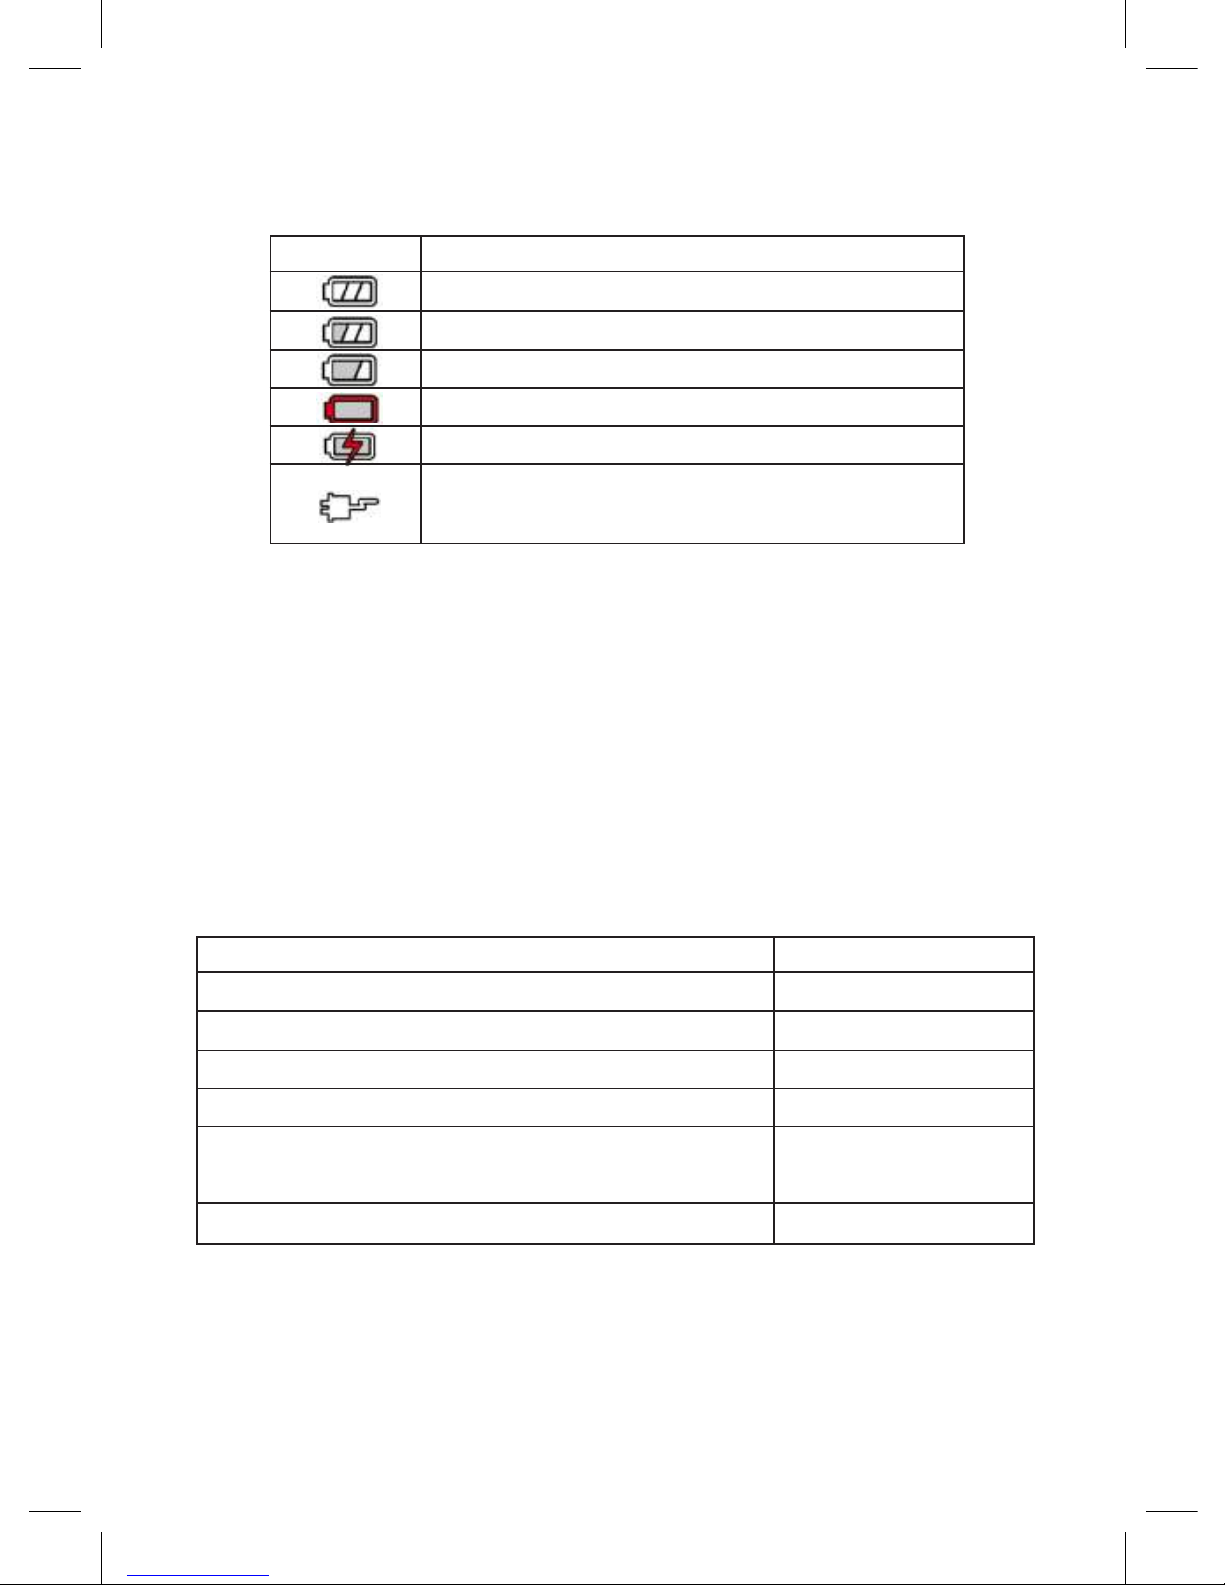
Battery Condition Indicator
Icon
Device Status
Description
Indicator Colour
Battery fully charged.
Battery 2/3 charged.
Battery 1/3 charged.
Battery discharged.
Battery is charging.
Connect car adapter to charge, battery is fully
discharged.
Power off, battery is charging.
Power off, battery fully charged.
Power on, battery is charging.
Power on, battery fully charged.
Standby mode/standby mode with disconnected
screen
Recording/recording with disconnected screen
Red
No light
Red
Green
Green
Red blinking
Note
Please note that at temperatures below 0°С and above 45°C the power
adapter will continue delivering power to the device but the lithium-ion
battery will not be charged. It is connected with peculiar features of lithium-
ion batteries and intended to extend their service life, being not a failure
Light Indicators
8
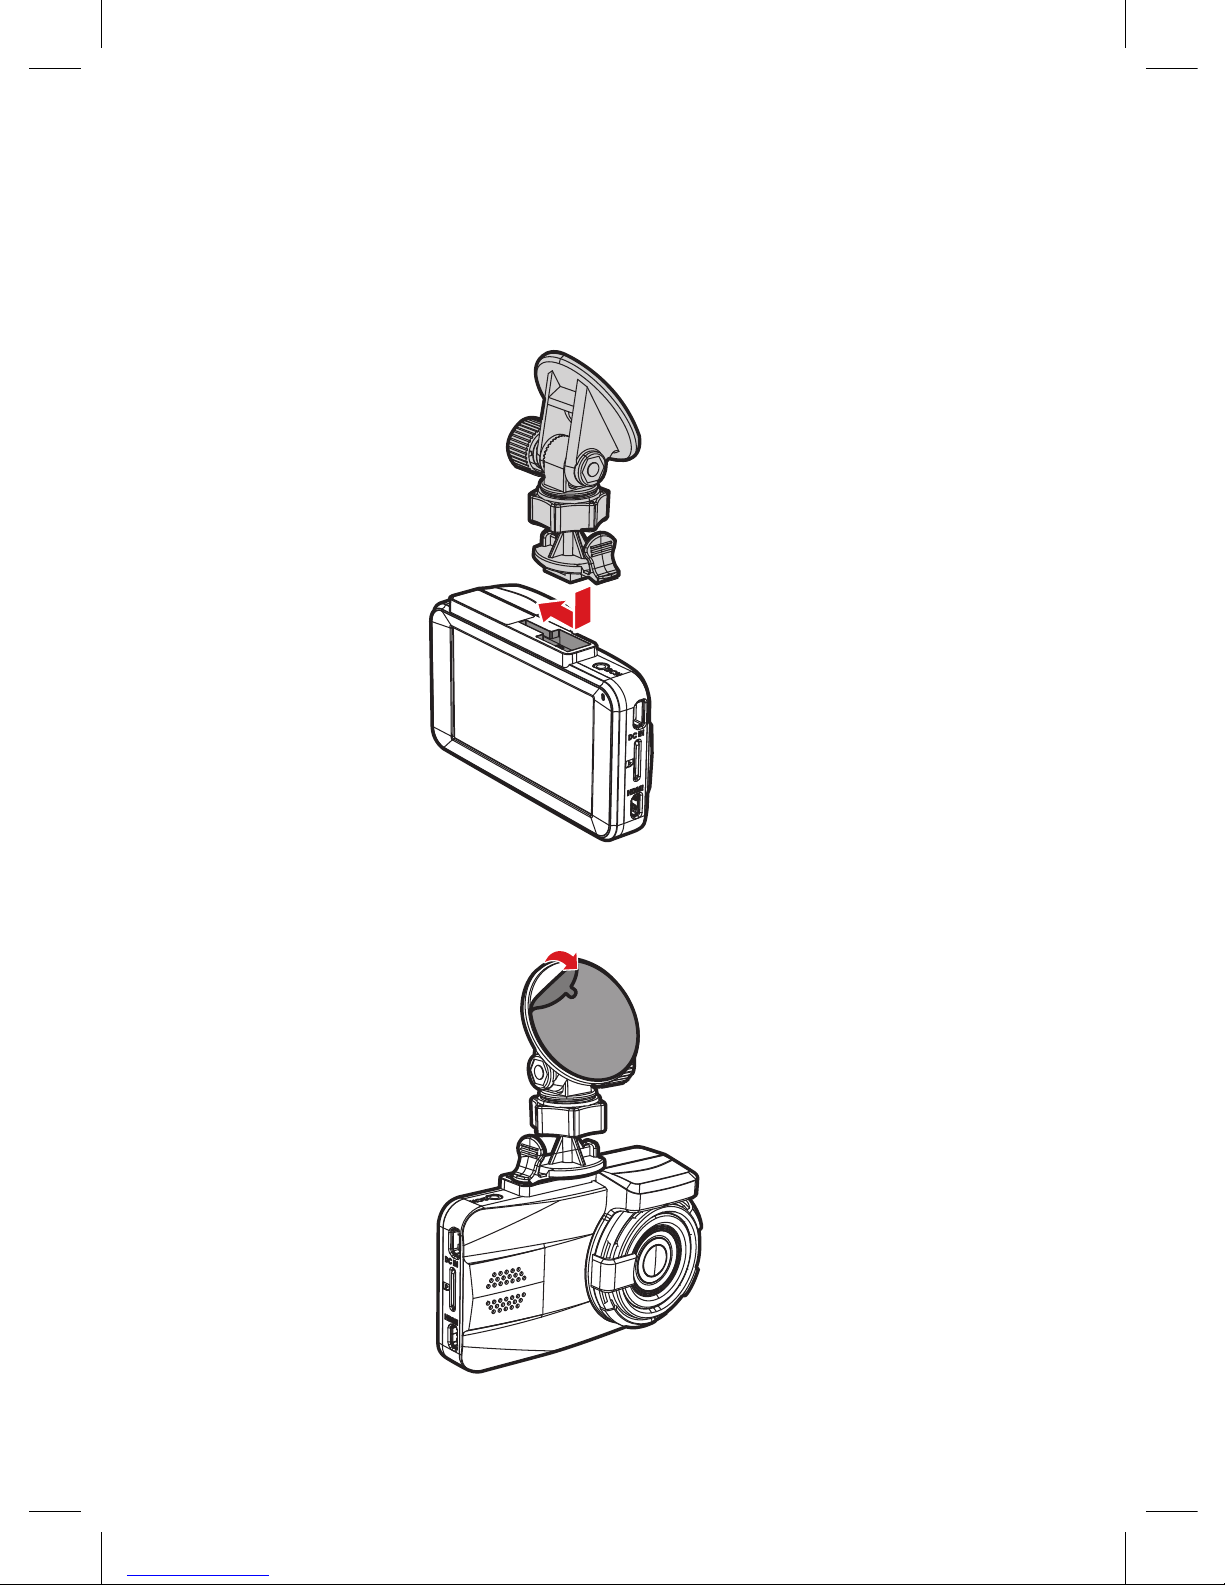
[ Installation of Dashboard Camera ]
Windshield Mounting
- Mount bracket on the device. Move it in the bracket holder till it goes
click.
- Remove protective film from adhesive bracket.
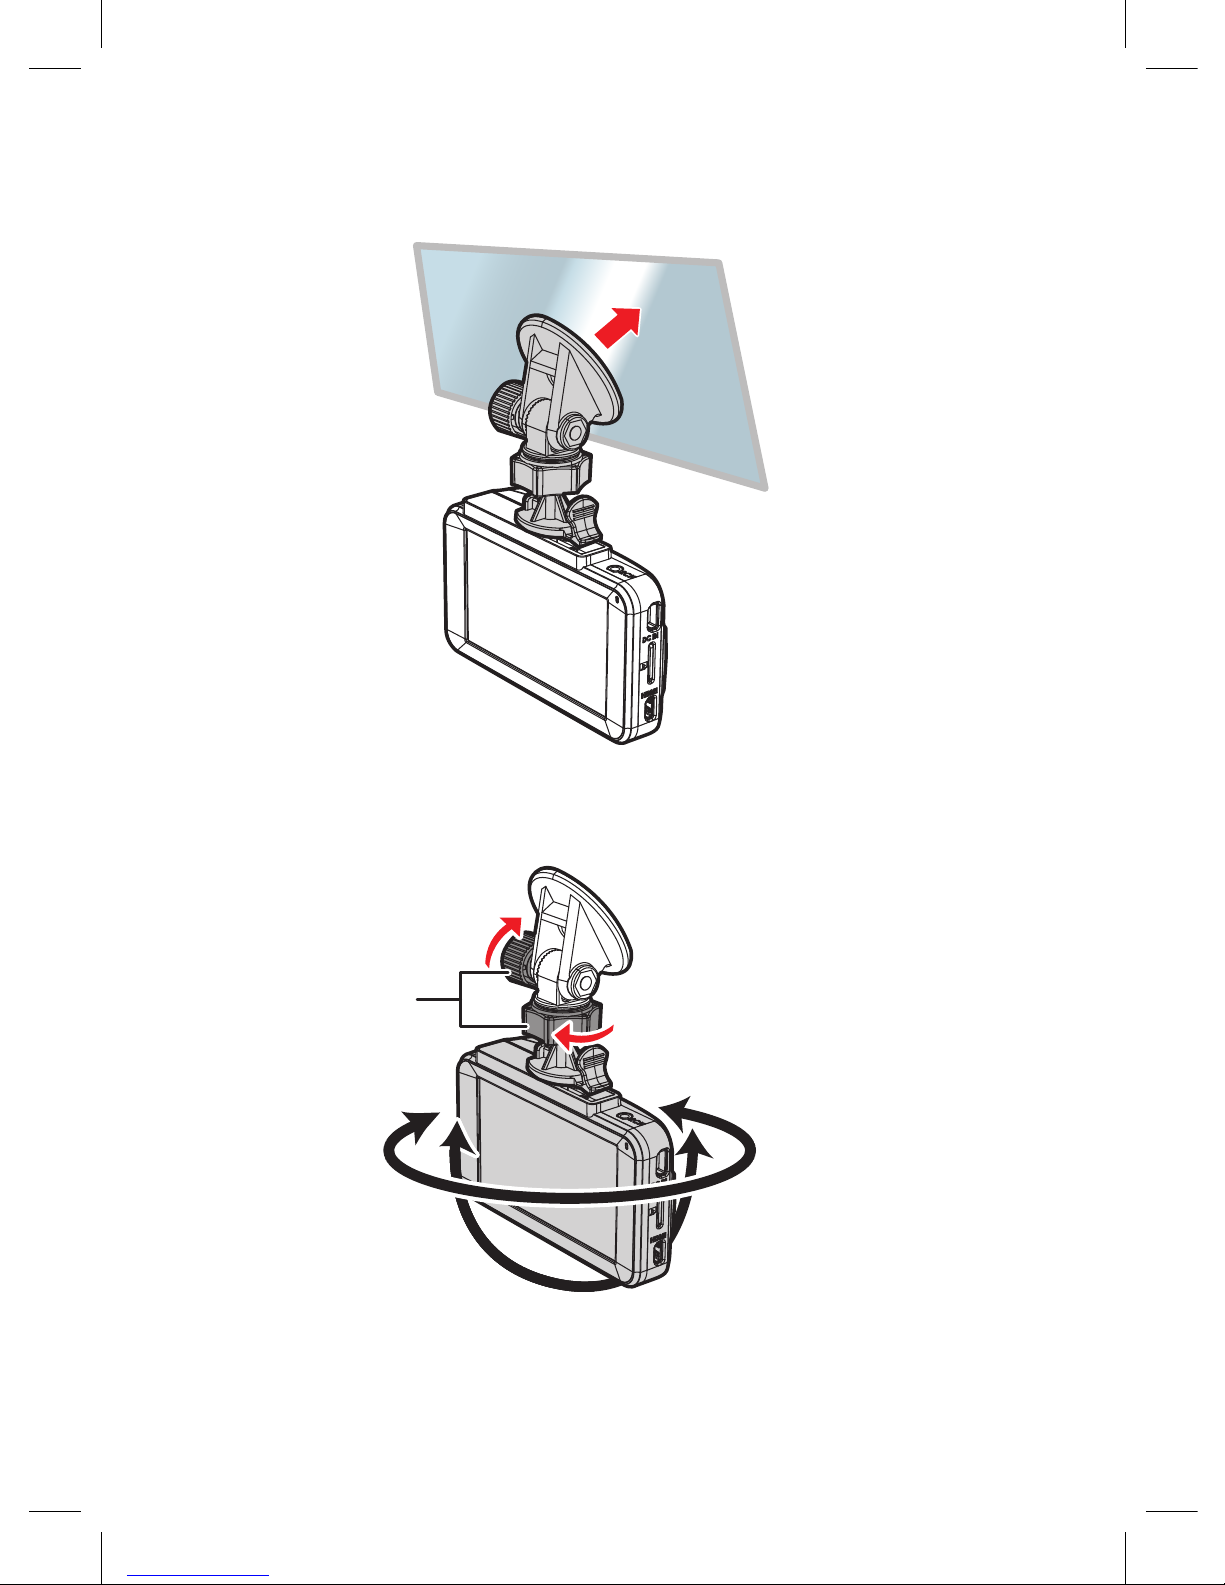
9
- Firmly holding the bracket base on the windshield, check that the base is
securely fixed.
Adjustment of Device Position
- Loosen knob to rotate the device vertically or horizontally.
Then tighten the knob to securely fix the dashboard camera.
knob

10
Power Connection
Only use power adapter included in the product delivery set to supply the device
and charge the battery.
- Connect one connector of power adapter to mini-USB receptacle on the
device.
-Connect other connector of power adapter to the car cigarette lighter socket.
-After car engine is started, the device will automatically switch on.
Note
For optimal view, the device should be mounted next to the rear view
mirror on the centreline and top of the windshield.
Position the lens so that the camera captures the image in proportion
“40% sky/ 60% road” to reach the best filming results.

11
[ Operation ]
Preparation of the device
А. Insert МicroSD card into the memory card slot.
Switch off the device before memory card installation and insert memory
card till it is fully fixed.
Card installation: Position MicroSD card against the slot as shown on figure
below and insert till it goes click.
Card removal: carefully press the card and the remove from the slot.
IMPORTANT: Attempting to insert the card with a wrong side can damage the
device and the card itself. Make sure the memory card is in correct position.
Warning: Do not apply too much effort when installing the memory card in
order to avoid damage of the device. To install , insert MicroSD into the slot till
it is fixed (goes click); if necessary, use a needle to seat the card. To remove the
card, press on it till click and remove from the slot, use a needle if necessary.
12
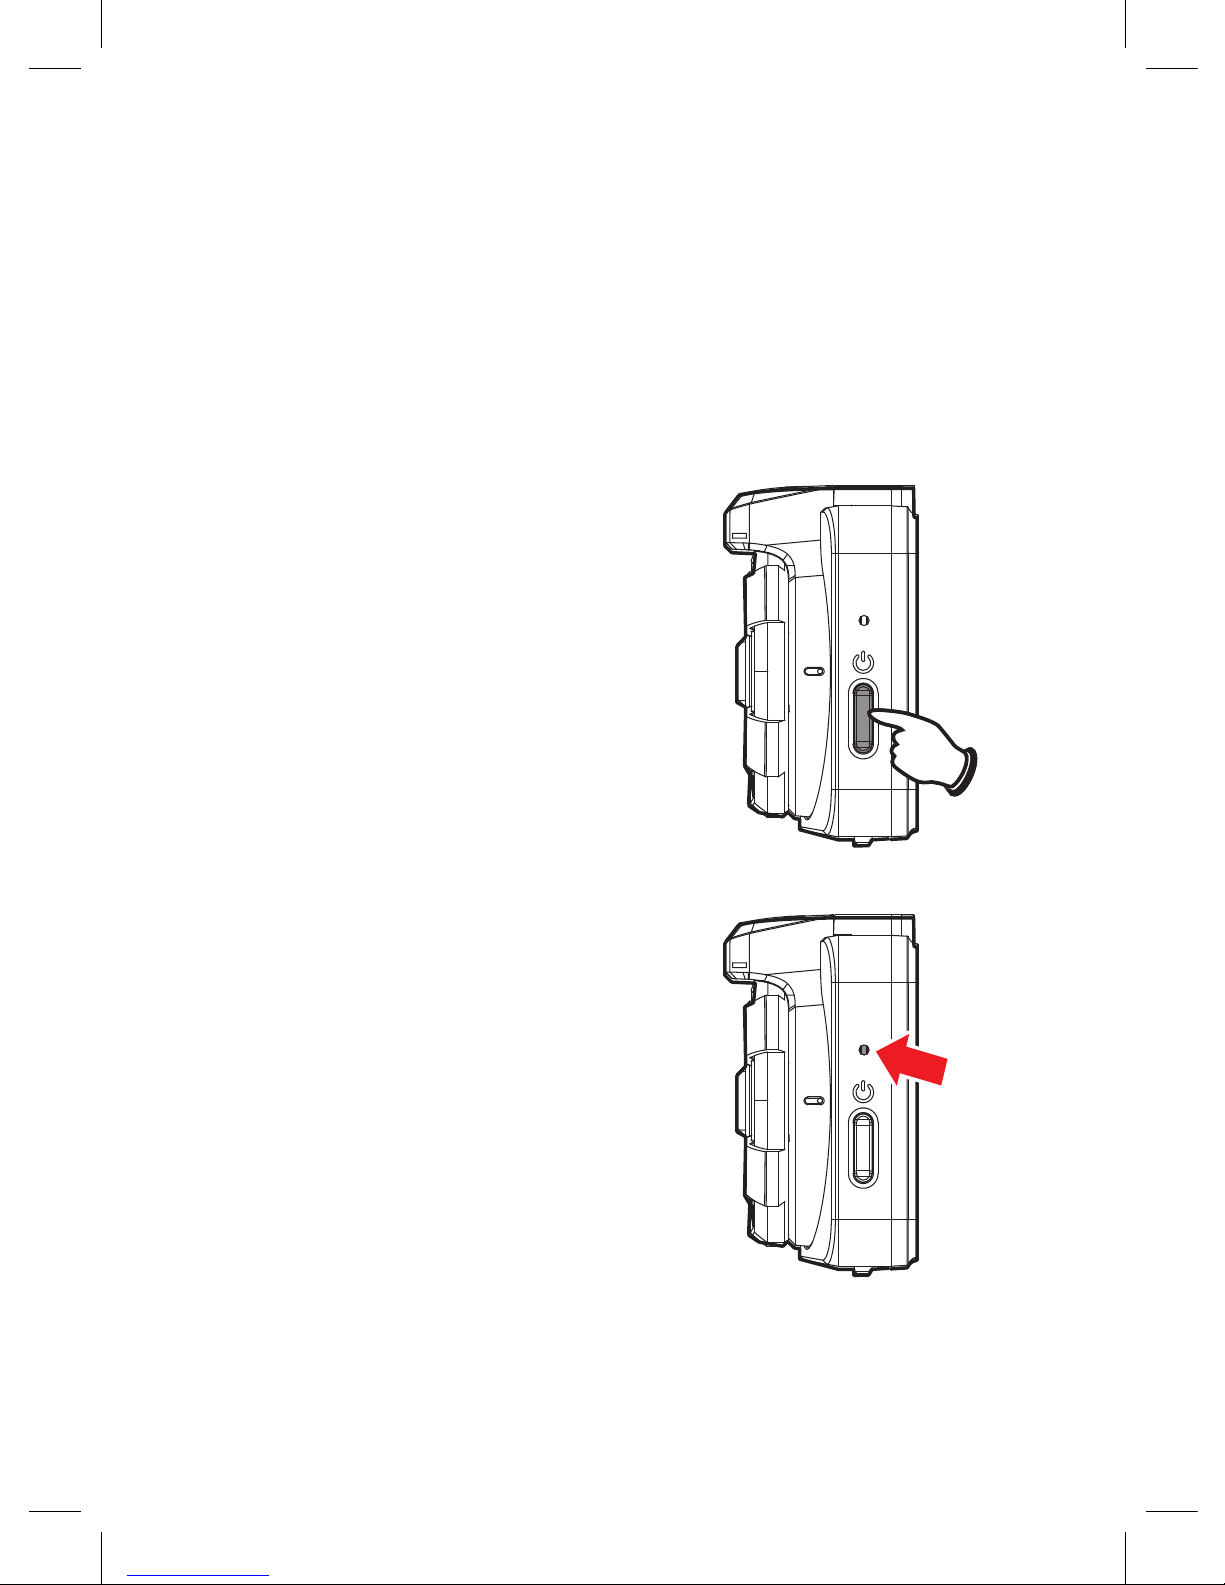
Switching ON/OFF
Automatic ON/OFF
After car engine is started, the device automatically switches on.
Manual ON/OFF and Reset
Manual ON/OFF
To switch on the device manually, press
power button.
To switch off the device, press power button
and hold it for at least 2 seconds.
Reset
Use a pin or paper clip to press reset button
and hold it for 5 seconds (through the opening).
13
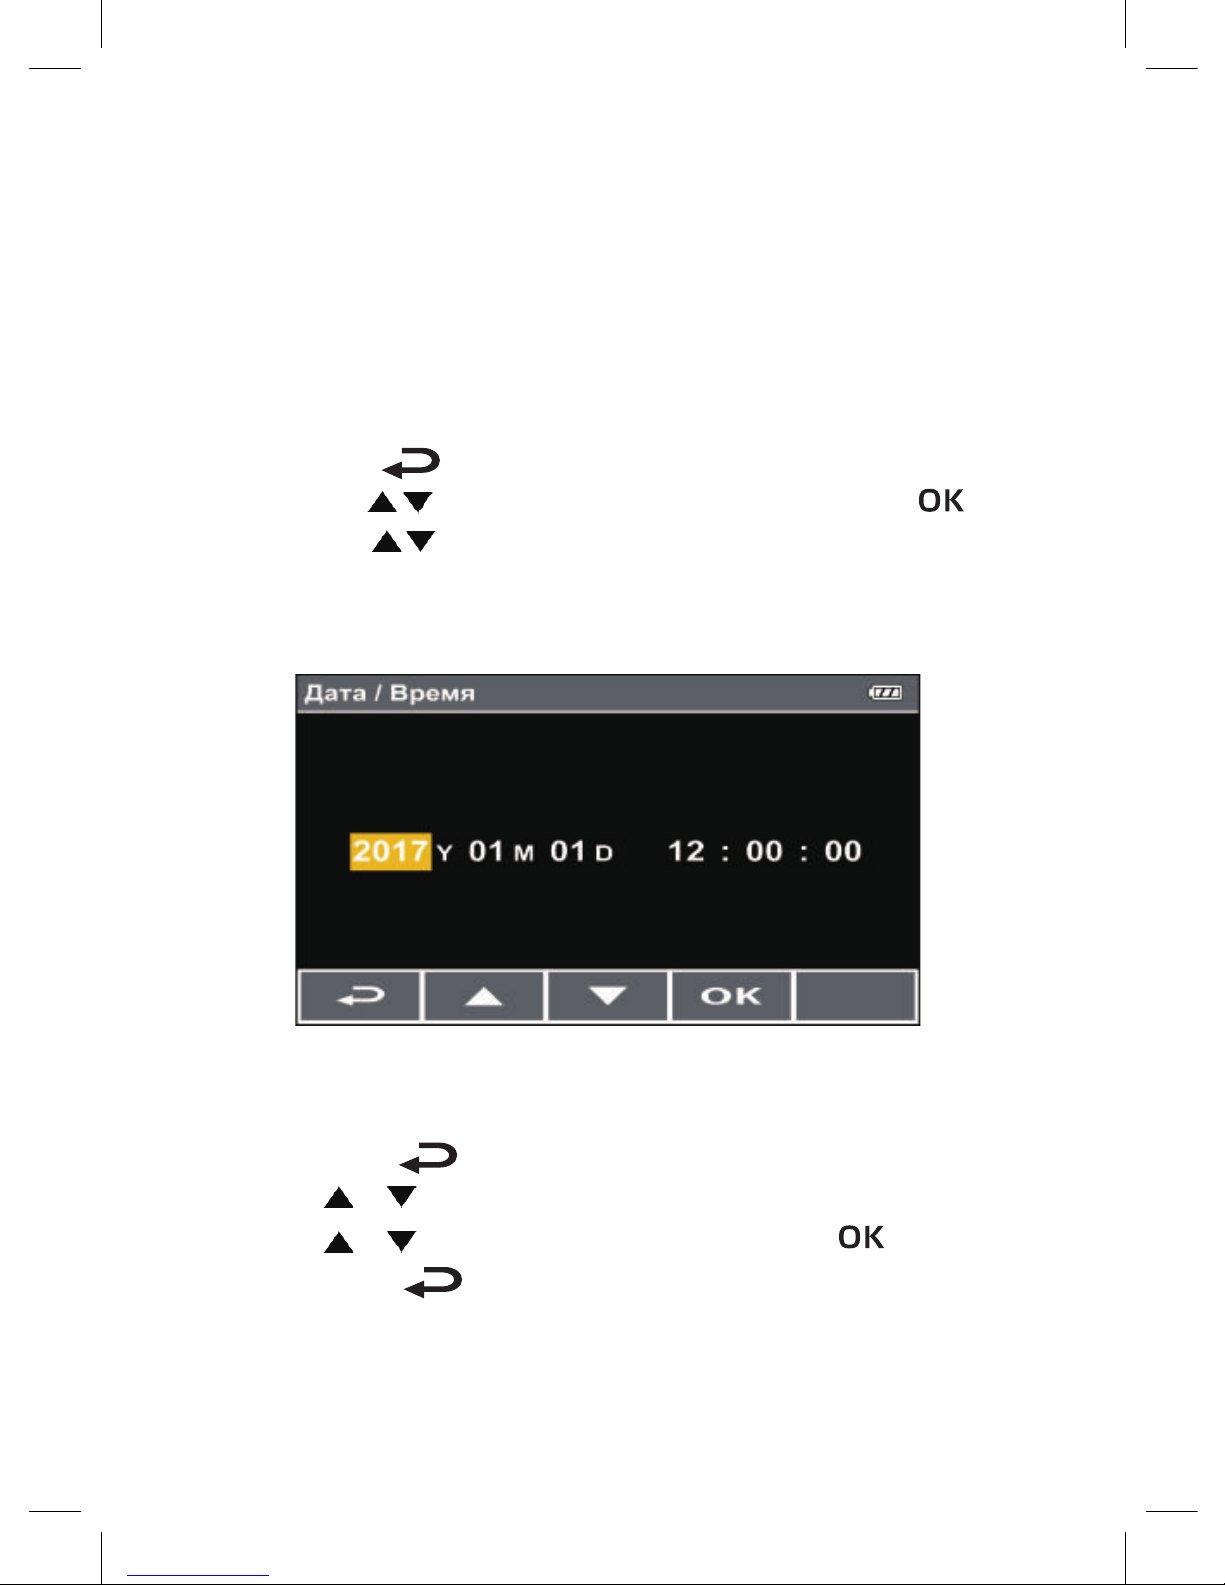
Initial Adjustment
Before using this device, it is necessary to set precise date and time as well as
the network frequency
Date / Time setting
To correctly set date and time, carry out the following steps:
-
-
Press button to enter main menu.
Use buttons / to select Date / Time and press button .
Use buttons / to set required value and press button to enter the
next box.
- Repeat step 4 before completion of date/time setting.
Network Frequency
To correctly set the network frequency:
- Press button to enter main menu.
- Use buttons / to select Network Frequency and press button OK.
- Use buttons / to select 50Hz and press button .
- Press button to exit menu.
14
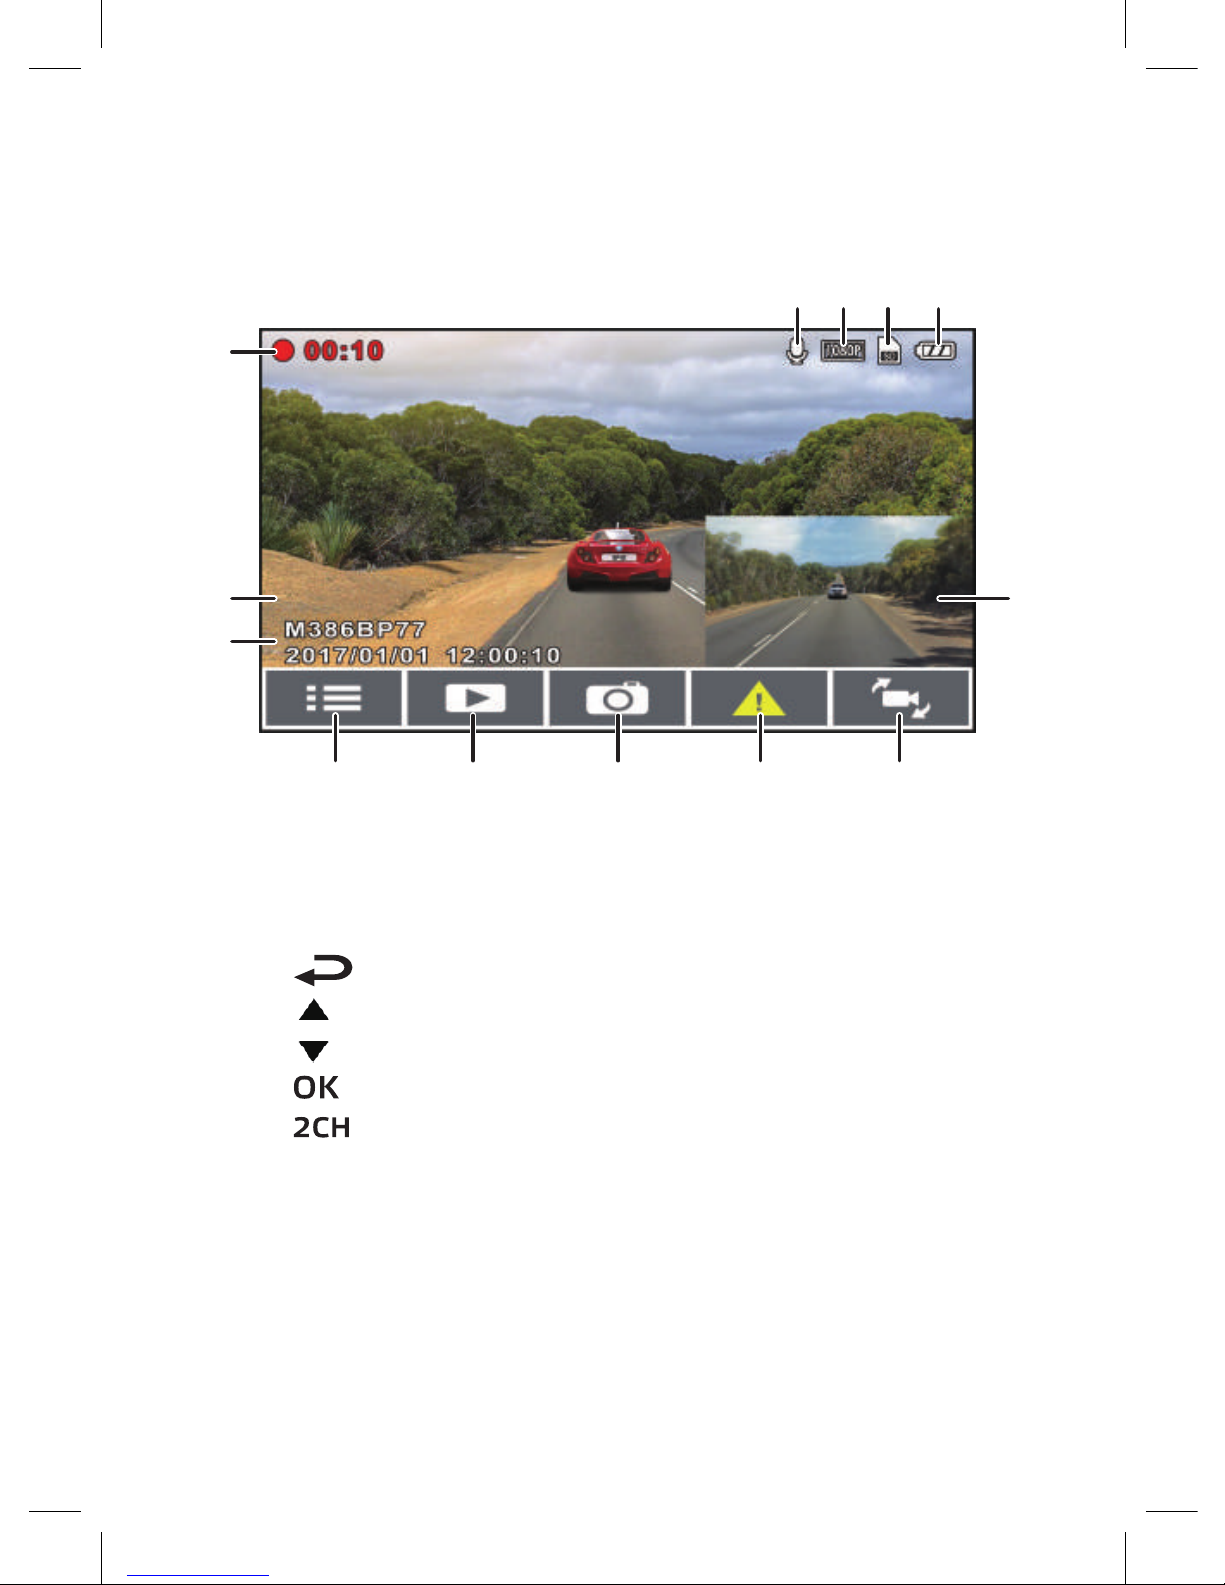
Video recording
Recording screen
1. Time of recording
2. Number plate stamp
3. Date/time stamp
to enter main menu
to enter Playback menu
to obtain photo
to block current recording
4. Press
5. Press
6. Press
7. Press
8. Press to switch view from front camera
to rear camera and back
9. Audio recording indication
10. Current video recording resolution
11. Memory card indication
12. Battery charge indicator
13. Rear camera view
13
2
1
910 11 12
4 5 6 7 8
3

15
Emergency Recording
To start emergency recording, carry out the following steps:
- Press button OK during recording to block current video file against
rerecording. “Emergency situation“ message will appear in left top
corner of the screen.
Note
1. If function Sensitivity G-sensor is activated and a collision
happened, the device will automatically block current video file.
2. A new file of emergency recording is created, which will be
protected against rerecording in the standard mode of loop
recording. Emergency recording folder will occupy 40% of available
card size. For example, if 8GB memory cards are used, then 3.2GB of
memory space will be reserved for emergency recording files. When
the emergency recording folder will be full, the old emergency
recording files will be deleted automatically with the creation of new
emergency recording files.

16
Photographing
You can take photos of current scene.
During video recording, press to take a photo.
Fatigue Warning
If Fatigue Warning function is activated, one hour after the recording mode is
started the device will generate an audio warning and then repeat it each half
hour.
-Press button to enter main menu.
- Use buttons / to select Fatigue Warning and press
button OK
-Use buttons to select ON amd press button OK
-Press button to exit menu.
17
Parking Mode
Parking mode is intended to fix events at the parking place.
-Press button to enter main menu.
-Use buttons /
- Use buttons /
to select Parking mode and press button OK to
select By G-sensor or By Motion Sensor
and press button .
- Press button to exit menu.
Element
By G-sensor
By Motion Sensor
OFF Parking mode is off.
Description
Upon disconnection of external power supply, the
system will issue message: "Press OK to switch off
or Parking mode will be activated after 10
seconds". It means that after 60 seconds the
system will automatically go into the vibration
detection mode; when video camera will detect
any external vibration affecting the motor car, the
video recording will last 10 seconds and the video
file will be protected. If button OK is pressed within
10 seconds, the video camera will switch off instead
of going into vibration detection.
Upon disconnection of external power supply, the
system will issue message: "Press OK to switch off or
Parking mode will be activated after 10 seconds".
That is, if a motion in front of the the camera lens or
an external effect (vibration) is detected, the system
will automatically switch on the motion sensor after
10 seconds, the video recording will last during 10
seconds if the system detects vibration, and will last
for the next 10 seconds until termination of the
vibration effect. If button OK is pressed within 10
seconds, the device switches off without activation of
Parking mode.
18
Note
1. If the battery is fully discharged, the dashboard camera can record
information continuously for about 20 minutes.
2. In operation mode of the device, the battery capacity is gradually
decreasing. This effect is normal for a battery.
3. Upon activation of By G-sensor, the file will be saved in folder
Emergency Situation, upon activation of By Motion Sensor - in folder
Video.
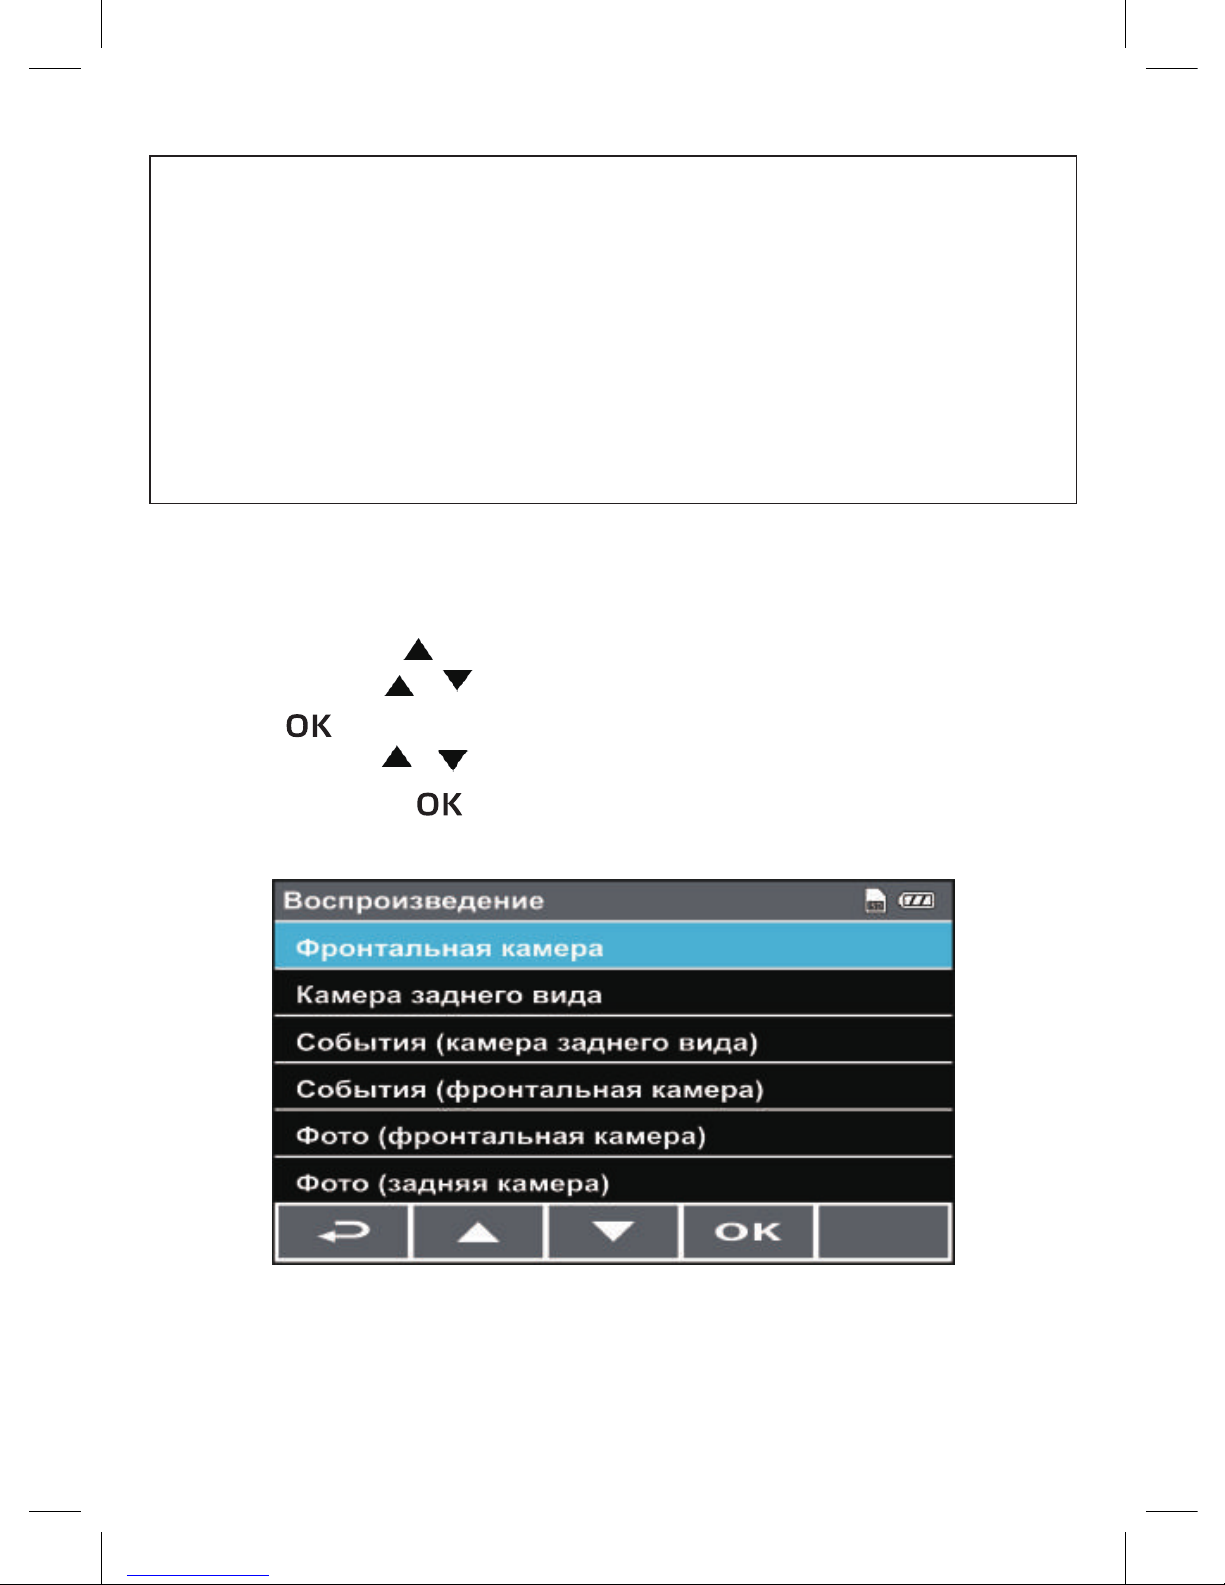
Playback of Video Records and Photographs
Playback
- Press button
- Use buttons /
button .
- Use buttons /
and press button
to enter Playback mode.
to select type of file for viewing and press
to go to the next or previous file
to view the file in full-screen mode.
Playback
Front camera
Rear view camera
Events (rear view camera)
Events (front camera)
Photo (front camera)
Photo (rear view camera)

Video Playback Screen Photo Viewing Screen
2
3
4
5
6
7
8
1 10
9
12
11
2
3
4
5
6
1 10
9
12
11
Element
File Type
Filename
Date/Time
Current Playback
Time
Select File (back)
Previous File
Next File
View
Alternate Camera
Battery
Current file type indication
Filename
Elapsed time and recording time indication
Recording date and time
Press button to go back to Select File menu
Press button to view the previous
photo/video record
Press button to view the next
video record/photo
Press button to view video (photo)
To switch between front and rear camera on the
screen
Battery charge indication
Description
No.
1
2
3
4
5
6
7
8
Memory card installed
Memory Card
9
10
Displayed File
Number
Number of currently displayed file and total
number of files to be displayed
11
Date/Time Stamp Recording date and time indication
12
19
Playback Screen
Table of contents
Other Neoline Dashcam manuals

Neoline
Neoline WIDE S55 User manual

Neoline
Neoline G-TECH X62 User manual

Neoline
Neoline G-Tech X27 User manual

Neoline
Neoline WIDE S61 User manual

Neoline
Neoline X3000 User manual

Neoline
Neoline G-TECH X81 User manual

Neoline
Neoline G-TECH X77 User manual

Neoline
Neoline G-TECH X5x series User manual

Neoline
Neoline X3000 User manual

Neoline
Neoline G-Tech X74 User manual


