Davey AquaReviva DAR20C Manual

Mineral and Salt Water Sanitiser
Models: DAR14C, DAR20C & DAR26C
Installation &
Operating Instructions
Please pass these instructions on to the operator of this equipment.
The installation of this product should be carried out by a person knowledgeable
in swimming pool plumbing requirements following the installation instructions
provided in this manual.
WARNING: Failure to follow these instructions and comply with all
applicable codes may cause serious bodily injury and/or property damage.
A
quaReviva
403165_AquaReviva_I&OI.indd 1 4/7/17 9:18 am
®
Rainbow Pool Products
PO Box 2388, Mansfield Qld 4122
Telephone STD 61-7-3849 5385
Facsimile STD 61-7-3849 5384
Email: [email protected]
Web: www.rainbowpoolproducts.com.au

•To minimise the risk of gas build-up in the cell, you must ensure there is
sufficient water flow through the cell when the unit is on and producing chlorine.
•It is essential that your pool pump circulates sufficient water through the cell to
completely fill the cell with water during the chlorination process.
•Periodically check the paddle of the safety flow switch to ensure it is free to
move back and forth.
•Always check Davey’s website, davey.com.au for the latest versions
of Installation & Operation Instructions that support these products.
IMPORTANT INSTRUCTIONS
FOR USE
Diagram A
CORRECT
OPERATION
WITH PUMP
RUNNING
Flow switch ON.
9
Flow switch OFF.
Diagram B
INCORRECT
OPERATION
WITH PUMP
RUNNING
8
Flow
Flow
403165_AquaReviva_I&OI.indd 3 4/7/17 9:18 am

4
Congratulations! You are now the proud owner of a new AquaReviva Mineral and Salt Water Sanitiser.
Please read all information in this manual carefully before installing or operating your Salt Water Sanitiser.
Contents
•Power Supply
•In-Line Electrolytic Cell
•2 x Barrel Unions
•Mounting Kit
•Flow Switch
•Installation & Operating Instructions
•Blanking Cap Assembly (plug, o-ring and lock ring)
PACKING LIST ........................................................................................................................................................... 4
IMPORTANT INFORMATION..................................................................................................................................... 5
INSTALLATION INSTRUCTIONS FOR AquaReviva.................................................................................................. 6
CONNECTING THE IN-LINE ELECTROLYTIC CELL TO THE POWER SUPPLY .................................................... 7
CONNECTING THE FLOW SWITCH TO THE POWER SUPPLY ............................................................................. 7
PRE-START UP PROCEDURE.................................................................................................................................. 8
OPERATION OF YOUR AquaReviva SYSTEM ....................................................................................................... 10
CONTROL PANEL LAYOUT..................................................................................................................................... 10
AquaReviva SPECIAL FEATURES .......................................................................................................................... 11
AUTOMATIC TIME CLOCK OPERATION................................................................................................................ 12
MAINTENANCE OF POWER SUPPLY.................................................................................................................... 14
MAINTENANCE OF THE IN-LINE ELECTROLYTIC CELL...................................................................................... 14
DAY TO DAY OPERATION....................................................................................................................................... 16
CHLORINE PRODUCTION...................................................................................................................................... 17
GENERAL INFORMATION....................................................................................................................................... 18
TROUBLE SHOOTING ............................................................................................................................................ 19
Packing List
Included with your AquaReviva System are the following items, please check the contents of the box
carefully prior to attempting to install the system:
1RWH7KH6DQLWLVHULVQRWLQWHQGHGIRUXVHE\\RXQJFKLOGUHQRULQ¿UP
persons without supervision. Please ensure that young children are
supervised to ensure that they do not play with the Sanitiser.
Power connections and wiring must be carried out by an authorised electrician.
A
quaReviva
403165_AquaReviva_I&OI.indd 4 4/7/17 9:18 am

5
IMPORTANT INFORMATION
ABOUT YOUR SANITISER
FACTORS THAT WILL IMPROVE THE PERFORMANCE
& LIFE OF YOUR AquaReviva WATER SANITISER
PLEASE READ THIS BEFORE OPERATING YOUR SANITISER
POOL BUILDERS: Please cover this information with your customer during the
new pool “Handover Session”
Sanitisers are a valuable piece of pool sanitising equipment and must be cared for to get the best
performance and life span.
There are THREE main factors that will damage your Sanitiser and reduce the life of the product.
Please monitor the following factors in accordance with your installation & operating instructions.
1. MAINTAIN RECOMMENDED TOTAL DISSOLVED SOLIDS (TDS) LEVELS
RECOMMENDED OPERATING RANGE: 4,000 - 6,000ppm
•Run Sanitiser at the TDS levels stated within this document and on the product to ensure
optimum sanitiser output and cell life.
•Operating this device at low TDS levels will damage the cell and reduce its life.
•The control panel displays a red LED indicator warning when the TDS levels are low.
•If no action is taken to rectify the TDS levels, damage to the cell may result which will not be
covered under warranty.
2. MONITOR & MAINTAIN YOUR SANITISER IN-LINE CELL
Davey AquaReviva has a “Reverse Polarity” In-Line cell.
•To keep your AquaReviva Salt Water Sanitiser in the best possible condition, regular
monitoring of the electrolytic cell is recommended. The ‘Cell’ is the clear plastic housing
containing the plates.
•During the sanitisation process a white powdery Calcium scale may naturally build up on the
titanium plates in the cell. Monitor the cell to prevent excessive scale build up. Excessive scale
EXLOGXSZLOOFDXVHGDPDJHWR\RXUFHOODQGGUDPDWLFDOO\UHGXFHLWVHI¿FLHQF\DQGOLIHVSDQ
•Reverse Polarity models have low maintenance cells that minimise scale build up.
•The control panel displays a red LED indicator warning when the cell requires cleaning.
•If Calcium scale builds up please clean the cell, following the cleaning instructions provided on
page 14.
•NEVER: Use concentrated acid to clean your cell.
•NEVER: Leave cell in cleaning solution for extended periods of time
•NEVER: Use metal implements, scourers or brushes to clean your cell
3. BALANCED POOL WATER CHEMISTRY
•Salt TDS levels MUST be maintained at 4,000 - 6,000ppm
for optimum performance and lifespan
•Calcium Hardness levels MUST be kept to ideal ranges of 200 - 275ppm (for Concrete and
Tiled Pools) and 100 - 225ppm (for other surfaces) to prevent excessive scale build up and
damage to equipment
•pH levels MUST be kept to ideal levels to prevent damage to equipment and pool surfaces and
to obtain optimum sanitiser effectiveness.
•Total Alkalinity and Stabiliser levels must also be kept in an ideal range.
Note: Please refer to the POOL WATER CHEMISTRY chart on page 17 for more information.
403165_AquaReviva_I&OI.indd 5 4/7/17 9:18 am

6
INSTALLATION INSTRUCTIONS FOR AquaReviva
INSTALLING THE POWER SUPPLY
6HOHFWDFRQYHQLHQWZHOOYHQWLODWHGORFDWLRQZLWKLQRQHPHWUHRI¿OWHUHTXLSPHQWDQGPRXQWWKH3RZHU6XSSO\
vertically onto a post or wall 1.5 metres above ground level. Australian Standards requires that the Power
Supply shall not be located within 3 meters of the pool water. Plug Power supply into a suitable weatherproof
outlet and plug pump into the power outlet of the Power Supply Unit. The Unit must be kept away from acid
and other chemical storage areas. Acid and chemical vapours will corrode the electronics inside the Unit.
It must also be kept away from heat sources. Good ventilation is necessary for correct operation.
Return to pool lineSuction Line
PUMP FILTER
ACCESSORIES
IN-LINE CELL
FLOW SWITCH
POWER SUPPLY
240V
Two self-tapping screws and wall plugs have been provided for fast and simple installation.
8VHDPPPDVRQU\GULOOELWZKHQ¿WWLQJ3RZHU6XSSO\WRDEULFNRUFRQFUHWHZDOO:KHQPRXQWLQJWRDSRVW
GULOOSLORWKROHVDQG¿WVFUHZVSURYLGHG2QFHVFUHZVDUHLQSRVLWLRQVLPSO\KDQJ6DQLWLVHUYLDEUDFNHWRQ
back of Unit.
IMPORTANT: This diagram is intended to
conform with SPASA for the safe operation of salt
sanitisers. Any deviation is at the installer’s risk
and may void the manufacturer’s warranty.
127(7KHFHOOPXVWEH¿WWHGWRDOORZIRUHDV\
removal and cleaning, and positioned after all
accessories such as heater or pool cleaner, but
before it divides if there is more than one return
to pool line.
403165_AquaReviva_I&OI.indd 6 4/7/17 9:18 am
®Rainbow Pool Products
PO Box 2388, Mansfield Qld 4122
Telephone STD 61-7-3849 5385
Facsimile STD 61-7-3849 5384
Email: [email protected]
Web: www.rainbowpoolproducts.com.au

7
CONNECTING THE IN-LINE ELECTROLYTIC CELL TO THE POWER SUPPLY
The AquaReviva Salt Water Sanitiser uses a reverse polarity In-Line Electrolytic Cell for low maintenance
RSHUDWLRQ7KH$TXD5HYLYD3RZHU6XSSO\LV¿WWHGZLWKDÀH[LEOHOHDGWHUPLQDWHGZLWKSXVKRQEUDVV
connectors.
7KHVHPXVWEHFRUUHFWO\¿WWHGWRWKHFRQQHFWLRQVRQWKH&HOO)LWEODFNFRQQHFWRUVWRWKHRXWHUWLWDQLXPURGV
Fit the white connector to the middle titanium rod as per illustration below.
127(7KH$TXD5HYLYD&HOOLVVXSSOLHGZLWKDSDGGOHW\SHÀRZVZLWFK
which is to be installed on the Cell as shown in the diagram on page 6.
,03257$177KHÀRZVZLWFKPXVWEHPRXQWHGZLWKWKHKLJKOLJKWHGDUURZ
RQWRSRIWKHVZLWFKSRLQWLQJLQWKHGLUHFWLRQRIÀRZ
CONNECTING THE FLOW SWITCH TO THE POWER SUPPLY
-RLQWKHFRQQHFWRURQWKHÀRZVZLWFKDQGWKHFRQQHFWRURQWKHFHOOFDEOHWRJHWKHU7KH\ZLOOFOLSWRJHWKHU
CONNECTING THE FILTER CIRCULATION PUMP TO THE POWER SUPPLY
Insert the pool pump’s 3 pin plug into the 3 pin socket located on the back of the sanitiser’s power supply plug.
See diagram on following page.
NOTE: Filter Circulation Pump current draw should not exceed 8 Amps.
403165_AquaReviva_I&OI.indd 7 4/7/17 9:18 am

8
Do not use a double adaptor to connect more than one pump –
it can cause overload to the system and could void your warranty.
PRE-START UP PROCEDURE
Before operating your AquaReviva Pool Sanitiser System please ensure the following quantity of
Pool Salt (P/N: M3708-20) or mineral salt (P/N: EMSALT-15) and mineral activator (P/N: EMACT-15) has
been added to your pool.
POOL SALT
SALT LEVEL GUIDE – 20kg Bag
To raise salt
concentration by Salt Required
ppm % 25,000L
Bags / kg 30,000L
Bags / kg 35,000L
Bags / kg 40,000L
Bags / kg 45,000L
Bags / kg 50,000L
Bags / kg 55,000L
Bags / kg 60,000L
Bags / kg 65,000L
Bags / kg 70,000L
Bags / kg
1000 0.1 1.3 / 26 1.5 / 30 1.8 / 36 2.0 / 40 2.3 / 46 2.5 / 50 2.8 / 56 3.0 / 60 3.3 / 66 3.5 / 70
2000 0.2 2.4 / 48 2.8 / 56 3.3 / 66 3.7 / 74 4.2 / 84 4.6 / 92 5.1 / 102 5.5 / 110 6.0 / 120 6.4 / 128
3000 0.3 3.6 / 72 4.4 / 88 5.1 / 102 5.9 / 118 6.6 / 132 7.4 / 148 8.1 / 162 8.9 / 178 9.6 / 192 10.4 / 208
4000 0.4 5.0 / 100 6.0 / 120 7.0 / 140 8.0 / 160 9.0 / 180 10.0 / 200 11.0 / 220 12.0 / 240 13.0 / 260 14.0 / 280
5000 0.5 6.3 / 126 7.5 / 150 8.8 / 176 10.0 / 200 11.3 / 226 12.5 / 250 13.8 / 276 15.0 / 300 16.3 / 326 17.5 / 350
6000 0.6 7.3 / 146 8.8 / 176 10.3 / 206 11.8 / 236 13.3 / 266 14.8 / 296 16.3 / 326 17.8 / 356 19.3 / 386 20.8 / 416
STORAGE AND SAFETY
1. Store in a dry, covered place away from direct sunlight for longer bag life
2. Always use the entire bag content of Salt, once opened. Do not keep open bags of Pool Salt, as it is sensitive
to moisture in the air.
3. Care should be taken to avoid contact with eyes and inhaling salt dust. Wearing eye protection and a dust mask is
good practice.
4. ,IH\HVEHFRPHDIIHFWHGÀXVKZLWKFOHDQWDSZDWHU
5. If skin becomes irritated, immediately wash contaminated skin with plenty of water and then wash with soap
and water.
•CHLORINE)RUDQHZSRROLQVWDOODWLRQWKDWKDVQRWEHHQFKORULQDWHGDGGVXI¿FLHQW&KORULQHOLTXLGRU
granular) to achieve a reading of 3 ppm (with a suitable test kit), or run the Sanitiser system continuously for at
least 24 hours or until a reading of 3 ppm is reached.
•STABILISER - It is essential that pool stabiliser be added and maintained at the rate of 30 - 50 ppm at all times.
Do not exceed 100 ppm. (FOR OUTDOOR POOLS ONLY)
•(Refer Day to Day Operation page 16 for further information).
Sanitiser’s plug
and socket
Pool pump’s
3 pin plug
403165_AquaReviva_I&OI.indd 8 4/7/17 9:18 am

9
EcoMineral SALT
For Mineral Salt applications please ensure the following quantity of EcoMineral Salt (P/N: EMSALT-15) and
EcoMineral Activator (P/N: EMACT-15) has been added to your pool.
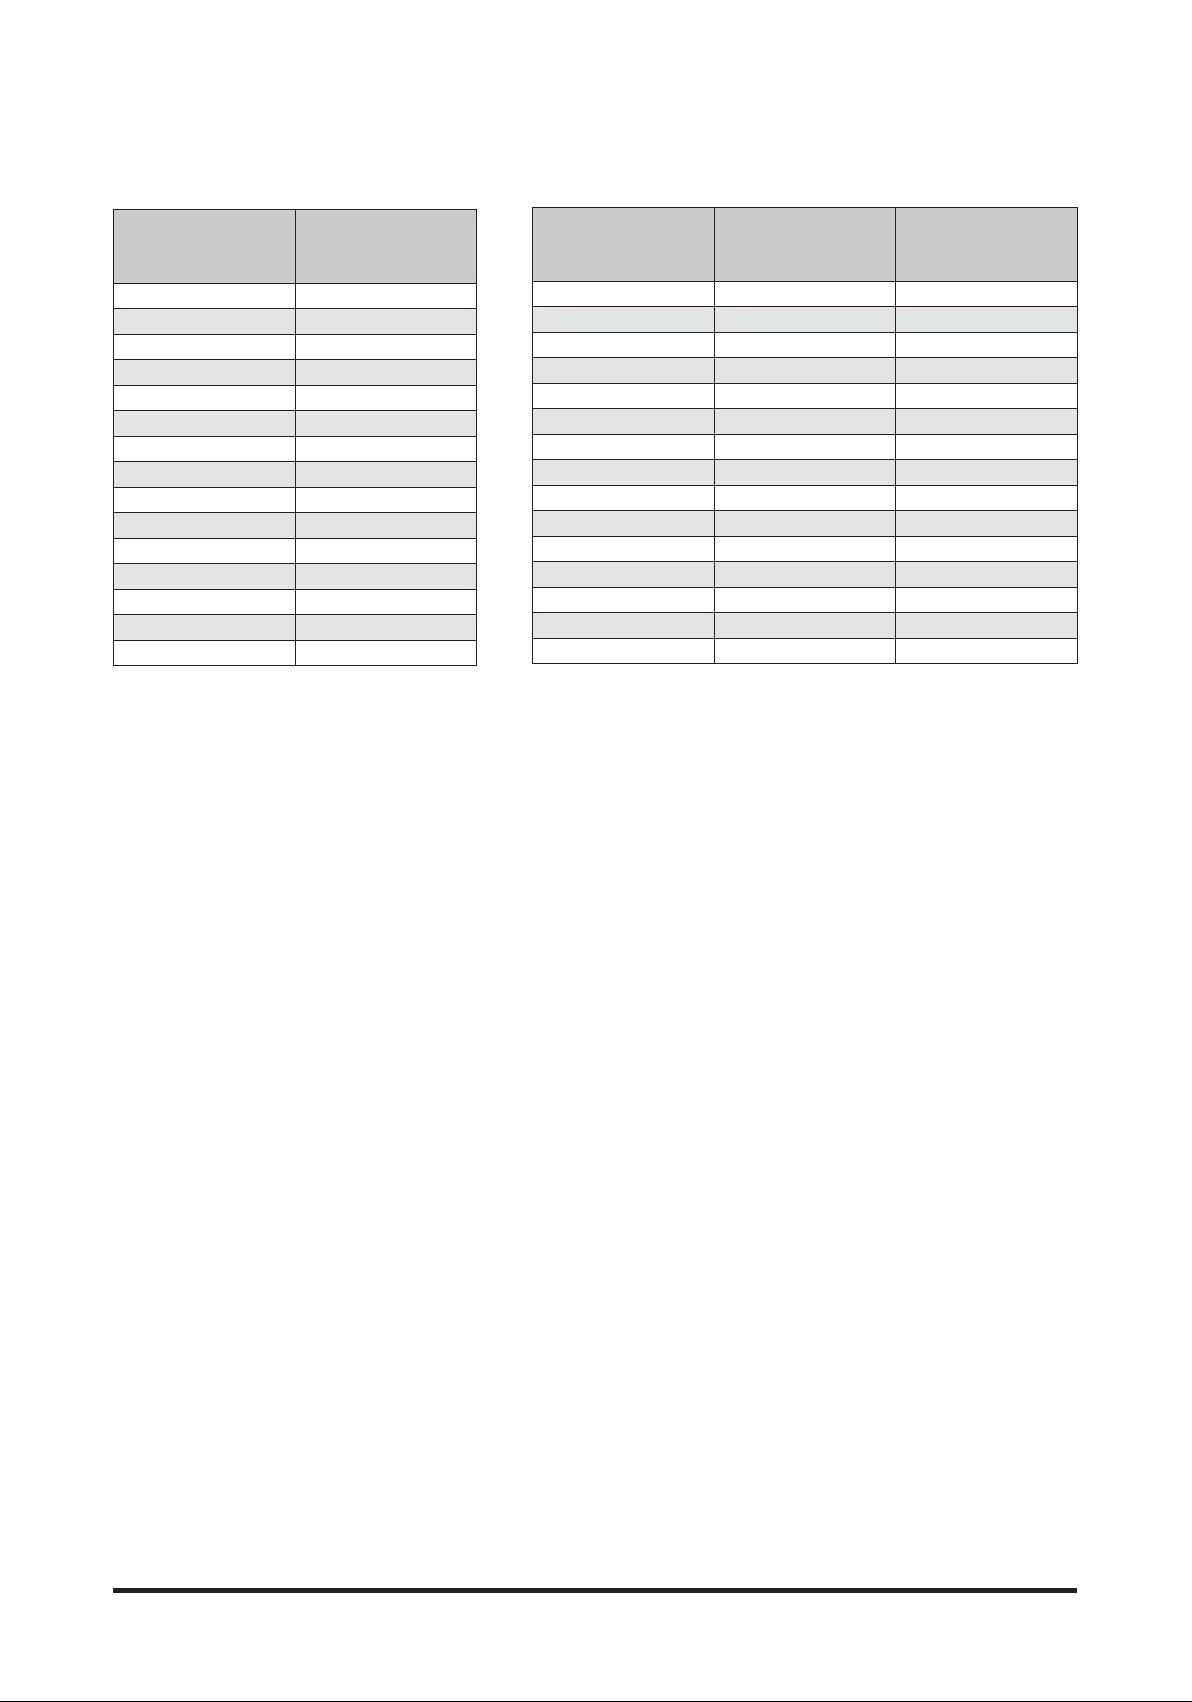
CONVERTING EXISTING SALT POOLS NEW MINERAL SALT POOLS
Pool Size (Litres)
Davey Therapeutic
EcoMineral Salt
(15kg bags)
5,000 to 10,000 1 Bag = 15kg
10,001 to 20,000 2 Bags = 30kg
20,001 to 30,000 3 Bags = 45kg
30,001 to 40,000 4 Bags = 60kg
40,001 to 50,000 5 Bags = 75kg
50,001 to 60,000 6 Bags = 90kg
60,001 to 70,000 7 Bags = 105kg
70,001 to 80,000 8 Bags = 120kg
80,001 to 90,000 9 Bags = 135kg
90,001 to 100,000 10 Bags = 150kg
100,001 to 110,000 11 Bags = 165kg
110,001 to 120,000 12 Bags = 180kg
120,001 to 130,000 13 Bags = 195kg
130,001 to 140,000 14 Bags = 210kg
140,001 to 150,000 15 Bags = 225kg
1. &RQWLQXHWRRSHUDWH\RXU¿OWHUSXPS
for a period of 24 hours following the
addition of Davey EcoMineral Salt to
ensure proper blending has occurred.
2. Davey EcoMineral Salt can be used
with all Davey Salt Water Chlorinators
with recommended TDS levels of
between 4,000 and 6,000ppm.
3. When replacing normal pool salt with
Davey EcoMineral Salt, ensure that
TDS levels do not exceed 6,000ppm
after its addition to the pool.
4. Ensure pH levels are between 7.4 & 7.6
after the addition.
1. :LWKWKH¿OWHUSXPSUXQQLQJSRXUWKHFRQWHQWVRI'DYH\
EcoMineral Salt and Davey EcoMineral Activator into the
pool evenly around the edge.
2. &RQWLQXHWRRSHUDWHWKH¿OWHUSXPSIRUDSHULRGRI
24 hours following the addition to ensure proper blending
has occurred.
3. It is recommended that TDS levels be maintained between
4,000 and 6,000ppm.
4. When using the Davey EcoMineral Salt and Davey
EcoMineral Activator, ensure that TDS levels do not exceed
6,000ppm after its addition to the pool.
5. Ensure pH levels are between 7.4 & 7.6 after the addition.
Note: When the need arises to top up your pool with Davey EcoMineral Salt or Davey EcoMineral Activator, due to dilution through rainfall
or backwashing. Davey recommends you use equal quantities of EcoMineral Salt to Activator (ratio 1:1) and that you maintain your TDS
level between 4,000 and 6,000ppm. This will ensure your mineral pool water stays soft, silky and crystal clear.
After adding Davey EcoMineral Salts to your pool the water may temporarily have discolouration and form clusters of foam on the
surface. This is completely normal and is part of the mineralisation stage and transformation process. This may last for 24 hours,
KRZHYHUDIWHUWKLVWLPH\RXUSRROZLOOUHWXUQWRQRUPDODQGEHFRPHFU\VWDOFOHDUDQGFOHDQ,WLVUHFRPPHQGHGWKDW\RXUXQ\RXU¿OWHU
pump for a minimum 24 hours after the addition of Davey EcoMineral Salts.
Pool Size (Litres)
Davey Therapeutic
EcoMineral Salt
(15kg bags)
Davey EcoMineral
Activator
(15kg bags)
5,000 to 10,000 1 Bag = 15kg 2 Bags = 30kg
10,001 to 20,000 2 Bags = 30kg 5 Bags = 75kg
20,001 to 30,000 3 Bags = 45kg 7 Bags = 105kg
30,001 to 40,000 4 Bags = 60kg 9 Bags = 135kg
40,001 to 50,000 5 Bags = 75kg 12 Bags = 180kg
50,001 to 60,000 6 Bags = 90kg 14 Bags = 210kg
60,001 to 70,000 7 Bags = 105kg 16 Bags = 240kg
70,001 to 80,000 8 Bags = 120kg 19 Bags = 285kg
80,001 to 90,000 9 Bags = 135kg 21 Bags = 315kg
90,001 to 100,000 10 Bags = 150kg 23 Bags = 345kg
100,001 to 110,000 11 Bags = 165kg 26 Bags = 390kg
110,001 to 120,000 12 Bags = 180kg 28 Bags = 420kg
120,001 to 130,000 13 Bags = 195kg 30 Bags = 450kg
130,001 to 140,000 14 Bags = 210kg 33 Bags = 495kg
140,001 to 150,000 15 Bags = 225kg 35 Bags = 525kg
STORAGE AND SAFETY
1. Store in a dry, covered place away from direct sunlight for longer bag life
2. Always use the entire bag content of EcoMineral Salt, once opened. Do not keep open bags of EcoMineral Salt
as it is sensitive to moisture in the air.
3. Care should be taken to avoid contact with eyes and inhaling salt dust. Wearing eye protection and a dust mask is
good practice.
4. ,IH\HVEHFRPHDIIHFWHGÀXVKZLWKFOHDQWDSZDWHU
5. If skin becomes irritated, immediately wash contaminated skin with plenty of water and then wash with soap
and water.
•CHLORINE)RUDQHZSRROLQVWDOODWLRQWKDWKDVQRWEHHQFKORULQDWHGDGGVXI¿FLHQW&KORULQHOLTXLGRU
granular) to achieve a reading of 3 ppm (with a suitable test kit), or run the Sanitiser system continuously for at
least 24 hours or until a reading of 3 ppm is reached.
•STABILISER - It is essential that pool stabiliser be added and maintained at the rate of 30 - 50 ppm at all times.
Do not exceed 100 ppm. (FOR OUTDOOR POOLS ONLY)
•(Refer Day to Day Operation page 16 for further information).
403165_AquaReviva_I&OI.indd 9 4/7/17 9:18 am

10
OPERATION OF YOUR AquaReviva SALT WATER SANITISER
Cell Output is expressed as a percentage. Set the system control to the percentage output required and the
XQLWZLOODXWRPDWLFDOO\DGMXVWWKHFHOORXWSXWWRWKHVHWOHYHO7KH8QLWLV¿WWHGZLWKDQHOHFWURQLFFRQWURODQG
warning system. This regulates the output of the Unit to the preset maximum and changes cell polarity as
indicated by POLARITY LEDs A&B. These LEDs will alternate over a number of hours or days depending on
how the unit is set to operate. The warning system consists of one Operation LED which will glow Green to
indicate normal operation or RED to indicate possible faults with the Unit or damaging operating conditions.
CONTROL PANEL LAYOUT
SELECTOR SWITCH
POLARITY STATUS
FUSE 3A
AB
P/N: 15777
0% 100%
1
2
3
4
5
6
7
8
Clock
Timer 1 - ON
Timer 1 - OFF
Timer 2 - ON
Timer 2 - OFF
Automatic
Manual - ON
OFF
68:00AM
Once the TDS level in the pool is correct the unit may be switched on.
1RWH2QFHWKHXQLWVWDUWVWKHUHLVDVKRUWWLPHGHOD\XQWLOWKHFHOORSHUDWHVWRHQVXUHWKH¿OWUDWLRQV\VWHP
is primed with water.
At this point the Operation LED should be Green; if red refer below. Note: Polarity LED may be either A or B
whichever is on or brightest.
The RED Operation LED will indicate a number of different possible problem situations:
Possible Problem Action
TDS Level Below Minimum $GG3RRO6DOWDWWKHUHTXLUHGTXDQWLWLHVVSHFL¿HGE\\RXU
water testing agent
&HOOLV&DOFL¿HG Clean Cell
Water temperature very cold Add Salt to compensate for cold water
7KHUHLVDSUREOHPZLWKZDWHUÀRZ
Check pump / pipes for blockage or damage.
&KHFNWKDWÀRZVZLWFKLVFRQQHFWHGSURSHUO\DQGLQWKH
right direction.
SANITISER
OUTPUT DIAL
POLARITY
INDICATOR
LEDs
OPERATION
LED
FUSE HOLDER
AND FUSE
TIMER DISPLAY &
SETTINGS BUTTONS
OPERATION
SELECTOR SWITCH
403165_AquaReviva_I&OI.indd 10 4/7/17 9:18 am

11
AquaReviva SPECIAL FEATURES
SYSTEM CONTROL (SANITISER OUTPUT DIAL)
7KH6\VWHP&RQWUROYDULHVWKHDPRXQWRIWLPHWKH&HOORSHUDWHVGXULQJWKH¿OWUDWLRQF\FOH
The System Control will not vary the electrical current supplied to the Cell.
$VDQH[DPSOHLIRQH¿OWUDWLRQF\FOHLVVHWDWKRXUVDQGWKH6\VWHP&RQWUROLVVHWWRWKHQWKHWRWDO
amount of time the Cell will operate during the 5-hour cycle will be 4 hours. If the System Control is set to
WKH&HOOZLOORSHUDWHIRUKRXUVWRWDORYHUWKHKRXU¿OWUDWLRQF\FOH$WWKH&HOOZLOOEH21IRUWKH
entire 5 hour cycle.
:KHQWKH6\VWHP&RQWUROLVVHWWRWKH&HOOZLOOEH2))IRUWKHGXUDWLRQRIWKH¿OWUDWLRQF\FOH:KHQWKH
6\VWHP&RQWUROLVVHWWRWKH&HOOZLOOEH21IRUWKHGXUDWLRQRIWKH¿OWUDWLRQF\FOH7RWXUQWKH&HOO2))
simply turn the System Control to 0.
NOTE: It is recommended to turn the sanitiser output dial to “0” when backwashing.
POLARITY INDICATORS A & B
These LEDs are used to check that the Cell current polarity is reversing. Whichever is on (or brightest)
indicates the polarity of operation. The Cell will operate in one polarity for a number of hours so any change
in these LEDs will happen slowly and depend on how the unit is operated.
LOW SALINITY INDICATION
<RXU$TXD5HYLYDLV¿WWHGZLWKDQXPEHURISURWHFWLYHV\VWHPVLQFOXGLQJWKHRSHUDWLRQ/('ZKRVHSULPDU\
function includes Low Salinity Indicator. As the TDS level in the pool decreases, the wear on the Cell
increases. Although Salt and Activator is not consumed in the sanitisation process, it is lost through
splashing, backwashing and on bathers as they leave the pool. The TDS level is also reduced by rain, which
causes dilution
As the TDS level in the pool falls toward the minimum TDS, the Operation LED will turn RED. At this point the
TDS level should be increased by adding the required amount of Salt as instructed by your pool water tester
or pool shop. The addition of Salt should not affect the AquaReviva power supply as it is protected against
overloads. If no action is taken and the TDS level continues to fall damage to the system may result.
There are other factors that can cause the Unit not to work correctly:
1. Heavy Rain – can cause very diluted pool water to pass over the Cell due to surface skimming.
2. Scaled Cell±DVFDOHG&HOOZLOOQRWGUDZDVPXFKHOHFWULFDOFXUUHQWDVDFOHDQ&HOOZKHQ¿UVWVWDUWHG
3. Cold Water – cold pool water reduces the ability of a Cell to carry electrical current.
4. Failing Cell – as the Cell ages there will come a time when the electrical current draw will drop. This can
be compensated for with the addition of extra Salt. A Cell is considered failed when it draws less than
RIPD[LPXPFXUUHQW3OHDVHQRWHWKDWWKH/RZ6DOLQLW\,QGLFDWRULVQRWOLNH7'6PHWHUVZKLFKDUH
WHPSHUDWXUHFRPSHQVDWHG6FLHQWL¿F,QVWUXPHQWV7KHDFFXUDF\ZLOOEHZLWKLQSSPDQGWKH\DUHZDWHU
temperature dependent, just as the Cell is.
403165_AquaReviva_I&OI.indd 11 4/7/17 9:18 am

12
AUTOMATIC TIME CLOCK OPERATION
TIMER SETTING AND FUNCTIONS
SELECTOR SWITCH
POLARITY STATUS
FUSE 3A
AB
P/N: 15777
0% 100%
1
2
3
4
5
6
7
8
Clock
Timer 1 - ON
Timer 1 - OFF
Timer 2 - ON
Timer 2 - OFF
Automatic
Manual - ON
OFF
68:00AM
127(:KHQ\RX¿UVWWXUQRQWKHSRZHUWRWKH6DQLWLVHULWZLOOWDNHDSSUR[LPDWHO\PLQ
for the LCD to appear on the screen.
Function Description
Selector
Switch
Position
Functions and Instructions
Set Clock 1
SET THE CURRENT TIME ON THE DIGITAL CLOCK
Select the Clock position on the selector switch to enable the time of day
to be input. A number ‘1’ will appear at the left of the screen.
D7KHGLVSOD\ZLOOÀDVKRQDQGRIIDVORQJDVWKHVHOHFWRUVZLWFK
remains at this position. Use the up and down buttons to reach the
desired times. Hold the buttons down for fast increments.
Set Timer 1 - ON 2
SET THE START TIME FOR THE FIRST RUN TIME SEQUENCE
Select the Timer 1-ON position on the selector switch. A number ‘2’ will
appear at the left of the screen.
This time factory pre-set to 6am. Proceed as per (a) in the ‘Set Clock”
instruction to change time.
To disable this timer, move up or down to 11:59PM. Press the UP button
one more time to turn OFF. NOTE: This step will also disable the time for
‘Set Timer 1 - OFF’.
Set Timer 1 - OFF 3
SET THE COMPLETION TIME OF THE FIRST RUN TIME SEQUENCE
Select the Timer 1- OFF position on the selector switch. A number ‘3’ will
appear on the left of the screen.
This time is factory pre-set to 8am. Proceed as per (a) in the ‘Set Clock’
instruction to change time.
403165_AquaReviva_I&OI.indd 12 4/7/17 9:18 am

13
Function Description
Selector
Switch
Position
Functions and Instructions
Set Timer 2 - ON 4
SET THE COMPLETION TIME OF THE SECOND RUN TIME
SEQUENCE
Select the Timer 2- ON position on the selector switch. A number ‘4’ will
appear on the left of the screen.
This time is factory pre-set to 5pm. Proceed as per (a) in the ‘Set Clock’
instruction to change time.
To disable this timer, move up or down to 11:59PM. Press the UP button
one more time to turn OFF. NOTE: This step will also disable the time for
‘Set Timer 2 - OFF’.
Set Timer 2 - OFF 5
SET THE COMPLETION TIME OF THE SECOND RUN TIME
SEQUENCE
Select the Timer 2- OFF position on the selector switch. A number ‘5’ will
appear on the left of the screen.
This time is factory pre-set to 11pm. Proceed as per (a) in the ‘Set Clock’
instruction to change time.
Automatic ON 6
FILTRATION SYSTEM SWITCHES ON AND OFF AUTOMATICALLY
ACCORDING TO YOUR SET TIMES
Select the Automatic ON position on the selector switch. A number ‘6’
will appear on the left of the screen.
Manual ON 7
OVER-RIDES THE AUTOMATIC TIME CLOCK SETTINGS
& SWITCHES FILTRATION SYSTEM ON
Select the Manual ON position on the selector switch. A number ‘7’ will
appear on the left of the screen.
NOTE: Sanitisation will be constant until turned OFF or back to Automatic
ON. Over sanitisation may occur if left for long durations
OFF 8
OVER-RIDES THE AUTOMATIC TIME CLOCK SETTINGS
& SWITCHES FILTRATION SYSTEM OFF
Select the OFF position on the Selector switch. A number ‘8’ will appear
on the left of the screen.
NOTE: Filtration & sanitisation will cease. Not recommended for long
durations.
IMPORTANT. Certain local electrical regulations state “If the supply cord
is damaged, it must be replaced by a special cord available from the
manufacturer or its service agent”.
403165_AquaReviva_I&OI.indd 13 4/7/17 9:18 am

14
MAINTENANCE OF POWER SUPPLY
Little or no maintenance is normally required with the exception of replacing blown Fuses. These Fuses can
be sourced from your local AquaReviva Dealer. However it is essential that the wall or post to which the
Unit is installed be sprayed (not the Unit itself) periodically with a good surface type insect repellent, since
penetration by insects may cause damage, which is not covered by your warranty.
Note: The back of the Unit has been designed as a heat sink. It is normal for this area to become very hot.
MAINTENANCE OF THE IN-LINE ELECTROLYTIC CELL
The In-Line Cell is composed of precious materials, and although proper maintenance can prolong its life
to the maximum, eventually the process of electrolysis will wear away its delicate coating, at which time it
gradually ceases to produce chlorine.
Mineral salts and calcium (scale) are deposited on the plates as electrolysis takes place. This build up will
LQWHUIHUHZLWKWKHÀRZRIHOHFWULFDOFXUUHQWLQWKH&HOODQGWKXVORZHUVVDQLWLVHUSURGXFWLRQ,WLVHVVHQWLDOWR
inspect the Cell regularly and clean when necessary. The rate at which deposits will form on the plate differs
ZLWKHDFKSRRODQGFDQEHLQÀXHQFHGE\WKHIROORZLQJ
•Calcium hardness of the water
•Water temperature
•pH level
•Water which has been chlorinated with calcium hypochlorite for an extended period
•Calcium in the plaster surfaces of a concrete pool
Because these conditions vary so much, check the Cell at least weekly to begin with to see when either
scale or a blue/green soapy substance appears on the plates. You will then be able to determine the cleaning
cycle necessary for your pool (more frequent cleaning may be required in summer). The intervals between
cleaning could get longer to the point where cleaning is only necessary a couple of times each year. One
exception is the use of bore water or ground water, in which case cleaning may always need to be as
frequent as once a week.
NOTE: In areas with hard water, reverse polarity systems may require
occasional manual cleaning.
The life of the AquaReviva Electrolytic Cells vary substantially from one installation to another due to
variations in operating time, water quality and composition, system and Cell maintenance.
Please ensure that when Cell replacement is necessary you use the correct genuine AquaReviva
Replacement Cell to match your system. The correct AquaReviva replacement cells to use are shown in the
table below:
Model Replacement Cell Code
DAR14C DARILC14REP
DAR20C DARILC20REP
DAR26C DARILC26REP
ALWAYS INSIST ON GENUINE DAVEY REPLACEMENT PARTS.
If it is necessary to replace the In- Line Electrolytic Cell, beware
of “look-a-likes”. Only the Genuine AquaReviva Cell is designed
and warranted to operate with the AquaReviva Power Supply.
SERIOUS DAMAGE MAY RESULT TO THE ELECTRONICS
INSIDE THE UNIT IF COPY CELLS ARE USED AND MAY VOID
WARRANTY.
403165_AquaReviva_I&OI.indd 14 4/7/17 9:18 am

15
TO CLEAN THE AquaReviva IN-LINE CELL
Ensure that the Power Supply is turned off – failure to do so may result in the pool pump turning on while the
&HOOLVQRWLQSODFH'LVFRQQHFWWKHFHOOOHDGDQGÀRZVZLWFKIURPWKH&HOODQGUHPRYHWKH&HOOIURPWKHSRRO
return line by undoing the unions, taking care not to lose the o-rings.
Method
1. Assemble a blanking cap from the supplied plug, o-ring and lock ring.
2. ,QVWDOOWKHEODQNLQJFDSRQWRWKHHQGRIWKH&HOORSSRVLWHWKHÀRZVZLWFKSRUW
3. Secure the Cell in a vertical position with the blanking cap at the bottom, to catch any spills the Cell should
be placed in an acid proof container.
4. Add 50mL of HYDROCHLORIC ACID to 500mL of WATER in a suitable sized container, carefully pour the
solution into the open end of the Cell.
5. Alternatively step 4 can be carried out using an approved commercial cell cleaning solution.
6. As the scale is being dissolved from the plates the solution will foam, when this foaming action has
stopped the Cell is clean and the solution can be returned to the container for future use or discarded
appropriately. NOTE: do not leave the acid solution in the Cell for more than ½ hour.
7. 5LQVHWKH&HOORXWZLWKFOHDQWDSZDWHUE\¿OOLQJDQGGUDLQLQJDFRXSOHRIWLPHVFKHFNWKDWDOOWKHVFDOH
deposits have been removed, repeat the cleaning process if necessary.
8. 5HWXUQWKH&HOOWRLWVSRVLWLRQLQWKHSLSHZRUNDQGUHFRQQHFWWKHFHOOOHDGDQGÀRZVZLWFK
NOTE: Always add acid to water, never add water to acid. Always wear eye
protection and rubber gloves. Always clean the Cell in a well-ventilated area.
SAFETY DEVICE
Hydrogen Gas is a by-product of the chlorine producing process. A Flow Switch has been supplied with the
XQLWZKLFKZLOOVWRSVDQLWLVDWLRQLIORZRUQRÀRZLVGHWHFWHG
$TXD5HYLYDXQLWVDUHDOVR¿WWHGZLWKD7KHUPDO&XW2XWWRSUHYHQWRYHUKHDWLQJ,IWKHWHPSHUDWXUHULVHLVWRR
high, power is automatically disconnected. The Unit will resume operation when it cools down.
403165_AquaReviva_I&OI.indd 15 4/7/17 9:18 am

16
DAY TO DAY OPERATION
Four Prime rules must be observed if your unit is to give the best possible service:
1. STABILISER
The importance of pool stabiliser cannot be over – emphasised. It is essential in helping retain chlorine
in your pool. Chlorine is rapidly dissipated by sunlight and the use of stabiliser will reduce this dissipation
substantially. Without stabiliser, it may be necessary to run the Unit for up to three times as long!
Stabiliser should be added at the rate of 500 grams for every 10,000 litres of water. Stabiliser should be
maintained at a level of 30 – 50 ppm. Before adding more stabiliser, have your pool water analysed at your
pool shop to ensure that you do not add too much. (FOR OUTDOOR POOLS ONLY, INDOOR DO NOT
REQUIRE STABILISER)
2. pH AND TOTAL ALKALINITY
A correct pH level must be maintained to prevent problems such as black spot, staining, cloudy water, etc.
An incorrect pH level can damage the pool. Correct pH levels are as follows; Fibreglass – 7.2 to 7.4
Concrete & tiled – 7.4 to 7.6 If you allow the pH level to rise to 8.0 or above, the chlorine required could be
as much as three times the normal amount.
Total Alkalinity should not be confused with pH, although the two are closely related. Total Alkalinity
determines the speed and ease of pH change. The ideal range is 80 – 150 ppm, or refer to your pool
professional.
You should use a test kit which includes a test for Total Alkalinity. Low Total Alkalinity can cause unstable
pH levels – i.e. An inability to keep the pH constant may cause staining, etching and corrosion of metals.
High Total Alkalinity will cause constantly high pH levels.
3. TDS LEVELS
WARNING: Some people recommend that you put salt directly in the skimmer
box. This is a very poor practice as it allows very high concentrations of salt
WREHSDVVHGWKURXJK\RXU¿OWUDWLRQDQGRWKHUSRROHTXLSPHQW
6DOWLVWKHHVVHQWLDOHOHPHQWE\ZKLFK\RXU8QLWRSHUDWHV,QVXI¿FLHQW6DOWZLOOGDPDJH\RXU&HOO
RECOMMENDED TDS LEVEL RANGE: 4,000 - 6,000ppm
WARNING: Do not add Hydrogen Peroxide to pool water or through
swimming pool hydraulic or sanitiser system. Use of Hydrogen Peroxide
will void warranty on Davey products.
Salt is NOT used up in the sanitisation process or by evaporation. It is only lost through backwashing,
VSODVKRXWRYHUÀRZRUE\OHDNDJHIURPWKHSRRORUSOXPELQJ+HDY\UDLQFDQGLOXWHWKH7'6OHYHOVLQ\RXU
pool; therefore TDS levels should be checked during these events.
Low TDS levels will destroy the coating on the Anode plates and will void all Warranty.
7KH$TXD5HYLYDKDVDEXLOWLQZDUQLQJLQGLFDWRUWRPLQLPLVHGDPDJHUHVXOWLQJIURPLQVXI¿FLHQW7'6OHYHOV
however, the ultimate responsibility is on the owner to ensure adequate TDS levels are maintained all year round.
4. RUNNING TIMES
These instructions cover AquaReviva for residential use only.
If you run your Sanitiser for 24 hours a day, or for long periods, the Cell life will be greatly reduced. It is important that
the correct model AquaReviva has been installed on your pool. Many models are available from Davey to cope with
small courtyard pools up to commercial applications. (Consult your local AquaReviva Dealer for more information).
Note: The AquaReviva guarantee does not apply to commercial or semi-commercial installations, i.e. where the
system runs more than an average of 8 hours per day over the year. Guarantee on commercial and semi-commercial
installations is 12 months only on both power supply and cells.
403165_AquaReviva_I&OI.indd 16 4/7/17 9:18 am

17
CHLORINE PRODUCTION
7KH$TXD5HYLYDPXVWEHUXQGDLO\WRJHQHUDWHVXI¿FLHQWFKORULQHWRVDQLWLVHWKHSRRO'XULQJ6XPPHUWKLVLV
approximately eight hours per day, preferably in two periods - between 6.00 and 8.00am and between 5.00
and 11.00pm. Night time is preferable because chlorine dissipates rapidly in direct sunlight. If these running
WLPHVDUHREVHUYHGDQGWKH&HOOLVIXQFWLRQLQJFRUUHFWO\\RXUSRROZLOOKDYHVXI¿FLHQWFKORULQHZKHQWHVWHGLQ
the morning.
If the level is too low either longer running times are required or the Sanitiser Output Control needs to be
DGMXVWHGWRPD[LPXP+DUVKORFDOFRQGLWLRQVVXFKDVWUDI¿FSROOXWLRQRUZLQGERUQHGXVWUHTXLUHGLIIHUHQW
running times, in which case, seek advice from your pool shop. During winter approximately 4 to 6 hours
DGD\VKRXOGSURYLGHHQRXJKFKORULQH:LWKRXWVXI¿FLHQW¿OWUDWLRQVDQLWLVDWLRQ\RXUSRROZLOOQHYHUIXQFWLRQ
correctly. ALWAYS RUN THE PUMP WHEN SWIMMING IN THE POOL. In extremely hot weather or during
periods of heavy bathing loads, the running time may need to be extended to 10 – 14 hours per day.
,QVRPHFDVHV\RXPD\¿QG\RXUFKORULQHOHYHOWREHWRRKLJK7RGHWHUPLQHLIWKLVLVWKHFDVHUXQ\RXU
¿OWHU6DQLWLVHUIRUWKHVXJJHVWHGWLPHVFKORULQHSURGXFWLRQOHYHODQGWHVW\RXUSRROZDWHURQWKHPRUQLQJ
after operation. If your chlorine test shows a high level of chlorine, either the running times can be reduced
slightly, or the Sanitiser Output Control can be turned anti-clockwise. Test your chlorine level again the
following morning at around the same time. If your chlorine level is still high, repeat the above process until
the correct level is attained.
“SHOCK” TREATMENT
Periodically, especially during extremely hot conditions, it may be necessary to boost the amount of chlorine
in your pool in order to maintain absolute sanitation of the water. This can be achieved by adding either
liquid or granulated chlorine. If granulated chlorine is added, the Cell must be checked regularly, since the
additives from this product will clog the electrodes. Alternatively, extend the running time of your AquaReviva.
CHLORINE TYPES AND COMPARISONS / MAX POOL SIZE
0DQ\6DQLWLVHUPDQXIDFWXUHUVFDOLEUDWHWKHLUXQLWVWRFRPSDUHZLWKJUDQXODWHGFKORULQHPDNLQJLW
necessary to adjust their readings to a lower level in order to determine true chlorine production. Below is a
comparison table of the available types of chlorine used to sanitise pools.
AquaReviva
Model
Production
Maximum
(g/hr 100%)
Production
(g/hr 65%
equivalent)
Chlorine
produced
over
8 hours
(grams 100%)
Maximum Pool Size (Litres)
Cool
Climates
<25ºC
Temperate
Climates
25ºC to 30ºC
Hot & Tropical
Climates
>30ºC
DAR14C 14 22 112 70,000 43,000 30,000
DAR20C 20 31 160 100,000 62,000 44,000
DAR26C 26 40 208 130,000 81,000 57,000
NOTE: The appropriate Sanitiser size for your pool is dependent on the local
climate and the bather load of the pool. Please note that Sanitiser cell life
can be increased with shorter running times during winter and lower output
settings. Davey recommends that a Sanitiser is run for between 6 - 8 hours a
day during summer, and 4 hours during winter.
403165_AquaReviva_I&OI.indd 17 4/7/17 9:18 am

18
GENERAL INFORMATION
POOL WATER CHEMISTRY INSTRUCTIONS
POOL WATER
BALANCE
Free Chlorine
(ppm) pH
Total
Alkalinity TA
(ppm)
Calcium
Hardness
(ppm)
Stabiliser -
Cyanuric Acid
(ppm)
Recommended
TDS Levels
(ppm)
Ideal Reading/
Range 1.5 - 3
Concrete &
Tiled Pools
7.4-7.6
Other Surfaces
7.2-7.4
80 - 150
Concrete &
Tiled Pools
200-275
Other Surfaces
100-225
30 - 50 4,000 - 6,000
To Increase
Increase
output of
Sanitiser.
Add chlorine.
Increase
¿OWUDWLRQWLPH
Add Soda
Ash (Sodium
Carbonate)
Add Buffer
(Sodium
Bicarbonate)
Add Calcium
Chloride
Add Cyanuric
Acid
Add equal
quantities of
AquaReviva
Salt and
Activator (1:1)
To Decrease
Decrease
output of
Sanitiser.
Decrease
¿OWUDWLRQWLPH
Add
Hydrochloric
Acid
Add
Hydrochloric
Acid or Dry
Acid
Partially Drain
5H¿OO3RRO
with lower
hardness
water to Dilute
Partially Drain
5H¿OO3RRO
to Dilute
Partially Drain
5H¿OO3RRO
to Dilute
Frequency
of Testing Weekly Weekly Weekly Weekly Regularly Regularly
COMMON TERMS
Algae Microscopic forms of plant life which enter the pool by rain, wind and dust. There are
QXPHURXVYDULHWLHV±VRPHDUHIUHHÀRDWLQJZKLOVWRWKHUVJURZRQZDOOVDQGLQFUDFNV
and come in different colours. Some are more resistant to chemical treatment than others.
Bacteria The germs that contaminate your pool. Introduced by swimmers, dust, rain storms
and other elements.
Balanced Water The correct ratio of mineral content and pH level that prevents pool water from being
corrosive or scale forming.
Chloramines Compounds formed when chlorine combines with nitrogen from urine, perspiration, etc.
Chloramines cause eye and skin irritation, as well as unpleasant odours.
Chlorine Demand The chlorine required to destroy germs, algae and other contaminants in the pool.
Chlorine Residual 7KHDPRXQWRIFKORULQHUHPDLQLQJDIWHUFKORULQHGHPDQGKDVEHHQVDWLV¿HG
This is the reading obtained with your test kit.
Cyanuric Acid Also known as stabiliser or conditioner. It reduces dissipation of chlorine by direct sunlight.
Liquid Acid Chemical used to reduce the pH and total alkalinity in the pool water, and for cleaning
Sanitiser Cell.
ppm An abbreviation for Parts Per Million the accepted measurement of chemical
concentration in swimming pool water. I ppm- l mg/L.
403165_AquaReviva_I&OI.indd 18 4/7/17 9:18 am

19
TROUBLE SHOOTING
No Chlorine Production - Check for:
1. Main power outlet switched off
2. Sanitiser not plugged into main outlet
3. Pump not plugged into Sanitiser
4. Time Clock set to Off position/Power switch turned Off
5. Sanitiser Output Control turned to “0” setting
6. Sanitiser fuse blown
7. Dirty Cell
8. Filter needs back washing
9. Flow switch not connected
10. ,QVXI¿FLHQWZDWHUÀRZWKURXJKFHOO
11. Running times incorrect
12. Main house fuse blown
13. Pump motor faulty
NOTES & SERVICE HISTORY
Low Chlorine Production - Check for:
1. Dirty Cell - clean if required
2. Filter needs back washing
3. Cell failing
4. Pool stabiliser too low
5. pH too high
6. TDS level too low
7. Running time inadequate
8. Sanitiser output control set too low.
403165_AquaReviva_I&OI.indd 19 4/7/17 9:18 am

AUSTRALIA
Head Office
6 Lakeview Drive,
Scoresby, Australia 3179
Ph: 1300 232 839
Fax: 1300 369 119
Website: davey.com.au
Davey Water Products Pty Ltd
Member of the GUD Group
ABN 18 066 327 517
NEW ZEALAND
7 Rockridge Avenue,
Penrose, Auckland 1061
Ph: 0800 654 333
Fax: 0800 654 334
Website: daveynz.co.nz
EUROPE
ZAC des Gaulnes
355 Avenue Henri Schneider
69330 Meyzieu, France
Ph: +33 (0) 4 72 13 95 07
Fax: +33 (0) 4 72 33 64 57
Website: daveyeurope.eu
INTERNATIONAL
Australian Head Office
Ph: +613 9730 9124
Fax: +613 9753 4248
Website: davey.com.au
® Davey is a trademark of Davey Water Products Pty Ltd. © Davey Water Products Pty Ltd 2017.
NORTH AMERICA
Ph: +1 866 328 7867
Website: daveyusa.com
MIDDLE EAST
Ph: +971 50 6368764
Fax: +971 6 5730472
Website: daveyuae.com
Davey Repair or Replacement Guarantee
In the unlikely event in Australia or New Zealand that this Davey product develops any malfunction within
warranty periods beginning from the date of original purchase due to faulty materials or manufacture, Davey
will at our option repair or replace it for you free of charge, subject to the conditions below.
Should you experience any difficulties with your Davey product, we suggest in the first instance that you
contact the Davey Dealer from which you purchased the Davey product. Alternatively you can phone our
Customer Service line on 1300 367 866 in Australia, or 0800 654 333 in New Zealand, or send a written
letter to Davey at the address listed below. On receipt of your claim, Davey will seek to resolve your
difficulties or, if the product is faulty or defective, advise you on how to have your Davey product repaired,
obtain a replacement or a refund.
Your Davey Guarantee naturally does not cover normal wear or tear, replacement of product consumables
(i.e. seals, bearings or capacitors), loss or damage resulting from misuse or negligent handling, improper
use for which the product was not designed or advertised, failure to properly follow the provided installation
and operating instructions, failure to carry out maintenance, corrosive or abrasive water or other liquid,
lightning or high voltage spikes or unauthorised persons attempting repairs. Where applicable, your Davey
product must only be connected to the voltage shown on the nameplate.
Your Davey Guarantee does not cover freight or any other costs incurred in making a claim. Please retain
your receipt as proof of purchase; you MUST provide evidence of the date of original purchase when
claiming under the Davey Guarantee.
Davey shall not be liable for any loss of profits or any consequential, indirect or special loss, damage or
injury of any kind whatsoever arising directly or indirectly from Davey products. This limitation does not
apply to any liability of Davey for failure to comply with a consumer guarantee applicable to your Davey
product under the Australian or New Zealand legislation and does not affect any rights or remedies that
may be available to you under the Australian or New Zealand Consumer Legislation.
In Australia, you are entitled to a replacement or refund for a major failure and for compensation for any
other reasonably foreseeable loss or damage. You are also entitled to have the goods repaired or replaced
if the goods fail to be of acceptable quality and the failure does not amount to a major failure.
Should your Davey product require repair or service after the guarantee period; contact your nearest Davey
Dealer or phone the Davey Support Centre on the number listed below.
For a complete list of Davey Dealers visit our website (davey.com.au) or call:
* Installation and operating instructions are included with the product when purchased new.
They may also be found on our website.
Davey Guarantee Period
Power Supply – Two (2) Years Electrolytic In-Line Cell – Three (3) Years
P/N 403165
403165_AquaReviva_I&OI.indd 20 4/7/17 9:18 am
®Rainbow Pool Products
PO Box 2388, Mansfield Qld 4122
Telephone STD 61-7-3849 5385
Facsimile STD 61-7-3849 5384
Email: [email protected]
Web: www.rainbowpoolproducts.com.au
This manual suits for next models
2
Table of contents
Other Davey Water Filtration System manuals

Davey
Davey EAFM7 User manual

Davey
Davey CrystalClear DCC2140 User manual

Davey
Davey EcoSalt MC12ORP Manual

Davey
Davey ProMatic 24 Manual

Davey
Davey microlene User manual

Davey
Davey Steriflo UV130 User manual

Davey
Davey EMX3600 Installation instructions

Davey
Davey aquashield centurion ASC50 User manual

Davey
Davey CrystalClear DCC2550 User manual

Davey
Davey Microlene UV68-CA User manual