David White Realist TR-300 4.5 User manual

Using the Transit
David White Instruments Realist TR-300 4.5" Transit
Telescope in
normal reading
orientation
Cross-hair focus
Compass
Upper tangent
screw
Upper clamp
Vertical clamp
Focus
Vertical tangent
screw
Lower clamp
& tangent screw
Vertical circle&
vernier
Plate levels
Capstan screws:
top
bottom
Horizontal circle &
vernier
Leveling screws
Upper clamp &
tangent screw

2
Checklist
•Transit in orange box. In the case should also be
•a plumbob and a 5/64" drill bit or the original adjustment tools
•a magnifying glass for reading the vernier
•Tripod with 8.5 cm wide screw-on mount.
•Stadia rod with rod level.
•Tape if desired.
•Survey pins if desired.
Setup
1. Set up tripod, getting the top close to horizontal.
2. Carefully mount transit on tripod, as close as possible to over the survey point.
3. Level in two directions using the plate levels, each in
line with opposite pairs of leveling screws. Rotate
horizontal circle 180° to check if bubbles stay level. If
necessary try again from this position. If you cannot get
the bubble to stay centered 180° apart, you'll need to
adjust the plate level (see the instructions). This is
commonly needed, so make sure you have the tool that
exactly fits the adjustment screws.
4. To position the transit exactly over a survey point
using the plumbob, after leveling you'll need to loosen
two adjacent leveling screws to be able to move the
transit on the tripod plate. You can only move it a short
distance – you may need to reposition your tripod and
relevel if you're off by more than that. Then level it
again.
5. Once leveled with the plate level, you can level to
greater accuracy with the telescope bubble:
•Bring the telescope over a pair of leveling
screws and center the telescope bubble by using
the vertical clamp and tangent screw.
•Rotate the telescope 180° in azimuth. If the
telescope
bubble does
not come to
the center,
bring it
halfway to
the center by
turning the
vertical
Adjusting a plate bubble level
After centering the bubble in one position,
rotate the horizontal circle 180° and if this
is off you need to adjust that plate level:
•Use the leveling screws to correct
the bubble half way to center, then:
•Use the smooth part of a 5/64" drill
bit, or the tool to adjust one or the
other side of the plate level up or
down to get the bubble centered.
You'll be turning the top and bottom
capstan screws the same direction to
move that side of the bubble up
(counter-clockwise) or down
(clockwise). Note that you have to
turn one to loosen it, and the other
the same direction to tighten it, in a
new position.
•If it's off very much at all, you'll
have to repeat this to get it closer
and closer.
Clamps and tangent screws
clamp
tangent
screw
There are three clamp and tangent screw
pairs: two (upper and lower) for horizontal
circle adjustments, and one for vertical. In
each case, the clamp is loosened to move the
transit more than a few degrees, then the
clamp is tightened for fine adjustment with
the tangent screw
3
tangent screw, and then center the bubble by using the two leveling screws. Rotate the
telescope again 180° in azimuth. The bubble should remain centered. If it does not,
repeat the process of bringing it halfway to center with the tangent screw and the rest of
the way with the leveling screws. When the bubble remains centered after the telescope
is rotated, bring the telescope over the other pair of leveling screws and bring the bubble
to center by using the leveling screws only. This makes the vertical axis of the transit
truly vertical.
•You may still have an error if the sighting is not parallel with the telescope bubble, or the
vertical vernier is off. You can detect this by making two sightings of the same distant
feature with the telescope in normal position and reverted position (rotate the telescope
vertically so the telescope bubble is on top) and comparing the readings. Part of this can
be fixed by adjusting the telescope bubble level, but the remaining index error (see
below) is probably best resolved by making two readings, normal and reversed.
6. Get the transit reading magnetic or true azimuths (though absolute accuracy is limited by the
compass to about a degree – with transits and theodolites the absolute accuracy is not as
important as the relative accuracy of angles) by:
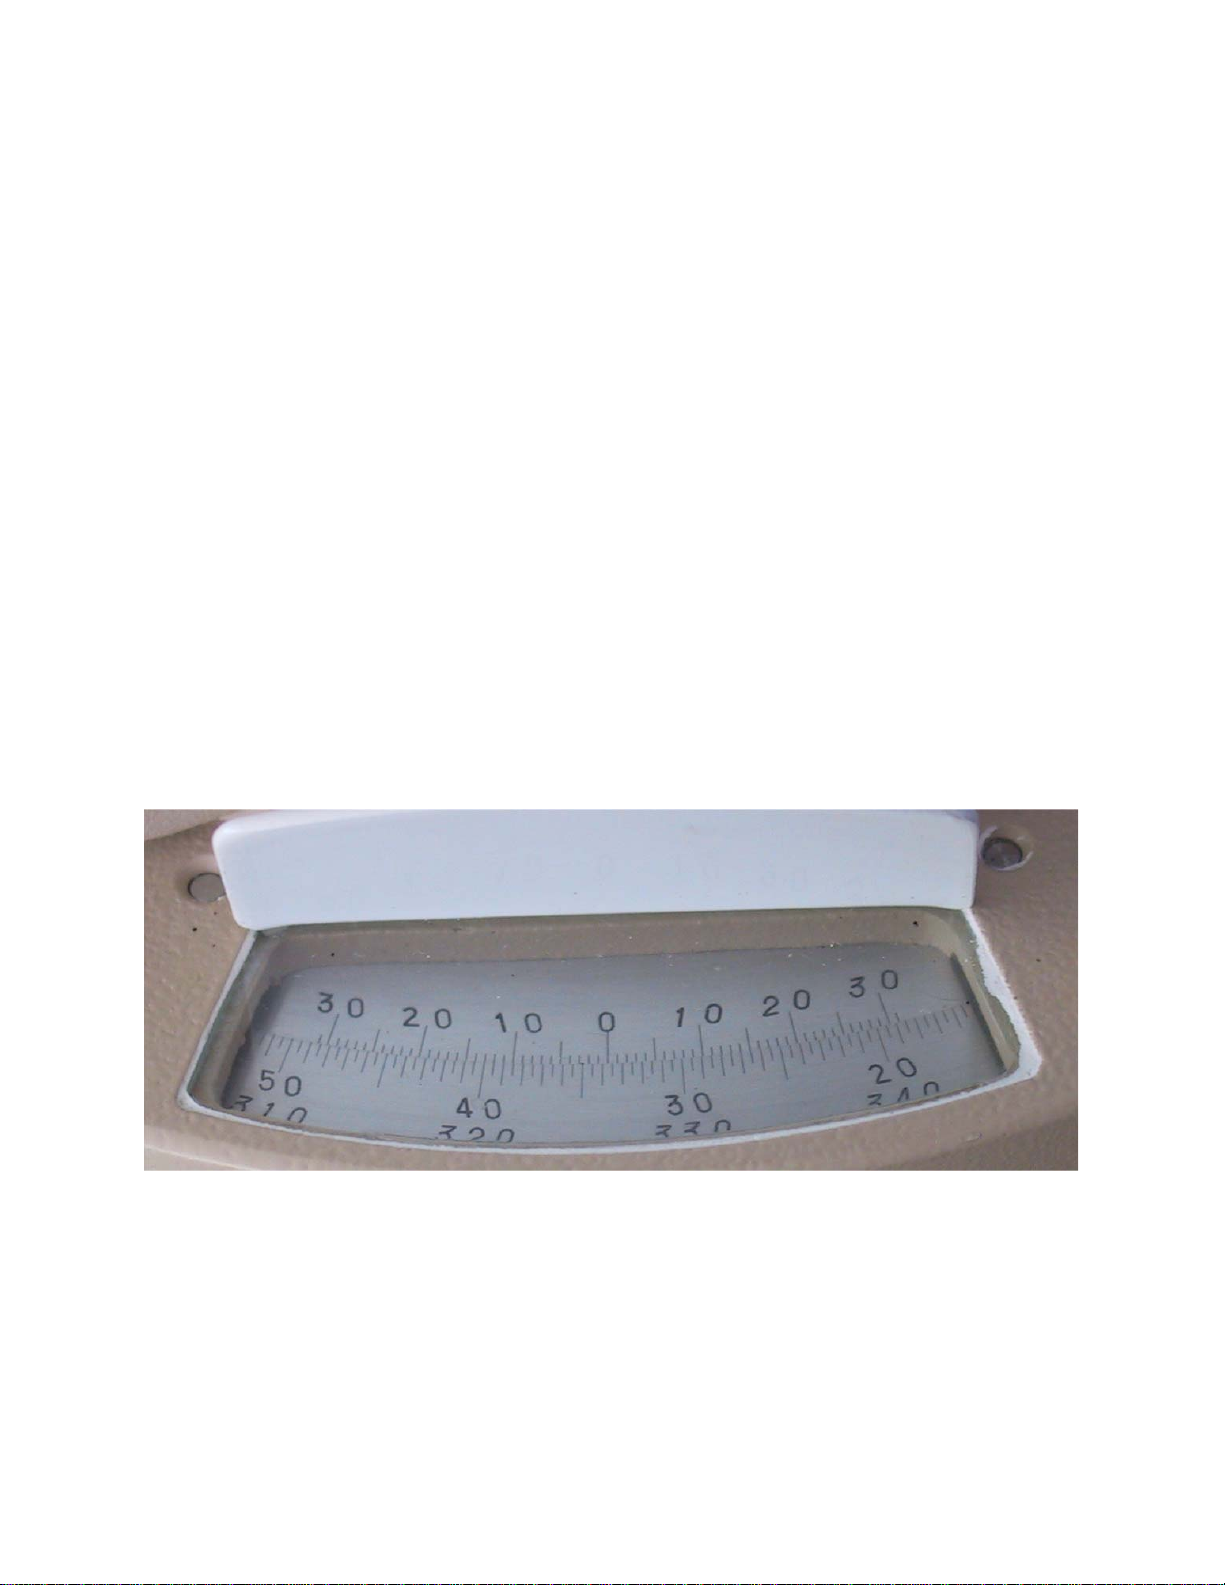
•Using the upper clamp and tangent screw to set the direction to zero. You'll need to
understand how to read the horizontal circle vernier. The lower scale shows the reading
to a half degree; the upper shows the minutes above or below that reading. For minutes
find which mark lines up with a degree or half degree mark below. The figure shows a
reading of 33° 45'. For now though, you just need to put the zero on the zero, but check
the vernier to make sure the 0° mark is lined up with the 0' mark.
•With the upper clamp closed, and the compass released (unscrew its lock until it moves
freely) open the lower clamp to rotate the telescope until the north arrow is pointing to
north on the scale, or to the magnetic declination (may be around 15.5°) to get true
directions. Then close the lower clamp.
4
Reading horizontal azimuths
From now on when you rotate the telescope with the upper clamp open, or fine adjust the upper
tangent screw, you'll get readings in azimuths. You can get angles by subtracting one angle from
another.
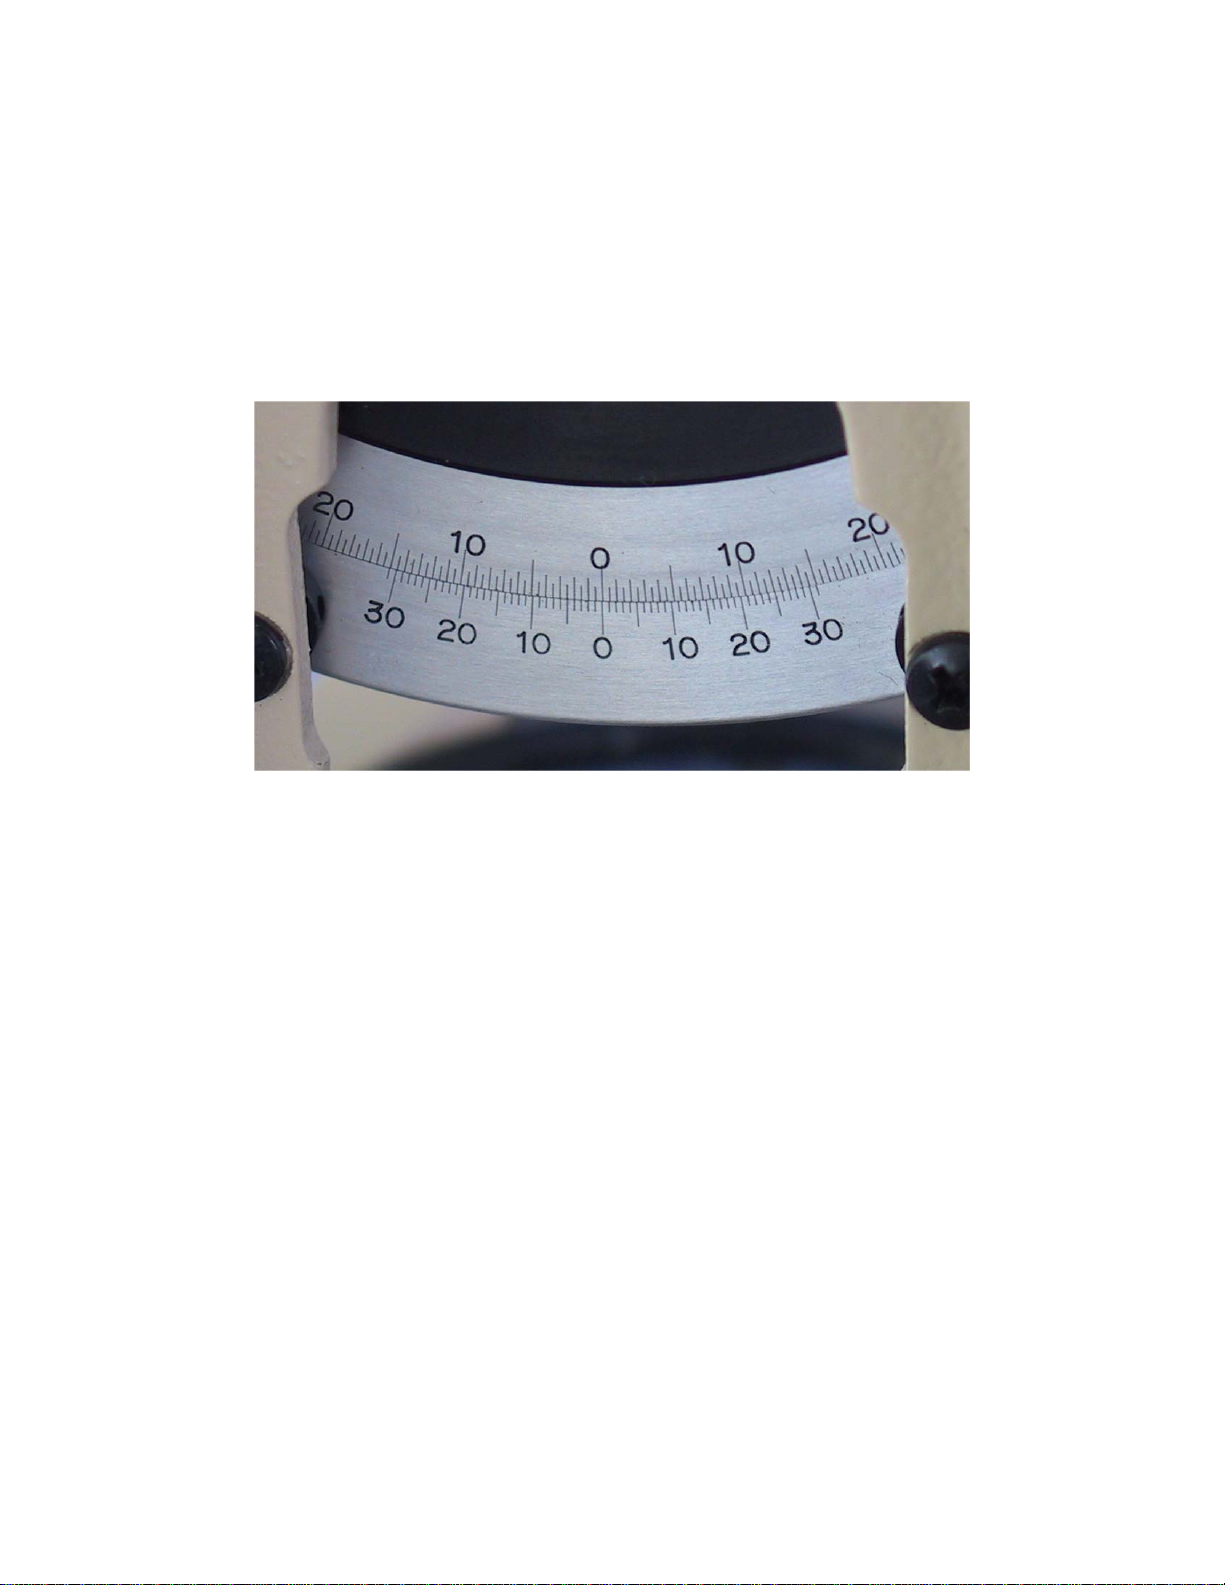
Reading vertical angles
Also uses a vernier to get degrees and minutes. The reading below is 0° 04'. Note that the
minutes are now on the bottom, in contrast to the horizontal circle – a potential source of
confusion and blunder.
A single reading may be off by 10' or more. To get a more accurate reading – to a minute –
average two readings: (1) the normal reading, and (2) a reversed reading, with the telescope
reversed 180° in azimuth and the telescope plunged (rotated vertically 180° so that the telescope
bubble is on top). Half of the difference is the index error, which should remain reasonably
consistent during a given use, so you could also add this index error to the normal reading
instead of making two readings; but it's probably a good idea to check this on multiple readings.
Reading distances, using the stadia rod
If reading is at level, the stadia readings can be converted to distances by subtracting the lower
from the upper stadia reading and multiplying the resulting difference (s) by the stadia interval
factor (K) to get distance: H = Ks. K should be approximately 100, but you can derive a more
accurate value by previously calibrating using a known horizontal distance – your derived K
should be recorded on paper and kept with the instrument.
If you're not reading a level reading, you can use the following formula to get horizontal distance
using the vertical angle a:
H = Ks cos(a) cos(a)
This is the general formula for any angle including zero, which should make sense as cos(0) = 1.
Other David White Measuring Instrument manuals


