DAVINCI GLIDERS Harmony Passenger Air User manual

www.dv-gliders.com
Davinci Products Inc.
53 Sinchon-gil, Okcheon-myeon, Yangpyeong-gun, Gyeonggi-do, South Korea. (12505)
Tel. +82(0)10-9799-3472 Fax. +82(0)10-9799-3472
sales@dv-gliders.com , info@dv-gliders.com

www.dv-gliders.com
- 1 -
User’s Manual
REV. 4 _ 28 May 2019

www.dv-gliders.com
- 2 -
Contents
Warning -3
Introducing the Harmony passenger AIR -4
Before you fly -6
Flying with the Harmony passenger AIR -9
Maintenance and repairs -11

www.dv-gliders.com
- 3 -
Thank you for choosing
the Davinci Harmony passenger AIR harness.
This harness is for the tandem passenger’s
equipment. It has air bag system and don’t have
the rescue pocket so do not use for the solo
flying. Also there are inner protect but you don’t
need to install it.
We hope to enjoy your tandem flying with your
passenger.
Davinci gliders team
WARNING!
THIS IS NOT TRAINING MANUAL. ATTEMPTING TO FLY THIS OR
ANY OTHER PARAGLIDER WITHOUT PROPER INSTRUCTION FROM A
CERTIFIED PROFESSIONAL INSTRUCTOR IS EXTREMELY
DANGEROUS TO YOURSELF AND BYSTANDERS.
DAVINCI GLIDERS are carefully manufactured and inspected at the
factory. Please use the harnesses only as described in this manual.
Do not make any modifications to the harnesses.
As with any sport – without taking the
necessary safety precautions, paragliding can be dangerous.

www.dv-gliders.com
- 4 -
Introducing the Harmony passenger AIR
Technical specifications
Size One size
Back protection type Airbag
Volume of Rescue Container No rescue container
max/min container volume [cm3] 12,000 / 7,460
Certification
The Harmony passenger AIR has EN and LTF
certification, max load 110 kg

www.dv-gliders.com
- 5 -
Components
1 Harness
2 25mm carabiners
3 Seat Plate
1 2 3
Features and innovation
Velcro shoulder straps
Located on both shoulders straps of the passenger
harness are Velcro strips and attachment loops. This
allows an excellent position for flight instruments or a
POV (point of view) camera mount.
www.dv-gliders.com
- 6 -
Before you fly
Make sure your dealer has checked the harness for
completeness and basic settings. Your harness must be
assembled by a suitably qualified paragliding
professional, for example, your instructor. Before your
flight, you have to make sure the connection with the
pilot and the glider using the spreader bar by carabinner.
Adjustments
Adjust your harness to suit your physique and flying style. It is
important to adjust it correctly to ensure you can easily slide into the
sitting position after take off. A poorly adjusted harness can adversely
affect the flying characteristics of your paraglider.
Perform adjustments before your first flight by hanging in a simulator
and fine-tune the settings if necessary during your first few flights.
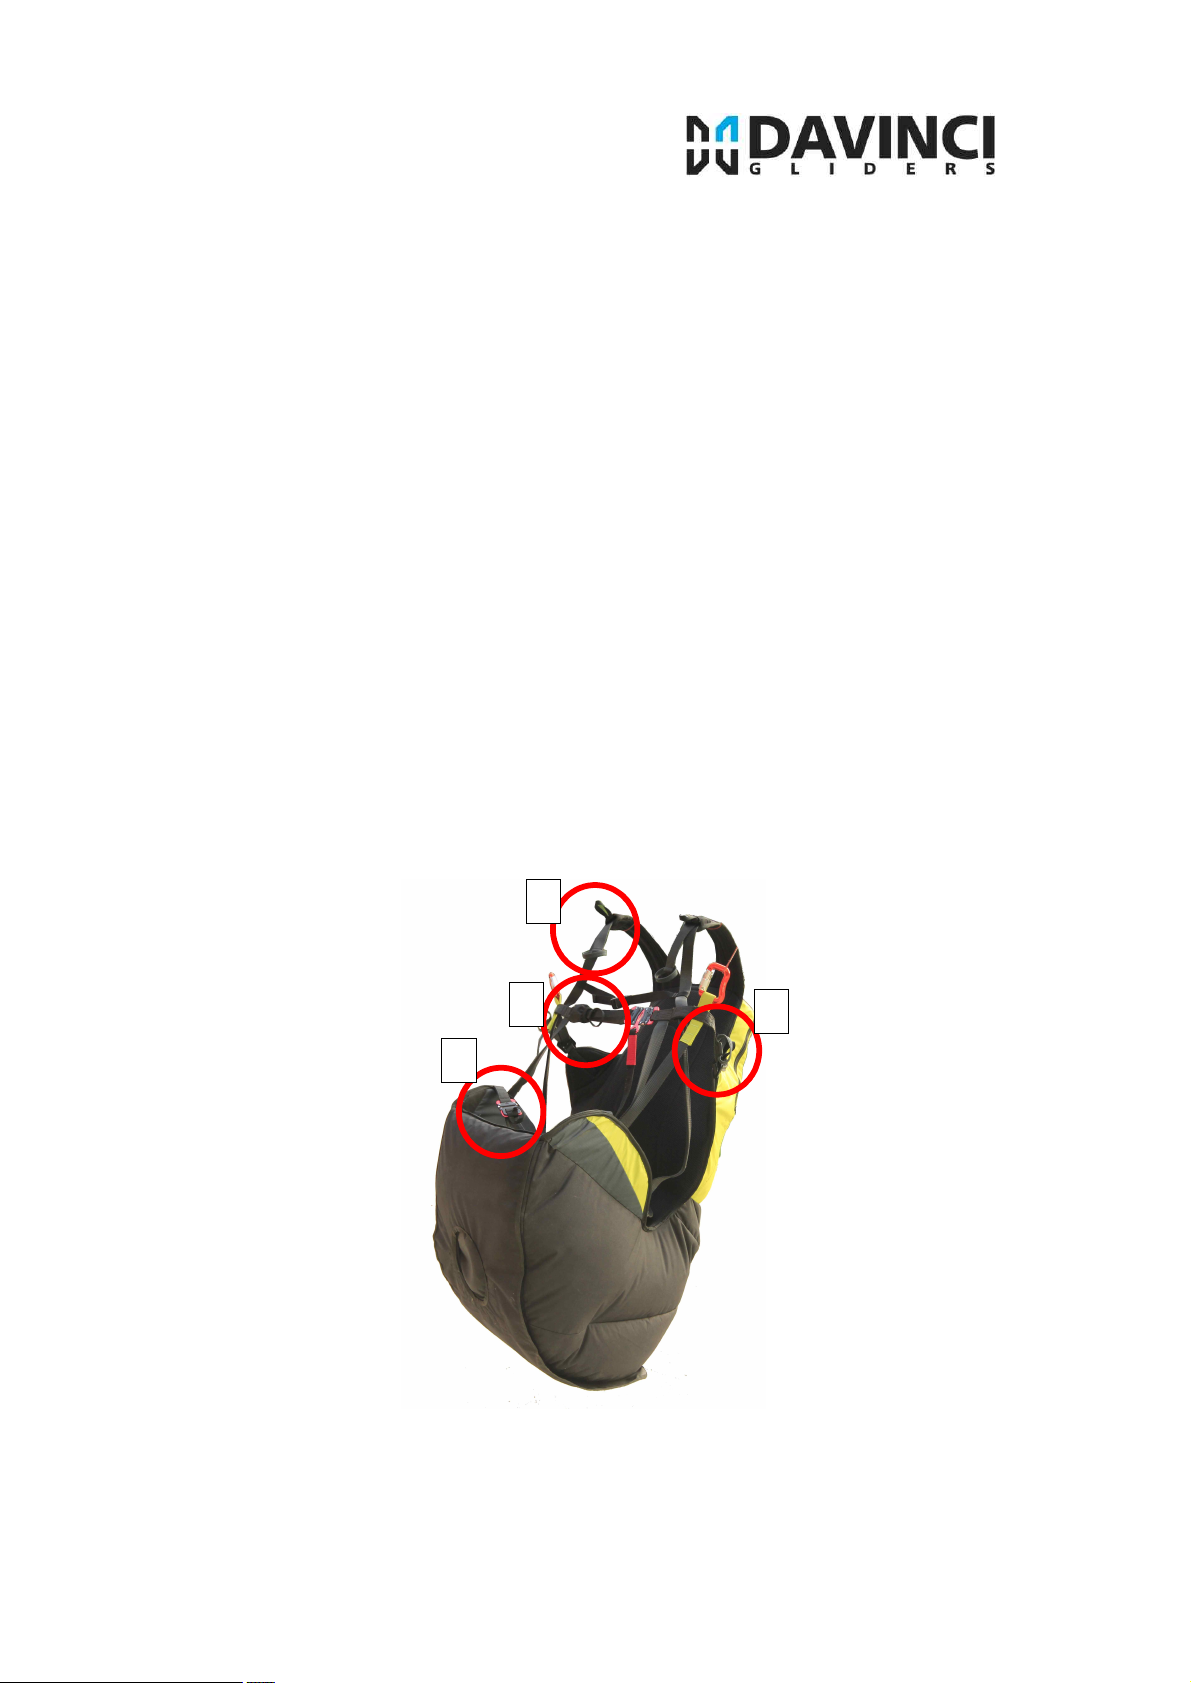
1
2
3
4

www.dv-gliders.com
- 7 -
(1) Shoulder straps
The optimum setting for the shoulder straps depends on the
height of the passenger. Step into the harness and stand
upright with the breast strap closed, symmetrically adjust the
shoulder straps until they are a snug fit, but not tight.
To tighten: pull down on the grey webbing strap
To loosen: pull up on the BLACK webbing strap
(2) Lateral Straps
The lateral straps adjust the angle between the thighs and
the back. Lengthening the straps increases the angle and
vice-versa. The easiest way to adjust them correctly is
during a flight in calm air. Remember that flying in the
supine position (i.e. leaning back), reduces the stability of
the harness and increases the risk of riser twists after a
deflation.
To tighten, pull forward on BLACK and Grey webbing strap
To loosen, pull back on the BLACK webbing strap
(3) Leg straps
The correct adjustment of the leg straps allows the pilot to
easily reach the sitting position after take-off without using
his hands. Use the buckles to adjust the leg straps so that
they fit comfortably without being tight; make sure you do it
symmetrically. If you need to lengthen the leg straps, first
check that the shoulder straps are not too tight.
(4) Chest Strap

www.dv-gliders.com
- 8 -
The adjustment of the chest strap controls the distance
between the carabiners and affects the handling and stability
of the glider. Widening the distance between the carabiners
increases feedback from the wing and allows for easier
weight shifting. Closing the strap gives you a more stable
feeling in turbulence but increases the risk of stable spiral
and also the risk of twisting! The chest strap may also be
adjusted in flight according to the conditions; for example, it
may be tightened in turbulent air and flown at a looser
setting in less turbulent or weak conditions.
To tighten, pull the black webbing strap to the left.
To loosen, pull the black webbing strap to the right.

www.dv-gliders.com
- 9 -
General warnings and advice
Before every flight, check the following:
þIs your passenger in good physical and mental condition?
þAre you familiar and compliant with all applicable laws and
regulations in your area?
þAre you briefed thoroughly about the site, airspace and
expected weather conditions of the day?
þIs your equipment and choice of site suitable for your level
of experience?
þDoes your passenger have a suitable helmet, gloves, boots,
eye-wear and adequate clothing?
þIs your passenger carrying some form of identification, so
that people know who you are in case of an accident? Take
along a radio and mobile phone if possible.
Pre-flight checks
As part of your normal pre-flight check routine, check:
þIs there any damage to the harness or carabiners that could
affect its airworthiness?
þAre all buckles, belts, zips securely fastened? Buckles should
click into place as you close them, and a gentle pull on the
fastened buckle verifies this. Secure any zips after fastening the
buckles. Take extra care in snowy or sandy environments.
þIs the paraglider connected correctly to the harness with
both carabiners secured by their locking mechanisms?
þAre all pockets closed properly and any loose items tied
down safely?
þHave you closed your leg and chest straps? Double check
before you take off
Flying with the Harmony passenger AIR

www.dv-gliders.com
- 10 -
Landing with the Harmony passenger AIR
Before landing, slide your legs forward in the
harness so that you adopt the standing position.
NEVER land in the seated position—it is very
dangerous even if you have back protection.
Miscellaneous
Towing
This harness can be used for towed launches. The tow bridle release
should be hooked directly to the main carabiners, ensuring that the
carabiners are positioned with the opening bar facing the rear. For
further details, refer to the documentation provided with your tow
release, or ask a qualified towing instructor at your flying site.
Flying over water Water
landings should be avoided at all costs, as the back protection
increases the risk of the pilot floating in a head-down position.

www.dv-gliders.com
- 11 -
Maintenance and repairs
The materials used in this harness have been carefully selected for
maximum durability. Nevertheless, keep your harness clean and
airworthy to ensure the longest possible period of safe operation.
Care and maintenance
Don’t drag your harness over rough or rocky ground. Avoid
unnecessary exposure to UV rays, heat and humidity. Keep the folded
harness in your rucksack when not in use.
Store all your equipment in a cool, dry place, and never put it away
while damp or wet. Regularly clean off dirt with a plastic bristled brush
and/or a damp cloth. If the harness gets exceptionally dirty, wash it
with water and a mild soap. Make sure you first remove the entire
sub-components. Allow the harness to dry naturally in a well
ventilated area away from direct sunlight. Occasionally lubricate the
zips and buckles with silicone spray, no more than once a year.
After a hard landing you must check your harness for damage.
Inspection checklist
Additional inspections should be performed after any crash, bad
landing or take off, or if there are any signs of damage or undue
wear. Always seek professional advice whenever in doubt.
The following checks should be carried out
Check all webbing, straps and buckles for wear and damage,
especially the areas that are not easily seen, such as the inside of the
carabiner hook-in points.
All sewing must be intact and any anomalies attended to immediately
to avoid exacerbation of the problem.
The seat and back plates must be free from cracks.
The main aluminium carabiners must be replaced at least every 5
years or after 500 hours, whatever comes first. Impacts may create
undetectable cracks that could result in structural failure under
The recommended check periodic is 2 year after use and if the
intensive user(>200hours a year) needs to check every year.

www.dv-gliders.com
- 12 -
continuous load.
Repairs
The manufacturer or an approved specialist should carry out any repair
that involves critical parts of the harness. This will ensure that the
correct materials and repair techniques are used.
Quality and service
We take pride in the quality of our products and are committed to
putting right any problems affecting the safety or function of your
equipment and which are attributable to manufacturing faults. Your
Davinci dealer is your first point of contact if you have any problems
with your equipment. If you are unable to contact your dealer or
Davinci importer, contact Davinci gliders directly via our website.
Care of the environment
We are privileged to fly in areas of outstanding natural beauty.
Respect and preserve nature by minimizing your impact on the
environment. When visiting an area, contact the local club for details of
environmentally sensitive areas and local restrictions.
When your paraglider eventually reaches the end of its useful life,
dispose of it with consideration and follow any local regulations.
Material List for Harmony Passenger Air
List Meterial
Fabric OXFORD 210D PU
Webbing NYLON-66 25mm / 30mm
Buckles Quick lock buckle light Male/Female. T-lock for light
QLB 1000
Thread. 630 D/9 Bonded, P/F 280 D/3 & 420 D/3 Bonded
POLYESTER


