DAVIS DriveRight 130AL User manual

U
SER
’
S
G
UIDE
130AL
Product # 8146GD, 8146HD

Product Numbers: 8146GD, 8146HD
Davis Instruments Part Number: 7395-056
DriveRight
®
Rev. B Manual (8/13/98)
Controlled Online: Davis Instruments:DriveRight:Manuals:DriveRight 130AL
This product complies with the essential protection requirements of the EC EMC Directive 89/
336/EC.
© Davis Instruments Corp. 1995. All rights reserved.
DriveRight is a registered trademark of Davis Instruments Corp., Hayward, CA.

Page 1
T
ABLE
OF
C
ONTENTS
I
NTRODUCTION
. . . . . . . . . . . . . . . . . . . . . . . . . . . . . . . . . . . . . . 2
A Word About Safe Use . . . . . . . . . . . . . . . . . . . . . . . . . . . . . . . . . . . . . 2
About This Manual. . . . . . . . . . . . . . . . . . . . . . . . . . . . . . . . . . . . . . . . . 2
O
PTIONAL
A
CCESSORIES
. . . . . . . . . . . . . . . . . . . . . . . . . . . . . . . . 2
U
SING
THE
D
AVIS
D
RIVE
R
IGHT
130AL . . . . . . . . . . . . . . . . . . . . . 3
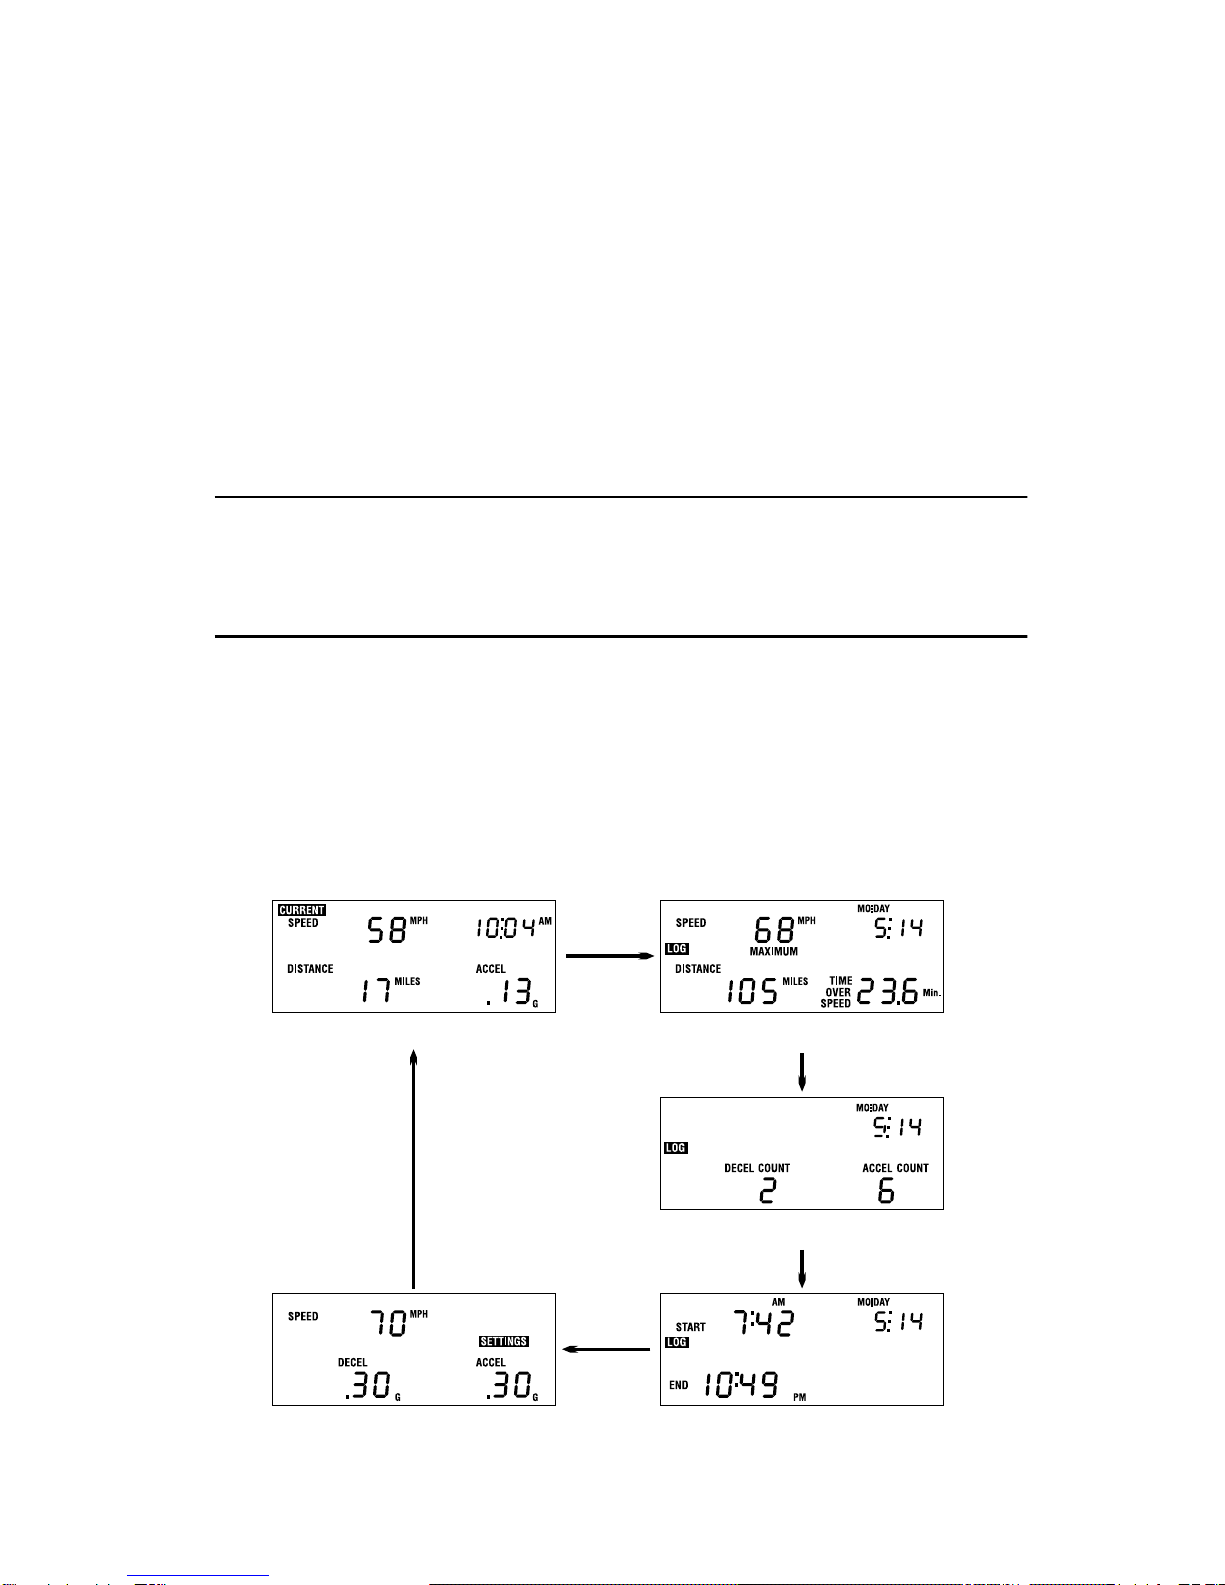
The Data Screens . . . . . . . . . . . . . . . . . . . . . . . . . . . . . . . . . . . . . . . . . . 3
The Settings Screens . . . . . . . . . . . . . . . . . . . . . . . . . . . . . . . . . . . . . . . . 4
The Buttons . . . . . . . . . . . . . . . . . . . . . . . . . . . . . . . . . . . . . . . . . . . . . . 5
Entering Settings . . . . . . . . . . . . . . . . . . . . . . . . . . . . . . . . . . . . . . . . . . . 7
C
ALIBRATING
THE
D
RIVE
R
IGHT
130AL. . . . . . . . . . . . . . . . . . . . . . 8
Calibration Using the Speedometer . . . . . . . . . . . . . . . . . . . . . . . . . . . . . 8
Calibration Using The Odometer . . . . . . . . . . . . . . . . . . . . . . . . . . . . . 10
U
SING
THE
D
ATA
S
CREENS
. . . . . . . . . . . . . . . . . . . . . . . . . . . . . 11
Current Readings Screen . . . . . . . . . . . . . . . . . . . . . . . . . . . . . . . . . . . . 11
Speed/Distance Log Screen . . . . . . . . . . . . . . . . . . . . . . . . . . . . . . . . . . 13
Acceleration/Deceleration Log Screen . . . . . . . . . . . . . . . . . . . . . . . . . . 15
Driving Time Log Screen . . . . . . . . . . . . . . . . . . . . . . . . . . . . . . . . . . . 16
Limits Screen. . . . . . . . . . . . . . . . . . . . . . . . . . . . . . . . . . . . . . . . . . . . . 17
S
ETTINGS
S
CREENS
. . . . . . . . . . . . . . . . . . . . . . . . . . . . . . . . . . 17
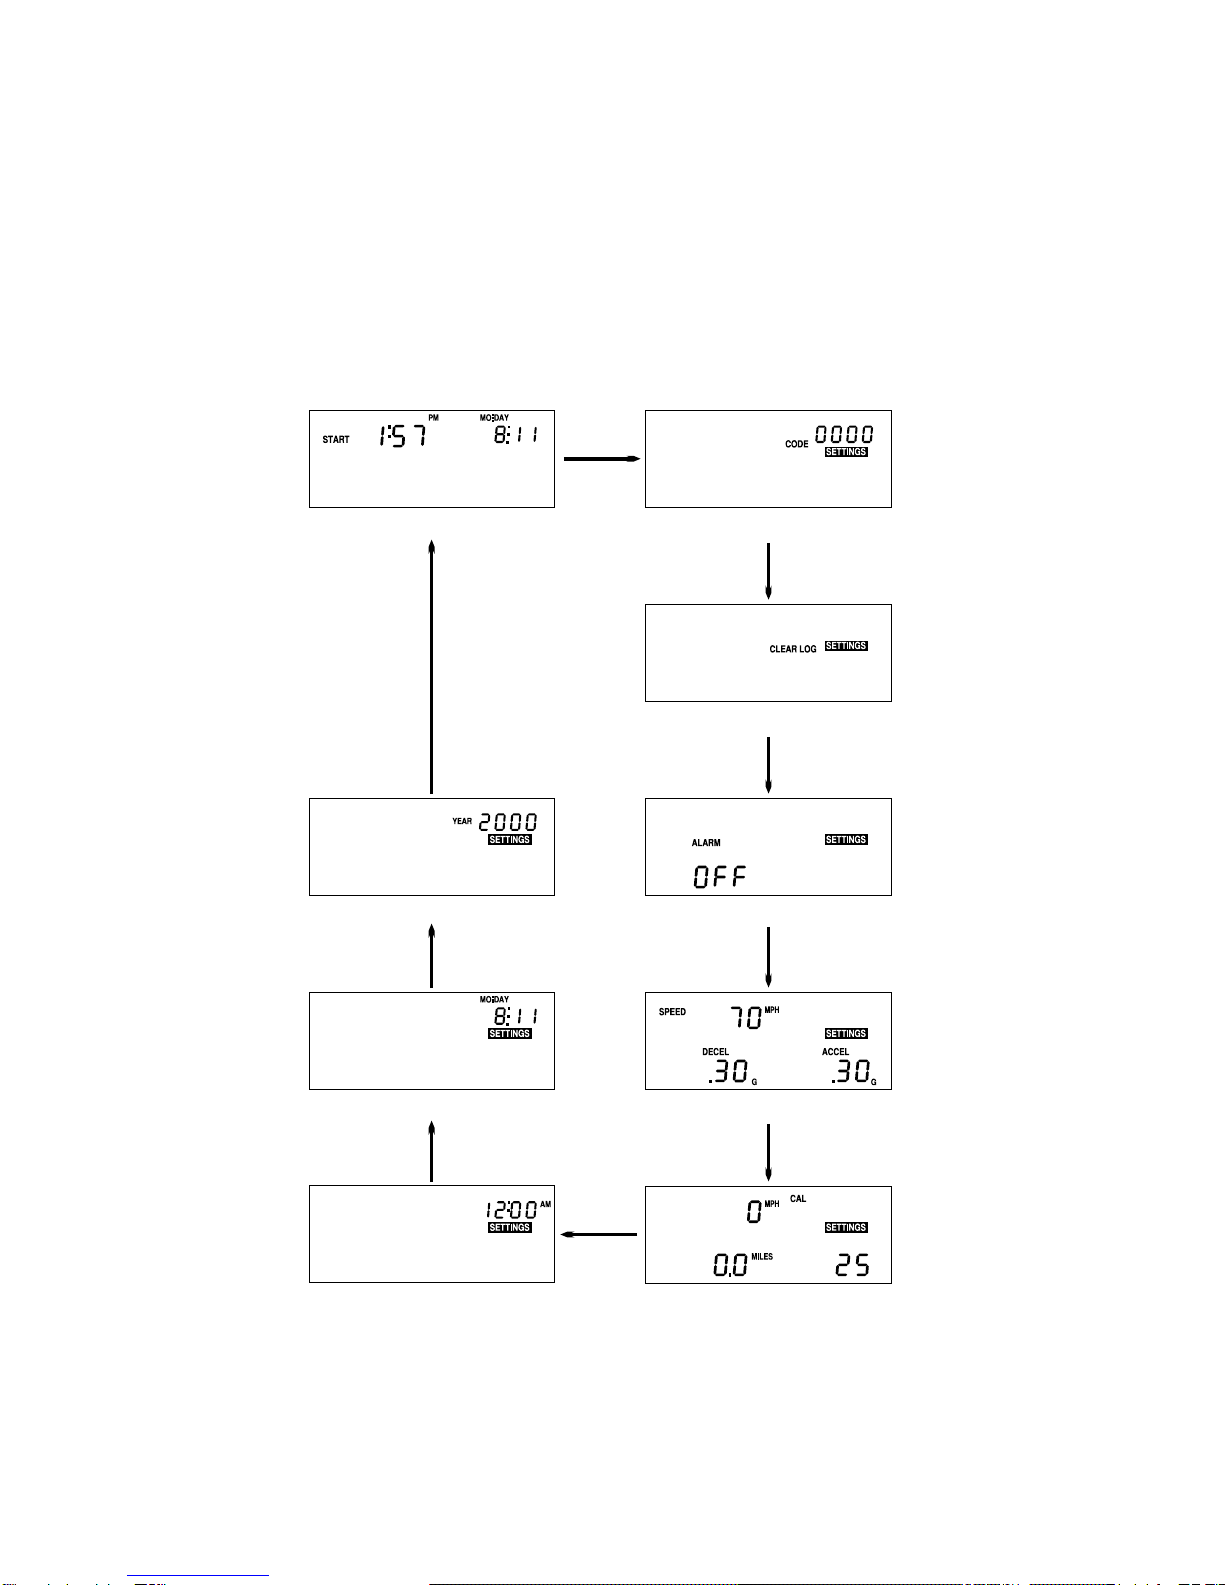
Last Correct Code Screen . . . . . . . . . . . . . . . . . . . . . . . . . . . . . . . . . . . 17
Code Entry Screen . . . . . . . . . . . . . . . . . . . . . . . . . . . . . . . . . . . . . . . . 18
Clear All Log Data Screen . . . . . . . . . . . . . . . . . . . . . . . . . . . . . . . . . . . 19
Alarm On/Off Screen . . . . . . . . . . . . . . . . . . . . . . . . . . . . . . . . . . . . . . 20
Limit Entry Screen . . . . . . . . . . . . . . . . . . . . . . . . . . . . . . . . . . . . . . . . 21
Calibration Screen. . . . . . . . . . . . . . . . . . . . . . . . . . . . . . . . . . . . . . . . . 22
Set Time Screen . . . . . . . . . . . . . . . . . . . . . . . . . . . . . . . . . . . . . . . . . . 22
Set Date Screen . . . . . . . . . . . . . . . . . . . . . . . . . . . . . . . . . . . . . . . . . . . 23
Set Year Screen . . . . . . . . . . . . . . . . . . . . . . . . . . . . . . . . . . . . . . . . . . . 23
M
ISCELLANEOUS
I
NFORMATION
. . . . . . . . . . . . . . . . . . . . . . . . . . 24
Tamper Protection . . . . . . . . . . . . . . . . . . . . . . . . . . . . . . . . . . . . . . . . 24
Battery Operation . . . . . . . . . . . . . . . . . . . . . . . . . . . . . . . . . . . . . . . . . 25
Display Lamp . . . . . . . . . . . . . . . . . . . . . . . . . . . . . . . . . . . . . . . . . . . . 26
Restarting the DriveRight 130AL . . . . . . . . . . . . . . . . . . . . . . . . . . . . . 26
T
ROUBLESHOOTING
G
UIDE
. . . . . . . . . . . . . . . . . . . . . . . . . . . . . 26
T
ECHNICAL
S
PECIFICATIONS
. . . . . . . . . . . . . . . . . . . . . . . . . . . . 29
W
ARRANTY
& R
EPAIR
I
NFORMATION
. . . . . . . . . . . . . . . . . . . . . . 30
One Year Limited Warranty . . . . . . . . . . . . . . . . . . . . . . . . . . . . . . . . . 30
Questions? Call Davis Customer Service. . . . . . . . . . . . . . . . . . . . . . . . 30

Page 2
I
NTRODUCTION
Congratulations on purchasing the Davis DriveRight 130AL! The DriveRight
130AL uses advanced microprocessor technology to record and track driver and
vehicle performance. You may set your own limits for speed, acceleration, and
deceleration. An alarm will sound whenever the limits are exceeded. Data is
logged for 130 days so you can review the information at a later date. The Drive-
Right 130AL even maintains an accident log which gives you a look at the vehi-
cle’s speed information just prior to an accident.
The DriveRight 130AL also features many security features to ensure the integrity
of the data. A password code prevents unauthorized clearing of data or changing of
limits. A tamper indicator appears any time power is removed from the unit and
remains on the display until the correct password is re-entered. All data stored in
the log is protected in “non-volatile” memory which means that it cannot be lost
even if the power is removed and the wires cut!
NOTE:
This manual explains the operation of the DriveRight 130AL. For infor-
mation on installing and mounting the unit, consult the Installation Guide.
A Word About Safe Use
It goes without saying that you should never attempt to set or calibrate the
DriveRight 130AL while you are driving. Safe driving requires extreme atten-
tiveness. The manipulation of the DriveRight 130AL while driving may result in
dangerous distraction. Stop the vehicle first, then, if necessary, recruit someone
to help you.
If you allow others to use your vehicle, always warn them about the DriveRight
130AL’s alarms. If they exceed a set limit, causing an alarm to sound, they may be
startled by the noise or they may get distracted while trying to trace the source of
the noise. In either case, this may become a safety concern, so warn them in
advance.
About This Manual
This manual begins with a brief explanation of the various screens which display
the information collected by the DriveRight 130AL and a description of the
unit’s four-button interface. Following this overview of the unit, each of the
screens are explained in detail. The components of each screen are described and
every function associated with that screen detailed. Finally, this manual explains
the use of the password for data security, and the operation of the unit on bat-
tery power.
O
PTIONAL
A
CCESSORIES
The following accessories, designed for use with the DriveRight 130AL, are
available from your dealer or may be ordered directly from Davis.

Page 3
• Second Car Kit:
To use the DriveRight 130AL in more than one vehicle,
order a Second Car Kit for each extra vehicle or new vehicle. The Second Car
Kit provides all the hardware necessary to install a sensor on another vehicle so
you may simply move the DriveRight 130AL display unit between the vehi-
cles.
• DriveRight 130AL Software Kit:
Dramatically expand the power of the
DriveRight 130AL by downloading data to your computer through a standard
serial port. Store, graph, sort, query, and print data collected by the DriveRight
130AL for a look at long-term driving tendencies.
U
SING
THE
D
AVIS
D
RIVE
R
IGHT
130AL
The sections below offer a basic description of the DriveRight 130AL. Detailed
instructions appear in later sections.
NOTE:
Please do not enter a password until you familiarize yourself with the use of
DriveRight 130AL. The default password (0000) allows access to all screens
and disables the tamper feature. See “Code Entry Screen” on page 18 and
“Tamper Protection” on page 24 for password instructions.
The Data Screens
All of the information monitored and displayed by the DriveRight 130AL can be
obtained by viewing the group of five “data screens.” To cycle through the available
data screens, press
MODE
. Every time you press
MODE
, the DriveRight 130AL
switches to the next screen in the cycle, as shown below:
Current Readings Screen Speed / Distance Log Screen
Acceleration / Deceleration Log Screen
Driving Time Log Screen
Limits Screen
Data Screens

Page 4
The Settings Screens
The “settings screens” allow you to perform a variety of DriveRight 130AL func-
tions such as entering limits, time, date, and code, clearing data, and turning
alarms on and off. To access the group of nine settings screens from any of the
data screens (or vice versa), press and hold
MODE
down until the unit beeps
and the first settings screen appears. Once viewing the settings screens, press
MODE
to cycle through the available settings screens. Every time you press
MODE
, the DriveRight 130AL switches to the next screen in the cycle, as shown
below:
Last Correct Code Screen Code Entry Screen
Clear All Log Data Screen
Alarm On / Off ScreenYear Entry Screen
Data Entry Screen Limit Settings Entry Screen
Time Entry Screen Calibration Screen
Settings Screens

Page 5
The Buttons
The Davis DriveRight 130AL utilizes a four-button interface. In general, each but-
ton has one “primary” function, though each button also performs some extra
functions when necessary. A brief description of each button and a list of its func-
tions is included below to get you started and to act as a reference.
"+"
:
Scrolls forward through the available digits, days, or display units when data
entry is necessary.
NOTE:
Pressing and holding down
"+"
increases the rate at which the numbers or
dates scroll forward.
"-"
:
Scrolls backward through the available digits, days, or display units when
data entry is necessary.
NOTE:
Pressing and holding down
"-"
increases the rate at which the numbers or
dates scroll backward.
Screen
+
Button Function
Any Screen Where
Data Entry is
Possible
When a digit is flashing,
"+"
scrolls forward (that is, 1, 2, 3, 4,
etc.) through the available entries for that digit. When a
display segment is flashing (for example, “MPH” or “km/h”),
"+"
toggles between the available display units for that
function.
Any Log Screen
Scrolls forward (that is, Sunday, Monday, Tuesday, etc.)
through up to 130 days of data in the log. The log is cyclical,
which means that when you reach the first day in the log,
pressing
"+"
again takes you to the last day in the log.
Current Readings
Toggles the display lamp on and off.
Screen
-
Button Function
Any Screen Where
Data Entry is
Possible
When a digit is flashing,
"-"
scrolls backward (that is, 9, 8, 7,
6, etc.) through the available entries for that digit. When a
display segment is flashing (for example “MPH” or “km/h”),
"-"
toggles between the available display units for that
function.
Log Screens
Scrolls backward (that is, Saturday, Friday, Thursday, etc.)
through up to 130 days of data in the log. The log is cyclical,
which means that when you reach the last day in the log,
pressing
"-"
again takes you to the first day in the log.
Current Readings
Toggles the display lamp on and off.

Page 6
SET/CLEAR
:
When entering data, pressing and then releasing the
SET/CLEAR
button accepts the entry for the currently flashing digit or display segment
and moves you to the next available digit or display segment so you may
enter data there. In addition, from many screens, pressing
SET/CLEAR
and
holding it down will clear the data related to that screen.
MODE
:
Pressing and releasing
MODE
changes the screen which appears on
the display. Pressing
MODE
and holding it down for three seconds (until
the unit beeps) toggles between the group of data screens and the group of
settings screens.
Screen
SET/CLEAR
Button Function
Any Screen Where
Data Entry is
Possible
Press and Release:
When a digit or segment is flashing,
pressing and releasing
SET/CLEAR
accepts the current entry
for that digit/segment and moves you to the next available
digit/segment.
Log Screens
Press and Release
: Toggles the time/date display between the
date of the logged data and the time at which the maximum
for that date was recorded.
Press and Hold
: Clears all logged data. (Note that you must
enter the correct code to execute this function.)
Current Readings
Press and Release
: Toggles the time/date display between the
time and the date.
Press and Hold
: Resets the distance register to zero.
Screen
MODE
Button Function
Any Data Screen
Press and Release:
Cycles to the next data screen.
Press and Hold
: Switches to the settings screens.
Any Settings
Screen
Press and Release
: Cycles to the next settings screen.
Press and Hold
: Switches to the data screens.
When Unit is in
“Sleep Mode”
Press and Release
: Returns the unit to normal operation. See
“Battery Operation” on page 25 for a description of sleep
mode.

Page 7
Entering Settings
You should familiarize yourself with the procedure for entering settings into the
DriveRight 130AL, since you will need to utilize this procedure often when using
the unit.
NOTE:
The instructions below demonstrate the settings entry procedure by showing
you how to set the time. The instructions assume that you have not yet entered a
code (see “Code Entry Screen” on page 18).
1. If necessary, press and hold
MODE
down to access the settings screens.
2. If necessary, press and release
MODE
until the set time screen appears.
You will be able to tell if a particular screen accepts data entry because one of the
digits or a display segment (for example, MPH or km/h) will be flashing. In this
case, the AM, PM, or 24HR segment will be flashing.
3. Press
"+"
or
"-"
to toggle between the PM, AM, and 24HR segments.
Each time you press
"+"
or
"-"
, the display segment changes. Changing the dis-
play segment changes the format in which the time appears (12 hour or 24
hour) and selects between AM and PM.
4. When the desired segment appears, press
SET/CLEAR
.
The display segment stops flashing and the first digit begins flashing.
5. Press
"+"
or
"-"
to increment the first digit.
Each time you press
"+"
or
"-"
, the digit increments one number up or down.
You may also hold
"+"
or
"-"
down to scroll quickly through available digits.
(Note that, for the first digit in the time, only 0, 1, and 2 are valid entries.)
NOTE:
Make sure the time you enter is in the correct format (12 hour or 24 hour).
6. When the desired number appears, press
SET/CLEAR
.
The next digit begins flashing.
7. Repeat this procedure until all digits have been correctly set.
It makes no difference which digit you enter first. If you enter a digit incorrectly,
accidentally skip past a digit, or only want to change certain digits, simply press
and release
SET/CLEAR
until the desired digit begins to flash.
8. When finished entering the time, press
MODE
.
This sets the time and moves you to the set date screen.
AM
SETTINGS
Flashing Segment

Page 8
C
ALIBRATING
THE
D
RIVE
R
IGHT
130AL
You must calibrate the unit before it will report the correct speed and acceleration.
Calibration adjusts the unit to work properly with your vehicle’s differential and tire
size.
NOTE:
You should calibrate the unit whenever you change tires.
Calibrating the unit may be accomplished in one of two ways: using either the
odometer or the speedometer as the basis for calibration. When calibrating the
DriveRight,
always
begin by obtaining a rough calibration of the unit using the
speedometer. Even if you plan to calibrate the unit using the odometer,
first
cali-
brate using the speedometer. Otherwise, the uncalibrated distance reading may
differ from your odometer reading so much that it will take too long to make the
numbers match.
Calibration Using the Speedometer
In order to calibrate using the speedometer, you must drive steadily at 25 MPH
(40 km/h) and press a button on the DriveRight 130AL. The DriveRight
130AL bases its calibration on the speed of the vehicle at the moment of calibra-
tion which it assumes to be 25 MPH (40 km/h).
NOTE:
Because of the nature of this calibration procedure, we strongly recommend
that it be performed by two people: one to drive the vehicle and one to oper-
ate the DriveRight 130AL.
1. If necessary, press and hold
MODE
down to access the settings
screens.
2. If necessary, press and release
MODE
until the Calibration screen
appears.
The calibration speed (25 or 40) appears at the bottom right of the display.
The uncalibrated speed reading appears at the top of the display, along with
the unit of measure (MPH or km/h). Note that until you calibrate the Drive-
Right 130AL this speed reading will be inaccurate. The distance, which
appears in the lower left of the display, is not necessary for this calibration
procedure.
CAL
MPH
DISTANCE
MILES
Calibration Speed
Uncalibrated Speed Reading
SETTINGS

Page 9
3. Drive the vehicle until you reach 25 MPH (40 km/h) and keep the vehi-
cle steady at that speed.
4. Once the vehicle is moving at the calibration speed, press and hold
SET/CLEAR
down.
The word CAL appears in the top right of the display when you press
SET/
CLEAR
.
5. Continue to hold
SET/CLEAR
down until the unit beeps and the word
dONE appears on the display.
This indicates that the unit has finished calibrating. The speed reading at the
top of the display will also change so that it reads much closer to your speedom-
eter’s reading.
6. Once the calibration is complete, drive the vehicle and compare the
vehicle’s speedometer to the DriveRight 130AL’s speed display.
Be aware that the DriveRight 130AL responds to changes in speed faster than
most vehicles’ speedometers. To accurately compare, you must drive steadily at a
speed for a short time.
7. If necessary, “fine tune” the calibration by pressing
"+"
or "-".
Each time you press "+" or "-", the DriveRight 130AL speed reading adjusts up
or down. Depending on the speed of the vehicle and the calibration, you may or
may not see a change in the speed reading in the calibration screen each time
you press the button.
NOTE:Pressing and holding "+" or "-" down increases the rate at which the
DriveRight 130AL adjusts the speed reading.
SPEED CAL
MPH
MILES
SETTINGS
DISTANCE
Calibration Mode
SPEED CAL
MPH
MILES
SETTINGS
DISTANCE
Calibration Completed

Page 10
8. Continue to Press "+" or "-" until the DriveRight agrees with your
vehicle’s speedometer at a variety of speeds.
9. When finished calibrating, press and hold MODE down until you
return to the data screen.
DO NOT PRESS AND HOLD SET/CLEAR in an effort to save the fine-
tuned calibration! If you press and hold SET/CLEAR, the unit completely
resets the calibration number. When you finish fine-tuning, press MODE to
exit the calibration screen. All information will be automatically saved.
Calibration Using The Odometer
In order to calibrate using the odometer, you must measure the distance you drive
on your vehicle’s odometer and compare that to the distance recorded by the
DriveRight 130AL. Then adjust the DriveRight 130AL until it reads the same dis-
tance as the vehicle. Depending on how far you drive in order to calibrate the unit,
this can result in an extremely accurate calibration.
We recommend that you drive a minimum of 20 miles when calibrating the unit.
NOTE:Your vehicle’s speedometer and odometer may not be perfectly linked. If they
differ and you calibrate your DriveRight 130AL using the vehicle’s odome-
ter, you may notice a discrepancy between the DriveRight 130AL’s speed
readings and the vehicle’s speedometer.
1. Obtain a rough calibration, using the speedometer as described in
“Calibration Using the Speedometer” on page 8.
2. After obtaining a rough calibration, reset your vehicle’s trip meter to
zero or make a note of the odometer reading.
3. Make a note of the distance travelled reading displayed in the Cur-
rent Readings screen.
4. Drive your vehicle for at least 20 miles (32 km).
The further you drive, the more accurate your calibration.
5. When you finish driving, determine how many miles/kilometers the
DriveRight recorded by subtracting the distance travelled reading
you noted prior to driving the vehicle (step 3)to the miles/kilome-
ters displayed when you finished.
6. Compare your vehicle’s trip meter reading to the distance travelled
reading on the DriveRight 130AL.
At this point, what you will need to do is increase or decrease the distance
measured by the DriveRight 130AL until it agrees with your vehicle’s odome-
ter reading. This is accomplished from the calibration screen.

Page 11
7. If necessary, press and hold MODE down to access the settings screens.
8. If necessary, press and release MODE until the calibration screen
appears.
The distance travelled appears at the lower left of the display. Note that until
you calibrate the DriveRight 130AL this distance reading will be inaccurate.
The vehicle speed and calibration speed, which appear on the display as well, are
not necessary for this calibration procedure
9. Press "+" or "-" until the number of Miles or Km shown matches the
number of Miles or Km recorded by your vehicle.
Note that, depending on how many miles you drove, you may need to press "+"
or "-" more than once before you see a change in the distance register.
NOTE:Pressing and holding "+" or "-" down increases the rate at which the
DriveRight 130AL adjusts the distance reading.
10.When finished calibrating, press and hold MODE down until you
return to the current readings screen.
DO NOT PRESS AND HOLD SET/CLEAR in an effort to save the fine-
tuned calibration! If you press and hold SET/CLEAR, the unit completely
resets the calibration number. When you finish fine-tuning, press MODE to exit
the calibration screen. All information will be automatically saved.
USING THE DATA SCREENS
The sections below describe the components of each of the five data screens as well
as describing what DriveRight 130AL functions you may perform from each
screen. To switch to the next data screen, press MODE. To switch to the group of
settings screens, press and hold MODE down.
Current Readings Screen
The current readings screen displays the current speed and acceleration or decelera-
tion, distance travelled, and the time or date.
SPEED CAL
MPH
DISTANCE
MILES
SETTINGS
Uncalibrated Distance Reading
PM
SPEED MPH
ACCEL
G
DISTANCE
MILES
CURRENT
Time/Date
Current Speed
Current
Acceleration
Total Distance
Travelled During Day

Page 12
• Current Speed: The current speed of the vehicle in MPH or km/h.
NOTE:If comparing the DriveRight 130AL’s speed reading to your vehicle’s
speedometer, be aware that the DriveRight 130AL responds to changes
in speed faster than most vehicles’ speedometers. To accurately compare,
you must drive steadily at a speed for a short time.
• Time/Date: The time or date (only one appears on the display at a time).
• Distance Travelled: The total distance travelled during the current day
(from 12:00 am to 11:59 pm) in Miles or Km. This register may be cleared
at any time during the day to track trip mileage. However, it also clears auto-
matically at midnight every day.
• Current Acceleration/Deceleration: The current Acceleration/
Deceleration in G’s. (G is the unit of measure for acceleration/deceleration
and is equal to the gravitational constant which is the acceleration of an
object when falling to earth in a vacuum.) Deceleration is represented by a
negative number.
NOTE:1G is approximately equal to an acceleration of 22 MPH per second
(35 km/h per second)
You may perform the following functions from the current readings screen:
• Toggle between time and date: To toggle the time/date display
between the time and date, press SET/CLEAR. Each time you press SET/
CLEAR, the unit switches from displaying the time to displaying the date,
or vice versa.
• Clear distance register: To reset the distance register to zero, press and
hold down SET/CLEAR. After a few seconds, the unit will reset the dis-
tance to zero (“0000”).
NOTE:This does not clear the distance in the log.
• Turn display lamp on and off: To turn the unit’s display lamp on,
press "+". To turn the unit’s display lamp off, press "+" again, or press "-".
NOTE:The display lamp does not work when the unit is operating on battery
power (see “Battery Operation” on page 25).

Page 13
Speed/Distance Log Screen
At the start of each new day, the DriveRight 130AL saves the previous day’s data to
the log. Up to 130 days worth of information may exist in the log at any one time.
For each day in the log, the speed/distance log screen displays the maximum speed,
total distance, and the amount of time spent driving faster than the set speed limit.
• Maximum Speed: The maximum speed recorded during the day in MPH
or km/h.
NOTE:Excessive mechanical vibrations at low speeds can cause erroneous read-
ings. Have your installation checked if you have this problem.
• Date of Logged Data/Time of Maximum Speed: The register in the
upper right of the display can show either the date on which the data appearing
in the display was recorded or the time at which the maximum speed was
recorded.
• Total Distance Travelled: The total distance travelled during the day in
Miles or Km.
• Amount of Time Over Set Speed Limit: The total amount of time in
which the speed of the vehicle exceeded the set speed limit. This register will
allow you to tell if the vehicle was driven consistently above your set limit for
speed or if the vehicle briefly “popped” over the set speed limit. The time in
this register appears in either seconds, minutes, or hours.
You may perform the following functions from the speed/distance log screen:
• Scroll through the days in the log: Up to 130 days worth of informa-
tion may exist in the log at any time. To move forward through the days, press
"+". To move backward, press "-". Each time you press "+" or "-", the unit dis-
plays the next/previous day in the log. The Date display in the upper right
shows the date on which the data was recorded.
DAY .MO
SPEED
MAXIMUM
km/h
OVER
TIME
SPEED
Min.
DISTANCE
Km
LOG
Date of
Logged Data
Maximum Speed
on Date Shown
Amount of Time Over
Speed Limit Setting
Total Distance
Travelled During Day

Page 14
• Show the time at which the maximum speed was recorded:
To display the time at which the maximum speed was recorded, press SET/
CLEAR. The time appears in place of the date. To return to the date, press
SET/CLEAR again.
• Erase an individual day from the log: You may erase a day from the
log following the procedure below.
NOTE:This procedure erases all data for the day, not just the data displayed on
the speed distance log screen.
1. From the speed/distance log screen, press "+" or "-" until the
desired day appears.
2. Press and hold down SET/CLEAR until the unit beeps and the
code entry screen appears.
You must enter the correct code in order to clear a day in the log. See
“Code Entry Screen” on page 18 for details on using and entering codes.
3. Use "+" and "-" to enter the correct code.
4. After the code is entered correctly, press MODE.
Once you press MODE (assuming the code is correct), the DriveRight
130AL clears the data for the displayed day and returns you to the speed/
distance log screen.
NOTE:You may erase every day in the log at once from the clear all log data screen
(see “Clear All Log Data Screen” on page 19).
SPEED
MAXIMUM
km/h
OVER
TIME
SPEED
Min.
DISTANCE
Km
LOG
Time Maximum
Speed Recorded
PM
CODE
SETTINGS
Code Setting

Page 15
Acceleration/Deceleration Log Screen
At the start of each new day, the DriveRight 130AL saves the previous day’s data to
the log. Up to 130 days worth of information may exist in the log at any one time.
For each day in the log, the acceleration/deceleration log screen displays the maxi-
mum acceleration and the number of times the set acceleration and deceleration
limits were exceeded.
NOTE:Excessive mechanical vibrations at low speeds can cause erroneous read-
ings. Have your installation checked if you have this problem.
• Number of Times Set Acceleration/Deceleration Limit
Exceeded: These registers show the number of times the acceleration or
deceleration of the vehicle exceeded the acceleration or deceleration limits you
set. Each time the acceleration or deceleration crosses the limit threshold
another count is recorded. However, until the vehicle’s acceleration drops
below the set limit no new counts will be recorded.
For example, if the set acceleration limit is 0.35 G, and the vehicle accelerates
at 0.36 G, the DriveRight 130AL would record a single count. If the vehicle
continues to accelerate at 0.36 G (or more), no new counts will be recorded. If
the vehicle’s acceleration drops to 0.35 G (or less) and then returns to 0.36 G
(or more) the DriveRight 130AL will record another count.
You may perform the following functions from the acceleration/deceleration log
screen:
• Scroll through the days in the log: Up to 130 days worth of informa-
tion may exist in the log at any time. To move forward through the days, press
"+". To move backward, press "-". Each time you press "+" or "-", the unit dis-
plays the next/previous day in the log. The Date display in the upper right
shows the date on which the data was recorded.
• Erase an individual day from the log: You may erase a day from the log
following the procedure described in “Erase an individual day from the log” on
page 14.
ACCEL COUNT
DECEL COUNT
LOG
MO DAY
Date of
Logged Data
# of Times Acceleration
Limit Setting Exceeded
# of Times Deceleration
Limit Setting Exceeded

Page 16
Driving Time Log Screen
At the start of each new day, the DriveRight 130AL saves the previous day’s data
to the log. Up to 130 days worth of information may exist in the log at any one
time. For each day in the log, the driving time log screen displays the first and
last time the car moved and the total time the vehicle was in motion.
• First Time Vehicle Moved: The time at which the vehicle first moved
during the day.
NOTE:If the vehicle is being driven at midnight, this register will show
12:00 AM.
• Last Time Vehicle Moved: The time at which the vehicle last moved
during the day in 12 or 24 hour format.
NOTE:If the vehicle is being driven at midnight, this register will show
11:59 PM.
• Date: The date on which the data appearing in the display was recorded
You may perform the following functions from the driving time log screen:
• Scroll through the days in the log: Up to 130 days worth of infor-
mation may exist in the log at any time. To move forward through the days,
press "+". To move backward, press "-". Each time you press "+" or "-", the
unit displays the next/previous day in the log. The Date display in the upper
right shows the date on which the data was recorded.
• Erase an individual day from the log: You may erase a day from the
log following the procedure described in “Erase an individual day from the
log” on page 14.
START
ND
AM
PM
LOG
MO DAY
Date of
Logged Data
!st Time Vehicle
Moved on Date
Shown
Last Time Vehicle
Moved on Date
Shown

Page 17
Limits Screen
The DriveRight 130AL allows you to enter your own personal limits for speed,
acceleration, and deceleration. You may view the set limits for speed, acceleration,
and deceleration on the limits screen.
NOTE:For information on entering limits, see “Limit Entry Screen” on page 21.
SETTINGS SCREENS
The sections below describe the components of each of the nine settings screens as
well as describing what DriveRight 130AL functions you may perform from that
screen. To access the group of settings screens, press and hold down MODE. To
switch to the next settings screen, press and release MODE. To return to the group
of data screens, press and hold MODE down.
NOTE:Many of the settings screens require or allow you to enter settings (for example,
code, time, date, limits, etc.). For instructions on entering settings, see “Enter-
ing Settings” on page 7.
Last Correct Code Screen
The DriveRight 130AL records the date and time that a correct code was last
entered. This screen allows you to detect if someone learns the code and uses it to
access the settings screens or simply to determine the last time you entered the cor-
rect code.
SPEED MPH
ACCEL
G
G
DECEL
SETTINGS
Speed Limit
Deceleration
Limit
Acceleration
Limit
PM MO DAY
Time of Last Correct
Code Entry
Date of Last Correct
Code Entry

Page 18
Code Entry Screen
The DriveRight 130AL uses a four-digit code to protect logged data and limit
settings from unauthorized tampering. Until the correct code is entered from
this screen, you may not advance to or use any further settings screens. If some-
one enters an incorrect code, the tamper indicator appears. For more informa-
tion on tamper detection, see “Miscellaneous Information” on page 24.
NOTE:If you do not wish to use a code in operating the DriveRight 130AL, simply
set the code to "0000"(the default code). When the code entry screen appears,
simply press MODE to enter "0000"as the correct code. Using “0000” as the
code also disables the tamper feature.
To move past the code entry screen, enter your code as described below.
1. From the code entry screen, use "+" and "-" to enter the correct
code.
2. When the correct code is entered, press MODE.
If the entered code is correct, the clear all log data screen appears. If the
entered code is not correct, the word NO appears on the display. You may
attempt to enter the correct code five times before the unit returns you to the
current readings screen and activates the tamper indicator.
CODE
SETTINGS
Code Setting
NO
CODE
TAMPER
SETTINGS
Invalid Code Indicator
Tamper Indicator
Table of contents
Other DAVIS Automobile Accessories manuals
Popular Automobile Accessories manuals by other brands

Total Security Systems
Total Security Systems CSH 1 24V installation manual

Brink
Brink 701523 installation instructions

Dynojet
Dynojet POWER VISION PV3-2504C installation guide

Malide
Malide MLD-B03 user manual

Metra Electronics
Metra Electronics 95-7326 installation instructions

AMP Research
AMP Research POWERSTEP 76141-01A installation guide

Axxess
Axxess AXDIS-GMLN31 installation instructions

Car-Interface
Car-Interface CI-CARPLAY-NTG5 instruction manual

FALCON EYE
FALCON EYE FWL0041 user manual

Car Solutions
Car Solutions LVTX-STD-V1.0 Specifications & installation

iSimple
iSimple IS7705 Installation & operation manual

Whispbar
Whispbar K663W Fitting instructions