Dawlance DWT 1775 PL User manual

Fully Automatic Washing Machine
MODEL: DWT 1775 PL
User Manual

Contents
Before using
Parts name................................................................................................. 1
Cautions..................................................................................................... 2
Installation and adjustment........................................................................ 4
How to use drainpipe................................................................................. 5
Water inlet installation................................................................................ 6
Operation
Preparation before operation..................................................................... 8
Load laundry.......................................................................................... 9
Use of detergent........................................................................................ 9
Control panel instructions.........................................................................10
Operation steps........................................................................................ 12
Maintenance............................................................................................ 13
Troubleshooting....................................................................................... 14
Other functions.........................................................................................16
Specications........................................................................................... 17

01 02
Parts nameBefore using
Drainpipe
Symb ol denition
Warning symbols
Pa y sp ecia l a tten ti on to the war nin g symbols . Th er e may be
se rous risks to per sonal body safety or damages to the washing
machine if not follow.
Plea se stop doing the contents with this symbol, otherwise
it will damage the appliance or injure your personal body.
Forbidden symbols
The end connecting to
the appliance
Connector for
water inlet hose
and tap
The end connecting to
water inlet hose connector
Bottom cover
(1pc)
Water inlet hose (1pc)
water inlet hose connector(1pc)
Accessories
Top lid
Top frame
Detergent box
Control panel
Inner tub
Pulsator
Body
Base
Feed valve
Power cord
Fixing foot(3pcs)
Back cover
Adjustable foot
Lint lter
Foot wheel
balancing
apparatus
CautionsBefore using
Don t install the washing machine in bathroom or damp
places,. Do not wash the machine with water, do not put
wet clothes on the control panel lm.
Do not use water hotter than 50 C.
If the machine is situated on a carpeted oor, please adjust
the feet in order to allow air to circulate freely.
Do not wash raincoat, bike cover, feather dress and such
waterproof laundries, which will make the washing machine
abnormal vibrations during spinning.
Do not share the same socket with other electric appliances.
Do not use the damaged plug or loose socket.
Before using
Please insert the plug into the power socket with rated voltage
220V A/C.
Always unplug the appliance and turn off the water when
the power is cut, moving or cleaning the washing machine,
or it is not in use. Do not insert or pull off the plug with wethand.
Do not make the electric cable bended, stretched, twisted, strapped or changed, pressed or nipped. Ifthe electric cable or plug is
damaged or the socket becomes loose, they must be repaired or changed by our appointedrepair stations or the professionals of
our post-sale service department to avoid danger. The pin of the plug must remain clean. Please clean it carefully with drycloth if
it is dirty.
Ventilation holes
at the bottom
Soft item

03 04
Any objects such as coins, safety pins, nails,screws, stones or any other hard, sharp material
can cause extensive damage and must not be placed into to the machine.
Before washing, please ensure the tap is open and the inlet hose is installed properly.
It is suggested to use low foam washing powder.
Do not put hands into the working machine.
It is dangerous even if the speed is very slow.
Take special care of the children, and forbid
them to climb on the washing machine.
It is dangerous to alter the specications or
attempt to modify this product in any way.
Do not overload the appliance or put any hot
goods(such as the kettle with hot water)on the
washing machine.
Garments which have been in contact with
volatile petroleum products should not be
machine washed.
Keep the appliance away from direct
sunlight and heat sources like the heater.
Benzene
Petroleum
Thinner
Cautions Before using
This appliance is not intended for use by persons(including children)
with reduced physical,sensory or mental capabilities,or lack of
experience and knowledge,unless they have been given supervision
or instruction concerning use of the appliance by a person
responsible for their safety.
Children should be supervised to ensure that they do not play with
the appliance.
Installation and adjustmentBefore using
LoosenFasten
Adjustable
nut
Adjustable
foot
HighLow
Please install and adjust the machine according to the requirements of the manual.
It is very important to your safety and correctoperation.
Unpacking
Unpack the carton and take out the bottom panel.
Open the top lid of washing machine and take out all of the accessories.
Remove all wrappers, including the polystyrene base.
You are advised to keep all the packaging for reuse in case the machine is to be
transported again.
Positioning
The distance between the washing machine and the wall should bemore than 50mm, and the
maximum allowed angle of the shank base of the machine is1 .The slanting or rough ground may
cause operating stopped or unstable, please adjust it with the followingmethods:
Horizontal checking
observe the water bubble in balancing apparatus
is in red circle or not. In red circle, it is horizontal
Adjustthe adjustable foot
1Lift up the adjustable foot gently, loose the adjustable nut
and twist the adjustable foot.
2Fasten the nut after adjustment.
3set the machine at, and observe again. If the water bubble
is not in red circle, repeat the above procedure , till the water
bubble isin red circle
1
Installing the bottom cover
Let the back of washing machine incline forward make
the side of bottom cover with sticker description back to
washing machine insert to the bottom of washing machine
along the direction of arrow.
Remove two xing clamp by scissors insert to the
accordingly holes red lines indicating gently pull
xing clamp should not be pulled out make the
bottom cover xed on the base.
Fixing clamp
Scissors
Bottom cover
The base

05 06
How to use drainpipeBefore using
1.the drainpipe must be hanged during use, the
height is not more than 1.2m to avoid leakage or stop,
if drain a long time, the machine will stop running.
2. You can adjust the situation of the elbow bend
pipe tochange the height of the drainpipe.
3. Do not extrude the drainpipe to ensue drain smoothly.
Drainpipe
Elbow
Less than 1.2m
Water inlet installationBefore using
Tap selection
Suitable tapNot suitable tap
1. Swing the inlet hose gently to conrm if it is
fastened.
2. After installation,open the tap and check if
it leaks.
3. Do not bend the inlet hose with overstrain.
4. Before each usage,check the connection
between inlet hose connector and thetap.
Make sure they are rmly tted to prevent
dropping from improper installation position.
Inlet valve connector
Inlet hose nut
Water absorption cushion
Connect the inlet hose with the washing machine
Check the connection between inlet
hose connector and the tap
1. Do not take off the water absorption cushion. Please
check if the cushion is dropped or damaged before
each usage. If it is, contact the seller immediately.
2. Put the inlet hose nut on the inlet valve connector.
3. Fasten the inlet hose nut and swing it gently tomake
sure if it is suitable.
The front end should be longer than 10mm. The tap exit end
face should be at and smooth, if not le it to avoid leakage
Cautions: When install the washing machine, please use the new hose assy along with the washing
machine, old hoseassy can not reuse.

07 08
Preparation before washing
1. Connect the inlet hose and open the tap.
2. This appliance must be earthed. Conrm
the socket is earthed reliably andinsert the
power plug. The earth terminal should not
link to gas pipeline, tap pipeline etc.
3. Hang up the drainpipe.
Before washing the laundries, please pay attention to thefollowings:
Read laundry care
label and check if
there is special
requirements for the
laundries
Before washing, empty
all pockets of small
objects which may
have been left inside
(coins,keys,screws etc.)
As these could damage
the drain pump.
Knot the long band,
fasten the buttons
and close the zippers.
Do not overload the
machine. Load the
laundry loosely
alternating large
items with small ones.
Sort the laundry
according to the type
of fabric, color-fastness
and how dirty it is. Put
thin laundries, woolens
and such prone to wear
and tear laundries into
washing bag.
A. Make sure the laundries are washable.
B. It is essential to wash new colored items separately when washing forthe rst time. White items
should not be washed with colored items..
C. Please immerge the non-absorbable laundries by hand.
D. Some stains such as fruit, wine, grass, rust etc. are difcult to remove and shouldbe treated
before washing with specic products, which canbe found in most household shops. In some
cases, it may help to soak the stain before washing with a special pre-soak product or biological
detergent.
E. Overturn the nap fabric and long oss laundries before putting them into themachine.
F. Do not put the laundries polluted by chemicals into themachine directly.
G. Very small item(handkerchiefs, ribbons, socks etc) should be washed in a washing bag or a pillow case.
Warningthe temperature of the water should be less than50
Preparation befor e oper ati on
OperationOperation
The capacity of washing and spinning of the machine refer
to the largest weight of the standard laundries under dry
condition .Washingquantity shall be lower than the rated
capacity. The maximum capacity ofthis machine is 15.0kg.
Different thickness, size and type of the laundries will
inuence the actual washing capacity. It is suitable that
the laundries can be turned round normally during washing.
Do not select high water level when laundries are less than
1.5kg to avoid water splashing.
Load laundries

09 10
Operation
It is suggested to use low foam washing powder
For the quantity of the concentrated washing powder, please refer to its manual
Remarks avoid splashing of water and waste of washing powder, water level should not be too
high if laundries are too small.
Withdraw the dispenser box before adding detergent
Pour concentrated synthetic washing powder into
the box directly as shown in the left illustration.
The dosage of the washing powder, please refer to
below.
It is suggested to use low sud washing powder.
How to use the washing powder
Detergent box
How to use bleach
Fill water to the selected level,
dilute the bleachin the container,
and pour itslowly into thewashing
tub.
Do not use bleach for coloredor
gured laundries as they are prone
to lose colors.
Do not putbleach to laundries
directly.
Refer to the manual for the usage
and quantity ofthe bleach.
Please dissolve powderbleach
before use.
Use of detergent
Dissolve in the machine directlynot suitable for
preset program
1. Low water level.
2. Add the washing powder, and run for 30 seconds
to dissolve it completely.
3. Put laundries in, select suitable water level.
The instant dissolving of the washing powder
1. Prepare warm water of 30 in a container.
2. Pour the powder while stirring to fully dissolve it.
The washing powder is more prone to pollute the
laundries than the detergent, therefore, please use
it with proper quantity.
Washing powder with poor quality or not used for a
long period may get blocked, please clean the
detergent box in time.
Use of deter gen t
Control panel instruction
Press this button to select one cycle from wash-rinse-spin
spin soak-wash-rinse -spin wash
wash-risne rinse-spin
At the beginning of start, the process setting is wash-rinse-spin .
Mode and meaning of the indicator light
on: indicate the selected mode
ashing: indicate the program is running
At the beginning of start, pressing WATER LE VEL , at the same time press PRES ET,
you can select WATER R ECYCLE, LOW NOISE , LOW NOISE-WATER RE CYCLE.
Only both RINSE and SPIN are selected, WATER R ECYCLE can be selected. Once
LOW NOISE i s selected, program default setting is NORMAL and PROGRAM
buttonis locked.
During working, press WATER LEVEL and PRESET to set CHILD LOCK, press
again to unlock this function.
Additional functions
At the beginning of start state
Put through the power, press POWER b utton, the machine is in the state of beginning of start:
1. If no water in the inner tub, the washing machine is in state of FUZZY, the process is wash,
rinse, spin . The program is NORMAL,digital timer shows -- , at this time, if press
START/PAUSEbutton(or press programto select HEAVY),the washing machine can
automatically set the water level according to the laundries quantity.
2. If there is water in the inner tub, and the machine is in state of non FUZZY, the water level setting
is 7 . Process is wash,rinse, spinprogram is NORMAL .

11 12
Operation
After select program, process and water level, press
this button to start.
Press this button to pause during working, press again
will rework .
Can select one program from NORMAL,HEAVY,SOFT,STANDARD,
FAST, WOOL,CHILD,FOAM CLEAN,TUB CLEAN and AIR DRY
At the beginning of start, the process is NORMAL.
To control the washing machine is in
working state or waiting state.
When washing, the digital timer shows
When trouble encountered, the digitaltime
shows trouble code.
Before washing, the digital timer
shows prest time, unit is HOUR.
If select AIR DRY, the digital timer
displays air dry time, unit is MIN.
the rest time of washing, unit isMIN.
At the beginning of start, press this button to select preset time from 2-24 hours.
If want to cancel preset time,press POWER to make the washing machine in
waiting state.
At the beginning of start, if with FUZZY logic and do not select water level, the digital timer
shows - - at this time, before press START/PAUSE, If select NORMAL or HEAVY,
with fuzzy logic. When select STANDARD, no fuzzy logic, the water level is 7 When
select FAST, no fuzzy logic, water level is 2 . If no WASH process, no fuzzy logic.
During wash (including rinse), if need to add water, press WATER LEVEL button to add
water, un-press will stop adding. Or PAUSE the washing machine and press WATER
LEVEL to select higher water level, then press START/PAUSE button, The washing
machine
Will add the water to setting level automatically and continue working. If your
resetting water level is lower than present water level, the lower water
Level will valid in
next water inlet.
At the beginning of start, press WATER LEVEL to select water level, at this time, no fuzzy
logic function, you can select appropriate water level. According to your laundries quantity.
1-2 is low water level, 3-6 is middle water level,7-10 is high water level.
If need to select air dry, please press "PROGRAM"button to select airy dry,then
press this button to set airdry time.
Automatically add water: during SOAK, WASH and RINSE process, if the washing
machine check the water level is lower than setting water level, The washing machine
will pause and add water to setting water level automatically.
At the beginning of start, if with FUZZY logic,
The digital timer shows -- .
Operation stepsOperation
1. Press power switch, put through power, the machine is in state of beginning:
4. Select appropriate water level according to your laundries quantity.
5. At the beginning of start, if need to select preset, please pres s PR ES ET button and select
appropriate preset time, the preset time is shown in the digital timer, and the time
indicates the time to nish the whole washing. If want to cancel PR ES ET, please press
POWE R to make the washing machine in waiting state.
6. At the beginning of start, if need to select air-dry, press PR OGRAM button and select AIR
DRY program,press PRES ET can select the time of AIR DRY. When the air dry function is
over, the washing machine will be in waiting state.
7. Close the top lid, press START/PAUSE , the washing machine is working. During working,
press WATE R LEVE L and PR ES ET button, child lock function will start, press again,
unlock this function. If open the top lid, washing machine stop working and give an alarm.
8. When the washing is nished, buzzer alarm, power supply cut off automatically.
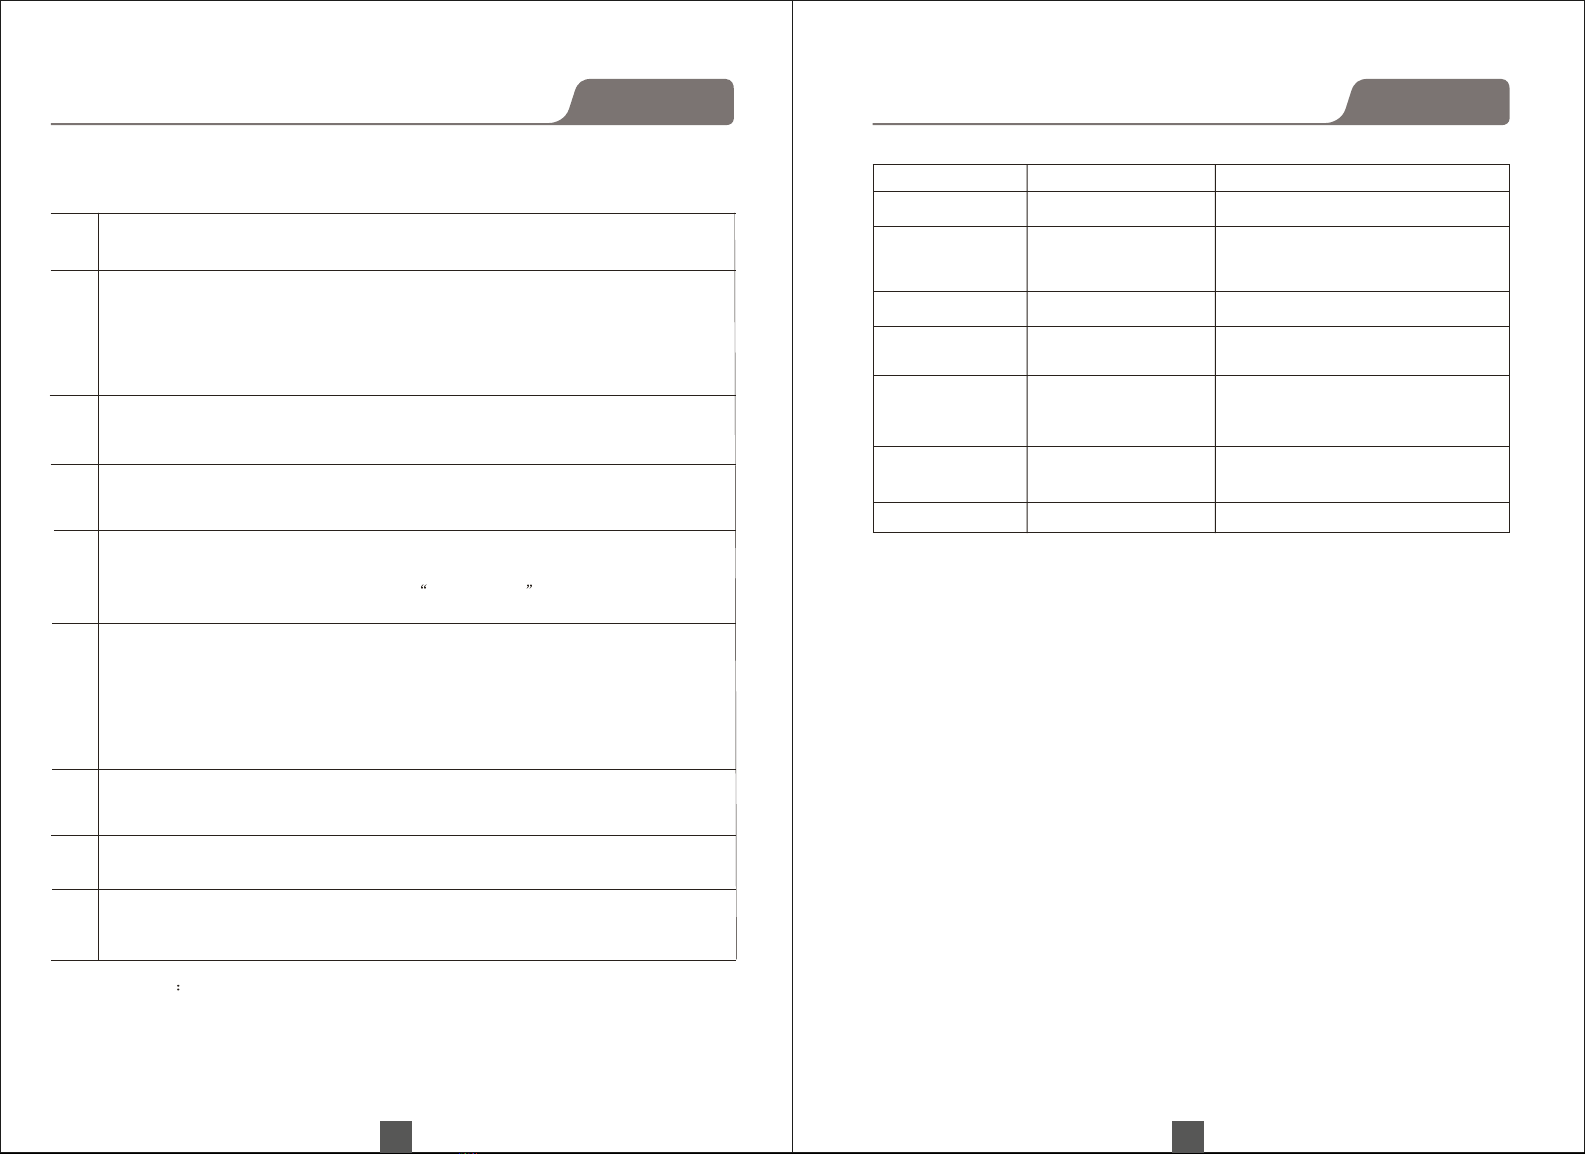
0
1
2
3
4
5
Times of pressing
theprocessbutton
Selected procedure
program
Applicable
procedure
Contents(the lighted indicator
indicate the programsabout
to run)
Wash, rinse, spin
Soak, wash,
rinse ,spin
Wash
when use detergent
repeatedly Wash light is on
Wash, rinse
Rinse ,spin
Spin
Standard program
For dirty laundries
No need tospin for
laundries creased easily
Wash by hand and
need to rinse and rinse
Wash by hand and
only need tospin
Wash rinse and spin
lights are on
Soak, wash, rinse and
spin lights are on
Wash and rinse lights
are on
Rinse and spin lights
are on
Spin light ison
Remarks: press PROCESS button continually, the above mode willbe
cycled in turn.
2. Press programbutton toselect proper program.
3. Press processbutton tobegin process selection.
Operation steps
1). if there is no water in inner tub,washing machine is in state of "FUZZY",thestate details
as per each model'sbutton explanation.Now press "START/PAUSE" button (press
"PROGRAM" and select "STRONG",the washing machine is in state of "FUZZY"), the
washing machine will start fuzzy sensor and to sensor the weight of laundries and set
water level automatically.
2). If there is water in inner tub, washing machine is not in state of "FUZZY",thestate details
as per each model'sbutton explanation..Now press "PROGRAM" and "PROCESS" to
select proper program and process.

13 14
MaintenanceOperation
1.Once you have using the machine, you are advised to turn offthe water taps.(if necessary, pull out
the inlet hose)
2. Do notkeep water i n tub for along time. When washing is nished , drain itright away.
3.Once you have nished using the machine, you are advised to unplugit.
4. Put the electric cable andthe drain hose in order.
5. Wipe the water on thesurface and in tub with softcloth and keepthe top lidopening for awhile. It
helps to preventmould and stagnantsmells forming insidethe appliance.
The machine stops automatically ,and music
buzzer will remind you to takeout the laundries
or start again.
Once you have nished using the machine,
you are advised to unplug itand turn offthe
water taps toavoid unexpected leakor re.
After the end of the programmeClean the exterior cabinet of theappliance with
soft cloth. Donot use cleanser, volatile chemical
materials to clean the machine, whichwill
damage plastic partsand the surface.
External cleaning
Clean inlet gate
It is possiblethat the inletlter net can be blocked
by the dust,please clean it according to thefollow
steps:
1. Close the tap and turnon the powerswitch.
2. Start thewashing machine for 5 seconds(make
the water i n the inlet hose ows to thetub),and
cut off thepowersupply.
3. Pull off the inlet hose, remove and clean the inlet
valve and the inlet net, and install again.
Maintenance metho ds
If the water in the inner tub has possibility to freeze,please do like below:
1. In winter, if remaining water freeze can cause the washing machine trouble,
please take off the water inlet hose and drain out the water in the hose and inner
tub.
2. If the water freeze , please don't operate the washing machine. Put 40 hot water
in the tub, the hot water should submerge the pulsator, after a few minutes, rotate
the pulsator by hand gently, then you can operate the washing machine.
Magic lter cleaning
1. pull out magic lter
2. open the box and clean it
3. close it and reinstall it
4. check if the lint block part is in good condition
press this part and pull out to take
out the magic lter
lint block part (black rubber)
Troubleshooting
It does not drain
It does not inlet
Spin stops and begins to inlet
during spin program
Press the program button to
select SPIN, but It does not spin
The spin is intermittent when spin
starts
First time to use, some water ows
from the drainpipe
No water supply
Tap is not open
Inlet hose gets blocked
Laundries is too much or too little or the
Machine is not place stably
Before contacting the technicians, please make the following checks:
Control panel has no any display
Plug is not inserted tightly
No electricity in the socket
Power switch is not turned on
Power supply is cut off
Inlet hose leaks
Inlet hose connector(connecting with the tap)is not xed tightly
Inlet hose and washing machine connector is loose
The remaining water when the factory make test
Do not closethe top lidwhen drain is nished
Open up thetop lid whenstart drain
Balance the laundries to reach to the best spin effect
PhenomenaPossible reason
Water outlet of drainpipe is higher than 1.2m
drainpipe is bended or get blocked

15 16
Settlement
Insert the plug tightly
Check the socket or change to another socket
Press power switch
Check power supply
Install the inlet hose again
Tighten the connector of the machine
Restart when water supply is resumed
Open the tap
Clean the lter according to beforeclean inlet gate
The machine is adjusting automatically
Close the toplid
Close the top lid
Normal
Normal
Notes If there is still a fault after the above checks, please pull out the plug and
contact the seller right away. It is dangerous to repair this product by yourself.
Settlement
The height of the drainpipe should be less than 1.2m
Straighten or clean the drainpipe
Other functions
1. Give an alarm
4. Child lock function
(1)if set child lock function, all the buttons will be locked including POWER. If the top lid
is opened during the washing machine working, the washing will be stopped and give an
alarm. But if you can close the top lid in 5 seconds, the washing machine will stop alarm
and continue working. If can not close the top lid in 5 seconds, the washing machine will
begin draining if there is water in the inner tub ,even closing the top lid is not valid. During
the draining, alarm will be given every 10 seconds , when the water in the inner tub is about
5cm higher, alarm will be given every 10 minutes (alar m is always given) . When the draining
is nished, the washing machine will be in the state of waiting, if close the top lid, the washing
machine is unlocked and start working as previous setting.
(2) Once child lock is set, if open top lid over 5 seconds during washing or rinse(there is water
in the inner tub), washing machine will drain and give an alram. If you unlock the function during
draining, the washing machine will add water to setting water level and continue working.
E1
E3
E2
F1
E4
E0
DisplayExplanation Settlement
The top lid is opened
when preset is startedClose the top lid and clear upthe alarm
After draining 7 minutes,
it still does not reach to
water level
Open top lid, according to before
troubleshooting and settlement to
settle it ,then close the top lidand
clear up the alarm.
The top lid is open when
spinning
Close the top lid and clear upthe
alarm
Spin does not balance
Open the top lid ,make the laundries
place equally, then close it andclear
up the alarm
After inlet 40 minutes still
not reach to setting water
level
Open top lid, according to before
troubleshooting and settlement to settle
it. Then close the tip lidand clear up the
alarm
Water level sensor is
wrong
Cut the power supply and call the
technicians
vibration testing system will supervise the running. Once vibration is beyond certain
3. Power supply is cut offautomatically
violent vibration. This machine has imbalance adjustment function, and the
During spinning, if the laundries are not placed equally in the tub, it would cause
2. Imbalance adjustment
level, the adjustment system will start automatically to adjust the imbalance.
5. Water recycle function
If set water recycle function, after the last time rinse nished, the washing machine will not
drain and spin, SPIN and WATE R RE CYCLE indicator light are ashing and an ala rm is given,
the washing machine stop working (if nobody operate, the alarm will be given every 10 minutes,
in 1 hour, power supply will be cut off automatically) . When press START/PAUSE, WATE R RE CYCLE
indicator light is on and the washing machine begin to drain and spin, the user can reuse the water.
E5
child-lock light flashing
synchronously
The top lid is opened
after setting child-lock
1) Press the power supply buttonand does notstart the programin 10 minutes,
the power supplywill be cutoff automatically.
2) After the washing is nished, buzzer will remind, the powersupply
can be cutoff automatically.
Close the top lid and clear upthe
alarm

17
DWT 1775 PL
220V~50Hz
10/112L 9/104L 8/96L 7/90L
6/82L 5/74L 4/68L 3/60L
2/54L 1/48L
0.03 MPa - 0.3 MPa
Wash:460 Spin:370
About 53kg
W665mm D675mm H1060mm
Model
Rated voltage and frequency
Water level/water volume (about)
Inlet pressure
Rated input power
Weight
Dimensions
Specications
Table of contents
Other Dawlance Washer manuals

Dawlance
Dawlance DWT 1470 PL User manual

Dawlance
Dawlance DW 7500 G User manual

Dawlance
Dawlance DW 9100 C User manual

Dawlance
Dawlance DW 6550 W User manual

Dawlance
Dawlance DW 9200 W FL User manual

Dawlance
Dawlance DWT 1166 X ADS+ User manual

Dawlance
Dawlance DW 7500 C User manual

Dawlance
Dawlance DW 9100 G User manual

Dawlance
Dawlance DW 6550 C User manual

Dawlance
Dawlance DWT 255 User manual