DC Power Solutions B-COOL9000RM-12V User manual
B-Cool A/C
Operator’s
Manual

Introduction
The B-COOL9000RM is a fully self-contained – one piece - roof mount AC unit,
available in 12 and 24 volts with an inside cab air diffuser, ready to connect wire
harness / battery cable and fuse block and comes pre- charged with R134a
refrigerant.
In other words – our roof mount air conditioner comes ready to go.
DC Power Solutions provides this document for informational purposes only. DC
Power Solutions has devoted significant time and effort to compile manuals
(Installation, Maintenance and Trouble-shooting) to assist customers with the
installation of the AC and product usage. However, DC Power Solutions makes
no representations warranties expressed or implied with respect to the
information, recommendations and descriptions contained within this and other
documents. Information from the manuals should at no time be regarded as
covering all contingencies. If you are in need of additional information, contact
DC Power Solutions directly.
DC Power Solution’s warranty shall not apply to any product which has been
installed, maintained, repaired or altered in a manner as to affect the product’s
integrity. Any alteration of these products and deviation from suggested
installation process without written approval will void DC Power solution’s
warranty.
DC Power Solutions accepts no liability to any person or entity for personal
injury of any kind, property damage, or any other direct, indirect, special, or
consequential damages whatsoever arising out of the use of the manuals or
deriving from any information, recommendations or descriptions contained in
the manuals.
To ensure the durability of DC Power Solutions products, please follow and
understand the instructions within the manuals.
Recycle and dispose of the air conditioning unit properly to help keep the
environment healthy.
There are Federal, Provincial and State regulations regarding the disposal of
refrigeration /AC machines. Consult a professional and ensure they follow the
laws when disposing of the refrigeration/AC unit.

The installation must be performed by a
qualified professional.
Switch off / disconnect the battery before
installation and performing maintenance work.
Wear goggles and gloves for the installation of
this product or disassembly an item for repair.
ATTENTION: The unit must be cooled before any
work is performed. Some parts are hot and can cause
burns.
ATTENTION. Do not remove any protection
provided on the unit. This could cause serious
injury.
ATTENTION: The unit is heavy. Do not handle
or install the unit alone.

BCOOL9000RM – FULLY SELF-CONTAINED – ELECTRIC
MODEL#
B-COOL9000RM - 12V
B-COOL9000RM – 24V
VOLTAGE
12V
24V
COMPRESSOR TYPE
25cc Electric scroll
Compressor
25cc Electric scroll
Compressor
MAXIMUM CURRENT
70 amps
40 amps
WORKING CURRENT
50 – 70 amps
15 – 40 amps
FREON TYPE
R134a
R134a
FREON QUANTITY
650g
650g
COOLING CAPACITY
10,230 BTU/h
10,230 BTU/h
EVAPORATOR AIR FLOW
800m³/h (470cfm)
800m³/h (470cfm)
CONDENSER AIR FLOW
2400m³/h (1410cfm)
2400m³/h (1410cfm)
CLIMATE CONTROLLER
Yes
Yes
REMOTE CONTROLLER
Yes
Yes
AC Rooftop Dimensions
96cm L X 72cm W X 16.5cm H
(37.8 X 28.35 X 6.5 Inches)
96cm L X 72cm W X 16.5cm H
(37.8 X 28.35 X 6.5 Inches)
AC Inside Cabin Dimensions
50cm L X 34cm W X 11.4cm H
(19.7 X 13.4 X 4.5 Inches)
50cm L X 34cm W X 11.4cm H
(19.7 X 13.4 X 4.5 Inches)
AC UNIT NET WIEGHT
34.5 Kg (76 lbs)
34.5 Kg (76 lbs)
AC UNIT GROSS WEIGH
38 Kg (83.75 lbs)
38 Kg (83.75 lbs)
AC SHIPPING BOX
107.5cm X 84.5cm X 40cm
(42.3 X 33.25 X 15.75 inches)
107.5cm X 84.5cm X 40cm
(42.3 X 33.25 X 15.75 inches)
OPERATING INSTRUCTIONS
Determining the operating mode of your A/C:
Press ON/OFF (power) Key for 3 Seconds to turn on the air conditioner.
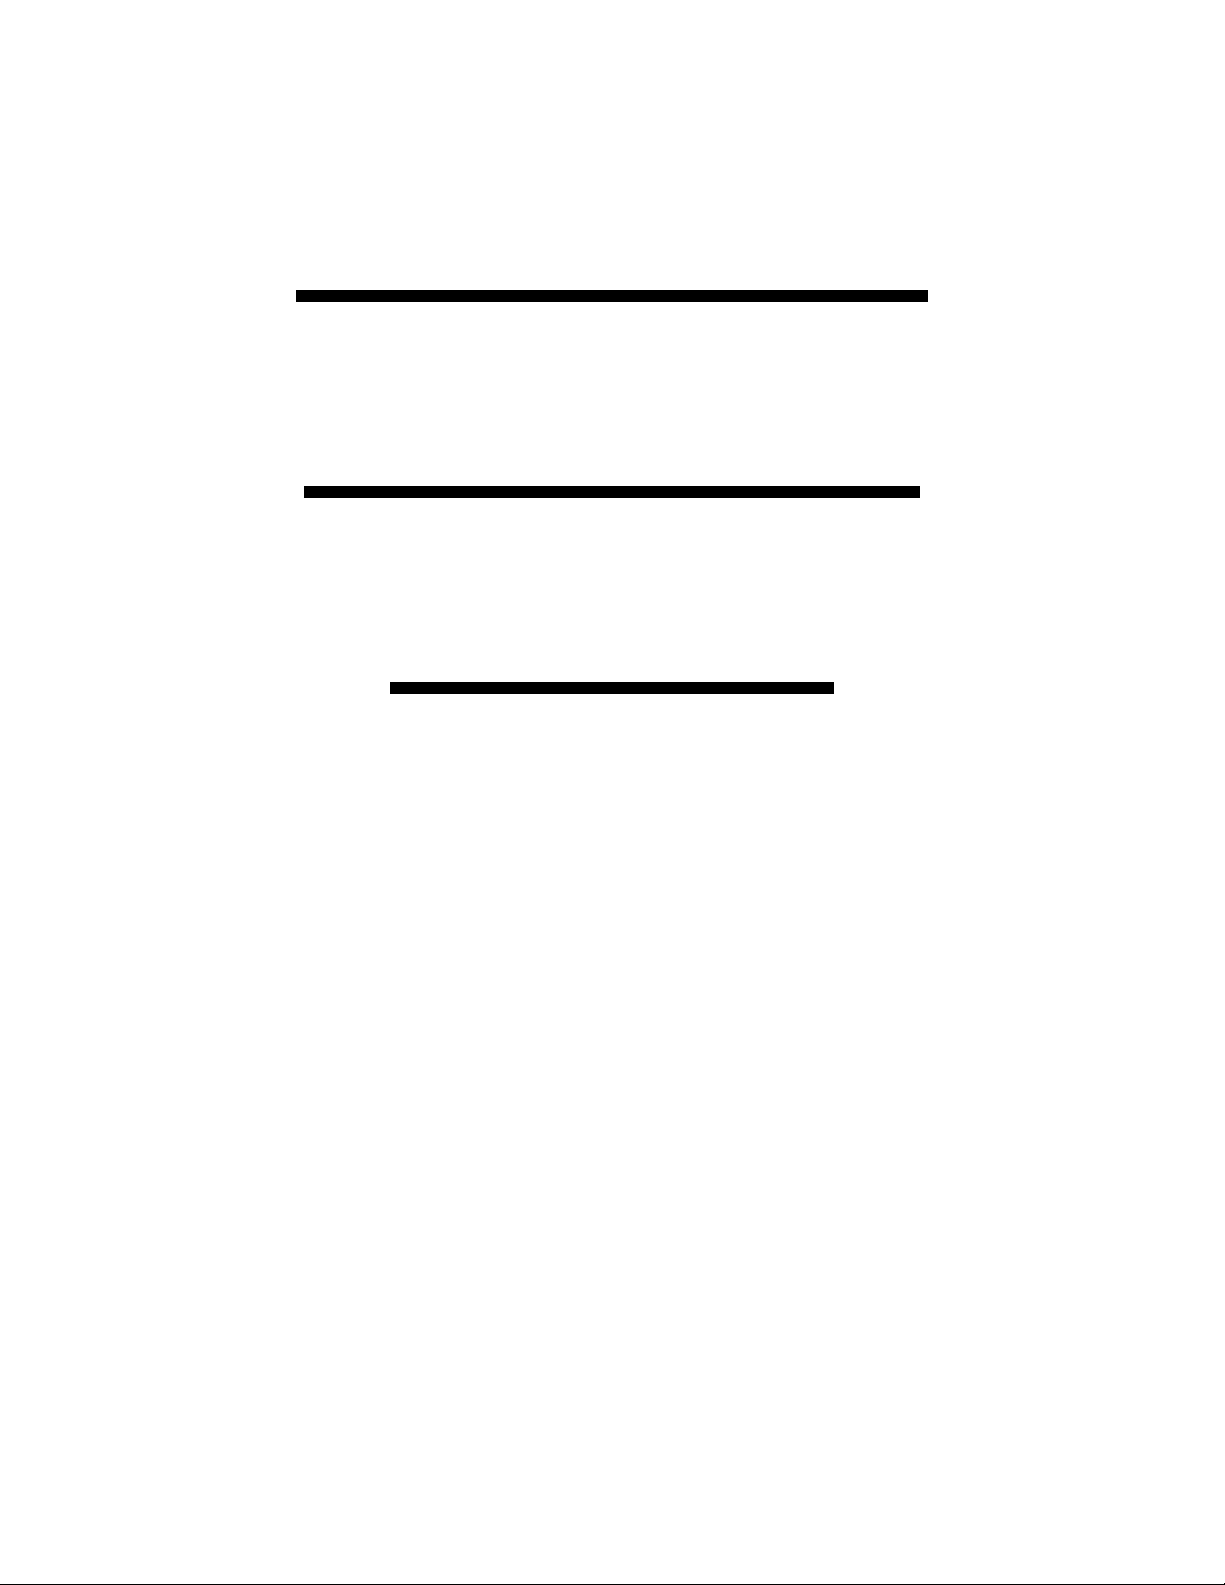
Look at the control panel. It will display either the letter “A” or the letter “P”.
A – Stands for Automatic Mode
P – Stands for Manual Mode
1) Automatic mode
In Auto mode you can only adjust the temperature. The lowest you can set the
temperature is 16 ℃or 60.8 F.
Air speed is adjusted by the system according to the
temperature.
The temperature display on control panel is the Air Inlet
Temperature. It can be called a “Standby” temperature.
When the thermostat senses air inlet temperature reaches the
temperature you set, the compressor shuts off and the
snowflake mark will disappear.
When the temperature becomes 6℃higher than the set air
inlet temperature, the compressor will turn on again

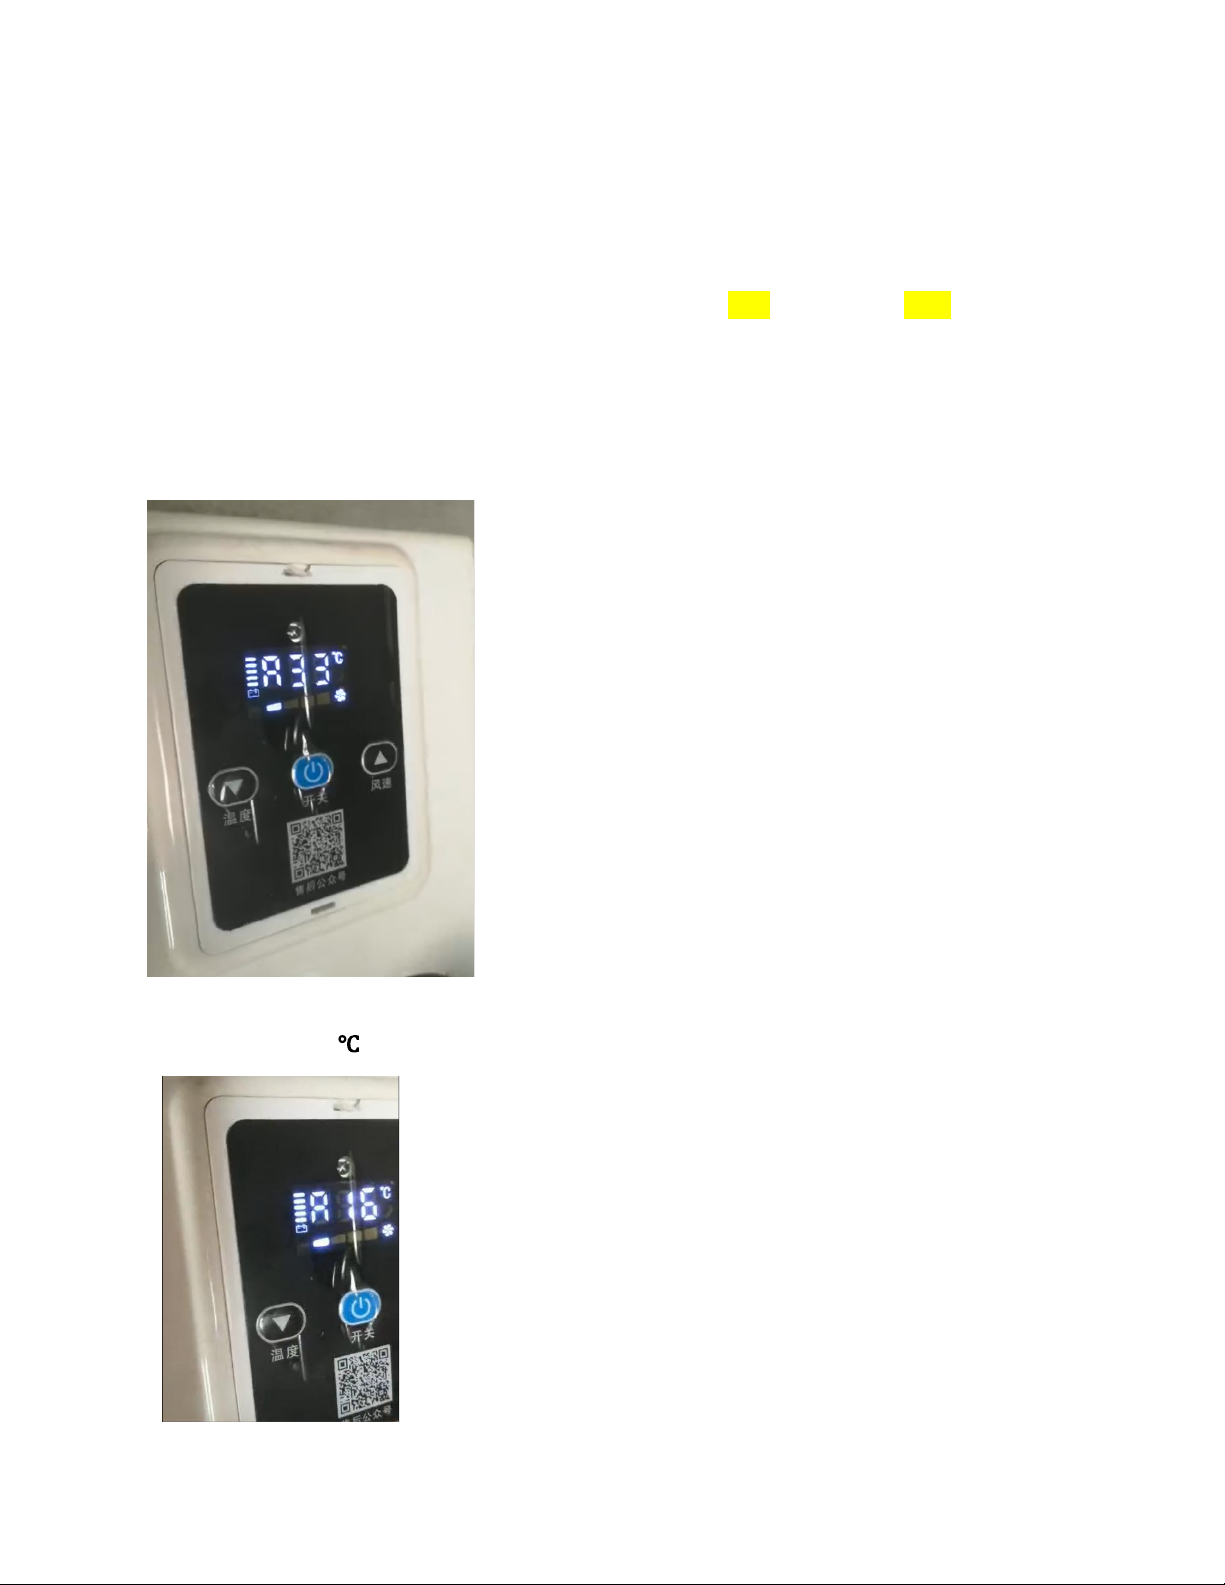
2) Manual Mode
The temperature display on control panel is air outlet temperature. This
temperature can be called “Compressor Protect Temperature” (to prevent
compressor from over-heating and evaporator from freezing). The lowest you can
set is 4℃or 39 F.
When the thermostat senses that the air outlet temperature has reached the set
temperature, the compressor shuts off and the Snowflake Mark disappear.
When the inside temperature rises to 6℃higher than air outlet temperature, the
compressor will turn on by itself.
The Manual Mode has 3 MODES
Sleep: Wind Speed 1-6 level with Star and Moon symbol
Standard: Wind Speed 2-6 level
Strong: Wind speed 3-6 level
Note: Every time you turn on the air conditioner the control panel memory will
remember the last working setting.

Setting up the Manual Mode from Automatic Mode
Press “STANDARD” button on the Remote control to enter Manual Setting Mode.
“P” Means the air conditioner is in Manual Setting Mode.
Setting up the Automatic Mode from Manual Mode
Press the button #10 (26°C) on your remote, and you should then see an “A” on the
control panel.
NOTE:
1) There are two thermostats in our air conditioners, but they cannot work at the
same time.
In automatic mode - only air inlet thermostat works.
In manual mode - only air outlet thermostat works.
2) Cooling effect in Manual Mode is better than in Automatic Mode.
3) When you set a low temperature in Manual mode, it is better set a high air speed.
4) Low temperature and low air speed - over a long time – may cause frosting on
the Evaporator
5) The Cooling effect of the 12V is better when the Vehicle is in motion than in
parking.
6) Our recommended Setting is the manual mode.
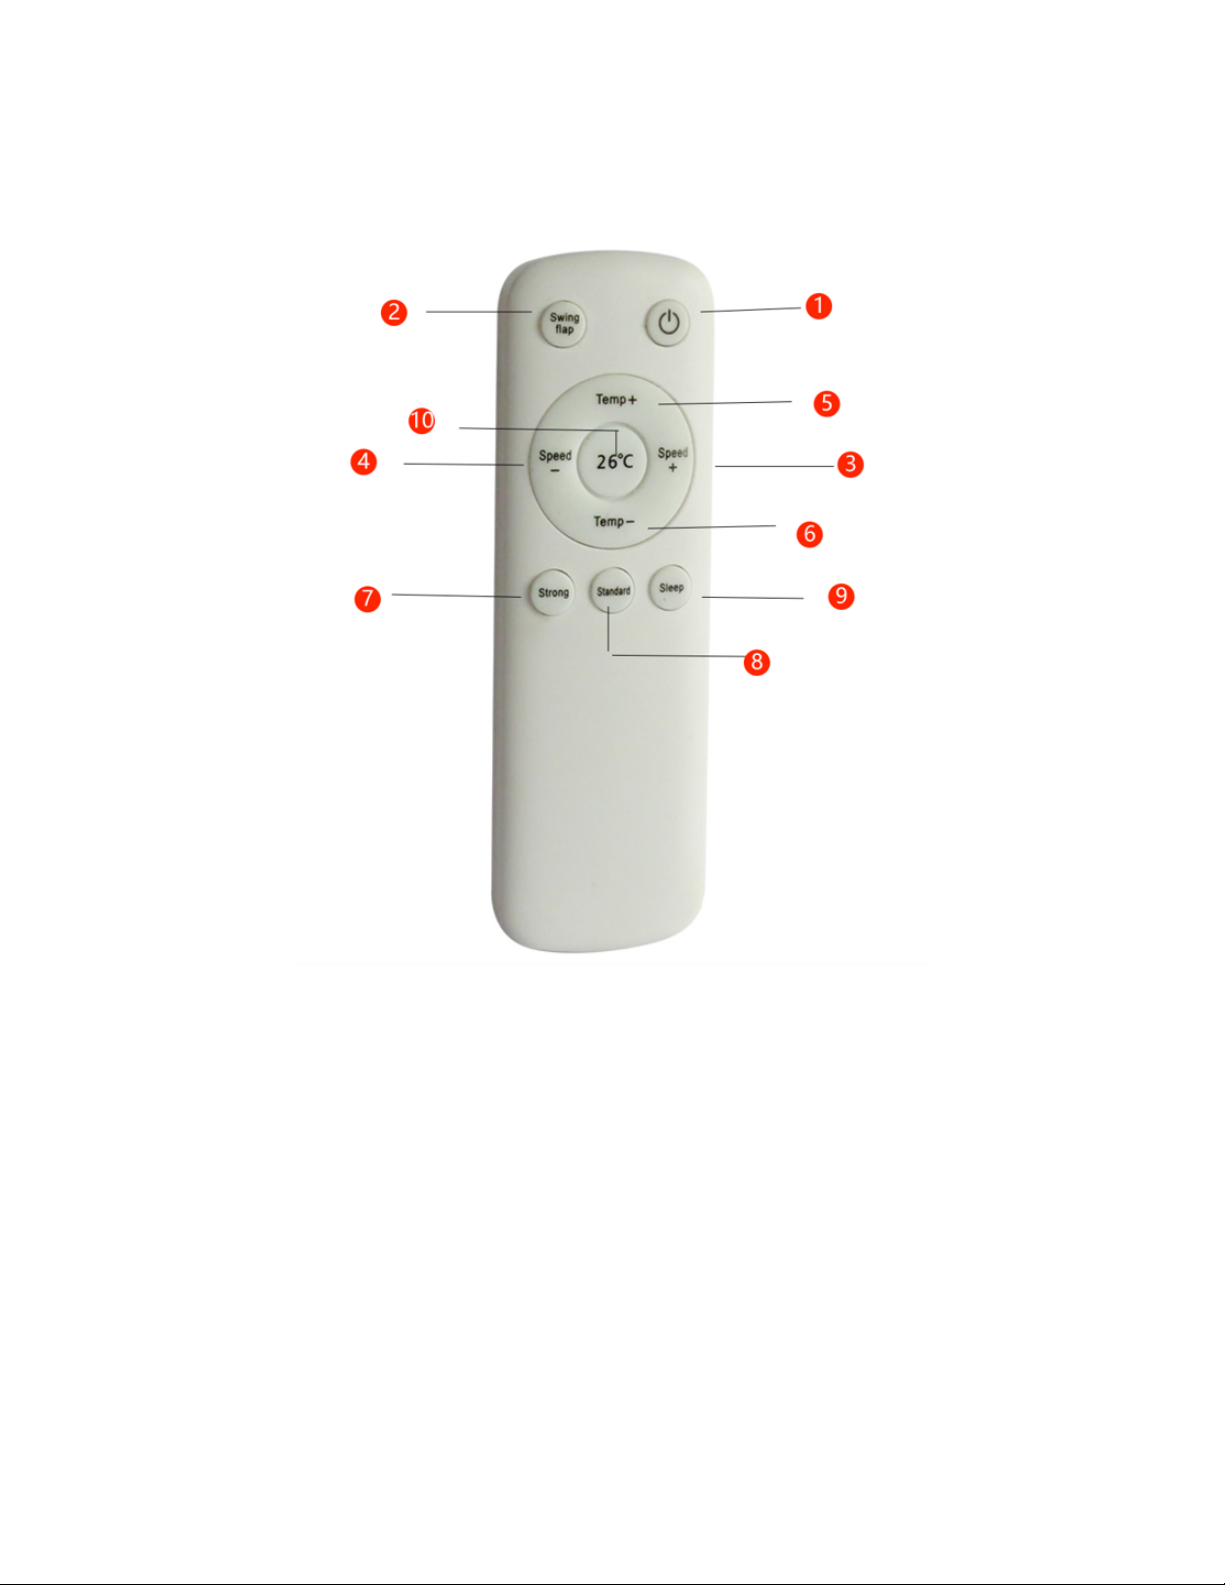
OPERATING INSTRUCTIONS FOR THE REMOTE CONTROL
The Key’s have the following functions:
1 Turn on/off air conditioner
2 Swing Flap: Only available on B-COOL12000FlexM-24V – swing air function.
3 Increase (evaporator blower motor) air flow.
4 Reduce (evaporator blower motor) air flow.
5 Temperature +
6 Temperature -
7 Strong mode
8 Standard mode **
9 Sleep Mode
10 26℃ECO mode ****
**Change the mode from Auto mode to Manual Mode.
****Change the mode from Manual Mode to Auto Mode

ERROR CODES - INSIDE CONTROL PANEL
If, while the air conditioner is running, any of the following codes appear on the
controller screen, please take the following steps as the code may indicate a serious
problem
1) Stop the Air conditioner & Power Off
2) After 10 minutes power ON & Start A/C
3) If code persists stop the A/C and power off contact technical department at
604-599-9200
ERROR
CODES
ISSUE
SOLUTION
E01
Voltage is too low
Charge the battery or Start the Engine
E02
Evaporator blower is not
operating
Check wiring and voltage of the supply wiring and repair.
Also check blower and replace if defective.
H22/H23
Check evaporator inlet sensor
by powering down the air
conditioner and restart the air
conditioner.
If the code reappears it means
that the sensor is defective or
has become dislodged from
the evaporator coil.
E04
Temperature Sensor of
Plenum
E05
Compressor over temperature
Indicator
This will power off the unit until the compressor cools
down so as not to damage the unit.
This may happen if the ambient temperature is very high.
Once the compressor cools the unit will restart again.
E06/E07
Condenser fan is not
operating
Check the wiring and voltage. Also check fan as it may
be defective and needs to be replaced
E09
Condenser fan control board
is defective
Replace the condenser fan control board
E10
Condenser fan failure
Replace the condensing fan motor
E11
Condenser fan is not
operating
Check the wiring for damage
E15
If error comes up almost
immediately
The Thermostat has been dislodged, Call the Technical
department at 604-599-9200
E15
If the error comes up after 10
minutes
Issue with the compressor controller, replace it, Call the
Technical Department at 604-599-9200
E15
If the error comes up after 30
minutes
Issue with freon, Call the Technical Department at
604-599-9200

ERROR (FLASHES) CODES – COMPRESSOR
FLASH
Result
Solution
1x
Standby
5x
Compressor Case temprature is too
high
Lack of refrigerant or dirty condenser
6x
Open circuit of cooling fan
Bad contact of electromagenetic fan
plug
7x
Short circuit of cooling fan
Short circuit in the motor or in the
connection line
9x
Condenser fan controller failure
Replace the controller
10x
Condenser fan failure
Replace the fan
11x
Condenser fan lost contact
Re-Connect the fan properly

GENERAL TROUBLESHOOTING
ISSUE
SOLUTION
IF THE COOLING EFFECT IS NOT
GOOD
Select the right mode and set proper temperature and
speed.
Check if there is any obstruction at the air inlet and
outlet
Check if the surface of the condenser is too dirty
Check if it is short of refrigerant and if the high and low
voltage is within the normal range
THERE IS WATER ON THE SURFACE
OF THE INDOOR UNIT
When running in an environment with high humidity,
water drops may form on at the air outlet and core
surface, which is a normal physical phenomenon
THE INSIDE CONTROL PANEL
DISPLAYS VOLTAGE FAULT
Check battery for low voltage and verify the power
source is either DC 12V or 24V, Check if the low
voltage protection value is too high
THE INSIDE CONTROL PANEL
DISPLAYS SENSOR FAULT
Check if the sensor at air inlet / outlet is plugged in
correctly, Check if the display temperature is higher
than normal ambient temperature. If it is, change the
sensor
THE INSIDE CONTROL PANEL
DISPLAYS FAN FAULT
Check if the fan is correctly plugged in. Connect the
fan with a separate 12V or 24V DC power source. If
the fan doesn’t work, replace fan.
THE INSIDE CONTROL PANEL
DISPLAYS OUTDOOR UNIT FAULT
Check if it is short of refrigerant.
Check if the high and low voltage is within the normal
range.
Check if the condenser is too dirty - so that heat
dissipation is adversely affected.

MAINTENANCE GUIDELINES
Before beginning cleaning, make sure the air conditioner is turned off & powered
off.
1) Surface Cleaning of inside unit: Wipe with a clean damp cloth. The cloth can
be dipped in a mild cleaning solution if the unit is very dirty.
2) The core of evaporation chamber is too dirty. Check for dirt and debris in the
evaporator, clean with compressed air if necessary.
3) Outdoor unit cleaning: Remove the top cover and clean the condenser with
compressed air. Pay attention not to damage the condenser coil.
4) Long time not in use: Unplug the air conditioner and wrap the outdoor unit to
avoid any physical damage.
5) Using after long time not in use: Clean the unit body condenser and
evaporation unit. Check for signs of any foreign matter at the air inlet or outlet of
the unit. Check if the drain is clear; Install remote controller, make inspection and
power it on.
Tips:
Maintain the AC unit frequently - at least once every 2 months. If you
operate the AC in a dusty - dirty environment, more frequent cleaning will be
required. Check for blockage on top and bottom of the condenser fan, the
condenser coil and air flow before and after the evaporator blower.
Other manuals for B-COOL9000RM-12V
1
This manual suits for next models
2
Table of contents
Other DC Power Solutions Automobile Accessories manuals


Popular Automobile Accessories manuals by other brands


Subaru
Subaru H501SAJ000 installation instructions

Hamron
Hamron 012452 operating instructions

Safe Fleet
Safe Fleet Bustin Slide & Go Platform Use and maintenance guide

Whispbar
Whispbar K493W Fitting instructions

Cruz
Cruz Evo Rack E32-140 Assembly instructions

Subaru
Subaru H001ssC800 installation instructions


