DCA Intertel s'print BT User manual

DCA Intertel 1 DCA Intertel
DCA Intertel BV
Distributieweg 25, 2404 CM Alphen a/d Rijn
The Nederlands
Phone: +31(0)172 604963 Fax: +31(0)172 605237
website: www.dca-group.com
User Manual
s’print BT
Portable thermal printer

2DCA Intertel DCA Intertel
DCA Intertel 3 DCA Intertel
TABLE OF CONTENS
PRINTER COMPONENTS 6
A. DPT100-B – Front external view 6
B. DPT100-B – Under view 7
INTRODUCTION 8
MANUAL ORGANIZATION 8
SYMBOL USED IN THIS MANUAL 8
GENERAL SAFETY INFORMATION 8
UNPACKING THE PRINTER 9
PRINTER FEATURES 10
PRINTER DESCRIPTION 11
1. INSTALLTION AND USE 13
1.1 CONNECTIONS 13
1.1.1 Battery Recharger 13
1.1.2 Turning the printer On and Off 14
1.2 BATTERIES 15
1.2.1 Recharging batteries 15
1.2.2 Information regarding battery use 16
1.2.3 Replacing batteries 16
1.2.4 Disposing of batteries 18
1.3 CONFIGURATION 19
1.3.1 Conguration Mod. DPT100-B/I 19
1.3.2 Conguration Mod. DPT100-BT 21
1.4 HEXADECIMAL DUMP 23
1.5 SIXLOAD 23
1.6 MAINTENANCE 24
1.6.1 Changing the paper roll 24
1.6.2 Cleaning 26
2. INTERFACES 27
2.1 RS232 SERIAL 27
2.2 INFRARED BIDIRECTIONAL SERIAL (only DPT100-B model) 30
2.2.1 Standard Mode 30
2.2.2 InfraRed communication protocol 31
2.2.3 Printing instructions 33
2.3 IrDA PROTOCOL OVERVIEW (only DPT100-I model) 34
2.3.1 IrDA DATA PROTOCOLS SUPPORTED 35
2.3.1.1 Physical Signal Layer(PHY) 35
2.3.1.2 IrLAP 35
2.3.1.3 IrLMP 36

2DCA Intertel DCA Intertel
DCA Intertel 3 DCA Intertel
2.3.1.4 Link Management-Information Access Service (LM-IAS) 36
2.3.1.5 IrCOMM 37
2.3.1.5.1 3-Wire Raw and IrLPT in Detail 37
2.3.1.5.2 How 3-Wire raw and IrLPT differ 37
2.3.1.5.3 IAS entry and hint bits 38
2.3.1.5.4 Basic link operation 38
2.4 BLUETOOTH PROTOCOL OVERVIEW (Only mod. DPT100-BT) 39
2.4.1 Supported Protocols 40
2.4.1.1 Serial Port Prole 41
2.4.1.2 Object Push Prole 41
3. PRINING FUNCTIONS 42
3.1 CONTROL CHARACTERS 42
4 TECHNICAL SPECIFICATIONS 56
4.1 Technical Specications 56
4.2 ADAPTOR SPECIFICATIONS 58
4.3 DIMENSIONS 59
5. CHARACTER SETS 60
APPENDIX A - ACCESSORIES AND SPARE PARTS 61
A.1 TICKET ALIGNMENT 61
A.1.1 Ticket alignment 61
A.1.2 Alignment Description 61
A.2 ACCESSORIES 62
A.3 SPARE PARTS 62

4DCA Intertel DCA Intertel
DCA Intertel 5 DCA Intertel
PRINTER COMPONENTS
A. DPT100-B – Front external view
1- Printer base
2- Cover
3- Paper holder
4- Printing mechanism
5- Multi-function + ON key
6- Paper exit slot
7- Infrared device

4DCA Intertel DCA Intertel
DCA Intertel 5 DCA Intertel
B. DPT100-B – Under view
1- Serial connector and battery recharger
2- Battery compartment

6DCA Intertel DCA Intertel
DCA Intertel 7 DCA Intertel
INTRODUCTION
MANUAL ORGANIZATION
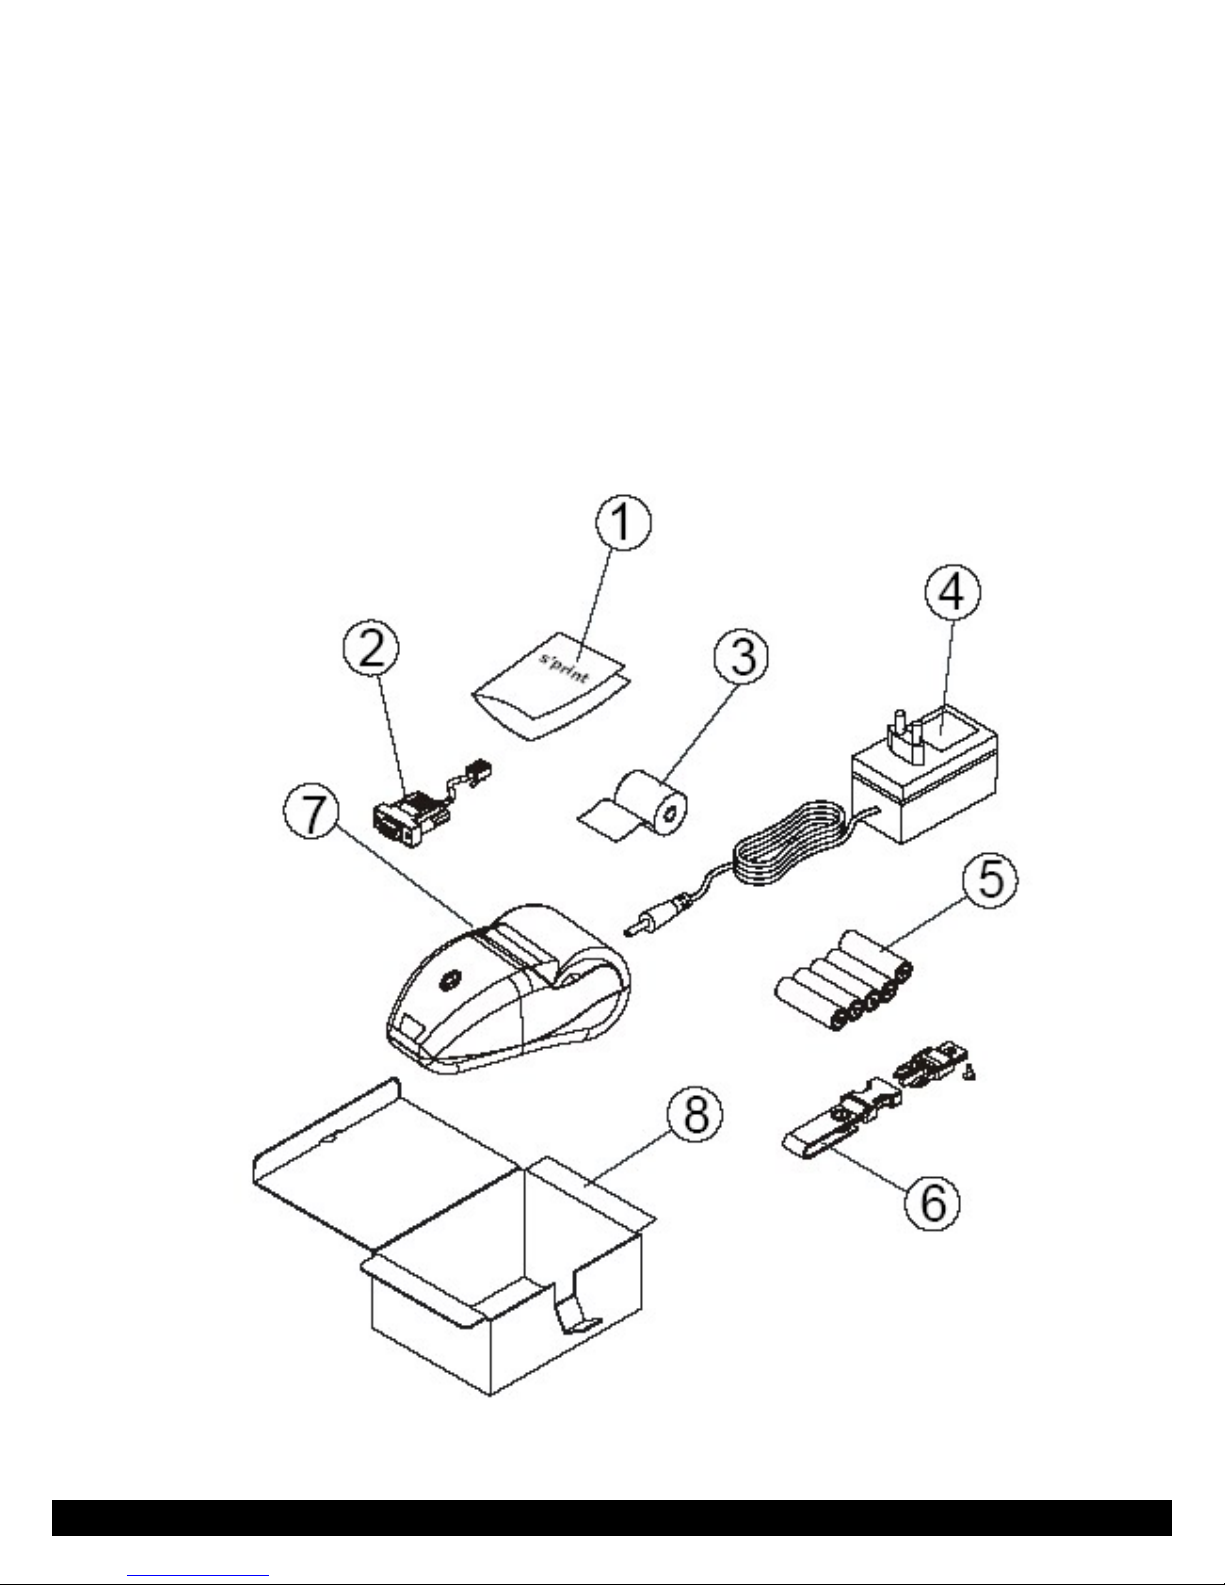
In addition to the Introduction which includes a description of the explanatory notes
used in the manual, general safety information, how to unpack the printer and a brief
description of the printer including its basic features, this manual is organized as fol-
lows:
Chapter 1: Contains the information required for correct printer installation and its
proper use, as well as interface specications
Chapter 2: Contains information on interface specications
Chapter 3: Contains a description of the printer command set
Chapter 4: Contains Technical Specications of the printer
Chapter 5: Contains the character sets (fonts) used by the printer
SYMBOL USED IN THIS MANUAL
NOTE
Gives important information or suggestions relative to the use of the
printer.
WARNING
Information marked with this symbol must be carefully followed to
guard against damaging the printer.
DANGER
Information marked with this symbol must be carefully followed to
guard against operator injury or damage.
GENERAL SAFETY INFORMATION
-Read and keep the instructions which follow.
-Before cleaning the printer, disconnect the power supply and make sure that the prin-
ter is off.
-Clean the printer with a damp cloth. Do not use liquid or spray products.
-Do not operate the printer near water.
-Only use approved accessories and batteries. Do not connect to
products that are not compatible.
-Use the type of electrical power supply indicated on the printer label. If in doubt, con-
tact your retailer.
-When deciding where to place the printer, make sure it is positioned
where its cables will not be damaged.
-Do not introduce foreign objects of any kind into the printer as they could cause a
short circuit and could jeopardize printer functioning.
-Do not spill liquids onto the printer.
-Do not carry out technical operations on the printer, with the exception of the sche-
duled maintenance procedures specically indicated in the user manual.
-Disconnect the printer from the electricity supply and have it repaired by a speciali-
zed technician when:
A. The feed connector has been damaged.
B. Liquid has seeped inside of the printer.
C. The printer has been exposed to rain or water.

6DCA Intertel DCA Intertel
DCA Intertel 7 DCA Intertel
D. The printer is not functioning normally despite the fact that all
instructions in the users manual have been followed.
E. The printer has been dropped and its outer casing damaged.
F. Printer performance is poor.
G. The printer is not functioning.
UNPACKING THE PRINTER
Remove the printer from its carton being careful not to damage the packing material
so that it may be re-used if the printer is to be transported in the future. Make sure
that all the components illustrated in gure are present and that there are no signs of
damage. If there are, contact DCA Intertel.
1. Warning sheet
2. Cable
3. Paper roll
4. Adaptor / Battery recharger
5. Batteries (5 pcs.)
6. Belt coupler
7. Printer
8. Box

8DCA Intertel DCA Intertel
DCA Intertel 9 DCA Intertel
PRINTER FEATURES
The new s’ print portable thermal printer offers an innovative alternative to impact-
based systems, with a range of interface options (RS232
serial,R232+IRDA, RS232+Bluetooth). The printer is powered using
batteries.
The battery version (with RS232+IRDA interface) is primarily intended for the auto-
matic identication and mobile telephony market, combined with portable terminals
without printer; the infrared bidirectional interface with which it is equipped makes
cable connection—so “inconvenient” for portable devices—unnecessary.
The BT version is powered by batteries (5 rechargeable AA penlight
batteries), and communicates through RS232 serial interface and
Bluetooth(TM). s’print-BT is a light weight and slim printer. By means of the
Bluetooth(TM) wireless technology it is capable to print wireless at high speed without
any alignment. The ideal and best match of s’print-BT is together with PDAs, mobile
phones, laptop computers, and automatic ID devices.
The supported Bluetooth(TM) proles are SPP (Serial Port Prole) that
provides RS232 serial cable emulation, and OPP (Object Push Prole)
enabling the print-out of vCard format objects (business cards).
It is important to note that s’ print is the rst printer designed with “sixload” easy pa-
per load, making it simpler and more convenient to use. It has a 203 dpi thermal print
mechanism that utilizes 57.5mm-wide paper rolls and can print up to 24 o 40(1) cha-
raters per line.
NOTE
The 40 column version is downloadable on the Support/Download/
Firmware section from www.dca-group.com web site.

8DCA Intertel DCA Intertel
DCA Intertel 9 DCA Intertel
PRINTER DESCRIPTION
The printers consists of a ABS-V0 casing (1) equipped with a cover (2)
under which is housed the paper roll and print mechanism. On the front is the multi-
function key (3) and red LED (4).
Multi-function key. This key is used to access a variety of printer option sdepen-
ding on how long it is held down. If the printer is off (red LED off), when this key
is pressed power is turned on (blinking red LED). To turn the printer off the key
is pressed two times (the LED begins to blinkfaster) and if it is not pressed again
within three seconds the printer shuts off. During the power-up phase, if the key
is held down for at least three seconds, the printer enters the conguration mode
and prints out a printer setup report. When the print-out is complete, the printer
remains in stand-by to receive characters from the serial interface that are printed
out in hexadecimal code. If the key is pressed, the printer by-passes the setup mode
and terminates the hexadecimal dump function. Pressing the key quickly will exit
the conguration mode, while if it is held down for at least a second, it is possible to
make changes in the individual parameters.

10DCA Intertel DCA Intertel
DCA Intertel 11 DCA Intertel
The red LED displays printer operating status and this check is
performed “on-line”. Table 1 lists operating statuses and the LED signals connected
to them:
LED Status Description
Always off Printer off
Always on Printer on - no fault with
batteries recharing
very slow blinking
(one blink every three seconds)
Printer on - no fault with
batteries recharing
slow blinking
(one blink every second)
Paper out message
fast blinking
(one blink every half second)
Resettable error (heat overheating,
battery voltage error)
Very fast blinking
(seven blinks per second)
In process of shutting off

10DCA Intertel DCA Intertel
DCA Intertel 11 DCA Intertel
1. Installtion and Use
1.1 CONNECTIONS
1.1.1 Battery Recharger
For the Battery Recharger/Power Supply and serial connection, the printer is equipped
with a connecting cable (g. 1.2) that comes packed with the printer and has a double
connection system. On one side is a 9-pin female connector (g. 1.2.A) for the serial
port; on the other side of the same connector is a RJ11 connector (g. 1.2.B) and a
jack (g. 1.2.C) for connection to the battery recharger.
The printer is equipped with a rechargeable battery pack, located in the
battery compartment (2), self-sufcient for printing. To recharge the
batteries, use the connection cable (g. 1.2) that comes packed with the
printer and following the instructions reported in the 1.2.1 paragraph.

12DCA Intertel DCA Intertel
DCA Intertel 13 DCA Intertel
1.1.2 Turning the printer On and Off
How to turn the printer On
• by briey pressing the multi-function key
• by sending a characters set on the serial line—it is better to send
characters that are not read as printer controls (ex. 0x0E)
• with the battery recharger connected
How to turn the printer Off (1)
• by briey pressing the multi-function key
• by sending the character ESC 0 over the serial line
• following a given period of inactivity as specied in setup (see sec. 1.3)
Turning the printer On and Off using software commands
If the printer is off, sending a characters set on the serial line will turn it on
(2)(3). Follow the instructions shown in the diagram below:
(1) NOTE
If the printer is connected to the battery recharger and it recharging the bat-
teries it’s not possible to turn off the printer. It must wait that the operation in
terminated.
(2) NOTE
It’s not possible to turn on
the printer sending one or
more characters through the
infrared device.
(3) NOTE
The printer start up
will not occur before
200-250 msec. This
delay is caused by
internal component.

12DCA Intertel DCA Intertel
DCA Intertel 13 DCA Intertel
1.2 BATTERIES
1.2.1 Recharging batteries
Appearing in the printer set up print out (see sec. 1.3) is the parameter
HEAD VOLT that gives the battery charge level. To recharge the batteries(4), use the
cable packed with the printer and proceed as follows:
- Connect the battery recharger jack to the cable jack (vedi g. 1.4) and plug the bat-
tery recharger into the electrical mains;
- Connect the cable RJ11 connector to the RJ11 connector located under the printer
(see g. 1.4). For a complete recharge, we recommend that the batteries be left to
charge for two hours;
(4) NOTE
During the recharge operation it’s not possible turning the printer off.
WARNING
Incorrect battery recharge voltage (different from that given in tab.
1.2) could seriously damage the printer.
Tables 1.1 and 1.2 provide specications for the battery recharger
Pin Signal IN/OUT Description
1+VRIC Power Battery recharge
2GND Power Ground signal
MAX recharge current 0.6 A
MAX recharge voltage 12V - 36V

14DCA Intertel DCA Intertel
DCA Intertel 15 DCA Intertel
1.2.2 Information regarding battery use
- Please note that the new NiMH battery reaches maximum performance
levels only after having been completely discharged and recharged at least
two or three times.
- Never use battery rechargers and/or batteries that are damaged or worn.
- Battery life varies greatly depending, for example, on print density and the
text to be printed.
- Recharge times vary depending on depletion levels, type of battery and
battery recharger used. Batteries may be recharged and discharged
hundreds of times, but they do wear out over time. When battery life (both
print and stand-by) is noticeably shorter than usual, it is time to buy a new
battery.
- Only utilize batteries that conform to specications and only recharge them
using battery rechargers approved by DCA Intertle BV.
- When the battery recharger is not in use, unplug it from the electrical
mains. If not used, even a completely-charged battery will automatically
discharge over time.
- NiMH batteries last longer if you remember to completely discharge them
every so often.
- Extreme temperatures can affect battery charge levels—leave them to
cool or warm as required.
1.2.3 Replacing batteries
Instead of the rechargeable battery pack supplied with the printer, 5 AA
ALKALINE penlight batteries may be used(5)(6).
(5) Note: if batteries other than those supplied with the printer are used, the
Battery parameter in setup must modied and the settings changed to Alkaline
if Alkaline batteries are used, or the to closest reference value for other types of
batteries (see sec. 1.3).
(6) Note: if Alkaline batteries are used it doesn’t make the recharge.

14DCA Intertel DCA Intertel
DCA Intertel 15 DCA Intertel
To replace batteries, proceed as follows:
- Remove the cover on the battery compartment (1) by unscrewing the
screws (2) and, using a at-head screwdriver, pry open at points A and B
(see g.1.5).
- Remove the battery pack (2) by lifting the battery removal tape (1) (see g. 1.6).

16DCA Intertel DCA Intertel
DCA Intertel 17 DCA Intertel
- Insert the 5 batteries(7) inside the compartment following the layout
indicated in g. 1.7 and re-position the battery removal tape;
(7) Note: when inserting the batteries, make sure the + and – signs are positio-
ned correctly.
- Reclose the battery compartment by tightening the fastening screws.
1.2.4 Disposing of batteries
- Batteries must be recycled or disposed of properly.
Do not throw batteries away as part of normal refuse
disposal.
- Do no throw batteries into open ame!

16DCA Intertel DCA Intertel
DCA Intertel 17 DCA Intertel
1.3 CONFIGURATION
1.3.1 Conguration Mod. DPT100-B/I
The printer set up print out (see g. 1.9) includes a range of information, and
among these should be pointed out the HEAD VOLT parameter that
indicates the battery charge level, i.e., the print head battery voltage.
The printer’s congurable parameters are:
• Interface: RS232D, Infrared(8).
• IR Protocol(9): Enable, DisableD.
• Baud Rate: 38400, 19200, 9600D, 4800, 2400, 1200, 600.
• Data length: 7, 8D bits/car.
• Parity: NoneD, even or odd.
• Handshaking: XON/XOFFD or Hardware(10).
• Autofeed: CR deactivatedD or CR activated.
• Battery: 1000 mAh, 1100 mAh, 1200 mAh, 1300 mAh, 1400 mAh,
1500 mAh, 1600 mAh, 1700 mAh, 1800 mAh, 1850 mAhD , Alkaline(11).
• Standby: 1min, 5minD, 10 min, 30 min(12), 1 h, 2h, None.
• Alignment: DisableD, Enable.
• Print density: -2, -1, 0D, +1, +2.

18DCA Intertel DCA Intertel
DCA Intertel 19 DCA Intertel
Please note: the parameters marked with the symbol D represent the default
values.
(8) Note
If the Interface parameter is set in infrared and ow control is required, any
time a transmission is effected a time break of one time and a half the byte
transmission is needed (for example 1.5 msec at 9600 bps). The reason is for
Half Duplex type of infrared line communication. As a result the Busy condition
check must be waited when transmitting data to the printer.
If said condition would slow down print-out, it is alternatively possible to trans-
mit the bytes to be printed in xed length blocks (for example 16 bytes at a
time) and to wait for the necessary time to receive a likely XON/XOFF.
(9) Note
The “IR Protocol” parameter is visualizzato only if interface is set in”Infrared”.
(10) Note
It is not possible to modify the “ow control” parameter if interface is set in in-
frared because it is automatically set in XON/XOFF.
(11) Note
This parameter regulates battery recharge time. If set to Alkaline, battery re-
charge is disabled. If another type of battery other than those supplied with the
printer is used, select the closest appropriate charge value from the list.
(12) Note
This parameter regulates the period of inactivity after which the printer shuts
off automatically to avoid battery discharge. Each time the key is pressed quik-
kly, the parameter will change and the current value will be printed out. Once
the desired value has been attained, hold the key down for at least a second
to pass to the next parameter, and so on. Printing out of a new printer set up
report indicates that set up is complete.

18DCA Intertel DCA Intertel
DCA Intertel 19 DCA Intertel
1.3.2 Conguration Mod. DPT100-BT
The printer set up print out (see g. 1.10) includes a range of information,
and among these should be pointed out the HEAD VOLT parameter that
indicates the battery charge level, i.e., the print head battery voltage.
The printer’s congurable parameters, with Bluetooth interface selected, are:
• Interface: BTD, RS232.
• BT Name ID(14): NO IDD, #0, #1, #2, #3, #4, #5, #6, #7, #8, #9.
• Authentication(15): Enabled, DisabledD.
• Autofeed: CR disabledD o CR enabled.
• Battery: 1000 mAh, 1100 mAh, 1200 mAh, 1300 mAh, 1400 mAh,
1500 mAh, 1600 mAh, 1700 mAh, 1800 mAh, 1850 mAhD,
Alkaline(10).
• Standby: 1min, 5minD, 10 min, 30 min, 1 h, 2h, None.
• Print mode: NormalD, revers.
• Alignment: DisableD, Enable.
• Print density: -2, -1, 0D, +1, +2.

20DCA Intertel DCA Intertel
DCA Intertel 21 DCA Intertel
The printer’s congurable parameters, with RS232 interface selected, are:
• Interface: RS232D, Infrared(8).
• IR Protocol(9): Enable, DisableD.
• Baud Rate: 38400, 19200, 9600D, 4800, 2400, 1200, 600.
• Data length: 7, 8D bits/car.
• Parity: NoneD, even or odd.
• Handshaking: XON/XOFFD or Hardware(10).
• Autofeed: CR deactivatedD or CR activated.
• Battery: 1000 mAh, 1100 mAh, 1200 mAh, 1300 mAh, 1400 mAh,
1500 mAh, 1600 mAh, 1700 mAh, 1800 mAh, 1850 mAh,
Alkaline(11).
• Standby: 1min, 5minD, 10 min, 30 min(12), 1 h, 2h, None.
• Alignment: DisableD, Enable.
• Print density: -2, -1, 0D, +1, +2.
Please note: the parameters marked with the symbol D represent the default
values.
(12) NOTE: It’s the name that identify the printer from a Bluetooth remote de-
vice.
(13) NOTE: BT PIN is the password that permit to connect to the printer, if
some
devices request it.
(14) NOTE: BT Name ID needs to diversify one printers from another that have
the same name, inside the same area. The index will be added at the end of
the name (example: S’print-BT #1). It’s possible that some Bluetooth remote
device don’t update immediatly printer name, but only at the beginning of new
connection. This happened because most of remote devices create a page table
between Bluetooth address (that is passed on every access) and the identicati-
on name. So the method of research of remote devices is sensibly faster, but it
involves that the printer name (or others devices BT) is update only sometimes,
for the most part it happened at the beginning of new connection.
(15) NOTE: Nota the authentication needs to enable the password entry, from
the host at every connection, for printing. This option activation allows to
print even if sameone isn’t enable to do it . If sameone is enable to use
the printer (and consequenty to know the password), it’s possible to
execute an operation of “pairing” (combination of the devices) in this
operation the password is requested only one time. It’s possible, when
the devices are coupled, to access to printing service without password.
The BT name, BT PIN, BT name ID and the authentication become actives only
turning off and than turning on the printer, reset commands or reset after set
up don’t get actives those setting.
If Bluetooth is enable, it’s better do not send data on RS232 line, because datas
could set over Bluetooth line.
Table of contents
Other DCA Intertel Printer manuals