DCM SOLUTION ESV700 User manual

Versión: 1.0 05/01/2021
DCM Solution S.A.
Sanitizing tunnel
ESV700
Installation Manual
All information contained in this document, including illustrations and specifications are reliable
at the date of its publication but is subject to change without notice.

Sanitizing tunnel ESV700
www.dcm.com.ar Installation Manual Page.: 2of23
© 2021 DCM Solution S.A.
This publication or any part thereof, must not be reproduced or transmitted in
any form or by any means, electronic or mechanical, including photocopying,
recording, storage in an information retrieval system, or otherwise, without the
prior written permission of DCM Solution SA.
The information contained in this manual, including illustrations and
specifications, has been carefully checked and is reliable as of the date of its
publication but is subject to change without prior notice.
DCM Solution S.A., assumes no liability for any inaccuracy, error or omission in
this manual.
Under any circunstances, DCM Solution S.A., will be liable for direct, indirect,
special, incidental or consequential damages resulting from any defect or
omission of this manual, even if the possibility of damage was advised.
In the interest of product development, DCM Solution S.A., reserves the right to
make improvements to this manual and the products described at any time,
without prior notice or obligation.
2021 –Sanitizing tunnel ESV700–Installation Manual

Sanitizing tunnel ESV700
www.dcm.com.ar Installation Manual Page.: 3of23
Table of contents
1Introduction _______________________________________________ 4
2Object description__________________________________________ 4
2.1 General _______________________________________________ 4
2.2 Technical specification __________________________________ 4
2.2.1 Standard characteristics _______________________________ 4
2.2.2 Optionals___________________________________________ 4
2.2.3 Models ____________________________________________ 4
2.2.4 Electric power supply _________________________________ 5
2.2.5 Electric consumption__________________________________ 5
2.2.6 Environmental conditions ______________________________ 5
2.2.7 Weight_____________________________________________ 5
2.2.8 Dimensions_________________________________________ 6
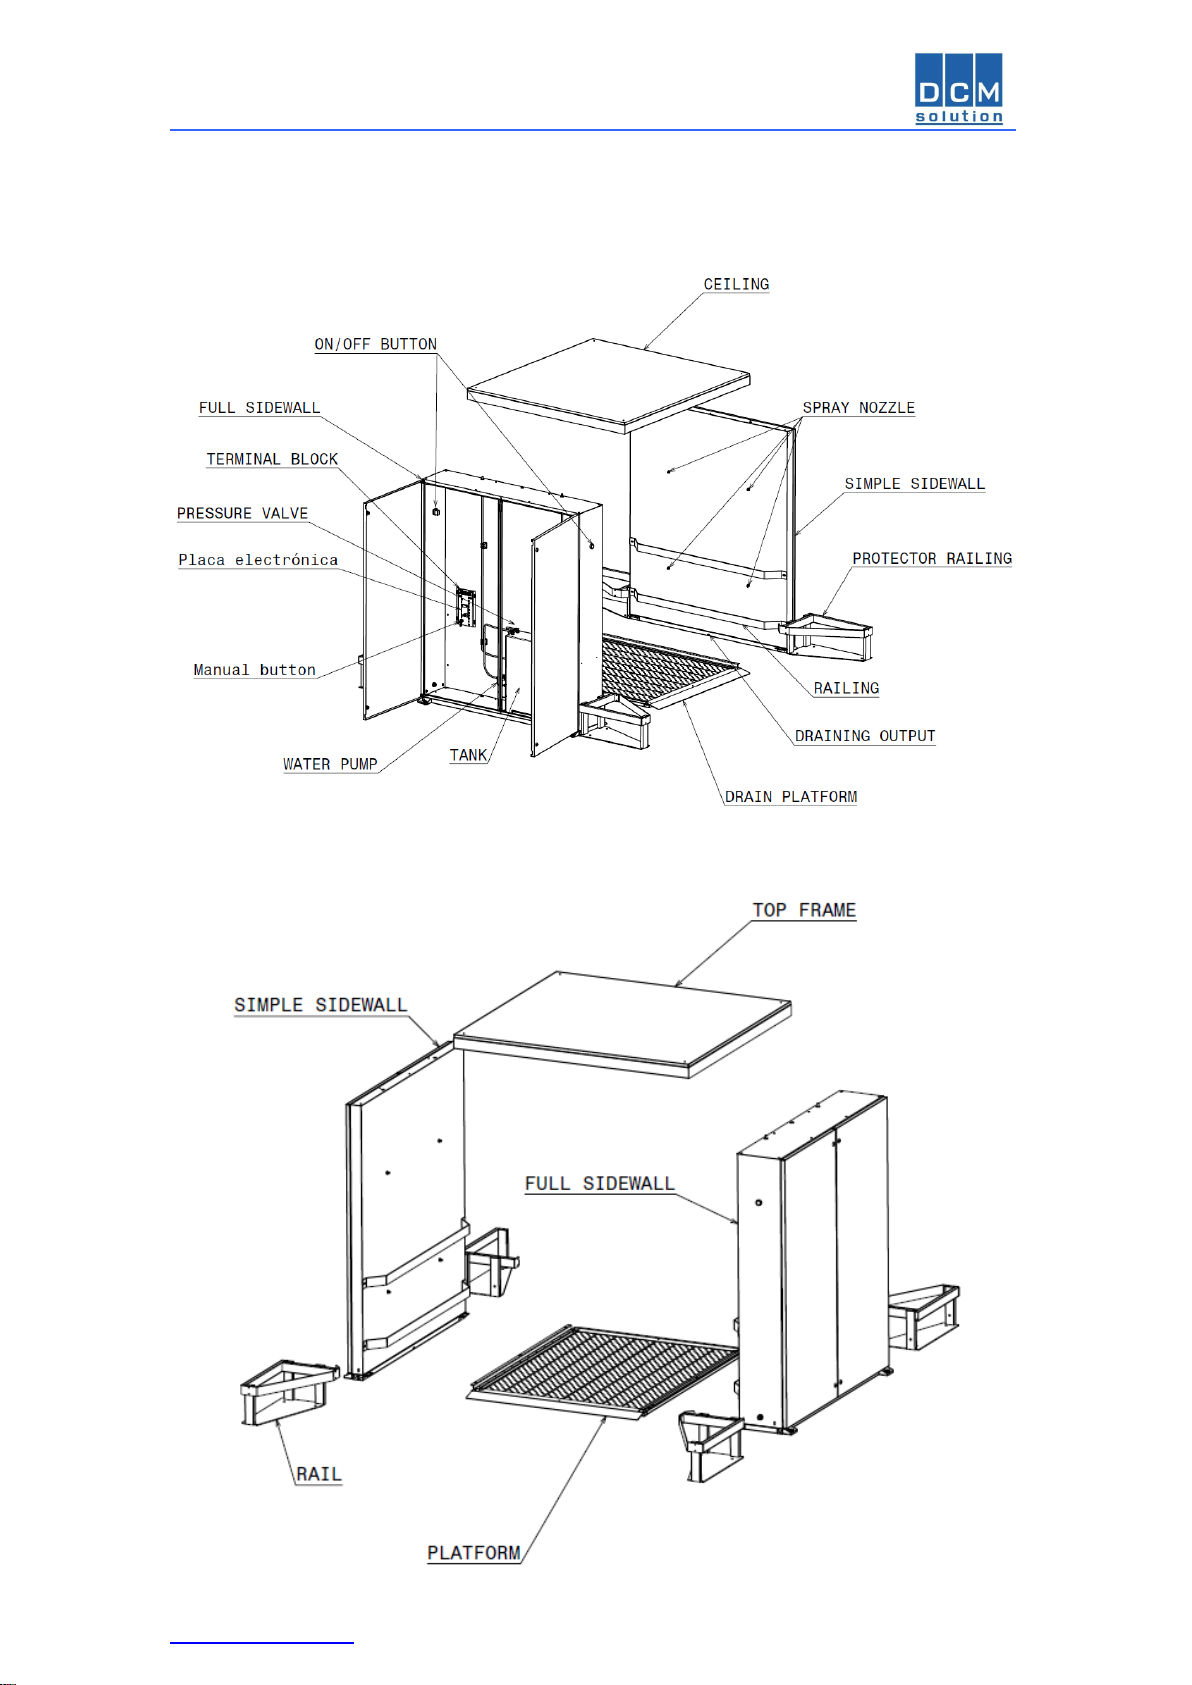
3Technical information_______________________________________ 7
3.1 Location of the components______________________________ 7
4Installation________________________________________________ 8
4.1 Required tools _________________________________________ 8
4.2 Preliminary work on site _________________________________ 8
4.3 Unpacking_____________________________________________ 9
4.4 Assembly ____________________________________________ 13
5Wiring___________________________________________________ 18
5.1 Pre requisites _________________________________________ 18
5.2 Power supply _________________________________________ 18
6Start up__________________________________________________ 19
6.1 Filling the tank ________________________________________ 19
6.2 Purge________________________________________________ 20
6.3 Pressure valve ________________________________________ 21
7Maintenance _____________________________________________ 22
7.1 Spray nozzle cleaning __________________________________ 22
7.2 Desagote plataforma ___________________________________ 23

Sanitizing tunnel ESV700
www.dcm.com.ar Installation Manual Page.: 4of23
1 Introduction
Please carefully read this manual which contains information that will assist you
in the operation and commissioning of the unit.
2 Object description
2.1 General
The ESV is a sanitizing tunnel for supermarket carts that allows a quick
sanitization to provide users hygienic safety before starting their purchases.
2.2 Technical specification
2.2.1 Standard characteristics
SAE1010 epoxy painted Steel cabinet
Poweron/ off button
Capacity of more than 500 cars/hour
2 rows of 4 industrial spray nozzles with anti-drip
1 liquid tank 45liters
System consumption: 10 liters per 2500 cars
Pressurizing unit
Low voltaje supply
Easy installation and operation
Does not include sanitizing liquid
It MUST be used with sanitizing products approved by an oficial entity
2.2.2 Optionals
Stainles ssteel cabinet
Automatic ignition by presence sensor
2.2.3 Models
ESV700 : SAE 1010 painted with epoxy sanitizing tunnel for supermaket
carts
ESV701 : Stainless steel sanitizing tunnel for supermarket carts

Sanitizing tunnel ESV700
www.dcm.com.ar Installation Manual Page.: 5of23
2.2.4 Electric power supply
Voltage
12VDC @ 5A
2.2.5 Electric consumption
Electric consumption
50 W max
2.2.6 Environmental conditions
Operating Temperature
+0 °C to +40 °C
Storage Temperature
-10 °C to +55 °C
Relative Humidity
95% non-condensible maximum
2.2.7 Weight
Weight
250 Kg

Sanitizing tunnel ESV700
www.dcm.com.ar Installation Manual Page.: 6of23
2.2.8 Dimensions
Characteristic
mm
Length
2250
Width
1510
Height
1580

Sanitizing tunnel ESV700
www.dcm.com.ar Installation Manual Page.: 7of23
3 Technical information
3.1 Location of the components

Sanitizing tunnel ESV700
www.dcm.com.ar Installation Manual Page.: 8of23
4 Installation
4.1 Required tools
Industrial hammer drill
10mm Widia Solid Carbide Drillfor concrete
4 10mm expansion metal plugs (type FISCHER steel MR10).
14 and 17mmwrench.
Mm Hexkey set.
Please carefully read all sections before starting the installation.
4.2 Preliminary work on site
Verify the position and location of the equipment according to the general
installation.
Depending on the area of installation of the equipment, there are two posible
variants.
1. If the floor is concrete, the installation can be carried out, with the help of
steel or chemical drills, by placing the drills in a position that matches
with the anchoring holes of the cabinet, either by means of the
installation plane or with a template.
2. In all the cases where the floor is not concrete, the installation should be
done on a bulk head plate. It must be made with threaded rods ØM10,
according to the installation blueprint, and tacked to the existing ground
with cement. It has to be 10cm below the level of the floor. It must also
be taken into account in this instance, that the threaded rods that are part
of the plate exceed the level of the floor by 5 cm.
Check that the floor or concrete base where the cabinets will be mounted is
even and leveled +/- 5mm in the area of attachment of the cabinets.

Sanitizing tunnel ESV700
www.dcm.com.ar Installation Manual Page.: 9of23
4.3 Unpacking
1. Place the package on the floor without turning it around.
2. Take the uppercover off.
3. Remove the styrofoam and grasp the platform.

Sanitizing tunnel ESV700
www.dcm.com.ar Installation Manual Page.: 10of23
4. Turn the platform around and place it where the sanitizer will be
installed.
5. Take the ceiling out of the box.
6. Unscrew the cover, open it and take the 4 railings.
7. Put back the cover and rescrew.

Sanitizing tunnel ESV700
www.dcm.com.ar Installation Manual Page.: 11of23
8. Remove the sidewalls from the box.
9. Discard packaging.

Sanitizing tunnel ESV700
www.dcm.com.ar Installation Manual Page.: 12of23
NOTA: You will find each item in its position. For each step you will have to
unscrew it, put thepart and screw it back..

Sanitizing tunnel ESV700
www.dcm.com.ar Installation Manual Page.: 13of23
4.4 Assembly
1. Open the full sidewall's doors.
2. Unscrew the nuts.
3. Remove the raills.

Sanitizing tunnel ESV700
www.dcm.com.ar Installation Manual Page.: 14of23
4. Pick up the 4 railings and attach the monthesidewalls as shown in the
images.
5. Join the sidewalls to the platform as shown in the illustrations and
screw.

Sanitizing tunnel ESV700
www.dcm.com.ar Installation Manual Page.: 15of23
6. Put the top frame in position, open the doors of both side walls and
screw.
7. After placing the top frame, connect the 4 hoses of the sidewalls to
the top frame's coupling.

Sanitizing tunnel ESV700
www.dcm.com.ar Installation Manual Page.: 16of23
8. Place each rail in its correct position as shown in the images,
matching the holes painted in red.

Sanitizing tunnel ESV700
www.dcm.com.ar Installation Manual Page.: 17of23
9. Open the sidewalls' doors and screw from the inside.
10.For screwing tank'sside rail, move the tank by cutting the seal. After
fixing the rail, put the tank back in position.

Sanitizing tunnel ESV700
www.dcm.com.ar Installation Manual Page.: 18of23
5 Wiring
5.1 Pre requisites
For equipment a power supply of 12Vdc 5Amp (not provided) should be used.
For greater electrical safety of the installation it is necessary to comply with the
following:
Power to equipmentmust come from an electrical board (not
provided).
The electric panel must be equipped with:
oConnection terminal block.
oCircuit Breaker.
o10A termal key.
oHave an excellent land fill.
5.2 Power supply
1. Open the full sidewall's door and identify the terminal block.

Sanitizing tunnel ESV700
www.dcm.com.ar Installation Manual Page.: 19of23
2. Connect the electric supply to the terminal block as shown in the
illustration.
6 Start up
6.1 Filling the tank
Fill the tank directly through the filter placed on the top of the tank.

Sanitizing tunnel ESV700
www.dcm.com.ar Installation Manual Page.: 20of23
6.2 Purge
Connect the unit to the power source with 12vDC.
Hold down the manual button, do not release until liquid comes from each of the
4 spray nozzles.
Table of contents
Other DCM SOLUTION Accessories manuals