DediProg NuProgPlus-U8 User manual

NuProgPlus-U8
Universal
Gang Programmer and Duplicator
User Manual
Version 1.0
© DediProg Technology Co., Ltd 2020 All rights reserved.
DediProg User Manual 01/2020

NuProgPlus-U8 User Manual
www.dediprog.com 2
Table of Contents
I. Introduction .............................................................................3
II. Product Information .................................................................3
III. System Requirement ................................................................3
IV. Product Descriptions.................................................................4
V. Dediware Quick Installation......................................................7
5.1 Software Installation ..........................................................................................................7
5.2 Install NuProgPlus-U8 Programmer ..................................................................................8
5.3 Dediware (For MCU/Flash/EEPROM)..............................................................................9
5.4 Dediware Production Mode .............................................................................................13
5.5 NuProg (For UFS/eMMC) ...............................................................................................16
5.6 NuProg Software Copy Mode..........................................................................................19
VI. Socket Adaptor Installation.....................................................22
VII. Revision..................................................................................24
Important notice:
This document is provided as a guideline and must not be disclosed without consent of
DediProg. However, no responsibility is assumed for errors that might appear.
DediProg reserves the right to make any changes to the product and/or the specification at
any time without notice. No part of this document may be copied or reproduced in any
form or by any means without prior written consent of DediProg.
NuProgPlus-U8 User Manual
www.dediprog.com 3
I. Introduction
This manual will be focusing on the hardware specification and the software quick
guide of NuProgPlus-U8. If you would like to know more about the Dediware software,
please download it from DediProg website. https://www.dediprog.com/download
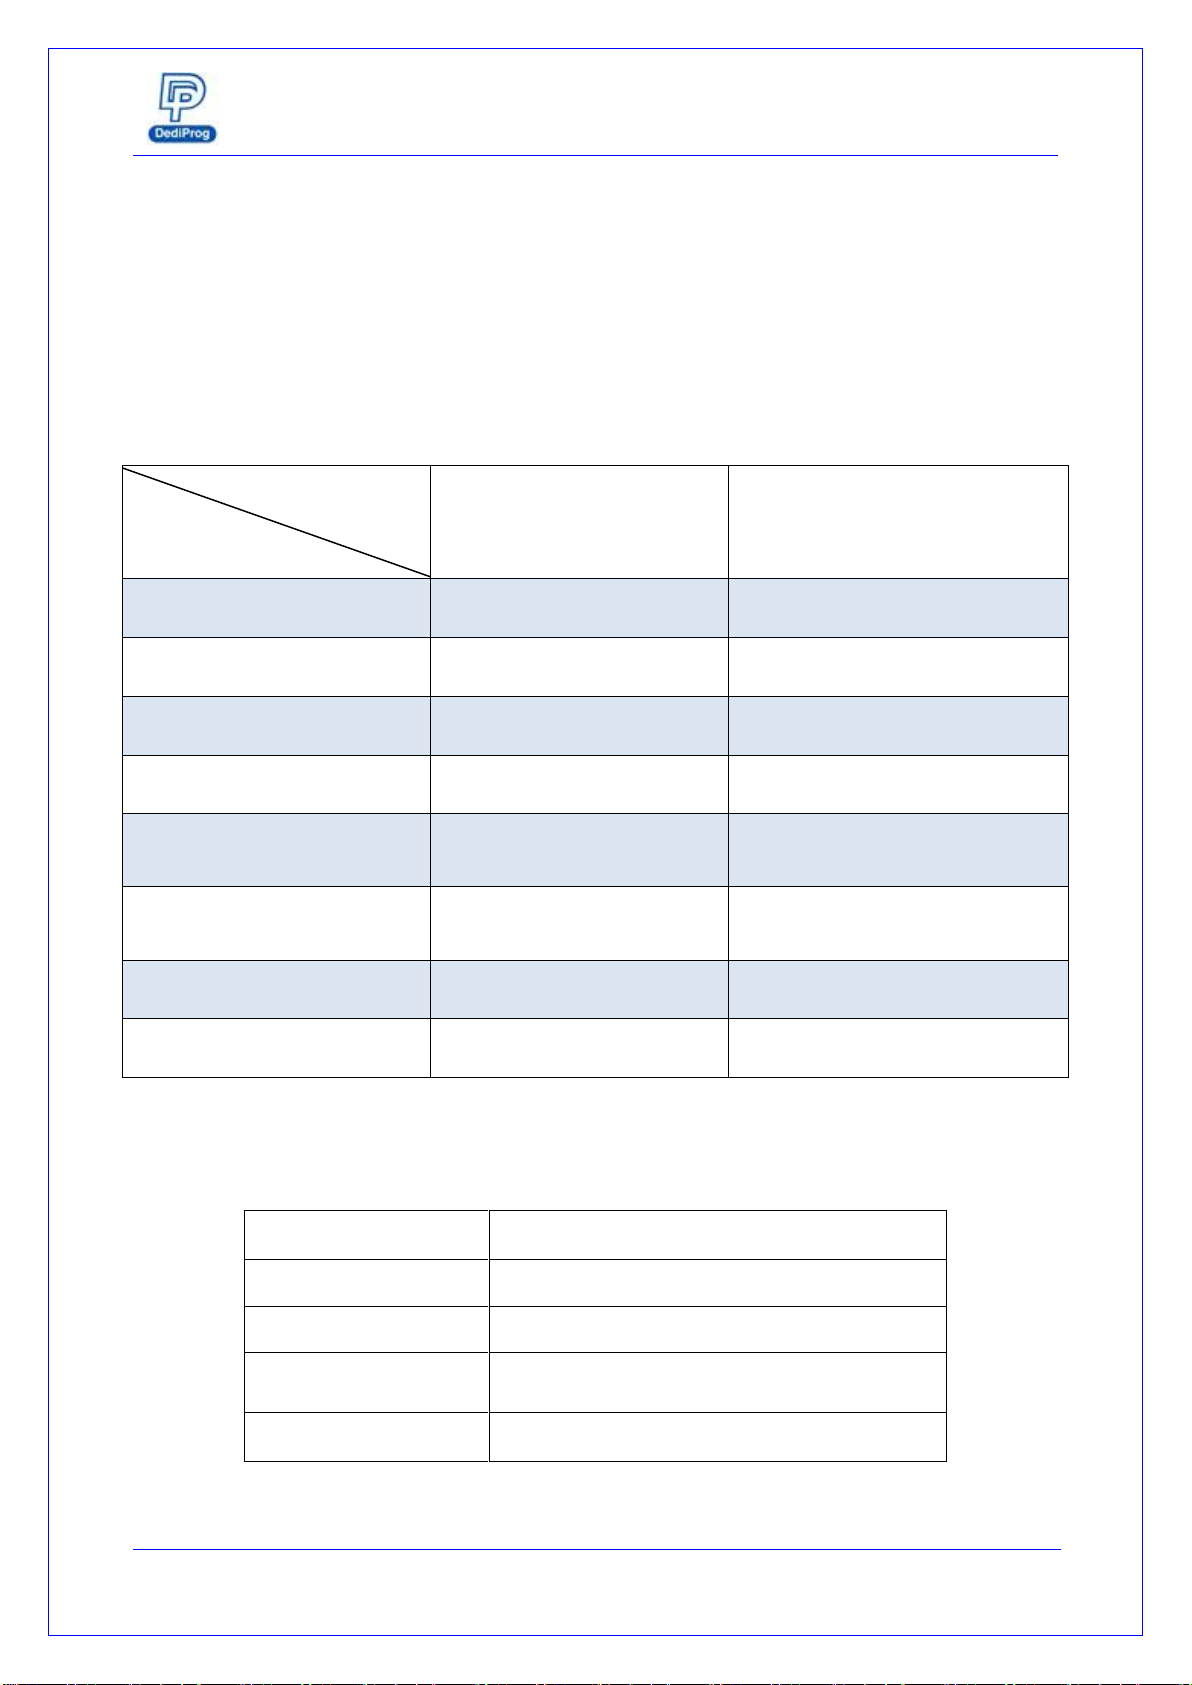
II. Product Information
Note * Multiple programmers of the same model can be driven by 1 PC
III. System Requirement
CPU:
i5 or above
OS:
Windows 7/8/8.1/10
USB Port:
USB 3.0
Free Disk Space:
More than 256GB
(Depends on the image file size)
CD ROM:
It is necessary for installing the software
ProgMaster-U8
NuProgPlus-U8
Supported IC Kinds
Universal
(UFS is not supported)
Universal (Support UFS)
USB Interface
USB2.0
USB3.0
LCD Keypad Panel
√
√
Sites
8 Sites
8 Sites
Socket
8 Sockets
8 Sockets (16 Sockets for SPI
Flash, eMMC, and UFS)
Power/Pass/Busy/Error LED
Indicators
√
√
Start button
√
√
Multiple Programmers*
√
√
Functions
Model
NuProgPlus-U8 User Manual
www.dediprog.com 4
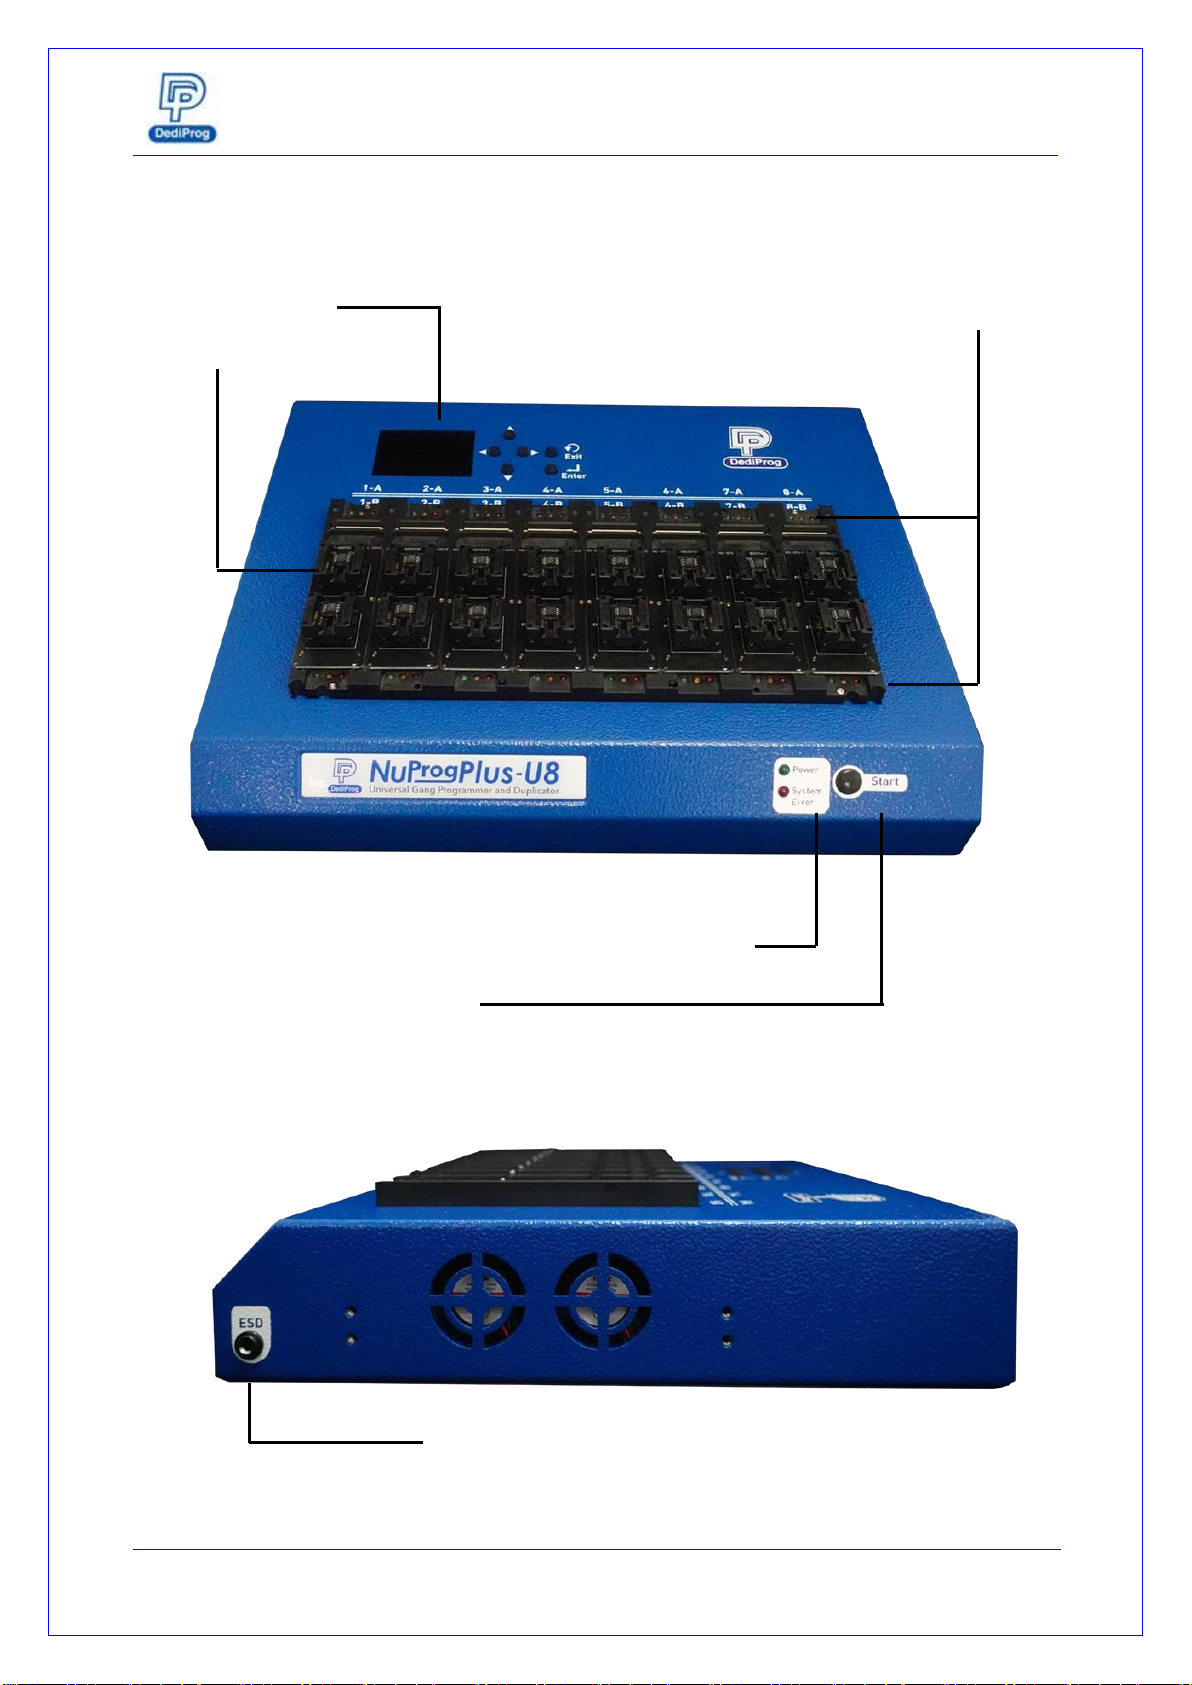
IV. Product Descriptions
E. Socket Sites
D. LCD Keypad Panel
B. Start Button
C. Status LED Indicator
A. Power and System status LED Indicators
F. ESD & GND

NuProgPlus-U8 User Manual
www.dediprog.com 5
A. Power and System Status LED Indicators
The System Error LED will turn off after the initialization is done.
B. Start Button
Use Start button to start programming in production mode.
C. Status LED Indicator
Red (Error): Programming fail
Yellow (Busy): In the progress of programming
Green (Pass): Program succeeds
G. USB Port
H. Power Connector
I.
Power Switch
F. ESD & GND

NuProgPlus-U8 User Manual
www.dediprog.com 6
D. LCD Keypad Panel
When the programmer is in the Stand-alone mode, the user can operate programming
through the LCD monitor and keypad.
E. Socket Sites
Install the socket adaptor according to different types of IC package.
F. ESD & GND
GND is for programming grounded; ESD is for connecting ESD wrist strap.
G. USB Interface
Control the Dediware software and the programmer by using the USB3.0 connector, one
end connects to the programmer; the other end connects to the USB3.0 port on the
computer
H. Power Connector
Connect with the DC 15V power cable provided by Dediprog (Input 100~240V/50~60Hz;
Output 15V)
I. Power Switch


NuProgPlus-U8 User Manual
www.dediprog.com 8
2. After installation, three Dediware icons will appear on the desktop.
Run the software for MCU/Flash/EEPROM programming
Run the software for eMMC and UFS programming and duplicating.
Supporting the Command line of the StarProg Series Programmers (Please refer
to the Dediware Command Line User Manual)
5.2 Install NuProgPlus-U8 Programmer
1. Connect the power cable to the NuProgPlus-U8 programmer
2. Connect the USB cable to the NuProgPlus-U8 programmer
3. Install the socket adaptor, please refer to VI. Socket Adaptor Installation
4. Turn on the power of the programmer
5. Place IC into the socket adaptor
6. Open the software and start programming

NuProgPlus-U8 User Manual
www.dediprog.com 9
5.3 Dediware (For MCU/Flash/EEPROM)
Note
It is able to create programming project file without connecting to NuProgPlus-U8. The user
can create project file on any computer that has installed Dediware. After creating the file,
the user can save the file on computer for programming.
1. Double click the software icon to open it
IC & Socket
Information
Checksum and
Programming File
Information
Production Quantity and
Batch Information
Engineering
Mode
Production
Mode
Log History
NuProgPlus-U8 User Manual
www.dediprog.com 10
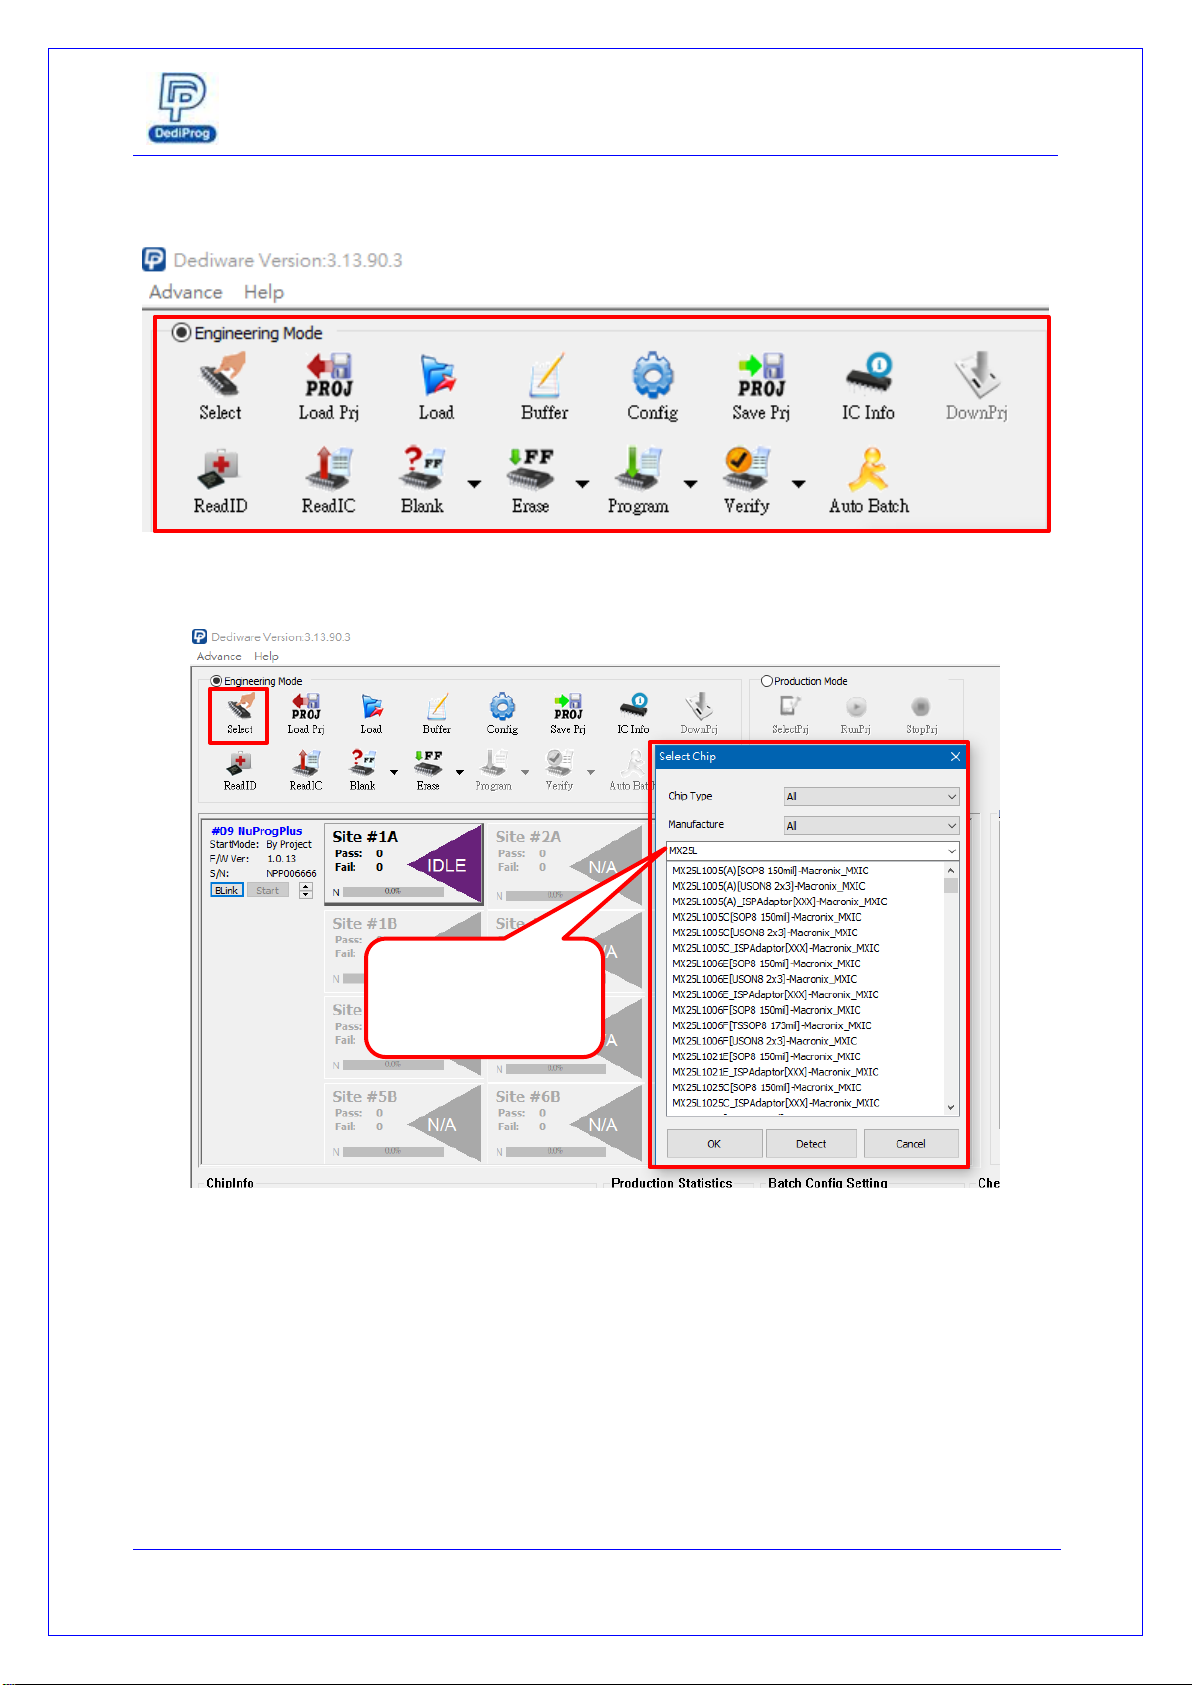
2. Switch to Engineering Mode
3. Select IC brand and IC Part Number (or use search to find the model name)
1
2
It is faster to find it
by entering the IC
model here

NuProgPlus-U8 User Manual
www.dediprog.com 11
4. Load the image file
5. Set up the programming procedure and mode
Other than set up Batch according to the programming need, user can also set up the Start
Mode and other functions according to different kinds of IC.
1
2
3
2
3
1
NuProgPlus-U8 User Manual
www.dediprog.com 12
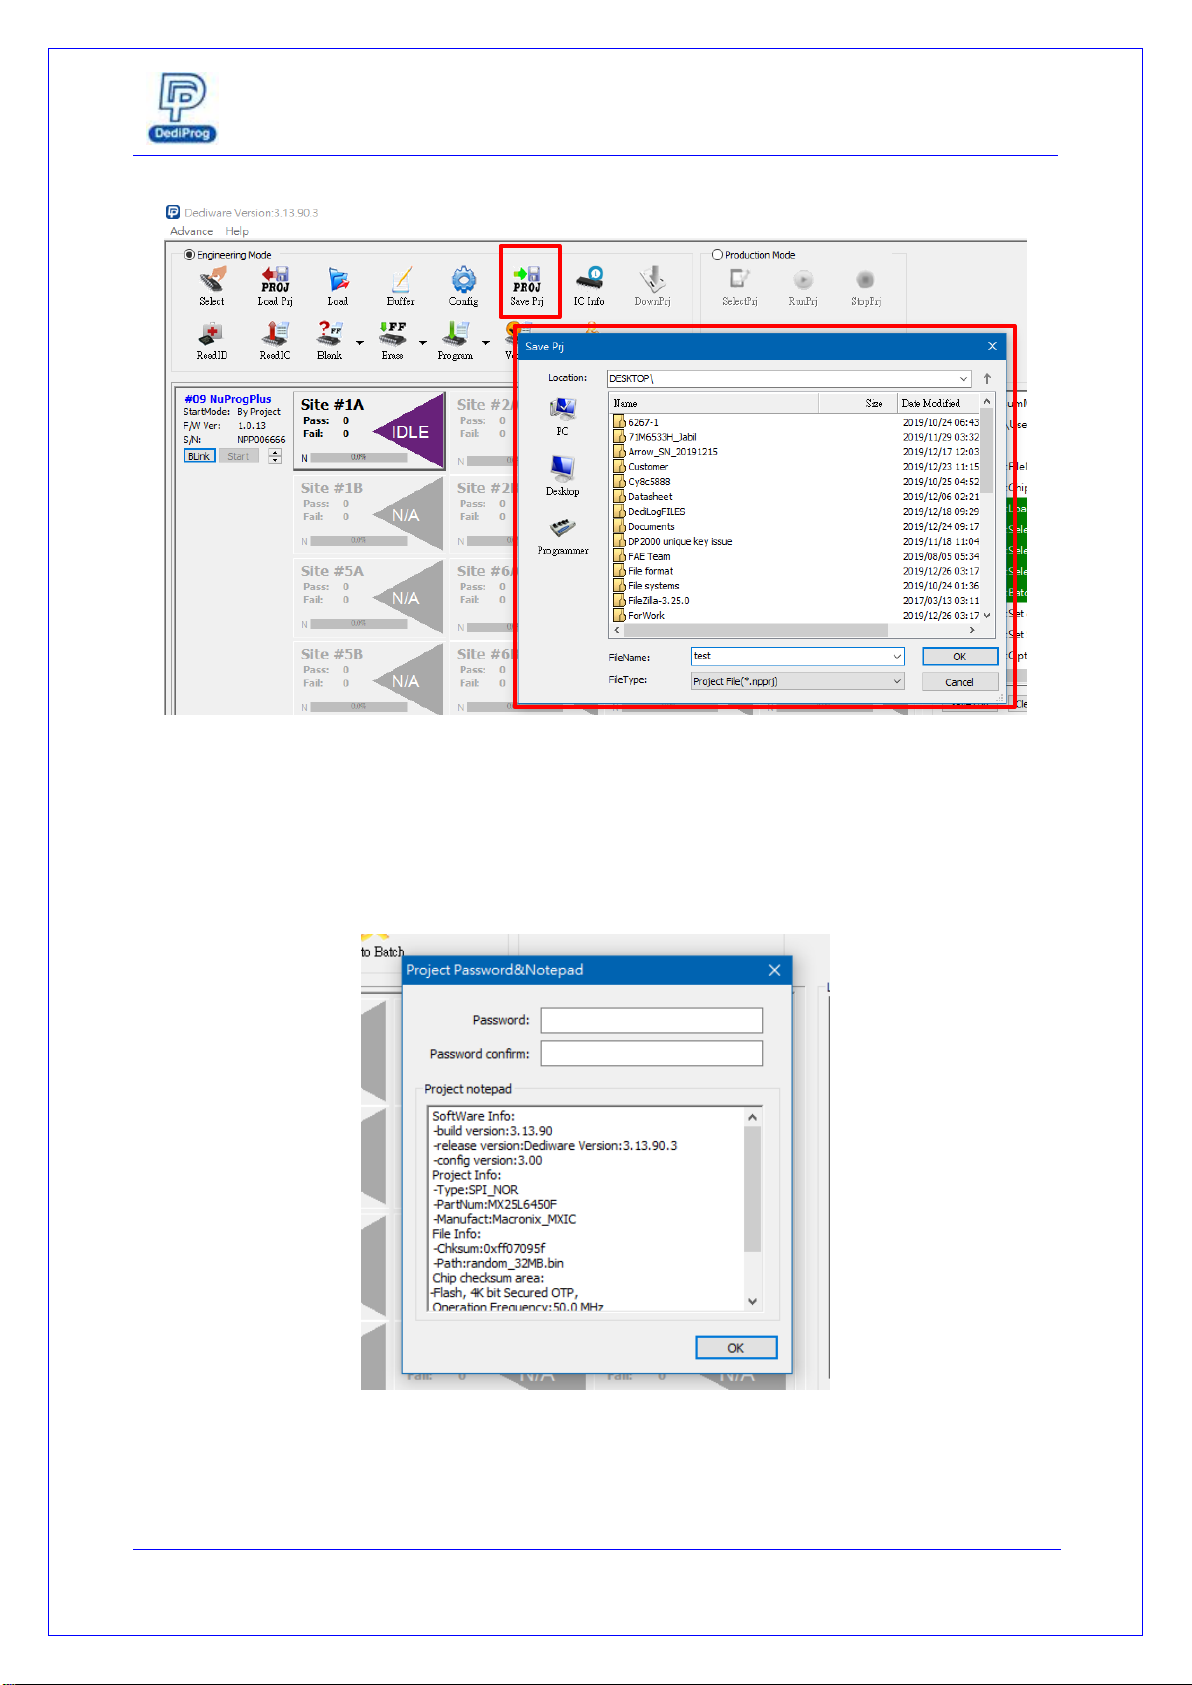
6. Save Programming Project File
Name the project file (*.npprj), once the user click ok, a window will appear for the user to set
up the password for production management. If the user has set the password, then it will be
requested when loading the project in the production mode. If not, then it will load the file
directly.
1
2

NuProgPlus-U8 User Manual
www.dediprog.com 13
5.4 Dediware Production Mode
After creating the project file, load it to the computer that has connected to other
programmer.
1. Open Dediware and switch to Production Mode.
2. Click SelectPrj to choose the programming project file.
1
2

NuProgPlus-U8 User Manual
www.dediprog.com 14
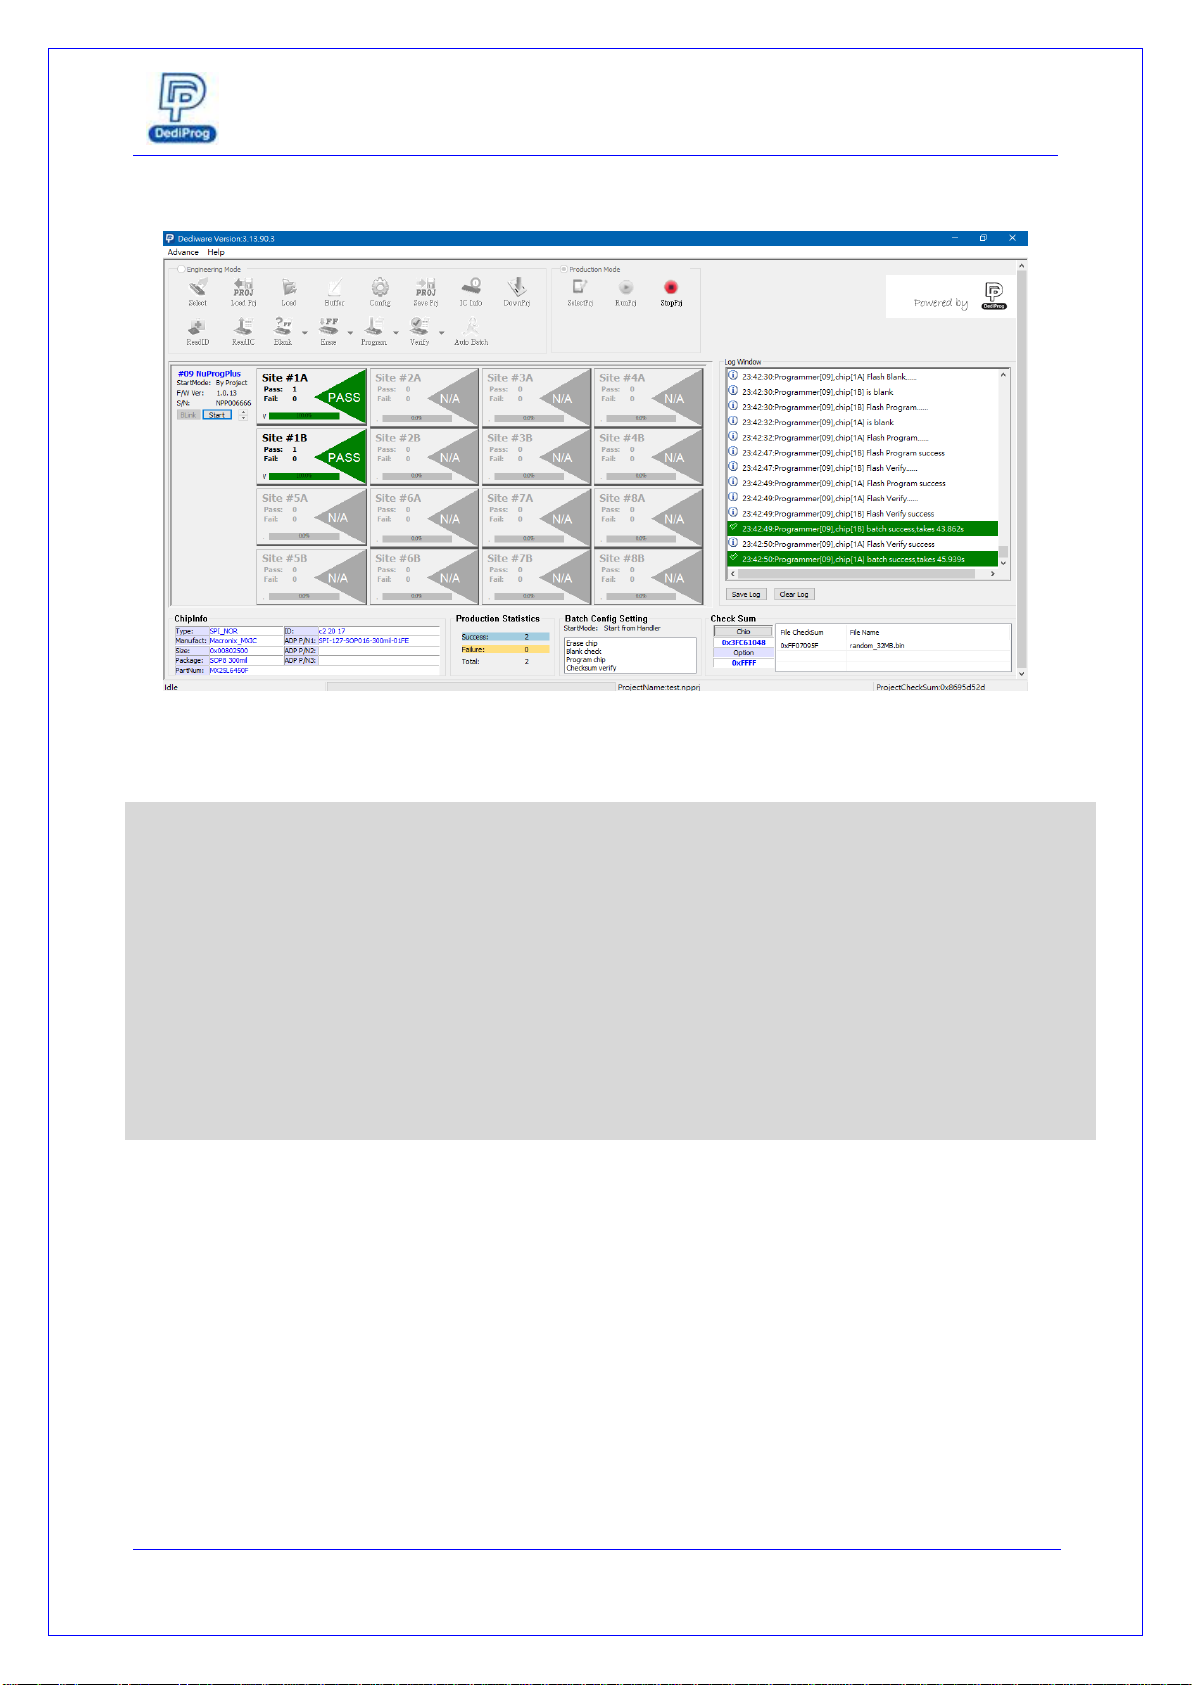
3. When the Log window appears “Select project success”, the RunPrj icon will become available.
4. After clicking “RunPrj”, the Log window will display all the socket adaptors’ status. If the socket site
did not install with the socket adaptor, then it will appear in grey, N/A. The start button will appear
and wait for the Start signal from the automated system to start programming. Meanwhile, the
StopPrj button will appear as well, which is for stopping the production. Once the user click the
StopPrj, then the software will create Log report for production tracking.
When “start” button appears, please wait for
the start signal on the automated
programming system to operate.
When the socket site is
empty, then it will be
yellow-marked.
NuProgPlus-U8 User Manual
www.dediprog.com 15
After programming completed, it will show the result, and the status LED indicator will change
accordingly.
Note
The socket adaptor must be installed properly before clicking “RunPrj.” Please pay attention
to the followings:
1. If the socket adaptor is not installed to the programmer properly, it might cause poor
connection; the Dediware will recognize it as N/A with grey status as well. Please re-
install the adaptor, and then click the SelectPrj and RunPrj to proceed.
2. Once the programmer has detected each socket site and determined it as empty
socket site, please do not install the socket adaptors on the empty site. If the user
want to install socket adaptor, please click StopPrj before install it, and then click
SelectPrj and RunPrj to detect.

NuProgPlus-U8 User Manual
www.dediprog.com 16
5.5 NuProg (For UFS/eMMC)
1. Switch to Engineering Mode
2. Click Detect > UFS/EMMC
1
2
When it detects ChipInfo, it
will show the IC Model

NuProgPlus-U8 User Manual
www.dediprog.com 17
3. Load the image and choose the target partition.
4. Set up programming procedure and mode
Other than set up the Batch setting according to the programming need, the user can turn on
the ID check function by checking the Skip Check ID box.
1
2
3
2
1
NuProgPlus-U8 User Manual
www.dediprog.com 18
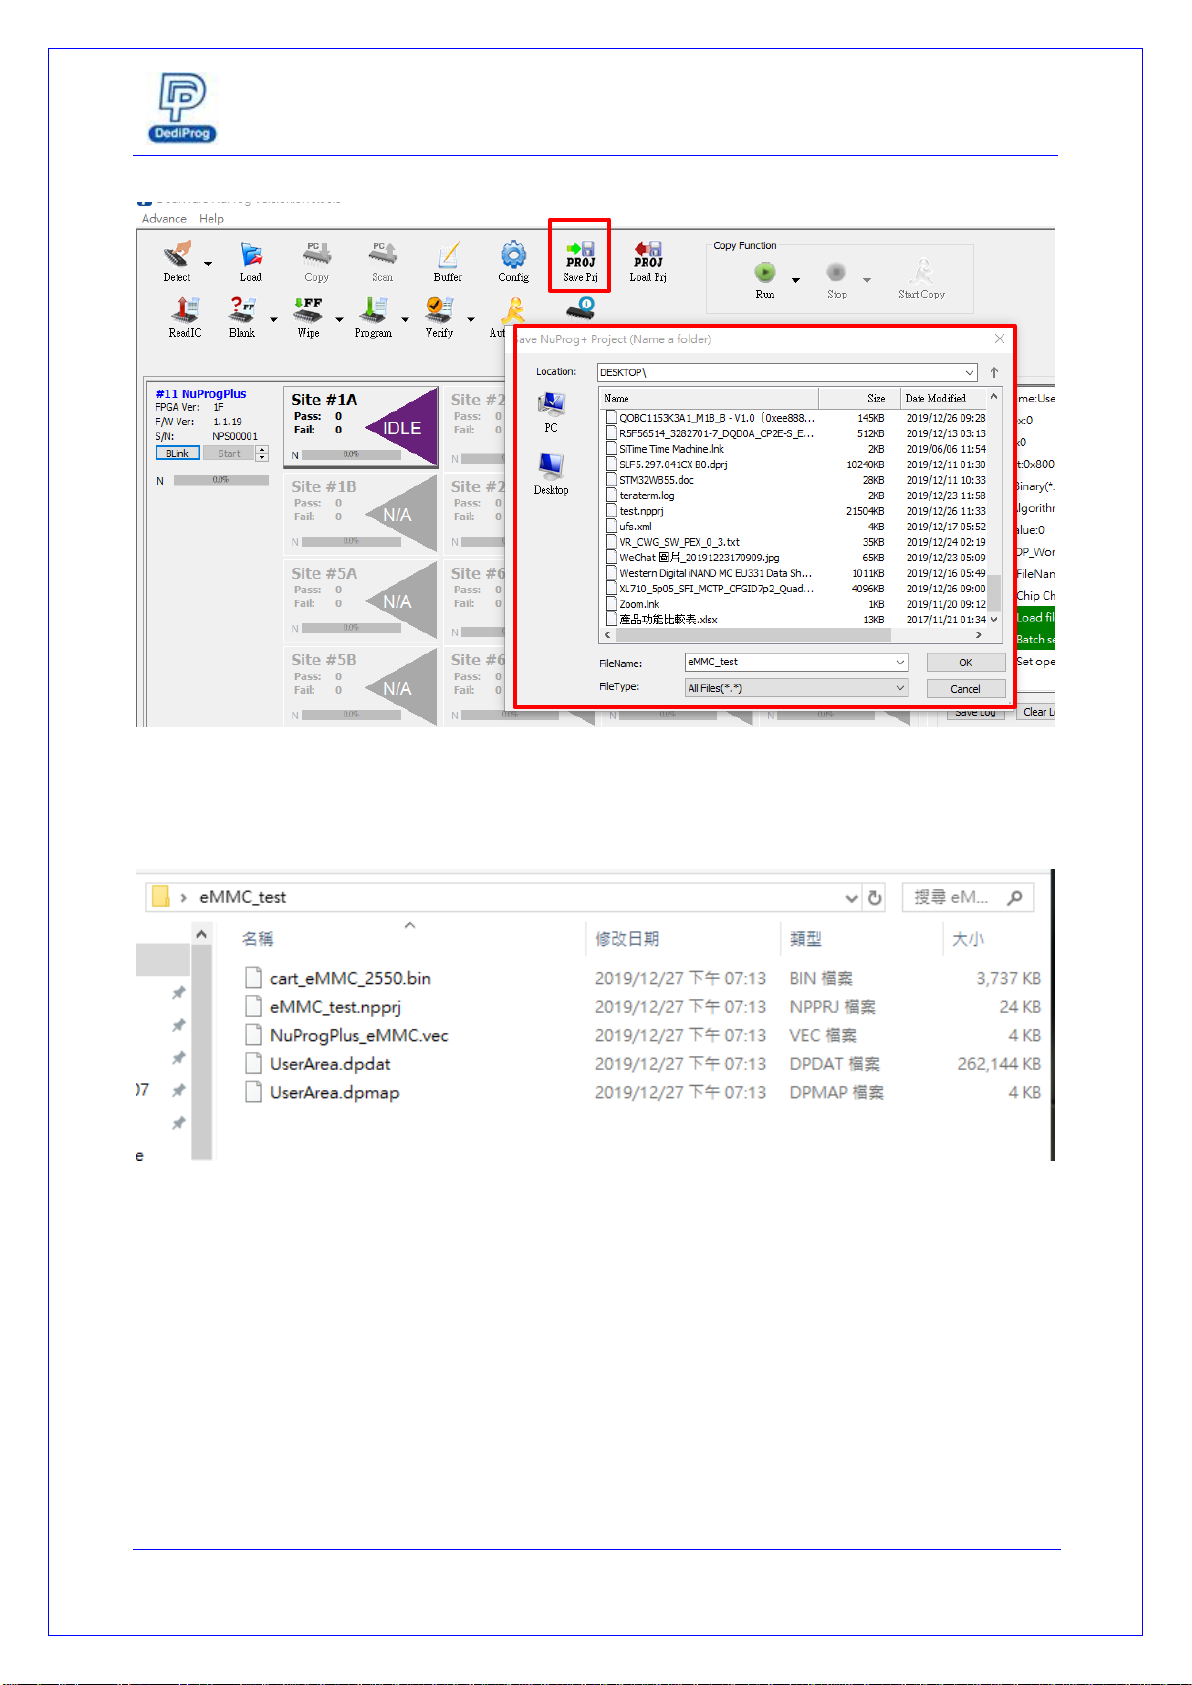
5. Save project file
After naming the file, it will create a folder at the assigned location, and it will store all the setting and
content that the project file need.
1
2
NuProgPlus-U8 User Manual
www.dediprog.com 19
5.6 NuProg Software Copy Mode
After creating the project file, load it to the computer that has connected to other
programmer.
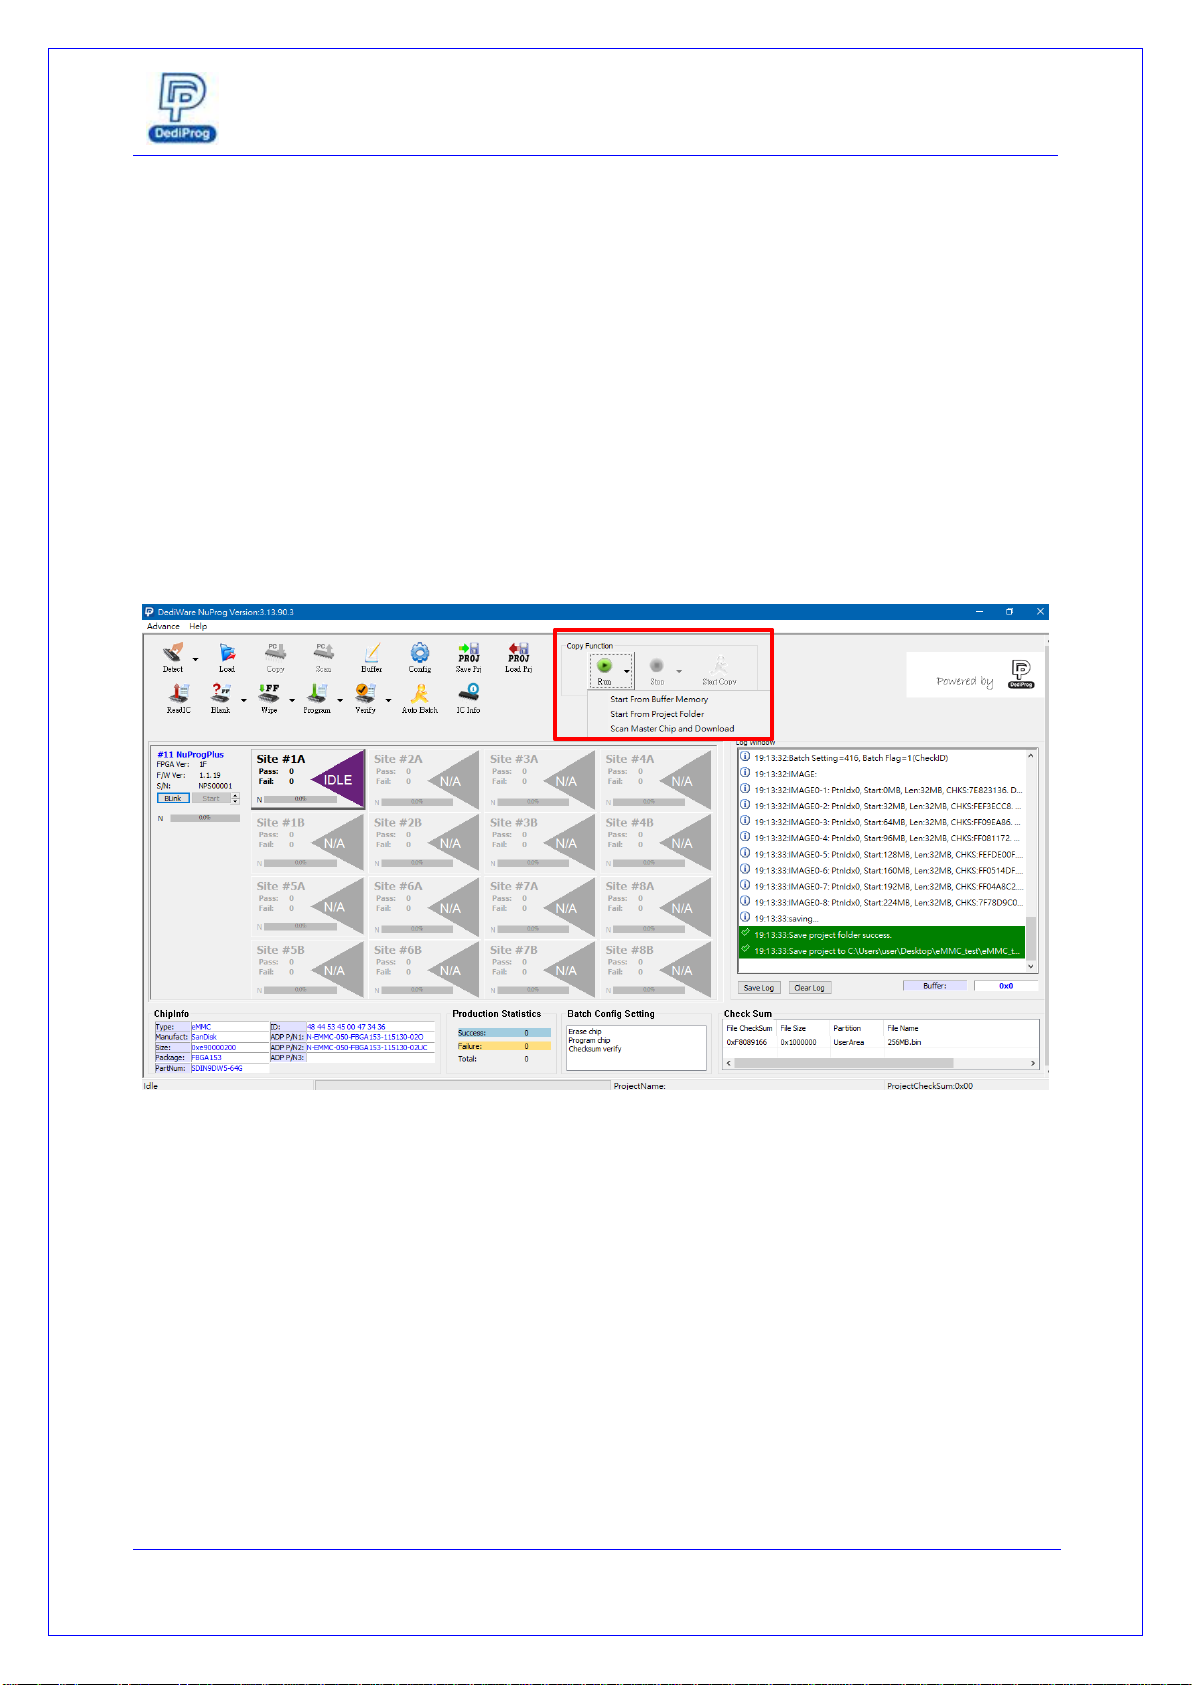
1. Click Run, there are three options.
Start from Buffer memory: Load the saved project file from the programmer memory
directly.
Start from Project folder: Choose the project folder from the computer, and the software
will load its data to the programmer memory. The next time using it, the user only needs
to click “Start from Buffer Memory” which will save the loading time.
Scan Master Chip and Download: Create the project file by scanning the mother IC on
site 1A and load it from the programmer memory.
NuProgPlus-U8 User Manual
www.dediprog.com 20
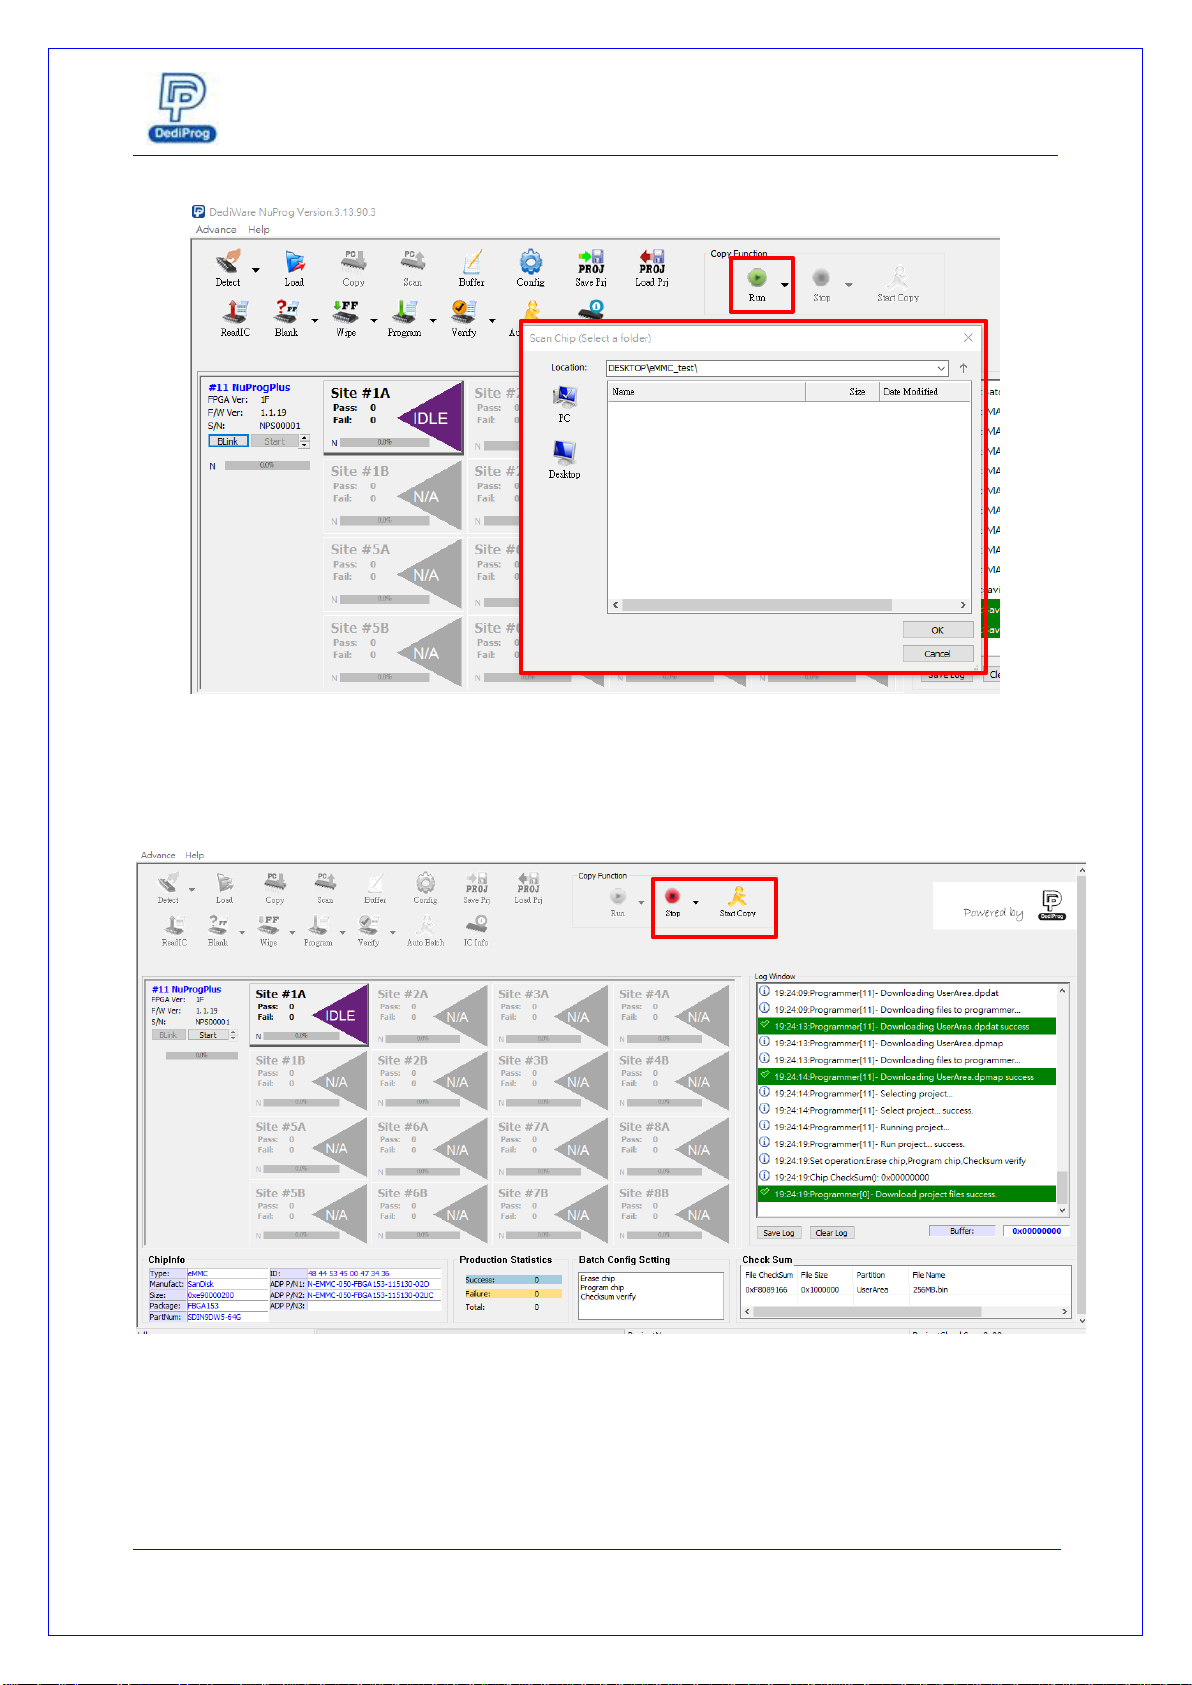
2. Use Start from Project Folder as an example, choose a programming project file.
3. The Log window will show “Download project files success”, meanwhile, the Run icon will
turn grey; the stop and start copy will appear.
1
2
This manual suits for next models
1
Table of contents
Other DediProg Motherboard manuals

DediProg
DediProg StarProg-ATE User manual

DediProg
DediProg StarProg-ATE User manual

DediProg
DediProg NuProg-E User manual

DediProg
DediProg SF600 Instruction Manual

DediProg
DediProg SF600 User manual

DediProg
DediProg NuProg-E2 User manual

DediProg
DediProg NuProg-F8 User manual

DediProg
DediProg NuProg-E User manual

DediProg
DediProg StarProg Series User manual

DediProg
DediProg StarProg-A User manual


