DeeZee DZ8270A User manual

Tool Boxes
Thank you for choosing Dee Zee to add function and accessorize your vehicle. Dee Zee has been a staple
brand in the truck accessory market since 1977 and we hold a reputation of quality manufacturing
based in America’s Heartland. Our products are born through careful engineering and backed by industry
leading warranty programs. We appreciate the opportunity to serve you and your vehicle!
Review the instruction pages in their entirety to prepare the required tools
Warning: The included J-Bolts must be used during installation to secure the crossover tool box to the truck
bed. Do NOT use self-tapping screws on crossover tool boxes. Self-tapping screws can be used only on chest
style tool boxes being installed to the truck bed.
The tool box warranty is void if one of these securing methods is not used.
Note: Dee Zee tool boxes are NOT air tight. An air-tight seal allows condensation to form inside of the box,
causing the contents to be susceptible to mold or rust. Dee Zee boxes feature various bulb seals and foam
gaskets on the lid to help resist weather elements.
Tool box locks are provided as a theft deterrent and they should always be engaged to prevent easy access to
the contents of your tool box when not in use. Contents stored in the tool box are the responsibility of the
user and Dee Zee disclaims responsibility of theft. Dee Zee does not insure any loss of contents.
Cleaning: To be entitled to all warranty rights offered with the product, Dee Zee tool boxes need to be cleaned
regularly with a mild detergent. Do NOT use abrasive cleaners. For stainless steel products, the application of a
high grade automotive wax is recommended.

TB 8170A-BODY
X2
TB8170A006
X2
BOTTOM
END PIECE
#10 CARRIAGE BOLT
TB8170A008
X2
TB8170A007
X2
PN ???
X24
PN 931
X40
PN ???
X40
PN 656
X12
PN ???
X24
BOLT
PN 934
X16
PN 549
X2
PN 90
X2
PN 113
X2
PN 89
X2
PN 550
X2
FGT 49
X1
FGT 12
X2
WRENC /RATC ET
3/8"
TAPE
MEASURE
SCISSORS
M4 ALLEN
13/32" DRILL BIT
TOOLS REQUIRED
ACORN NUT
N O P
VINYL CAP3/8" LOCK WAS ER
J K L
#10 BUTTON EAD J-BOLT
LARGE GASKET
3/8" WAS ER
M
Q
C D E
F G I
#10 WAS ER
Dee Zee Brite Tread Tool Box Installation Instruction
Dee Zee Brite Tread Tool Box Installation InstructionDee Zee Brite Tread Tool Box Installation Instruction
Dee Zee Brite Tread Tool Box Installation Instruction
TOOL BOX FRONT/BACK
A B
DZ 8270A
DZ 8270ADZ 8270A
DZ 8270A
#10 LOCK WAS ER #10 NUT
H
SMALL GASKET
3/8" NUT
PS TB BOLT TOGET ER 1 OF 9
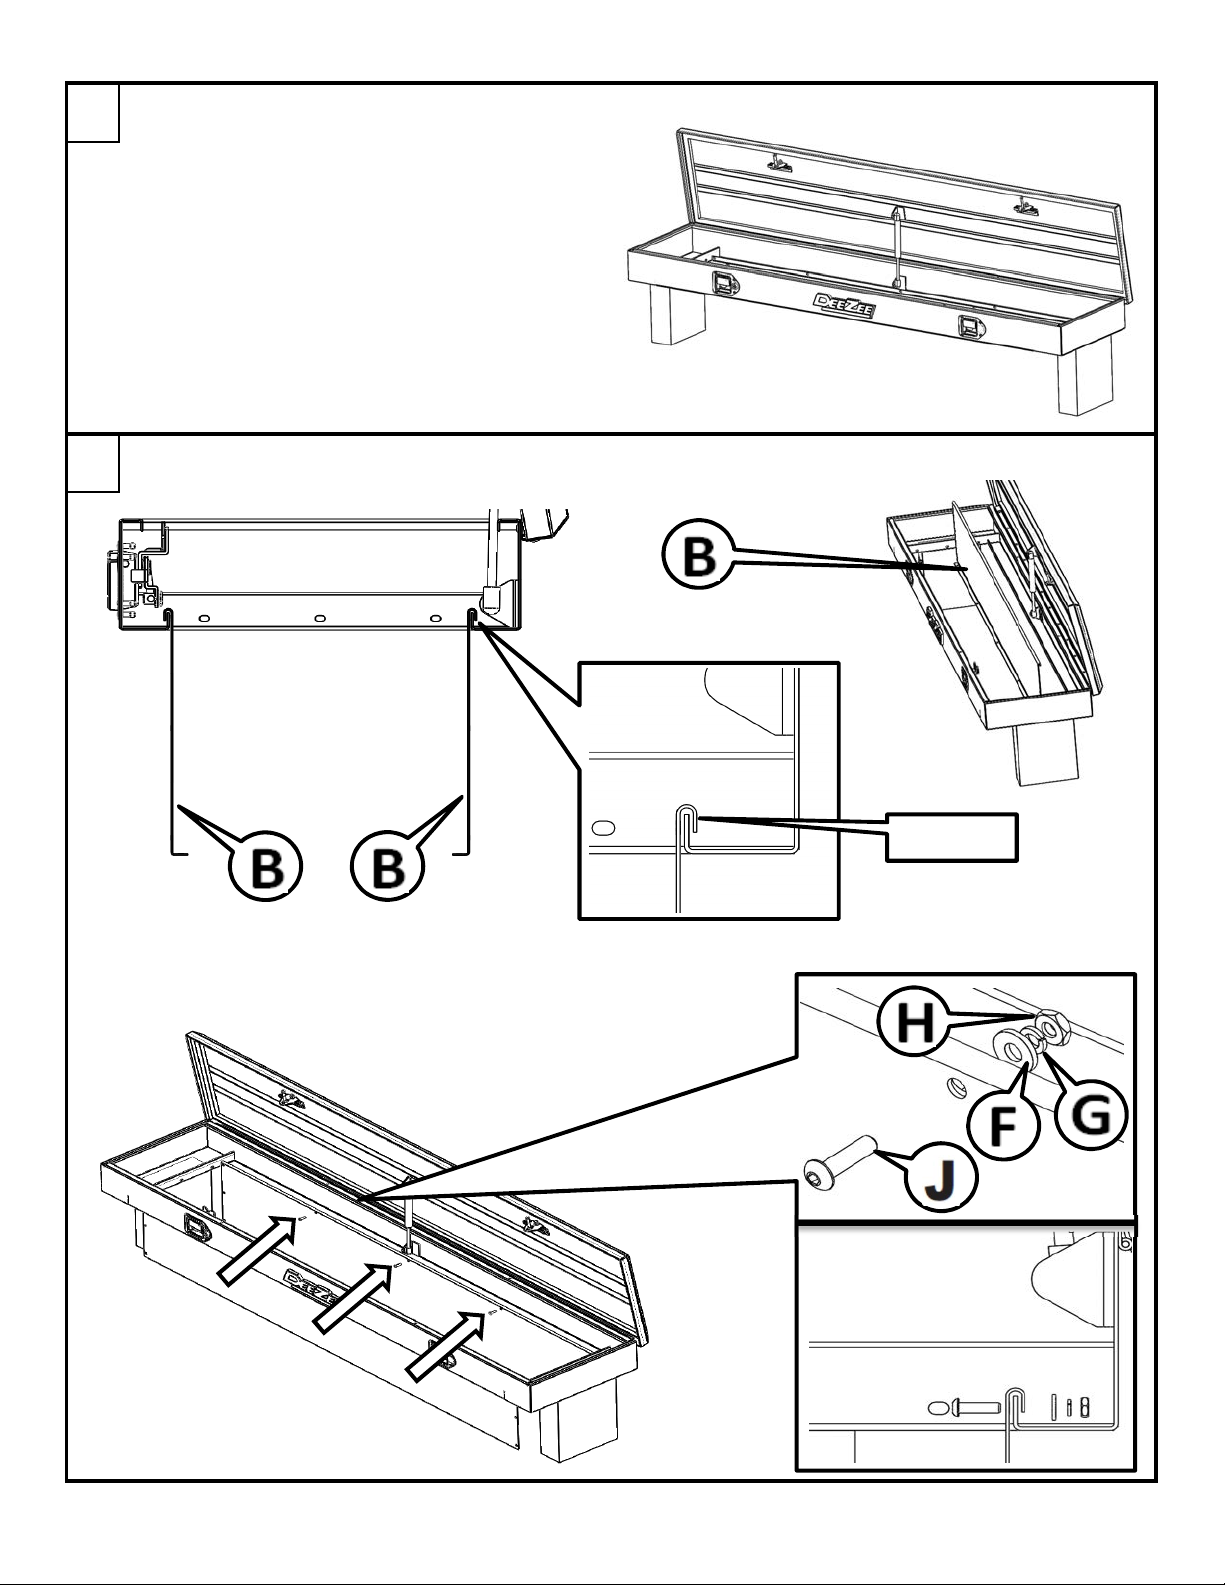
Styrofoam blocks are provided to help with the assembly of the box.
Set the ends of the box on the styrofoam.
To make the assembly as easy as possible,
do
NOT
tighten any of the hardware listed in the
steps below until told to do so.
Leaving the hardware and tool box pieces loose
will make aligning the holes easier.
Take the FRONT/BACK [B] and place them in position in the tool box. The end with the "hook" will sit on
the lip in the tool box.
Loosely attach the FRONT/BACK pieces with the #10 button head bolt [J], #10 washer [F], #10 lock washer [G],
and #10 nut [ ]. Only attach these pieces in the three middle locations.
Do this for both the front and back piece.
1
2
HOOK
PS TB BOLT TOGET ER 2 OF 9
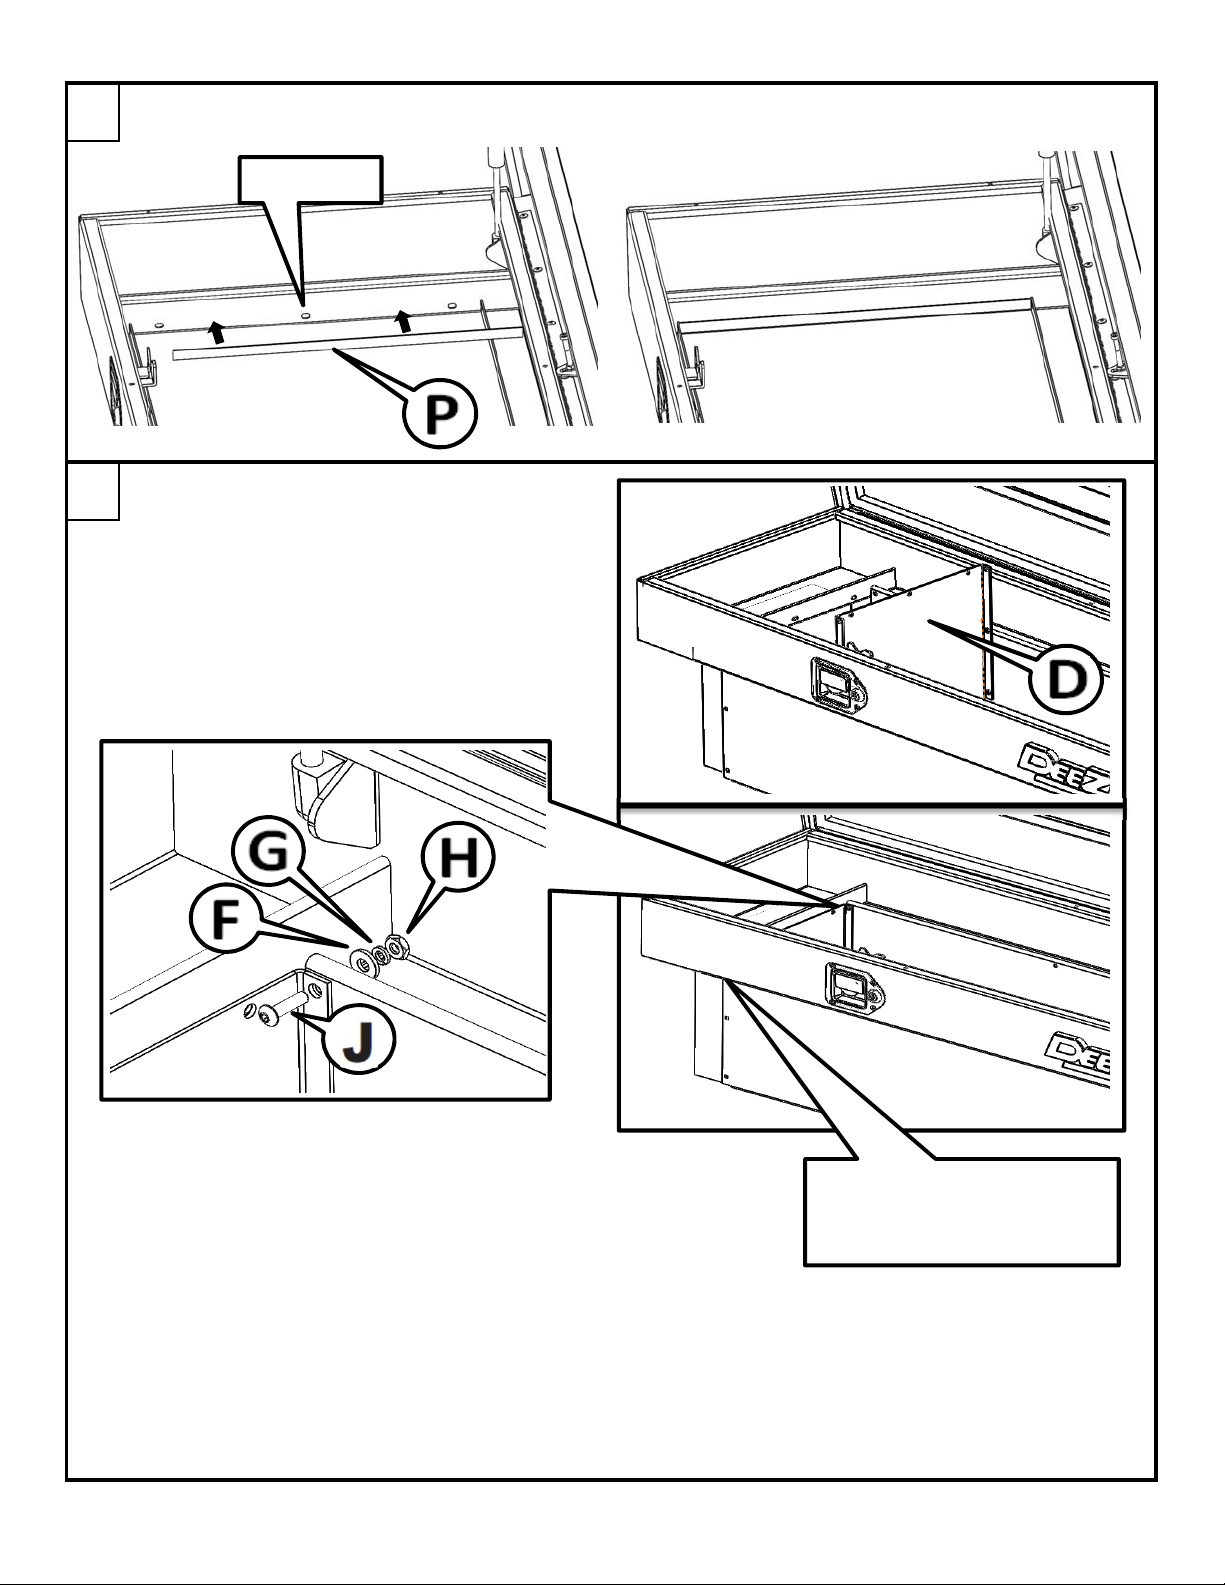
Cut and apply gasket [P] to the end piece over the 3 slots.
The gasket should run from corner to corner. Repeat for other end.
Peel the plastic from the end pieces [D]. Place
the end piece in the box as shown and
Loosely attach the end piece with a
#10 button head bolt [J], #10 washer [F],
#10 lock washer [G], and #10 nut [ ].
Only attach the end piece at the top on
both the front and back.
Repeat this step for the other end piece.
3
4
SLOTS
ATTACH TOP ON
FRONT ALSO
PS TB BOLT TOGET ER 3 OF 9

Push the bottom of the end piece out as shown below on both ends of the box.
Place the BOTTOM [C] into the tool box with the diamond tread surface up.
Push the bottom of the end pieces in making sure that the bottom piece is under the end piece
flange.
5
PUSH OUT
TREAD
PUSH IN END PIECE
FLANGE
BOTTOM
BOTTOM
END PIECE
FLANGE
PS TB BOLT TOGET ER 4 OF 9
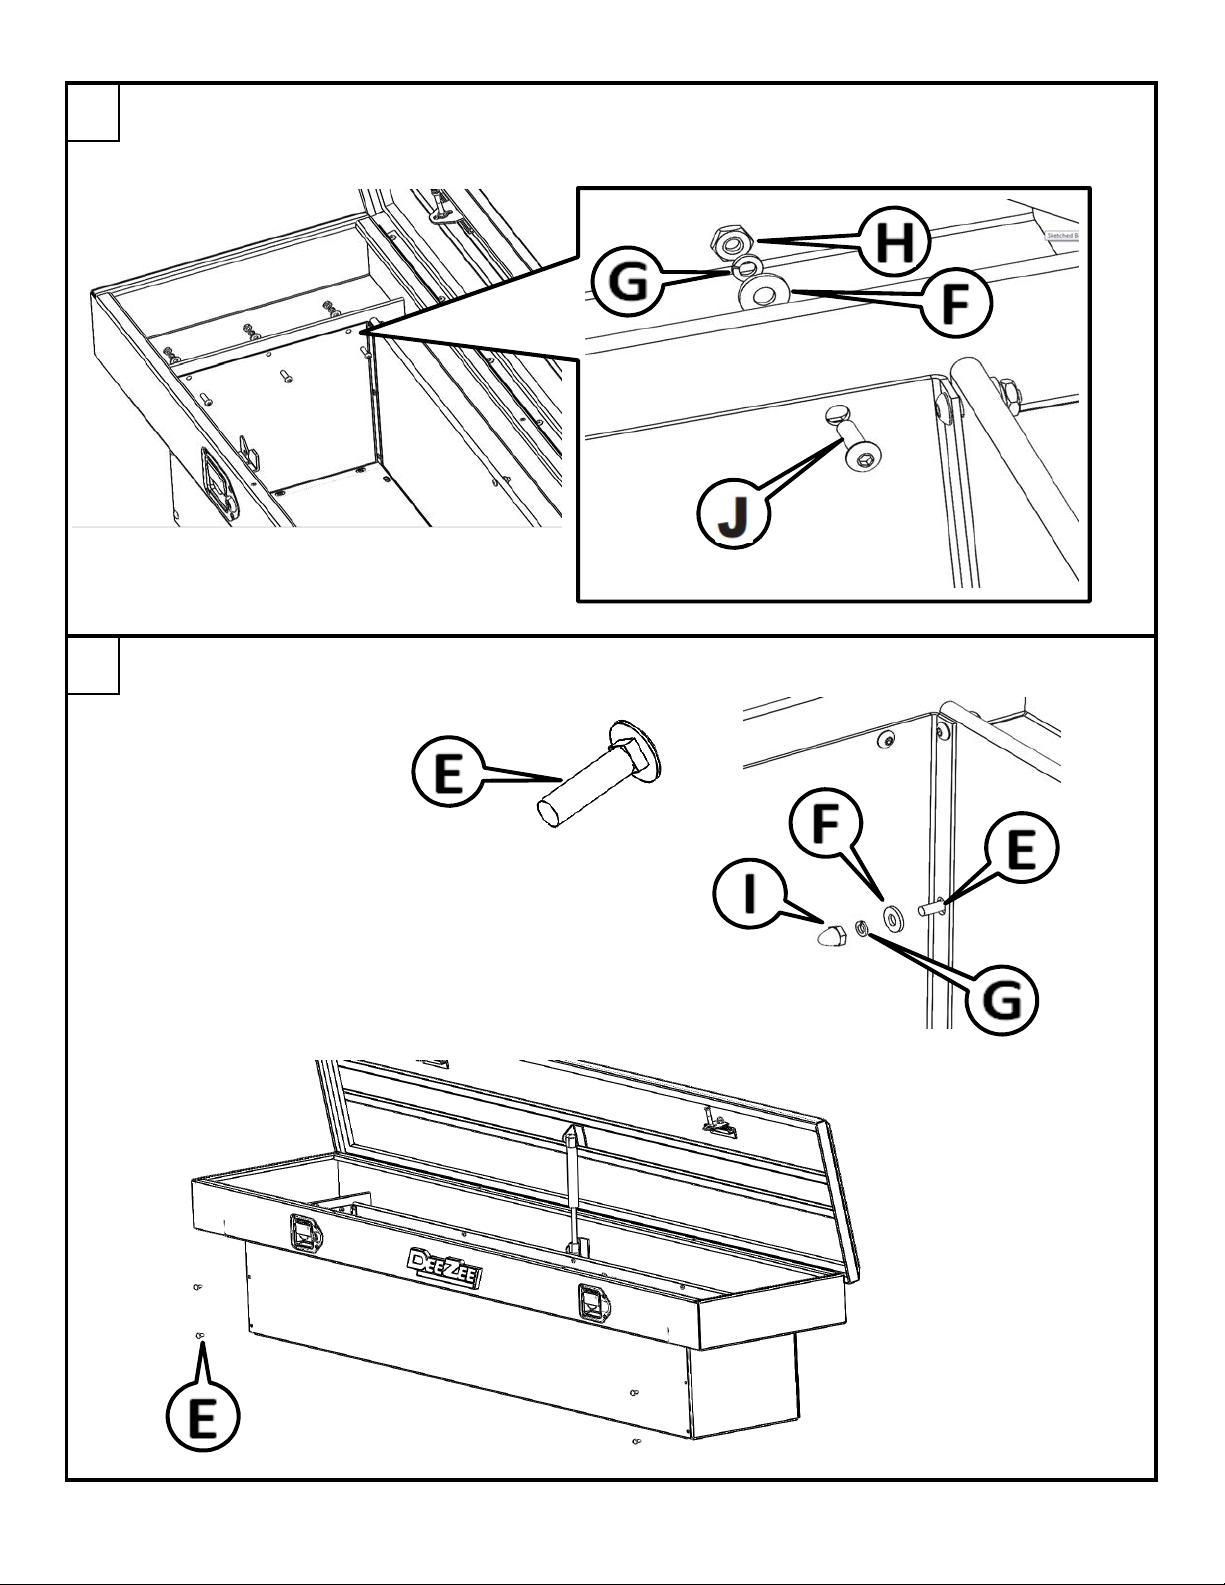
Loosely attach the top edge of the end piece with three #10 button head bolt [J], #10 washer [F],
#10 lock washer [G], and #10 nut [ ]. Repeat for the other end.
The button head bolt will have to be pushed through the gasket installed previously.
The rest of the box will be assembled using the square neck carriage bolt [E], #10 washer [F],
#10 lock washer [G], and #10 acorn nut [I].
The hardware is still to be installed loosely.
Attach the front of the box to the end piece.
6
7
PS TB BOLT TOGET ER 5 OF 9

Attach the back of the box to the end piece.
Attach the bottom of the box to the front, back and end pieces.
*
Once all of the pieces have been bolted together loosely, the hardware can be tighted.
Start at the top and work towards the bottom.
*
For the button head bolts, this process can be made quicker by using a cordless drill with
a 4mm allen drive and a 3/8" wrench.
*
For the carrriage bolts, this process can be made quicker by using a cordless drill with a
3/8" socket. Make sure that the carriage bolt is engageing the hole before tightening.
To help reach the nuts attaching the button, a long extension will need to be used.
TIG TEN ARDWARE
AROUND T E TOP FIRST
TIG TEN ARDWARE ON
FOUR CORNERS SECOND
TIG TEN ALL ARDWARE
ATTAC ING BOTTOM LAST
PS TB BOLT TOGET ER 6 OF 9

TO INSTALL TOOL BOX IN TRUCK BED:
Peal the backing covering the adhesive on the large gasket [Q].
Apply the large gasket to the underside of the tool box.
Place the tool box in the truck and center it on the vehicle.
Open the lid to make sure there is sufficient clearance for the cab.
9
PS TB BOLT TOGET ER 7 OF 9
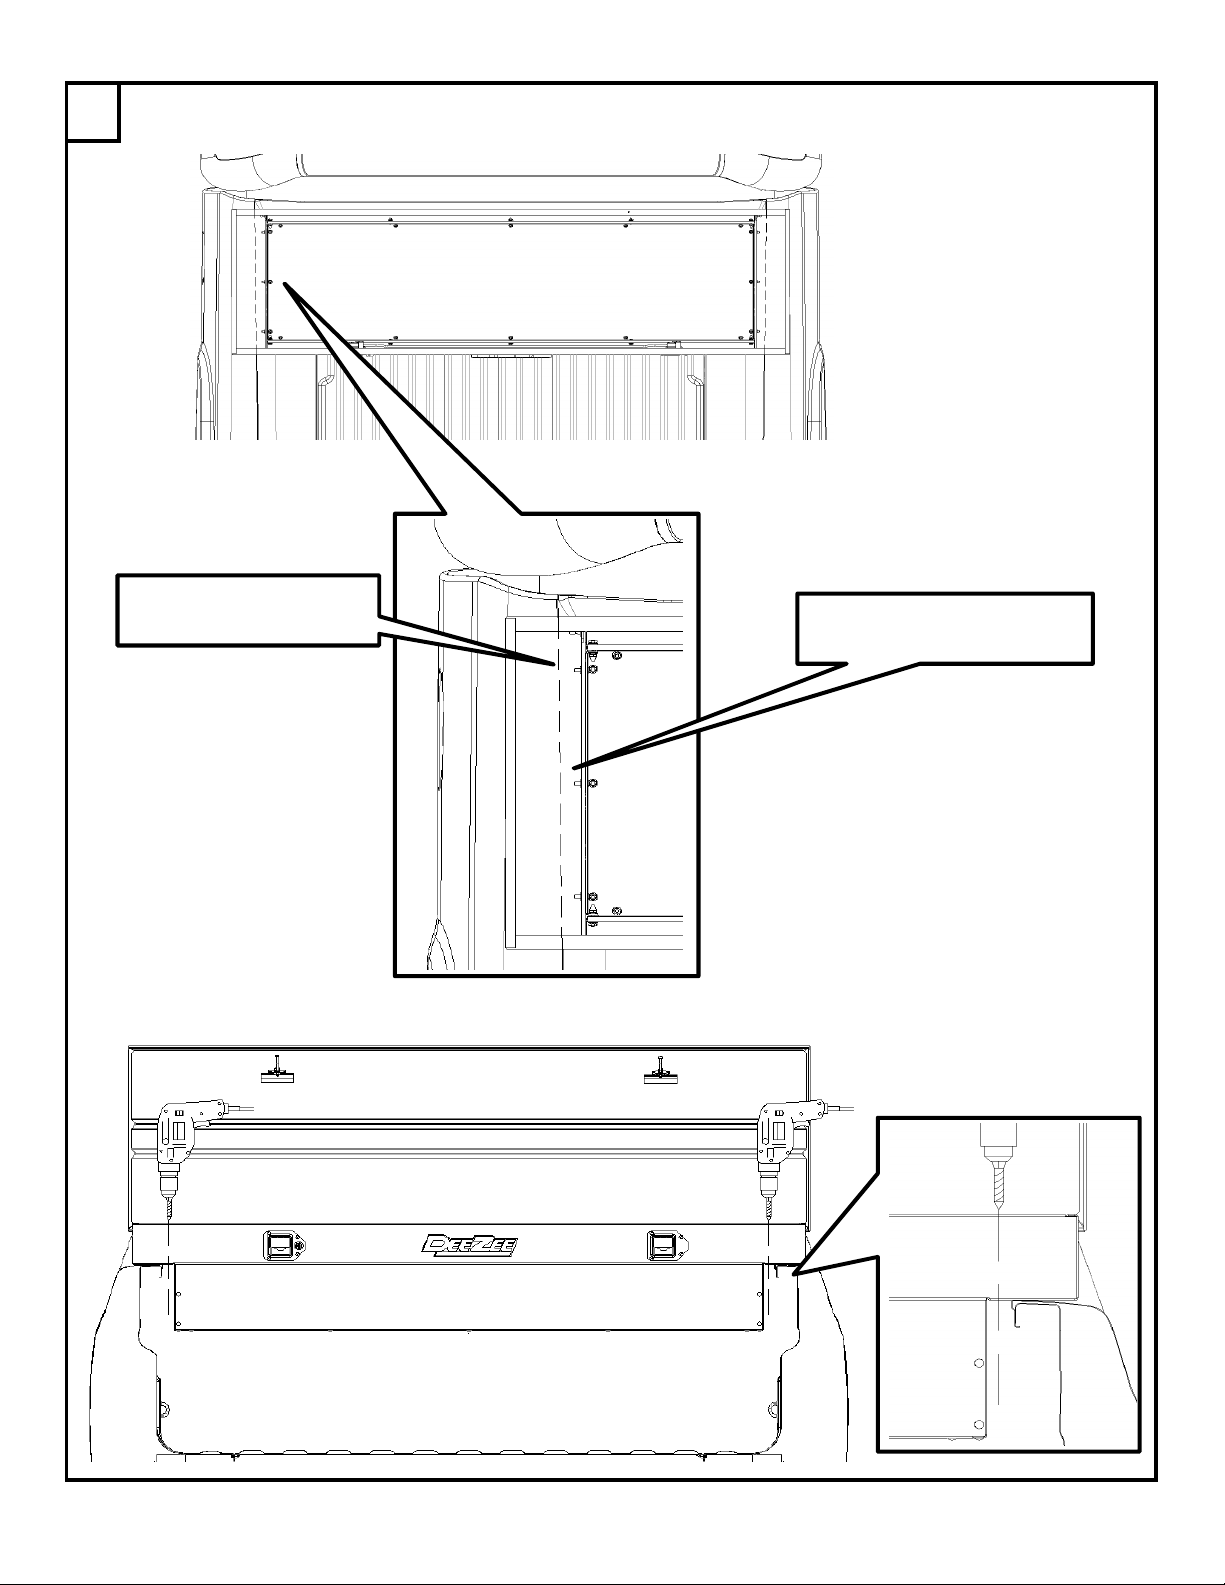
Once the tool box is centered, mark and drill the mounting hole for the J-hook.
The mounting hole should be near the center of the box, and near the lip of the truck bed rail
TOP VIEW OF TOOL
BOX BODY IN TRUCK BED
Drill a 13/32" hole on ench end of the tool box. Be sure to drill between the edge of the tool box and
the bed rail.
10
LIP OF TRUCK BED RAIL
UNDER TOOL BOX OLE FOR J-BOLT S OULD BE
IN T IS AREA
PS TB BOLT TOGET ER 8 OF 9
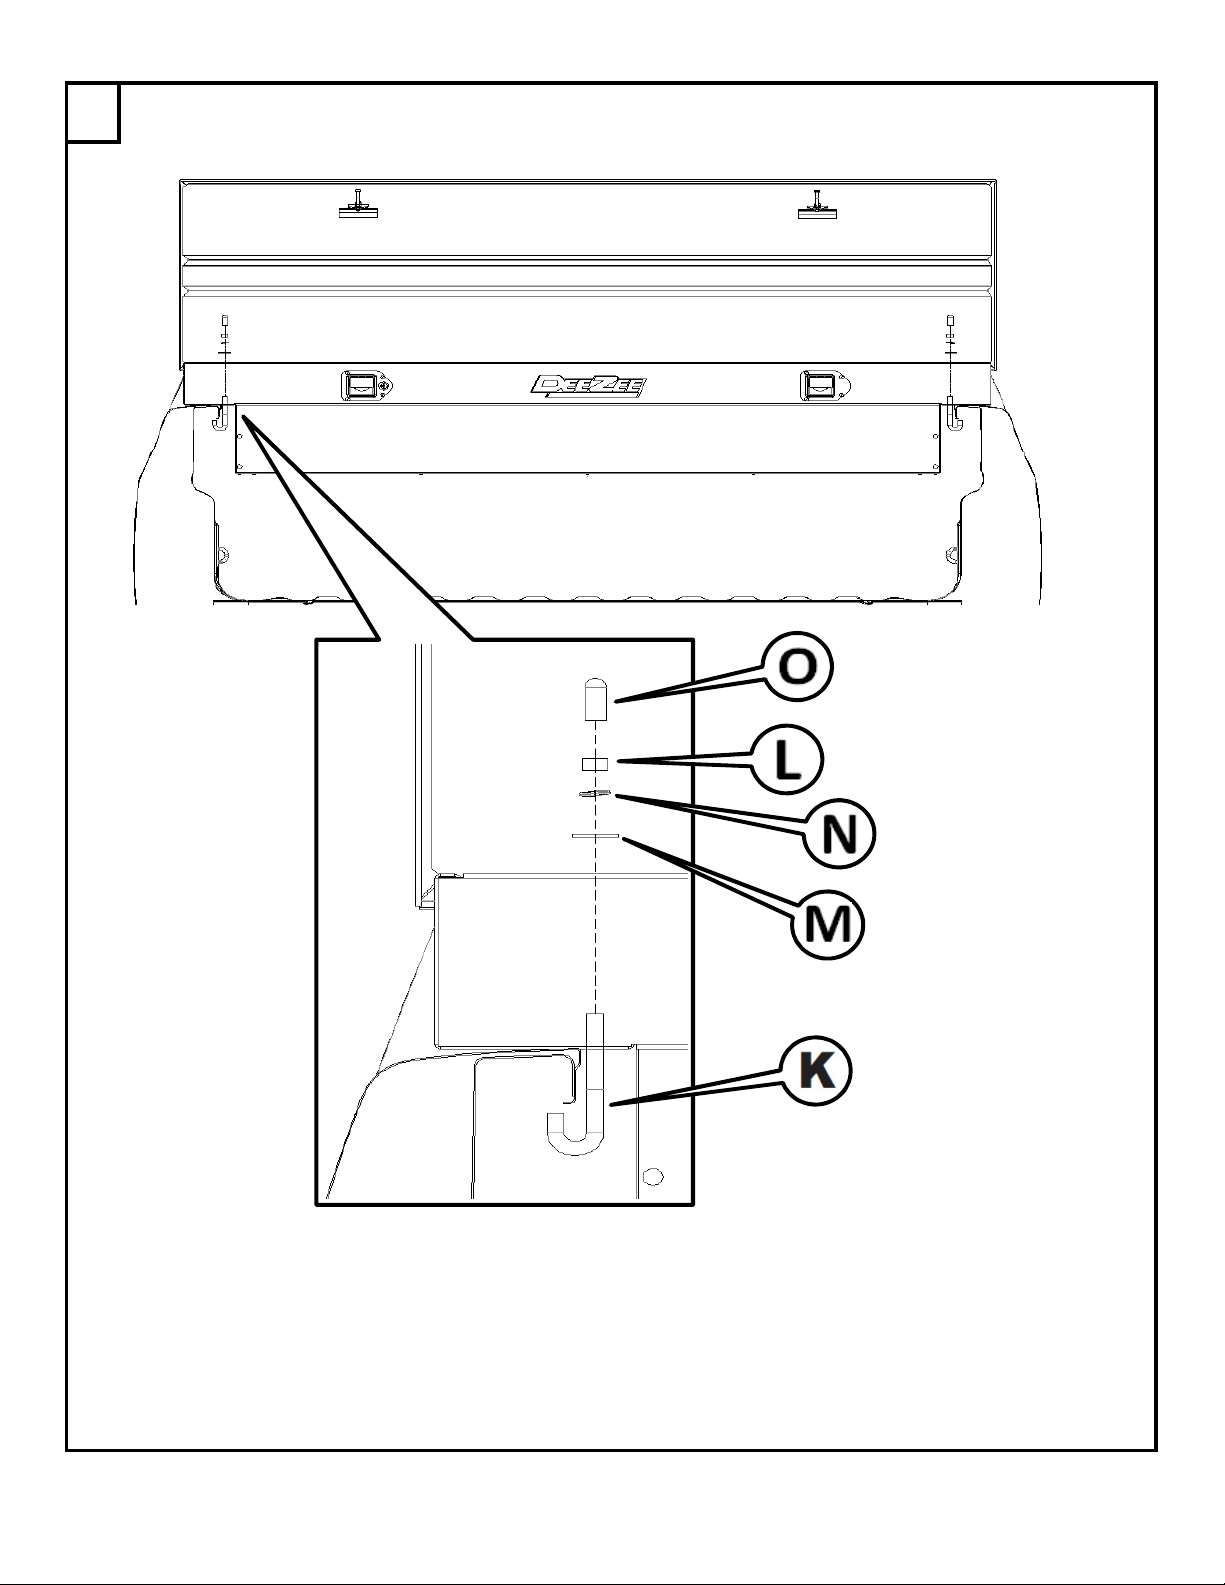
Once the holes are drilled, attach the tool box using the J-bolt [K], 3/8" washer [M], 3/8" lock washer [N],
and 3/8" nut [L]. Once the tool box is secured, palce the vinyl cap [O] in the exposed J-bolt threads.
Use a 9/16" deep well socket, or a 9/16" wrench to tighten.
11
PS TB BOLT TOGET ER 9 OF 9
Table of contents


