Deitz Pharmafill PS1 Packserter User manual
Model PS1 Packserter
Operation Manual
REV B

2022-10-04 REV B Pharmafill Model PS1 Operation Manual
Page
2
CONTENTS
1. INTRODUCTION............................................................................................................... 5
2. SPECIFICATIONS .............................................................................................................. 7
3. INSTALLATION
Unpacking ............................................................................................................... 8
Commissioning........................................................................................................ 8
Fiber-Optic Sensors and Air Cylinders .................................................................. 10
Compressed Air..................................................................................................... 10
Electric................................................................................................................... 11
4. FEATURES
General.................................................................................................................. 13
Illustrated Features............................................................................................... 14
Adjustable Machine Height................................................................................... 15
5. OPERATION
Power Up............................................................................................................... 16
Using the Control Panel ........................................................................................ 18
Insert Packets........................................................................................................ 19
Adjust Settings ...................................................................................................... 22
Feed Options......................................................................................................... 24
One Step Options.................................................................................................. 25
Technician Only..................................................................................................... 26
6. SETTING UP FOR A RUN
Install Supply Roll.................................................................................................. 28
Install Change Parts............................................................................................... 28
Start Up ................................................................................................................. 28
Feed In the Supply Strip........................................................................................ 28
Adjust Roller Guides.............................................................................................. 29
Setup Conveyor..................................................................................................... 29
Adjust Settings ...................................................................................................... 29
Adjust Machine Height ......................................................................................... 29
Use One Step Options........................................................................................... 29
Run a Manual Test ................................................................................................ 29
Adjust Dual Sensor Mounting Block ..................................................................... 29
Illustrations ...................................................................................................... 20-33
7. RUNNING PRODUCTION
Start Up ................................................................................................................. 34
Check Supply Roll.................................................................................................. 34

2022-10-04 REV B Pharmafill Model PS1 Operation Manual
Page
3
Check Bottles ........................................................................................................ 34
Test Operation ...................................................................................................... 34
Begin Operation.................................................................................................... 34
Stopping The Packserter Manually ....................................................................... 35
When The Packserter Stops Automatically........................................................... 35
8. ROUTINE MAINTENANCE
Installing Change Parts.......................................................................................... 36
Cleaning................................................................................................................. 41
Belt Maintenance.................................................................................................. 41
Knife Maintenance................................................................................................ 42
Knife Blade Adjustment ........................................................................................ 42
Sensor Adjustment................................................................................................ 44
Illustrations ...................................................................................................... 45-46
9. TECHNICAL INFORMATION
Cycle of Operation ................................................................................................ 48
Troubleshooting.................................................................................................... 49
Index of Technical Notes/Drawings ...................................................................... 50
(Technical Notes/Drawings Begin After Last Page)

2022-10-04 REV B Pharmafill Model PS1 Operation Manual
Page
4
Warning
This machine contains moving parts and operates
automatically. This may present a hazard to
personnel.
Never operate this machine with any covers or guards removed or any guard switches or safety
devices removed or bypassed.
Only people who have been correctly trained should operate or clean this machine.
Only people who are correctly qualified and trained should carry out maintenance, installation,
or any other service work.
Never clean or service the machine without isolating the
electrical supply and isolating the air supply.
Always test for the presence of voltage before touching or working on electrical components.
Note that there might be other requirements that could apply.
Refer to the manuals supplied by the component manufacturers for further safety instructions.

2022-10-04 REV B Pharmafill Model PS1 Operation Manual
Page
5
Section 1 - INTRODUCTION
Thank you for purchasing a Pharmafill Model PS1 PACKSERTER automatic packet inserter. We at
Deitz Company hope you will find that the Model PS1 meets or exceeds your expectations and
requirements for an affordable, reliable, and innovative addition to your packaging operation.
Pharmafill products are designed and manufactured by Deitz Company Inc., in Wall, NJ, USA. We
have manufactured machinery for the bottle filling industry since 1966 and began directly
marketing our Pharmafill line in 1993. We are a small (but growing) family-owned business that
emphasizes quality, innovation, and superior customer service.
If you have any questions or comments, please contact us by phone or visit our website. Chances
are someone whose last name is Deitz will handle your inquiry personally.
Deitz Company Inc.
PO Box 1108
1750 Route 34
Wall, NJ, USA 07719
Tel 732-681-0200
Fax 732-681-8468
E-mail sales@deitzco.com or
sales@pharmafill.com
Web site deitzco.com or
pharmafill.com
The operation manual is designed to make it easier for you to know the machine and to make use
of its intended range of operation. It contains important instructions on how to operate the
machine safely, adequately, and economically. Observing these instructions helps to avoid risks, to
reduce cost for repair work and machine downtime, and enhances the machine’s operational
reliability and lifetime.
The operation instructions are to be supplemented by further instructions due to existing national
regulations on accident prevention and environmental protection.
If used in compliance with the instructions contained in this manual and if safety devices are
regularly maintained and properly working, this machine is not dangerous to the operator.
This manual is to be kept accessible to all operators using this machine and it is assumed that
before use the operator will read fully and understand this manual and will follow instruction
stated within.

2022-10-04 REV B Pharmafill Model PS1 Operation Manual
Page
6
As this machine may be used in the packaging of hazardous substances, the operator should be
aware of the precautions required for these substances.
In addition to the operating instructions and the binding regulations on accident prevention valid in
the country where the machine is being used and at its operational site, the recognized technical
rules on safe and proper working must be observed as well.
These operating instructions and the information contained therein have been compiled with due
care and attention. However, DEITZ COMPANY does not take any responsibility for misprints,
translation errors or other errors and any damages resulting there from.
DEITZ COMPANY retains the right to make changes in the described products to improve
functionality, reliability, and design. The measurements or data shown on schematics, sketches and
photos are not binding. They are for description purposes.
The information and drawings found in the operation manual are the intellectual property of DEITZ
COMPANY and may not be copied or given to third parties.
LEGAL NOTICE: DEITZ COMPANYTM, PHARMAFILLTM and PACKSERTERTM and any graphic
representations of the same are legal trademarks of Deitz Company Inc. and may not be used by
others without specific written permission from Deitz Company.

2022-10-04 REV B Pharmafill Model PS1 Operation Manual
Page
7
Section 2 - SPECIFICATIONS
GENERAL
MODEL PS1 PACKSERTER Packet Inserter
TYPE AD1090
PRODUCT CAPACITY ¼-gram to 5-gram packets on continuous strip spool.
CHANGE PARTS Quantity: 3 for each width of strip (1 set included)
SPOOL CAPACITY 11.8” wide x 1” ID core x 18.1” OD (30cm x 2.5cm x 46 cm).
RATE 80 to 100 cut packets per minute, depending on length.
INPUT REQUIREMENTS
VOLTAGE 110 VAC1
CYCLES 50/60 HZ
PHASE 1
AMPERAGE 5.0 AMPS
COMPRESSED AIR** 50 PSI (344 kPa), consumes less than 1.0 CFM (28 LPM) 2
AIR MUST BE FREE OF WATER VAPOR AND OIL
ROOM HUMIDITY 85% RH non-condensing
PHYSICAL DIMENSIONS
WEIGHT 250 lbs (113 Kg) - without product spool
FLOOR FOOTPRINT 20” wide x 30” deep (51cm X 77cm)
HEIGHT Adjustable from 66” to 75” high (168 TO 190 cm) 3
FILLING HEIGHT Adjustable from 67” TO 76” (171cm to 193cm) 3
STANDARD CONVEYOR 4.5” wide x 36” to top surface (12cm x 92 cm) 3
BOTTLE HEIGHT From 1” to 9” (2.5cm to 23cm) 3
Notes:
1. Other input voltages are available as factory options if specified at the time of order
2. Compressed air must clean and dry, free of moisture (water) and oil.
3. May be adjusted further by adjusting or modifying leveling feet.

2022-10-04 REV B Pharmafill Model PS1 Operation Manual
Page
8
Section 3 - INSTALLATION
A. Unpacking
B. Commissioning
C. Sensors and Gating Cylinders
D. Compressed Air
E. Electric
A - Unpacking
❑Carefully remove equipment from crate and remove all packing materials.
❑Inspect all supplied equipment for damage (if any damage is present, please notify DEITZ
COMPANY immediately).
❑Position the machine on the line and adjust the legs of the machine to level the machine.
Note that the machine is designed for a standard conveyor height of 36 inches from the
floor to the top of belt.
B - Commissioning
❑All necessary connections for machine operation have been made prior to shipping (Fig. 3.1-
3.3). You will only need to connect clean, compressed air and electrical supply.
❑Check that the machine is correctly installed, levelled up and aligned.
❑Check that there are no loose bolts, screws and that all electrical connections are tight.
❑Ensure that the machine isolator (main disconnect switch) is in the OFF position.
❑Do not “megger” the machine (high voltage insulation test) as damage to electronic
components may result.
❑Apply power to the machine and check polarity and voltage of the incoming supply.
❑Check that all emergency stops work correctly.
❑Check that all guard switches operate correctly.
❑Check that the machine operates correctly.
Figure 3.1
2022-10-04 REV B Pharmafill Model PS1 Operation Manual
Page
9
B –Commissioning (continued)
Figure 3.2
Figure 3.3

2022-10-04 REV B Pharmafill Model PS1 Operation Manual
Page
10
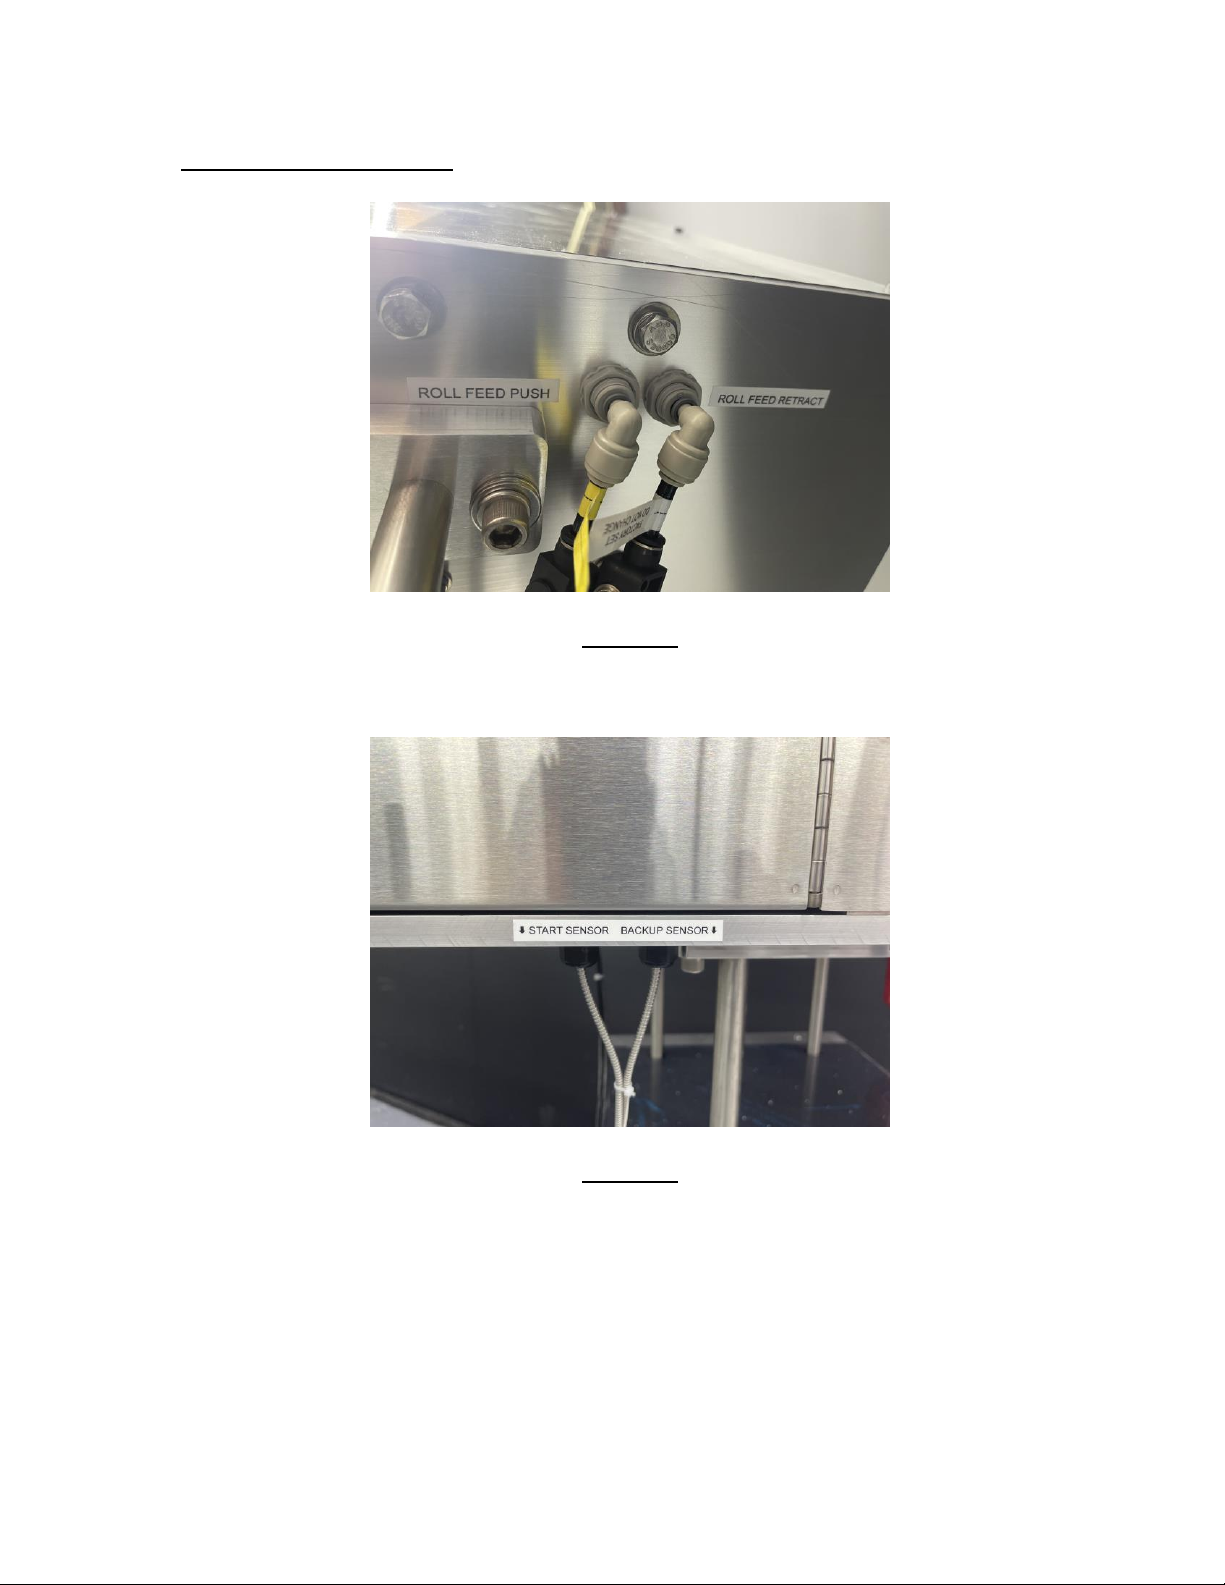
C - Sensors and Gating Cylinders
❑Two Bottle Sensors and two Gating Cylinders are attached to a length of rail
❑Using a 7/16” nut driver or combo wrench, remove sensors and cylinders from the demo
rail and attach to your conveyor rail (Fig. 3.4)
(More detailed setup instructions will follow in Fig. 4B., Section 6I and TN0085)
Figure 3.4
D - Compressed Air
❑Compressor must be adequate to meet the specifications (see Section 2).
❑Machine is supplied with filter and regulator (fig. 4.1).
❑The supply air should be clean and dry, free of condensation and oil.
❑Connect the pneumatic supply (fig. 3.5). Standard fitting is for ¼” O.D. tubing.
Figure 3.5
COMPRESSED AIR IN
AIR TO
MACHINE
2022-10-04 REV B Pharmafill Model PS1 Operation Manual
Page
11
E - Electric
❑Power source must be adequate to meet the specifications (see Section 2).
❑Check the polarity and voltage of the incoming supply.
❑The machine must be solidly earthed.
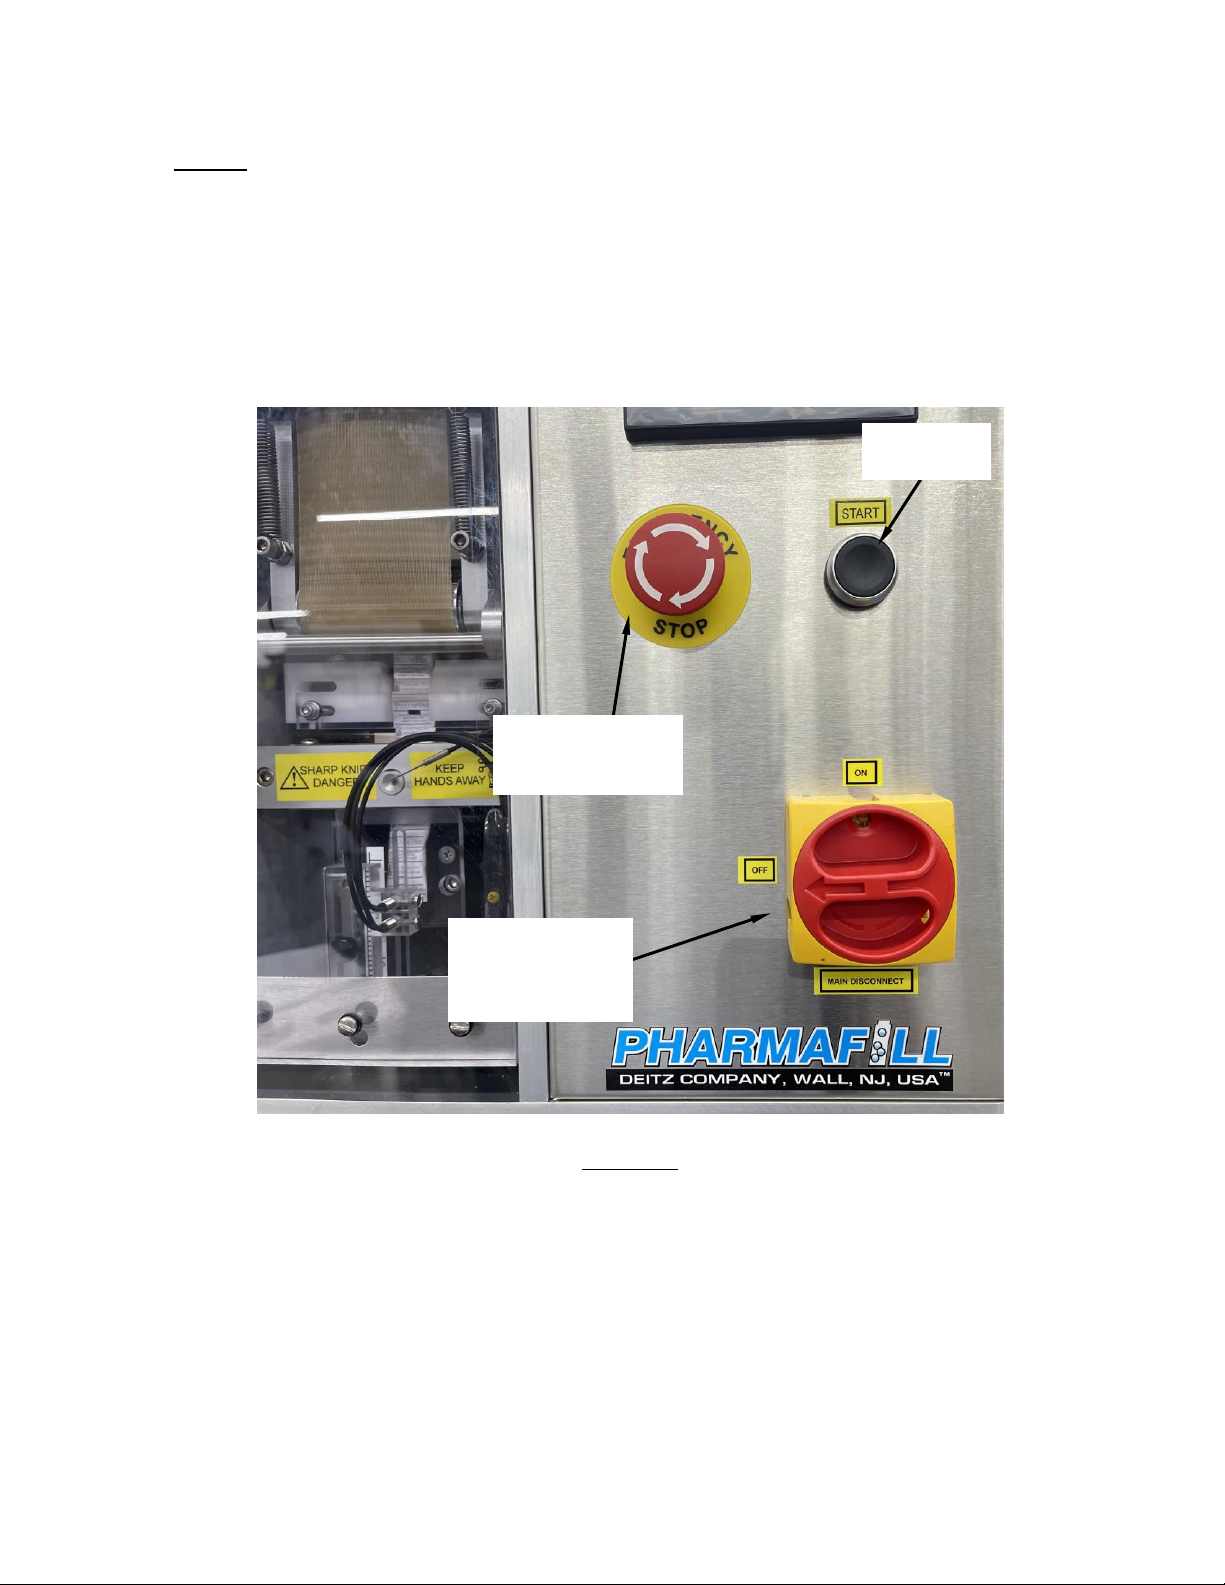
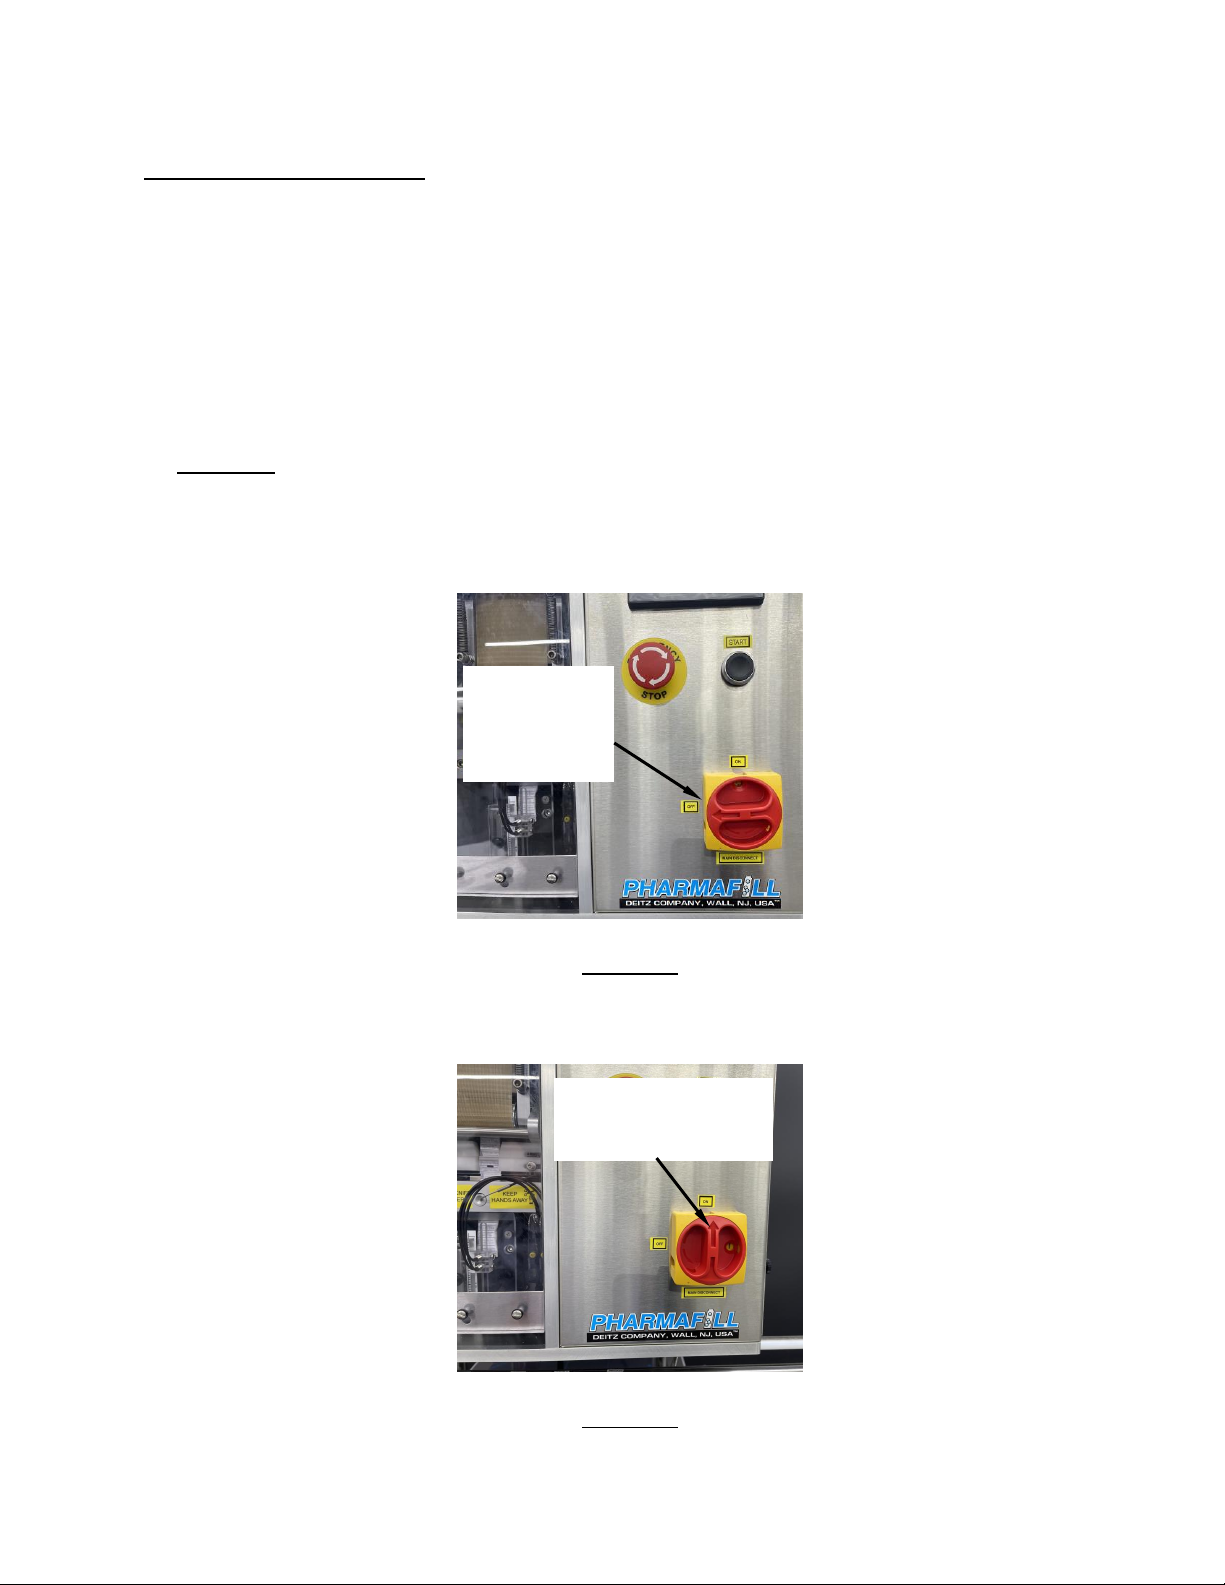
❑Make sure the MAIN DISCONNECT SWITCH is in the OFF position (fig 3.6). If it is not, no
action will take place, but this is good practice.
❑Connect the main electrical supply.
Figure 3.6
MAIN DISCONNECT
SWITCH
(SHOWN IN “OFF”
POSITION)
EMERGENCY STOP
PUSHBUTTON
(TWIST TO RELEASE)
START
PUSHBUTTON

2022-10-04 REV B Pharmafill Model PS1 Operation Manual
Page
12
E - Electric (continued)
❑Make sure the electrical connectors in the back of the machine are secure (fig. 3.7).
Figure 3.7
❑Turn the Main Disconnect Switch to the ON position (fig 3.8). No action will take place.
❑To confirm that the machine is powered up, twist and release the EMERGENCY STOP
PUSHBUTTON then press the START button. The Operator Interface Panel should light up.
Figure 3.8
❑The Packserter is now ready for operation.
MAIN DISCONNECT
SWITCH
(SHOWN IN “ON” POSITION)
MAIN POWER “IN”

2022-10-04 REV B Pharmafill Model PS1 Operation Manual
Page
13
Section 4 - FEATURES
A. General
B. Graphic Illustration (fig 4.1)
C. Adjustable Machine Height
A - General
•Automatically cuts continuous strip packets into individual packets.
•Suitable for any strip-type product such as desiccants, oxygen absorbers, lotion
samples, fast-food condiments, etc.
•PLC-controlled, with digital touch-pad operator interface.
•Brushless DC step motor drive for repeatability and reliability.
•Easy access, positive drive, belt feed mechanism.
•Pneumatically operated knife assembly.
•3-color stack light (Green/Yellow/Red) for high-visibility status indication.
•Ready to roll up to any conveyor - includes lift platform and bottle-gating control.
•Stainless steel, anodized aluminum, acetal & polycarbonate construction.
2022-10-04 REV B Pharmafill Model PS1 Operation Manual
Page
14
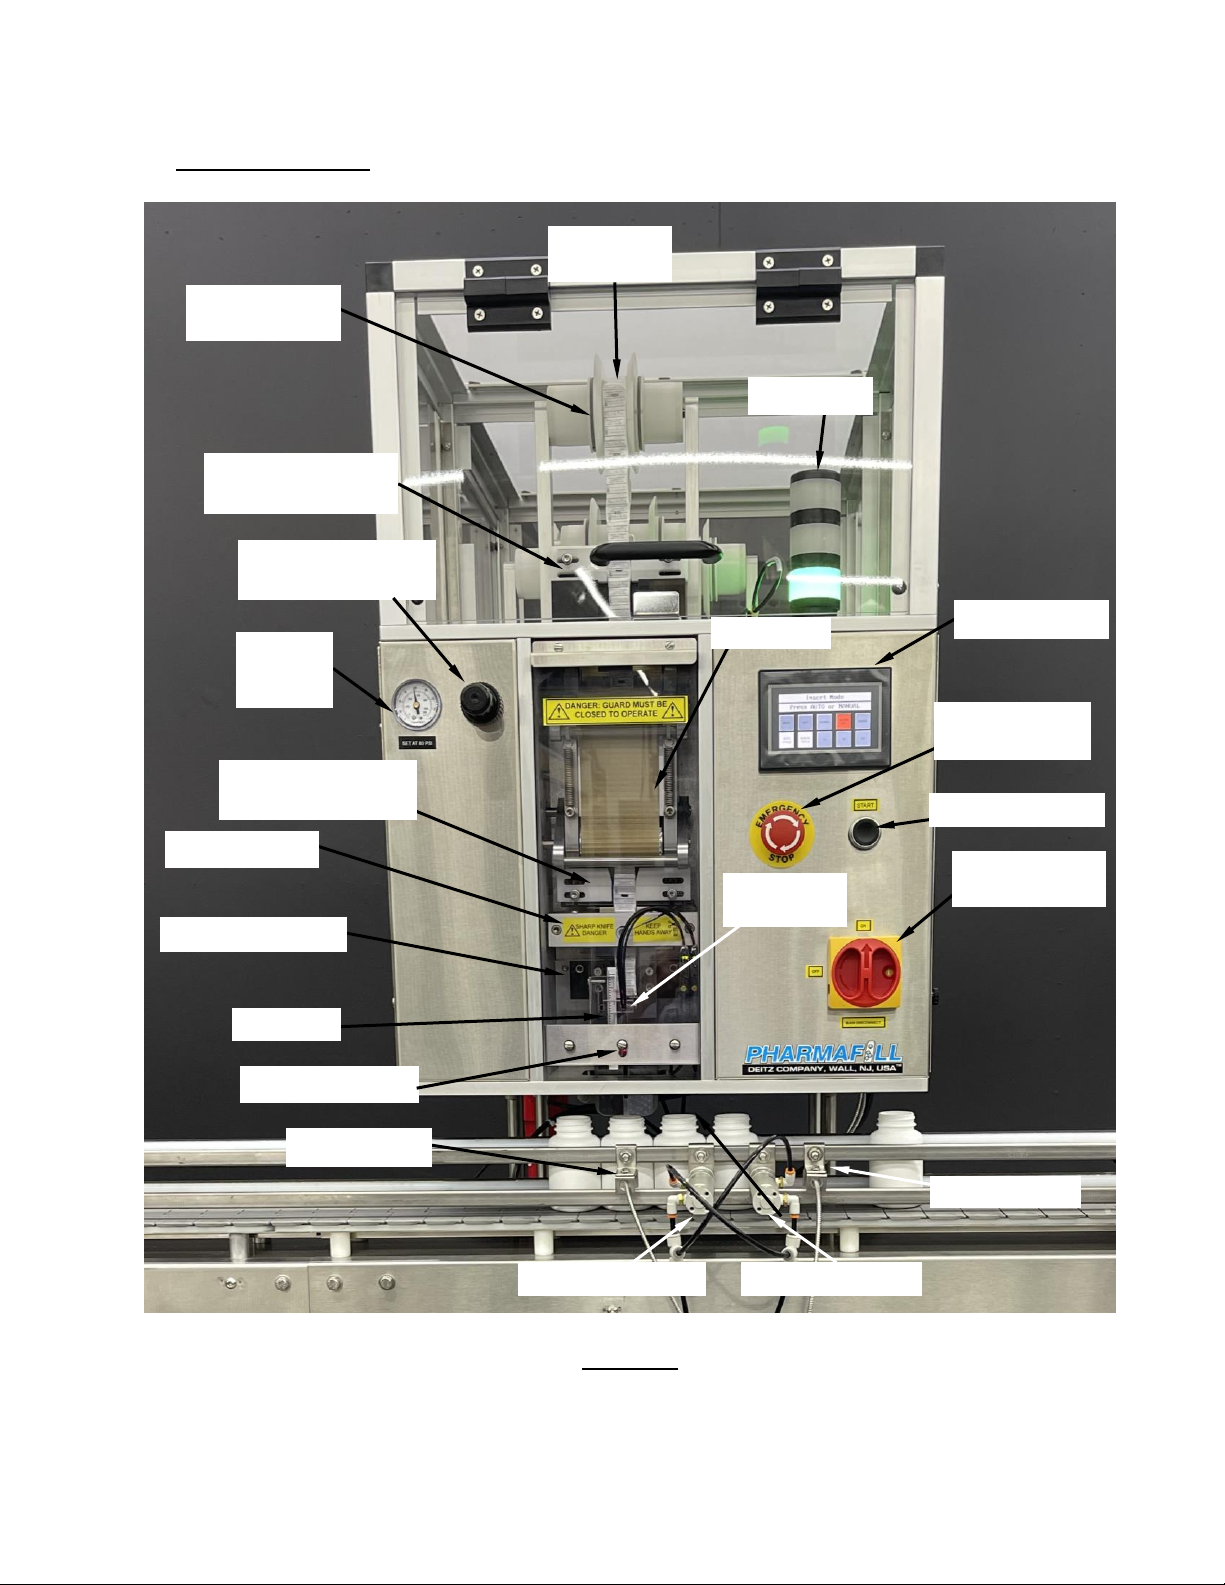
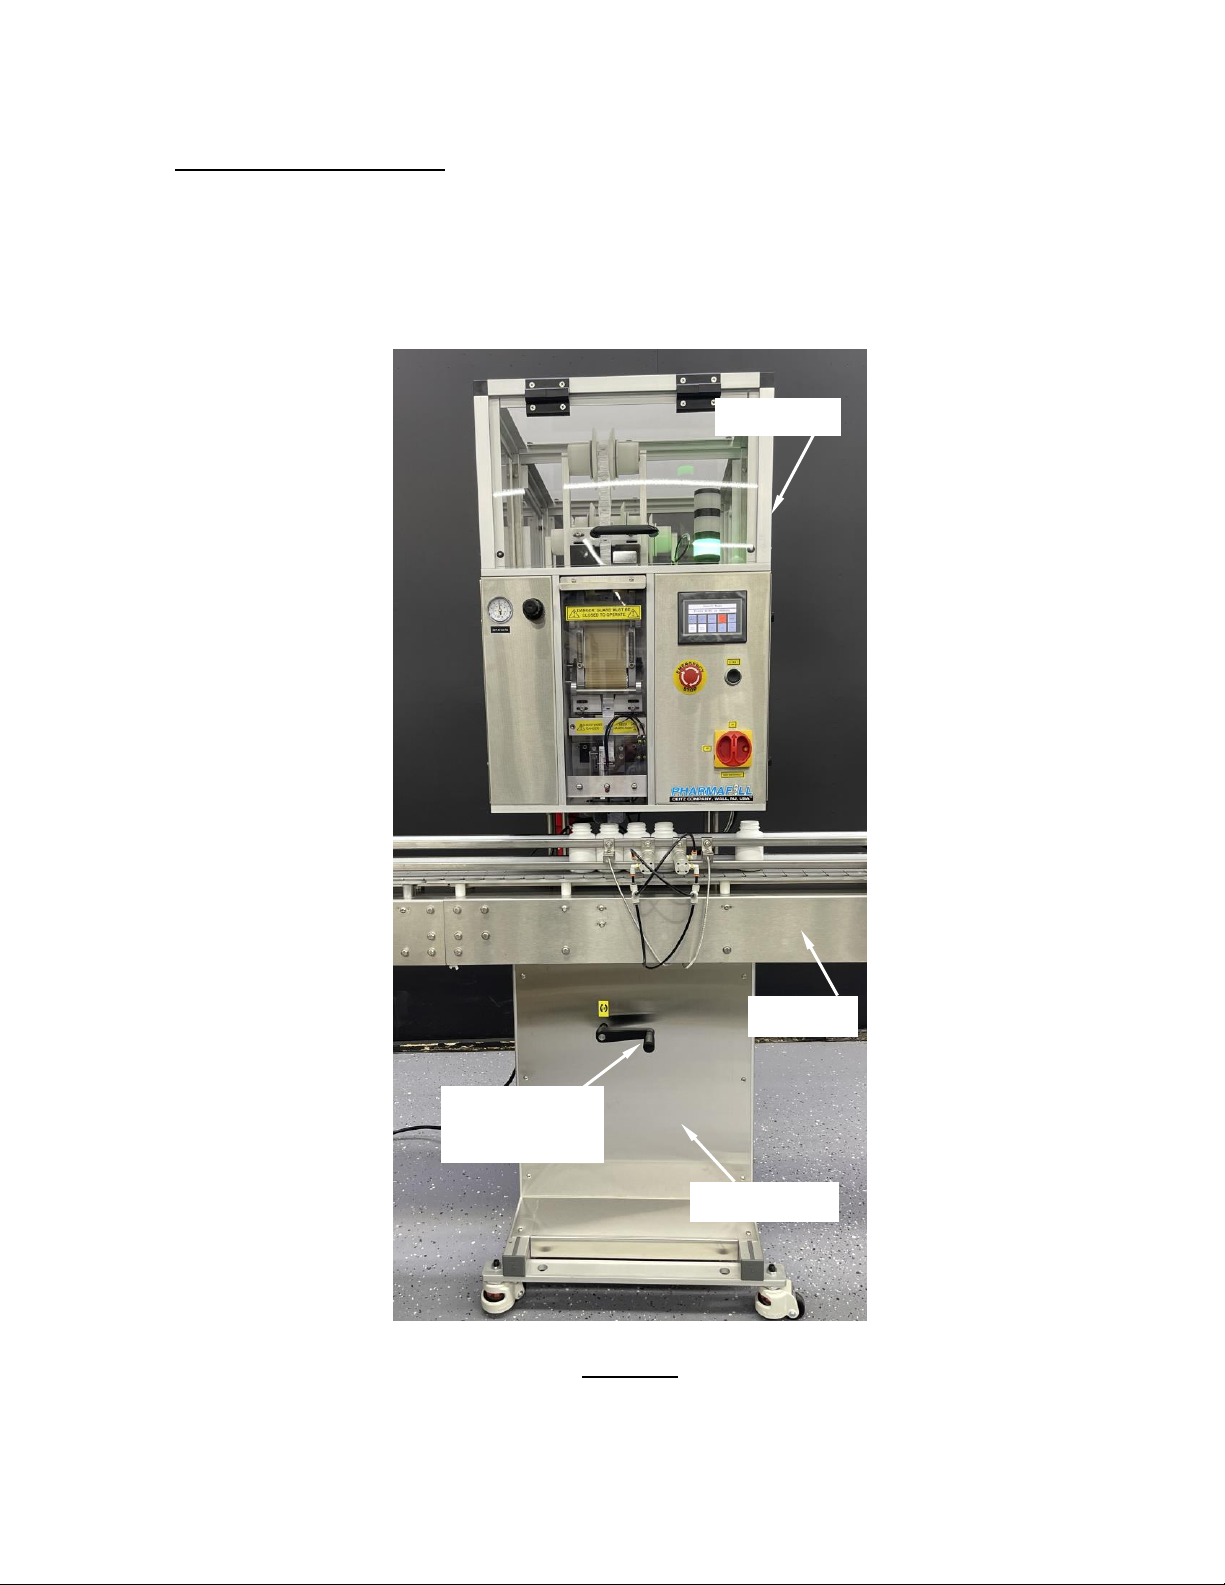
B - Illustrated Features
Figure 4.1
STACK LIGHT
CONTROL PANEL
START PUSHBUTTON
MAIN DISCONNECT
SWITCH
BACKUP SENSOR
INFEED ROLLERS
& ROLLER GUIDES
UPPER GUIDE BLOCK
SUPPLY STRIP SENSOR
BELT DRIVE
LOWER GUIDE BLOCK
PACKET MARK SENSOR
CUT-OFF KNIFE
EXIT GUIDE BLOCK
EMERGENCY STOP
PUSHBUTTON
START SENSOR
BOTTLE STOP GATE 1
BOTTLE STOP GATE 2
EXIT TUBE
SUPPLY ROLL
(IN BACK)
AIR PRESSURE FILTER/
REGULATOR
AIR
PRESSURE
GAGUE
CUT PACKET SENSOR
CUT LENGTH
SENSORS
2022-10-04 REV B Pharmafill Model PS1 Operation Manual
Page
15
C - Adjustable Machine Height
The Packserter is mounted on top of a variable height lift platform (fig. 4.2). To
accommodate various bottle heights on a fixed height conveyor, the Packserter height may
be manually adjusted via a hand crank on the lower left side of the lift platform. For height
range please see the specifications in Section 2.
Figure 4.2
PACKSERTER
CONVEYER
MANUAL CRANK
FOR HEIGHT
ADJUSTMENT
LIFT PLATFORM
2022-10-04 REV B Pharmafill Model PS1 Operation Manual
Page
16
Section 5 - Operation
A. Power Up
B. Using the Control Panel
C. Insert Packets
D. Adjust Settings
E. Feed Options
F. One Step Options
G. Technician Only
A - Power Up
The Main Disconnect Switch (fig 5.1) controls the electric power to the Packserter. No
power goes to any electrical component when this switch is in the OFF position.
Figure 5.1
To begin operation, turn the Main Disconnect Switch to the ON position (fig. 5.2).
Figure 5.2
MAIN
DISCONNECT
SWITCH
(SHOWN IN “OFF”
POSITION)
MAIN DISCONNECT
SWITCH
(SHOWN IN “ON” POSITION)
2022-10-04 REV B Pharmafill Model PS1 Operation Manual
Page
17
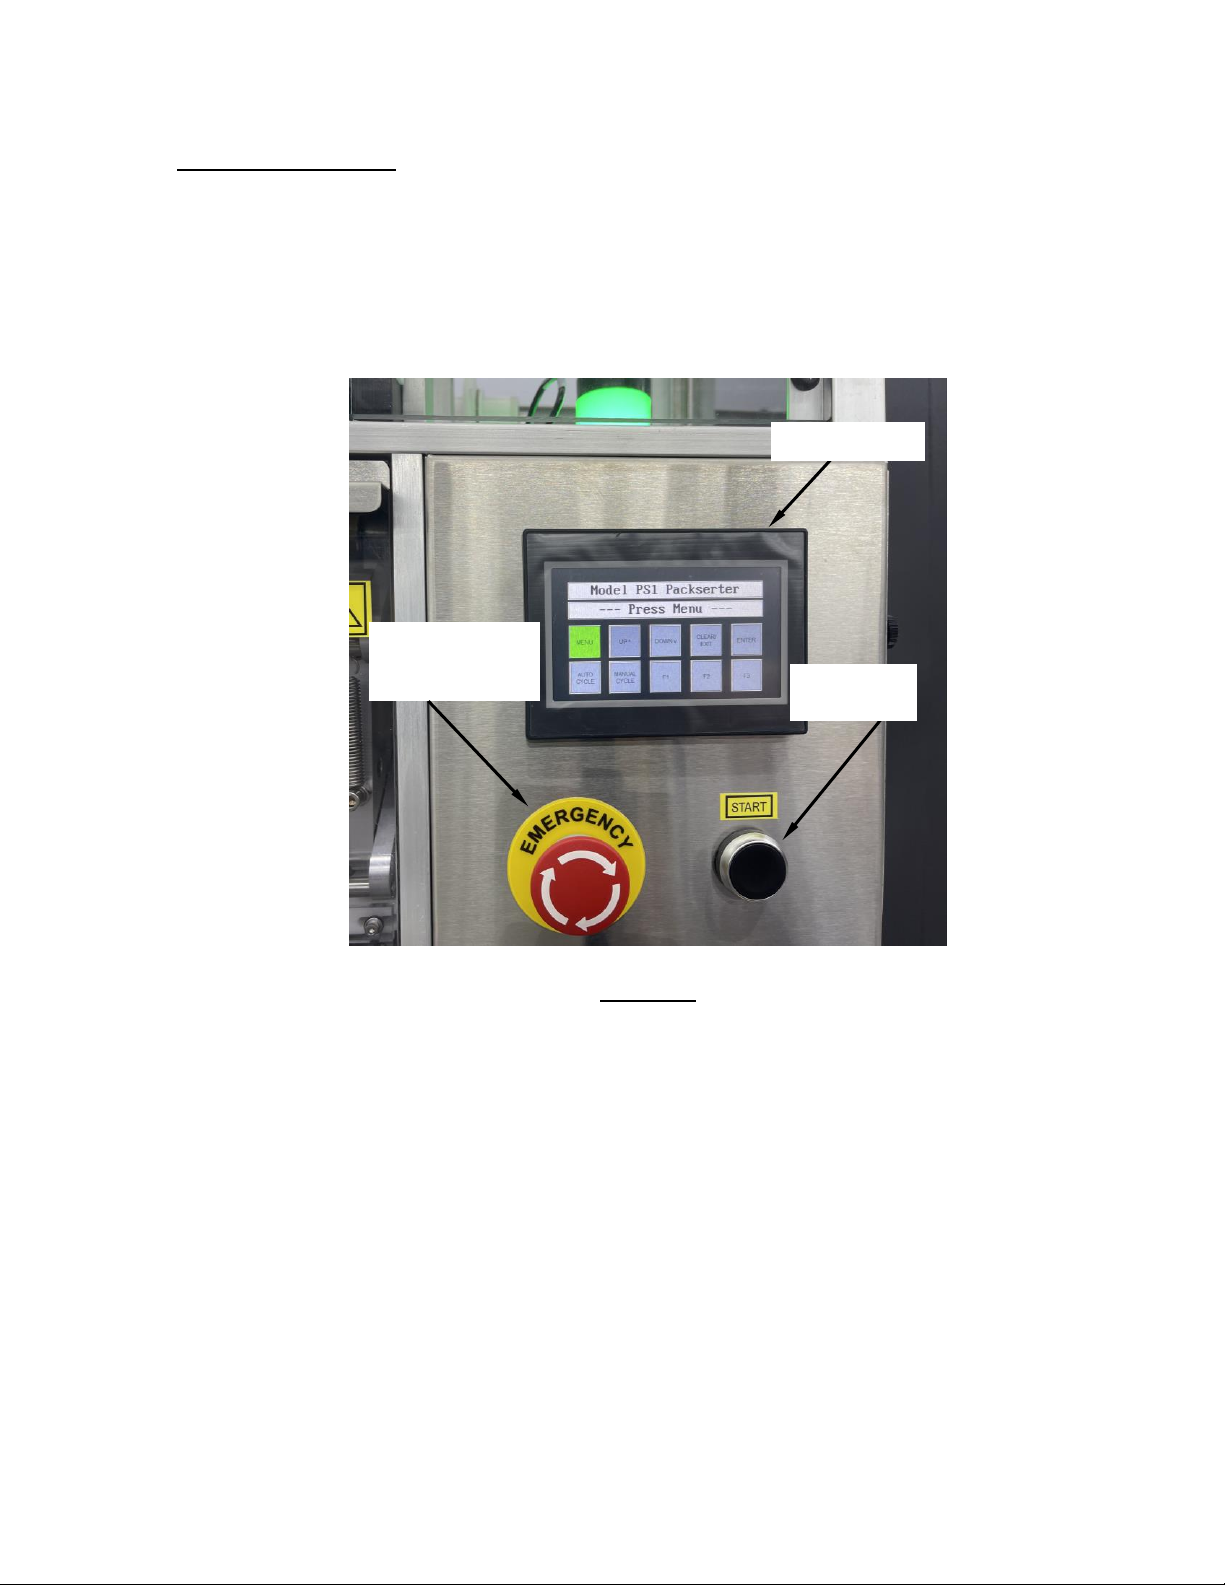
A - Power Up (continued)
The Emergency Stop Pushbutton (fig 5.3) (also know as the E-stop) will also effectively
disconnect all power to the electrical components of the machine via a latching relay. When
pressed, it will lock into the depressed position. Twist the E-stop to release it.
Press the Start Pushbutton to power up the Machine (fig 5.3).
Figure 5.3
The Control Panel (fig 5.3) will light up, along with other components such as the stack light
and the fiber optic light sources.
EMERGENCY STOP
PUSHBUTTON
(TWIST TO RELEASE)
START
PUSHBUTTON
CONTROL PANEL
2022-10-04 REV B Pharmafill Model PS1 Operation Manual
Page
18
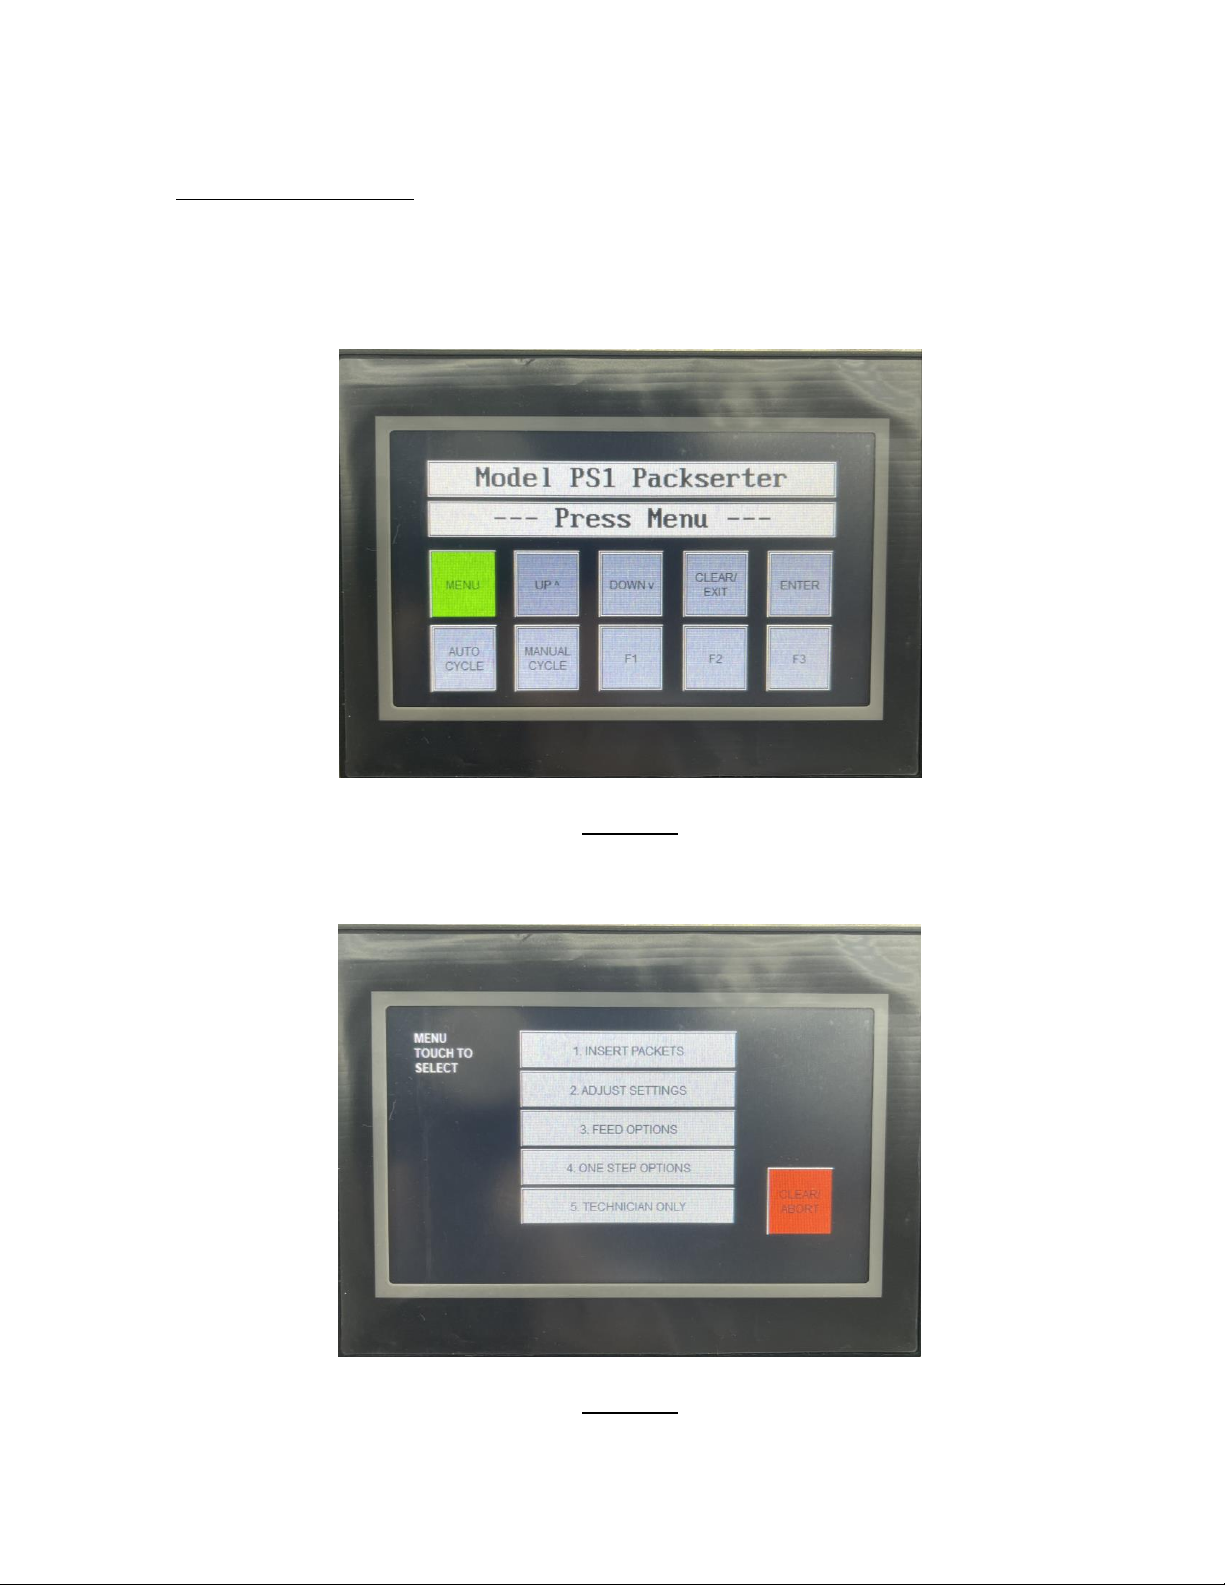
B - Using The Control Panel
This is the screen (fig. 5.4) you will see when the Packserter is first powered up. The upper
row of 5 buttons is for menu control and data input. The lower row of 5 buttons is for
Machine control after a menu item is selected.
Figure 5.4
Press MENU. All functions are accessed through the menu.
Figure 5.5

2022-10-04 REV B Pharmafill Model PS1 Operation Manual
Page
19
C - Insert Packets Mode
To automatically cycle whenever a bottle is present,
press AUTO CYCLE.
The machine will cycle when a bottle is present at the
start sensor and all proper conditions are met. This is
an alternate contact button. Press once to turn it on;
press again to turn it off.
The control panel will display “Waiting for Bottle”
when there is no bottle at the START SENSOR. A cycle
will start as soon as a bottle is detected.
(See Section 4B. for sensor locations)
The control panel will display “Bottle Backup” when
there is a bottle in front of the BACKUP SENSOR. The
machine will not cycle. Once the backup is cleared,
the cycle will resume.
(See Section 4B. for sensor locations)
Insert Packets mode is used to run the machine
manually or automatically.
Press MENU.
The MENU appears.
Press “1. Insert Packets”.
Press ENTER.
To cause the machine to make one cycle, press
MANUAL CYCLE.
The machine will make one cycle even if there is no
supply strip loaded. This is a momentary contact
button. It may be held down to cycle continuously.

2022-10-04 REV B Pharmafill Model PS1 Operation Manual
Page
20
C - Insert Packets Mode (continued)
The control panel will display “Supply Strip Missing”
when there is a no strip in front of the SUPPLY STRIP
SENSOR in the Upper Guide Block. The machine will
not cycle. When the supply strip is restored, the cycle
will resume.
(See Section 4B for sensor locations)
If the LONG sensor output signal is ON, there is a Long
Feed Error. The RED stack light will turn on and the
cycle will stop. The HMI will display “Long Feed Error”.
Press CLEAR / EXIT.
(See Section 8F for Sensor Adjustment)
If the SHORT sensor output signal is OFF, there is a
Short Feed Error. The RED stack light will turn on and
the cycle will stop. The HMI will display “Short Feed
Error”. Press CLEAR / EXIT.
(See Section 8F for Sensor Adjustment)
The control panel will display “No Cut Pack Dropped”
when the CUT PACKET SENSOR in the Exit Tube does
not immediately detect a cut packet dropping
through after a cut. The operator must press
CLEAR/EXIT and correct the problem.
(See Section 4B for sensor locations)
The control panel will display “Cut Packet Jam” when
the CUT PACKET SENSOR in the Exit Tube detects
something blocking the tube, such as a cut packet.
The operator must press CLEAR/EXIT and correct the
problem.
(See Section 4B for sensor locations)
Table of contents
Other Deitz Industrial Equipment manuals


