manuals.online logo
Brands
  1. Home
  2. •
  3. Brands
  4. •
  5. Dell
  6. •
  7. Monitor
  8. •
  9. Dell E1715S User manual

Dell E1715S User manual

1
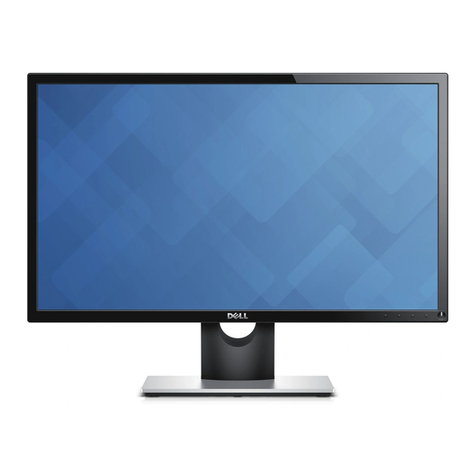
17" LCD Monitor Dell E1715S
Service
Service
Service
Simplified
2
Important Safety Notice
Proper service and repair is important to the safe, reliable operation of all DELL Company Equipment. The service
procedures recommended by DELL and described in this service manual are effective methods of performing
service operations. Some of these service operations require the use of tools specially designed for the purpose.
The special tools should be used when and as recommended.
It is important to note that this manual contains various CAUTIONS and NOTICES which should be carefully read
in order to minimize the risk of personal injury to service personnel. The possibility exists that improper service
methods may damage the equipment. It is also important to understand that these CAUTIONS and NOTICES ARE
NOT EXHAUSTIVE. DELL could not possibly know, evaluate and advise the service trade of all conceivable ways
in which service might be done or of the possible hazardous consequences of each way. Consequently, DELL has
not undertaken any such broad evaluation. Accordingly, a servicer who uses a service procedure or tool which is
not recommended by DELL must first satisfy himself thoroughly that neither his safety nor the safe operation of the
equipment will be jeopardized by the service method selected.
Hereafter throughout this manual, DELL Company will be referred to as DELL.
WARNING
Use of substitute replacement parts, which do not have the same, specified safety characteristics may create
shock, fire, or other hazards.
Under no circumstances should the original design be modified or altered without written permission from DELL.
DELL assumes no liability, express or implied, arising out of any unauthorized modification of design.
Servicer assumes all liability.
FOR PRODUCTS CONTAINING LASER:
DANGER-Invisible laser radiation when open. AVOID DIRECT EXPOSURE TO BEAM.
CAUTION-Use of controls or adjustments or performance of procedures other than those specified herein may
result in hazardous radiation exposure.
CAUTION -The use of optical instruments with this product will increase eye hazard.
TO ENSURE THE CONTINUED RELIABILITY OF THIS PRODUCT, USE ONLY ORIGINAL MANUFACTURER'S
REPLACEMENT PARTS, WHICH ARE LISTED WITH THEIR PART NUMBERS IN THE PARTS LIST SECTION
OF THIS SERVICE MANUAL.
Take care during handling the LCD module with backlight unit
-Must mount the module using mounting holes arranged in four corners.
-Do not press on the panel, edge of the frame strongly or electric shock as this will result in damage to the screen.
-Do not scratch or press on the panel with any sharp objects, such as pencil or pen as this may result in damage to
the panel.
-Protect the module from the ESD as it may damage the electronic circuit (C-MOS).
-Make certain that treatment person’s body is grounded through wristband.
-Do not leave the module in high temperature and in areas of high humidity for a long time.
-Avoid contact with water as it may a short circuit within the module.
-If the surface of panel becomes dirty, please wipe it off with a soft material. (Cleaning with a dirty or rough cloth
may damage the panel.)
3
1. Exploded view diagram with list of items
4
No. Description Q’ty
1 LOGO DELL 1
2 BEZEL 1
3 KEY_FUNCTION 1
4 KEY_POWER 1
5 KEY BOARD 1
7 PANEL 1
8 INSULATING SHEET 1
9 POWER 1
10 INSULATING SHEET 1
11 MAINFRAME 1
12 KNOB_CONTROL 1 No. Part No. Description Q’ty
14 MAINFRAME 1 6 0Q1G6019 1 SCREW (KEY BOARD-BEZEL) 4
15 REAR_COVER 1 13 0Q1G 130 6 47 CR3 SCREW (KNOB_CONTROL) 1
16 STAND-BASE ASS'Y 1 17 0M1G3030 4 47 CR3 SCREW (REAR_COVER-MAINFRAME) 2
18 COVER_VESA 1 20 0M1G2940 10 47 CR3 SCREW (REAR_COVER-MAINFRAME) 4
19 DECO_LOGO 1 22 0M1G2430 5125 SCREW (MAIN BOARD-MAINFRAME) 1
21 PLATE 2 24 0M1G1140 6120 SCREW (POWER BOARD-MAINFRAME) 1
23 MAIN BOARD 1 25 0M1G1030 6120 SCREW (MAIN BOARD-POWER BOARD-MAINFRAME) 3
5
2. Wiring connectivity diagram
Connector Ass’y PN:
395G801406RJ6000HF
Connector Ass’y PN:
395G179W30B51200HF
Connector Ass’y PN:
395G082509D53000HF
This Connector welding
in Key Board
6
3. Mechanical Instruction
Tools Required
Listthetypeandsizeofthetoolsthatwouldtypicallycanbeusedtodisassembletheproducttoapoint
wherecomponentsandmaterialsrequiringselectivetreatmentcanberemoved.
ToolDescription:
−
Screwdriver (Phillip-head, Hexagonal head)
−
Penknife
7
3.1 Disassembly Procedures:
Step Figure Remark
S1. Before
disassemble
Turn off power,
Unplug external
cables from product
To remove the stand:
1. Wedge your fingers
Press and hold the stand
release button.
S2.Remove the
STAND-BASE
ASS’Y
2. Lift the stand up and
away from the monitor.
Note:
To prevent scratches on
the LCD screen while
removing the stand, ensure
that the monitor is placed
on a soft, clean surface.
8
S3.Remove the
REAR COVER
1 2
Use a Philips-head
screwdriver to remove 2
screws for unlocking
mechanisms.
(No.1~2 screw
size=M3x4;
Torque=4±1kgf.cm)
Use Penknife to separate
the bezel and rear cove
follow the arrows in
sequence, then you can
take out rear cover.
S4.Disconnect the
connectors,and tear
off the tapes
9
S5.Unscrew the
hex screws
1 2
Use a hex screwdriver to
remove 2 screws for
unlocking mainboard.
(No.1~2 is Hex-screw,
Torque= 4.5±0.5kgf.cm)
S6.Unscrew the
screws to remove
the Main board and
Power board
1
3 2
4 5
Use a Philips-head
screwdriver to remove 5
screws for unlocking
mainboard.
(No.1~4 screw
size=M4x8;Torque=
6±1kgf.cm;
No.5 screw
size=D3x6;Torque=
6±1kgf.cm)
S7. Disconnect the
connectors
S8.Remove the
KEY BOARD
1 2 3
Use a Philips-head
screwdriver to remove 3
screws for unlocking Key
board.
(No.1~3 screw size=
M2x2.5
Torque=0.9±0.4kgf.cm)
10
S9. Remove the
screw
1
Use a Philips-head
screwdriver to remove 1
screw for unlocking clip.
(No.1 screw size=Q3x6;
Torque=4±1kgf.cm)
The MAIN FRAME
11
3.2 Assembly Procedures:
Step Figure Remark
S1. Tighten the clip
1
Use a Philips-head
screwdriver to screw 1
screw for tighten the clip
(No.1 screw size=Q3x6;
Torque=4±1kgf.cm)
S2.Assembly the
KEY BOARD
1 2 3
Use a Philips-head
screwdriver to screw 3
screws for tighten Key
board.
(No.1~3 screw size=
M2x2.5
Torque=0.9±0.4kgf.cm)
S3. Connect the
connectors
12
Use a Philips-head
S4.Sscrew the
screws to tighten
the Main board and
Power board
3
1
4
2
3
1
5
screwdriver to screw 5
screws for tighten
mainboard.
(No.1~4 screw
size=M4x8;Torque=
6±1kgf.cm;
No.5 screw
size=D3x6;Torque=
6±1kgf.cm)
S5.Screw the hex
screws
1
2
Use a hex screwdriver to
screw 2 screws for
tighten mainboard.
(No.1~2 is Hex-screw,
Torque= 4.5±0.5kgf.cm)
S5.Connect the
connectors,and
paste the tapes
13
S6.Assembly the
REAR COVER
1 2
Use a Philips-head
screwdriver to screw 2
screws for tighten
mechanisms.
(No.1~2 screw
size=M3x4;
Torque=4±1kgf.cm)
S7.Assembly the
STAND-BASE
ASS’Y

14
4. Trouble shooting instructions
15
16
17
18
19


Other manuals for E1715S

3

Other Dell Monitor manuals

Dell S2209WFP User manual

Dell

Dell S2209WFP User manual

Dell 2709W - UltraSharp - Widescreen LCD Monitor User manual

Dell

Dell 2709W - UltraSharp - Widescreen LCD Monitor User manual

Dell U2723QE User manual

Dell

Dell U2723QE User manual

Dell E176FP User manual

Dell

Dell E176FP User manual

Dell AW2721DB Instructions for use

Dell

Dell AW2721DB Instructions for use

Dell C1422H Instructions for use

Dell

Dell C1422H Instructions for use

Dell G2210 User manual

Dell

Dell G2210 User manual

Dell P1911 User instructions

Dell

Dell P1911 User instructions

Dell P2418HTE User manual

Dell

Dell P2418HTE User manual

Dell P3424WE User manual

Dell

Dell P3424WE User manual

Dell G2724D User manual

Dell

Dell G2724D User manual

Dell S3220DGFc User manual

Dell

Dell S3220DGFc User manual

Dell S199WFP - 19" LCD Monitor Instruction Manual

Dell

Dell S199WFP - 19" LCD Monitor Instruction Manual

Dell UltraSharp 2001FP User manual

Dell

Dell UltraSharp 2001FP User manual

Dell C5518QT User manual

Dell

Dell C5518QT User manual

Dell P2421B Instructions for use

Dell

Dell P2421B Instructions for use

Dell 3007WFP-HC - UltraSharp - 30" LCD Monitor User manual

Dell

Dell 3007WFP-HC - UltraSharp - 30" LCD Monitor User manual

Dell 1701FP User manual

Dell

Dell 1701FP User manual

Dell E177FPc User manual

Dell

Dell E177FPc User manual

Dell S3222DGM User manual

Dell

Dell S3222DGM User manual

Dell E178FPC User manual

Dell

Dell E178FPC User manual

Dell E770p User manual

Dell

Dell E770p User manual

Dell S2318HN User manual

Dell

Dell S2318HN User manual

Dell IN2020 User manual

Dell

Dell IN2020 User manual

Popular Monitor manuals by other brands

BenQ BL902TM user manual

BenQ

BenQ BL902TM user manual

AOC E2343FS - Service manual

AOC

AOC E2343FS - Service manual

AG Neovo SX-15 Specifications

AG Neovo

AG Neovo SX-15 Specifications

Memorex MT1701 user guide

Memorex

Memorex MT1701 user guide

Asus VW247H user guide

Asus

Asus VW247H user guide

Dukane ImagePro P42 user manual

Dukane

Dukane ImagePro P42 user manual

Samsung SyncMaster 323T user manual

Samsung

Samsung SyncMaster 323T user manual

beneq Lumineq EL320.240-FA3 Operation manual

beneq

beneq Lumineq EL320.240-FA3 Operation manual

Panasonic BTLH2550E - LCD VIDEO MONITOR operating instructions

Panasonic

Panasonic BTLH2550E - LCD VIDEO MONITOR operating instructions

Sharp LL-T15G3 Operation manual

Sharp

Sharp LL-T15G3 Operation manual

Elo TouchSystems AccuTouch 821615-000 product manual

Elo TouchSystems

Elo TouchSystems AccuTouch 821615-000 product manual

HP w15e - Widescreen LCD Monitor user guide

HP

HP w15e - Widescreen LCD Monitor user guide

Samsung SyncMaster C23A750X user manual

Samsung

Samsung SyncMaster C23A750X user manual

NEC MultiSync P702 Dimensional drawing

NEC

NEC MultiSync P702 Dimensional drawing

Cooler Master GM27-CFX user manual

Cooler Master

Cooler Master GM27-CFX user manual

ViewSonic VA502mb-1 Service manual

ViewSonic

ViewSonic VA502mb-1 Service manual

Pioneer PDP-436RXE operating instructions

Pioneer

Pioneer PDP-436RXE operating instructions

TUYA CA32APDB09 operation instruction

TUYA

TUYA CA32APDB09 operation instruction

manuals.online logo
manuals.online logoBrands
  • About & Mission
  • Contact us
  • Privacy Policy
  • Terms and Conditions

Copyright 2025 Manuals.Online. All Rights Reserved.