Dell Venue 10 5050 User manual

Dell Venue 10– 5050
User’s Guide
Regulatory Model: T14G
Regulatory Type: T14G001

Notes, Cautions, and Warnings
NOTE: A NOTE indicates important information that helps you make better use of your computer.
CAUTION: A CAUTION indicates either potential damage to hardware or loss of data and tells you
how to avoid the problem.
WARNING: A WARNING indicates a potential for property damage, personal injury, or death.
Copyright ©2015 Dell Inc. All rights reserved. This product is protected by U.S. and international copyright and
intellectual property laws. Dell™and the Dell logo are trademarks of Dell Inc. in the United States and/or other
jurisdictions. All other marks and names mentioned herein may be trademarks of their respective companies.
2015 -03
Rev. A00

Contents
1 Features...................................................................................................................5
2 Charging the Battery............................................................................................ 7
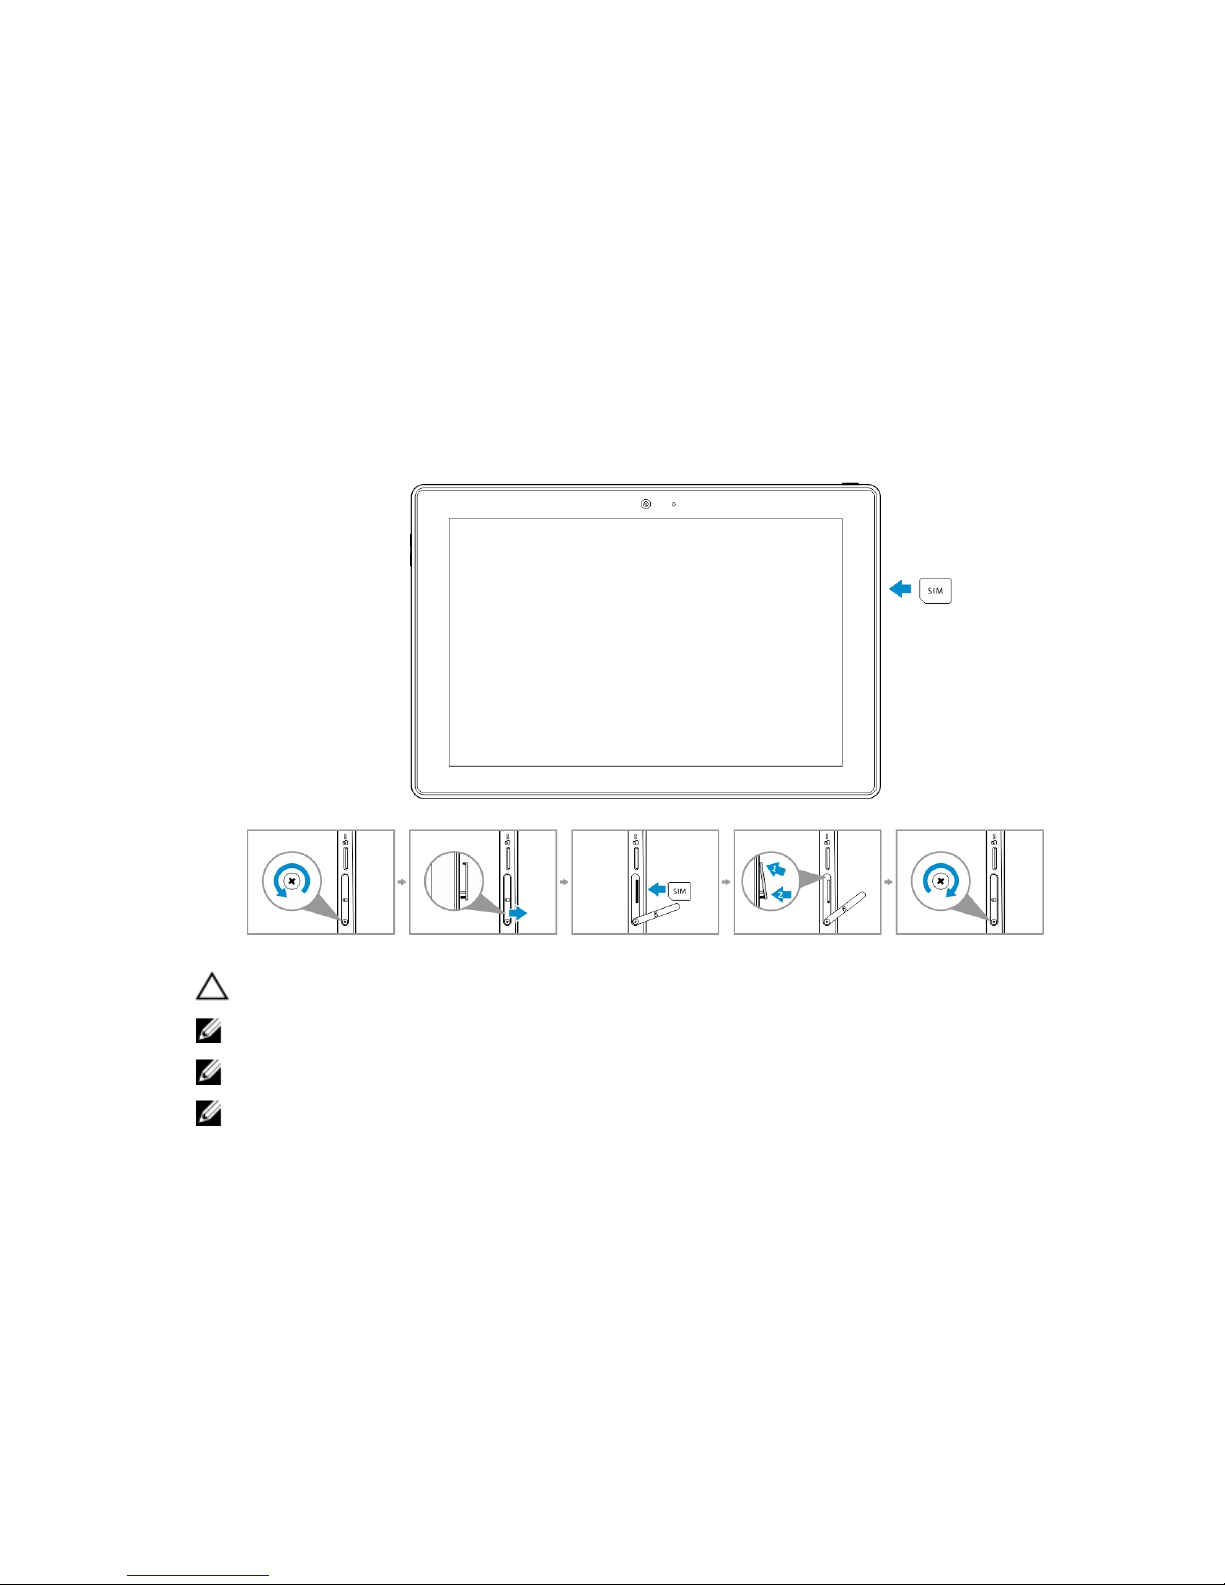
3 Inserting the Micro-SIM Card (Optional)..........................................................8
Inserting the MicroSD Card...................................................................................................................8
4 Getting Started....................................................................................................10
Turning On or Off the Device.............................................................................................................10
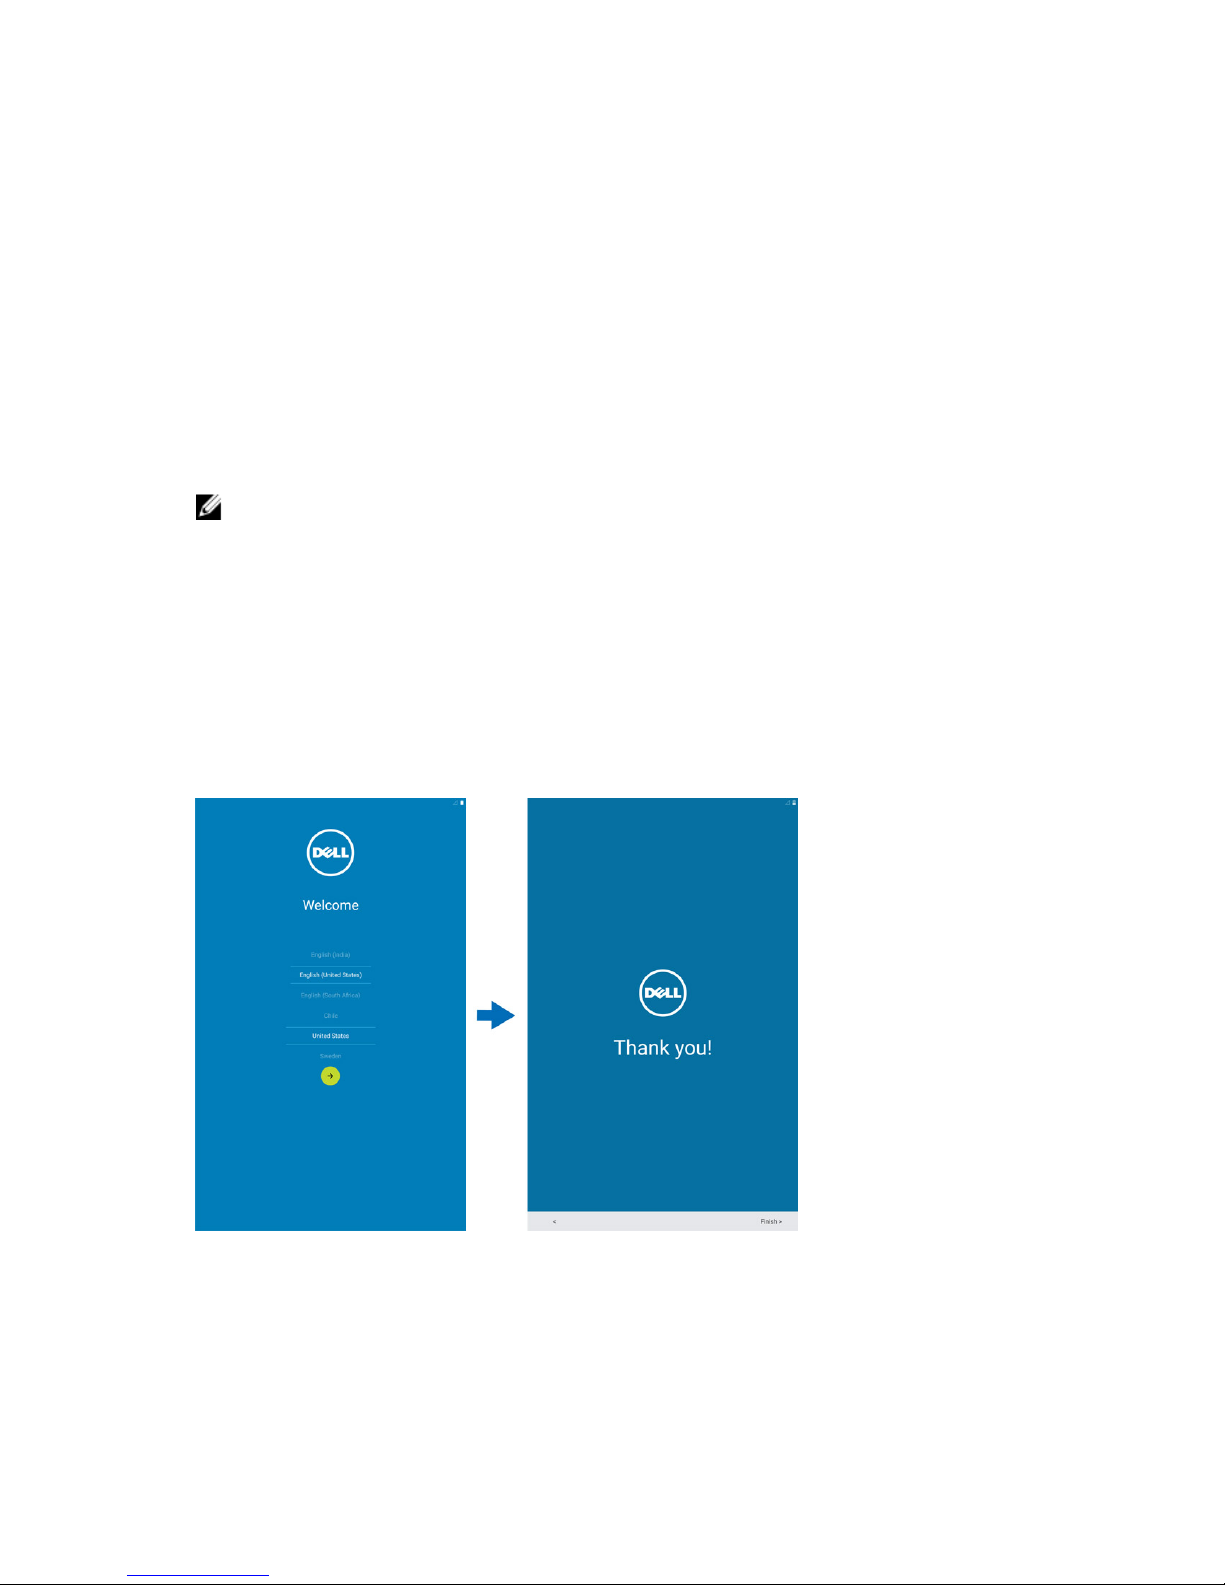
Finishing Android Setup...................................................................................................................... 10
Customizing the Screen......................................................................................................................10
Locking and Unlocking Your Device...................................................................................................11
Touch Tips........................................................................................................................................... 12
Right-Click..................................................................................................................................... 13
Status Bar............................................................................................................................................. 14
Screen Orientation.............................................................................................................................. 16
Keys and Functions..............................................................................................................................16
Apps and Widgets................................................................................................................................16
5 Using Your Device...............................................................................................18
Contacts...............................................................................................................................................18
Creating a ContactSearching for a Contact.................................................................................18
Text Entry.............................................................................................................................................19
Managing Your Device’s Storage........................................................................................................20
Checking Storage Space...............................................................................................................20
Erasing App Data and Cache........................................................................................................ 20
Un-mounting the SD Card........................................................................................................... 20
Erasing All Data From Your Device...............................................................................................20
Internet................................................................................................................................................ 20
Connecting to the Internet Using Wi-Fi....................................................................................... 21
Connecting to the Internet using mobile broadband..................................................................21
Using the airplane mode...............................................................................................................22
Browsing the Internet....................................................................................................................22
NFC...................................................................................................................................................... 23
Email.................................................................................................................................................... 25
Opening the Email App................................................................................................................. 25
Setting up an Email Account.........................................................................................................25
Adding other Email accounts........................................................................................................26
3

Deleting an Email account on your device..................................................................................26
Creating and sending Emails........................................................................................................ 26
Customizing Your Device................................................................................................................... 26
Display settings..............................................................................................................................26
Sound & notification settings........................................................................................................26
Date, time, and time zone.............................................................................................................27
Protecting Your Device....................................................................................................................... 27
Screen-unlock pattern.................................................................................................................. 27
PIN................................................................................................................................................. 28
Password....................................................................................................................................... 28
Apps..................................................................................................................................................... 29
Camera.......................................................................................................................................... 29
Copying files to and from the device........................................................................................... 29
Bluetooth.............................................................................................................................................30
Turning on Bluetooth and making the device discoverable....................................................... 30
Pairing and connecting a Bluetooth device.................................................................................30
Ending a Bluetooth connection................................................................................................... 30
Unpairing....................................................................................................................................... 30
Gallery.................................................................................................................................................. 31
Sharing or deleting albums............................................................................................................31
Browsing pictures and videos....................................................................................................... 31
Displaying a full picture................................................................................................................. 31
Calendar...............................................................................................................................................31
Adding a new event....................................................................................................................... 31
Clock..............................................................................................................................................32
Setting an alarm.............................................................................................................................32
6 Getting Your Stylus Ready for Use.................................................................. 33
Using the Optional Stylus with Your Tablet ...................................................................................... 33
7 Docking Your Tablet to the Keyboard Dock .................................................35
Undocking Your Tablet from the Keyboard Dock............................................................................. 35
8 Troubleshooting................................................................................................. 37
9 Technical Specifications................................................................................... 39
10 Contacting Dell.................................................................................................43
4

1
Features
Table 1.
1. Camera
2. Camera-status light
3. Microphones
4. Power button
5. MicroSD memory card reader
6. Micro-SIM reader (LTE/HSPA
+ models only)
7. Speaker
8. Noble security-cable slot
9. Back camera
10. Near Field Communication
(NFC) reader
11. Dock-guide slots
12. Dock pins
13. Service-tag label
14. Wi-Fi / WWAN status light
(optional)
15. USB 2.0 connector
16. Speaker
17. Battery-status light
18. Micro USB power connector
19. Micro HDMI connector
20. Volume buttons
21. Audio connector
Keyboard dock (optional)
22. Dock connector
23. Dock latches
24. Undock button
25. Touchpad
Stylus (optional)
26. Pen Tip (replaceable)
27. Buttons
28. Pen loop
5

6

2
Charging the Battery
NOTE: Your device may not be fully charged when you receive it. It is recommended to charge the
device for 4 hours for the first time.
CAUTION: Use only the power adapter and/or cable that shipped with the device. Using
unauthorized power adapters or power cables may cause severe damage to your tablet.
1. Connect the micro-USB end of the USB cable to the USB port of the device.
2. Connect the other end of the USB cable to the adapter.
3. Connect the power adapter to an electrical outlet.
An animated icon appears on the screen while the battery is being charged. When the battery is fully
charged, the icon is static.
NOTE: Battery LED will be off when the battery is fully charged.
NOTE: When disconnecting the device from the adapter, disconnect the power adapter from the
power outlet and then disconnect the cable from your device.
7

3
Inserting the Micro-SIM Card (Optional)
1. Loosen the screw that secures the card-slot door.
2. Open the card-slot door.
3. Insert the card into the respective slot and push the card in until it click in place.
4. Close the card-slot door.
5. Tighten the screw to secure the card-slot door.
CAUTION: Opening the card-slot door without loosening the screw may damage the door.
NOTE: The type of screw may vary depending on the tablet configuration.
NOTE: Make sure the card is correctly aligned and is inserted all the way.
NOTE: Turn off your device before inserting the micro‑SIM card.
Inserting the MicroSD Card
1. Insert the microSD card into the respective slot and push the card in until it click in place.
8

NOTE: Make sure the card is correctly aligned and is inserted all the way.
NOTE: Turn off your device before inserting the microSD card.
9

4
Getting Started
Turning On or Off the Device
To turn on your device, press and hold the power button for 2 seconds.
NOTE: When your device is fully discharged, it is recommended to connect the device to the power
adapter for charging for 3-5 minutes and then turn on the device.
To turn off your device, press the power button to open the options menu, and then select Power off
→OK.
Finishing Android Setup
After you turn on your device for the first time, follow the prompts on the screen to finish Android setup.
You can configure settings such as language, Wi-Fi, date & time, sign-in to your Google account, and so
on.
Customizing the Screen
After finishing android setup, follow the instructions on the screen to customize the home screen.
10

Locking and Unlocking Your Device
Press the power button to turn off the screen and lock your device.
You can also configure your device to automatically lock after a certain period of inactivity.
Tap →Settings →Display→Sleep to set the time after which you want the device to enter sleep state
and lock itself.
To unlock the screen, press the power button and then slide the lock icon in any direction.
NOTE: The procedure to unlock your device varies depending on the security method you choose.
11

Touch Tips
Your device supports multi-touch. You can use the touch screen as follows:
Gesture Actions Functions
Touch
Tap gently on the display with your fingertip.
• Select items on the screen, including options,
entries, images, and icons
• Start applications
• Touch buttons on the screen
• Input text using the on-screen keyboard
Touch and Hold
Touch and hold your finger on the display
• Display detailed information about an item
• Open the context menu of an item to
perform further actions
Drag and Drop
1. Touch and hold your finger on an item on the
screen
2. Keeping your finger in contact with the display,
move your fingertip to the desired location
3. Take your finger off the display to drop the item
in the desired location
Move item such as images and icons on the
screen
Swipe or Slide
Move your finger in a vertical or horizontal direction
on the display
• Scroll through the Start screen, web pages,
lists, entries, photos, contacts, and so on
• Close an application. (Swipe the application
to the bottom of the display)
12

Gesture Actions Functions
Zoom in
Touch the display with two fingers and then move
the fingers apart
Enlarge the view of an image or web page
Zoom out
Touch the display with two fingers and then move
the fingers closer
Reduce the view of an image or web page
Rotate
Touch the display with two or more fingers and then
move the fingers in a clockwise or counter-
clockwise arc
Rotate an object by 90 degrees
Right-Click
To perform a right-click on your tablet, touch and hold your finger for 2 seconds on any section of the
screen or an icon and then release your finger.
The options menu appears on the screen.
13

Status Bar
The status bar at the top of the screen displays notifications from apps, time, status of various devices
such as battery, SIM card, Bluetooth, and so on.
14

Table 2.
1 Notification panel displays notification icons to
inform you of new emails, missed calls, unread
messages, and so on. Slide the panel down to
view the notifications and then tap a notification
icon to view more details. Tap to clear all the
notifications.
2 Status panel displays the status icons for battery
status, alarms, Bluetooth, network connection,
and so on. Slide the panel down to access more
settings and configuration options.
15

Screen Orientation
For optimal viewing experience, the screen orientation changes automatically depending on how you
hold the device.
To toggle auto-rotate, slide down the status panel and tap the AUTO ROTATE icon.
Keys and Functions
Your tablet has a multi-touch display. You can touch the screen to operate the tablet.
Gesture Actions Functions
1Back • Tap to return to the previous screen or to exit
the current app.
• In text input mode, tap to close the on-screen
keyboard.
2Home • Tap to return to the main screen.
• Tap and hold to open Search.
3Menu Tap to open a list of recently-used apps.
Apps and Widgets
•Apps: Software that allows you to perform a specific task. Your device is pre-loaded with a variety of
apps, and additional apps can be downloaded from the Play Store.
•Widgets: A small app that resides on the home screen and provides quick and easy access to
information.
16

17

5
Using Your Device
Contacts
To view and manage your contacts, tap →Contacts.
Creating a Contact
1. Tap →People→Create a new contact.
2. Sign in to an existing Google account or create a new Google account to back up your contacts
online or choose the option to save the contacts on the device to keep local.
18

3. To save the contacts on the device and to keep it as local, enter the contact information using the
on-screen keyboard and then tap Add new contact .
Searching for a Contact
To locate a contact:
1. Scroll through the contact list until you find the desired contact.
2. Tap to open the search bar, and then type either the contact’s full or partial name in the Find
contacts box. A list of matching contacts is displayed.
After you locate the desired contact, tap the contact’s entry to view the details.
Text Entry
You can type text using the on-screen keyboard. To open the on-screen keyboard, tap a text box. To
close the keyboard, tap the back key .
Table 3.
1• Tap to type letters.
19

• Tap and hold to type numbers.
2• Tap to use voice input. The device enters the words that it can recognize.
NOTE: It is recommended to speak close to the microphone and use this feature in a
quiet environment to improve speech-recognition accuracy.
3• Tap to delete a character, symbol, or a space to the left of the cursor.
• Tap and hold to delete text to the left of the cursor.
4• Tap once to show the uppercase keyboard for typing a capital letter.
• Tap twice to enable the Caps Lock mode and tap once to change back to the lowercase
mode.
5 Tap to display the keys for typing numbers and punctuation marks.
Managing Your Device’s Storage
Checking Storage Space
Tap →Settings→Storage. The used, unused, and total space on the device's internal storage and
microSD card is displayed.
Erasing App Data and Cache
1. Tap →Settings→Apps →DOWNLOADED/RUNNING/All.
2. From the Apps list, tap the app whose cache or data you want to remove.
3. In the app screen, tap Clear cache or Clear data.
Un-mounting the SD Card
1. Tap →Settings→Storage.
2. Tap Unmount →OK to remove the SD card.
CAUTION: It is recommended that you unmount the SD card before removing it. Removing the
SD card while it is in use may cause data loss or result in app errors.
Erasing All Data From Your Device
CAUTION: Performing these steps erases all data, including your personal information and
downloaded apps from your device. Make sure that you back up all the required data before you
proceed.
1. Tap →Settings→Backup & reset→Factory data reset.
2. Tap Reset tablet.
3. Read the warning and tap Erase everything.
Internet
You can connect your device to Wi-Fi or mobile networks to access the Internet.
20
Table of contents
Other Dell Tablet manuals

Dell
Dell Inspiron 13-7347 2-in-1 User manual

Dell
Dell Latitude ST User manual

Dell
Dell Streak User manual

Dell
Dell Venue 10 Pro - 5055 User manual

Dell
Dell Venue 8 Pro User manual

Dell
Dell Venue 10 7000 Series User manual

Dell
Dell XPS10 User manual

Dell
Dell T01C001 User manual

Dell
Dell Inspiron 3470 User manual

Dell
Dell STREAK TM1745 User manual

Dell
Dell INSPIRON K08A001 User manual

Dell
Dell Streak User manual

Dell
Dell Venue User manual

Dell
Dell Venue Pro 11 - 5130 User manual

Dell
Dell XPS 12 User manual

Dell
Dell XPS 18 User manual

Dell
Dell Venue 8 Pro User manual

Dell
Dell 8 User manual

Dell
Dell Venue 10 Pro 5056 Operating instructions

Dell
Dell Streak7 User manual