DeLonghi Air Purifier with Ioniser User manual

AIR PURIFIER WITH IONISERInstructions for use
5713710031_03/06.13

2
N
A
Fig. 2
Fig. 4
Fig. 3
B
XU
D
EF
M
I
H
C
L
G
S R Q T OP
V
N
W
Y

3
INTRODUCTION
Thank you for choosing a De’Longhi product. Please take a
few minutes to read these instructions. This will avoid all
risks and damage to the appliance.
Symbols used in these instructions
Important warnings are identied by these symbols.
It is vital to respect these warnings. Failure to observe the in-
structions could result in electric shock, serious injury, burns,
re or damage to the appliance.
Danger!
Failure to observe the warning may result in life threatening
injury by electric shock.
Important!
Failure to observe the warning could result in injury or dama-
ge to the appliance.
Please note:
This symbol identies important advice or information for
the user.
Troubleshooting and repairs
If the appliance requires repair, always contact the manufac-
turer’s Customer Services.
Always insist on original spare parts.
Repairs carried out by unauthorised personnel may be dan-
gerous and invalidate the guarantee.
Designated use
This is a household appliance only. Use only as described in
these instructions.
As with all electrical equipment, whilst the instructions aim
to cover as many eventualities as possible, caution and com-
mon sense should be used when operating and installing the
appliance.
IMPORTANT SAFEGUARDS
Fundamental safety warnings
Danger! This is an electrical appliance, it is therefore
important to respect the following safety warnings:
•
Never touch the appliance with wet or damp hands.
•
Never use the appliance with bare or wet feet.
•
Never touch the plug with damp hands.
•
Never immerse the appliance in water.
•
Make sure the socket used is freely accessible at all times,
enabling the appliance to be unplugged when necessa-
ry.
•
Unplug directly from the plug only. Never pull the power
cable as you could damage it.
•
To disconnect the appliance completely you must unplug
it from the mains socket.
•
If the appliance is faulty, do not attempt to repair.
Turn it o, unplug from the mains socket and contact Cu-
stomer Services.
•
If the power socket does not match the plug on the ap-
pliance, have the socket replaced with a suitable type by
a qualied electrician.
•
Never move the appliance by pulling on the power cable.
•
The appliance must not be modied in any way, as any
modications may be extremely dangerous.
•
If the power cable is damaged, it must be replaced by the
manufacturer or the manufacturer’s Customer Services in
order to avoid all risk.
•
Do not use an extension cable.
•
The appliance must be installed in accordance with the
rules on household appliances in force in the country con-
cerned.
Important! Keep all packaging (plastic bags, polyst-
yrene foam) away from children.
Important! Do not obstruct the air intake and outlet
grills.
Important safeguards en

4
TECHNICAL DATA
Power supply see rating plate
Absorbed power “
Suitable for rooms of up to 80 m2Mod. AC230
40 m2Mod. AC150
Number of fans 1
Fan speed 3
Ioniser button YES
Technical characteristics
In compliance with European directive 2002/96/EC,
the appliance must not be disposed of with house-
hold waste, but taken to an authorised waste separa-
tion and recycling centre.
DISPOSAL
IONISER
NANO SILVER FILTER
PHOTOCATALYTIC FILTER
WITH UVC LAMP
PREFILTER
HEPA FILTER/ACTIVE
CARBON FILTER
IONISER
en
Important! The appliance is not intended for use by
persons (including children) with reduced physical, sensory
or mental capabilities, or lack of experience and knowledge,
unless they have been given supervision or instruction con-
cerning use of the appliance by a person responsible for their
safety. Children should be supervised to ensure that they do
not play with the appliance.
TECHNICAL CHARACTERISTICS
• De’Longhipuriersincorporatethelatesttechnological
features for home air ltration;
• Theairistakeninthroughthefrontpanel;
• Thecontaminatedairpassesthroughawashableprel-
ter which removes large impurities such as coarse dust,
hair, etc. The partially ltered air is then passed through
a long-lasting HEPA lter with a large ltering surface,
easily recognisable by the special pleated paper. This
HEPA (High Eciency Particulate Air) lter removes im-
purities down to a size of 0.3 microns, ltering all types
of particle including tobacco, house dust and pollen;
• The air is then passed through a black active carbon
lter which removes a variety of pollutants and un-
pleasant odours such as smoke, ne dust particles and
formaldehyde. Some models have an active nano-silver
lter against most pathogens (Staphylococcus aureus
and Escherichia coli) yeasts and moulds. Moreover, the
appliance is equipped with a lter with photocatalytic
titanium dioxide with a UVC lamp, which can eliminate
a variety of bacteria and toxic gases.
• Thepuriedairisreturnedtotheroomthroughthetop
grille. The upward ow of air improves air circulation
in the environment, without generating irritating cur-
rents.
• Whenactive,theindependentlycontrolledioniserrele-
ases a cloud of benecial negative ions into the room
together with the outow of ltered air, allowing the
removal of dust particles, pollen, cigarette smoke and
car exhaust fumes.
• Oncontactwiththenegativeions,theparticlesofdust
suspended in the air are negatively charged and can
combine with the positively charged particles to form
larger particles which will then be ltered by the pu-
rier. The negative particles are attracted by positively
charged surfaces, such as the oor or wall.
• Negativeionsimprovetheionbalanceintheatmosphe-
re, as positive charges generally predominate. The ioni-
zer therefore helps reduce the static electricity created
by the presence of rugs, carpet, televisions and compu-
ter screens.

5
Description/Use en
DESCRIPTION
A) Front panel
B) Washable prelter
C) HEPA lter/active carbon lter
D) Nano-silver lter (certain models only)
E) Photocatalytic lter with UVC lamp
F) Air quality sensor
G) AQS (Air Quality System) Air quality LED indicator
H) Handle
I) Filtered air outlet grille
L) Power cable with plug
M) Cable compartment
N) Control panel
O) ON/OFF
P) Fan speed
Q) AUTO speed
R) Ioniser
S)
AQS (Air Quality System) air quality LED indicator on/o
T) Auto-o
U) Reset button
V) Fan speed LED display
W) LED timer (1-2-4-8 h)
X) HEPA lter exhausted LED
Y) Safety microswitch
USE
Read these instructions before using the appliance.
•
Unpack the air purier and place on a stable at surface
so that the air intake in the front panel and air outlet
(top grille) are not blocked. A good position in the room
might be at least a metre from the wall.
•
Remove the front panel (g. 3). Inside the purier you
will nd the prelter (B) and HEPA lter/active carbon
lter (C)and the nano-silver lter (D) (certain models
only) packed, depending on the model, in a plastic bag.
And the photocatalytic lter (E) xed to the air intake
grill.
• Removethelter(s)(dependingonthemodel)fromthe
bag, as shown in g. 2, then place them in the following
order: nano lter, with the silver side adhering to the
appliance, HEPA lter with the black active carbon side
resting directly on and adhering to the nano-silver, then
the prelter, slotting it in place as shown in g. 4.
• Replacethefrontpanel;
• Aftermakingsurethevoltageinyourhomecorresponds
to the voltage indicated on the appliance, plug the ap-
pliance into the mains socket.
• Removetheprotectivelmfromthecontrolpanel.
• TurntheapplianceonbytouchingtheON/OFFicon(O).
The corresponding icon lights up and the appliance co-
mes on automatically at minimum speed. The AUTO icon
(Q) ashes and the air quality LED indicators (G) light up
orange for 3 minutes. This time is necessary for the ap-
pliance to detect air quality, then the AUTO icon becomes
steady and the air quality LED indicators (G) change co-
lour depending on the air quality detected and also the
fan speed changes accordingly:
BAD AIR QUALITY:
orange + max. fan speed
SATISFACTORY AIR QUALITY:
green + med. fan speed
GOOD AIR QUALITY:
blue + min. fan speed
Please note: the change in colour of the air quality in-
dicator (G) is always sequential:
ORANGE <-----> GREEN
<-----> BLUE
Please note: to vary the set fan speed, touch the icon
(P) corresponding to the required fan speed (Min/Med/
Max).
• TheLEDcorrespondingtotheselectedspeedlightsup.
Please note: When the appliance starts after having
been turned o, using a light pressure on the ON/OFF,
it starts with the last function set
with the exception of
the
auto-o function
).
“AUTO” operation (Q)
Tap the “AUTO” icon, the appliance independently decides the
fan speed according to the air quality detected (min, med,
max).
Ioniser (R)
For the release of negative ions into the environment through
puried air, touch the ioniser icon (R).The corresponding LED
lights up.
Auto-o (T)
This function can be used to turn the appliance o automati-
cally after a given period of time.
With the appliance on, touch the auto-o icon (T) to select
how many hours should elapse before the appliance goes o
(1-2-4-8 hours), the corresponding LED comes on.

Care and Maintenance en
6
AQS (S)
Tap the AQS icon (Air Quality System) to enable or disable
the air quality LED indicators (G). This function is particularly
useful if you want to completely eliminate the light source,
during night operation for example.
Note: the AQS icon enables or disables the LED indi-
cators only while the air quality detection system is
always active.
HEPA lter exhausted LED (X)
When the lter LED (X) ashes, the HEPA lter/active carbon
lter must be replaced. Proceed as follows:
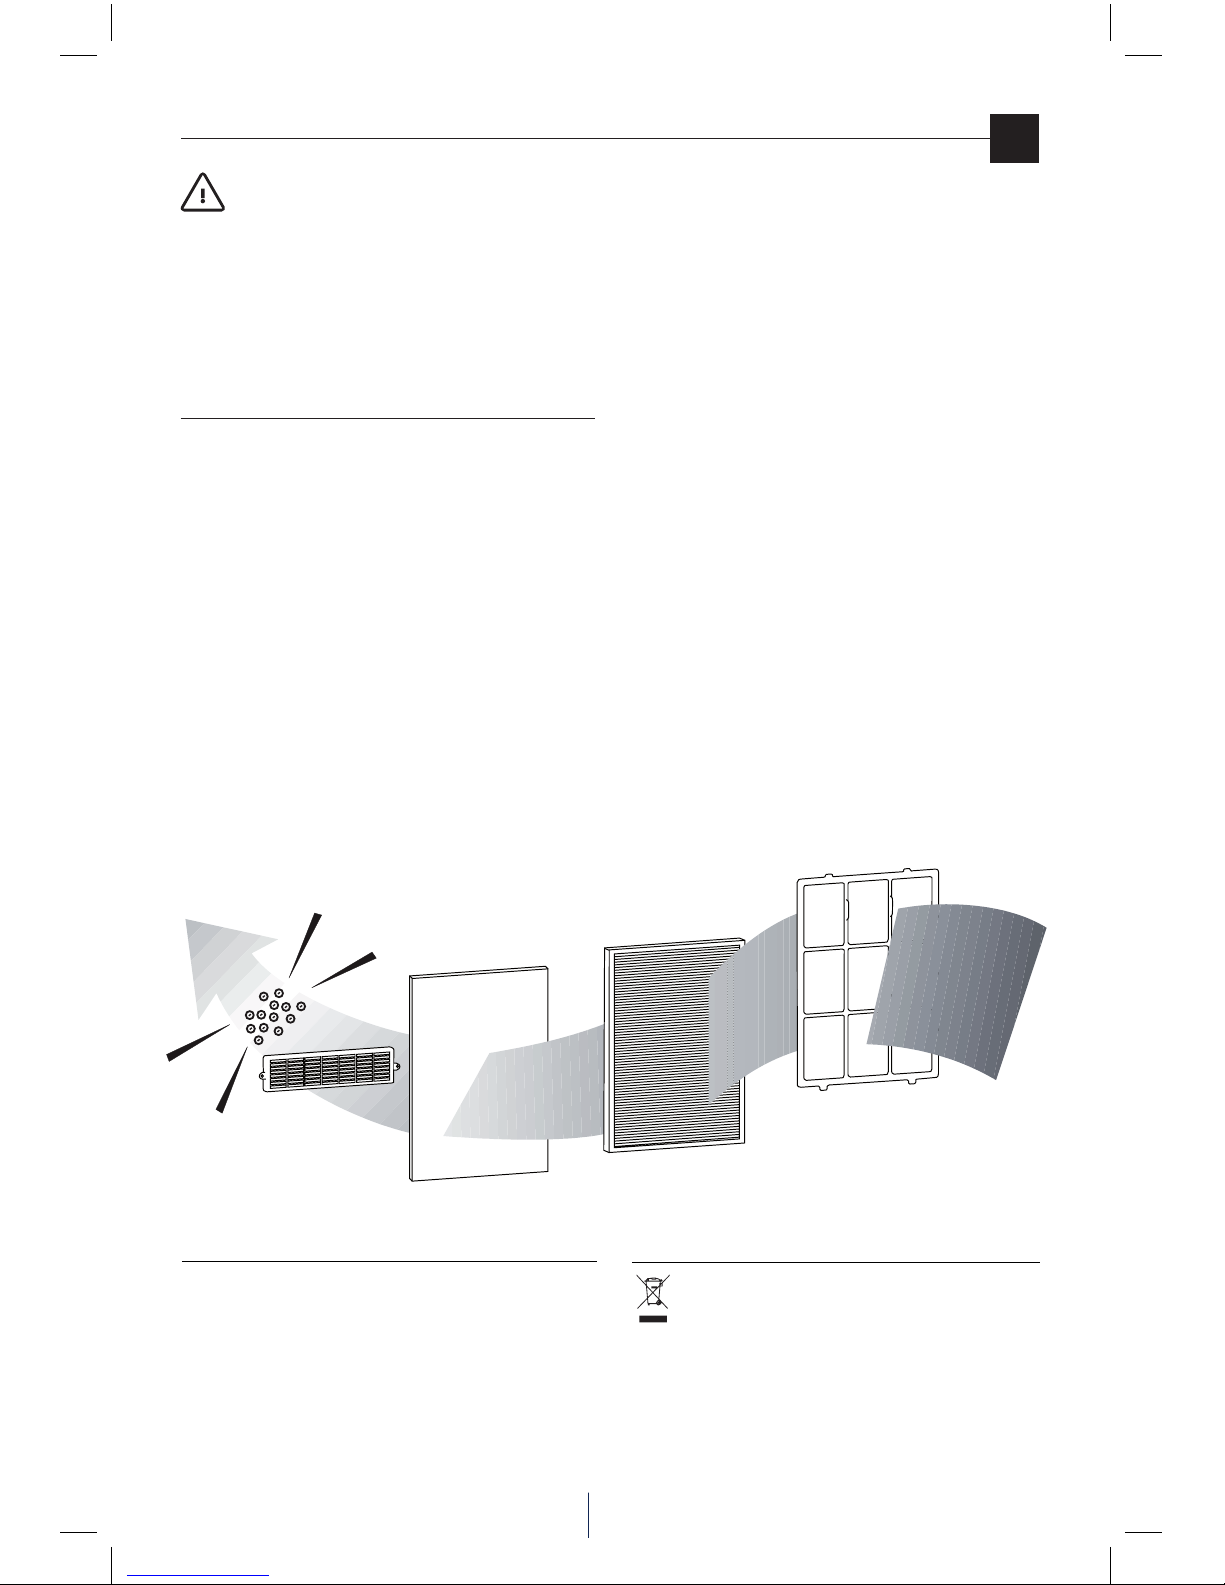
After unplugging the appliance from the mains socket, remo-
ve the front panel (A) and the prelter (B), then remove the
HEPA lter/active carbon lter (C) and replace with a new one
obtainable from De’Longhi’s authorised Customer Services.
Replace the lters in the correct sequence as described above,
then put the front panel back.
At this point, turn the appliance back on and reset as follows:
• insertaneobjectintotheholeintheresetbutton(U)
and press until the ashing LED comes on steadily. Rele-
ase the button. After about 5 seconds, the lter LED (X)
goes o.
Please note: Before performing cleaning and mainte-
nance, always unplug the appliance from the mains
socket.
Please note: Pressing the reset button (U) for less
than 3 seconds activates/deactivates the icon tone.
Please note: The appliance has a safety microswitch
(Y) which turns the appliance o whenever the front
panel (A) is removed.
Cable compartment (M)
The appliance has a practical cable compartment (M), useful
for storing the cable when the appliance is not in use.
CLEANING THE APPLIANCE
Clean the outside of the appliance with a soft slightly damp
cloth to remove dust, dirt or ngerprints. The front panel and
prelter can be removed and washed separately in hot soapy
water (they are NOT dishwasher safe). Dry the components
thoroughly before putting them back in the appliance. The
top grille can be cleaned with a soft brush.
Do not clean the appliance by immersing in water.
MAINTENANCE AND FILTER
REPLACEMENT
• Rememberthattheeciencyofyourairpurierdepen-
ds on the condition of the lters. They should therefore
be checked regularly by removing the front panel.
Prelter (B)
• Checktheprelterregularly.
If large quantities of dust and other impurities have ac-
cumulated, remove and hand wash in hot soapy water.
Dry thoroughly before replacing in the appliance.
• Frequentcleaningoftheprelterhelpsextendthelifeof
the HEPA lter/active carbon lter.
• Whentheltergoesfromwhitetodarkgreyorbrown,
it must be replaced.
HEPA lter/active carbon lter (C)
• ThelifeofaHEPAlter/activecarbonlterdependson
the operating conditions of the appliance.
In general, considering about 4 hours operation a day at
medium speed with normal quantities of dust/smoke in
the air, it should last about 6 months. However, when the
HEPA lter exhausted LED (X) ashes, it must be replaced.
(See the HEPA lter exhausted LED indicator paragraph).
To replace the HEPA lter/active carbon lter, rst remo-
ve the prelter (B), then remove the HEPA lter/active
carbon lter (C) and replace with a new one.
• DonotwashtheHEPA lter/activecarbonlter.When
exhausted, it cannot be regenerated.
• ReplacementDe’Longhilterscanbeobtainedfromthe
manufacturer’s Customer Services and household ap-
pliance shops.
Nano-silver lter (D) (certain models only)
• Thenano-silverlter(D)hasalifelongdurationbecause
it is protected by the HEPA lter. However, regular vacu-
uming is recommended.
Photocatalytic lter with UVC lamp (E)
• Itisapermanentlterthatrequiresnomaintenance.
IT MUST NEVER BE REMOVED as it acts as protection
for the UVC lamp.
Table of contents
Other DeLonghi Air Cleaner manuals

DeLonghi
DeLonghi DEC12-14 User manual

DeLonghi
DeLonghi HFX85W20C User manual

DeLonghi
DeLonghi HFX85W15C User manual

DeLonghi
DeLonghi AC230 User manual

DeLonghi
DeLonghi DDSX 220WFA User manual

DeLonghi
DeLonghi HFX85W15 Series User manual

DeLonghi
DeLonghi DAP 130 User manual

DeLonghi
DeLonghi HFX85W20 User manual

DeLonghi
DeLonghi HFX85W15 Series Specification sheet

DeLonghi
DeLonghi AC 230 User manual