Denver DVD-202 User manual

mp3
DVD / MP3 / CD PLAYER
DVD-202
OPERATION MANUAL

2
The lightning flash with arrow-
head symbol, within an equilat-
eral triangle, is intended to alert
the user to the presence of
uninsulated "dangerous voltage"
within the product's enclosure
that may be of sufficient magni-
tude to constitute a risk of elec-
tric shock to persons.
The exclamation point within an
equilateral triangle is intended to
alert the user to presence of im-
portant operating and mainte-
nance (servicing) instructions in
the literature accompanying the
appliance.
RISK OF ELECTRIC SHOCK
DO NOT OPEN
WARNING: TO REDUCE THE
RISK OF ELECTRIC SHOCK,
DO NOT REMOVE COVER (OR
BACK). NO USER-SERVICE-
ABLE PARTS INSIDE, REFER
SERVICING TO QUALIFIED
SERVICE PERSONNEL.
PLEASE READ THE INSTRUCTION CAREFULLY BEFORE OPERATING THIS UNIT.
WARNING
To prevent fire or shock hazard, do not expose this appliance to rain or moisture.
IMPORTANT
Since the CD circuitry may cause interference to other radio tuners nearby, switch this unit off
when not in use or move it away from the affected radio tuner.
DANGER
LASER SAFETY
This unit employs an optical laser beam system in the CD mechanism,
designed with built -in safeguards. Do not attempt to disassemble,
refer to qualified service personnel. Exposure to this invisible laser
light beam may be harmful to the human eye.
THIS IS A CLASS-1 LASER PRODUCT. USE OF CONTROLS, OR
ADJUSTMENTS OR PROCEDURES OTHER THAN THOSE SPECI-
FIED HEREIN, MAY RESULT IN HAZARDOUS LASER LIGHT BEAM
EXPOSURE.
INVISIBLE LASER
RADIATION WHEN
OPEN AND INTER-
LOCK FAILED OR DE-
FEATED. AVOID DI-
RECTEXPOSURETO
LASER BEAM.

3
Getting Started
Before attempting to connect, operate or adjust this product, please read these instruction
completely and keep this manual for future reference.
Dear customers :
May we take this opportunity to thank you for purchasing this DVD Player.
We strongly recommend that you carefully study the operating instructions before operating
the unit.
Main Features
•Front loading DVD / MP3 / CD player.
•Built-in Dolby Digital.
Standards
Video : NTSC or PAL
Audio : PCM (48 or 96 kHz), MPEG layer 2, Dolby AC-3 & dts line out
Features of audio specifications
–DTS for Digital (Coaxial & Optical) output only
–Linear PCM output

4
* Player is CD-R, CD-RW compatible.
Note: CD-R, CD-RW Discs recorded with writing device can only be used when they are
correctly treated.
Region Management Information
This DVD Player is designed and manufactured to respond to the Region Management Infor-
mation that is recorded on a DVD disc. If the Region number described on the DVD disc does
not correspond to the Region number of this DVD Player, this DVD player cannot play that
disc.
This Region number of this DVD player is .
Disc maintenance
–Before playback, wipe the disc from the center hole toward the outer edge with a clean
cloth.
–Never use bezine, thinner, cleaning fluid, static electricity prevention liquids or any other
solvent.
Note : Dirty disc may cause bad picture.
Audio & Video
Audio
Audio
Disc size 12cm
single side, single layer / single side, double layer
PAL and NTSC DVD disc
Playback time 135min / 240min max.
Disc size 12cm / 8cm
CD disc
Playback time 74min/20min max.
MP3 format disc
Getting Started
Disc types
MP3
Correct
From the center to the edge
Incorrect

5
Safety precautions
Warning
To avoid electrical shock, do not open the
cabinet, refer servicing to qualified person-
nel only.
Warning
Keep the unit away from flower vases, tubs,
sinks, etc. If liquids are spilt into the unit,
serious damage could occur.
Warning
Do not expose this equipment to rain or
moisture.
Warning
Do not block ventilation holes of the unit so
that air can circulate freely,
Attention
If smoke, malodor or unrelated noise are
emitted from the unit, turn off the power and
disconnect the AC power cord.
Attention
Touching the unit is dangerous especially if
during thunder.
Attention
When left unused for a long period of time,
the unit should be unplugged from the house-
hold AC outlet.
Attention
Be sure to turn the unit off and disconnect the AC
power cord before cleaning the unit surface. If the
surface is dirty, wipe clean with a cloth which has
been dipped in a weak soap and water solution and
wrung out thoroughly, and then wipe again with a
dry cloth.
Note: This unit is a class 1 laser product and uses a visible laser beam which could
cause hazardous radiation exposure if directed. Be sure to operate it correctly as
instructed.

6
Front Panel Control
1. Power On/Off
2. Standby Indicator
3. Display
4. Disc Tray
5. Open/Close Button
6Remote Sensor Button
7. Skip Backward Button
8. Skip Forward Button
9. Stop Button
10. Play/Pause Button
Rear Panel Control
1. Digital Audio Output (Coaxial)
2. Digital Audio Ouput (Optical)
3. Analog Audio Output
4. Video Output (Composite)
5. S-Video Output
6Component Video Output (Scart)
7. AC Power Cord
Display
1. DVD Indicator
2. Dts Indicator
3. Dolby Digital Indicator
4. Multi-angle view Indicator
5. MP3 Indicator
6. Disc loading Indicator
7. PLAY Indicator
8. REPEAT Indicator
9. PAUSE Indicator
10. Track (CD) / Chapter (DVD) number
11. Play Time Display
1
67 8 9 1110
2 3 4 5
1 2 3 4 5 6 7 8 9 10
1
25 7
34 6

7
Getting Started
Battery installation (remote control unit)
1. Remove the battery cover.
2. Insert two batteries (AAA) making sure the polarity (+/-) matches the marks inside the unit.
3. Replace the cover.
–Do not attempt to recharge, short-circuit, disabssemble,
heat or throw the batteries into the fire.
–Do not mix old and new batteries
Note : Weak batteries can leak and severely damage the re-
mote control unit.
Remote Control Unit
1. Power on/off
2. Numeric Buttons
3. PAL/MULTI/NTSC Button
4. Audio Button
5. Angle Button
6. DVD Menu Button
7. Subtitle Button
8. Direction Buttons
( Up / Down/ Left/ Right)
9. Previous Button
10. Step/Pause Button
11. Play Button
12. Stop Button
13. Search Button
14. Slow Button
15. Mute Button
16. Eject Button
17. Zoom Button
18. Set Up Button
19. Display Button
20. PBC Button
21. Volume + Button
22. Volume - Button
23. Enter Button
24. Next Button
25. Fast Backward Button
26. Fast Forward Button
27. Program Button
28. Repeat Button
29. Return Button
30. Cancel Button
31. Repeat A-B Button
+
—
+
—
MUTE
MUTE
3
2
14
6
58
7
0
9+10
+10
DISPLA
DISPLA
Y
PBC
PBC
AUDIO
UDIO
ANGLE
ANGLE
DVD MENU
VD MENU
VOL+
OL+
PREVIOUS
PREVIOUS
NEXT
NEXT
/STEP
/STEP
PLA
PLA
Y
REPEA
REPEA
T
RETURN
RETURN
A-B
A-B
SLO
SLO
W
SEARCH
SEARCH
ZOOM
ZOOM
SETUP
SETUP
PAL-MUL-NT
AL-MUL-NT
VOL-
OL-
SUBTITLE
SUBTITLE
PR
PR
OGRAM
OGRAM
CANCEL
CANCEL
1
2
3
4
5
6
7
8
9
10
11
12
13
14 31
30
29
28
27
26
25
24
23
22
21
20
19
18
17
16
15

8
Connect To TV
Caution : Turn off all the equipment before any installation.
This unit provides several types of video and audio signals output. They are :
•SCART Output
•RCA output
•S-Video Output
User can choose a suitable connection type to connect the player to TV.
1. SCART Version
2. Connection via Composite (RCA) Cable
In this type of connection, we have to connect the Left/RightAudio Cables (Red and White)
and a Video signal (Yellow).
Note : Go to part 4.
3. Connection via S-Video Cable
Video in
Audio in L
Audio in R
SCART (RGB)
S-Video in
Audio in L
Audio in R

9
4. Configure the TV System
The DVD Player supports PAL, NTSC and Multi-system TV type. In case there is no
picture output on the screen, please switch your player TV mode in the Setup menu for
proper TV System configuration.
1. Presss SETUP on the remote control.
2. Choose SCREEN SETUP and press ENTER.
3. Choose TV SYSTEM.
4. Select the correct TV mode.
Connection to Amplifer
There are four different types of connection between the DVD player and an amplifier.
•Digital output via Optical Fiber (Connection 1).
•Digital output via Coaxial Cable (Connection 2).
•2Channels (Left/Right) Audio Output (Connection 3 - 4)
NOTE: 1. The Digital/Optical output cut off, when Analog output was selected.
2. TheAnalog output cut off, when Digital/Optical output was selected.

10
Operation
TV Selection
Turn on the TV, the DVD player and the Audio Amplifer System (if any).
1. Press the “TV/VIDEO” button on the TV.
2. Selet the Video Mode (TV).
Note: If there are more than 1 AV channel for the TV, select the channel you have con-
nected to the DVD player.
3. Select the CorrectAudio Input on the AV Amplifier (if any)
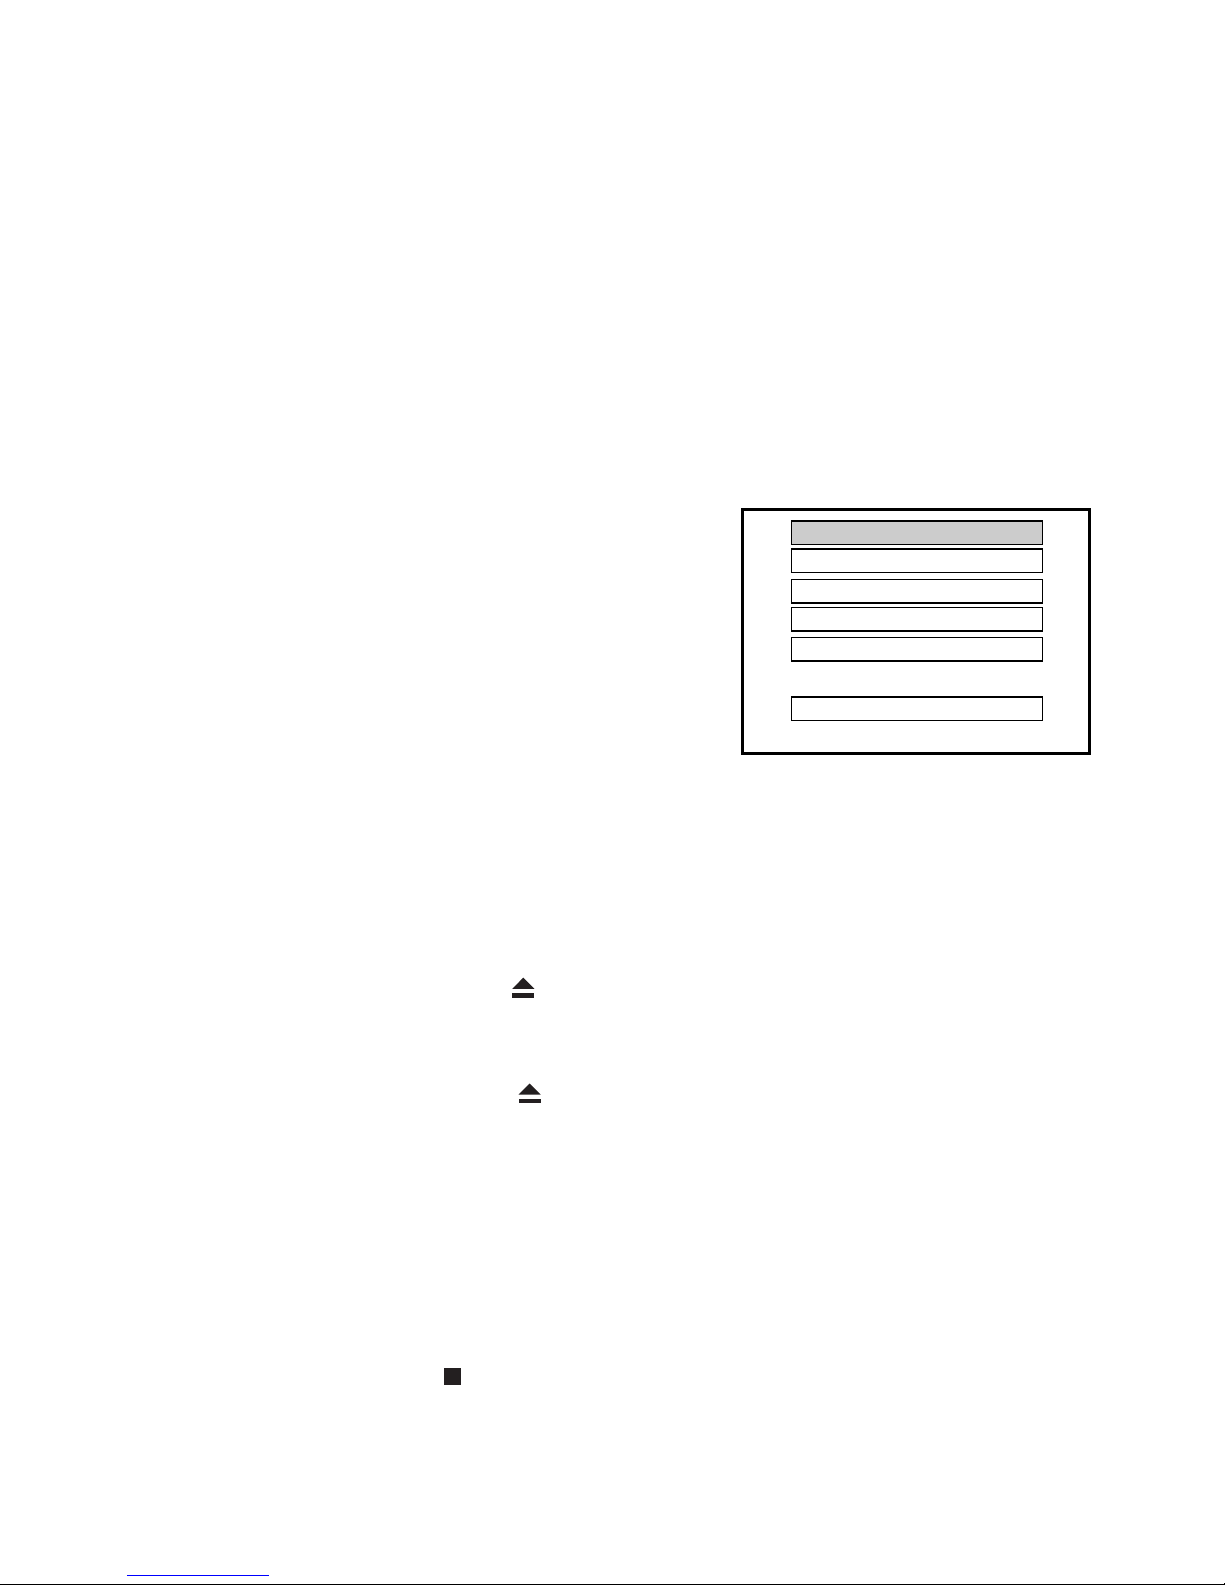
Setup Mode
•Setup Mode provides the menu for the configura-
tion of LANGUAGE mode, SCREEN mode,AUDIO
mode .
•Item selection in the Setup Menu is done by using
the Navigation Arrows and the ENTER key.
•To exit the Setup Menu, choose the EXIT option in
the Setup Menu and press ENTER.
OSD
There are 7 OSD languages embedded in the DVD Player : English, French, German, Italian,
Spanish,Denish and Swedish.
•Press the SETUP button on the remote controller to enter the setup menu main page.
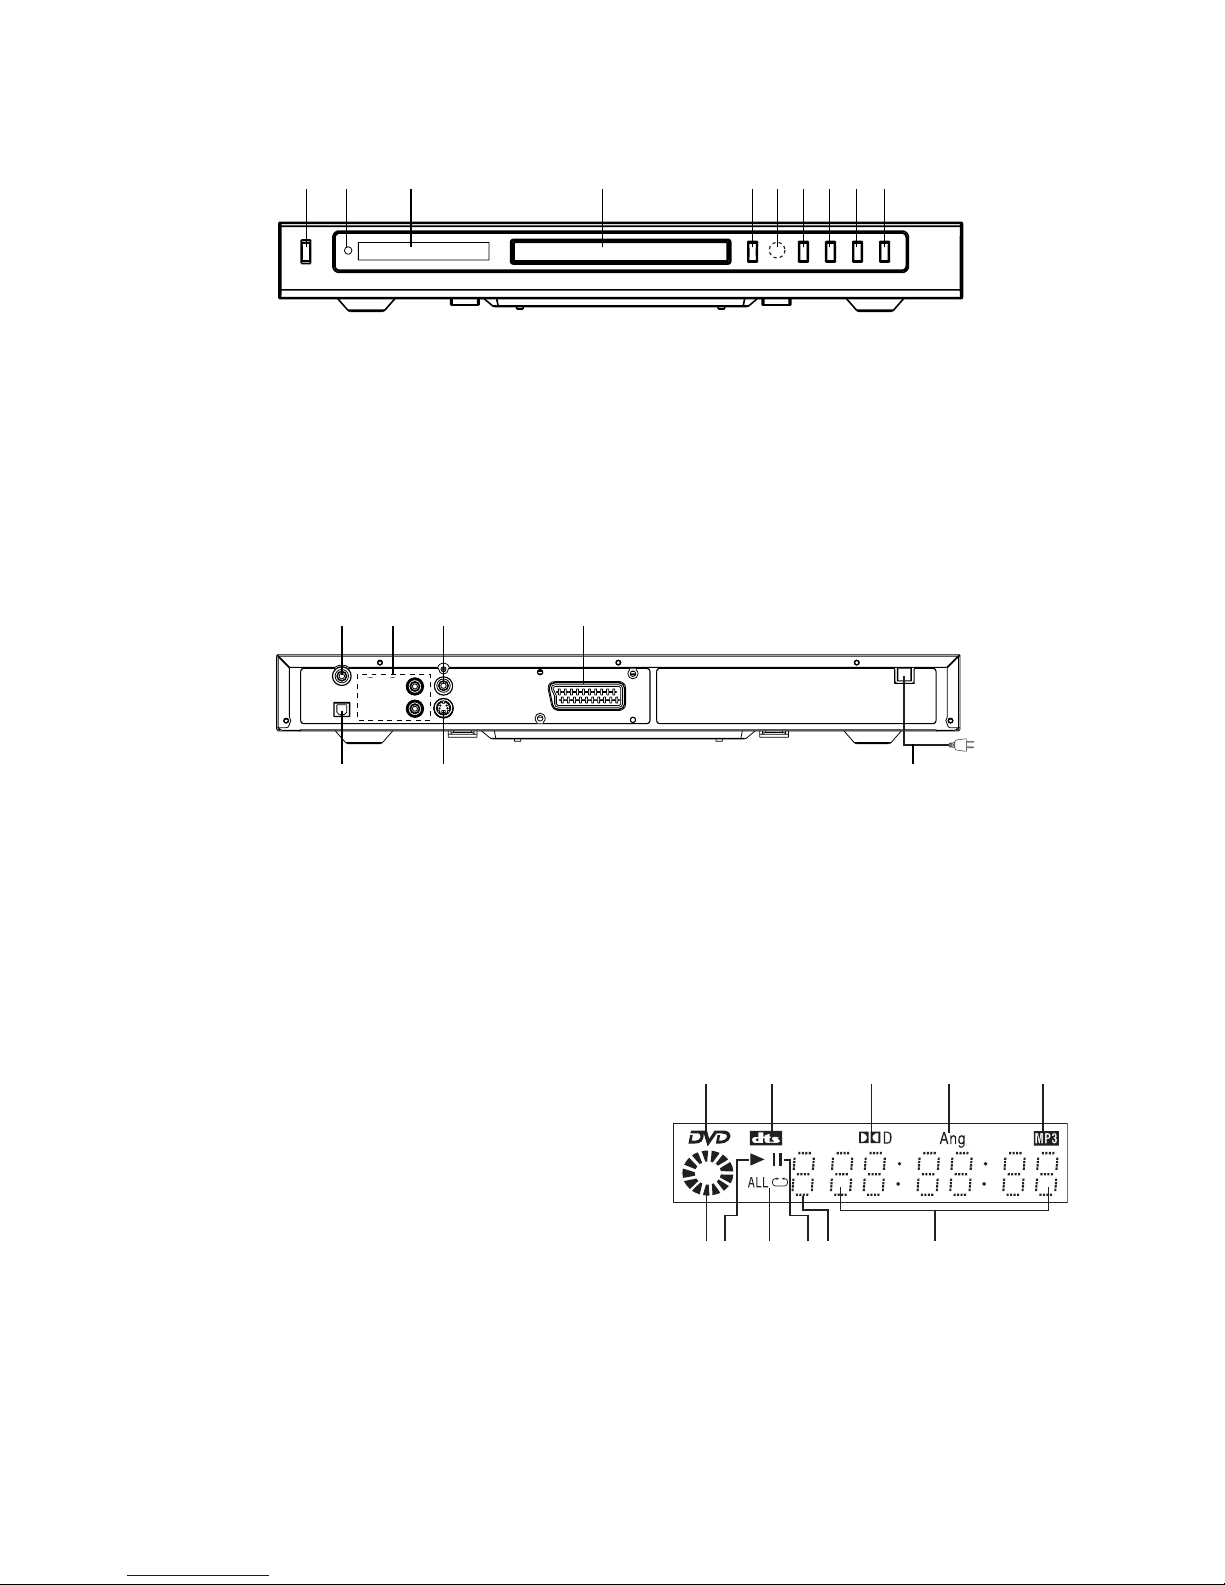
Play Discs
1. Press the OPEN/CLOSE button ( ) on the front panel and load the Disc on the tray. the
label side should be facing upwars. For a Double-sided DVD Disc, put the disc with label
A/1 up.
2. Press the OPEN/CLOSE button ( ) again to close the tray and the disc will be loaded.
3. The Disc will be loaded automatically.
•If it is a DVD disc, it will show the Menu / Title Page on the screen where you can access
to the Casting Information, Product History, Movie Introduction etc.
•Select the desired items from the Menu screen using the Navigation Arrows ( )
and pressing ENTER button on the remote control.
Note: Play button on the front panel cannot be used for selection of DVD on screen menu.
• For CD, it will play the first track directly.
4. Press the STOP button ( ) if you want to stop the Disc playback. You can resume
playback by pressing the PLAY button and it will start at the location where you have
pressed stopped (Resume Play).
5. Press the STOP button twice to have the Disc really stopped.
SET UP MENU
LANGUAGE SET UP
SCREEN SET UP
AUDIO SET UP
CUSTOM SET UP
EXIT
LANGUAGE SET UP

11
Pause Mode
This function is applicable for DVD and CD audio.
1. Press the PAUSE button ( ) will cause the player to enter Pause mode.
2. Press the PLAY button or PAUSE button again will resume to Play State.
DVD Menu Play
The DVD Menu Play function is only applicable for DVD movie. User can access the Casting
informationm, Production History, Movie Introduction etc. directly through this function.
1. Press the DVD MENU button on the remote control to enter the Root Menu.
2. Use the NavigationArrows () or input the item index through the Number keys (0-
9) to do the selection.
3. Press ENTER to confirm the selection.
Audio
This funciton is applicable for DVD with different effects.
- For a DVD disc, pressing the AUDIO button will change the language of playback,
-OSD will display audio 1/2: 5.1 CH ENGLISH etc.
Mute
Mute key is used to remove all the audio effect on the speakers. Once the MUTE key is
pressed, the playback will continue with no sound effect.
Fast Play
This function is applicable for DVD, and CD audio but with different effects. The FAST FOR-
WARD (FF) key and FAST BACKWARD (FR) key are used to achieve fast play function.
Note : Press PLAY button at any stage will resume to normal speed.
Slow Play
The Slow Forward is applicable for DVD while the Slow Backward can only be performed in
DVD.
Note: Press PLAY button to switch back to normal playback speed.
Repeat Mode
Repeat
This function is applicable for DVD and CD audio but with different effects.
-For DVD disc playback, user can choose to repeat the current chapter, current title and
disc. Subsequent key press of the REPEAT key can change between these three options.
-For CD, user can choose to repeat the current track or the whole disc (RepeatAll). Subse-
quent key press of the REPEAT key can change between these two options.

12
Repeat AB
This function is applicable for DVD and CD audio. User can specify the repeating interval by
marking the starting point and the end point.
1. Press the REPEATAB button to mark the starting point (Playback will continue).
2. Press the REPEAT AB button to mark the end point (The marked part will be repeated
automatically.)
Note : Press the REPEATAB button during repetition will disable the Repeat mode.
Subtitle
This function is only applicable for DVD disc. It can change the subtitle language shown on
the screen.
Note : Number of subtitle available depends on the DVD disc.
Angle
Some discs may have multiple viewing angles during production. The ANGLE button is to
select the viewing angle shown on the screen.
Note : The number ofAngle of View depends on the disc.
Search
This function is applicable for DVD and CD audio. Through this function, the user can access
a specific location or a specific track by key in the target time or the track number.
Resume Play
This function is applicable for DVD and CD audio. During the disc playback, when the STOP
button is pressed once, the player will enter the Resume Play mode. At this time, if the PLAY
button is pressed, the player will resume playback at the location where the STOP button is
pressed. If the STOP button is pressed (i.e. STOP button is pressed twice), the player will be
stop.
Zoom
This function is applicable for DVD. User can enlarge a static picture or a moving picture by
pressing the ZOOM key. There are 2 levels of zooming (2x and 4x) and they can be achieved
one by one through subsequent key presses on the ZOOM key.
Besides, user can select the portion of the picture to be enlarged by using the Navigation keys
().
Program Mode
this function is applicable for DVD and CD audio. User can assign the playback sequence
according to his/her preference. For CD audio, user can assign the track sequence while for
DVD disc, user can assign both the Title and Chapter sequence.
-CD
1. Press the PROGRAM key. The Program Sequence tabel will be shown on the screen.
2. Enter the track number according to the user preference through the Number keys (0-9).

13
3. Assigning the playback sequence, press ENTER on the remote control to confirm.
To remove the program:
1. Press the PROGRAM key to invoke the Program Mode.
2. Move the highlight cursor to the STOP option by using the Navigation Arrows.
3. Press ENTER to confirm.
-DVD
1. Press the PROGRAM key. The Program Sequence tabel will be shown on the screen.
2. Enter the Title number with the Number keys (0-9) on the remote control.
3. Enter the Chapter number of the Title selected in the last step.
4. Repeat step 2 - 3 to input the sequence.
5. Press ENTER on the remote control to confirm.
Note : The Program can be removed in the same ways as CD audio.
MP3 OPERATION
This unit can support ISO9660 file system CD-ROM navigation. Multi-Media files such as
MP3 thus can be played in the player.
Operation
•Insert the MP3 disc into the tray. Navigation Menu will be displayed. The menu will show
the files in the root directory, and the MP3 files then be play automatically.
Note :
•Operation such as “STOP”, “NEXT” and “PREVIOUS” are similar to that of CD Audio disc
playback.

14
TROUBLE SHOOTING
Check the following guide for the possible cause of a problem before contacting service.
Symptom
No Power
The power is on, but DVD
player does not work
No Picture
The playback picture is poor
The DVD player does
not start playback
No Sound
The Remote Control
does not work properly
Cause
•The power cord is disconnected.
•No disc is inserted.
•The TV is not set to receive DVD
signal output.
•The video cable is not connected
securely.
•
The connected TV power is turned off.
•Theequipmentconnectedwiththe
audio cable is not set to receive
DVD signal output.
•The audio cable is not connected
securely.
•
The power of the equipment connected
with the audio cable is turned off.
•The Digital Audio Output is set to
the wrong position.
•The disc is dirty.
•No disc is inserted.
•An unplayable disc is inserted.
•The disc is placed upside down.
•The disc is not placed with the
guide.
•The disc is dirty.
•Amenu is on the TV screen.
•The Rating level is set.
•
The remote control is not pointed at
the remote sensor of the DVD player.
•The remote control is too far from
the DVD player.
•
There is an obstacle in the path of the
remote control and the DVD player.
•The batteries in the remote con-
trol are exhausted.
Correction
•Plug the power cord into the wall
outlet and unit securely.
•
Insert a disc. (Check that the DVD or au-
dio CD indicator in the DVD display is lit.)
•
Select the appropriate video input mode
on the TV so the picture from the DVD
player appears on the TV screen.
•Connect the video cable into the
jacks securely.
•Turn on the TV.
•Select the correct input mode of the
audio receiver so you can listen to the
sound from the DVD player.
•Connect the audio cable into the
jacks securely.
•Turn on the equipment connected with
the audio cable.
•
Set the Digital audio Output to the correct
position, then turn on the DVD player
again by pressing the POWER button.
•Clean the disc.
•Insert a disc
•
Insert a playable disc. (Check the disc
type, color system and Regional code.)
•
Place the disc with the playback side down.
•Place the disc on the disc tray cor-
rectly inside the guide.
•Clean the disc.
•Press the SET UP button to turn off
the menu screen.
•Cancel the Rating function or change
the rating level.
•Point the remote control at the remote
sensor of the DVD player.
•Operate the remote control within
about 23ft (7m).
•Remove the obstacle.
•Replace the batteries with new ones.

15
SPECIFICATION
GENERAL
Power source AC 230V 50Hz
Power consumption 10W
Mass 2.5 Kg
External dimensions (WxHxD) 430 X 48 x 253 mm
Operating conditions Temperature: 5°C to 35°C
Operation status Horizontal
Operating humidity 5% to 90%
CD/DVD
Laser Semiconductor laser, wavelength 650nm
Signal system PAL 625/50, NTSC 525/60
Frequency response (audio) 4Hz to 20 KHz
Signal to noise ratio (audio) More than 90dB (1KHz, NOP, 20KHz LPF/A-Filter)
Dynamic range (audio) More than 95dB
Harmonic distortion (audio) 0.2% (1KHz)
VIDEO
Video output 1.0V (p-p), 75 ohm, negative sync., RCA jack
S-Video output (Y) 1.0V (p-p), negative sync., Mini DIN 4-pin x 1
(C) 0.3V (p-p), 75 ohm
* The default secret code is 9922.
* Design and specification are subjuect to change without notice.
Table of contents
Other Denver DVD Player manuals

Denver
Denver DVH-1243 User manual

Denver
Denver DVD-7742 User manual

Denver
Denver DVD-958K User manual

Denver
Denver DVD-7779 MK2 User manual

Denver
Denver LDD-2458MC User manual

Denver
Denver DVH-7786 User manual

Denver
Denver DVH-1238 User manual

Denver
Denver DVU-1008 User manual

Denver
Denver DVH-1245 User manual

Denver
Denver DVD-438 User manual

Denver
Denver DRS-1110 MK2 User manual

Denver
Denver DVU-1112 User manual

Denver
Denver DVH-7783 MK2 User manual

Denver
Denver MTW-753 TWIN User manual

Denver
Denver DVH-1213K User manual

Denver
Denver DVD-958KM User manual

Denver
Denver DWM-100USBBLACKMK3 User manual

Denver
Denver DVH-1239 User manual

Denver
Denver DVH-1239 MK2 User manual

Denver
Denver DVH-7769 BLACK User manual