Denwa Communications DW-710 User manual
www.denwaip.com
1
SMART VIDEO
PHONE USER
MANUAL
DW-710
DW- 810
SMART VIDEO PHONE
USER MANUAL
www.denwaip.com
DW-710
DW-810

www.denwaip.com
Safety Notices
Please read the following safety notices before installing or using this phone. They are crucial for the
safe and reliable operation of the device.
Please use the external power supply that is included in the package. Other power supplies may cau-
se damage to the phone, aect the behavior or induce noise.
Before using the external power supply in the package, please check with home power voltage. Inac-
curate power voltage may cause re and damage.
Please do not damage the power cord. If power cord or plug is impaired, do not use it, it may cause
re or electric shock.
The plug-socket combination must be accessible at all times because it serves as the main discon-
necting device.
Do not drop, knock or shake it. Rough handling can break internal circuit boards.
Do not install the device in places where there is direct sunlight. Also do not put the device on carpets
or cushions. It may cause re or breakdown.
Avoid exposure the phone to high temperature, below 0℃ or high humidity. Avoid wetting the unit
with any liquid.
Do not attempt to open it. Non-expert handling of the device could damage it. Consult your authori-
zed dealer for help, or else it may cause re, electric shock and breakdown.
Do not use harsh chemicals, cleaning solvents, or strong detergents to clean it. Wipe it with a soft
cloth that has been slightly dampened in a mild soap and water solution.
When lightning, do not touch power plug or phone line, it may cause an electric shock.
Do not install this phone in an ill-ventilated place.
You are in a situation that could cause bodily injury. Before you work on any equipment, be aware
of the hazards involved with electrical circuitry and be familiar with standard practices for preventing
accidents.

www.denwaip.com
3
Contents
Introduction
Smart Video Phone Denwa DW-810/710 Overview 5
With Attachment 5
Phone component descriptions 7
Interface introduction 8
Touch Screen Description 10
Status Bar 11
Functional applications 14
Update of the phone 16
Dssk 18
Contact 21
Add new local contact 22
Add account 22
Creat group 22
Favorite 22
Network Phonebook 23
BlockList&CallBarring 24
Phone Settings 25
System info 25
Network 26
Network 26
PPPoE 28
QoS 29
Port 30
Stun 32
Account 33
Call 36
General 36
Dial plan 40
Account 42
Display 44
Tone 44
Time&date 45
Maintain 45

www.denwaip.com
4
Service port 45
CWMP set 47
Backup 48
Update 49
Audio 50
Audio 50
Audio param 51
Video 52
Video param 52
Bandwidth 53
Softkey 54
MCAST 55
Reboot 56
Call Service 56
Register 56
Outgoing & Incoming call 57
Video Call 58
Blind Transfer 59
Semi-attended Transfer 60
Attended Transfer 60
Conference Call 61
Call Hold 62
Android Settings 63
Ethernet conguration 63
Security 63
Language&Input 64
Web Settings 65
Logon 65
Network 66
QoS & VLAN 66
Service Port 69
Registration 71
Dial Plan 72
Basic Settings 72
Dial Plan Add 73
Security 75

www.denwaip.com
5
Thank you for purchasing the DW-710/810 Android smart video phone. The DW-710/810 is a fully featured video pho-
ne that provides voice and video communication over the data network. This phone has all the features of a traditional
telephone and all gives access to many data service features. This guide will help you easily use the various features
and services available on your phone.
Introduction
Smart Video Phone Denwa DW-710 / DW-810
Overview
Item Function
Power supply for telephone.
Power Adapter
Network Cable Used to access network for the phone.
Make phone calls with the phone’s basic functions.
Handset
Handset Cable Connected with the Handset and the phone.
With Attachment

www.denwaip.com
6
Denwa DW-810
Denwa DW-710
www.denwaip.com
7
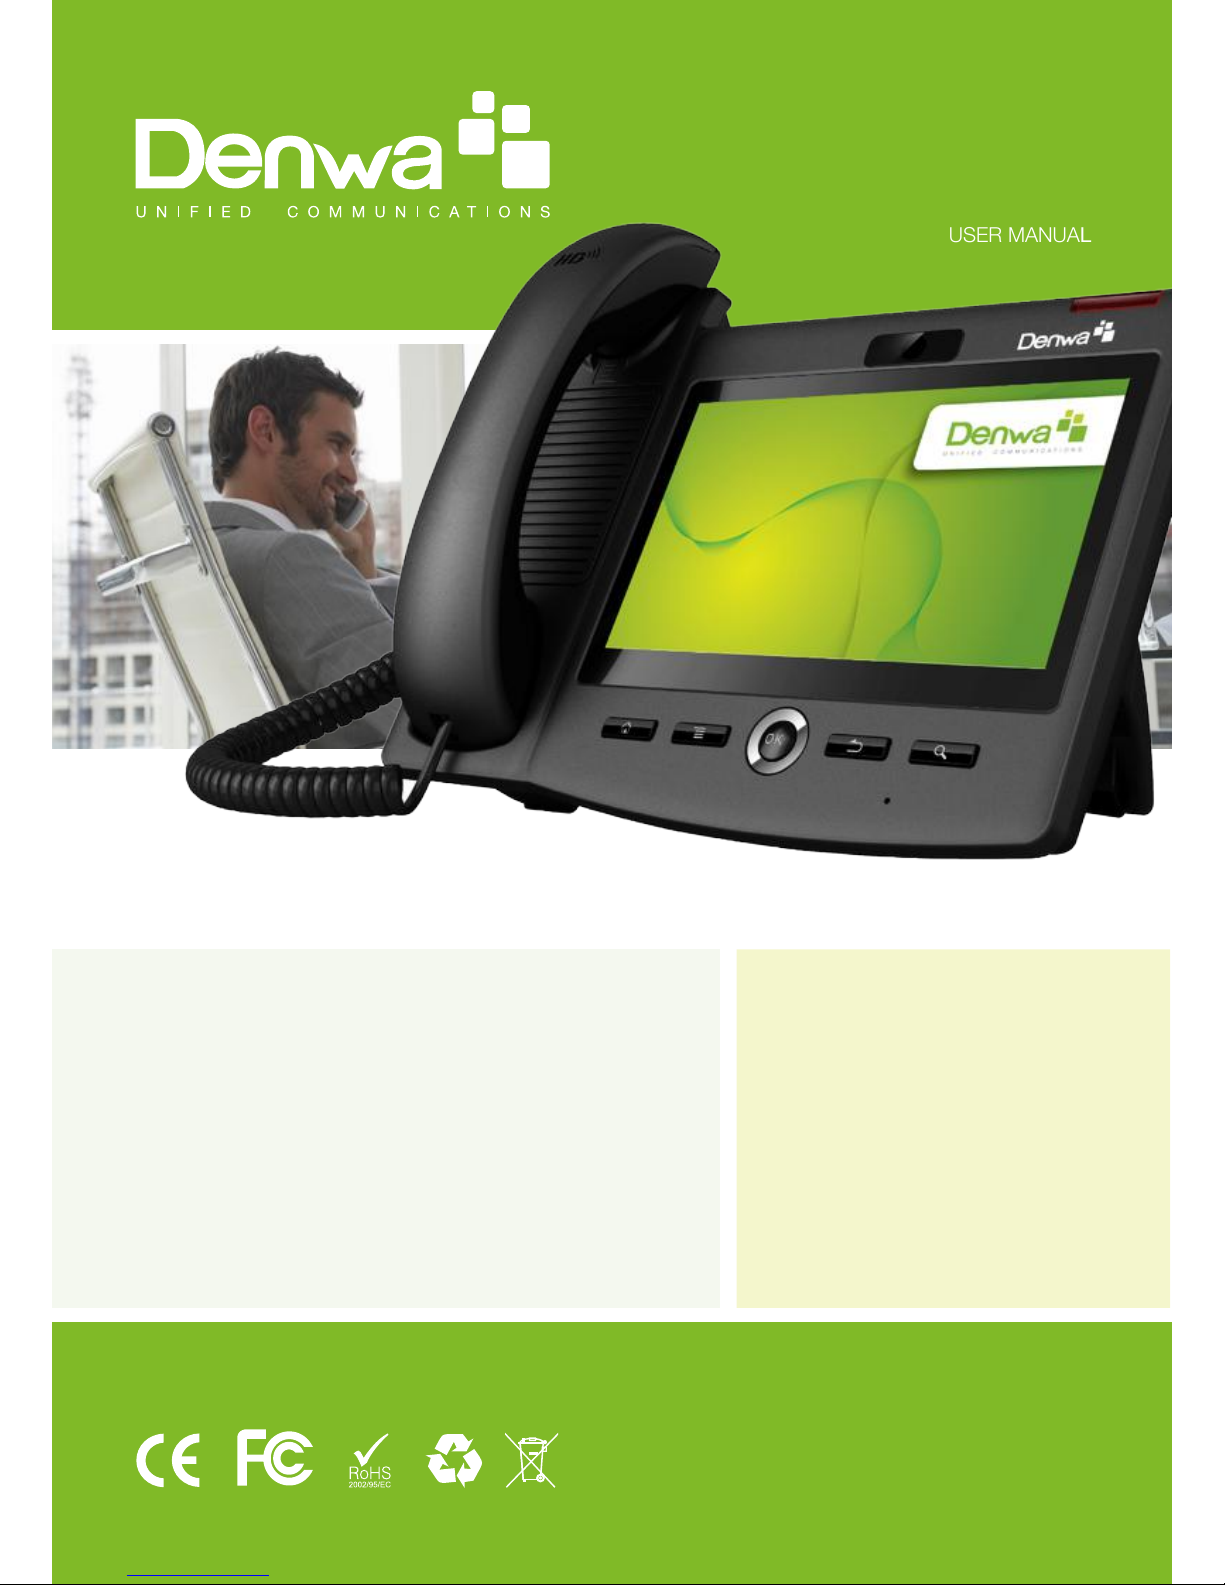
DW-710 / DW-810 Phone component descriptions
Key Function
Headset key. Click it enter the dial interface when the phone is in desktop,
receive the call using headset mode or switch the call to headset mode during
a call.
Option key. You can browse and accomplish all functions of the phone through
pressing this key. Also, you can press and hold this key to complete screenshot.
The hands-free key.
Return key. Press this button in the detailed interface, it will return to the pre-
vious interface; If it is pressed in the application program interface, the current
program will be closed.
Home key. Press this key, the phone will return to the idle screen.
The Camera
Denwa DW-810Denwa DW-710
Only Denwa DW-810

www.denwaip.com
8
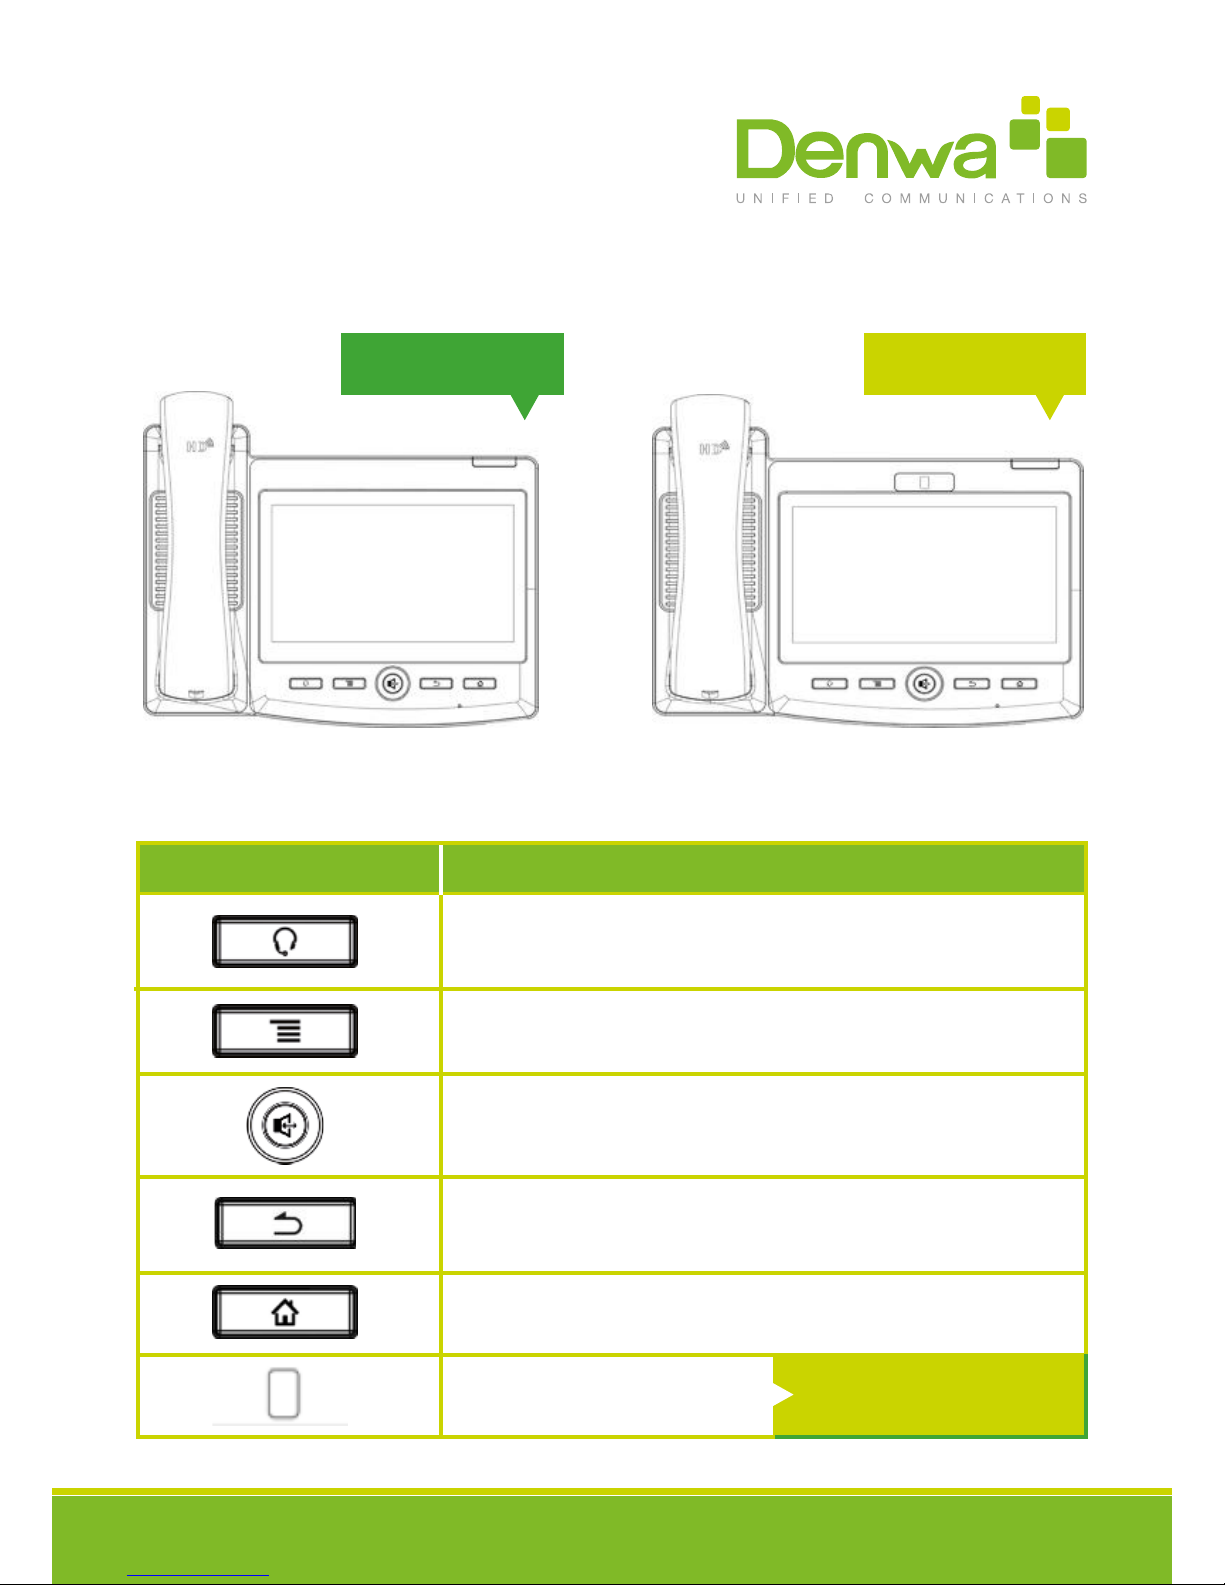
Key Name
SD Card interface
DW-710 / DW-810 Interface introduction
DC Power Interface
PC interface
Meaning
Connect SD Card for
saving data.
Specication RJ45, connect it
computer.
Input: 220V AC
Output: 12V DC
Internet interface Specication RJ45, connect it to
network.
Handset interface Specication RJ9, used to connect
the Handset to the phone.
HEADSET
HDMI
DC PCINTERNET
HANDSET
www.denwaip.com
9
Note:
1. Put the handset line into the handset interface according to the interface illustration.
2. Plug the power adapter into the DC port; poke the other side of the power adapter into an electric socket.
3. Insert one end of RJ45 network cable into the phone’s WAN port (Please refer to the
Key Name
USB interface.
Headset interface.
HDMI interface.
Meaning
Connect it to USB disk.
Interface for high-denition audio and
video. A-A interface, A to A interface.
Specication RJ9, used to
connect the Headset to the phone.

www.denwaip.com
10
Interface illustration picture 1) and put the other end into the network equipment. After that, if the network con-
nection status on the status bar is displayed as, actions such as making some telephone calls and surng the internet
could be done. If the network connection status on the status bar is displayed as, please verify whether the network
was congured correctly and the network cable was plugged in correctly.
Interface
Touch Screen Description
You can touch the screen manually to complete the corresponding operation. Here are three ways to use:
Click: Any icon or button can be clicked to realize its function.

www.denwaip.com
11
Press and hold the standby interface will pop-up choice wallpaper desktop option box, you can according to the
prompt to change the wallpaper.
Support full multi-touch.
Touch screen:
Slide your nger on the screen upward or downward slowly to move the interface on the screen.
On some kinds of screen such as idle desktop, you can switch the desktop just by moving your ngers on the screen
to left or right. Dragging your nger to slide will not select or activate anything on the screen.
You can just wait or gently press any place of the screen to stop the sliding after your nger rapidly sliding on the screen.
Gently pressing or touching to stop the scrolling will not select or activate anything on the screen.
Slide:
Status Bar
All of the status information about DW-810/710 is displayed on the top of the screen. You can click on the notication
icon in the left of the status bar or drag down the drop-down list with your ngers to enter the notication panel to further
review and deal with all of the information.
Note:The right icon of the status bar can’t be drag, just the left can.

www.denwaip.com
12
Key Name
Handset mode
Headset mode
Silent mode
Meaning
Indicates that the phone is in the handset mode.
Shows that the phone is in silent mode. This mode can be canceled by
directly clicking the mute button when the screen is in the idle interface.
Indicates that the phone is in the headset mode.
Hands-free mode Indicates that the call is in hands-free status.
Alarm clock If you set an alarm clock, the alarm clock icon will display on the status bar.
Displays that the network connection is successful. Tap the icon directly
into the network settings.
Network status
(successful)
Network status
(failed)
Shows that the network connected failed. You need to check the network
is properly connected and the parameters are congured correctly.
Displays that the phone successfully identies the USB device. Tap the
icon directly to switch into the USB application wizard.
Shows that there are several missed calls. You can click on the icon
directly to switch into the call log.
SD card
Missed calls
Status Bar

www.denwaip.com
13
Key Name
Open the DND
Call forward
Auto answer
Meaning
Shows that the phone is on “Do Not Disturb” mode. Any of the call could
be directly rejected before it’s ring interface appears. There is only a
missed call icon leaving in the status bar.
Shows that the phone is in silent mode. This mode can be canceled by
directly clicking the mute button when the screen is in the idle interface.
Indicates that the phone is in the headset mode.
Black list If a phone number is added to the rewall, then open the rewall function,
all calls about this phone number could be rejected directly.
New record Indicates that there are several new unread phone recordings.
www.denwaip.com
14
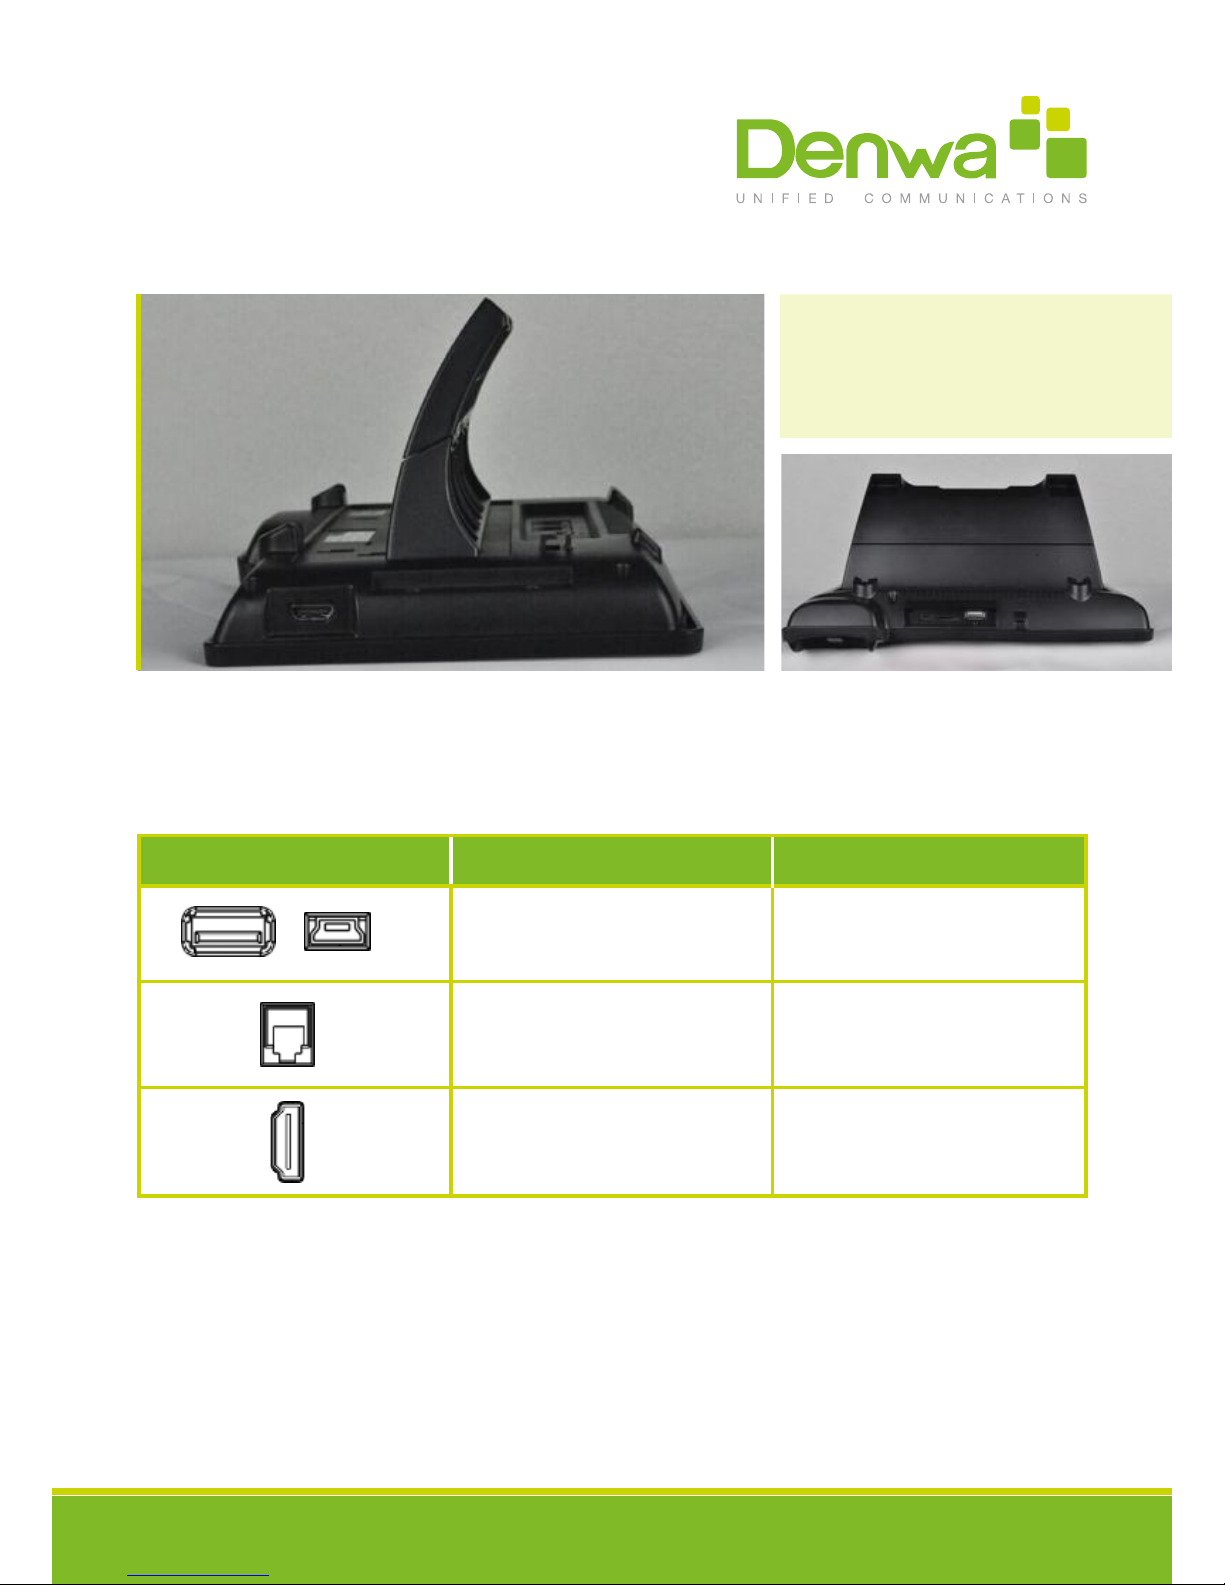
Key Meaning
Click this icon, and it will switch to pre-dial interface. You can make some phone calls through
the screen or keyboard.
Functional applications:
Email
Phone
Settings
Contacts
Android
Settings
Message
MWI
Has the function of sending and receiving e-mail. When an account has been congured suc-
cessfully, you can send and receive your e-mail on the phone and this account will automatically
It contains System, Network, Account, Call, Display and so on. You can congure
some settings.
Support functions such as search, add, remove and edit.
It contains the Call settings, Basic settings,Advanced settings, VOIP and so on, you can
congure some settings in the corresponding menu.(Android system settings).
Like the phone, with messages to write, read and send function.
All calls will be transferred into voice mail when the MWI is enabled.

www.denwaip.com
15
Key Meaning
Enter into the calendar and you can view the accurate date.
Have export contacts, add blacklists and outgoing call barring functions.
Connect pppoe.
Call log
Calendar
Import and
Export
Management
PPPOE
Enter the call log and you can view all call records. You can also view the “Incoming Calls”,
“Outgoing Calls” and “Missed Calls” records by pressing the Option key.
www.denwaip.com
16
Update of the phone
Please contact with service provider to get the new version to upgrade.
Strongly recommended:
1) Before the upgrade the new version, please send personal data backup to mobile devices, to prevent accidental loss.
2 ) Once the upgrade process, please do not power blackout, equipment may not be able to start.
Auto provision: Keep phone registered successfully and congure parameters about automatic updates such as server
address, upgrade le name, time interval and so on. And then the phone will check for updates from the server at a
xed time intervals and upgrade itself. See the specic automatically upgrade instructions, please switch to Update.
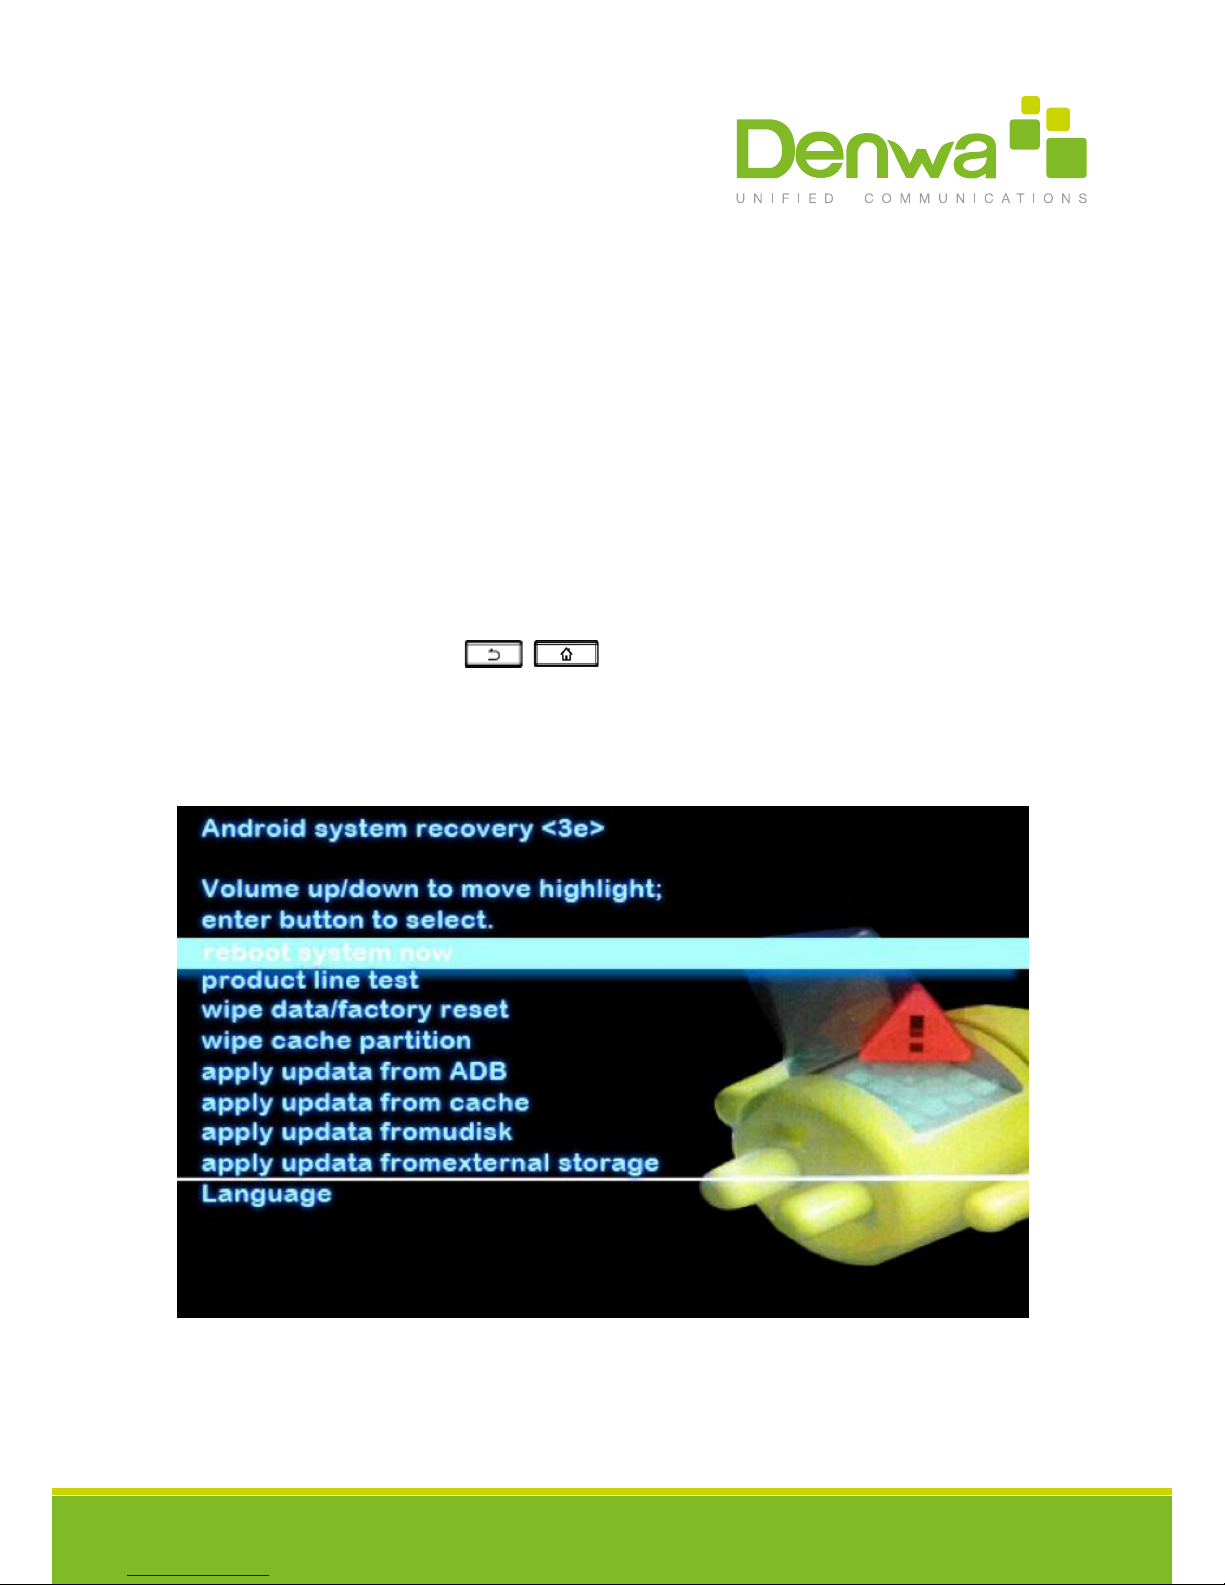
Manual upgrade - USB: Will upgrade package in U disk and inserted the U disk into the USB
interface (the content of the need to be updated).Before the phone restart, at the same time hold down the “” and “”,
then insert the power supply and will enter the unit at this time to Recovery mode, you can see under the Recovery
operation menu, shown below :

www.denwaip.com
17
Through the hardkey “down”, “up”, “OK”, to operate on the Recovery menu.
Select “apply update from udisk” or “apply update from external storage” (SD card), enter the sub-directory and select
the upgrade packages, click on “OK” key to start upgrade .After the success of the upgrade, there will be prompt on
interface, the user can immediately return to the main menu select “reboot system now” to restart the system to start
using the new version.
Notes: In some cases after upgrading, in order to avoid new and old version data of incompatible problems, needs to
remove user data and system cache (the so-called double wiper) whether you need specic clear, please refer to the
Release Note.
Web Update:
Input the phone’s IP on the web;
Input the user name and password to phone’s web;
Enter “MAINTENANCE”—“UPDATE”;
Click the button “Browser”to select the image on your PC and click the button “Update”;
Waiting, the system will be update success.
www.denwaip.com
18
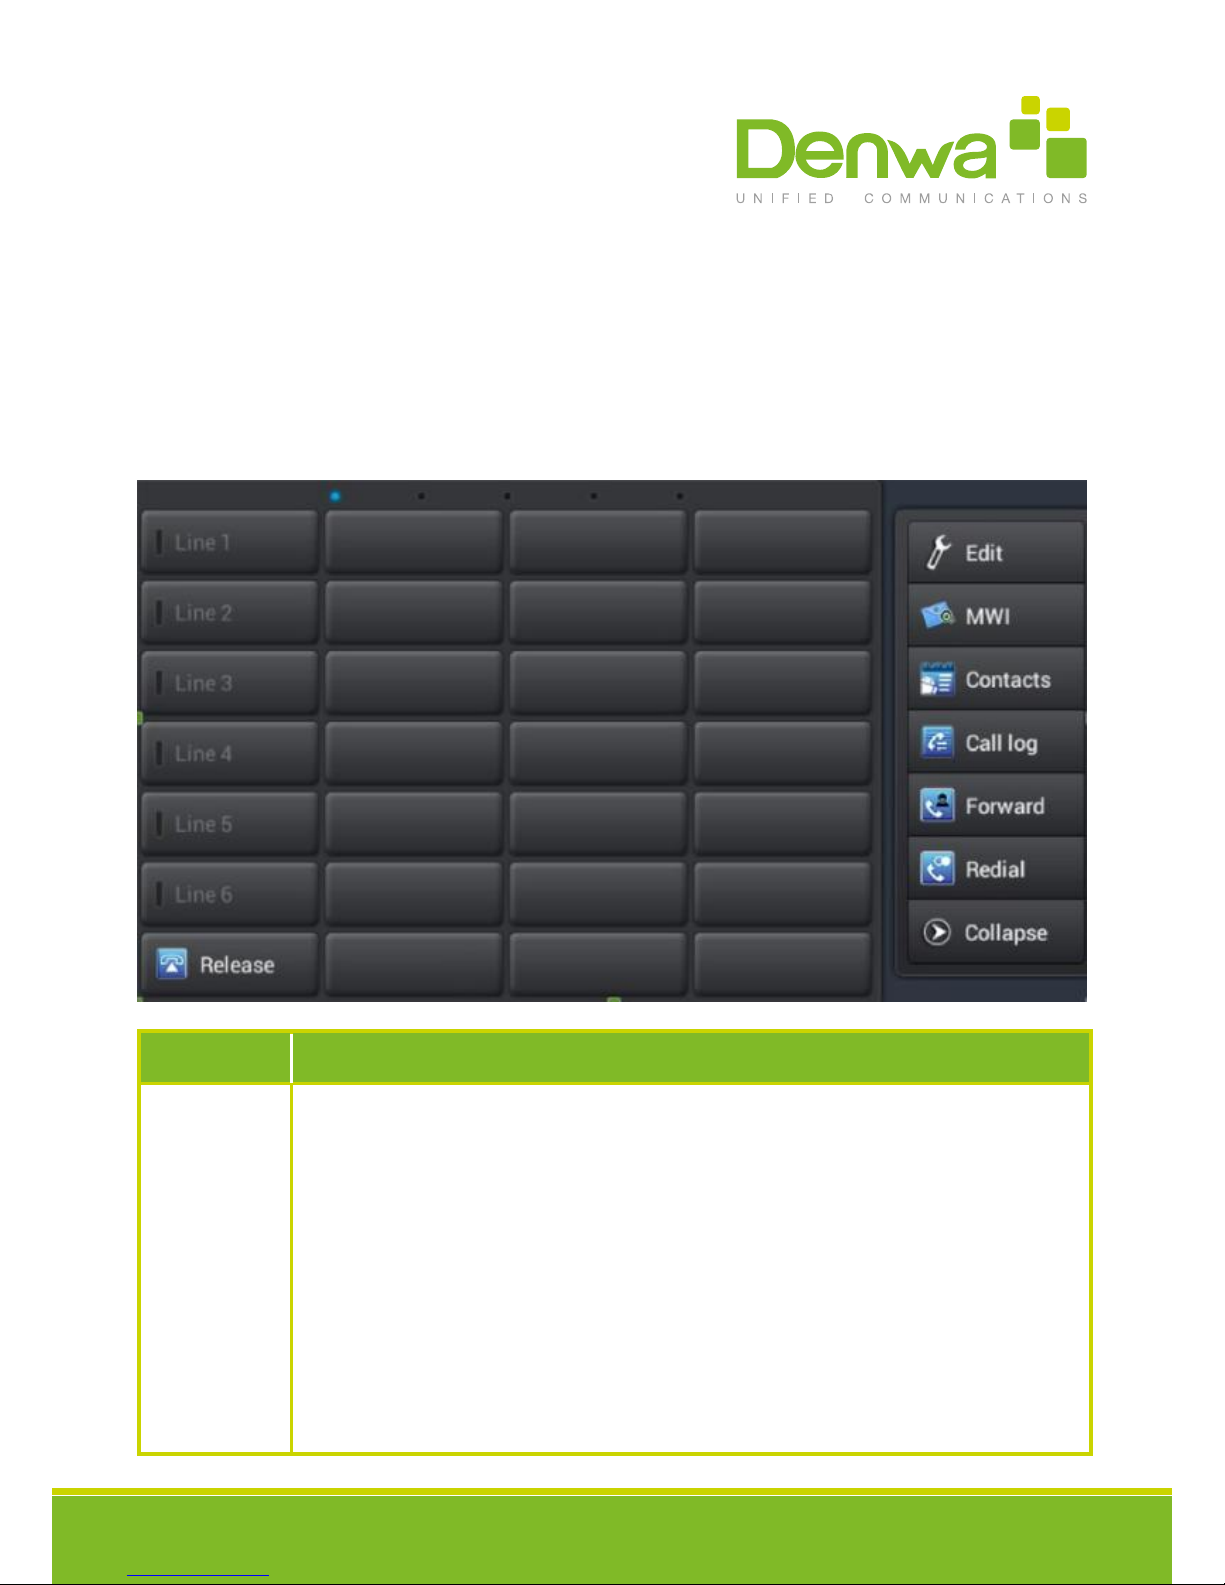
Introduction: This module contains ve expansion module, 140 editable key. You can click “edit” or press and hold the
key to edit it. Line1~6 and release are the default keys, but you can also edit them. Like the below picture:
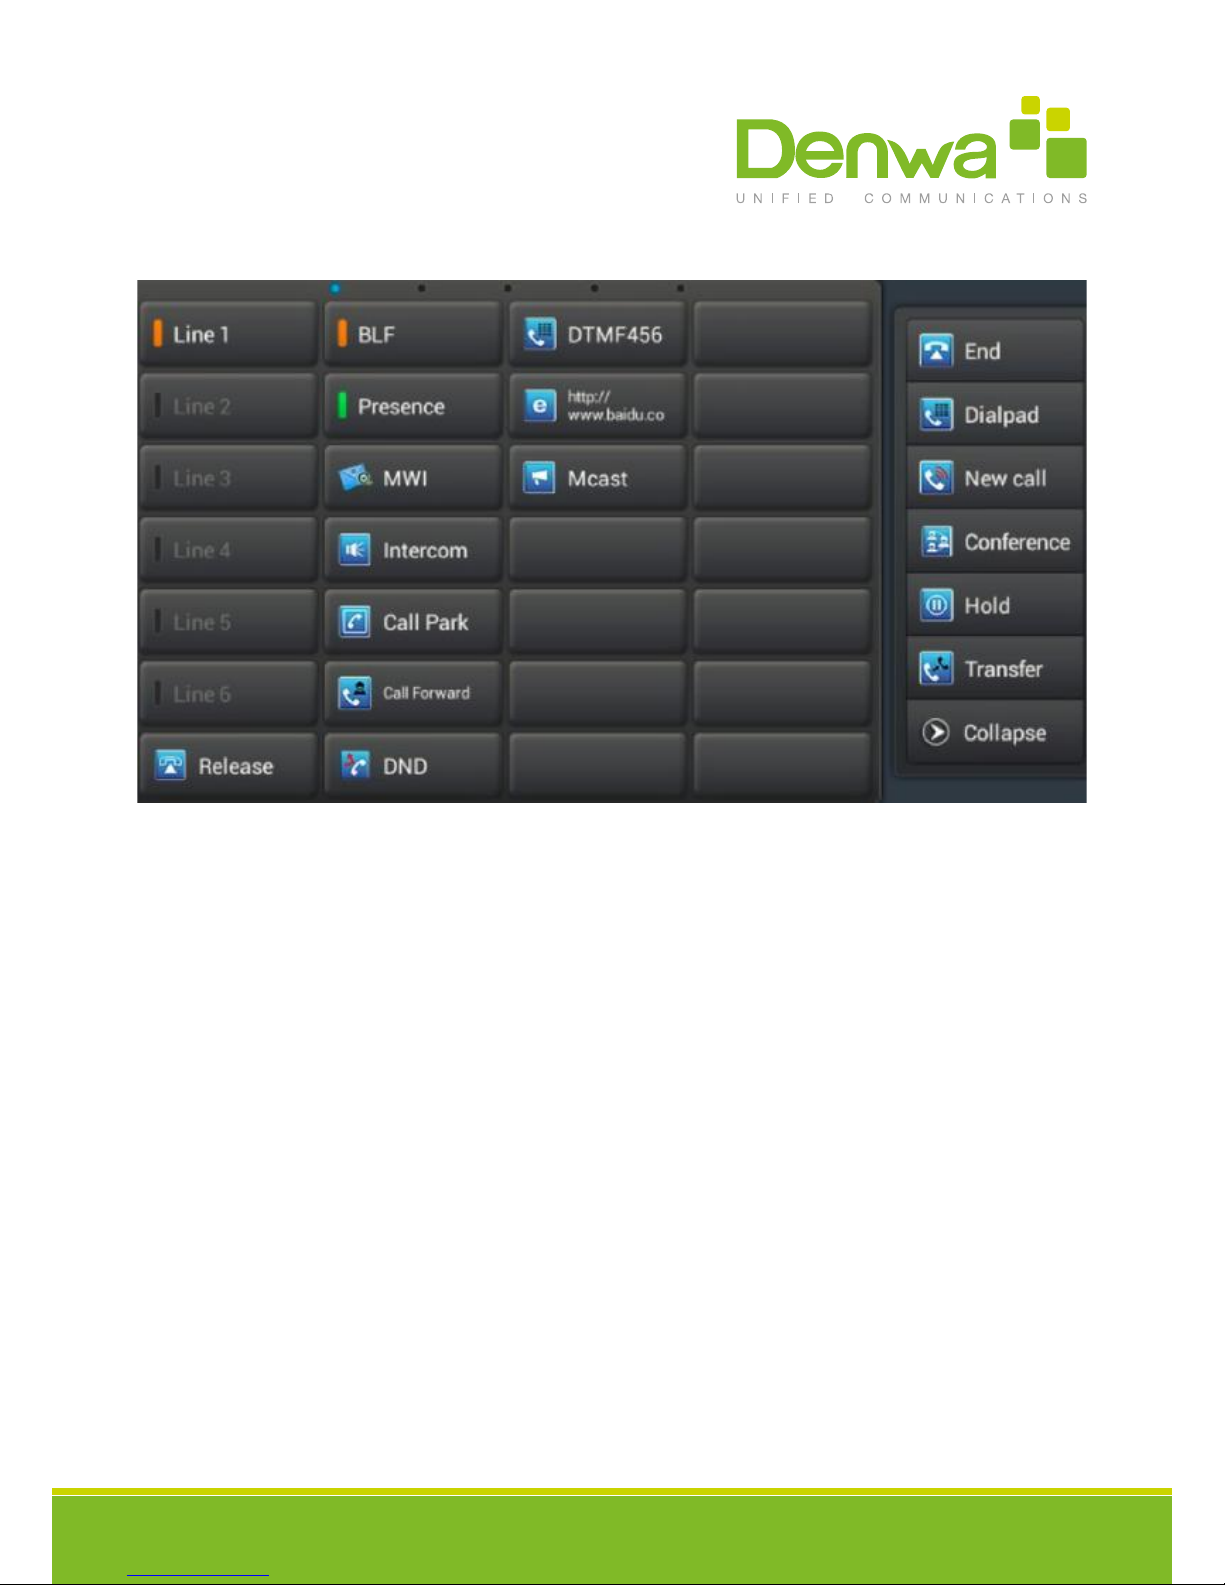
Desskey
Type Meaning
Clicking on the button you can dial the mapped number directly.
Subscribe : BLF , Presence ,Speed Dial and Intercom
Pickup number :the number which server set.
Pickup :That is, when A calls B, B ringing but no one answered the call, C could dial a number
which is comprised of specied prex and B’s number, and then C can talk with A.
BLF: It used to prompt you the state of the subscribe user, and that could pick up the subs-
cribed number by the state. BLF help you monitor the state of subscribe user (idle, ringing, a
call).
Presence: Compared to BLF, the Presence is also able to view whether the user is online.
Note: You cannot subscribe the same number for BLF and Presence at the same time
Speed dial :You can call the number directly which you set. This feature is convenient for you to
dial the number which you frequently dialed.
Intercom: This feature allows the operator or the secretary to connect the phone quickly; it is
widely used in oce environments.
Memory Key
www.denwaip.com
19
The button map the sip line, it enter the dial pad and light the default sip line when
you click the button.
Line
Led Status Led Status
The button map some Key Event.
Title: Consistent with the subscription name
Subtype: Some basic keys
It maps the keypad of the phone, allowing you to edit the dialed number or input numbers
during a call.
Key Event
DTMF
It maps the website; click it to open the URL directly.
URL
Multicast It maps the Multicast; you can click it to make a multicast.
c
The object is idle.
Steady green
Led Status Description
The object is ringing.
The object is active.
Slow blinking red
Steady red
The LED status of BLF
Steady orange
O
The object has failed.
The subscribed number is in a call with current line.
Fast blinking red
Not subscribed.
The object is online.Steady green
Led Status Description
The object is ringing.
The object is active.
Slow blinking red
Steady red
The LED status of Presence
The object has failed.
Not subscribed.
Fast blinking red
O
www.denwaip.com
20
Note: Please set Type rst, then set subtype and value base on the introduction.
You can select value from cantacts by clicking the contact icon. Save the conguration and click complete in right side.
You can delete the dsskey by the same method, edit->clear->save->complete.
Other manuals for DW-710
1
This manual suits for next models
1
Table of contents
Other Denwa Communications Telephone manuals


