Dericam B A Series User manual

User Manual
Dericam Wi-Fi Bullet
IP Camera-BxA&BxC Series

Shenzhen Dericam Technology Co., Ltd. User Manual V1.0.7
Email: [email protected]om Website: www.dericam.com
1
Contents
Welcome................................................................................................................................................ 3
1 Features............................................................................................................................................. 4
1.1 Overview..................................................................................................................................... 4
2 Camera Connection and Installation.............................................................................................. 5
2.1 Connection Guide...................................................................................................................... 5
2.2 Installation Guide .................................................................................................................. 5
2.3 Default Username and Password ........................................................................................... 7
3 Access the Camera.......................................................................................................................... 8
3.1 Mobile Device Access............................................................................................................... 8
3.2 Web Browser Access on Computer........................................................................................ 8
3.2.1 Search Tool for Windows OS ...............................................................................8
3.2.2 Search Tool for Mac OS.......................................................................................9
3.2.3 Local Access via Web Browser ..........................................................................11
3.2.4 Remote Web Access..........................................................................................13
3.3 NVR access.............................................................................................................................. 14
3.4 RTSP access............................................................................................................................ 14
4 App for Mobile Device.................................................................................................................... 17
4.1 Add Camera .............................................................................................................................17
4.1.1 Set up a new camera..........................................................................................17
4.1.2 Set up an existing camera..................................................................................21
4.2 Camera list page......................................................................................................................22
4.3 Live view page .........................................................................................................................24
4.4 Camera Setups via App..........................................................................................................25
4.4.1 Edit Password ....................................................................................................25
4.4.2 Motion Detection ................................................................................................25
4.4.3 Alert Settings......................................................................................................26
4.4.4 Scheduled Recording Settings ...........................................................................26
4.4.5 Audio Settings....................................................................................................27
4.4.6 Video Settings....................................................................................................27

Shenzhen Dericam Technology Co., Ltd. User Manual V1.0.7
Email: [email protected]om Website: www.dericam.com
2
4.4.7 Wi-Fi Settings.....................................................................................................27
4.4.8 SD Card Settings................................................................................................28
4.4.9 Device Time Settings .........................................................................................28
4.4.10 Email Settings ..................................................................................................28
4.4.11 FTP Settings ....................................................................................................30
4.4.12 System Settings ...............................................................................................31
4.4.13 Device Information ...........................................................................................31
4.5 Local File Management ..........................................................................................................31
4.6 Playback from SD Card..........................................................................................................32
5 Web Interface for Operation.......................................................................................................... 33
5.1 Login page................................................................................................................................ 33
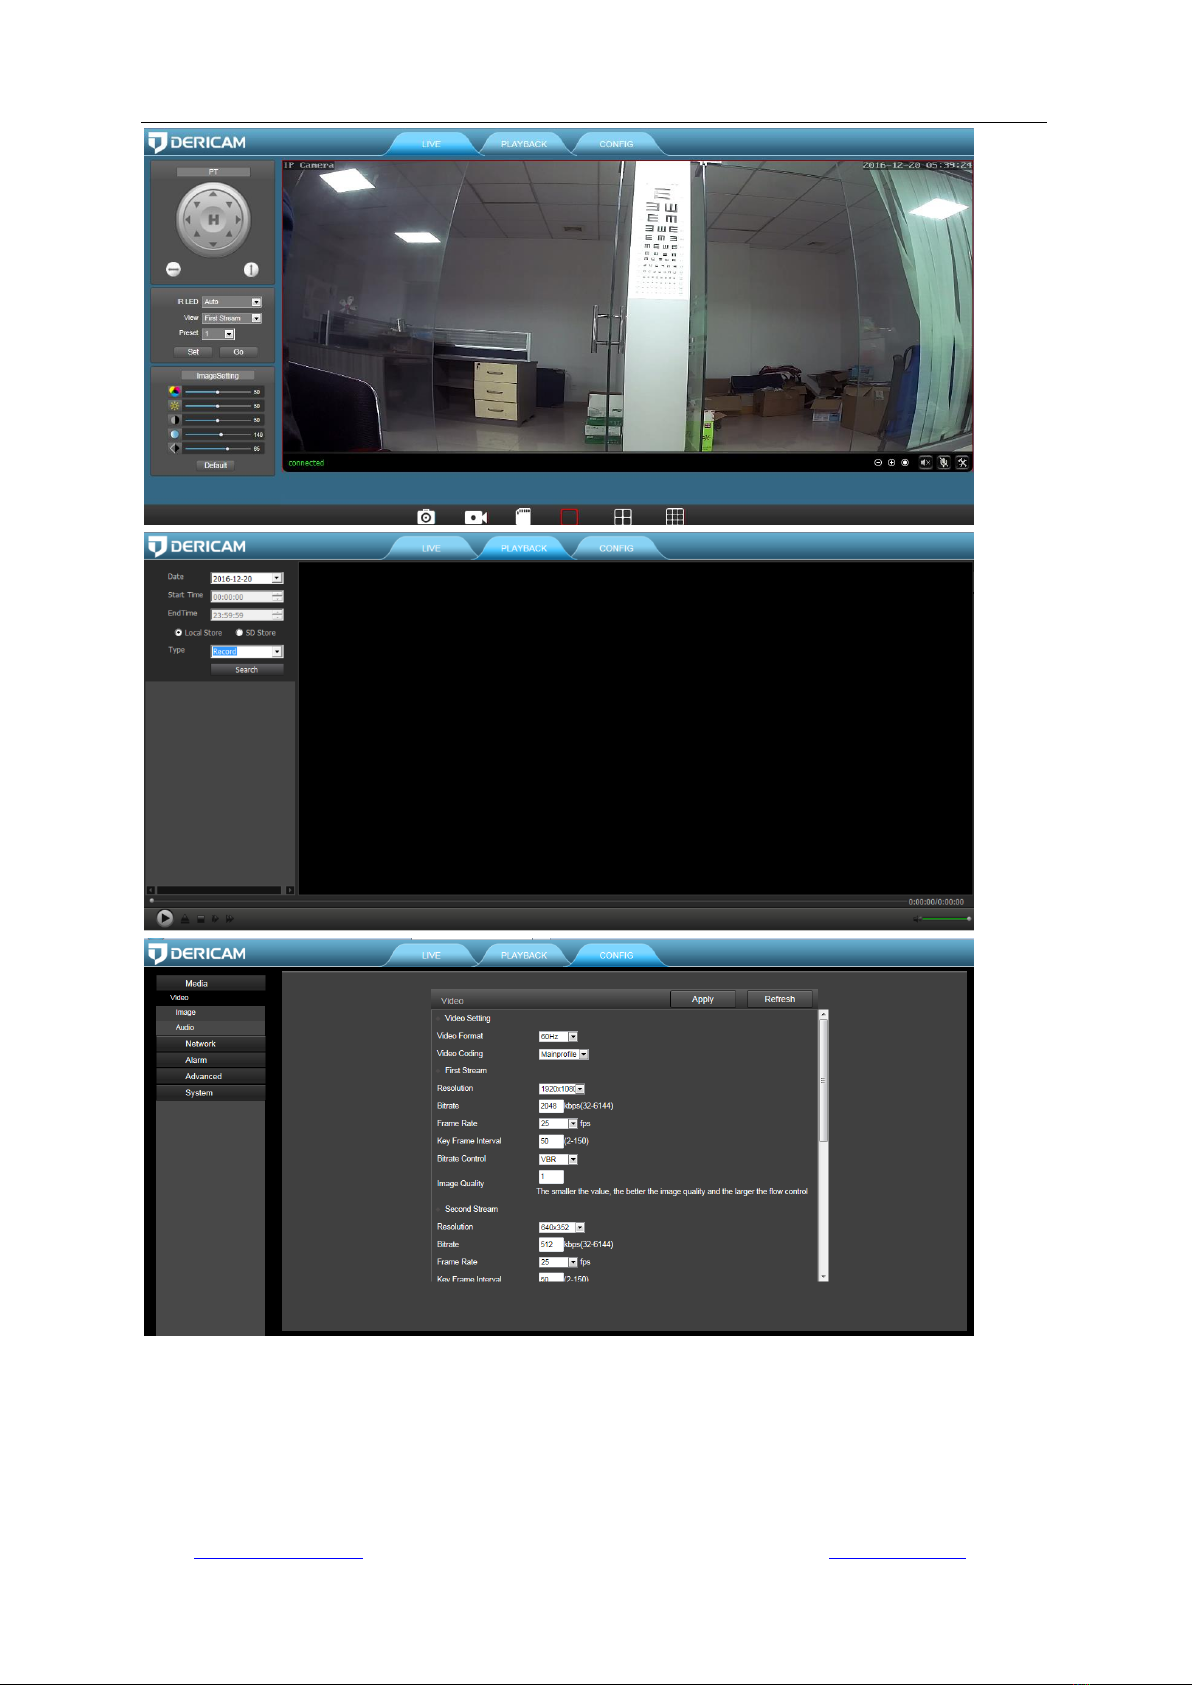
5.2 Live page...................................................................................................................................33
5.2.1 OSD...................................................................................................................33
5.2.2 Pan/Tilt control ...................................................................................................34
5.2.3 View...................................................................................................................34
5.2.4 Preset.................................................................................................................34
5.2.5 IR Control...........................................................................................................34
5.2.6 Image Settings ...................................................................................................35
5.2.6 Tool bar..............................................................................................................35
5.3 Playback (Only Available for IE browser on windows OS)................................................37
5.3.1 Search and playback videos...............................................................................37
5.3.2 Tool bar..............................................................................................................37
5.4 Configuration............................................................................................................................37
5.4.1 Media settings....................................................................................................38
5.4.2 Network..............................................................................................................40
5.4.3 Alarm..................................................................................................................42
5.4.4 Advance.............................................................................................................44
5.4.5 System...............................................................................................................49
6. Frequently Asked Questions........................................................................................................ 52

Shenzhen Dericam Technology Co., Ltd. User Manual V1.0.7
Email: [email protected]om Website: www.dericam.com
3
Welcome
Thank you for purchasing our Dericam Security IP Camera! This user manual is designed to be a
helpful tool for the installation and operation of your camera.
For access to other support information, please visit www.dericam.com and go to Support Center for
details.
To contact Dericam support, please email to support@dericam.com
Important Security Warnings
In order to keep your camera secure and prevent unauthorized access, please never use the default
password for your camera. Always ensure your password is at least 8-10 characters long and contains
a combination of lowercase characters, uppercase characters as well as numbers.

Shenzhen Dericam Technology Co., Ltd. User Manual V1.0.7
Email: [email protected]om Website: www.dericam.com
4
1 Features
1.1 Overview
Dericam Wi-Fi Bullet IP Camera is designed to meet the demands for outdoor IP surveillance cameras
in the DIY Home & Small business security market. This camera is specially designed to offer you a
way to view what is going on inside your home, warehouse, shops, office and so on.
1.2 Key Features
Video Resolution 1920x1080@30FPS(B2), 1280x720@25FPS(B1)
Auto IR-LED illumination with auto IR-Cut Switch
2 IR LEDs IR Night vision range (up to 98 feet/30 meters)
Wi-Fi compliant with IEEE 802.11b/g/n, 2.4GHz band
Support WEP,WPA-PSK and WPA2-PSK Encryption
Support recording and playback via micro SD Card, up to 128GB
Be compatible with ONVIF Protocol and Blue Iris Software
Support motion detection alert via email or pushing notification
Support motion detection event recording via micro SD card or FTP
Support schedule recording via local micro SD card
Support IE/Firefox/Chrome/Safari browsers
H.264 high profile video compression format

Shenzhen Dericam Technology Co., Ltd. User Manual V1.0.7
Email: [email protected]om Website: www.dericam.com
5
2 Camera Connection and Installation
To make your experience with the Dericam camera easy and simple, we've provided multiple
ways to set up, view, and operate your camera as on your needs. Please set up your camera in
the way that works best for you.
2.1 Connection Guide
The Dericam camera can be accessed via web browser on computer or “Dericam”App on
smartphone or tablet. Before access, you should connect the camera to your router via Ethernet
cable or Wi-Fi after it is powered on.
1) Mount the Wi-Fi antenna and make it stand vertically.
2) Connect the camera‟s DC socket with the power adapter for power up.
3) Connect the camera to the router with Ethernet cable or through WiFi.
Notes:
During the first installation, you need to use wired network connection with Ethernet cable even
for Wi-Fi setup.
2.2 Installation Guide
1 Install the Micro-SD Card to Camera
1) Loosen the screws and disassemble the Micro-SD waterproof cover on the belly of the
camera.
2) Insert the Micro-SD card you want to install, it supports up to 128GB Micro-SD card. Please
pay attention to the front and back side of the Micro-SD Card before installation, or it can‟t be
recognized by the camera.
3) Put the Micro-SD waterproof cover back and tighten screws securely to make it available for
waterproof.

Shenzhen Dericam Technology Co., Ltd. User Manual V1.0.7
Email: [email protected]om Website: www.dericam.com
6
2Install Camera to the Wall
The camera has a standard camera tripod screw hole (1/4-20 UNC thread) for use in mounting
the camera onto a stable surface.
Note: Prior to installation ensure that the installation environment can support at least 3 times the
weight of the camera.
1) Drill pilot holes in the position that you wish the camera to be seated using a 3/16 drill bit.
2) Seat the included drywall mounts in the pilot holes that you drilled.
3) Screw the mount on the drywall mounts with the screws provided. Once the position is set,
tighten the screws securely.

Shenzhen Dericam Technology Co., Ltd. User Manual V1.0.7
Email: [email protected]om Website: www.dericam.com
7
2.3 Default Username and Password
To login to the system for the first time, use one of the following default username/password
combinations. Once you‟ve successfully logged in, it is highly recommended to change the
password for security reasons.
Username: admin
Password: admin
Note:
1. Changing the password for admin account is necessary with prompt during initial setup.
2. The password is case sensitive.
3. If you forget the username/password, or fail to login the camera with any usernames/passwords
you know, please hold on the hard reset button of the device for 5-8 seconds to reset it at status of
power on.And then do initial setup.

Shenzhen Dericam Technology Co., Ltd. User Manual V1.0.7
Email: [email protected]om Website: www.dericam.com
8
3 Access the Camera
3.1 Mobile Device Access
The Dericam camera can be accessed via the “Dericam”app on iOS and Android
smartphone/tablet. It is required to download the “Dericam”App first from the Apple Store or
Google Play, and then install it. About how to use the App to setup and access the camera, the
details will be given later on section 4.
3.2 Web Browser Access on Computer
The Dericam camera can be accessed via the web browser on both windows and Mac OS. The
complete and all advanced functions of the camera are available to be acquired by accessing via
web browser.
3.2.1 Search Tool for Windows OS
To easily search and access the Dericam camera in web browser of Windows OS, please install
the “Dericam Search Tool” for Windows OS from the software CD, or you can download the latest
version from www.dericam.com.
Before running the search tool, please ensure:
-The camera is power on and connected to the router via an Ethernet cable or Wi-Fi.
-The camera and the PC are on the same local network.
- Use IE/Chrome/ Firefox on Windows OS, or Safari/Chrome on Mac OS to view.

Shenzhen Dericam Technology Co., Ltd. User Manual V1.0.7
Email: [email protected]om Website: www.dericam.com
9
You can also change some camera‟s network configurations and camera name through the
Search Tool after inputting the correct username and password. Please remind that the login
Username and Password of the camera are not available to change in below blanks of the Search
Tool. There is an entry to changing the username and password in web browser after access.
3.2.2 Search Tool for Mac OS
For Mac OS computer, please install the “Dericam Mac SearchTool.zip”for Mac OS from the
software CD or after downloading from www.dericam.com. The operation is similar as on
Windows OS. Run it to search the camera on your LAN, and you can get the information including
the name, UID, IP address, Mac address, Http port and firmware version of the camera as below.

Shenzhen Dericam Technology Co., Ltd. User Manual V1.0.7
Email: [email protected]om Website: www.dericam.com
10
Double click the camera on the search list to open the camera with web browser, such as Safari
(see below).
Right click on a searched item; you can refresh the search result by selecting “Refresh Camera
List”or “Flush Arp Buffer”. And you can modify the IP address, device name and http port of the
camera after selecting “Network Configuration”. Please note:
1. You should input the correct username and password first, and then it is available to modify the
“Network Configuration”.
2. The login Username and Password of the camera are not available to change in below blanks
of “Network Configuration”. There is an entry to changing the username and password in web
browser after access.
3. The camera will reboot automatically if you modify the http port.

Shenzhen Dericam Technology Co., Ltd. User Manual V1.0.7
Email: [email protected]om Website: www.dericam.com
11
3.2.3 Local Access via Web Browser
Run the search tool and click “Next” to search Dericam cameras on the LAN. After the device is
found and listed in the search result window, double click on the device item to open a web
browser for viewing the camera on computer. If Microsoft Edge pops up as default browser, go to
“More”->”Open with Internet Explorer” for normal viewing.
Or you can open the web browser first, put the IP address and port number of the camera in the
URL blank of the browser by manual to login your camera.
For example: http://192.168.1.108:80.
The IP Address and HTTP port number of the camera are displayed on the list of the Search Tool.
Usually the default HTTP port No. is 80.

Shenzhen Dericam Technology Co., Ltd. User Manual V1.0.7
Email: [email protected]om Website: www.dericam.com
12
Login to the camera by your login credentials (default username/password are both “admin”). If
this is your first time logging into the camera by default account after it is reset, you will be
prompted to change the default password. Please select a password that is at least 8 characters
long, and include a combination of uppercase letters, lowercase letters, and numbers.
When opening the camera‟s interface, the browser like IE/ Firefox on Windows OS will prompt you
to install a plugin. The plugins are necessary to get video from camera. Click the button “install”to
download and install the plugin. If the browser prompts you to allow the plugin to work on the
computer, click “Allow”to ensure the plugin can run successfully. Then the camera is now
successfully set up for live viewing, playback and configuration!
Shenzhen Dericam Technology Co., Ltd. User Manual V1.0.7
Email: [email protected]om Website: www.dericam.com
13
Note: Due to the limitations of NPAPI plugins, the web browser of Chrome/Safari does not support
the setting features of playback, talk, motion-detection and privacy mask.
3.2.4 Remote Web Access
You can access Dericam camera remotely via web browser using UPnP/DDNS functionality or
Port Forwarding.

Shenzhen Dericam Technology Co., Ltd. User Manual V1.0.7
Email: [email protected]om Website: www.dericam.com
14
Before using UPnP/DDNS functionality, ensure your router should support the uPnP networking
protocol and the protocol should be enabled. Please refer to your router manufacturer‟s
documentation to learn how to enable UPnP. And then login the camera via web browser, go to
the “Config”->”Network”->”DDNS”page to enable the UPnP and enter the information of a
third-party‟s DDNS, such as “Dyndns.org”, “3322.org”, “dynddns.us”, or “No-ip.com”. Click Apply
to save the settings. Then you can access the camera by DDNS remotely.
Port Forwarding is another method to set up remote access. It is required to make settings on
both the camera and your router. Please refer to the corresponding documentation provided by
the manufacturer or from the FAQ area of the support center on our website www.dericam.com to
learn the detail instructions.
3.3 NVR access
The Dericam camera can connect to any NVR that supports ONVIF protocol. This allows the
camera to view live, playback and record to a network storage device.
3.4 RTSP access
The Dericam camera supports standard RTSP, you can access its video and audio directly by
RTSP player such as VLC. Please make sure you enabled the RTSP feature in the Camera
Setups before viewing the camera in web browser.
RTSP URL
First stream: rtsp://username:password@IP:port/11
Second stream: rtsp://username:password@IP:port/12
Follow these steps to access the camera‟s RTSP stream by VLC player:
1) Open the VLC player and go to “Media” -> ”Open Network Stream”;

Shenzhen Dericam Technology Co., Ltd. User Manual V1.0.7
Email: [email protected]om Website: www.dericam.com
15
2) Enter the URL of the camera in VLC and click the play button.
3) You may need to enter the username and password of the camera for RTSP authentication.
4) Then you can view the video via the VLC player now.

Shenzhen Dericam Technology Co., Ltd. User Manual V1.0.7
Email: [email protected]om Website: www.dericam.com
16
Note: you can also view the video remotely by the RTSP stream if you have the set up DDNS or
port forwarding.

Shenzhen Dericam Technology Co., Ltd. User Manual V1.0.7
Email: [email protected]om Website: www.dericam.com
17
4 App for Mobile Device
To access your camera on a mobile device, please search and download the “Dericam”App
from Apple Store or Google Play, and then install it. For any Android devices, the App is also
available to be downloaded from www.dericam.com.
Note:
1. The interface screenshots in this manual were taken from the App for iOS device. They may
differ slightly from the interfaces for Android or different versions.
2. Currently the camera supports 2.4GHz band only. So if you have a dual band router, please
disable 5GHz band and only enable 2.4G for Wi-Fi connection.
3. The username and password are case sensitive.
4.1 Add Camera
After installing the hardware and completing self-inspection, run the Dericam App on the mobile
device. Tap “Add Camera”.
-If it is the first time to set up the camera, choose “Setup a new camera”.
-If the camera has been installed on any phone, tablet or computer before, choose “Setup an
existing camera”.
Make sure the camera should be powered up and connected to the router with Ethernet cable,
and your smartphone or tablet should be connected on the same local area network (LAN) via
Wi-Fi.
4.1.1 Set up a new camera.
Go to “Set up a new camera”. There are two methods for adding a new camera: scanning for your
camera on the LAN and entering the camera‟s UID code by manual connection. We do

Shenzhen Dericam Technology Co., Ltd. User Manual V1.0.7
Email: [email protected]om Website: www.dericam.com
18
recommend you to add the camera by scanning on the network, so you do not need to enter the
long UID code.
4.1.1.1 Scan for your camera
Here are the steps with screenshots about adding the camera by scanning.
-Choose “Scan for your camera”. Select the camera you want to set up from the camera list
detected by scanning.
-Give the camera a name, and enter right username and password to login it. The default
username/password is admin/admin. Note, the username and password are case sensitive.
-It is required to change the default password for secure policy. Please remind that you should
remember the username and changed password for future login.
-For continue Wi-Fi setup now, choose “Yes”; or tap "NO" or “Done”to finish setting and directly
go to live view with Ethernet cable connection. You can also configure your Wi-Fi connection later.
-After tapping “Yes”for Wi-Fi setup, the program will auto scan Wi-Fi networks and list all detected
Wi-Fi networks. Select the one you want to apply the camera on. Please tap the refresh icon to
search the Wi-Fi AP list again if the Wi-Fi SSID you want was not found.
-Enter the Wi-Fi password, tap “Check WiFi connection” and usually a message “WiFi connection
success” will appear. Otherwise, check the Wi-Fi password. Please note that some special
characters like“\ " & = ”are not supported. If your Wi-Fi password includes any of these special
characters, please login your router to change the Wi-Fi password as a new one supported by the
camera first.
-Tap “Next”and plug out the Ethernet cable. Choose “Start Live View”. Wait about 30 seconds for
live view picture to come.

Shenzhen Dericam Technology Co., Ltd. User Manual V1.0.7
Email: [email protected]om Website: www.dericam.com
19
This manual suits for next models
2
Table of contents
Other Dericam IP Camera manuals


Popular IP Camera manuals by other brands


TRUELOOK
TRUELOOK TRU23019-11D3 installation manual

Dwyer Instruments
Dwyer Instruments TIC-30 Operation manual

Ventus
Ventus WT816 manual

Logitech
Logitech QuickCam Pro 4000 Setup

TRANWO Technology
TRANWO Technology VMi120 Smart iCAM user manual

Moog Videolarm
Moog Videolarm ACH13HB8N Installation and operation instructions