EtroVISION EV6355A-BO User manual

EV6355A Series
IR Outdoor IP Camera
User’s Manual Ver. 6.0

About This Guide
Model
EV6355A-BO
EV6355AP-BO
EV6355A-CO
EV6355AP-CO
Before Using the EV6356A Series IR Outdoor IP Camera
Check PC requirement
Check OS platform requirement
Install EtroStation™ 3.0 software before you start using the video
server.
Read special and important precautionary information.
Basic knowledge of network setup and configuration will be helpful.
Icon Descriptions
Notes: This icon represents a tip for operation.
Caution: This icon stands for an action that probably impairs the
operation.
Warning: This icon stands for an action that can cause damage to the
operation.
Disclaimer
© 2007 Etrovision Technology. All rights reserved.
Etrolink™ & AnyUSB™ are trademarks of Etrovision Technology; other
product or service names mentioned herein are the trademarks of their
respective owners. Information contained in this document may be
superseded by updates. No representation or warranty is given and no
liability is assumed by Etrovision Technology with respect to the accuracy or
use of the information, or infringement of patents or other intellectual
property rights. No licenses are conveyed, implicitly or otherwise, under any
intellectual property rights.

TABLE OF CONTENTS
BROWSER .................................................................................................. 9
INITIAL USERNAME &PASSWORD ......................................................................10
Administrator .......................................................................................... 10
WIRELESS (ONLY WHEN CONNECTING WI-FI DONGLE) ............................................18
Wireless SETTINGS .................................................................................. 18
Station SETTINGS .................................................................................... 19
Enter the port number, user name, password, and server name information of the
SMTP server. If you’d like to receive the attached snapshots, please enable the
appropriate check box. Authentication is not a mandatory requirement by SMTP
servers. In some situations, the required information includes the SMTP server
name and e-mail address only.................................................................... 36
Please fill in the address of remote FTP server, port number, user name, and
password................................................................................................ 36
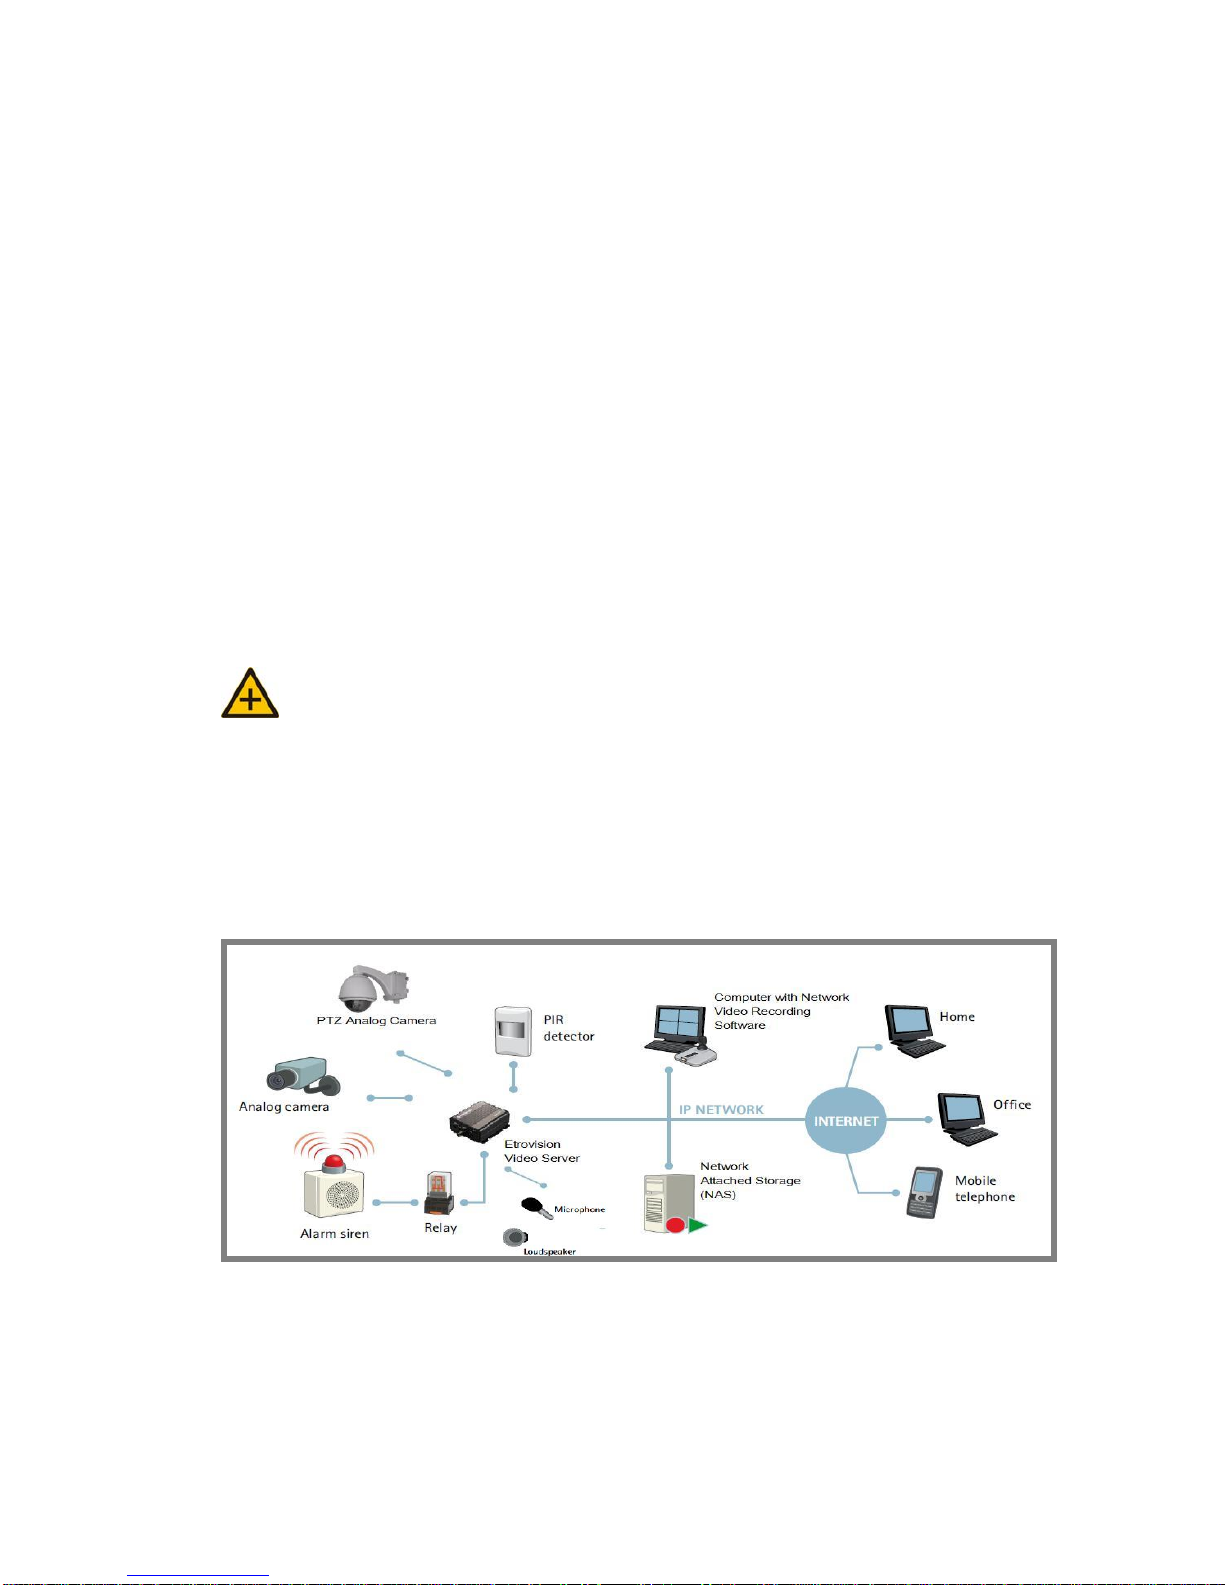
1. PRODUCT OVERVIEW
EV6355A Series IR Outdoor IP Camera support dual streams
simultaneously.
Combination options include:
Stream 1 Stream 2
H.264 M-JPEG
H.264 MPEG-4
H.264 H.264
M-JPEG MPEG-4
M-JPEG H.264
M-JPEG M-JPEG
MPEG-4 H.264
MPEG-4 M-JPEG
MPEG-4 MPEG-4
Stream 1 Stream 2
Note: If users assign MPEG-4 for both Stream1 and 2, the image will be unable
to reach real-time performance. M-JPEG for both Stream 1 and 2 leads to the same
result. This is system limitation.
Package Checklist
IP Camera x 1
Power Adapter x 1
USB Cable x 1
Product CD x 1
Screws
2. SETTING AND INSTALLATION
Note:
Connect the IP camera to your network by using a standard Cat-5 cable.
Connect the video output of your camera to a monitoring device via a BNC type
connector.
Connect speaker and active microphone to Audio In / Out.
Product CD
Product CD in the package contains:

EtroStation™3.0 NVR management software
o16CH Live View / Recording / 4CH Playback
User’s Manual
Power on IP Camera
Use the power adapter, provided in the package, to power on the IP
camera. The adapter should be connected to 110v~22Ov AC socket.
Connect to Network
Connect the IP camera and network hub/switch via a standard CAT5
Ethernet cable and RJ-45 socket. Please pay attention that the PC must be
on the same network domain with the IP camera.
3. USING THE IP CAMERA FOR THE FIRST TIME
Before You Install Software
Please check PC OS platform. Microsoft Windows 2000 or
Windows XP is capable of running EtroStation™3.0 software.
PLEASE read EtroStation™3.0 user’s manual before installation.
Language Support
English
Install EtroStation™ 3.0
User can easily find the specific IP camera on the network via this
software.
Browser for Live Viewing and Video Settings
Microsoft IE browser version 6 or higher is recommended. Currently
Mozilla Firefox and others are not compatible.
Factory Setting – Initial IP Address
Default IP Address: 192.168.1.2
Gateway: 192.168.1.1
Subnet Mask: 255.255.255.0
Network Domain
Alter the IP address of the PC to the same domain of default value
(192.168.1.2). Users may alter the IP address of the IP camera to the
same of PC via EtroScan™. Please refer to page 45 to check detailed
information.
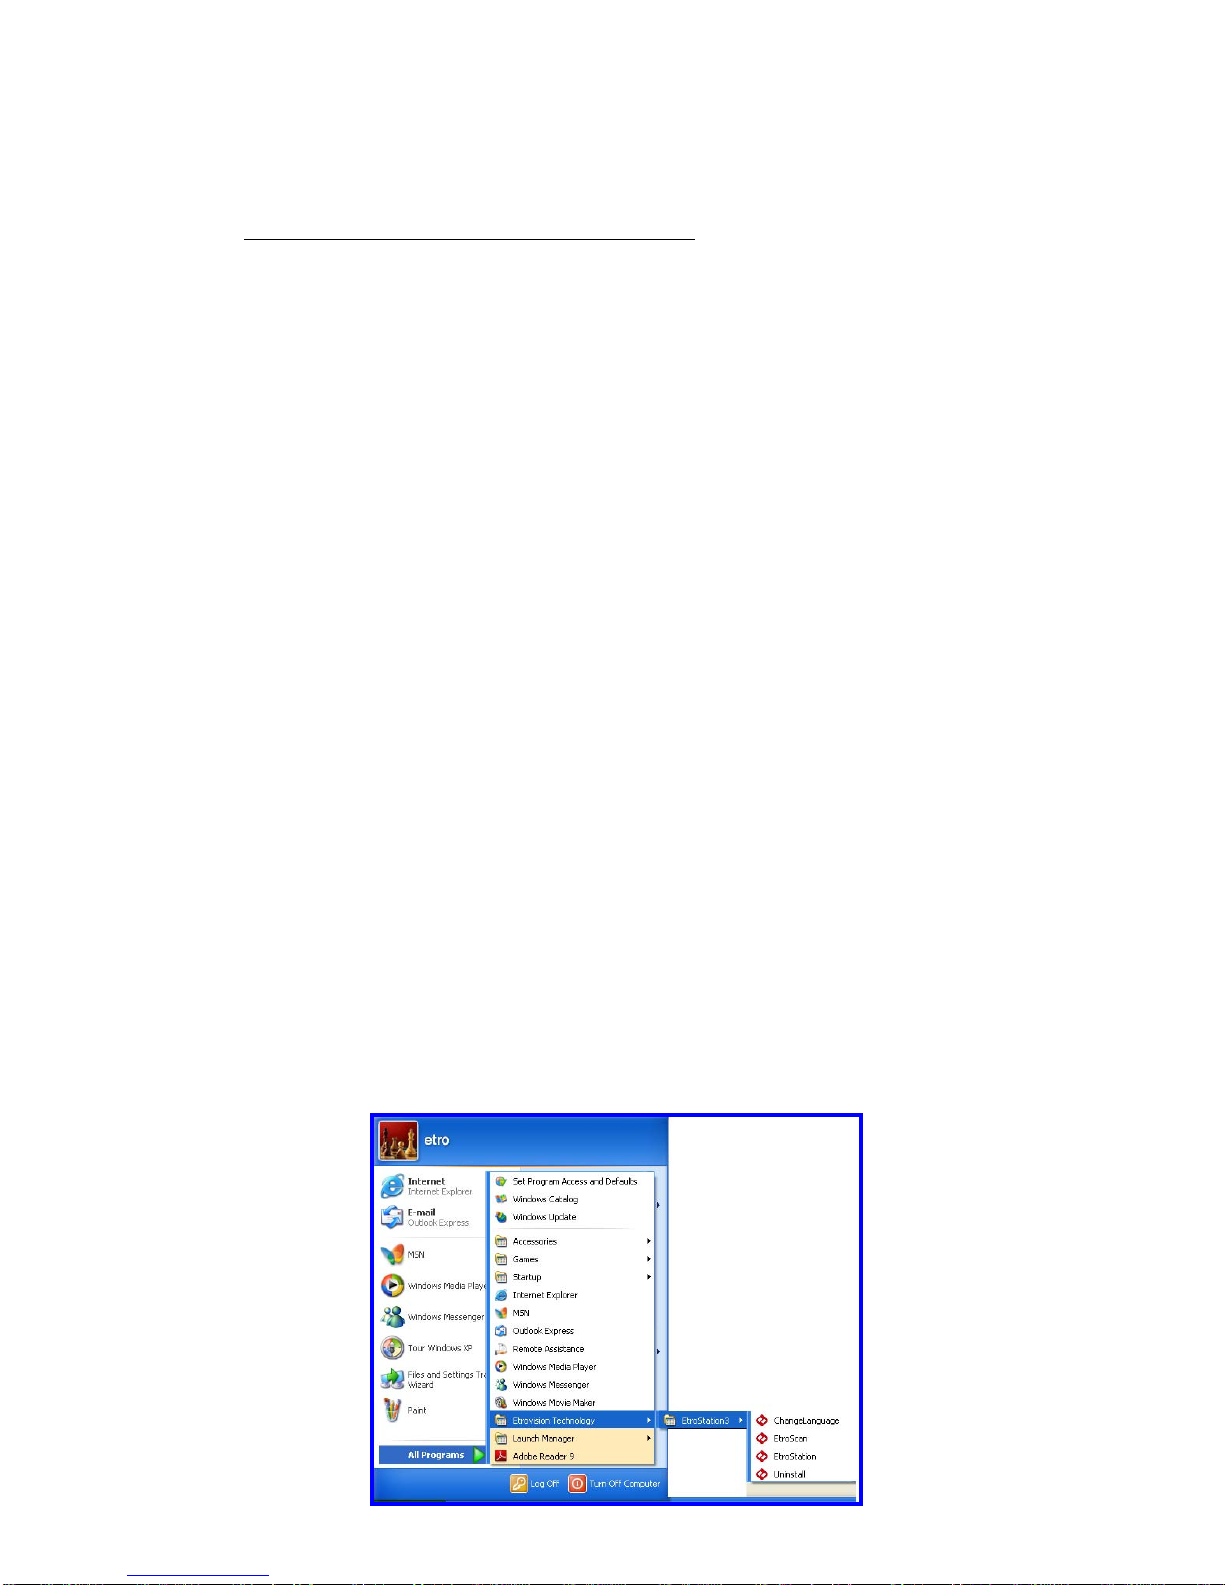
Use EtroScan™
The software allows users easily and quickly find the specific IP camera on
the network. Run EtroStation™ 3.0 setup and install the two applications.
The following is the brief instruction:

Select EtroScan™ from the start menu. User can see the following image:
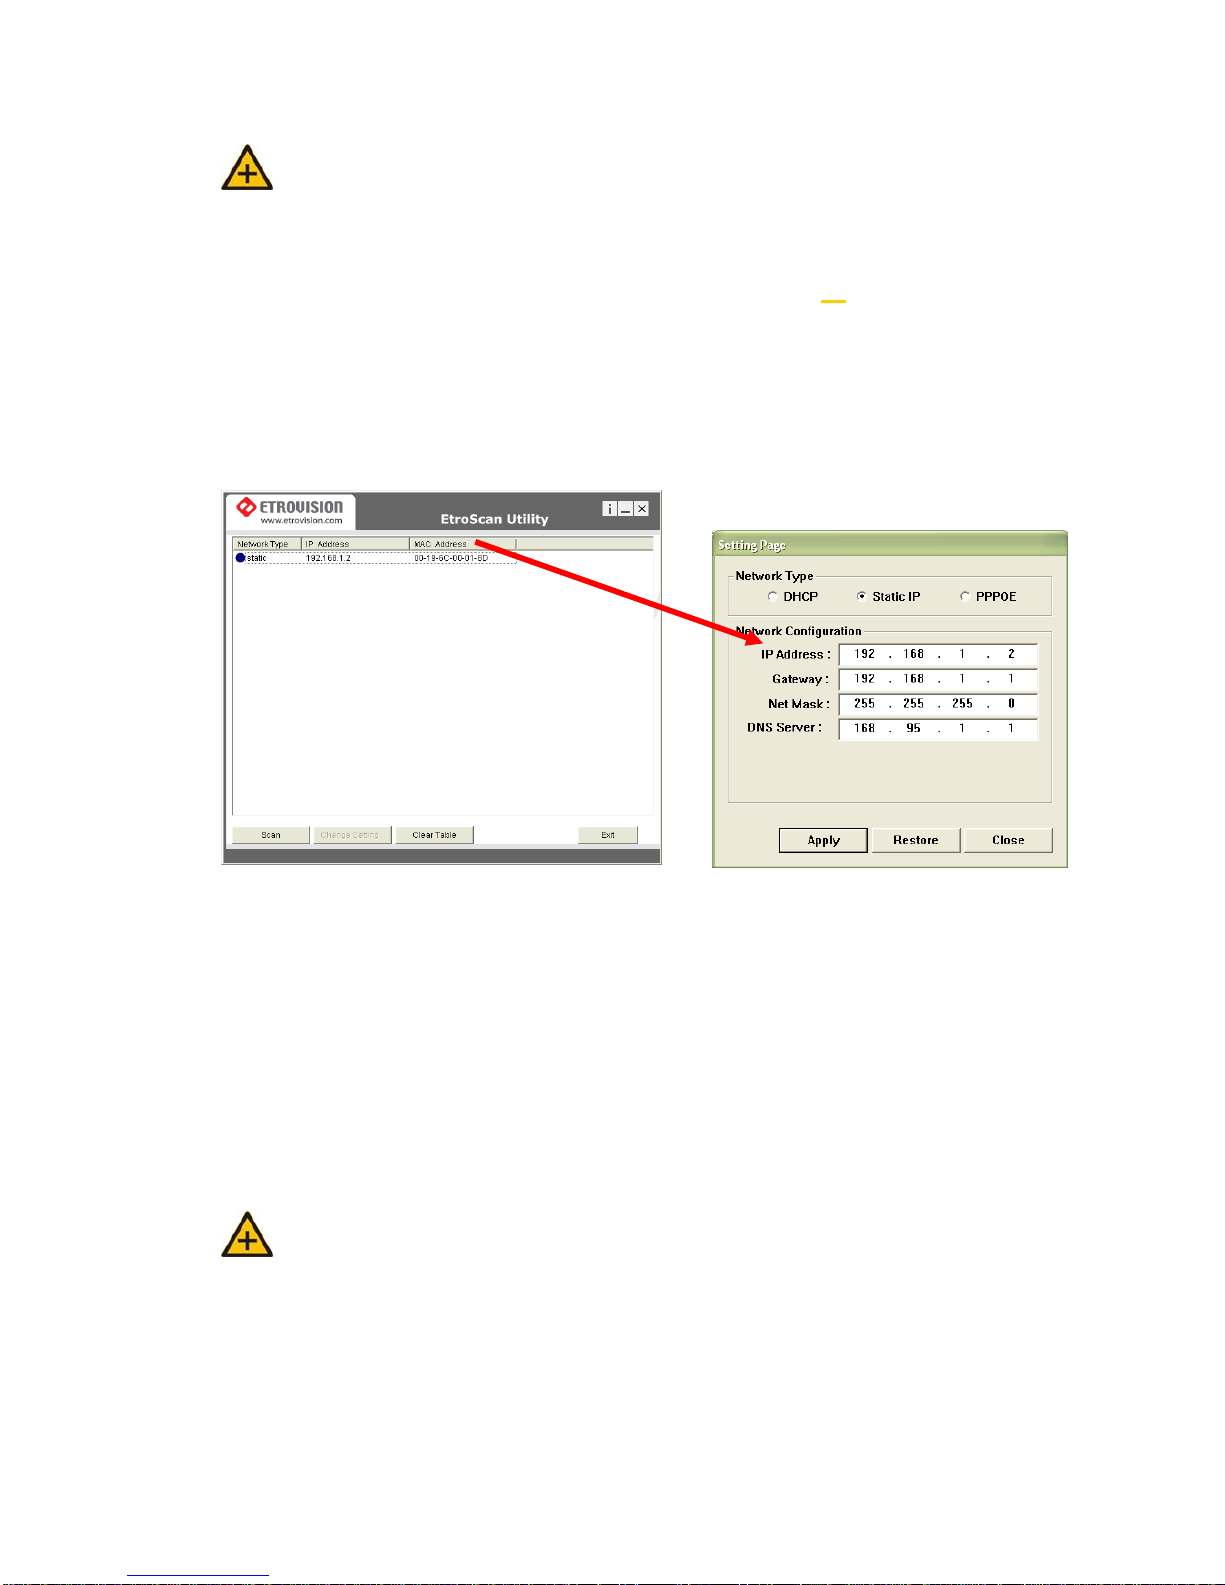
Press Scan button to check the IP and MAC address list. Press Clear
Table button and press Scan again to refresh.
You will find the list of IP and MAC address listed. To indentify your IP
camera you can flip over the IP camera and check the label for MAC
address on the bottom side.
Press Scan to automatically find online Video Server or
Full Function of Video Server on the network domain
Note: Please pay attention that a completed RMA form must contain the serial
number of the product. For more information, please refer to our website.
Change Network Setting via EtroScan™
Double click on a specific IP address; the setting page will pop up. Users
may alter some basic network parameters in this page.
Be sure to press APPLY to enable the new setting
Within 10 seconds, the dialog box would disappear. This indicates that the
new settings are deployed. After typing in the new IP address, user may
close the setting page and wait for 45 seconds. It takes 45 seconds to
restart the system. After rebooting, user may press Scan to check the
new IP address.
Note: “DOUBLE Right Click Function”
Double right click on a specific IP
address on the list; user can quickly open the live viewing browser page.
Press Exit to quit.
Double click

4. ACCESS IP Camera
Browser
Open an IE browser
Type in the IP address of video server that you found via EtroSacn™. For
example: 192.168.1.2 (default IP address)
A popup login dialog box will automatically display.
Initial username and password (case-sensitive):
Login: root
Password: pass
Press OK button to access to the live viewing web page.
root
pass
Initial Username & Password
Administrator
Default ID / Password = root / pass
The ID of administrator can not be changed or deleted; only the
password is changeable.
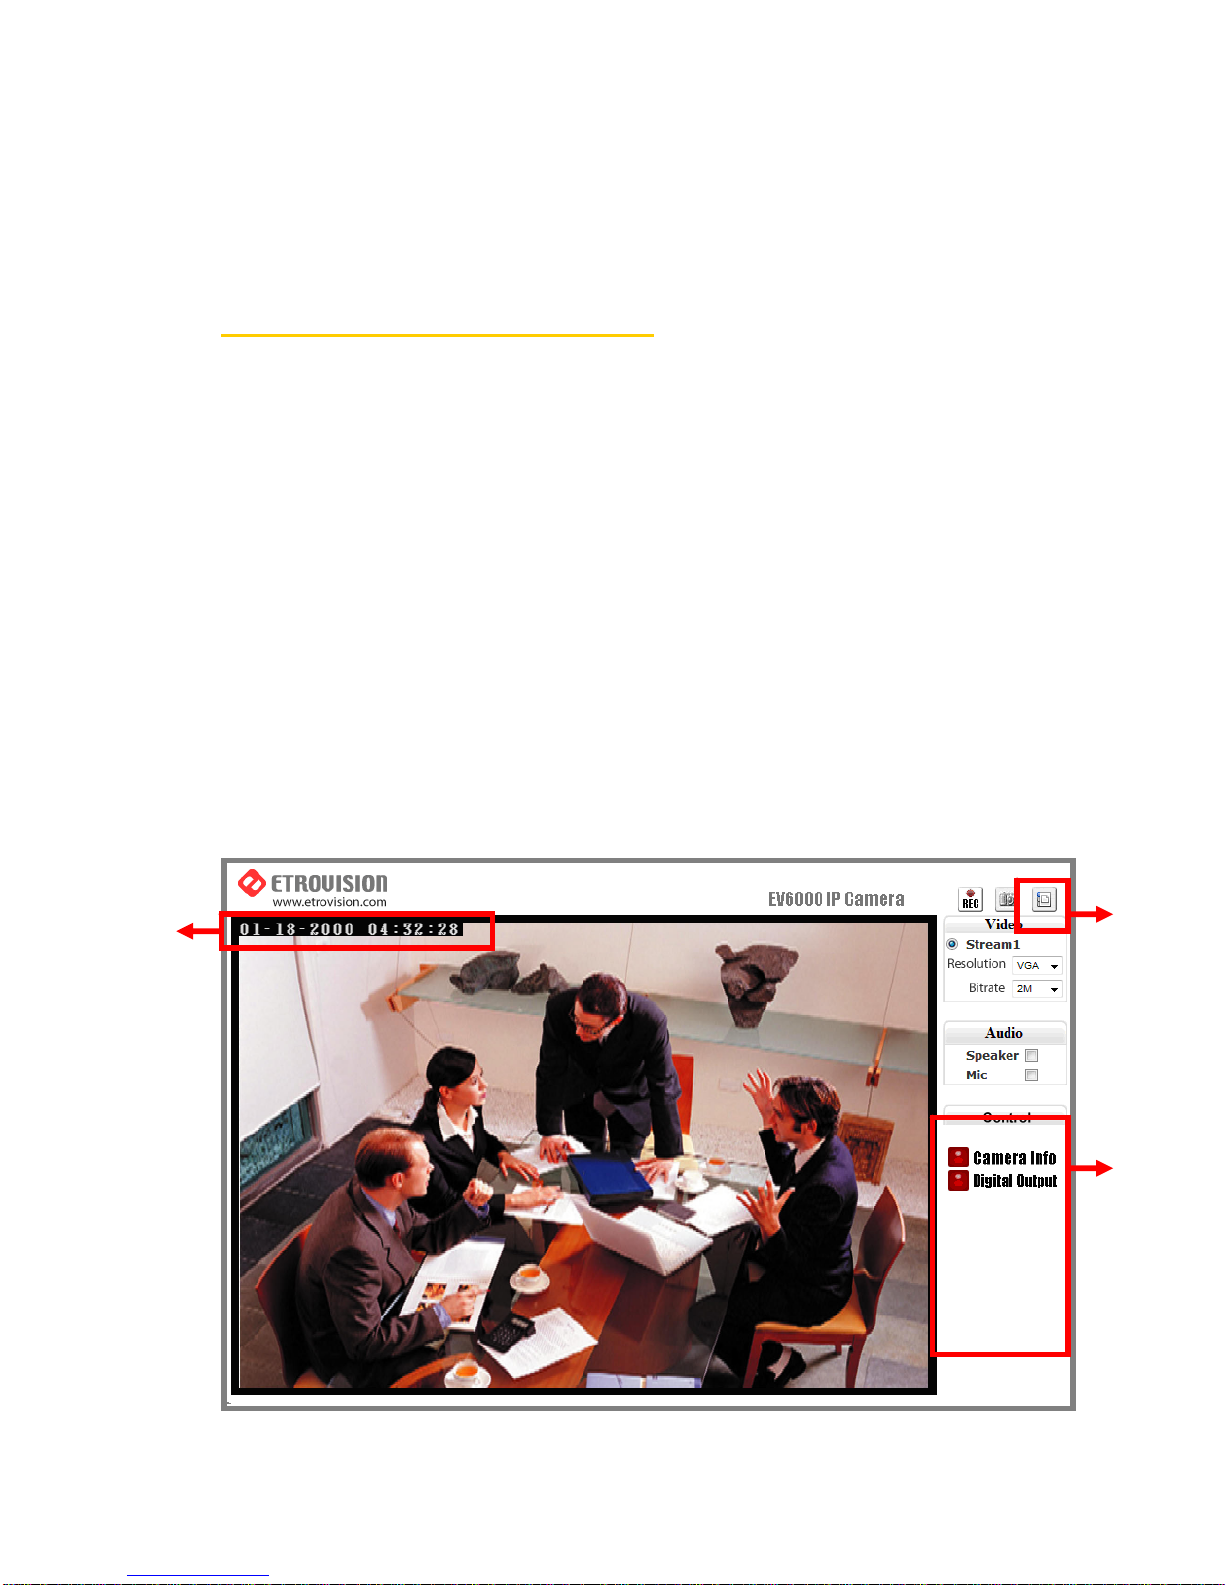
Administrator has the authority to view and control system settings.
After logging in with root / pass as administrator, user may see the live
viewing page.
14
3
1
4
4
This manual suits for next models
3
Table of contents
Other EtroVISION IP Camera manuals

EtroVISION
EtroVISION EV8150A User manual

EtroVISION
EtroVISION EV6356A User manual

EtroVISION
EtroVISION EV6250A Series User manual

EtroVISION
EtroVISION EV8180A User manual

EtroVISION
EtroVISION EV6552A User manual

EtroVISION
EtroVISION EV6250A Series User manual

EtroVISION
EtroVISION EV6150A-BI User manual

EtroVISION
EtroVISION EV6150A User manual

EtroVISION
EtroVISION EtroScan EV8782 Series User manual

EtroVISION
EtroVISION 1080p/5M series User manual


