manuals.online logo
Brands
  1. Home
  2. •
  3. Brands
  4. •
  5. Desalto
  6. •
  7. TV Mount
  8. •
  9. Desalto Sail 304 User manual

Desalto Sail 304 User manual

Istruzioni di montaggio
Assembly instruction
Montageanleitung
Instructions de montage
Instrucciones de montaje
Sail 304
design by Caronni + Bonanomi
system
P
MC
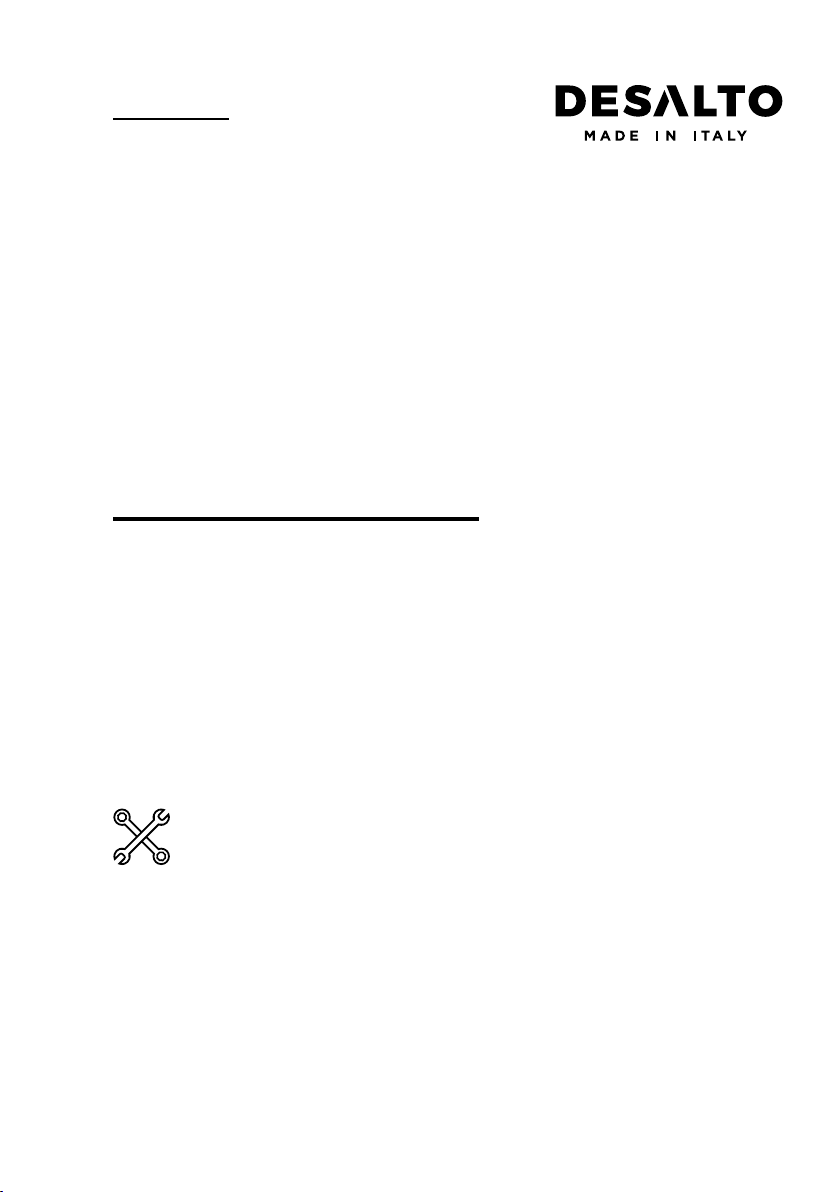
I tasselli forniti in dotazione sono indicati per ssaggio in: calcestruzzo, mattone pieno,
pietra naturale, forato “doppio UNI”, forato in “Poroton”, forato cemento o “Leca”,
spugnocemento. Vericare il tipo e la tenuta della parete ed eventualmente utilizzare viti
e tasselli alternativi adeguati.
The rawlplugs provided are suitable for xing to: concrete, full brick, natural stone, double UNI-
standard perforated brick, “Poroton” perforated brick, perforated cement or spongy “Leca”
cement. Check the type and fastness of the wall and possibly use suitable alternative screws
and rawlplugs.
Die mitgelieferten Dübel eignen sich zur Montage auf Mauerwerk aus: Beton, Vollziegel,
Naturstein, Lochziegeln Typ “ UNI doppelt”, Lochziegeln Typ “Poroton”, Lochziegeln aus
Zement oder Typ “Leca”, geschäumter Zement. Kontrollieren Sie die Entsprechung der Dübel
zum Mauerwerk, und benutzen Sie ggf. andere und besser angemess- enere Dübel und
Schrauben.
Les chevilles qui sont fournies sont indiqué es pour la xation dans: le béton, les briques
pleines, la pierre naturelle, mur percé “double UNI”, percé en “Poroton”, en ciment ou “Leca”,
en béton mousse. Contrôler le type et la tenue du mur et, éventuellement, utiliser des vis et
d’autres chevilles appropriées.
Los tacos incluidos en dotacíon para colocar en: hormigón, ladrillo completo, piedra natural,
agujerado “doble UNI”, agujerado en “Poroton”, cemento agujerado o “Leca”, cemento
esponja. Vericar el tipo y el aguante de la pared y si es necesario utilizar tornillos y tacos
alternativos más adecuados.
!
2 3Desalto - Sail 304 Desalto - Sail 304
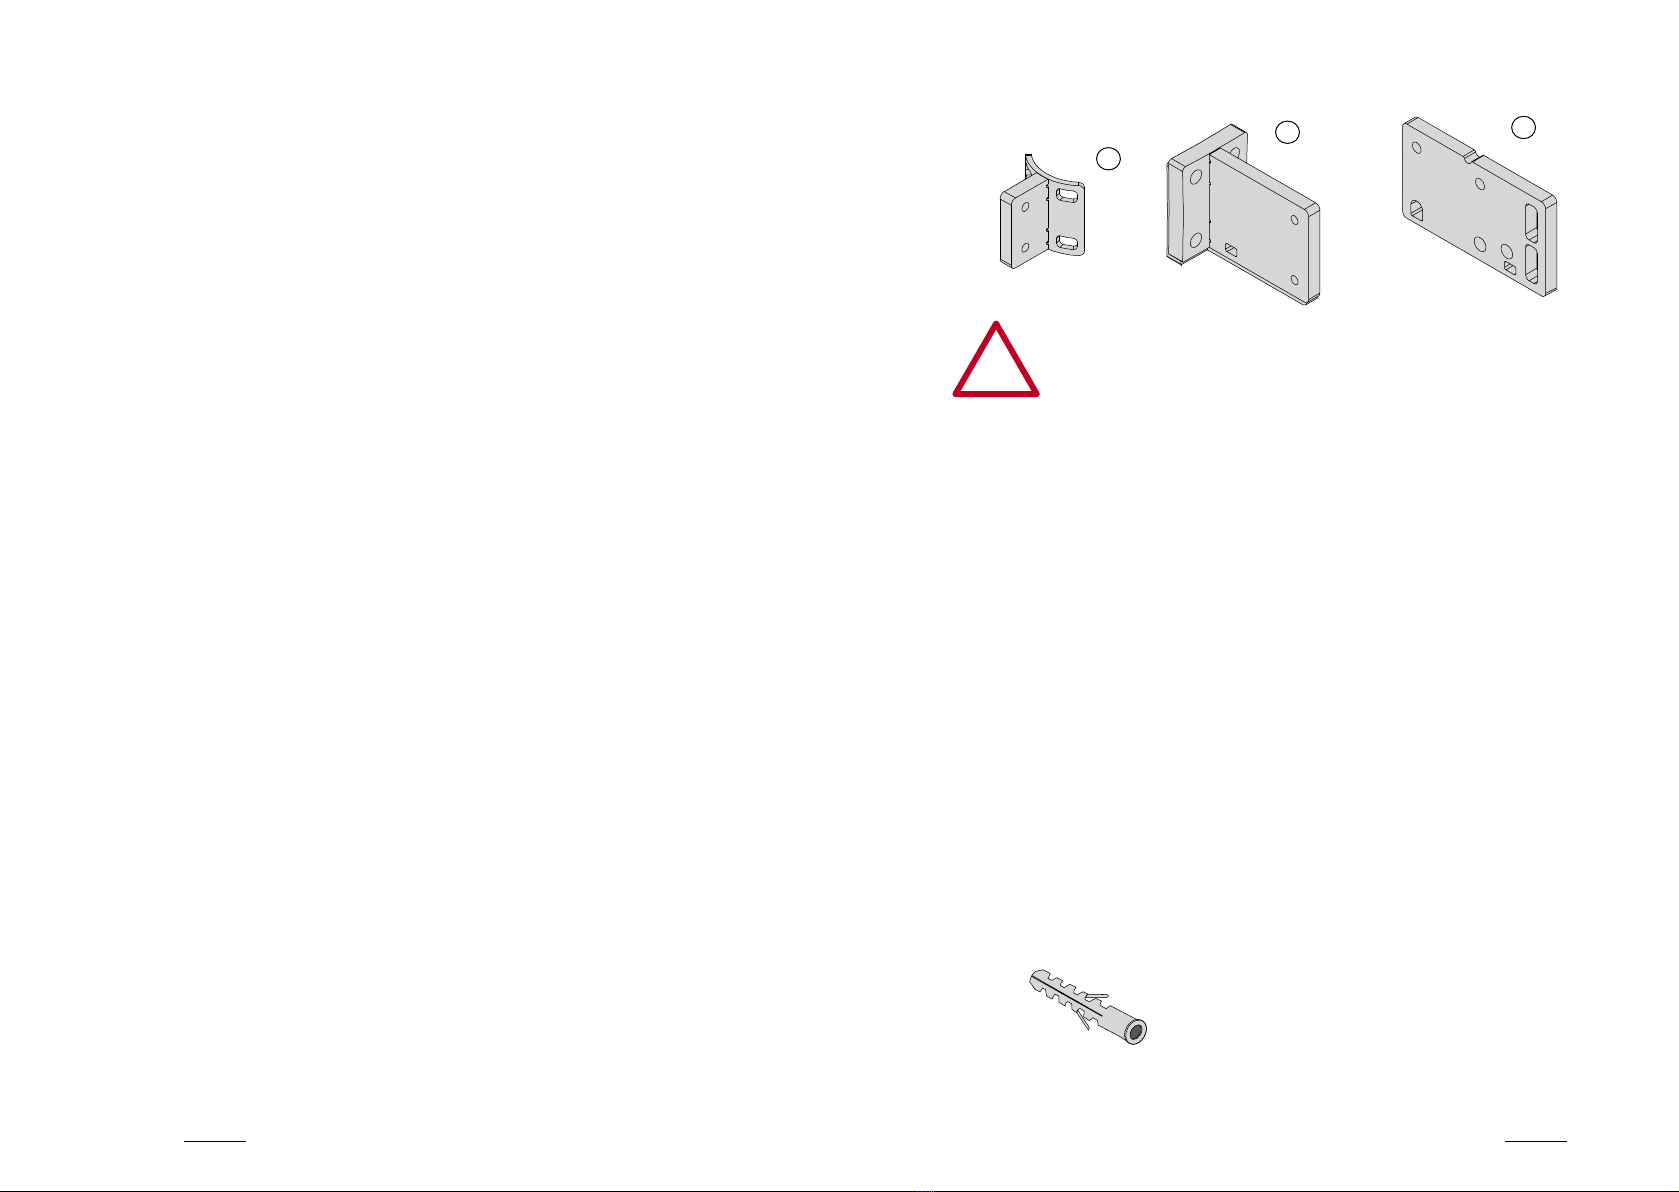
1Individuare l’altezza di posizionamento della piastra M in base all’altezza
nominale del modello scelto, prendendo come riferimento i fori inferiori (1-A).
Forare la parete usando la piastra come riferimento. Inserire i 4 tasselli (1-B).
Identify the height of positioning of the plate M according to the nominal height of
the choosen item, taking as reference the lower holes (1-A). Pierce the wall using the
plate as reference. Insert the 4 plugs. (1-B)
Sail H 94 > 44,5 cm
Sail H 119 > 69,5 cm
Sail H 151 > 101,5 cm
M
(1-A)
(1-B)
Fissare la piastra M a muro.
Fix the plate Mto the wall
2
5x60
5x15
M
4 5Desalto - Sail 304 Desalto - Sail 304
Individuare il punto per il ssaggio della base a pavimento, perpendicolare alla
piastra Ma muro. La distanza dal muro è a scelta tra le due indicate.
Identify the point for the xing of the base to the oor, perpendicular to the plate M
to the wall.The distance from the wall can be choosen between the two indicated
distances.
3
15,5 cm / 20,0 cm
M
M
Posizionare la base usando la pellicola adesiva già applicata (scelta consigliata) e/o
ssando una vite (dopo aver forato il pavimento e posizionato un tassello).
Position the base using the adhesive pellicle that is already applied ( recommended choice )
and/or by xing a screw (after having pierced the oor and having positioned a plug).
4x60
4A 4B
4C
VERSIONE CON MENSOLA
VERSION WITH SHELF
VERSION MIT KABELKANAL
VERSION AVEC RAINURE PUOR PASSAGE DES CÂBLES
VERSIÓN CON CANAL PASACABLES
6 7Desalto - Sail 304 Desalto - Sail 304
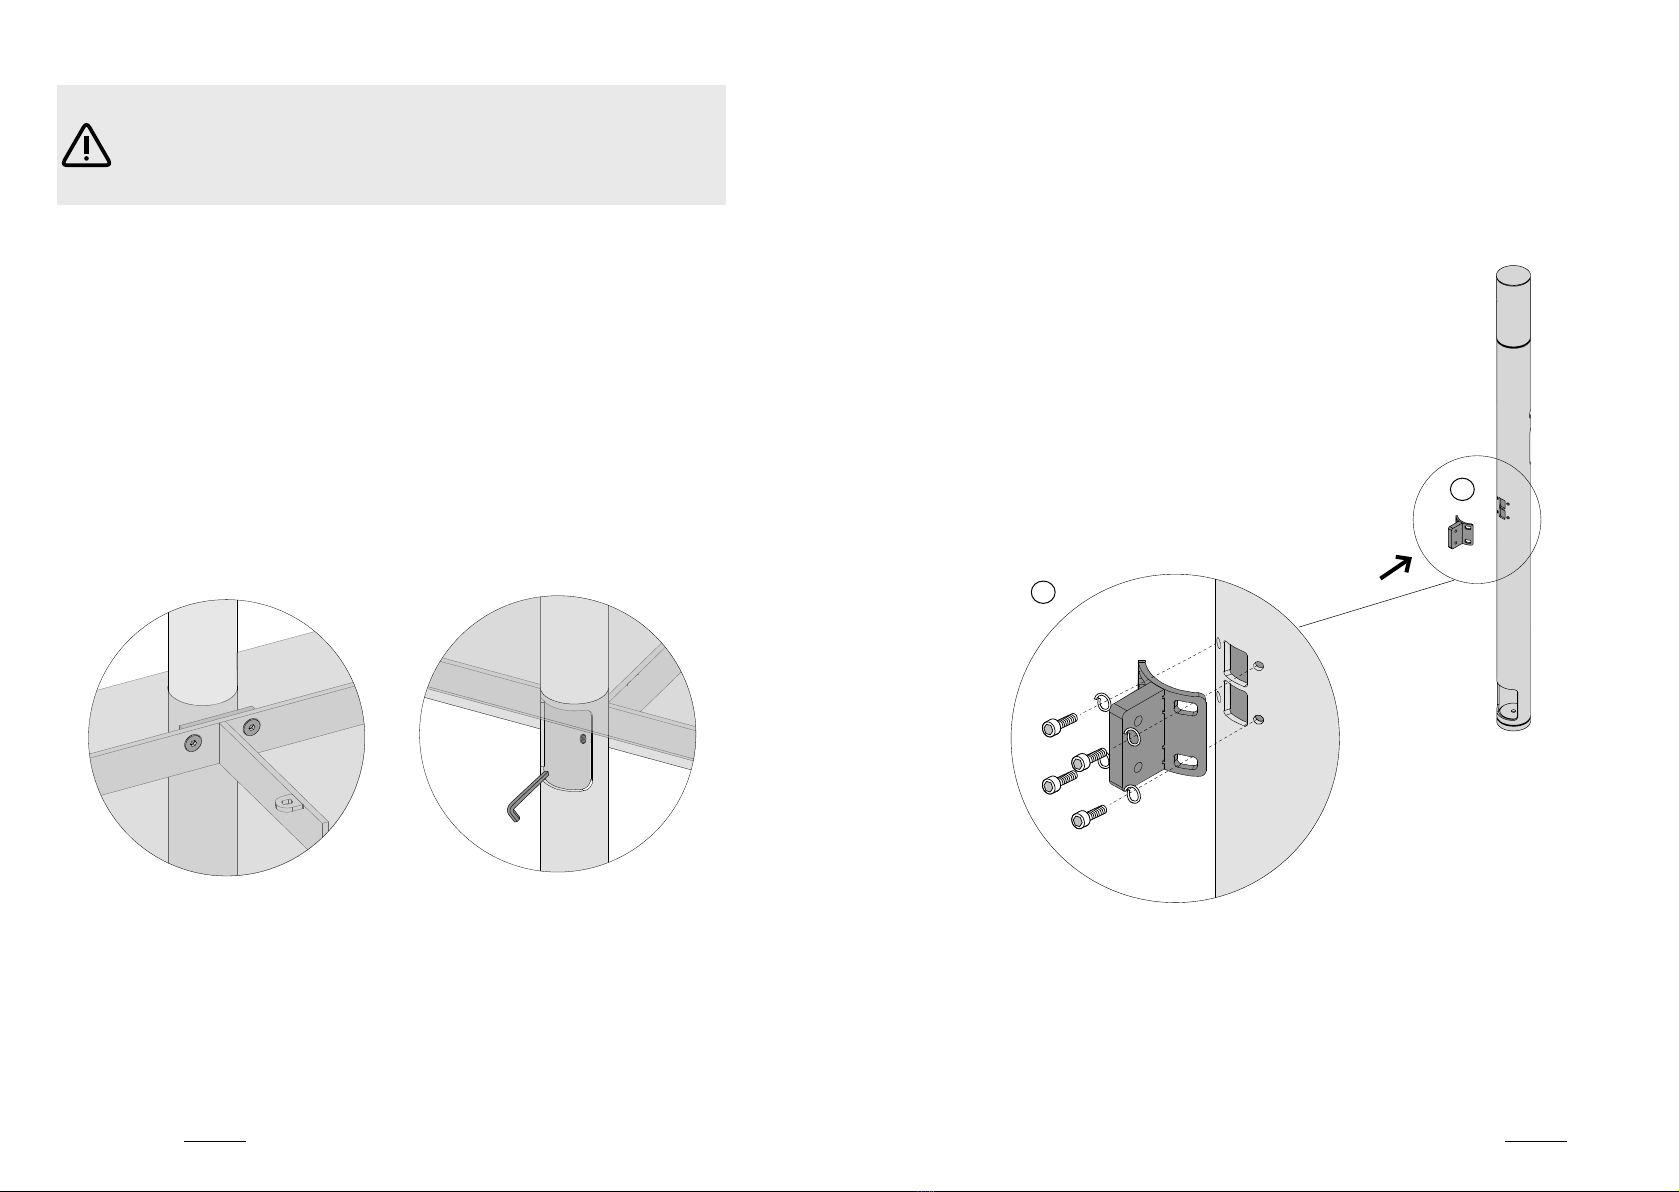
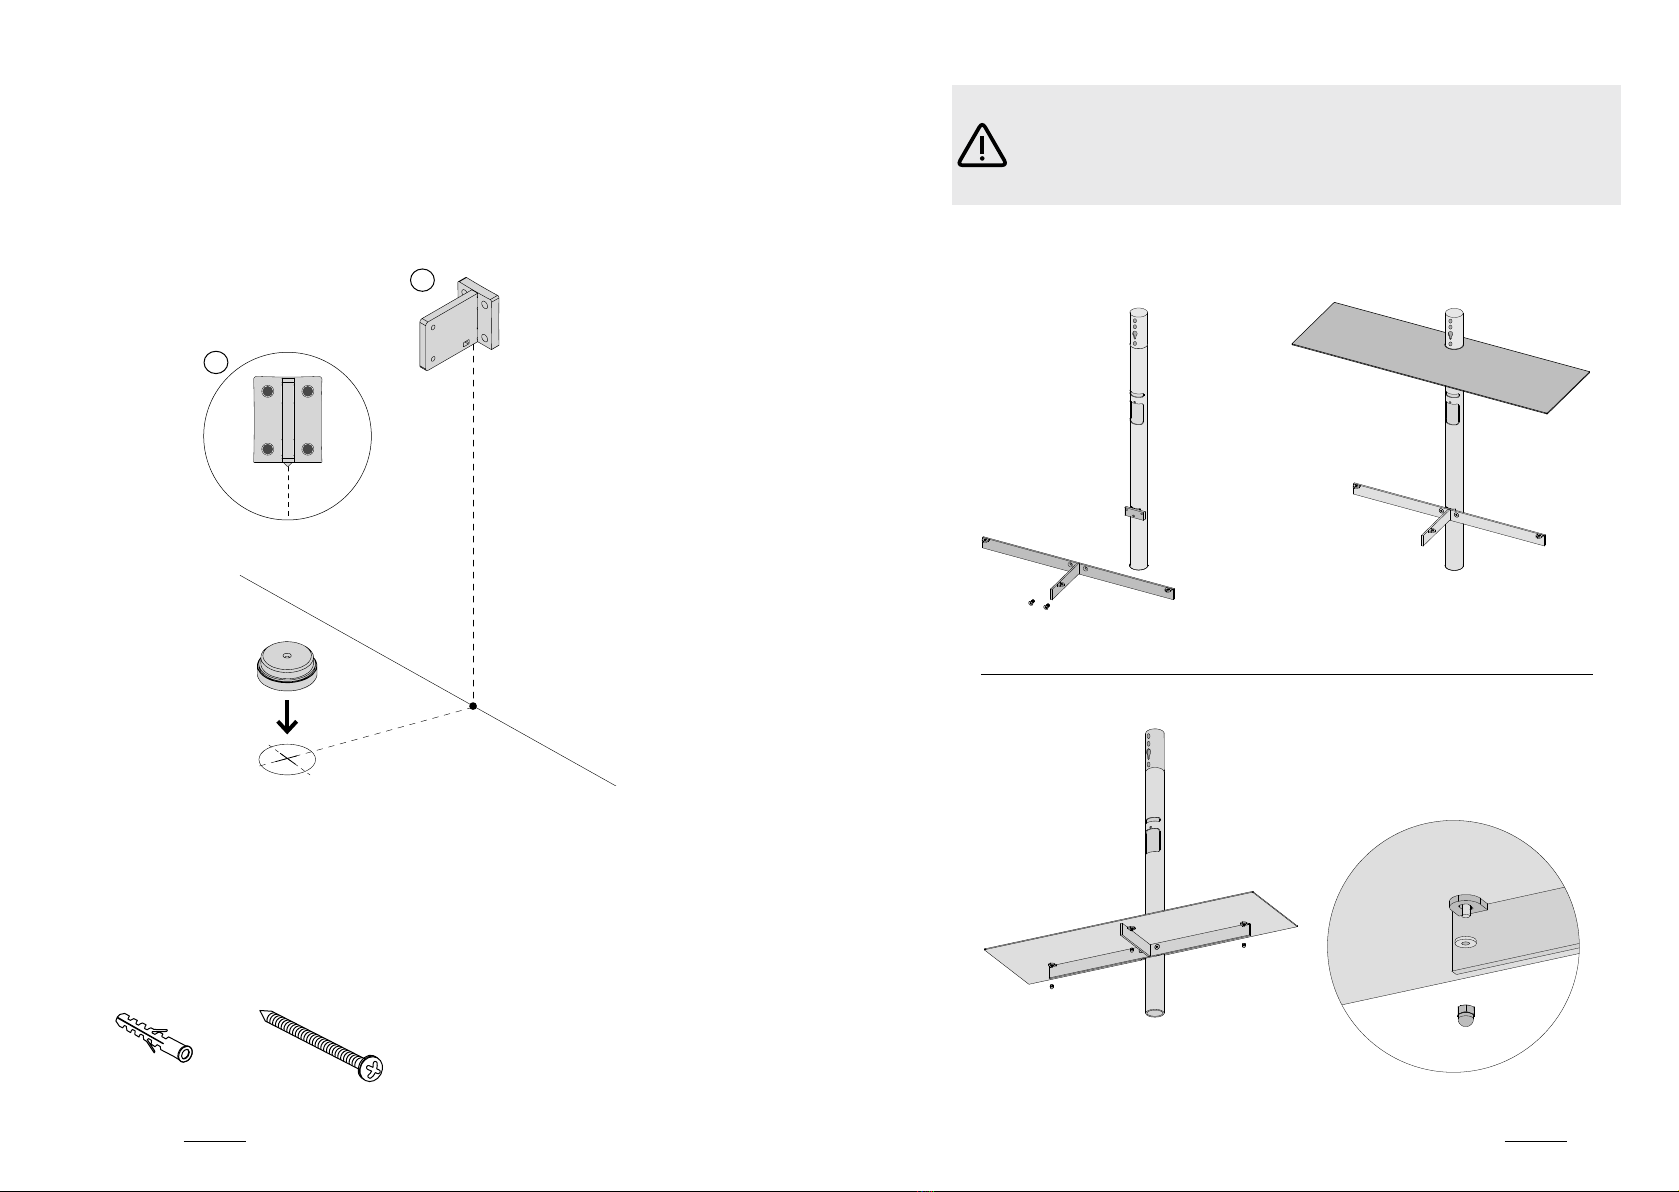
Posizionare la piastra P alla piantana senza stringere le viti.
Position the plate P to the upright without tighten the screws.
P
P
5
Se il piano non risultasse perfettamente orizzontale, regolare agendo sul grano all’interno
del tubo verticale nel seguente modo:
A) Allentare le viti della piastra;
B) Regolare il grano all’interno del tubo agendo dal foro posteriore;
C) Stringere nuovamente le viti della piastra.
If the shelf is not perfectly aligned, act on the regulation mechanism inside the vertical tube
as follows:
A) Loosen the screws of the plate;
B) Regulate the threaded nuts that are inside the tube by acting from the rear hole;
C) Tighten again the screws of the plate.
A / C B
VERSIONE CON MENSOLA
VERSION WITH SHELF
VERSION MIT KABELKANAL
VERSION AVEC RAINURE PUOR PASSAGE DES CÂBLES
VERSIÓN CON CANAL PASACABLES
8 9Desalto - Sail 304 Desalto - Sail 304
6Fissare la piastra di congiunzione C alla piastra a muro M . Vericare che sia
perfettamente orizzontale. Stringere le viti.
Fix the connenction plate C to the wall plate M .
Verify that it is perfectly horizontal. Tighten the screws.
alto
up
C
CM
20,0 cm 15,5 cm
7 8
Posizionare la piantana.
Position the upright.
Fissare la piastra C alla piastra P .
Vericare che la piantana sia
perfettamente perpendicolare al
pavimento. Stringere le viti.
Fix the plate C to the plate P . Ve-
rify that the upright is perfectly
perpendicular with the oor. Tighten
the screw
10 11Desalto - Sail 304 Desalto - Sail 304
9Stringere le 4 viti della piastra P.
Tighten the 4 screws to the plate P.
Allineare la mensola al muro
Align the shelf to the wall
10 Per coprire le piastre, allargare leggermente le alette della copertura, per poi
rilasciarle quando in posizione.
To cover the plates, lightly widen the covers and then release it, when positioned.
!
11
12
12 13Desalto - Sail 304 Desalto - Sail 304
13 Fissare l’eventuale presa elettrica multipla all’apposito supporto (con viti
o fascette non incluse).
Fix the multiple socket, if necessary, to the suitable support (with screws or
small bands, which are not included).
14
Passaggio cavi.
Cable passing.
TV
HI-FI
DEVICE
presa elettrica
socket
14 15Desalto - Sail 304 Desalto - Sail 304
15A 15B
16 17Desalto - Sail 304 Desalto - Sail 304
Applicare i gommini ai bordi della superficie posteriore del
TV per evitare che si rovini al contatto con il muro.
Apply the rubbers to the edges of the back surface of the TV to
avoid that it can ruin against the wall.
Aggangiare gli sportellini ssandoli con una leggera pressione.
Hook up the portholes, by xing them wit a light pressure.
16
TV
17
ATTACCHI VESA
VESA BRACKETS
ANSCHLUSSELEMENTE VESA
ENGANCHE VESA
FIXATION VESA
OPZ. 1
100
75
300
200
400
75x75
100x100
200x200
300x300
400x400
Fissare il TV direttamente alla piastra frontale Sail.
Passi di foratura VESA supportati:
Fix the TV directly to the Sail front plate.
Vesa step holes:
Das TV direkt zu der frontalen Platte Sail befestigen.
Für VESA gelten folgende Gewindebohrungen:
Fixer la TV directement à la plaque frontale du Sail.
Les perforations pour Vesa sont:
Colocar el TV directamente al panel frontal del Sail.
Los pasos de agujerado Vesa soportados son:
T V AS S E M B LY
18 19Desalto - Sail 304 Desalto - Sail 304
OPZ. 2
Regolare in altezza le guide forate
per ottenere il posizionamento del TV
desiderato.
Adjust height of holed guides to dene
the best TV regulation.
Stellen Sie die Höhe der gebohrten
Führungen so ein, Bis die jeweils
gewünschte Position des Fernsehers
erzielt wird.
Pour obtenir la position désirée de la TV
régler les guides percés en hauteur.
Atornillar las guìas agujereadas para
obtener la posicìon deseada del TV.
+
_
ATTACCO UNIVERSALE
UNIVERSAL BRACKET
UNIVERSALANSCHLUSS
FIXATION UNIVERSELLE
ENGANCHE UNIVERSAL
I
TV
II III
20 21Desalto - Sail 304 Desalto - Sail 304
IV
ATTACCO UNIVERSALE + PIASTRE REGOLABILI
UNIVERSAL BRACKET + ADJUSTABLE BARS
UNIVERSALANSCHLUSS + ZERLEGBARE PLATTEN
FIXATION UNIVERSELLE + BARRES RÉGLABES
ENGANCHE UNIVERSAL + PLACAS REGULABLES
Regolare in orizzontale ciascuna piastra secondo le necessità.
Set horizontally each bar according to your needs.
Regulieren Sie je Platte waagerecht bei Bedarf.
Régler en horizontal chaque plaque selon nécessité.
Ajustar en horizontal cada placa de acuerdo con las necesidades.
Qualora lo spazio sulla piastra Sail non fosse suciente, utilizzare le due piastre regolabili
aggiuntive.
If the space on the Sail plate is not enought, you can x the two adjustable addictional bars.
Wenn der Raum auf der Platte Sail nicht genug ist, befestigen Sie die zwei zusätzlichen
verstellbaren Platten.
Si l’espace de la plaque Sail n’est pas susant, xer les deux barres réglabes additionnelles.
Si no hay espacio su ciente en el panel Sail, jar también las dos placas regulables adicionales.
I
OPZ. 3
100
75
300
200
400
22 23Desalto - Sail 304 Desalto - Sail 304
II III
Qualora fosse necessario centrare in altezza il televisore alla Piastra Sail, ssare una
piastra regolabile aggiuntiva all’altezza desiderata, utilizzando i fori VESA indicati (Fig.A).
If it is necessary to center in heght the TV to the Sail Plate, x an additional adjustable plate
to the desired height, by using the indicated VESA holes ( Picture.A)
S’il est nécessaire de centrer le téléviseur en hauteur sur la plaque du Sail, xez une plaque
réglable supplémentaire à la hauteur désirée, en utilisant les trous VESA indiqués (Fig.A).
Wenn es notwendig ist das TV in der Höhe zu der Platte zu zentrieren, befestigen Sie
eine zusätzliche verstellbare Platte zu der gewünschten Höhe, mit der Benutzung von den
angegebenen VESA Bohrungen . ( Figur A )
En caso de que fuera necesario centrar en altura el televisor a la placa del Sail, jar una placa
regulable adjuntada en la altura deseada, utilizando los agujeros VESA indicados (Fig.A).
I
ATTACCO UNIVERSALE + PIASTRE REGOLABILI
UNIVERSAL BRACKET + ADJUSTABLE BARS
UNIVERSALANSCHLUSS + ZERLEGBARE PLATTEN
FIXATION UNIVERSELLE + BARRES RÉGLABES
ENGANCHE UNIVERSAL + PLACAS REGULABLES
A
OPZ. 4
24 25Desalto - Sail 304 Desalto - Sail 304
II III
26 27Desalto - Sail 304 Desalto - Sail 304
Desalto Spa
via per Montesolaro
22063 Cantù - CO
Italy
T +39 031 7832211
F +39 031 7832290
info@desalto.it
www.desalto.it 01 / 2020

Other Desalto TV Mount manuals

Desalto Sail 301 User manual

Desalto

Desalto Sail 301 User manual

Desalto Sail System User manual

Desalto

Desalto Sail System User manual

Desalto Sail 307 User manual

Desalto

Desalto Sail 307 User manual

Popular TV Mount manuals by other brands

Metra Electronics 99-7614 installation instructions

Metra Electronics

Metra Electronics 99-7614 installation instructions

Kanto RV250G user manual

Kanto

Kanto RV250G user manual

Hanwha Techwin SBP-136B manual

Hanwha Techwin

Hanwha Techwin SBP-136B manual

USX-MOUNT XMS008-01 instruction manual

USX-MOUNT

USX-MOUNT XMS008-01 instruction manual

Eaton Metalux SLSTP 8x4/2 Row Mount Bracket installation instructions

Eaton

Eaton Metalux SLSTP 8x4/2 Row Mount Bracket installation instructions

Displays2go HVAWM4290L instructions

Displays2go

Displays2go HVAWM4290L instructions

ricoo S7711 quick start guide

ricoo

ricoo S7711 quick start guide

peerless-AV YBTMU installation manual

peerless-AV

peerless-AV YBTMU installation manual

Pyle PSW976S installation guide

Pyle

Pyle PSW976S installation guide

Thunderbolt Magnum Solar 68687 quick start guide

Thunderbolt Magnum Solar

Thunderbolt Magnum Solar 68687 quick start guide

Novus NVB-6045JB user manual

Novus

Novus NVB-6045JB user manual

Forging Mount HY4107 instruction manual

Forging Mount

Forging Mount HY4107 instruction manual

THOMSON WAB846 operating instructions

THOMSON

THOMSON WAB846 operating instructions

NuTone CI370 Series installation instructions

NuTone

NuTone CI370 Series installation instructions

Avocent Rack Bracket Specifications guide

Avocent

Avocent Rack Bracket Specifications guide

peerless-AV LCZ-4F4G30B Installation and assembly

peerless-AV

peerless-AV LCZ-4F4G30B Installation and assembly

Fiber Novelty FN01 installation manual

Fiber Novelty

Fiber Novelty FN01 installation manual

Bretford MSP-C144 Assembly instructions

Bretford

Bretford MSP-C144 Assembly instructions

manuals.online logo
manuals.online logoBrands
  • About & Mission
  • Contact us
  • Privacy Policy
  • Terms and Conditions

Copyright 2025 Manuals.Online. All Rights Reserved.