Desert Aire SA Series Owner's manual
Installation and Operation Manual
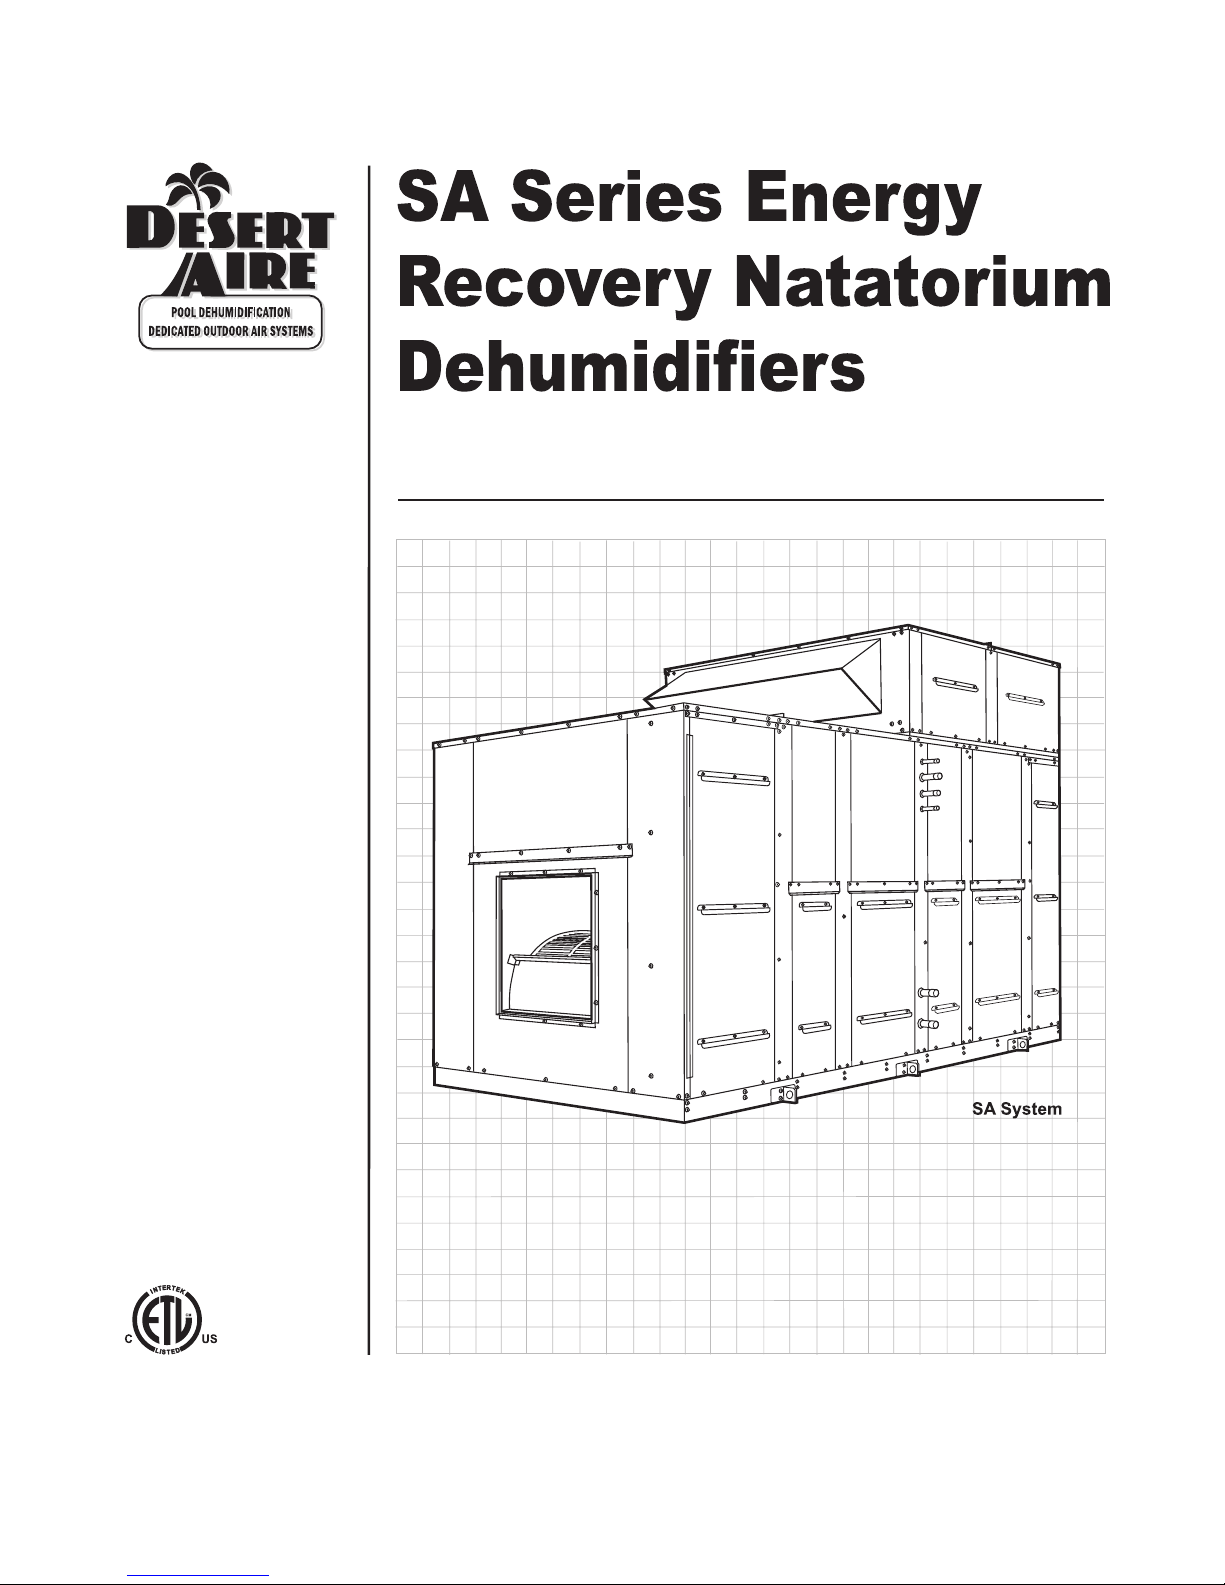
• Select
Aire (SA) systems
are dual refrigeration
circuit dehumidifiers.
• Systems remove between
55 and 340 pounds of
moisture per hour
.
• Refrigeration circuits
consist of scroll
compressors for high
performance and long life
.
• Models feature 8-row
evaporator coils for high
moisture removal capacity
.
• SA
systems include an
exclusive exhaust air heat
recovery system and
patented air flow
balancing.
• SA
’s dual refrigeration
circuit design allows
staging to minimize
energy consumption and
optimize energy recovery
.

2
3
Desert Aire - SA Manual
DANGER
ONLY TRAINED, QUALIFIED PERSONNEL SHOULD INSTALL AND/OR SERVICE
DESERT AIRE EQUIPMENT. SERIOUS INJURY, DEATH AND PROPERTY DAMAGE CAN
RESULT FROM IMPROPER INSTALLATION/SERVICE OF THIS EQUIPMENT. HIGH VOLTAGE
ELECTRICAL COMPONENTS AND REFRIGERANT UNDER PRESSURE ARE PRESENT.
Desert Aire
Dehumidication Equipment
Standard Limited Warranty
Desert Aire warrants the dehumidifying unit to be free from defects in materials and workmanship subject to the terms,
conditions and limitations stated herein.
TERMS
Desert Aire warrants all components (except as noted) for a period of two (2) years from the date of shipment. This
warranty shall be limited to the supply of new or rebuilt parts for the part which has failed because of
defects in workmanship or material, and does not include the cost for labor, transportation or other costs not herein
provided for. Replaced parts are warranted only for the remaining portion of the original warranty period.
CONDITIONS
The warranty is subject to the following conditions:
1. The unit must be properly installed and maintained in accordance with the Desert Aire
“Installation and Operation Manual” provided with each unit and/or other documentation
provided.
2. The Start-Up Report must be completed and returned to Desert Aire Service for evaluation. If no
decienciesareidentiedaWarrantyValidationLetterwillbeissuedthatprovidesallwarranty
datesandcoverage.Ifinstallationorstart-updecienciesarepresent,thesemustbecorrected
and communicated to Desert Aire in order to activate warranty.
3. This warranty shall not apply to any part that has been tampered with, or has been subject to
misuse, negligence or accident. A warranty can be obtained for altered equipment but only with
written consent from Desert Aire.
4. The following parts and components are excluded from the warranty: belts, lters, driers, fuses and
refrigerant.
5. Refrigerant coils or other components that corrode due to improperly balanced pool chemistry or
corrosive air quality will not be warranted.
6. All replacements or repairs will be FOB Germantown, WI.
7. This warranty shall be null and void if defects or damages result from unauthorized opening of the
refrigerant circuit, tampering with factory set controls, or operating outside the original design
conditions.

4Desert Aire - SA Manual
8. Desert Aire shall not be liable for labor costs incurred in diagnosing the problem, or the removal
or replacement of the part or parts being repaired.
9. Desert Aire must preauthorize all warranty coverage described herein.
ExtendedWarranty:
Your Desert Aire unit may have extended warrantees beyond this Standard Limited Warranty document.
Extended warrantees are only available at the time of the purchase of the original equipment. These extended war-
rantees are covered under a separate document and their terms and conditions are separate from this document.
It is mentioned in this document for informational purposes only. Any Extended Warranties will be identied on the
Warranty Validation Letter.
Any and all incidental or consequential damages are expressly excluded from this warranty. Some states do not allow
the exclusion of incidental or consequential damages for personal injury, so the above limitations may not apply to you
for certain damages. This warranty gives you specic legal rights, and you may also have other rights, which vary
from state to state. No person or representative is authorized to make any warranty or assume any liability not strictly
in accordance with the aforementioned.
Inquiries regarding warranty matters should be addressed to:
Desert Aire Corp c/o Service Manager
N120 W18485 Freistadt Road • Germantown, WI 53022
Additional copies of this manual can be purchased for a nominal fee from Desert Aire. Desert Aire also posts the most
current revision of our I/O Manuals on our website. For a digital copy of the I/O Manual for your unit revision, please
submit request to the contact information listed above.
GasHeatExchangerTen(10)-YearProratedWarrantyTerms(ForSA™unitswithgasheatonly)
Desert Aire offers an extended prorated eight (8)-year warranty for gas heat exchanger. All other heater components
are covered under the initial 2 year warranty.
2 Years Parts Only from date of shipment. Prorated from years 3-9 as follows:
Year 3: Desert Aire warrants 70% of replacement price
Year 4: Desert Aire warrants 60% of replacement price
Year 5: Desert Aire warrants 50% of replacement price
Year 6: Desert Aire warrants 40% of replacement price
Year 7: Desert Aire warrants 30% of replacement price
Year 8: Desert Aire warrants 20% of replacement price
Year 9: Desert Aire warrants 10% of replacement price

5
Desert Aire - SA Manual
SafetyLabelsareusedthroughoutthismanual.TheycomplywiththeANSIZ535.4Standard.
Pleasebefamiliarwiththefollowinglabelsandtheirdenitions.
This is the safety alert symbol. It is used to alert you to potential
personal injury hazards. Obey all safety messages that follow this
symbol to avoid possible death or injury.
Indicates an imminently hazardous situation which, if not
avoided, will result in death or serious injury.
Indicates a potentially hazardous situation which, if not
avoided, could result in death or serious injury.
Indicates a potentially hazardous situation which, if not
avoided, could result in minor or moderate injury.
Caution used without the safety alert symbol indicates a
potentially hazardous situation which, if not avoided, could
result in property damage.
ProductWarningfortheStateofCalifornia:
Table of contents
Other Desert Aire Dehumidifier manuals


