Desjardins Monetico Mobile User manual

USER GUIDE
Mobile
solutions
2
Click on the topic
you’re looking for
Table of contents
←
Introduction
←
→
Using the guide
Sales
Invoices
Refund
Expenses
Help
Left-hand
menu
Quotes
1
Using the
guide
2
Sales
3
Invoices
4
Refund
6
Expenses
8
Help
7
Left-hand
menu
5
Quotes

3
Using the guide
Monetico mobile solutions
Congrats on your new mobile payment solution! You can now accept card payments, both in person and over
the internet, using your smartphone or tablet and our secure keypad.
Using the guide
The three mobile solutions (Mobile, Mobile + and Invoicing) use the same app and control panel, but have different
features enabled. This guide covers all three, so we’ve included a visual at the beginning of each section letting you
know if the feature being discussed is included with your solution. It looks like this:
Available with these solutions: Mobile Mobile + Invoicing
Included
Not included
Introduction
←
→
Sales
Invoices
Refund
Expenses
Help
Left-hand
menu
Quotes
4
Using the guide
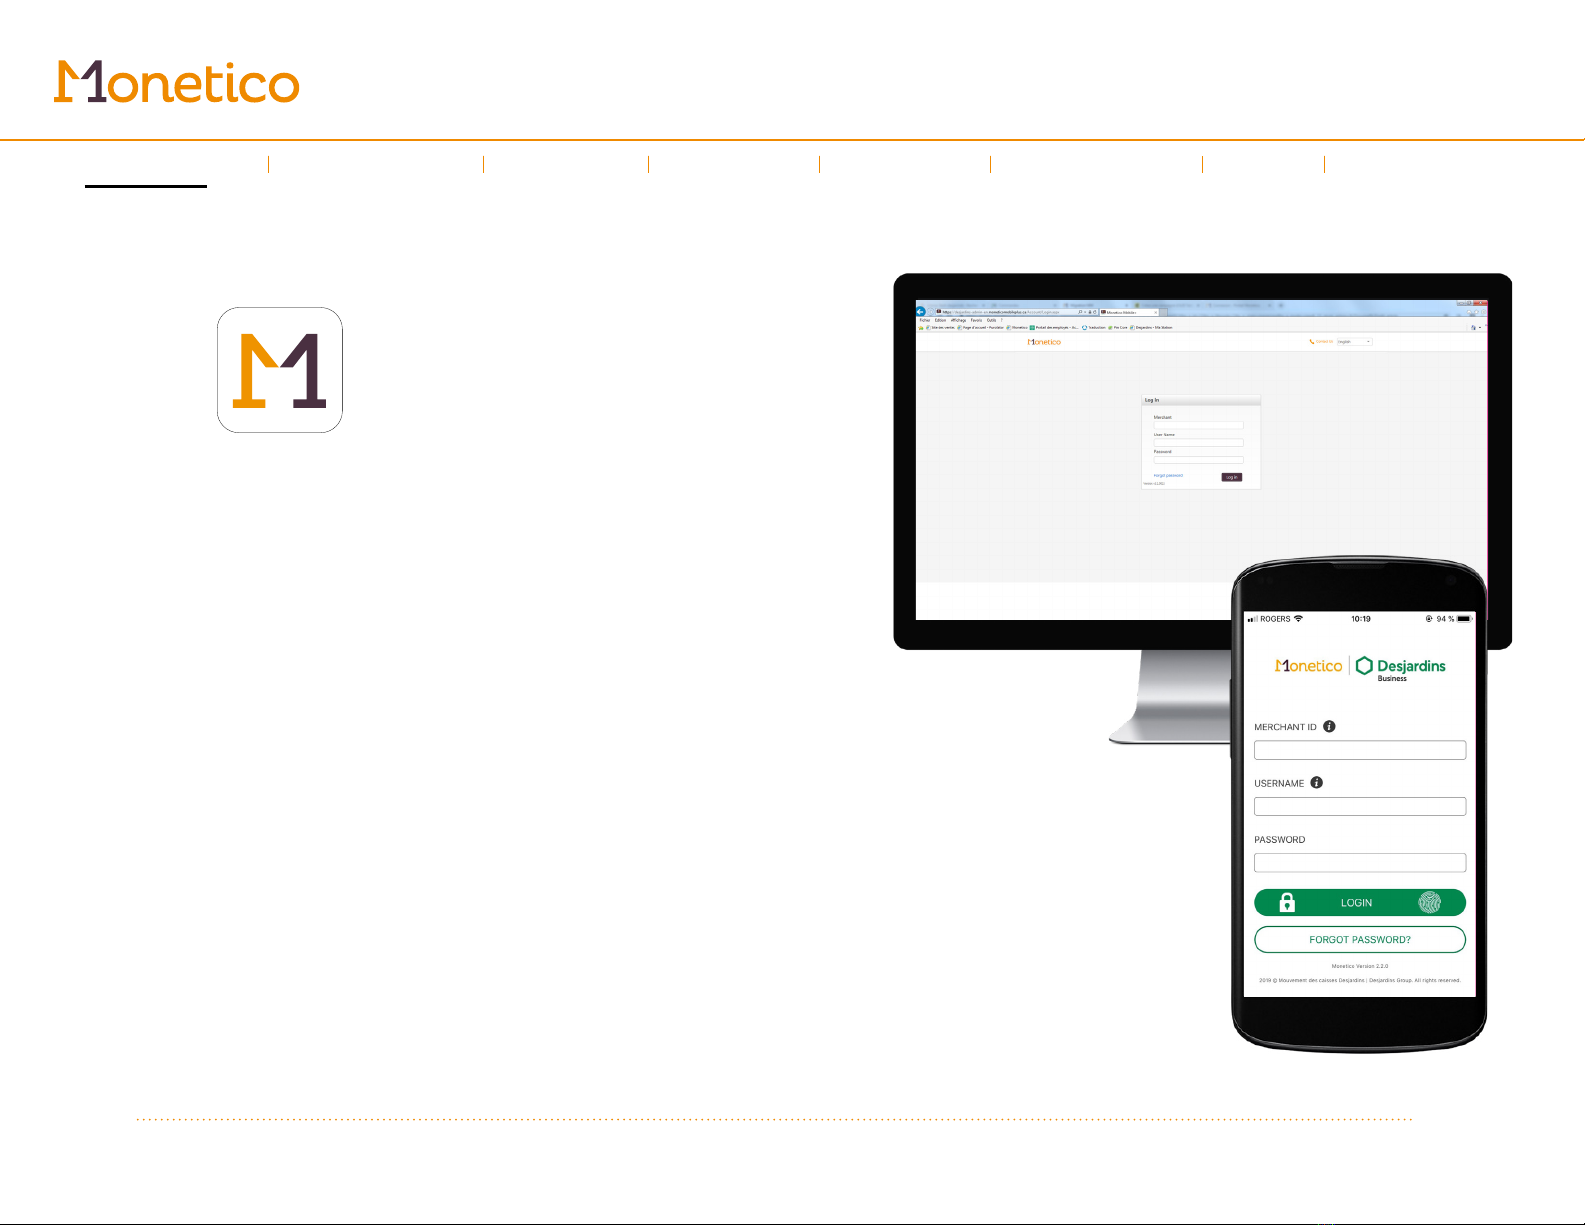
Getting started
First, you’ll need to download and install the Desjardins Monetico app. You can find
it in the App Store (Apple) or Google Play store (Android).
The online control panel can be found at
desjardins-admin-en.moneticomobileplus.ca
Note: If you’re using an iPad, you’ll find the app in the “iPhone only” section—but don’t worry, the app
will still work fine on your tablet.
Logging in
Before you can use the Monetico app or online control panel, you’ll have to log in.
You’ll need the following information:
- Your merchant ID (it starts with 0 and is 9 digits long)
- The username and password that were sent to you by email.
Introduction
←
→
Sales
Invoices
Refund
Expenses
Help
Left-hand
menu
Quotes

5
Using the guide
Changing your password
The first time you log in, you’ll be asked to create a new password. It will need to
be at least 8 characters long (Alphanumeric).
Once your password has been changed, you’ll automatically be logged out. Use
your new password to log back in. We’ll also send you an email confirming that
your password has been changed.
If your smartphone or tablet is compatible with Touch ID (iOS)/Face ID (iOS) or
fingerprint scanner (Android), you can activate this feature for the Monetico app.
This means you’ll be able to open the app with your fingerprint or by showing your
face instead of your password. This option can be found in the Settings menu.
Any information you enter in the app or online control panel will automatically
be saved to all platforms, whether you’re using your computer, smartphone
or tablet.
Do you have the Invoicing solution?
Skip ahead to page 9
Introduction
←
→
Sales
Invoices
Refund
Expenses
Help
Left-hand
menu
Quotes
6
Using the guide
Setting up your keypad
If you’re using a Mobile or Mobile + solution, you’ll need to use Bluetooth®to pair
your device to your iCMP keypad. You’ll only need to do this once, when you’re
setting up your keypad. Afterwards, your device will automatically connect to your
keypad.
Note: Make sure that your device has Bluetooth®enabled whenever you need to
use your keypad!
Our keypad pairing process meets the requirements of the PCI DSS Wireless
Guideline*. For optimum security:
• Make sure that no one can see you enter your password during the pairing
process
• Only redo the pairing process if the keypad’s settings have been completely
erased
Pairing your keypad and device
STEP 1
Check your device’s Settings menu to make sure that Bluetooth is enabled.
STEP 2
On your iCMP keypad, search for nearby Bluetooth devices:
• Turn on the keypad (button on the right)
• Press the yellow button and enter 0for the code
• Press F1 to access the MENU
Introduction
←
→
Sales
Invoices
Refund
Expenses
Help
Left-hand
menu
Quotes

7
Using the guide
• Select CONFIGURATION and press the green button
• Select TERM CONFIG and press the green button
• Press F2 to scroll down to MOBILITY and press the green button
• Select ASSOCIATION and press the green button.
• Select COMPANION iOS for Apple or PRESS F2 to select COMPANION
OTHER for Android and press the green button
• When you see New pairing?, confirm by pressing F4.
STEP 3
For Apple devices: Use F2 and F3 on the keypad to select your device,
then press on the green key.
For Android devices: Using your mobile device, select your keypad from the list of
Bluetooth devices. Its name starts with “ICMP” and ends with the last 8 digits of the
keypad’s serial number.
STEP 4
Confirm the pairing on your device. A message will appear on both your device
and the keypad with a confirmation number.
Make sure that the numbers match. Use the messages on your keypad and device
to verify that the pairing is complete.
*The iCMP keypad uses Secure Simple Pairing (SSP) protocol.
Introduction
←
→
Sales
Invoices
Refund
Expenses
Help
Left-hand
menu
Quotes

8
Using the guide
Turning off the keypad
Once you’ve finished using the iCMP keypad, you can turn it off by pressing # and
the yellow button at the same time.
Keypad status
Your keypad status will appear in the top right corner of your mobile device.
Make sure your keypad is connected before you start a transaction.
Keypad not connected
Keypad connected
Connecting...
Introduction
←
→
Sales
Invoices
Refund
Expenses
Help
Left-hand
menu
Quotes

9
Sales
Sale
Available with these solutions : Mobile Mobile + Invoicing
Your app automatically opens on the Sale screen, making it easy for you to quickly
accept customer payments.
Making a sale
1. Use your device’s onscreen number pad to enter the amount of the sale. The
amount you enter should appear in the sub-total field.
2. Edit any sales options (payment method, tax %, customer) by tapping
Options. The payment options you can choose from will vary depending on
which solution you have:
a. Payment method:
i. If you have a Mobile solution, your options are: Credit/Debit, Cash,
Cheque and Other.
ii. If you have a Mobile + solution, your payment methods are:
Credit/Debit, Cash, Cheque and Other.
iii. If you have the Invoicing solution, your payment methods are:
Cash, Cheque or Other. Note: To accept a card payment, you’ll
need to create a quote through the Quote tab.
b. Tax %: Choose the tax percentage to apply to the sale if the tax option
is activated in your default settings.
c. Select a customer: Choose a customer from a list of existing customers
or create a new profile.
Introduction
←
→
Using the guide
Invoices
Refund
Expenses
Help
Left-hand
menu
Quotes
10
Sales
3. Once you’re ready, press Pay.
4. If you’ve chosen “Credit/Debit” as your payment type, the app will send a
signal to the keypad. Make sure that appears in the top right corner of
your screen. Follow the instructions on the iCMP keypad. Your customer can
either insert their card into the card reader or use the contactless payment
option. Mobile payments are also accepted.
5. Once the payment has gone through, the Receipt screen will appear with
a summary of the sale. You can then close the window, or send or print the
receipt.
a. Tap Send receipt to choose what you’d like to do next. You can choose
to send the receipt by email or text message (you’ll be prompted to enter
the customer’s contact information).
b. Tap Print to send the receipt to your printer. You can choose how many
copies to print.
Note: If your printer is turned on and paired, the receipt will print automatically
Introduction
←
→
Using the guide
Invoices
Refund
Expenses
Help
Left-hand
menu
Quotes

11
Invoices
Invoices
Available with these solutions : Mobile Mobile + Invoicing
The Invoices tab contains a list of all the payments made with your solution, plus
any incomplete transactions (quotes that are approved and pending payment,
refused transactions). This is also where you issue refunds.
Use to search for a specific invoice.
Use to display transactions by date, name, status or specific time period.
Issuing refunds
Issuing a refund using your mobile device (available for Mobile and Mobile +)
• Go to the Invoices tab.
• Select the transaction to refund.
• Go to Payment history and tap once to open the Invoice admin window.
• Select Refund and follow the instructions on the keypad.
Refunding transactions through the online control panel (your computer)
For the Mobile and Mobile + solutions, you can only use the control panel for
non-credit/debit transactions like cheques and cash. You must use your mobile
device to refund card payments.
Introduction
←
→
Using the guide
Sales
Refund
Expenses
Help
Left-hand
menu
Quotes

12
Invoices
If you have the Invoicing solution, the refund will be issued directly to the credit card
that your customer used to pay.
• Select Quotes and invoices from the menu on the left.
• Click Invoices.
• Click the invoice number that you want to refund.
• Check the box next to the transaction by clicking it, and more options will
appear. Click Refund.
• Enter the refund amount in the window that opens.
• Click Refund.
Introduction
←
→
Using the guide
Sales
Refund
Expenses
Help
Left-hand
menu
Quotes
13
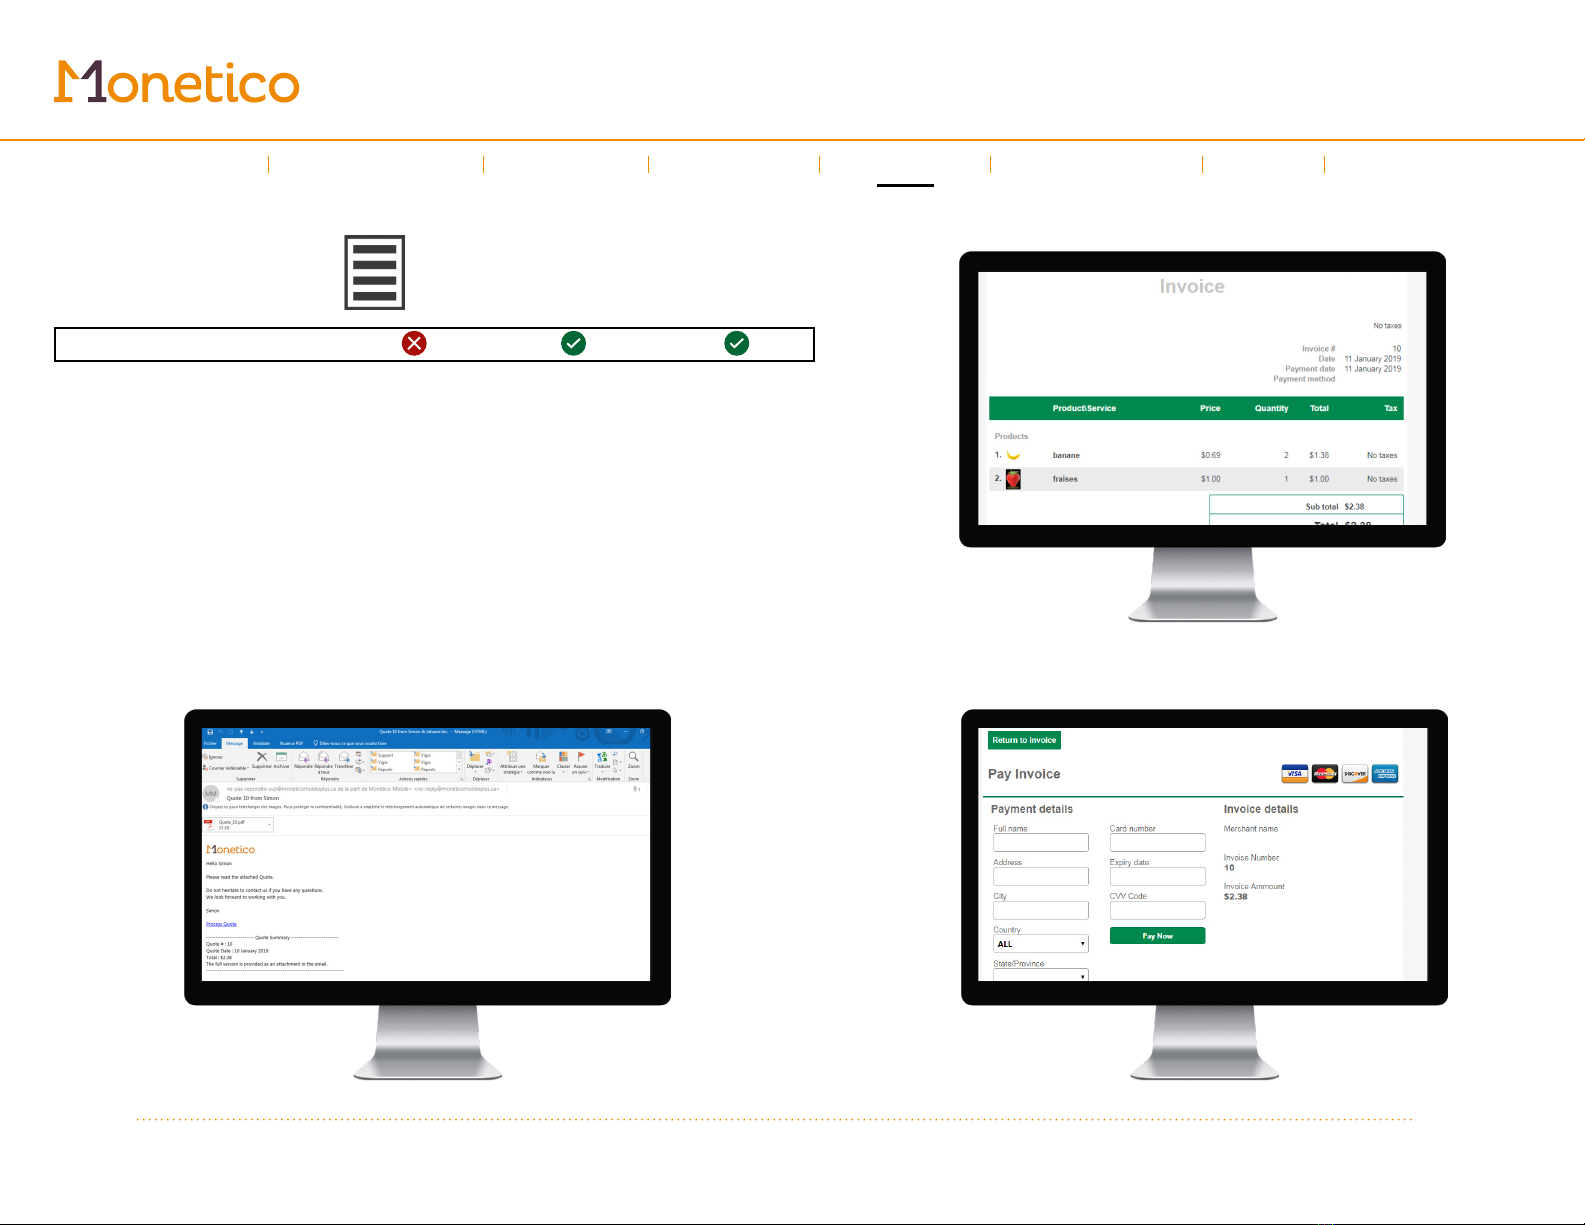
Quotes
Quotes
Available with these solutions: Mobile Mobile + Invoicing
The Quotes tab lets you see your current quotes and create new ones, which can
be printed or sent to your customers by email.
Note: If you only have the Invoicing solution and want to accept a credit card
payment from a customer, you must create a quote and send it to them. They will
receive an email with a link to a secure website, where they can approve their quote
and pay the invoice.
Sample email
Sample invoice
Sample secure payment page
(Invoicing solution only)
Introduction
←
→
Using the guide
Sales
Invoices
Refund
Expenses
Help
Left-hand
menu

14
Quotes
Creating quotes
On your mobile device:
Tap in the Quotes screen, to access the New quote screen. Select a customer
from your list or add a new one, then add products or services to their total.
You can add new products or services to your catalogue by tapping in this
screen. Fill out the window that opens and press Save to add the product or
service to your catalogue.
By creating a catalogue entry for each of your products and services, you’ll be able
to prepare quotes faster.
If you’ve already added products and services to your catalogue, you can search
for them by entering keywords in the search bar. To adjust the quantity, press
the number that appears next to the product or service being purchased.
Once your invoice is complete, press Balance. to move on to the
Review quote screen. Here, you can choose to view, save or accept payment now
for the quote.
Tapping Preview brings you to the Quote details page, which contains all of the
detailed information entered for the quote.
Introduction
←
→
Using the guide
Sales
Invoices
Refund
Expenses
Help
Left-hand
menu

15
Quotes
If you tap Save, you can choose from Save & Email quote, Draft quote or
Approve quote. You can also set an expiry date for the quote and select if the
quote will appear in English or French.
• The Save & Email quote option will send the quote to the customer by
email and/or text message, based on the information provided in the
customer record.
• The Draft quote option lets you save a draft of the quote so it can be
finished later.
• Approve quote lets you approve the quote, turning it into an invoice that
can be paid now or later.
If you are using the Invoicing solution: You must select Save & Email quote if
your customer wants to pay by credit card.
Your customer will be sent the invoice and a link to a secure payment
page. Your customer will have to select the Process quote link to be sent
to the quote approval page. From this page, he will be able to pay the
quote directly by selecting the pay bouton, or to approve or decline it. If
the quote is approved, your customer will be brought to the Invoice page,
where he can select Pay Invoice to pay with his credit card.
Once the quote has been sent, the Quote details screen will appear on your
device, containing the Pay and Approve quote buttons. Tap the green arrow in
the top right corner to close out the window and return to the home page.
If you are using the Mobile + solution: Once the quote has been sent, the Quote
details screen will appear, containing the Pay and Approve quote buttons. If you
tap Pay, a window will pop up with different payment methods. If you approve the
quote, it automatically becomes a payable invoice, that can be paid now or later.
Introduction
←
→
Using the guide
Sales
Invoices
Refund
Expenses
Help
Left-hand
menu
16
Quotes
Tapping Pay lets you accept payment on the quote. The next screen will let you
record a payment method. If you are using the Invoicing solution, you will only be
able to select cash, cheque or other. If you are using Mobile or Mobile +, you can
also accept credit and debit payments—just make sure that your iCMP keypad is
connected to your mobile device.
Viewing quotes
To see the detailed information on a quote that you’ve saved, select it from your list.
The Quote details screen contains all the information entered for your quote.
You can tap to edit the quote, or to send it by email or text message.
Approve quote lets you approve the quote and move it to the Invoice tab, where it
can be paid.
To accept a full or partial payment, tap Pay. The Select a payment method screen
will appear. To record a partial payment, tap on the amount field and enter the
amount being paid.
Through the online control panel (your computer)
In the left-hand menu, click Quotes and invoices, then click to access the
Quotes tab.
From here, click to start a new quote. Select a customer from
your list, then add products or services to their total. You can also add a new
customer by pressing the + Customer button.
Introduction
←
→
Using the guide
Sales
Invoices
Refund
Expenses
Help
Left-hand
menu

17
Quotes
• Go to the Products or Services tab.
• Click and select the products and services you’d like to add to
the quote.
• You can adjust the quantities included in the quote by changing the
number in the Quantity column.
• Click to add a new product or service to your
catalogue. Fill out the window that opens and press Save and use to add the
product or service to your catalogue.
Once the customer and the products/services have been selected, press Save.
The Save option lets you access two options: Save & email and Save.
• The Save & email option lets you send the quote by email or text message.
You will need the customer’s contact information. The customer will receive
an email or text message with a link to a website where they can refuse or
approve the quote.
• The Save option will create a new quote in your list.
Once the quote has been saved, the Quote details screen will appear,
containing the Approve and Approve & email options. Once a quote has been
approved, it automatically becomes a payable invoice.
At any time, you can click , in the top right corner to open a window
where you can choose the payment method and amount. To record a partial
payment, click the amount field and enter the amount being paid.
Introduction
←
→
Using the guide
Sales
Invoices
Refund
Expenses
Help
Left-hand
menu

18
Expenses
Expenses
Available with these solutions: Mobile Mobile + Invoicing
To keep your business in good financial shape, you need to keep track of how
much you’re spending and what you’re spending it on.
In Expenses, you can record and categorize all your business expenses.
To record an expense, tap . Enter your details and then tap Save.
Use to search for a specific expense that you’ve already entered.
Use to sort expenses by date or category, or to filter by payment method or
specific time period.
Introduction
←
→
Using the guide
Sales
Invoices
Refund
Help
Left-hand
menu
Quotes

19
Left-hand
menu
Left-hand menu
Available with these solutions: Mobile Mobile + Invoicing
Customers
The Customers option displays a list of all your customers. You can select one from
the list or add a new one by tapping .
Reports
The Reports option displays a summary of your business activities. The reports you
can choose may vary depending on your solution.
Settings
The Settings option lets you access the application settings. The settings available
change depending on your solution.
• Merchant settings
• Pinpad settings (only for Mobile and Mobile +)
• Default parameters
• Advanced settings
The Merchant settings option lets you modify your profile, add a new user or
change your password.
Introduction
←
→
Using the guide
Sales
Invoices
Refund
Expenses
Help
Quotes

20
Left-hand
menu
Merchant settings
Merchant profile: Lets you make changes to your profile. You can save them
by tapping Save.
Add user: Lets you create a new user who will have access to your account.
You can give them a unique username and password, and select from two
user types: Normal has access to admin and refund functions only, while
Administration has access to everything.
Modify password: Lets you change your current password.
Default transaction type (only for Mobile and Mobile +): Lets you choose the
transaction type that will automatically be displayed. You can choose between
Purchase and Purchase with tip.
Pinpad settings (only for Mobile and Mobile +)
The Pinpad settings menu contains options for your iCMP keypad.
Initialization: Lets you configures the keypad settings.
Batch total: Lets you see the total amount of the batch open on the keypad
linked to your mobile device. The batch total can be printed or sent by email
or text message.
Batch closure: Lets you send a request to the keypad to close the batch. We
recommend closing your batch at the end of each day. The batch closure can
be printed or sent by email or text message.
Introduction
←
→
Using the guide
Sales
Invoices
Refund
Expenses
Help
Quotes
This manual suits for next models
2
Table of contents
Other Desjardins Payment Terminal manuals


