Detonate Surf 4K Action Camera User manual

4K Action Camera
User Manual

Table of Contents:
Caution
Camera Special Features
Product Accessories
Camera Interface
Button function
Camera Operation
Power on/off
Battery Charging
Insert/Remove Battery
Video Mode
Normal recording
Loop recording
Picture Mode
Playback Mode
Menu Setting
Remote Control Description
Install and use WiFi
Connect HDMI
Connect TV
Playback on PC
Technical specification
Company Information and Support
Caution:
Please carefully review the following guidelines before you use this camera.
Please refer to manual instruction to operate the camera correctly. Incorrect operation may
cause damage to internal components.
Do not fall or hit the camera, it may damage internal components.
Do not alter or dismantle the camera to avoid damage to camera.
The temperature rise indicator is normal when camera use for a long time.
Do not touch the lens when recording which will affect the video quality.
Please use "Class10" and above TF (Micro SD) card to ensure capturing the best quality video
and pictures.
Camera Special Features:
Invert Mode
Should you need to invert camera while using, set "invert mode" in the menu to
“On”, the camera will be now rotated 180 degrees.

WiFi Function
It will be more convenient to operate the machine at a distance of 15m by using mobile
phone via WiFi connection.
High Speed Recording
The camera has 720P 120fps high speed recording.
Slow Motion
The video will be displayed twice as slow as the video frame (at 60fps video) or 4 times as
slow (at 120fps video).
Time Lapse
The camera will take pictures at a certain rate then make a video consisted by pictures.
Such as recording sunrises, sunsets, flowers blooming etc. This function makes short videos
to record in Time Lapse.
Capture Mode
Under recording press Mode button to take a picture. This way the camera can be used to
manually capture, but also this can be set to automatic, which makes it become more
convenient.
2.4G wireless remote control
Waterproof wrist remote controller
Diving mode
Video’s color underwater will be the same as normal environment when set “Diving mode”
on.
Product Accessories:
Pivot Arms (2pcs) Buckle Basic Mount AC Charger
1050mah Battery Bicycle Handlebar Mount Helmet Flat Mount
Helmet Curved Mount Tripod mount adapter Waterproof Case
USB Cable Helmet Strap mount J-Hook Buckle
User Manual HDMI out Cable (optional) TV out Cable (optional)

Camera Interface:

1. Mode button/Wifi button
2. 1/4” screw hole
3. Up button
4. Down button
5. HDMI port
6. USB port
7. Power button
8. Speaker
9. TF (Micro SD) card slot
10. Charging indicator
11. Working indicator
Button Function:
Power button:
Short press to turn on/long press to turn off camera;
In standby mode - short press to start/stop recording;

In picture mode - short press to take a picture;
In playback mode - short press to start/pause playback;
In Wifi mode - short press to exit Wifi setting;
Confirm menu setting and time setting.
Up button:
Under standby mode press it to zoom in;
Under standby mode press it to enter/exit the menu;
In the Menu setting or Playback mode choose the last option or file;
Increase the digit in the time setting.
Down button:
Under standby mode press it to zoom out;
Choose the next option or file in the Menu setting or Playback mode;
Decrease the digit in the time setting.
Mode button:
Short press to switch into Video/Picture/Playback Mode under standby mode;
Long press to enter WiFi setting;
During recording short press to capture;
In setting mode - press it to switch from mode menu to system menu when you are at the
top of menu;
In time setting to switch Year/Month/Date/Time;
Start/stop capture timing when setting capture automatically.
Camera Operation:
Power on/off
Power on: Short press power button, screen shows start up picture, the blue working
indicators will light up, camera enters standby mode.
Power off: When camera is on, long press power button to switch the camera off.
Battery Charging
Connect camera with power charger via USB cable, the red light will light up. Once the
battery is full, red light will be off. Turn off camera when charging to charge battery faster.
Insert/Remove Battery
To insert or exchange the battery, please remove the front cover of the camera.
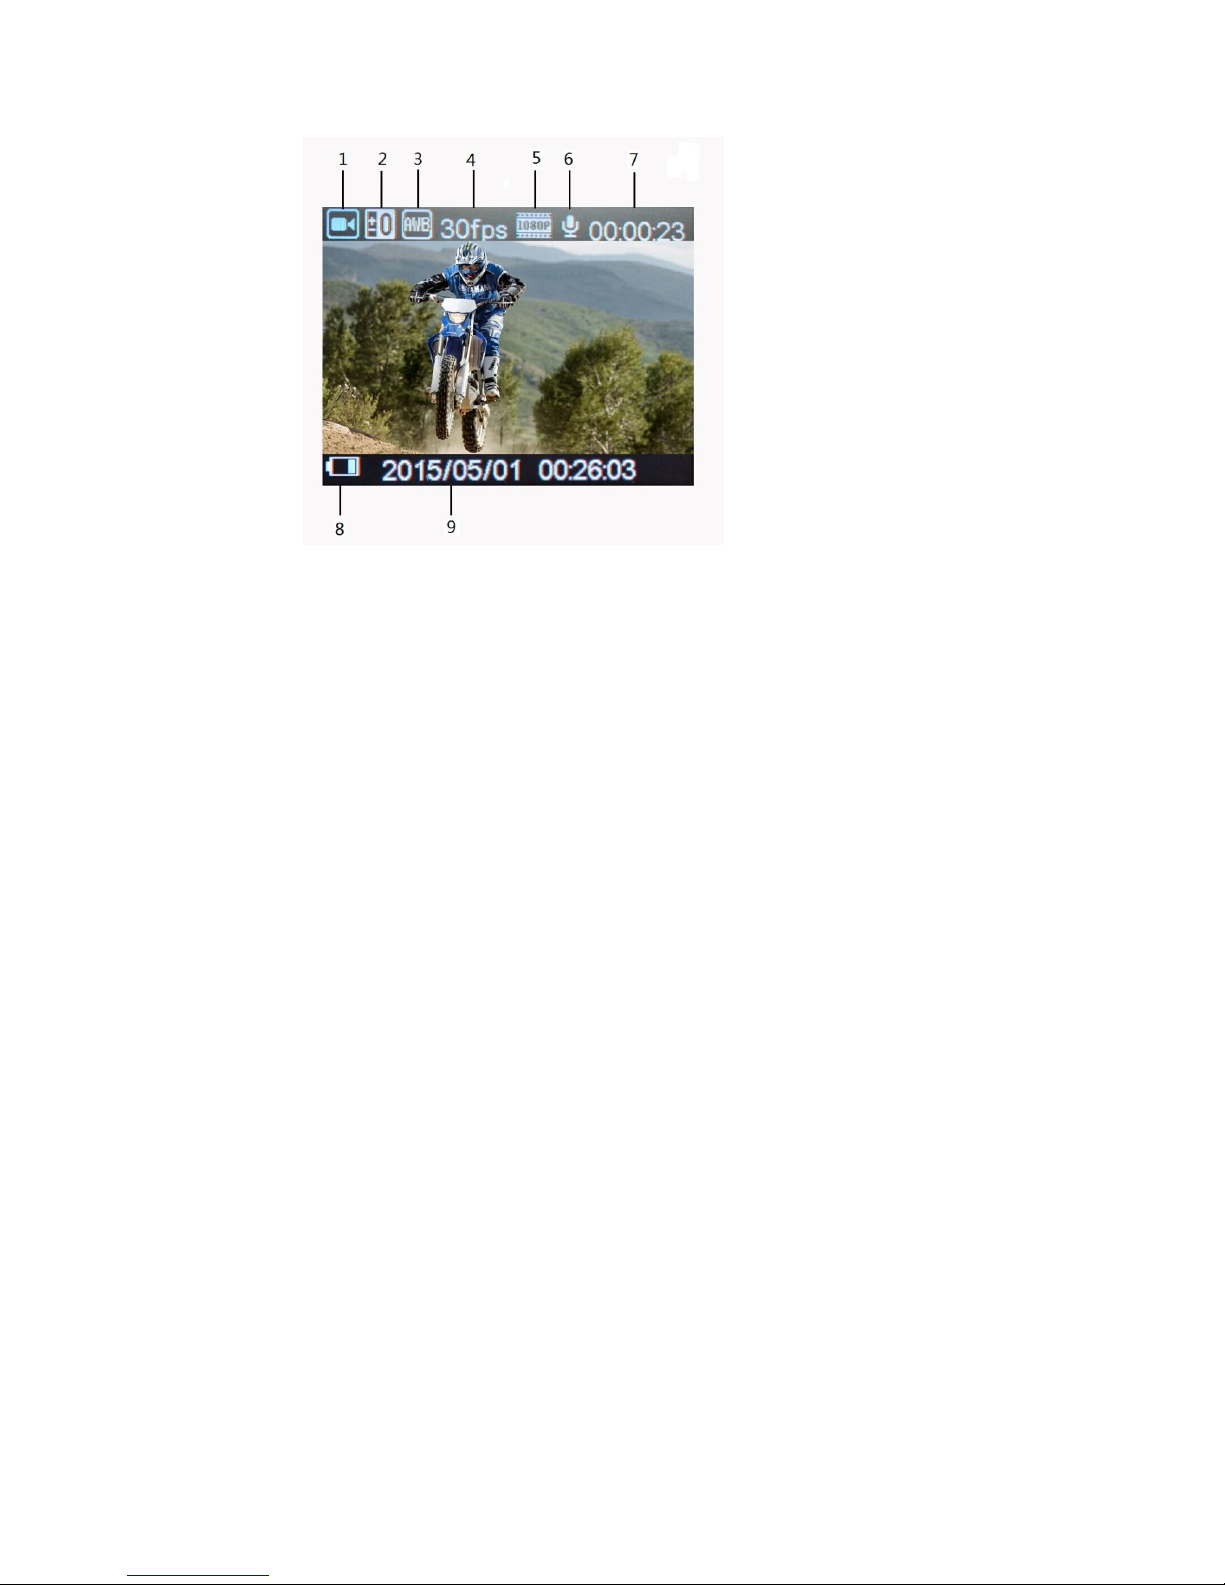
Video Mode
Video interface:
1. Record icon 2.Exposure Compensation 3.White Balance 4.Frame rate
5. Video resolution 6.Microphone 7. Remaining time of the memory card 8.
Battery icon 9. Year /Month / Day/Time
Normal recording
Set "seamless" to OFF in the video mode menu, Press Power button, camera starts
recording till card is full. Press Power button again to stop recording.
Seamless recording (refer to menu setting)
Under standby mode, press Power button to start recording, the blue indicator will flash.
When the video recorded up to the time you set (1 minute/3 minutes/5minutes),
camera will save the footage automatically and continue recording.
When TF card is full, camera will overwrite the first footage by time sequence and
continue recording. Press Power button again to stop recording, the remaining recording
time is on the LCD screen.
Note:
“Seamless” can’t be used in 4K resolution.
4K resolution doesn’t support “Wifi, zoom function and time lapse”.
Please set “capture timing” off when you use “seamless” or “time lapse”.
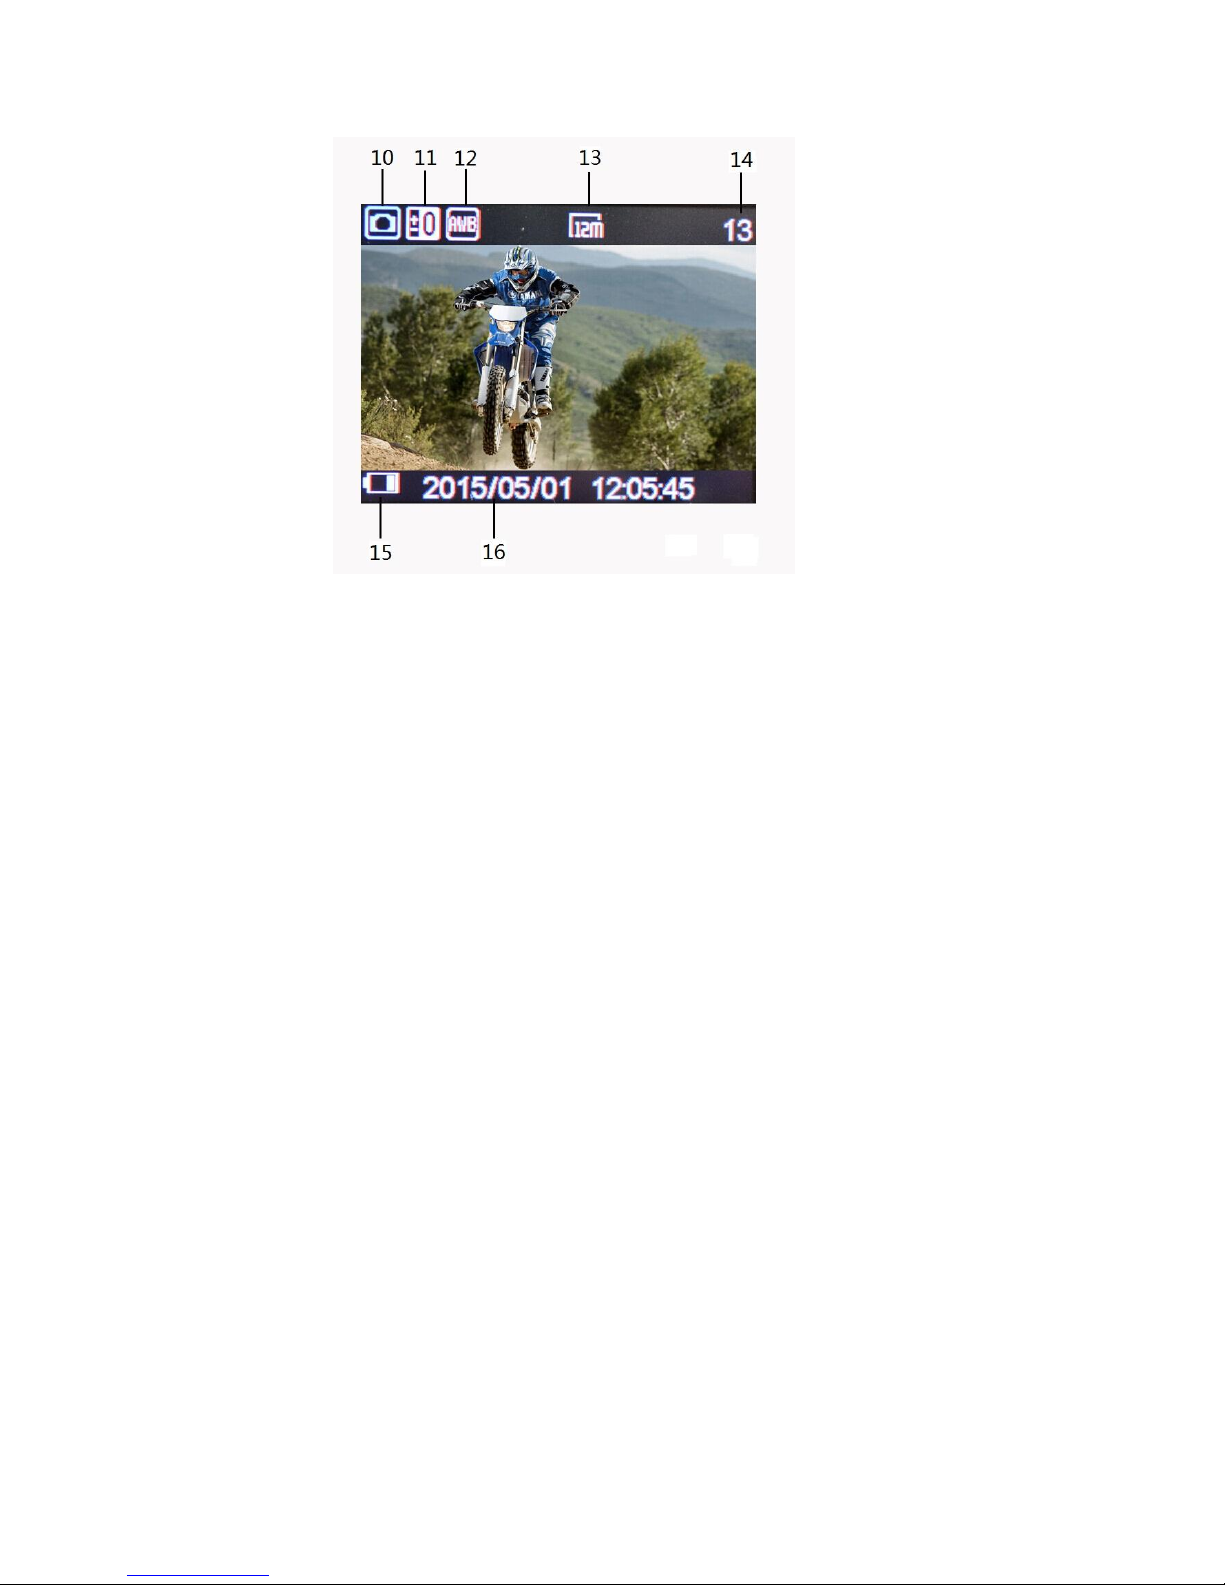
Picture Mode
Picture interface:
10. Picture icon 11. Exposure Compensation 12.White balance 13.Picture size
14. Remain photos 15.Battery icon 16. Year /Month/Day/Time
Camera default setting is video mode. Under standby mode, press Mode button to enter
picture mode, aim at the object you want to shoot and press Power button, camera will save
pictures automatically.
Capture function
1. Capture manually: Press mode button to take a picture under recording when “Capture
Timing”in system menu is off.
2. Capture automatically: when “Capture timing” in system menu is set “5s/10s/15s/30s/
60s”, the machine will capture and save automatically under normal recording. Press
Mode button to start and stop capture.
Note:
4k resolution doesn’t support capture function.
Camera could not support capture function when “time lapse” and “slow motion” is on.
Please set “capture timing” off when “seamless/time lapse/slow motion” will be used.
Playback Mode
1. Playback icon 2. File number / total number of files
3. Select the file you want to play
4. File Preview 5. File length 6. Date stamp 7. Time stamp

In standby mode, press Mode button to switch to Playback mode. Press UP/Down
Button to select the video / picture you need, press power button to preview / playback
or stop playing.
Menu Setting
In standby mode, press Up button for seconds to enter/exit the menu, then press
Mode button can switch mode menu and system menu. Press Down button to page
down, press Up button to page up, press Power button to confirm.
Video mode/Picture mode/Playback modes each have two menus: Mode menu and
System menu. All systems are same.
Video menu:
Resolution:4k 15fps/2.7k 30fps/1440p 30fps/1080p 60fps/1080p 50fps/1080p 30fps/
1080p 25fps/720p 120fps/720P 60fps/720p 50fps/720p 30fps/720p 25fps
Video quality: Super fine / Fine / Normal
Seamless: OFF / 1 minute / 3 minutes / 5 minutes
Slow Motion: Off / Auto
Time Lapse: Off / 0.5sec / 1sec / 3sec / 5sec / 10sec / 30sec / 1min
White Balance: Auto / Daylight / Cloudy / Tungsten / Fluor
Diving mode: Off / On
Exposure: -2.0 -1.0 +0.0 +1.0 +2.0
Capture timing: Off / 5s / 10s / 15s / 30s / 60s
Motion detect: OFF / ON
Date stamp: Off / Date / Date & Time
Picture menu:
Image Size: 20M / 12M / 8M / 5M / 3M
White Balance: Auto / Daylight / Cloudy / Tungsten / Fluor H
Exposure: -2.0 -1.0 +0.0 +1.0 +2.0
Timer Shot: Off / 2s / 10s / 30s / 60s / Double

Periodical Snap: Off / 0.5s / 1s /2s/ 3s
Photo Burst: off / 3 photos / 5 photos / 10 photos
Date Stamp: Off / Date / Date &Time
Playback mode menu:
Please select File type!
VIDEO
JPG
Protect: Single / Protect All / Unprotected All
Delete: Single / All
System menu:
Sounds: Beep (on / off) / Volume (0/1/2/3) Voice Rec (H/M/L /off)
Power Frequency: 50Hz / 60Hz / Auto
Power Save: Off / 1 min / 3 min / 5 min
Date & Time: 05/01/2016 13:38 Year / Month / Day
Language: English / Traditional Chinese / Simplified Chinese / German / French /
Spanish / Russian/Italian/Thai/Japanese
Invert Mode: OFF / ON
WiFi Password: 1234567890
Time Zones: -12 to +12
TV Out: Yes / No
Remote Pair: OFF / ON
Format: Yes / No
System: Factory Reset / System Info / Card Info
Remote Control Description
There are two buttons on the remote controller, press the video button to start/stop the
recording. Press the picture button to take pictures under picture mode or capture under
video mode.
Matching the remote control:
Set "Remote Pair" in the menu to On, keep pressing the two buttons on the remote
control, when you can see blue light of Remote control flashing, release two buttons after 3
seconds. Remote should be paired now. Press power button on the camera to exit the
Remote Pair and try to record video or picture with the remote control. Please repeat the
pairing if remote can’t start recording.
Install and use WiFi
1. Scan the QR code on the gift box to download the APP and Install it.
2. Set WiFi password in the menu of camera. (Default password is 1234567890).
3. Long press mode button to open WiFi function.
4. Find “customer” in the WiFi list of smart phone and enter password to connect it.
5. When smart phone is connected to camera, camera screen will display Wifi device
connected. Find the APP in smart phone, and then you can control the
camera via the smart phone.
6. Press Power Button of camera to exit WiFi setting.
Note:
Before opening WiFi function, make sure micro SD card is inserted in the camera.
The effective distance is influenced by environment. The decrease of the WiFi signal and
operation delay is normal.
The “Power Saving Mode” in mobile should be set “Off”.
The “Keep Wi-Fi on during sleep” in the mobile should be set “Always”.
Connect HDMI
Connect camera to HDMI-TV via HDMI cable, all operations can be displayed in
High definition HDMI-TV screen.
Note: 20MP pictures don’t support to playback on HDMI-TV.
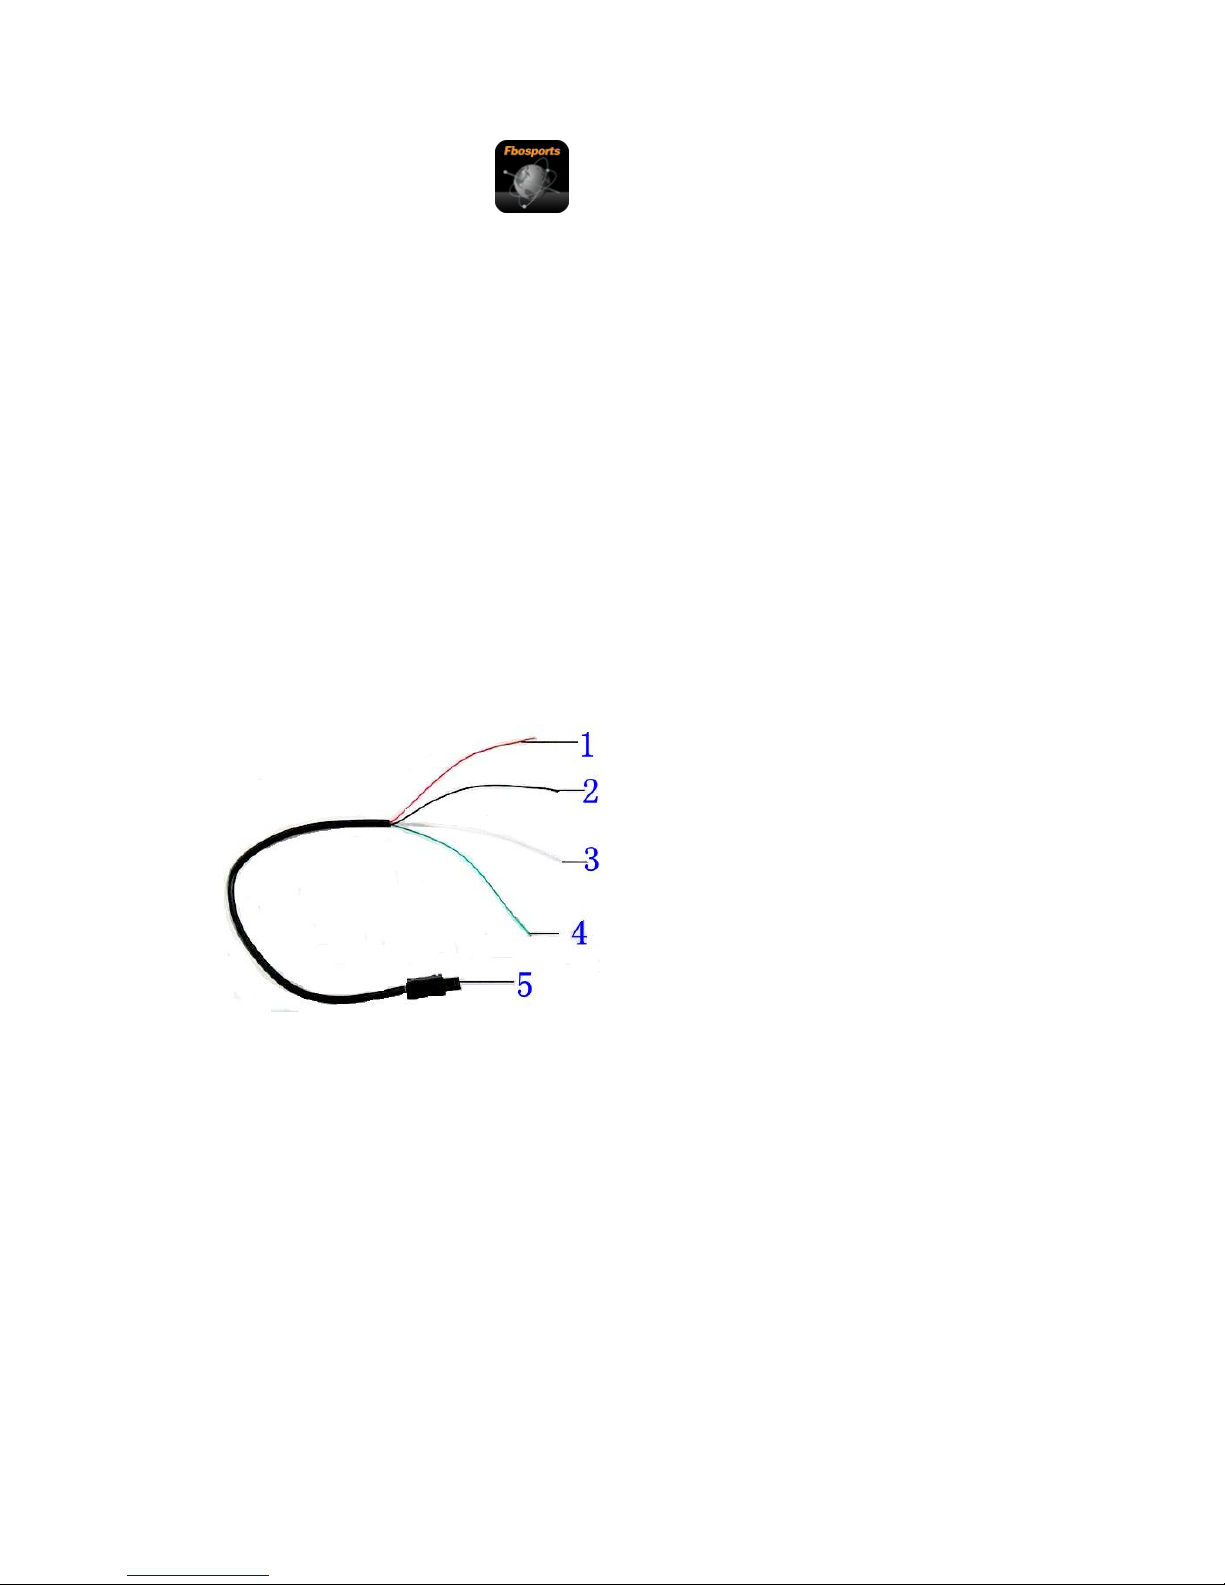
Connect TV
Connect camera to TV via TV cable, set menu “TV mode” to Yes, press Power
button to confirm, then all operations can be displayed in TV screen.
1. The positive pole of the power 5v
2. The negative pole of the power
3. Video output
4. Unavailable
5. USB port
Playback on PC
Connect camera to PC and open camera, screen will display: “MSDC”, “PCCAM”,
“Working”. Press Up button or Down button to choose the option, press Power button to
confirm.
MSDC: Enter MSDC to check files. Camera will be worked as removable disk.
PCCAM: Camera will be worked as PCCAM.
Working: Camera can be used normally and be powered by the PC.

Technical specification:
Dimension
60*45*25mm(Not including lens)
Sensor
12 Mega CMOS Sensor
Lens
170 degree (7G+IR F=2.5 f=3.0mm)
Image size
20M / 12M / 8M / 5M / 3M
Resolution
4K 3840*2160@15fps
2.7K 2704*1524@30fps
1440p 1920*1440@30fps
1080p 1920*1080@60/50/30/25fps
720p 1280*720@120/60/50/30/25fps
Screen
HD 2 inch screen
Time lapse
Support
Slow motion
Support
Diving mode
Support
PC CAM
Support
Snapshot
Support
Wifi frequency
2.4GHz-2.4835GHz
Wifi distance
15m in open space
Waterproof
50m in waterproof case
Remote controller frequency
2.4GHz
Remote controller
Waterproof to 3m,control to 10m
Audio
Built-in Microphone/speaker
Battery
Replaceable Li-ion battery 1050mAh/3.7V 3.885Wh
Loop recording
Optional 1/3/5 minutes
File format
MOV H.264/JPG
Memory card
4GB to 32GB(Micro SD Card Class 10 and above)
HDMI output
Real time output
USB port
USB 2.0 high-speed interface
Notice: The manufacturer however reserves the right to amend the specifications according to
market demand without notice.
Company Information and Support:
Website : https://www.detonate.co
FB: https://facebook.com/detonate.co
IG: https://instagram.com/detonate_surf_co
Webshop: www.shop.detonate.co
Customer Service Email Support: 4KCamera@detonate.co


