DeWalt DPD3800 User manual

DPD3800
Pressure Washer
Laveuse à pression
Lavadora a presión
INSTRUCTION MANUAL
GUIDE D'UTILISATION
MANUAL DE INSTRUCCIONES
INSTRUCTIVO DE OPERACIÓN, CENTROS DE SERVICIOY PÓLIZA
DE GARANTÍA.ADVERTENCIA: LÉASE ESTE INSTRUCTIVO ANTES
DE USAR EL PRODUCTO.
If you have questions or comments, contact us.
Pour toute question ou tout commentaire, nous contacter.
Si tiene dudas o comentarios, contáctenos.
1-800-4-De

2
A. Panel assembly
B. Nozzle holder
C. Professional Spray gun
D. Side Handle
E. Quick-connect
spray wand
F. Frame
G. Engine dipstick/oil plug
H. Engine switch
I. Starter grip
J. Engine
K. Choke control
L. Throttle control lever
M. Fuel valve lever
N. Gas cap
O. Handle assembly
P. High-pressure hose
Q. High-pressure pump
DPD3800 PRESSURE WASHER
Refer to the engine instruction manual for location and operation of
other engine controls.
CAT 67DX
Oil: Use DP70
Oil Capacity: 10.8 oz. (319.4 ml)
FIG. 1
J
C
E
P
K
OA
F
B
Q
HG
N
L
M
ID

3
IF YOU HAVE ANY QUESTIONS OR COMMENTS ABOUT
THIS OR ANY DeWALT TOOL, CALL US TOLL FREE AT:
1-800-4-DeWALT (1-800-433-9258)
WARNING: Do not operate this unit until you read and understand
this instruction manual and the engine instruction manual for safety,
operation and maintenance instructions.
WARNING: When using this product basic precautions should
always be followed, including the following:
1. Read all instructions before using the product.
2. To reduce the risk of injury, close supervision is necessary when
a product is used near children.
3. Know how to stop the product and bleed pressures quickly. Be
thoroughly familiar with the controls.
4. Stay alert–watch what you are doing.
5. Do not operate the product when fatigued or under the influence
of alcohol or drugs.
6. Keep operating area clear of all persons.
The definitions below describe the level of severity
for each signal word. Please read the manual and
pay attention to these symbols.
DANGER: Indicates an imminently hazardous
situation which, if not avoided, will result in death
or serious injury.
WARNING: Indicates a potentially hazardous
situation which, if not avoided, could result in death
or serious injury.
CAUTION: Indicates a potentially hazardous
situation which, if not avoided, may result in minor
or moderate injury.
CAUTION: Used without the safety alert symbol
indicates a potentially hazardous situation which, if
not avoided, may result in property damage.
MODEL WEIGHT HEIGHT WIDTH LENGTH PSI MAX* AVERAGE
OPERATING
PSI
GPM MAX* AVERAGE
OPERATING
GPM
ENGINE
DPD3800 130 lbs 29" 24" 40" 3800
(26200 kPa) 3462
(23869 kPa) 4.0
(15.1 L/min)
3.9
(14.8 L/min)
DeWALT
389 cc OHV,
11 Net HP, 13
Gross HP **
* Maximum PSI and GPM ratings determined in accordance with the Pressure Washers Manufacturers Association (PWMA)
standard PW101
** Horsepower rating (shown as maximum output @ 3600 rpm) is in accordance with SAE J1349 for Net HP and SAE J1995 for Gross HP.
Actual engine power will be lower. Engine power depends on the application, operating speed, operating conditions and other variables.

4
7. Do not overreach or stand on unstable support. Keep good
footing and balance at all times.
8. Follow the maintenance instructions specified in the manual.
DANGER: RISK OF INJECTION OR SEVERE INJURY. KEEP
CLEAR OF NOZZLE. DO NOT DIRECT DISCHARGE STREAM AT
PERSONS. THIS PRODUCT IS TO BE USED ONLY BY TRAINED
OPERATORS.
WARNING: This product may not be equipped with a spark-
arresting muffler. If the product is not equipped and will be used
around flammable materials or on land covered with materials such
as agricultural crops, forest, brush, grass or other similar items, then
an approved spark arrester must be installed and is legally required
in the state of California. It is a violation of California statutes
section 130050 and/or sections 4442 and 4443 of the California
Public Resources Code, unless the engine is equipped with a spark
arrester, as defined in section 4442, and maintained in effective
working order. Spark arresters are also required on some U.S.
Forest Service land and may also be legally required under other
statutes and ordinances.
WARNING: This product and its exhaust contain chemicals
known to the State of California to cause cancer, and birth
defects or other reproductive harm. In addition, some cleaning
products and dust contain chemicals known to the State of
California to cause cancer, and birth defects or other reproduc-
tive harm. Wash hands after handling.
DANGER: RISK OF EXPLOSION OR FIRE
WHAT CAN HAPPEN HOW TO PREVENT IT
• Spilledgasolineandit’s
vapors can become ignited
from cigarette sparks,
electrical arcing, exhaust
gases and hot engine
components such as
the muffler.
• Shutoffengineandallow
it to cool before adding fuel
to the tank.
• Usecareinfillingtankto
avoid spilling fuel. Move
pressure washer away
from fueling area before
starting engine.
• Heatwillexpandfuelinthe
tank which could result in
spillage and possible fire
explosion.
• Keepmaximumfuellevel
1/2" (12.7 mm) below
bottom of filler neck
to allow for expansion.
• Operatingthepressure
washer in an explosive
environment could
result in a fire.
• Operateandfuelequipment
in well-ventilated areas free
fromobstructions.Equip
areas with fire extinguisher
suitable for gasoline fires.
• Materialsplacedagainstor
near the pressure washer
can interfere with its proper
ventilation features causing
overheating and possible
ignition of the materials.
• Neveroperatepressure
washer in an area containing
dry brush or weeds.

5
• Mufflerexhaustheatcan
damage painted surfaces,
melt any material sensi-
tive to heat (such as siding,
plastic, rubber, vinyl or the
pressure hose, itself), and
damage live plants.
• Alwayskeeppressurewasher
a minimum of 4' (1.2 m) away
from surfaces (such as
houses, automobiles or
live plants) that could be
damaged from muffler
exhaust heat.
• Improperly stored fuel could
lead to accidental ignition.
Fuel improperly secured
could get into the hands of
childrenorotherunqualified
persons.
• StorefuelinanOSHA
approved container, in a
secure location away from
work area.
• Useofacids,toxicor
corrosive chemicals,
poisons, insecticides, or any
kind of flammable solvent
with this product could result
in serious injury or death.
• Donotsprayflammable
liquids.
DANGER: RISK TO BREATHING (ASPHYXIATION)
WHAT CAN HAPPEN HOW TO PREVENT IT
• Breathingexhaustfumes
will cause serious injury
or death! Engine exhaust
contains carbon monoxide,
an odorless and deadly gas.
• Operatepressurewasherin
a well-ventilated area. Avoid
enclosed areas such as
garages, basements, etc.
• Neveroperateunitina
location occupied by
humans or animals.
DANGER: RISK TO BREATHING (ASPHYXIATION) CONTINUED
• Somecleaningfluids
contain substances which
could cause injury to skin,
eyes or lungs.
• Useonlycleaningfluids
specifically recommended
for high-pressure washers.
Follow manufacturers
recommendations. Do not
use chlorine bleach or any
other corrosive compound.
DANGER: RISK OF FLUID INJECTION AND LACERATION
WHAT CAN HAPPEN HOW TO PREVENT IT
• Yourpressurewasher
operates at fluid pressures
and velocities high enough to
penetrate human and
animal flesh, which could
result in amputation or
other serious injury. Leaks
caused by loose fittings or
worn or damaged hoses can
result in injection injuries.
DO NOT TREAT FLUID
INJECTION AS
A SIMPLE CUT! See a
physician immediately!
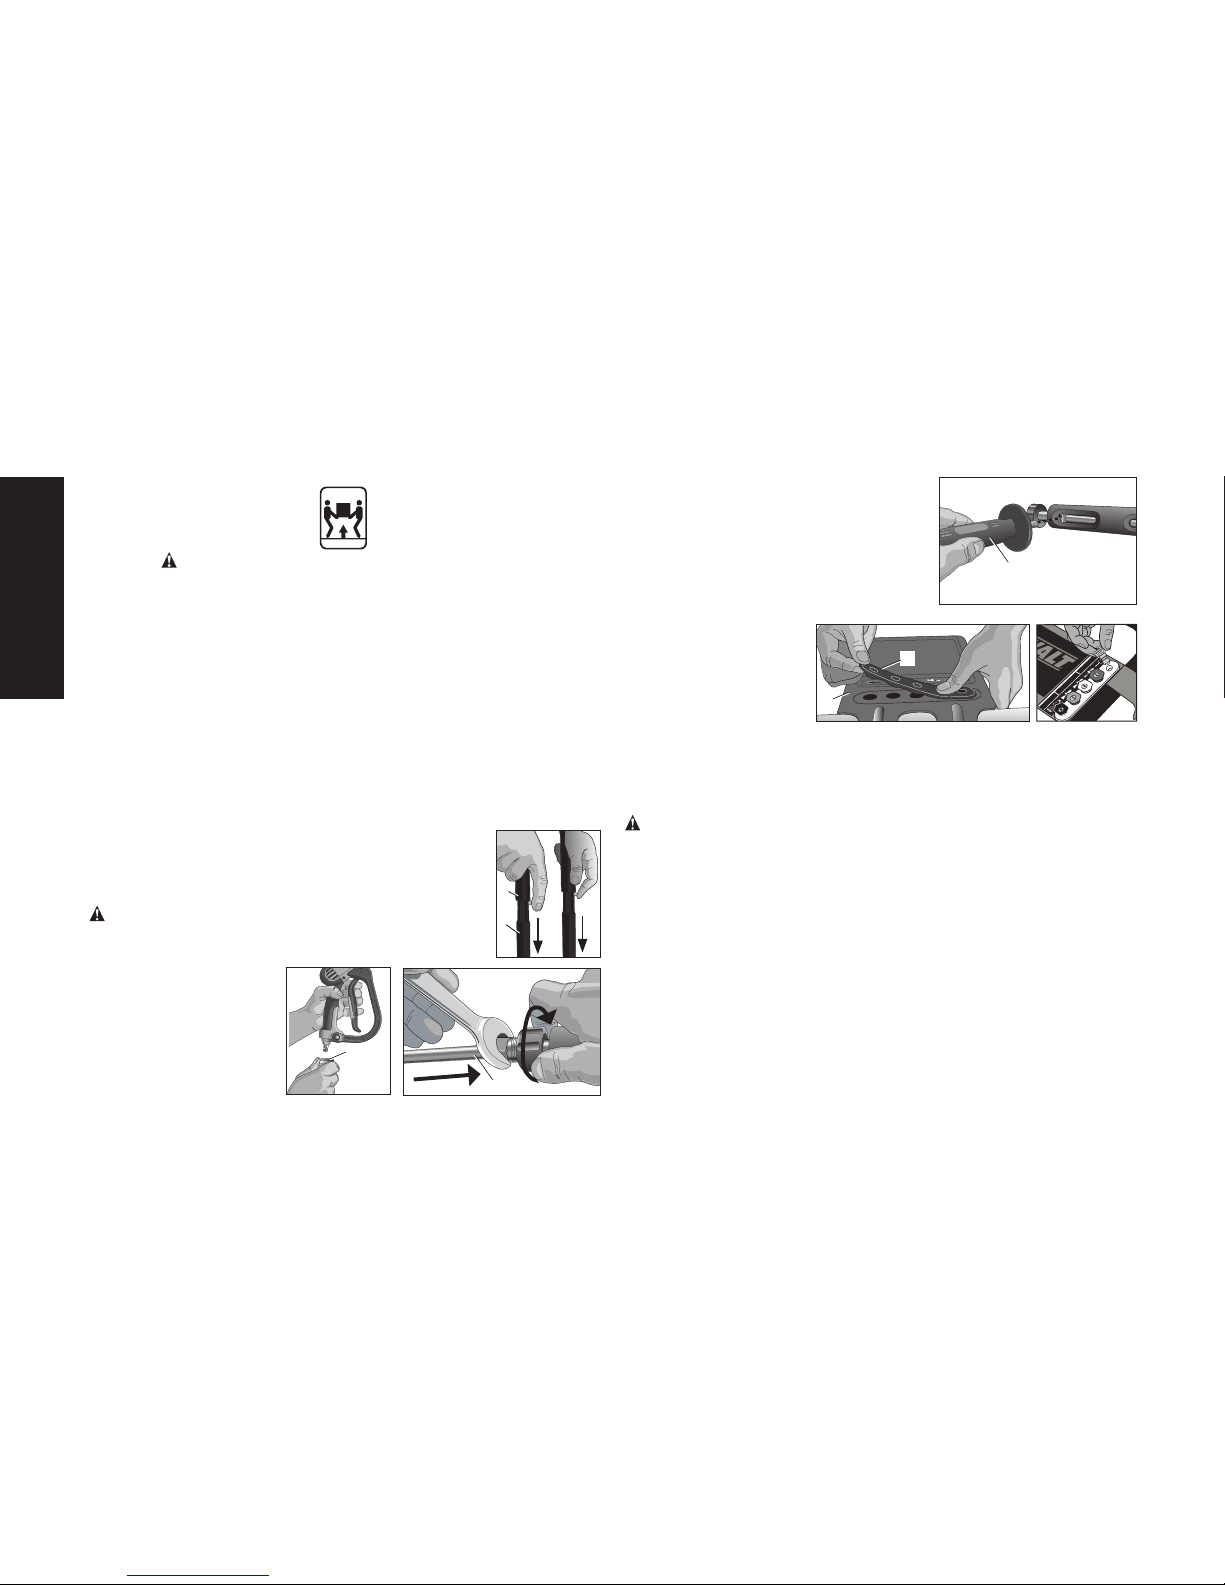
• Inspectthehigh-pressure
hose regularly. Replace
the hose immediately if it is
damaged, worn, has melted
from contacting the engine,
or shows any signs of cracks,
bubbles, pinholes, or other
leakage. Never grasp a
high-pressure hose that
is leaking or damaged.
• Nevertouch,grasporattempt
to cover a pinhole or similar
water leak on the high-
pressure hose. The stream
of water IS under high
pressure and WILL
penetrate skin.
• Neverplacehandsinfront
of nozzle.

6
DANGER: RISK OF INJURY FROM SPRAY
WHAT CAN HAPPEN HOW TO PREVENT IT
• High-velocityfluidspray
can cause objects to break,
propelling particles at high
speed.
• AlwayswearANSI-approved
Z87.1 safety glasses. Wear
protective clothing to protect
against accidental spraying.
• Neverpointwandatorspray
people or animals.
• Lightorunsecuredobjects
can become hazardous
projectiles.
• Alwayssecuretriggerlock
when wand is not in service
to prevent accidental
operation.
• Neverpermanentlysecure
trigger in pull-back (open)
position.
• Directsprayawayfromself
and others.
• Makesurehoseandfittings
are tightened and in good
condition. Never hold onto
the hose or fittings during
operation.
• Donotallowhosetocontact
muffler.
• Neverattachorremovewand
or hose fittings while system
is pressurized.
• Whenusingreplacement
lances or guns with this
pressure washer, DO NOT
use a lance and/or lance/gun
combination that is shorter
in length than what was
provided with this pressure
washer as measured from
the nozzle end of the lance
to the gun trigger.
• Injuriescanresultifsystem
pressure is not reduced
before attempting
maintenance or
disassembly.
• Torelievesystempressure,
shut off engine, turn off water
supply and pull gun trigger
until water stops flowing.
• Use only accessories rated
equaltoorhigherthanthe
rating of the pressure washer.

7
DANGER: RISK OF UNSAFE OPERATION
WHAT CAN HAPPEN HOW TO PREVENT IT
• Unsafeoperationofyour
pressure washer could lead
to serious injury or death to
you or others.
• Donotusechlorine
bleach or any other
corrosive compound.
• Becomefamiliarwiththe
operation and controls of
the pressure washer.
• Keepoperatingareaclear
of all persons, pets and
obstacles.
• Donotoperatetheproduct
when fatigued or under the
influence of alcohol or drugs.
Stay alert at all times.
• Neverdefeatthesafety
features of this product.
• Donotoperatemachine
with missing, broken or
unauthorized parts.
• Neverleavewand
unattended while unit
is running.
• Ifproperstartingprocedure
is not followed, engine can
kickback causing serious
hand and arm injury.
• Ifenginedoesnotstartafter
twopulls,squeezetrigger
of gun to relieve pump
pressure. Pull starter cord
slowly until resistance is felt.
Then pull cord rapidly to
avoid kickback and prevent
hand or arm injury.
• Thespraygun/wandis
a powerful cleaning tool
that could look like a toy
to a child.
• Keepchildrenawayfromthe
pressure washer at all times.
• Reactiveforceofspray
will cause gun/wand to
kickback, and could cause
the operator to slip or fall
or misdirect the spray.
Improper control of gun/
wand can result in
injuries to self and
others.
• Donotoverreachorstand
on an unstable support.
• Donotusepressurewasher
while standing on a ladder.
• Gripgun/wandfirmlywith
both hands. Expect the
gun to kickback when
triggered.

8
DANGER: RISK OF INJURY OR PROPERTY DAMAGE
WHEN TRANSPORTING OR STORING
WHAT CAN HAPPEN HOW TO PREVENT IT
• Fueloroilcanleakorspill
and could result in fire or
breathing hazard. Serious
injury or death can result.
Fuel or oil leaks will damage
carpet, paint or other
surfaces in vehicles
or trailers.
• Oilcouldfillthecylinderand
damage the engine if the unit
is not stored or transported in
an upright position.
• Ifpressurewasheris
equippedwithafuelshut-off
valve, turn the valve to the
OFF position before transport-
ing to avoid fuel leaks. If pres-
surewasherisnotequipped
with a fuel shut-off valve,
drain the fuel from tank before
transporting. Only transport
fuel in an OSHA-approved
container.
Always place pressure washer
on a protective mat when
transporting to protect against
damage to vehicle from leaks.
Always transport and store
unit in an upright position.
Remove pressure washer
from vehicle immediately upon
arrival at your destination.
WARNING: RISK OF BURSTING
WHAT CAN HAPPEN HOW TO PREVENT IT
• Over inflation of tires could
result in serious injury and
property damage.
• Useatirepressuregauge
to check the tires pressure
before each use and while
inflating tires; see the tire side-
wall for the correct tire pres-
sure.
NOTE: Air tanks,
compressors and similar
equipmentusedtoinflate
tires can fill small tires similar
to these very rapidly. Adjust
pressure regulator on air
supply to no more than the
rating of the tire pressure.
Add air in small increments
andfrequentlyusethetire
gauge to prevent over
inflation.

9
• High-velocityfluidspray
directed at pneumatic tire
sidewalls (such as found
on automobiles, trailers and
the like) could damage the
sidewall resulting in serious
injury.
• Onpressurewashersrated
above 1600 PSI (11032 kPa)
use the widest fan spray
(40º nozzle) and keep the
spray a minimum of 8"
(20 cm) from the pneumatic
tire sidewall. Do not aim
spray directly at the joint
between the tire and rim.
WARNING: RISK OF HOT SURFACES
WHAT CAN HAPPEN HOW TO PREVENT IT
• Contactwithhotsurfaces,
such as engines exhaust
components, could result in
serious burn.
• Duringoperation,touch
only the control surfaces
of the pressure washer.
Keep children away from
the pressure washer at all
times. They may not be able
to recognize the hazards of
this product.
WARNING: RISK OF CHEMICAL BURN
WHAT CAN HAPPEN HOW TO PREVENT IT
• Useofacids,toxicor
corrosive chemicals, poisons,
insecticides, or any kind of
flammable solvent with this
product could result in seri-
ous injury or death.
• Donotsprayacids,gasoline,
kerosene, or any other
flammable materials with this
product. Use only household
detergents, cleaners and
degreasers recommended
for use with pressure
washers.
• Wearprotectiveclothing
to protect eyes and skin
from contact with sprayed
materials.
WARNING: RISK OF
ELECTRICAL SHOCK
WHAT CAN HAPPEN HOW TO PREVENT IT
• Spraydirectedatelectrical
outlets or switches, or objects
connected to an electrical
circuit, could result in a
fatal electrical shock.
• Unpluganyelectrically
operated product before
attempting to clean it. Direct
spray away from electric
outlets and switches.

10
WARNING: RISK OF
INJURY FROM LIFTING
WHAT CAN HAPPEN HOW TO PREVENT IT
• Seriousinjurycanresult
from attempting to lift too
heavy an object.
• Thepressurewasheristoo
heavy to be lifted by one
person. Obtain assistance
from others before lifting.
1. Place handle assembly (O) onto frame, depress
F
O
the snap buttons, and slide the handle assembly
onto the frame (F) until snap buttons are secured
in place.
CAUTION: Risk of personal injury. Avoid placing
hands between handle and frame when assembling
to prevent pinching.
2. Attach high-pressure
E
P
hose (P) to spray gun.
Make sure it is
secure.
3. Connect wand (E) to
spray gun. Make sure
connection is secure.
4. Thread the side handle (D) into spray
D
gun extension and tighten to desired
position.
5. Place the nozzle holder (B) onto the
panel assembly (A) and push each
nozzle holder into place.
6.Removethefivecoloredquick-connect
nozzles from the
B
A
plastic bag and insert
them into correct
grommet on the
nozzle holder.
Nozzles are color
coded to match colored nozzles on panel assembly.
NOTE: The high-pressure pump was filled with oil at the factory.
Always check oil level before using (refer to Maintenance for more
information).
WARNING: Risk of bursting.
Use a tire pressure gauge to check the
tires pressure before each use and while inflating tires; see the tire side-
wall for the correct tire pressure.
NOTE:Airtanks,compressorsandsimilarequipmentusedtoinflate
tires can fill small tires similar to these very rapidly. Adjust pressure
regulator on air supply to no more than the rating of the tire pressure.
Addairinsmallincrementsandfrequentlyusethe tire gauge to
prevent over inflation.
The pressure setting is preset at the factory to achieve optimum pres-
sure and cleaning. To lower the pressure, follow these instructions.

11
White
40˚covers wide
areas of
cleaning
metal, concrete,
wood or vinyl
Black
low pressure applies cleaning
solutions metal, concrete,
wood or vinyl
* CAUTION: The high-pressure spray from your pressure washer
is capable of causing damage to surfaces such as wood, glass,
automobile paint, auto striping and trim, delicate objects such
as flowers and shrubs. Before spraying, check the item to
be cleaned to assure yourself that it is strong enough to resist
damage from the force of spray.
CHANGING NOZZLES ON SPRAY WAND
DANGER: Risk of fluid injection. Do not direct discharge stream
toward persons, unprotected skin, eyes or any pets or animals.
Serious injury will occur.
WARNING: Flying objects could cause risk of serious injury. DO
NOT attempt to change nozzles while pressure washer is running.
Turn engine off before changing nozzles.
1.Pullquick-connectcouplerbackandinsert
nozzle.
2.Release quick-connect coupler and
twist nozzle to make sure it is secure in
coupler.
1. Back away from the surface to be cleaned. The further away you
are, the less the pressure will be on the surface to be cleaned.
2. Change to the 40˚ nozzle (white). This nozzle delivers a less
powerful stream of water and a wider spray pattern. Refer to
Spray Wand Nozzles.
CAUTION: DO NOT attempt to increase pump pressure. A higher
pressure setting than the factory set pressure may damage pump.
3. Reduce the speed of the gasoline engine (RPM). Slow the
engine down and the water pressure will go down with it.
The nozzles for the spray wand are stored in the nozzle holder (B) on
the panel assembly (A). Colors on the panel identify nozzle location
and spray pattern. Refer to the following chart to choose the correct
nozzle for the job to be performed.
Nozzle Color Spray Pattern Uses Surfaces*
Red
0˚ powerful
pinpoint for
very intense
cleaning
metal or
concrete;
DO NOT use
on wood
Yellow
15˚ intense
cleaning of
small areas
metal, concrete
or wood
Green
25˚intense
cleaning of
larger areas
metal, concrete
or wood

12
WARNING: Flying object could cause risk of serious injury. Ensure
nozzle is completely inserted in quick-connect socket and quick-
connect snap ring is fully engaged (forward) before squeezing gun
trigger.
Applying chemicals or cleaning solvents is a low-pressure operation.
NOTE: Use only soaps and chemicals designed for pressure washer
use. Do not use bleach.
TO APPLY CHEMICALS AND SOLVENTS
1. Press chemical hose (S) onto barbed
S
fitting located near high pressure hose
connection of pump as shown.
2. Place the other end of chemical hose
with filter on it into the container holding
chemical/cleaning solution.
NOTE: For every 7 gallons (26.5 liters)
of water pumped 1 gallon (3.8 liters) of chemical/cleaning solution
will be used.
3.Installlow-pressure(black)nozzleintoquickconnectfittingofspray
wand, refer to SprayWand Nozzles.
NOTE: Chemicals and soaps
will not siphon if the black soap nozzle is not installed on the
spray wand.
4. After use of chemicals, place chemical hose into container of clean
water and draw clean water through chemical injection system
to rinse system thoroughly. If chemicals remain in the pump it
could be damaged. Pumps damaged due to chemicals will not be
covered under warranty.
WARNING: To reduce the risk of injury, read the pressure washer
instruction manual and the engine instruction manual before starting
pressure washer.
DANGER: Risk of fluid injection and laceration. When using the
high-pressure setting, DO NOT allow the high-pressure spray to
come in contact with unprotected skin, eyes or with any pets or ani-
mals. Serious injury will occur.
enough to penetrate human and animal flesh, which could
result in amputation or other serious injury. Leaks caused by
loose fittings or worn or damaged hoses can result in injection
injuries. DO NOT TREAT FLUID INJECTION AS A SIMPLE
CUT! See a physician immediately!
WARNING: Risk of fire, asphyxiation and burning. NEVER fill fuel
tank when engine is running or hot. Do not smoke when filling fuel
tank.
fill fuel tank completely. Fill tank to 1/2" (12.7 mm) below
bottom of filler neck to provide space for fuel expansion.Wipe any
fuel spillage from engine and equipment before starting engine.
run engine indoors or in enclosed, poorly ventilated
areas. Engine exhaust contains carbon monoxide, an odorless
and deadly gas.
DO NOT let hoses come in contact with very hot engine
muffler during or immediately after use of your pressure
washer. Damage to hoses from contact with hot engine
surfaces will NOT be covered by warranty.
CAUTION: pull water supply hose to move pressure wash-
er. This could damage hose and/or pump inlet.
DO NOT use hot water, use cold water only.
turn water supply off while pressure washer engine is
running or damage to pump will result.

13
DO NOT stop spraying water for more than T
two minutes at a time. Pump operates in
bypass mode when spray gun trigger is not
pressed. When the temperature inside the
pump rises too high the thermal relief valve (T)
will open and release a gush of water in an
effort to lower the temperature inside the pump.
The thermal relief valve will then close. If pump is left in bypass
mode for more than two minutes internal components of the
pump can be damaged.
START-UP PROCEDURE
1.Inawell-ventilatedoutdoorarea,addfresh,high-quality,unleaded
gasoline with a pump octane rating of 86 or higher. Do not overfill.
Wipe up spilled fuel before starting the engine. Refer to engine
instruction manual for correct procedure.
2. Check engine oil level. Refer to the engine instruction manual for
correct procedure.
3. Connect the water hose to the water source. Turn the water source
on to remove all air from the hose. When a steady stream of water
is present, turn the water source off.
4. Verify the filter screen (U) is in water inlet of pump.
U
The cone side faces out.
5. Connect the cold water source (V) to pump inlet.
NOTE: Water source must provide a minimum of
5 gallons per minute at 20 PSI (138 kPa).
WARNING: To reduce the possibility of contami-
nation always protect against backflow when con-
nected to a potable water system.
6. Connect high-pressure hose (P) to pump
V
P
outlet.
7. If applying a chemical or cleaning solution,
refer to Chemicals and Cleaning
Solvents.
8. Turn the water source on.
CAUTION: Risk of property damage. Failure
to do so could cause damage to the pump.
9. Remove all air from the pump and high pressure hose by depress-
ing trigger until a steady stream of water is present.
10. Turn the engine ON/OFF switch (H) to the ON position.
11. Place the fuel valve lever (M) in the ON postion.
12.
If the engine is cold, move the choke (K) to the CLOSED position
as shown.
M
H
K
13. WARNING: Risk of unsafe operation. Pull starter grip slowly
until resistance is felt. Then pull starter grip (I) rapidly to avoid
kickback and prevent hand or arm injury.
NOTE: Do not allow the starter grip to snap back. Return it gently
by hand.
WARNING: Risk of unsafe operation. If engine does not start
after two pulls, squeeze trigger of gun to relieve pump pressure. Pull
starter cord slowly until resistance is felt. Then pull cord rapidly to
avoid kickback and prevent hand or arm injury.

14
NOTE: If the oil level in the engine is low, the engine will not start.
If the engine does not start, check the oil level and add oil as
needed.
14. As the engine warms up, move the choke to
the OPEN position.
15. Depress trigger on gun to start water flow.
WARNING: Risk of unsafe operation. Stand
on a stable surface and grip gun/wand firmly with
both hands. Expect the gun to kickback when
triggered.
16. Release trigger to stop water flow.
DANGER: Risk of injury from spray. Engage the X
trigger lock (X) when gun is not in use to prevent
accidental spraying.
17. Adjust spray for the task being performed
by changing quick connect nozzle. Refer to
Spray Wand Nozzles.
1. If chemicals were applied, place the chemical hose into a
container of clean water and draw clean water through chemical
injection system to rinse system thoroughly.
CAUTION: Risk of property damage Failure to do so could cause
damage to the pump.
2. Place the engine ON/OFF switch (H) to the OFF Position.
3. Place the fuel valve lever (M) in the OFF
postion.
CAUTION: Risk of property damage.
turn water supply off while pressure washer
engine is running or damage to pump will result.
4. Turn water source off.
5. Pull trigger on spray gun to relieve any water pressure in hose or
spray gun.
6. Refer to Storage for proper storage procedures.
WARNING: Risk of burning. When performing maintenance, you
may be exposed to hot surfaces, water pressure or moving parts that
can cause serious injury or death.
WARNING: Risk of fire. Always disconnect, spark plug wire, let
the engine cool and release all water pressure before performing
any maintenance or repair. The engine contains flammable fuel. Do
not smoke or work near open flames while performing maintenance.
To ensure efficient operation and longer life of your pressure washer,
a routine maintenance schedule should be prepared and followed.
If the pressure washer is used in unusual conditions, such as high
temperatures or dusty conditions, more frequent maintenance
checkswillberequired.
Consult the engine instruction manual for the manufacturer's recom-
mendations for any and all maintenance.
NOTE:Thepressurewasherframeisequippedwithanoildrain
hole to help make changing the engine oil easier.
NOTE: The pump was filled with oil at the factory.
Change pump oil after the first 10 hours of operation and every 250
hours thereafter.

15
NOTE: The pump was filled with oil at the factory.
1. Change pump oil after the first 10 hours of operation and every
250 hours thereafter.
TO CHECK OIL
1. The oil level should come to the Q
AA
Z
dot in the middle of the sight
glass (Z).
HOW TO CHANGE PUMP OIL
1. Loosen pump oil plug (Q).
2. Place a container under the oil
drain plug (AA).
3. Remove pump oil drain plug.
4. After oil is drained, replace oil
drain plug. Tighten securely.
5. Remove pump oil plug and fill with 14 oz. (414 ml) of DP70 pump
oil. If DP70 is not available use 30W non-detergent oil.
6. Replace pump dipstick/oil plug and tighten securely.
If the nozzle becomes clogged with foreign materials, such as dirt,
excessive pressure may develop. If the nozzle becomes partially
clogged or restricted, the pump pressure will pulsate. Clean the
nozzle immediately using the nozzle kit supplied and the following
instructions:
1. Shut off the pressure washer and turn off the water supply.
2. Pull trigger on gun handle to relieve any water pressure.
3. Disconnect the spray wand from the gun.
4. Remove the high-pressure nozzle from the Y
spray wand. Remove any obstructions
with the nozzle cleaning tool (Y) provided
and back flush with clean water.
5. Direct water supply into spray wand to
back flush loosened particles for 30
seconds.
6. Reassemble the nozzle to the wand.
7. Reconnect spray wand to gun then turn on water supply.
8. Start pressure washer and place spray wand into high pressure
setting to test.
This filter screen (U) should be checked periodically and cleaned if
necessary.
1. Remove the filter screen (U) by grasping the
U
end and removing it from water inlet of
pump.
2. Clean filter by flushing it with water on both
sides.
3. Reinsert filter into water inlet of pump. Cone
side faces out.
NOTE: Do not operate pressure washer without
filter properly installed.
1. Using a 1/8" (3.2 mm) hex head wrench
loosen set screw in hub collar.
2. Slide hub collar from axle and remove the
tire.

16
Consult the engine instruction manual for the manufacturer's
recommendations for storage.
The manufacturer recommends using a pump protector/winter-
izer, such as DeWALT winterizer (DP80) when storing the unit
for more than 30 days and/or when freezing temperatures are
expected. DeWALT winterizer (DP80) is availabe at the store
where the pressure washer was purchased. If a pump protector/
winterizer is not available, RV antifreeze can be used as outlined in
the following steps.
NOTE: Using a pump protector/ winterizer or RV antifreeze helps to
provide proper lubrication to the internal seals of the pump regard-
less of temperature or environment.
1. Obtain a funnel, 6 oz. (170 mL)
of RV antifreeze and 16–36" (40–
91cm) of garden hose with a
male hose connector attached to
one end.
CAUTION: Risk of property damage.
antifreeze is corrosive and can dam-
age pump.
2. Disconnect spark plug wire.
3. Connect length of garden
hose to water inlet of pump.
4. Add RV antifreeze to hose as shown.
5. Pull engine starter rope slowly several times until antifreeze
comes out of high-pressure hose connection of pump.
6. Remove garden hose from water inlet of pump.
7. Reconnect spark plug wire.
1. Drain all water from high-
pressure hose, coil it and store it
in cradle of the pressure washer
handle.
2. With nozzle pointed down and
the spray gun and wand in a
vertical position, squeeze trigger
to drain all water from spray gun
and wand. Store in gun holder.
3. Store chemical hose so it is protected from damage.
4. If space is needed, handles may be removed and attached as
shown.
CAUTION: Risk of personal injury. Avoid placing hands between
handle and frame when assembling to prevent pinching.
CAUTION: Risk of property damage. Always store and transport unit
in an upright position.
Recommended accessories for use with your tool are available for
purchase from your local dealer or authorized service center. If you
need assistance in locating any accessory for your tool, please con-
tact DeWALT Industrial Tool Co., 701 East Joppa Road, Baltimore,
MD 21286, call 1-800-4-DeWALT (1-800-433-9258) or visit our web-
site www.dewalt.com.

17
DANGER: Risk of fluid injection. When using replacement lances
or guns with this pressure washer, DO NOT use a lance and/or
lance/gun combination that is shorter in length than what was pro-
vided with this pressure washer as measured from the nozzle end
of the lance to the gun trigger.
WARNING: The use of any other accessory not recommended for
use with this tool could be hazardous. Use only accessories rated
equal to or higher than the rating of the pressure washer.
Please have the following information available for all service calls:
Model Number ____________ Serial Number ___________
Date and Place of Purchase ____________________________
To assure product SAFETY and RELIABILITY, repairs, maintenance
and adjustment should be performed by a DeWALT factory service
center, a DeWALT authorized service center or other qualified
service personnel. Always use identical replacement parts.
This DeWALT pressure washer is warranted for three years from
date of purchase. DeWALT will repair, without charge, any defects
due to faulty materials or workmanship. This warranty does not
cover parts that are damaged through misuse or abuse, or parts
which must be replaced from time to time due to normal pressure
washer operation. Normal wear parts include, but are not limited to,
the engine air filter, spark plug, pump valve seals and O rings. This
warranty does not apply to accessories or damage caused where
repairs have been made or attempted by a repair center not autho-
rized by DeWALT. This warranty gives you specific legal rights and
you may have other rights which vary in certain states or provinces.
For further details of warranty coverage and warranty repair informa-
tion, visit www.dewalt.com and click on Service and Support or call
1-800-4-DeWALT (1-800-433-9258).
LATIN AMERICA: This warranty does not apply to products sold in
Latin America. For products sold in Latin America, see country spe-
cific warranty information contained either in the packaging, call the
local company or see website for warranty information.
FREE WARNING LABEL REPLACEMENT: If your warning labels
become illegible or are missing, call 1-800-4-DeWALT for a free
replacement.

18
Bypass mode: Allows water to re-circulate within pump when the gun trigger is not pulled.
Chemical hose: Feeds cleaning agents into the pump to mix with the water. Refer to Chemicals and Cleaning Solvents.
Chemical injection system: Mixes cleaners or cleaning solvents with water to improve cleaning effectiveness.
Choke control: Opens and closes carburetor choke valve.
CU: Cleaning Units. GPM multiplied by PSI. (GPM x PSI = CU)
Fuel valve lever: Opens/closes connection between fuel tank and carburetor.
GPM: Gallons Per Minute. The unit of measure for the flow rate of water.
PSI:PoundsperSquareInch.Theunitofmeasureforwaterpressure.Alsousedforairpressure,hydraulicpressure,etc.
kPa (kilopascal): Metricpressuremeasurement.1kilopascalequal1000pascals.
Quick-connect spray wand: Allowstheusertoquicklychangeouthigh-pressurenozzles.RefertoSprayWandNozzles.
Thermal relief valve: When the temperature inside the pump rises too high the valve will open and release a gush of water in an effort to
lower the temperature inside the pump. The valve will then close.
Water supply: Allpressurewashersmusthaveasourceofwater.Theminimumrequirementsforawatersupplyare20PSI(138kPa)and
5 gallons per minute.
This section provides a list of the more frequently encountered malfunctions, their causes and corrective actions. The
operatorormaintenancepersonnelcanperformsomecorrectiveactions,andothersmayrequiretheassistanceofaqualifiedDeWALT
technician or your dealer.
Problem Code
Engine will not start ......................................................................................................1, 2, 3, 4, 5, 6, 7, 8, 36
(refer to the engine's instruction manual for further engine troubleshooting)
No or low pressure (initial use)......................................................................................9, 10, 11, 12, 13, 14, 15, 16
Will not draw chemicals .................................................................................................16, 17, 18, 19, 20, 21
No or low pressure (after period of normal use) ...........................................................22, 23, 24
Water leaking at gun/spray wand connection................................................................25, 26
Water leaking at pump...................................................................................................25, 26, 27, 28
Oil leaking at pump........................................................................................................29, 30, 31, 32, 33, 34, 35
Pump Pulsates...............................................................................................................12

19
CODE POSSIBLE CAUSE POSSIBLE SOLUTION
1No fuel. Add fuel.
2Low oil. Addrequiredamountofoil.
3Pressure builds up after two pulls on the recoil starter or after
initial use. Squeezeguntriggertorelievepressure.
4Choke lever in the No Choke position. Move choke to the Choke position.
5Spark plug wire not attached. Attach spark plug wire.
6Engine ON/OFF switch in OFF position. Place engine ON/OFF switch in on position.
7Choke lever in the Choke position on a hot engine or an
engine that has been exposed to thermal heat for a long
period of time.
Move choke to the No Choke position.
8Fuel valve closed. Move the fuel valve lever to the Open position.
9Spray wand not in high pressure. See Spray Wand Nozzles under Operation.
10 Low water supply. Water supply must be at least 5 GPM @ 20 pSI (138 kPa).
11 Leak at high-pressure hose fitting. Repair leak. Apply sealant tape if necessary.
12 Nozzle obstructed. See Nozzle Cleaning under Maintenance.
13 Water filter screen clogged. Remove and clean filter.
14 Air in hose. Turn off the engine, then the water source. Disconnect the
water source from the pump inlet and turn the water source
on to remove all air from the hose. When there is a steady
stream of water present, turn water source off. Reconnect
water source to pump inlet and turn on water source.
Squeezetriggertoremoveremainingair.
15 Choke lever in the Choke position. Move choke to the No Choke position.
( cont.)

20
( cont.)
CODE POSSIBLE CAUSE POSSIBLE SOLUTION
16 High-pressure hose is too long. Use high-pressure hose under 100 feet (30.48 m). Lengthen
water supply hose instead of high-pressure hose.
17 Spray wand not in low pressure. See Spray Wand Nozzles under Operation.
18 Chemical filter clogged. Clean filter.
19 Chemical screen not in cleaning solution. Make sure end of chemical hose is fully submerged into
cleaning solution.
20 Chemical too thick. Dilute chemical. Chemical should be the same consistency
as water.
21 Worn seal or packing. Have parts cleaned or replaced by authorized service center.
22 Chemical build up in chemical injector. Have replaced by an authorized service center.
23 Worn or obstructed valves. Have replaced by authorized service center.
24 Worn unloader piston. Have replaced by authorized service center.
25 Worn or broken o-ring. Check and replace.
26 Loose hose connection. Tighten.
27 Piston packings worn. Have replaced by authorized service center.
28 Pump head or tubes damaged from freezing. Have replaced by authorized service center.
29 Oil seals worn. Have replaced by authorized service center
30 Loose drain plug. Tighten.
31 Worn drain plug o-ring Check and replace.
32 Worn fill plug o-ring. Check and replace.
33 Pump overfilled. Check for correct amount.
34 Incorrect oil used. Drain and fill with correct amount and type of oil.
35 Vent plug is clogged. Clean vent plug; blow air through it to remove any blockage.
If problem persists, replace plug.
36 Air filter filled with oil. Clean air filter element. Refer to engine instruction manual
for correct procedure.
Table of contents
Other DeWalt Pressure Washer manuals

DeWalt
DeWalt DWPW2400 User manual

DeWalt
DeWalt DXPW004E User manual

DeWalt
DeWalt DPE3800 User manual

DeWalt
DeWalt DP3400 User manual

DeWalt
DeWalt DS3532 User manual

DeWalt
DeWalt DPD3100 User manual

DeWalt
DeWalt DXPW1500E User manual

DeWalt
DeWalt A16505 User manual

DeWalt
DeWalt DXPW3025 User manual

DeWalt
DeWalt DCPW1600 User manual

DeWalt
DeWalt DPD3100 User manual

DeWalt
DeWalt DXPW series User manual

DeWalt
DeWalt DXPW3400PR User manual

DeWalt
DeWalt DXPW3425 User manual

DeWalt
DeWalt DXPW3394 User manual

DeWalt
DeWalt DWPW2100 User manual

DeWalt
DeWalt XR DCMPW1600 User manual

DeWalt
DeWalt DH4240B User manual

DeWalt
DeWalt DP3700 User manual

DeWalt
DeWalt 7103629 User manual