DeWalt DCV581H User manual

If you have questions or comments, contact us.
Pour toute question ou tout commentaire, nous contacter.
Si tiene dudas o comentarios, contáctenos.
1-800-4-DeWALT
Instruction Manual
Guide D’utilisation
Manual de instrucciones
DCV581H
18V NiCd/20 V Max* Li-Ion 2-Gallon Corded/Cordless Wet/Dry
Vacuum
Aspirateur avec/sans fil, sec/humide, 2 gallons, 18 V NiCd/20 V
Li-Ion Max*
Aspiradora en húmedo/seco con cable/inalámbrica de 2
galones de 18 V NiCd/20 V Max* de iones de litio (Li-Ion)
final page size: 8.5 x 5.5 in

ENGLISH
English (original instructions) 1
Français (traduction de la notice d’instructions originale) 11
Español (traducido de las instrucciones originales) 22

ENGLISH
1
English (original instructions)
Definitions: Safety Alert Symbols and Words
This instruction manual uses the following safety alert symbols and words to alert you to hazardous situations and your risk
of personal injury or property damage.
DANGER: Indicates an imminently hazardous situation which, if not avoided, will result in death or seriousinjury.
WARNING: Indicates a potentially hazardous situation which, if not avoided, could result in death or seriousinjury.
CAUTION: Indicates a potentially hazardous situation which, if not avoided, may result in minor or moderateinjury.
(Used without word) Indicates a safety related message.
NOTICE: Indicates a practice not related to personal injury which, if not avoided, may result in propertydamage.
WARNING! Read all safety warnings and all
instructions. Failure to follow the warnings and
instructions may result in electric shock, fire and/or
seriousinjury.
WARNING: To reduce the risk of injury, read the
instructionmanual.
If you have any questions or comments about this or
any
DeWALT
tool, call us toll free at:
1-800-4-
DeWALT
(1-800-433-9258).
1 Battery port
2 Vacuum hose
3 On/off button
4 Tank latch
5 Filter (Fig.E)
6 Side exhaust port
7 Hose clip
8 Crevice tool
9 Wide nozzle tool
10 Cord Wrap
Fig. A
8
9
4
7
10 36
2
1

ENGLISH
2
IMPORTANT SAFETY INSTRUCTIONS
WARNING: When using electric appliances, always
follow basic safety precautions to reduce the risk of
fire, electric shock and personal injury, including the
following:
To Reduce Risk of Injury
• Before any use, be sure everyone using this vacuum
reads and understands all safety instructions and other
information contained in thismanual.
• Save these instructions and review frequently prior to use
and in instructingothers.
• Instructions for compatible batteries and chargers are
included for reference in this manual. Read all instruction
manuals included with your battery or charger. Read all
cautionary markings on the charger and battery. Consult
the chart at the end of this manual for compatibility of
chargers and batterypacks.
When using this vacuum, basic safety precautions should
always be followed including the following:
READ ALL INSTRUCTIONS BEFORE
USING VACUUM
WARNING: To reduce the risk of electric shock. Do not
expose to rain. Storeindoors.
• Do not leave vacuum when connected to power source.
Unplug from outlet and remove battery when not in use
and beforeservicing.
• Do not allow vacuum to be used as a toy. Close attention
is necessary when used by or nearchildren.
• Use this appliance ONLY as described in the manual. Use
only
DeWALT
recommendedattachments.
• Do not use this appliance with a damaged cord or plug. If
the appliance is not working correctly, has been dropped,
damaged, left outdoors, or dropped in water, return it to a
servicecenter.
• Do not pull or carry by cord, use cord as a handle, close a
door on cord, or pull cord around sharp edges or corners.
Keep cord away from heatedsurfaces.
• Do not unplug this appliance by pulling on the cord. To
unplug, grasp the plug, not thecord.
• Do not handle plug or appliance with wethands.
• Do not put any objects into the openings of the appliance.
Do not use the appliance with any opening blocked; keep
free of dust, lint, hair and anything else that may reduce
airflow.
• Keep hair, loose clothing, fingers, and all body parts away
from the openings and movingparts.
• Do not place outlet of vacuum near eyes or ears
whenoperating.
• The blower operation can result in foreign objects being
blown into eyes, which can result in eye damage. Always
wear safety goggles when using blowerfeature.
• Use safety equipment. Always wear eye protection.
Dust mask, non-skid safety shoes, hard hat, or hearing
protection must be used for appropriateconditions.
• Use extra care when cleaning onstairs.
• Do not use without filter inplace.
• Do not use the appliance to pick up flammable or
combustible liquids, such as gasoline, or use in areas
where flammable or combustible liquids arepresent.
• Do not pick up anything that is burning or smoking, such
as cigarettes, matches or hotashes.
• Do not use in areas where explosive vapors may
bepresent.
• Do not use to pick up explosive dust, or in areas where
air contains explosive dust such as coal, grain, or other
combustiblematerial.
• Static shocks are possible in dry areas or when the relative
humidity of the air is low. This is only temporary and does
not affect the use of the vacuum. To reduce the frequency
of static shocks, add moisture to the air with a console or
installedhumidifier.
• To avoid spontaneous combustion, empty canister after
eachuse.
• Store idle tools. When not in use, the vacuum should be
stored in a dry, high or locked up place – out of the reach
ofchildren.
• Disconnect battery pack from vacuum and unplug
vacuum from the power supply before making any
adjustments, changing accessories, servicing, moving or
storing the vacuum. Such preventative safety measures
reduce the risk of starting the applianceaccidentally.
• Avoid accidental starting. Be sure the switch is in the off
position before inserting the battery pack or plugging the
vacuum into a walloutlet.
• Never leave vacuum running unattended. Turn poweroff.
• Keep your work area clean and well lit. Cluttered benches
and dark areas inviteaccidents.
• Avoid body contact with grounded surfaces such as pipes,
radiators, ranges and refrigerators. There is an increased
risk of electric shock if your body isgrounded.
• Do not overreach. Keep proper footing and balance at all
times. Proper footing and balance enables better control
of the vacuum in unexpectedsituations.
• Do not use appliance if switch does not turn it on or off.
Any appliance that cannot be controlled with the switch is
dangerous and must berepaired.
• Turn off all controls before removing the battery
orunplugging.
• This appliance is provided with double insulation. Use
only identical replacement parts. Refer to instructions for
Servicing of Double-InsulatedAppliances.
SAVE THESE INSTRUCTIONS
Additional Safety Information
WARNING: When not in use, place vacuum on a
stable surface where it will not cause a tripping
or fallinghazard.
• Do not use vacuum as a stepladder.
• Do not place heavy objects onvacuum.

ENGLISH
3
Double Insulation
Double insulated vacuums are constructed throughout with
two separate layers of electrical insulation or one double
thickness of insulation between you and the vacuum’s
electrical system. Vacuums built with this insulation system
are not intended to be grounded. As a result, your vacuum
is equipped with a two prong plug which permits you to
use extension cords without concern for maintaining a
groundconnection.
NOTE: Double insulation does not take the place of normal
safety precautions when operating this vacuum. The
insulation system is for added protection against injury
resulting from a possible electrical insulation failure within
thevacuum.
Servicing Of Double-Insulated
Appliances
Servicing a double-insulated appliance requires extreme
care and knowledge of the system, and should be done
only by qualified service personnel. Replacement parts for
a double-insulated appliance must be identical to the parts
theyreplace.
Polarized Plugs
Polarized plugs (one blade is wider than the other) are used
on equipment to reduce the risk of electric shock. When
provided, this plug will fit in the polarized outlet only one
way. If the plug does not fit fully in the outlet, reverse the
plug. If it still does not fit, contact a qualified electrician to
install the proper outlet. Do not change the plug in anyway.
WARNING: ALWAYS use safety glasses. Everyday
eyeglasses are NOT safety glasses. Also use face or
dust mask if cutting operation is dusty. ALWAYS WEAR
CERTIFIED SAFETY EQUIPMENT:
• ANSI Z87.1 eye protection (CAN/CSA Z94.3),
• ANSI S12.6 (S3.19) hearing protection,
• NIOSH/OSHA/MSHA respiratoryprotection.
WARNING: Some dust created by power sanding,
sawing, grinding, drilling, and other construction
activities contains chemicals known to the State
of California to cause cancer, birth defects or other
reproductive harm. Some examples of these chemicals
are:
• lead from lead-based paints,
• crystalline silica from bricks and cement and other
masonry products, and
• arsenic and chromium from chemically-treatedlumber.
Your risk from these exposures varies, depending on how
often you do this type of work. To reduce your exposure to
these chemicals: work in a well ventilated area, and work with
approved safety equipment, such as those dust masks that are
specially designed to filter out microscopicparticles.
• Avoid prolonged contact with dust from power
sanding, sawing, grinding, drilling, and other
construction activities. Wear protective clothing and
wash exposed areas with soap and water. Allowing
dust to get into your mouth, eyes, or lay on the skin may
promote absorption of harmfulchemicals.
WARNING: Use of this tool can generate and/
or disperse dust, which may cause serious and
permanent respiratory or other injury. Always use
NIOSH/OSHA approved respiratory protection
appropriate for the dust exposure. Direct particles
away from face andbody.
Additional Specific Safety Rules for All
Battery-Operated Tools
• A battery-operated tool with integral batteries or a
separate battery pack must be recharged only with
the specified charger for the battery. A charger that
may be suitable for one type of battery may create a risk of
fire when used with anotherbattery.
• Use battery-operated tool only with the specifically
designed
DeWALT
battery pack. Use of any other
batteries may create a risk offire.
• When battery pack is not in use, keep it away from
other metal objects like: paper clips, coins, keys,
nails, screws, or other small metal objects that can
make a connection from one terminal to another.
Shorting the battery terminals together may cause sparks,
burns, or afire.
The label on your tool may include the following symbols. The
symbols and their definitions are asfollows:
V.........................volts
Hz .......................hertz
min.....................minutes
or DC......direct current
......................Class I Construction
(grounded)
…/min.............. per minute
BPM....................beats per minute
IPM.....................impacts per minute
RPM....................revolutions per
minute
sfpm ...................surface feet per
minute
SPM....................strokes per minute
A.........................amperes
W........................watts
or AC........... alternating current
or AC/DC.... alternating or
direct current
......................Class II
Construction
(double insulated)
no.......................no load speed
n.........................rated speed
......................earthing terminal
.....................safety alert symbol
.....................visible radiation
.....................wear respiratory
protection
.....................wear eye
protection
.....................wear hearing
protection
.....................read all
documentation
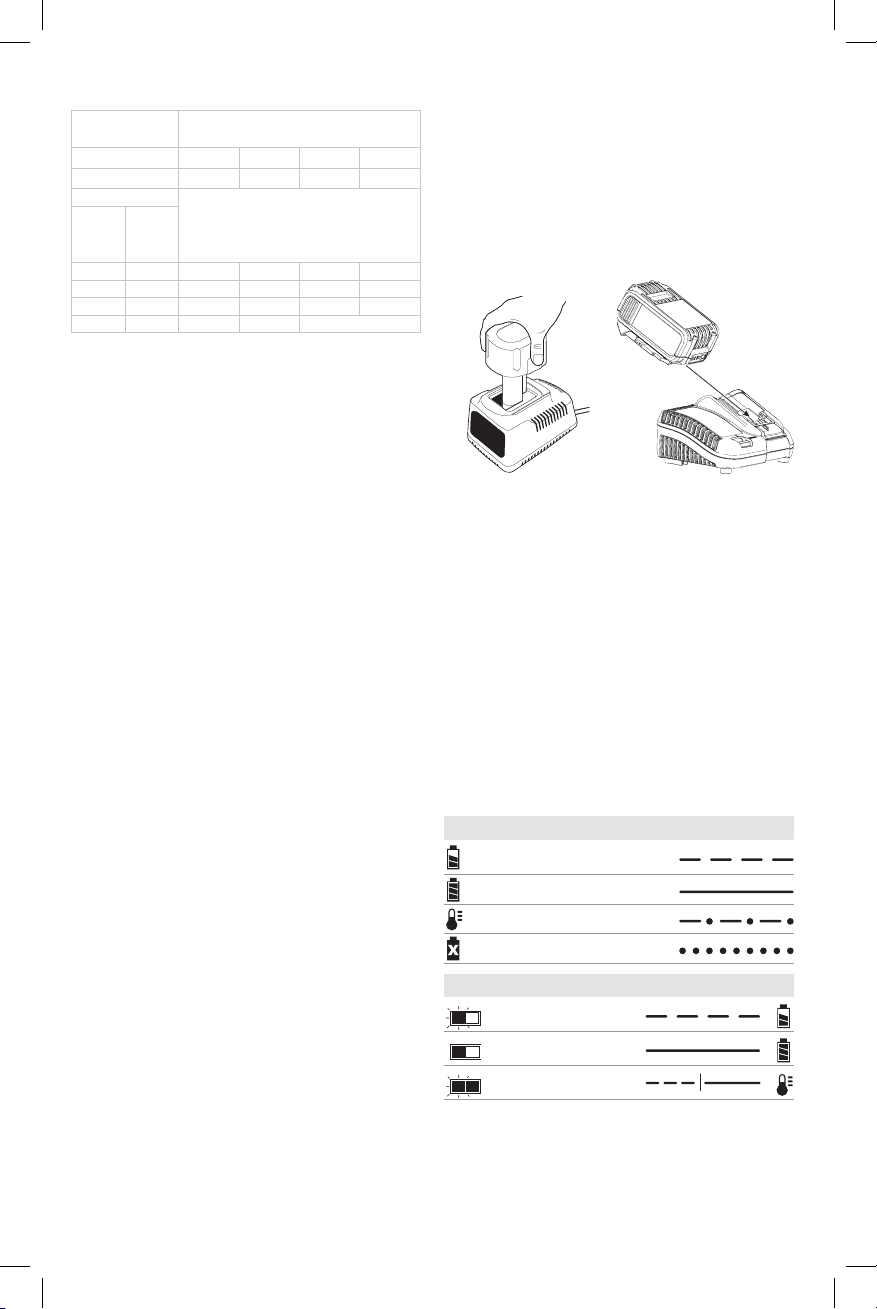
BATTERIES AND CHARGERS
The battery pack is not fully charged out of the carton.
Before using the battery pack and charger, read the
safety instructions below and then follow charging
proceduresoutlined. When ordering replacement battery
packs, be sure to include the catalog number andvoltage.
Your tool uses a
DeWALT
charger. Be sure to read all safety
instructions before using your charger. Consult the chart
at the end of this manual for compatibility of chargers and
batterypacks.
READ ALL INSTRUCTIONS

ENGLISH
4
Important Safety Instructions for All
Battery Packs
WARNING: Read all safety warnings and all
instructions for the battery pack, charger and
power tool. Failure to follow the warnings and
instructions may result in electric shock, fire and/
or seriousinjury.
• Do not charge or use the battery pack in explosive
atmospheres, such as in the presence of flammable
liquids, gases or dust. Inserting or removing the battery
pack from the charger may ignite the dust orfumes.
• NEVER force the battery pack into the charger. DO
NOT modify the battery pack in any way to fit into
a non-compatible charger as battery pack may
rupture causing serious personal injury. Consult
the chart at the end of this manual for compatibility of
batteries andchargers.
• Charge the battery packs only in designated
DeWALT
chargers.
• DO NOT splash or immerse in water or otherliquids.
• Do not store or use the tool and battery pack in
locations where the temperature may reach or
exceed 104°F (40°C) (such as outside sheds or metal
buildings in summer). For best life store battery packs in
a cool, drylocation.
NOTE: Do not store the battery packs in a tool with
the trigger switch locked on. Never tape the trigger
switch in the ONposition.
• Do not incinerate the battery pack even if it is
severely damaged or is completely worn out. The
battery pack can explode in a fire. Toxic fumes and
materials are created when lithium ion battery packs
areburned.
• If battery contents come into contact with the skin,
immediately wash area with mild soap and water. If
battery liquid gets into the eye, rinse water over the open
eye for 15 minutes or until irritation ceases. If medical
attention is needed, the battery electrolyte is composed of
a mixture of liquid organic carbonates and lithiumsalts.
• Contents of opened battery cells may cause
respiratory irritation. Provide fresh air. If symptoms
persist, seek medicalattention.
WARNING: Burn hazard. Battery liquid may be
flammable if exposed to spark orflame.
WARNING: Fire hazard. Never attempt to open the
battery pack for any reason. If the battery pack case
is cracked or damaged, do not insert into the charger.
Do not crush, drop or damage the battery pack. Do
not use a battery pack or charger that has received a
sharp blow, been dropped, run over or damaged in
any way (e.g., pierced with a nail, hit with a hammer,
stepped on). Damaged battery packs should be
returned to the service center forrecycling.
Specific Safety instructions for Nickel
Cadmium (NiCd) or Nickel Metal
Hydride (NiMH)
• Do not incinerate the battery pack even if it is
severely damaged or is completely worn out. The
battery pack can explode in afire.
• A small leakage of liquid from the battery pack cells
may occur under extreme usage or temperature
conditions. This does not indicate afailure.
However, if the outer seal is broken:
ʵ and the battery liquid gets on your skin, immediately
wash with soap and water for severalminutes.
ʵ and the battery liquid gets into your eyes, flush them
with clean water for a minimum of 10 minutes
and seek immediate medical attention. (Medical
note: The liquid is 25–35% solution of potassium
hydroxide.)
Specific Safety instructions for Lithium
Ion (Li-Ion)
• Do not incinerate the battery pack even if it is
severely damaged or is completely worn out. The
battery pack can explode in a fire. Toxic fumes and
materials are created when lithium ion battery packs
areburned.
• If battery contents come into contact with the skin,
immediately wash area with mild soap and water. If
battery liquid gets into the eye, rinse water over the open
eye for 15minutes or until irritation ceases. If medical
attention is needed, the battery electrolyte is composed of
a mixture of liquid organic carbonates and lithiumsalts.
• Contents of opened battery cells may cause respiratory
irritation. Provide fresh air. If symptoms persist, seek
medicalattention.
WARNING: Burn hazard. Battery liquid may be
flammable if exposed to spark orflame.
Fuel Gauge Battery Packs
Some
DeWALT
battery packs include a fuel gauge which
consists of three green LED lights that indicate the level of
charge remaining in the batterypack.
The fuel gauge is an indication of approximate levels of
charge remaining in the battery pack according to the
followingindicators:
75–100% charged
51–74% charged
< 50% charged
Pack needs to be charged
To actuate the fuel gauge, press and hold the fuel gauge
button. A combination of the three green LED lights will
illuminate designating the level of charge left. When the
level of charge in the battery is below the usable limit, the

ENGLISH
5
fuel gauge will not illuminate and the battery will need to
berecharged.
NOTE: The fuel gauge is only an indication of the charge left
on the battery pack. It does not indicate tool functionality
and is subject to variation based on product components,
temperature and end-userapplication.
For more information regarding fuel gauge battery packs,
please contact call 1-800-4-
DeWALT
(1-800-433-9258) or
visit our website www.dewalt.com.
The RBRC® Seal
The RBRC® (Rechargeable Battery
Recycling Corporation) Seal on the nickel
cadmium, nickel metal hydride or lithium-
ion batteries (or battery packs) indicates
that the costs to recycle these batteries
(or battery packs) at the end of their useful life have already
been paid by
DeWALT
. In some areas, it is illegal to place
spent nickel cadmium, nickel metal hydride or lithium-ion
batteries in the trash or municipal solid waste stream and
the Call2Recycle® program provides an environmentally
consciousalternative.
Call 2 Recycle, Inc., in cooperation with
DeWALT
and other
battery users, has established the program in the United
States and Canada to facilitate the collection of spent nickel
cadmium, nickel metal hydride or lithium-ion batteries. Help
protect our environment and conserve natural resources by
returning the spent nickel cadmium, nickel metal hydride
or lithium-ion batteries to an authorized
DeWALT
service
center or to your local retailer for recycling. You may also
contact your local recycling center for information on
where to drop off the spent battery. RBRC® is a registered
trademark of Call 2 Recycle,Inc.
Using Automatic Tune-Up™ Mode
(NiCd/NiMH only)
The automatic Tune-Up™ Mode equalizes or balances the
individual cells in the battery pack allowing it to function
at peak capacity. Battery packs should be tuned up weekly
or after 10 charge/discharge cycles or whenever the pack
no longer delivers the same amount of work. To use the
automatic Tune-Up™, place the battery pack in the charger
and leave it for at least 8 hours. The charger will cycle
through the followingmodes.
1. The red light will blink continuously indicating that the
1-hour charge cycle hasstarted.
2. When the 1-hour charge cycle is complete, the light
will stay on continuously and will no longer blink. This
indicates that the pack is fully charged and can be used
at thistime.
3. If the pack is left in the charger after the initial 1-hour
charge, the charger will begin the Automatic Tune-Up
mode. This mode continues up to 8 hours or until the
individual cells in the battery pack are equalized. The
battery pack is ready for use and can be removed at any
time during the Tune-Upmode.
4. Once the Automatic Tune Up mode is complete, the
charger will begin a maintenance charge; the red
indicator will remainlit.
Important Safety Instructions for All
Battery Chargers
WARNING: Read all safety warnings and all
instructions for the battery pack, charger and
power tool. Failure to follow the warnings and
instructions may result in electric shock, fire and/
or seriousinjury.
• DO NOT attempt to charge the battery pack with
any chargers other than the ones in this manual.
The charger and battery pack are specifically designed to
worktogether.
• These chargers are not intended for any uses other
than charging
DeWALT
rechargeable batteries.
Any other uses may result in risk of fire, electric shock
orelectrocution.
• Do not expose the charger to rain orsnow.
• Pull by the plug rather than the cord when
disconnecting the charger. This will reduce the risk of
damage to the electric plug andcord.
• Make sure that the cord is located so that it will not
be stepped on, tripped over or otherwise subjected
to damage orstress.
• Do not use an extension cord unless it is absolutely
necessary. Use of improper extension cord could result in
risk of fire, electric shock orelectrocution.
• When operating a charger outdoors, always provide
a dry location and use an extension cord suitable
for outdoor use. Use of a cord suitable for outdoor use
reduces the risk of electricshock.
• An extension cord must have adequate wire size
(AWG or American Wire Gauge) for safety. The smaller
the gauge number of the wire, the greater the capacity
of the cable, that is, 16 gauge has more capacity than 18
gauge. An undersized cord will cause a drop in line voltage
resulting in loss of power and overheating. When using
more than one extension to make up the total length,
be sure each individual extension contains at least the
minimum wire size. The following table shows the correct
size to use depending on cord length and nameplate
ampere rating. If in doubt, use the next heavier gauge. The
lower the gauge number, the heavier thecord.

ENGLISH
6
Minimum Gauge for Cord Sets
Volts Total Length of Cord in Feet
(meters)
120 V 25 (7.6) 50 (15.2) 100 (30.5) 150 (45.7)
240 V 50 (15.2) 100 (30.5) 200 (61.0) 300 (91.4)
Ampere Rating
American Wire Gauge
More
Than
Not
More
Than
0 6 18 16 16 14
610 18 16 14 12
10 12 16 16 14 12
12 16 14 12 Not Recommended
• Do not place any object on top of the charger or
place the charger on a soft surface that might block
the ventilation slots and result in excessive internal
heat. Place the charger in a position away from any heat
source. The charger is ventilated through slots in the top
and the bottom of thehousing.
• Do not operate the charger with a damaged cord
orplug.
• Do not operate the charger if it has received a sharp
blow, been dropped or otherwise damaged in any
way. Take it to an authorized servicecenter.
• Do not disassemble the charger; take it to an
authorized service center when service or repair
is required. Incorrect reassembly may result in a risk of
electric shock, electrocution orfire.
• Disconnect the charger from the outlet before
attempting any cleaning. This will reduce the risk of
electric shock. Removing the battery pack will not reduce
thisrisk.
• NEVER attempt to connect 2 chargerstogether.
• The charger is designed to operate on standard
120V household electrical power. Do not attempt to
use it on any other voltage. This does not apply to the
vehicularcharger.
WARNING: Shock hazard. Do not allow any liquid to
get inside the charger. Electric shock mayresult.
WARNING:Burn hazard. Do not submerge the
battery pack in any liquid or allow any liquid to
enter the battery pack. Never attempt to open the
battery pack for any reason. If the plastic housing of
the battery pack breaks or cracks, return to a service
center forrecycling.
CAUTION: Burn hazard. To reduce the risk of injury,
charge only
DeWALT
rechargeable battery packs.
Other types of batteries may overheat and burst
resulting in personal injury and propertydamage.
NOTICE: Under certain conditions, with the charger
plugged into the power supply, the charger can
be shorted by foreign material. Foreign materials
of a conductive nature, such as, but not limited to,
grinding dust, metal chips, steel wool, aluminum
foil or any buildup of metallic particles should be
kept away from the charger cavities. Always unplug
the charger from the power supply when there is no
battery pack in the cavity. Unplug the charger before
attempting toclean.
Charging a Battery (Fig. B)
DANGER: Electrocution hazard. 120 volts are present
at recessed terminals of the tower port. Do not probe
with conductive objects. Electric shock or electrocution
mayresult.
1. Plug the charger into an appropriate outlet before
inserting battery pack.
Fig. B
NiCd/NiMH/Li-Ion
Tower Battery Li-Ion Slide Battery
2. Insert the battery pack into the charger, making sure
the battery pack is fully seated in the charger. The red
(charging) light will blink continuously indicating that
the charging process has started.
3. The completion of charge will be indicated by the red
light remaining ON continuously. The battery pack is
fully charged and may be used at this time or left in the
charger. To remove the battery pack from the charger,
push the battery release button(s) on the battery pack.
NOTE: To ensure maximum performance and life of battery
packs, charge the battery pack fully before first use.
Charger Operation
Refer to the indicators below for the charge status of the
battery pack.
DC9310
Charging
Fully Charged
Hot/Cold Pack Delay
Problem Pack or Charger
DCB107, DCB112, DCB113, DCB115, DCB118, DCB132
Charging
Fully Charged
Hot/Cold Pack Delay*
*DCB107, DCB112, DCB113, DCB115, DCB118, DCB132:
The red light will continue to blink, but a yellow indicator
light will be illuminated during this operation. Once the
battery pack has reached an appropriate temperature, the
yellow light will turn off and the charger will resume the
charging procedure.

ENGLISH
7
The compatible charger(s) will not charge a faulty battery
pack. The charger will indicate faulty battery pack by
refusing to light or by displaying a problem pack or charger
blink pattern.
NOTE: This could also mean a problem with a charger.
If the charger indicates a problem, take the charger and
battery pack to be tested at an authorized service center.
Hot/Cold Pack Delay
When the charger detects a battery pack that is too hot
or too cold, it automatically starts a Hot/Cold Pack Delay,
suspending charging until the battery pack has reached an
appropriate temperature. The charger then automatically
switches to the pack charging mode. This feature ensures
maximum battery pack life.
A cold battery pack will charge at a slower rate than a warm
battery pack. The battery pack will charge at that slower rate
throughout the entire charging cycle and will not return to
maximum charge rate even if the battery pack warms.
The DCB118 charger is equipped with an internal fan
designed to cool the battery pack. The fan will turn on
automatically when the battery pack needs to be cooled.
Never operate the charger if the fan does not operate
properly or if ventilation slots are blocked. Do not permit
foreign objects to enter the interior of the charger.
Electronic Protection System
Li-Ion tools are designed with an Electronic Protection
System that will protect the battery pack against
overloading, overheating or deep discharge.
The tool will automatically turn off if the Electronic
Protection System engages. If this occurs, place the lithium-
ion battery pack on the charger until it is fully charged.
Wall Mounting
DCB107, DCB112, DCB113, DCB115, DCB118, DCB132
These chargers are designed to be wall mountable or to
sit upright on a table or work surface. If wall mounting,
locate the charger within reach of an electrical outlet,
and away from a corner or other obstructions which may
impede air flow. Use the back of the charger as a template
for the location of the mounting screws on the wall. Mount
the charger securely using drywall screws (purchased
separately) at least 1" (25.4 mm) long, with a screw head
diameter of 0.28–0.35" (7–9mm), screwed into wood to an
optimal depth leaving approximately 7/32" (5.5 mm) of the
screw exposed. Align the slots on the back of the charger
with the exposed screws and fully engage them in the slots.
Charger Cleaning Instructions
WARNING: Shock hazard. Disconnect the charger
from the AC outlet before cleaning. Dirt and grease
may be removed from the exterior of the charger using
a cloth or soft non-metallic brush. Do not use water or
any cleaning solutions.
Important Charging Notes
1. Longest life and best performance can be obtained if
the battery pack is charged when the air temperature is
between 65°F and 75°F (18°– 24°C). DO NOT charge
the battery pack in an air temperature below +40°F
(+4.5°C), or above +104°F (+40°C). This is important
and will prevent serious damage to the batterypack.
2. The charger and battery pack may become warm to the
touch while charging. This is a normal condition, and
does not indicate a problem. To facilitate the cooling of
the battery pack after use, avoid placing the charger or
battery pack in a warm environment such as in a metal
shed or an uninsulatedtrailer.
3. If the battery pack does not charge properly:
a. Check operation of receptacle by plugging in a lamp
or other appliance;
b. Check to see if receptacle is connected to a light
switch which turns power off when you turn out the
lights;
c. Move the charger and battery pack to a location
where the surrounding air temperature is
approximately 65°F– 75°F (18°– 24°C);
d. If charging problems persist, take the tool, battery
pack and charger to your local servicecenter.
4. The battery pack should be recharged when it fails to
produce sufficient power on jobs which were easily
done previously. DO NOT CONTINUE to use under these
conditions. Follow the charging procedure. You may
also charge a partially used pack whenever you desire
with no adverse effect on the batterypack.
5. Foreign materials of a conductive nature such as, but
not limited to, grinding dust, metal chips, steel wool,
aluminum foil, or any buildup of metallic particles
should be kept away from charger cavities. Always
unplug the charger from the power supply when there
is no battery pack in the cavity. Unplug the charger
before attempting toclean.
6. Do not freeze or immerse the charger in water or any
otherliquid.
Storage Recommendations
1. The best storage place is one that is cool and dry, away
from direct sunlight and excess heat orcold.
2. For long storage, it is recommended to store a fully
charged battery pack in a cool dry place out of the
charger for optimalresults.
NOTE: Battery packs should not be stored completely
depleted of charge. The battery pack will need to be
recharged beforeuse.
SAVE THESE INSTRUCTIONS FOR
FUTURE USE
COMPONENTS (FIG. A)
WARNING: Never modify the power tool or any part
of it. Damage or personal injury couldresult.
Refer to Figure A at the beginning of this manual for a
complete list ofcomponents.
INTENDED USE
The vacuum is designed to operate only on a
DeWALT
18V
NiCd/NiHiD/Li-Ion battery pack, 20V Max* Li-Ion battery
pack, or a 120V AC input. Battery pack and charger are sold

ENGLISH
8
separately. The vacuum will automatically switch between
AC and DCmodes.
NOTE: The 120V AC power input is only designed to
power the operation of the vacuum and will not charge an
installed batterypack.
The vacuum is designed to perform as a wet/dry unit
with no component changes required when changing
from wet to dry, or dry to wet pick up. This vacuum is for
householduse.
It is recommended that the tank be emptied of any dry
contents prior to being used for wet pick up to facilitate
tankcleaning.
DO NOT use under wet conditions or in presence of
flammable liquids orgases.
DO NOT let children come into contact with the tool.
Supervision is required when inexperienced operators use
thistool.
OPERATION
WARNING: To reduce the risk of serious personal
injury, turn unit off and remove the battery pack
before making any adjustments or removing/
installing attachments or accessories. An
accidental start-up can causeinjury.
Installing and Removing the Battery Pack
(Fig. C)
NOTE: Make sure your battery pack is fullycharged.
To install the battery pack into the vaccum, insert/slide
battery into battery port1. Make sure the battery pack is
fullyseated.
Fig. C
1
To remove the battery pack from the vacuum, press
and hold the battery release on the battery pack and
remove battery. To charge battery, insert it into your
DeWALT
charger.
Using the Appliance (Fig. A, D)
1. Attach the appropriate accessory to the hose2.
2. Insert
DeWALT
battery pack or plug into a 120V
walloutlet.
3. To turn machine on, press the I/O (on/off) button3.
Fig. D
Vacuum Cleaning
To Empty Tank (Fig. E)
The sound of the motor changes and suction is reduced
when the tank isfull.
1. Turn machine off. Unplug it from any power source, and
remove the batterypack.
2. Unlatch tank latches4 and remove power head from
thetank.
3. Empty contents of tank into suitablecontainer.
4. Clean or change filter5. See Filter section of
thismanual.
Fig. E
5
4
5. Inspect machine for damage by foreign objects. Contact
the nearest
DeWALT
authorized service center for
replacement of damaged or missingparts.
6. Replace power head onto the tank and latchsecurely.
NOTE: The machine must be used in the upright position at
all times to prevent unwanted actuation of the Automatic
Vacuum Shutoff. If unwanted actuation should happen, turn
off the motor and wait until the motor stops turning. Turn
the motor on again and suction will berestored.
Filter
Filter Care (Fig. F)
The HEPA wet/dry filter5 included with this vacuum
is a long life filter. To be effective in minimizing dust
recirculation the filters MUST be installed correctly and in
goodcondition.
NOTE: Never operate without a filter in place. A clean filter
is the most important factor in the operation and efficiency
of any vacuum. If the filter becomes clogged beyond
cleaning, damaged, or fails to operate properly, replace only
with genuine
DeWALT
replacementfilters.
To Clean or Change the Filter (Fig. E, F)
1. Turn machine off. Unplug it from any power source, and
remove the batterypack.

ENGLISH
9
2. Unlatch the tank latches4 and remove the power head
from the tank. Twist the filter5 to the right to remove it
from the powerhead.
Fig. F
5
3. Clean the filter by shaking off excess dust, tapping into
a waste receptacle, then rinsing under running water.
Depending on the condition of the filter, a water wash is
not always required. Do not use a brush to cleanfilter.
4. Reinstall and secure the filter onto power head by
twisting the filter to theleft.
5. Replace power head onto the tank and securelatches.
Blower (Fig. A)
The blower function can be used to remove debris from
behind small spaces, to dry a damp floor, to blow grass
clippings or leaves from an outside walk, patio,etc.
To Use as a Blower
1. Empty the tank following the instructions under the
Vacuum Cleaning section of thismanual.
2. Twist the vacuum hose2 toremove.
3. Insert the hose into the side exhaust port6 and twist
tosecure.
MAINTENANCE
WARNING: To reduce the risk of serious personal
injury, turn unit off and remove the battery pack
before making any adjustments or removing/
installing attachments or accessories. An
accidental start-up can causeinjury.
• Empty the vacuum often, especially when wet debris is
in thecanister.
• MAINTAIN TOOL WITH CARE. Keep the side exhaust port
clean and unblocked for best and safestperformance.
• Do not attempt to repair the vacuum. To assure
product safety and reliability, repairs, maintenance,
and adjustments should be performed by authorized
DeWALT
servicecenters.
Cord, Hose and Accessory Storage (Fig. A)
When the vacuum is not in use, the power cord should
be secured around the vacuum handle underneath the
cord wrap10. The vacuum hose can be wrapped around
appliance, underneath the battery interface, and secured
with the hose clip7 also located at the back of the vacuum.
The two accessories (crevice tool and wide nozzle) can be
stored on board the vacuum aswell.
Cleaning
WARNING: Blow dirt and dust out of all air vents with
clean, dry air at least once a week. To minimize the risk
of eye injury, always wear ANSI Z87.1 approved eye
protection when performingthis.
WARNING: Never use solvents or other harsh
chemicals for cleaning the non-metallic parts of
the tool. These chemicals may weaken the plastic
materials used in these parts. Use a cloth dampened
only with water and mild soap. Never let any liquid
get inside the tool; never immerse any part of the tool
into aliquid.
Charger Cleaning Instructions
WARNING: Shock hazard. Disconnect the charger
from the AC outlet before cleaning. Dirt and grease
may be removed from the exterior of the charger using
a cloth or soft non-metallic brush. Do not use water or
any cleaningsolutions.
Accessories
WARNING: Since accessories, other than those
offered by
DeWALT
, have not been tested with this
product, use of such accessories with this tool could be
hazardous. To reduce the risk of injury, only
DeWALT
recommended accessories should be used with
thisproduct.
Recommended accessories for use with your tool
are available at extra cost from your local dealer or
authorized service center. If you need assistance in
locating any accessory, please contact
DeWALT
Industrial
Tool Co., 701East Joppa Road, Towson, MD 21286, call
1-800-4-
DeWALT
(1-800-433-9258) or visit our website:
www.dewalt.com.
The DCV581H includes a 1-1/4" hose, crevice tool (stored in
the handle) and widenozzle.
A replacement filter is available at extra cost at your local
DeWALT
servicecenter.
Dust Collector (Fig. G)
In the vacuum mode, the appliance can also function as a
dust collector for power tool applications producing dust
ordebris.
Install the DWV9000 dust extraction adaptor, availiable at
additional cost, to facilitate connection of a power tool to
the vacuum hose2.
2
Fig. G
1. Unscrew and remove the standard hosenozzle.

ENGLISH
10
2. Screw on the dust extraction adaptor to thehose.
3. Attach the adaptor to the powertool.
NOTE: Follow these instructions in reverse to set up the
appliance for standard vacuum use.
IMPORTANT! The DWV9000 dust
extraction adaptor is designed to work
with Dust System Compatible
DeWALT
power tools. An additional adaptor will
be necessary for use with incompatible
DeWALT
tools.
Repairs
The charger and battery pack are notserviceable.
WARNING: To assure product SAFETY and
RELIABILITY, repairs, maintenance and adjustment
(including brush inspection and replacement, when
applicable) should be performed by a
DeWALT
factory
service center or a
DeWALT
authorized service center.
Always use identical replacementparts.
Register Online
Thank you for your purchase. Register your product nowfor:
• WARRANTY SERVICE: Registering your product will
help you obtain more efficient warranty service in case
there is a problem with yourproduct.
• CONFIRMATION OF OWNERSHIP: In case of
an insurance loss, such as fire, flood or theft, your
registration of ownership will serve as your proof
ofpurchase.
• FOR YOUR SAFETY: Registering your product will
allow us to contact you in the unlikely event a safety
notification is required under the Federal Consumer
SafetyAct.
Register online at www.dewalt.com/register.
Three Year Limited Warranty
DeWALT
will repair, without charge, any defects due to
faulty materials or workmanship for three years from
the date of purchase. This warranty does not cover part
failure due to normal wear or tool abuse. For further detail
of warranty coverage and warranty repair information,
visit www.dewalt.com or call 1-800-4-
DeWALT
(1-800-
433-9258). This warranty does not apply to accessories
or damage caused where repairs have been made
or attempted by others. THIS LIMITED WARRANTY IS
GIVEN IN LIEU OF ALL OTHERS, INCLUDING THE IMPLIED
WARRANTY OF MERCHANTABILITY AND FITNESS FOR A
PARTICULAR PURPOSE, AND EXCLUDES ALL INCIDENTAL
OR CONSEQUENTIAL DAMAGES. Some states do not allow
limitations on how long an implied warranty lasts or the
exclusion or limitation of incidental or consequential
damages, so these limitations may not apply to you. This
warranty gives you specific legal rights and you may have
other rights which vary in certain states orprovinces.
In addition to the warranty,
DeWALT
tools are covered
byour:
1 YEAR FREE SERVICE
DeWALT
will maintain the tool and replace worn parts
caused by normal use, for free, any time during the first year
afterpurchase.
2 YEARS FREE SERVICE ON DEWALT BATTERY PACKS
DC9071, DC9091, DC9096, DC9182, DC9280, DC9360, DCB120,
DCB127, DCB201, DCB203, DCB203BT, DCB207, DCB361
3 YEARS FREE SERVICE ON DEWALT BATTERY PACKS
DCB200, DCB204, DCB204BT, DCB205, DCB205BT, DCB206,
DCB606, DCB609
NOTE: Battery warranty voided if the battery pack is
tampered with in any way.
DeWALT
is not responsible
for any injury caused by tampering and may prosecute
warranty fraud to the fullest extent permitted bylaw.
90 DAY MONEY BACK GUARANTEE
If you are not completely satisfied with the performance of
your
DeWALT
Power Tool, Laser, or Nailer for any reason, you
can return it within 90 days from the date of purchase with
a receipt for a full refund – no questionsasked.
LATIN AMERICA: This warranty does not apply to products
sold in Latin America. For products sold in Latin America,
see country specific warranty information contained in
the packaging, call the local company or see website for
warrantyinformation.
FREE WARNING LABEL REPLACEMENT: If your warning
labels become illegible or are missing, call 1-800-4-
DeWALT
(1-800-433-9258) for a freereplacement.

FRANÇAIS
11
Définitions : symboles et termes d'alarmes sécurité
Ces guides d'utilisation utilisent les symboles et termes d'alarmes sécurité suivants pour vous prévenir de situations
dangereuses et de risques de dommages corporels ou matériels.
DANGER: indique une situation dangereuse imminente qui, si elle n’est pas évitée, entraînera la mort ou des
blessuresgraves.
AVERTISSEMENT: indique une situation potentiellement dangereuse qui, si elle n’est pas évitée, pourrait entraîner la
mort ou des blessuresgraves.
ATTENTION: indique une situation potentiellement dangereuse qui, si elle n’est pas évitée, pourrait entraîner des
blessures légères oumodérées.
(Si utilisé sans aucun terme) Indique un message propre à la sécurité.
AVIS : indique une pratique ne posant aucun risque de dommages corporels mais qui par contre, si rien n’est fait
pour l’éviter, pourrait poser des risques de dommages matériels.
AVERTISSEMENT! lire tous les avertissements de
sécurité et toutes les directives. Le non-respect
des avertissements et des directives pourrait se
solder par un choc électrique, un incendie et/ou une
blessuregrave.
AVERTISSEMENT : afin de réduire le risque de
blessures, lire le mode d’emploi del’outil.
Pour toute question ou remarque au sujet de cet outil
ou de tout autre outil
DeWALT
, composez le numéro
sans frais : 1-800-4-
DeWALT
(1-800-433-9258).
1 Logement du bloc-piles
2 Tuyau de l’aspirateur
3 Bouton marche/arrêt
4 Verrouillage de cuve
5 Filtre (Fig.E)
6 Orifice d’échappement latéral
7 Collier de serrage
8 Suceur
9 Embout large
10 Rembobineur de cordon
Français (traduction de la notice d’instructions originale)
Fig. A
8
9
4
7
10 36
2
1

FRANÇAIS
12
CONSIGNES IMPORTANTES DE SÉCURITÉ
AVERTISSEMENT: Lors de l’utilisation de tout
appareil électrique, des précautions de base doivent
être suivies pour réduire tout risque d’incendie, de
chocs électriques ou de dommages corporels, y
compris les suivantes:
Pour réduire tout risque de dommages
corporels
• Avant tout utilisation, S’assurer d’avoir bien lu et compris
toutes les directives contenues dans le présentguide.
• Conservez les présentes directives et les relire fréquemment
particulièrement avant d’utiliser l’outil ou d’en expliquer le
fonctionnement àautrui.
• Les instructions pour les piles et chargeurs compatibles
sont incluses pour référence dans ce guide d’utilisation.
Lire tout manuel d’instructions inclus avec la pile ou le
chargeur. Lire tout avertissement apposé sur le chargeur
ou la pile. Consulter le tableau en fin de guide d’utilisation
pour connaître les compatibilités entre chargeurs et blocs-
piles.
Lors de l’utilisation de cet aspirateur, prendre
systématiquement des précautions élémentaires, y compris
les suivantes:
LIRE TOUTES CES DIRECTIVES AVANT
TOUTE UTILISATION DE L’ASPIRATEUR
AVERTISSEMENT: pour réduire tout risque de chocs
électriques, ne pas l’exposer à la pluie. Entreposer à
l’intérieur.
• Ne pas abandonner l’aspirateur alors qu’il est branché sur
le secteur. Le débrancher de la prise et en retirer son bloc-
piles en fin d’utilisation, et avant toutentretien.
• Ne pas laisser l’aspirateur être utilisé comme un jouet.
Rester très vigilant lorsque l’appareil est utilisé par des
enfants ou en leurproximité.
• Utiliser l’appareil SEULEMENT comme décrit dans ce
guide d’utilisation. Utiliser exclusivement des accessoires
recommandés par
DeWALT
.
• Ne pas utiliser cet appareil avec un cordon ou une fiche
endommagé. Si l’appareil ne fonctionne pas correctement,
s’il est tombé, a été endommagé, est resté dehors ou est
entré en contact avec de l’eau, le rapporter dans un centre
deréparation.
• Ne pas le tirer ou le transporter à l’aide de son cordon,
utiliser son cordon comme poignée ou le coincer dans une
porte, ou tirer ce cordon sur des arêtes vives ou des coins
acérés. Protéger le cordon de lachaleur.
• Ne pas débrancher cet appareil en tirant sur son cordon.
Pour le débrancher, tirer sur la fiche et non pas sur
lecordon.
• Ne pas manipuler la fiche ou l’appareil avec les
mainshumides.
• N’insérer aucun objet dans les ouvertures de l’appareil.
Ne pas utiliser l’appareil si ses ouvertures sont bloquées.
Les maintenir propres et nettes de tout cheveu, toute
poussière, peluche, ou toute autre chose pouvant en
réduire la circulation d’air.
• Maintenir les cheveux, les vêtements amples, les doigts, et
toute autre partie du corps éloignés des ouvertures et des
piècesmobiles.
• Pendant son opération, ne pas approcher les yeux ou les
oreilles des ouvertures de l’aspirateur.
• L’utilisation du souffleur pourra propulser des objets
étrangers dans les yeux et causer des dommages oculaires.
Porter systématiquement des lunettes de protection lors de
l’utilisation de la fonctionsouffleur.
• Utiliser le matériel de sécurité approprié. Porter
systématiquement une protection oculaire. Porter un
masque anti-poussières, des chaussures antidérapantes,
un casque de sécurité ou des protecteurs auditifs lorsque
la situation lerequiert.
• Rester extrêmement vigilant lors du nettoyage d’escaliers.
• Ne pas utiliser l’aspirateur sans sonfiltre.
• Ne pas utiliser l’appareil pour aspirer des liquides
inflammables ou combustibles, comme l’essence, ou
l’utiliser dans des lieux abritant des liquides inflammables
oucombustibles.
• Ne pas aspirer des objets incandescents, ou se
consumant, comme les cigarettes, les allumettes ou les
cendreschaudes.
• Ne pas utiliser en présence de vapeursexplosives.
• Ne pas utiliser pour aspirer des poussières explosives, ou
si l’air contient des poussières explosives comme celles du
charbon, du grain ou de tout autre matériaucombustible.
• Des décharges statiques peuvent se produire si
l’environnement est sec ou lorsque l’humidité relative
de l’air est basse. Ce n’est que temporaire et n’affectera
pas l’utilisation de l’aspirateur. Pour réduire la fréquence
des décharges statiques, ajouter de l’humidité à
l’air à l’aide d’un humidificateur console, ou d’un
humidificateurintégré.
• Pour éviter toute combustion spontanée, vider la cuve
après chaqueutilisation.
• Entreposer les outils après utilisation. Après utilisation,
ranger l’aspirateur dans un endroit sec, en hauteur ou
dans un endroit verrouillé, hors de la portée desenfants.
• Déconnecter le bloc-piles de l’aspirateur et débrancher
ce dernier du secteur avant tout réglage, changement
d’accessoire, ou entretien, ou avant de le déplacer ou
l’entreposer. Ces mesures préventives de sécurité réduisent
les risques de démarrage accidentel de l’appareil.
• Éviter tout démarrage accidentel. S’assurer que
l’interrupteur est en position d’ARRÊT avant d’insérer un
bloc-piles ou de brancher l’aspirateur sur une prisemurale.
• Ne jamais laisser l’aspirateur fonctionner sans supervision.
Arrêter systématiquement l’appareil.
• Garder la zone de travail propre et bien éclairée. Les
établis encombrés et les endroits sombres sont propices
auxaccidents.
• Éviter tout contact entre le corps et les éléments mis à la
terre, comme les tuyaux, les radiateurs, les cuisinières, afin
de réduire les risques de déchargesélectriques.
• Ne pas effectuer de travaux hors de portée. Les pieds
doivent rester bien ancrés au sol pour permettre de

FRANÇAIS
13
maintenir son équilibre en permanence. Une position
stable et un bon équilibre permettent de mieux maîtriser
l’aspirateur en cas de situationsimprévues.
• Ne pas utiliser cet appareil si son interrupteur est
défectueux. Tout appareil dont l’interrupteur est
défectueux est dangereux et doit êtreréparé.
• Arrêter tout bouton de commande avant de retirer le bloc-
piles ou de débrancher l’appareil.
• Cet appareil est doté d’une double isolation. Utiliser
seulement des pièces de rechange identiques. Se
reporter aux instructions Entretien des appareils à
doubleisolation.
CONSERVER CES CONSIGNES
Consigne de sécurité supplémentaire
AVERTISSEMENT: après utilisation, ranger
l’aspirateur sur une surface stable et de façon
à éviter qu’il ne fasse ni trébucher ni chuter
quelqu’un.
• Ne pas utiliser cet aspirateur commeescabeau.
• Ne pas mettre des objets lourds sur l’aspirateur.
Double isolation
Les aspirateurs à double isolation sont complètement
construit avec deux couches distinctes d’isolant électrique
ou une double épaisseur de matière isolante pour vous
protéger contre tout choc électrique. Les aspirateurs
construit avec ce système d’isolation n’ont pas besoin
d’être mis à la terre. Par conséquent, votre aspirateur est
équipé d’une fiche à deux broches permettant d’utiliser une
rallonge ne nécessitant aucune prise demasse.
REMARQUE : Le fait que cet appareil est muni d’une double
isolation ne signifie pas que l’utilisateur doit cesser de
suivre les consignes de sécurité qui s’impose. Ce système
d’isolation offre une protection supplémentaire contre
les blessures causées par un choc électrique lorsque les
systèmes d’isolation internes fontdéfaut.
Entretien des appareils à double
isolation
L’entretien des appareils à double isolation requiert des
soins extrêmes et une bonne connaissance du système, et
ne devrait être fait que par du personnel qualifié. Les pièces
de rechange d’un appareil à double isolation doivent être
identiques aux piècesremplacées.
Fiches polarisées
Afin de réduire les risques de choc électrique, cet appareil est
muni d’une fiche polarisée (c’est-à-dire que l’une des lames est
plus large que l’autre) et ne peut être raccordé qu’à une prise
polarisée, et ce, dans un seul sens. On doit l’inverser si on est
incapable de l’enfoncer complètement. Si la fiche ne s’adapte
toujours pas, on doit faire appel à un électricien qualifié pour
qu’il installe la prise appropriée. On ne doit jamais modifier
lafiche.
AVERTISSEMENT: porter SYSTEMATIQUEMENT
des lunettes de protection. Les lunettes courantes
NE sont PAS des lunettes de protection. Utiliser aussi
un masque antipoussières si la découpe doit en
produire beaucoup. PORTER SYSTÉMATIQUEMENT UN
ÉQUIPEMENT DE SÉCURITÉ HOMOLOGUÉ:
• Protection oculaire ANSI Z87.1 (CAN/CSA Z94.3);
• Protection auditive ANSI S12.6 (S3.19);
• Protection des voies respiratoires NIOSH/OSHA/MSHA.
AVERTISSEMENT: les scies, meules, ponceuses,
perceuses ou autres outils de construction peuvent
produire des poussières contenant des produits
chimiques reconnus par l’État californien pour causer
cancers, malformations congénitales ou être nocifs au
système reproducteur. Parmi ces produits chimiques,
on retrouve:
• Le plomb dans les peintures à base de plomb;
• La silice cristallisée dans les briques et le ciment, ou autres
produits de maçonnerie; et
• L’arsenic et le chrome dans le bois ayant subi un
traitementchimique.
Le risque associé à de telles expositions varie selon la
fréquence à laquelle on effectue ces travaux. Pour réduire
toute exposition à ces produits: travailler dans un endroit
bien aéré, en utilisant du matériel de sécurité homologué, tel
un masque antipoussières spécialement conçu pour filtrer les
particulesmicroscopiques.
• Limiter toute exposition prolongée avec les
poussières provenant du ponçage, sciage, meulage,
perçage ou toute autre activité de construction.
Porter des vêtements de protection et nettoyer à
l’eau savonneuse les parties du corps exposées. Le
fait de laisser la poussière pénétrer dans la bouche, les
yeux ou la peau peut favoriser l’absorption de produits
chimiquesdangereux.
AVERTISSEMENT: cet outil peut produire et/
ou répandre de la poussière susceptible de causer
des dommages sérieux et permanents au système
respiratoire. Utiliser systématiquement un appareil
de protection des voies respiratoires homologué par
le NIOSH ou l’OSHA. Diriger les particules dans le sens
opposé au visage et aucorps.
Directives particulières additionnelles de
sécurité concernant les outils à piles
• Un outil sans fil fonctionnant avec piles intégrées ou
séparées ne doit être rechargé qu’avec un chargeur
désigné à cet effet. Un chargeur convenant à un modèle
de piles peut entraîner des risques d’incendie lorsqu’il est
utilisé avec un autre type depiles.
• N’utilisez l’appareil sans fil qu’avec sa batterie
spécifique. Toute autre pile augmente les risques
d’incendie.
• Après utilisation, rangez le bloc-pile à l’écart
d’objets métalliques tels que trombones, pièces
de monnaie, clés, clous, vis ou autres petits objets
susceptibles de conduire l’électricité entre les bornes.
Un court-circuit augmenterait les risques d’étincelles, de
brûlures ou d’incendie.

FRANÇAIS
14
L’étiquette apposée sur votre outil peut inclure les symboles
suivants. Les symboles et leur définition sont indiqués ci-après:
V.........................volts
Hz .......................hertz
min.....................minutes
or DC......courant continu
......................fabrication classe I
(mis à la terre)
…/min.............. par minute
BPM....................battements par
minute
IPM.....................impacts par minute
RPM....................revolutions per
minute
sfpm ...................pieds linéaires par
minute (plpm)
SPM (FPM).........fréquence par
minute
A.........................ampères
W........................watts
or AC........... courant alternatif
or AC/DC.... courant alternatif
ou continu
......................fabrication classe II
(double isolation)
no.......................vitesse à vide
n.........................vitesse nominale
......................borne de terre
...................... symbole
d’avertissement
.....................radiation visible
.....................protection
respiratoire
.....................protection oculaire
..................... protection auditive
.....................lire toute la
documentation
BLOCS-PILES ET CHARGEURS
Le bloc-piles n’est pas totalement chargé d’usine. Avant
d’utiliser le bloc-piles et le chargeur, lire les consignes de
sécurité ci-après puis suivre la procédure de chargement
indiquée. Pour commander un bloc-piles de rechange,
s’assurer d’en inclure le numéro de catalogue et latension.
Cet outil fonctionne avec un chargeur
DeWALT
. S’assurer
de bien lire toutes les consignes de sécurité avant toute
utilisation du chargeur. Consulter le tableau en fin de
manuel pour connaître les compatibilités entre chargeurs
et blocs-piles.
LIRE TOUTES LES CONSIGNES
Consignes importantes de sécurité
les blocs-piles
AVERTISSEMENT : Lire toutes les instructions et
toutes les consignes de sécurité propres au bloc-
piles, au chargeur et à l’outil électrique. Tout
manquement aux avertissements et instructions
pose des risques de décharges électriques,
d’incendie et/ou de blessures graves.
• Ne pas recharger ou utiliser un bloc-piles en milieu
déflagrant, en présence, par exemple, de poussières,
gaz ou liquides inflammables. Le fait d’insérer ou
retirer un bloc-piles de son chargeur pourrait causer
l’inflammation de poussières ou d’émanations.
• NE JAMAIS forcer l’insertion d’un bloc-piles dans un
chargeur. NE modifier un bloc-piles d’AUCUNE façon
pour le faire rentrer dans un chargeur incompatible,
car il pourrait se briser et causer des dommages
corporels graves. Consulter le tableau en dernière page
de ce manuel pour connaître les compatibilités entre
chargeurs et blocs-piles.
• Recharger les blocs-piles exclusivement dans des
chargeurs
DeWALT
.
• NE PAS éclabousser le bloc-piles ou l’immerger dans l’eau
ou dans tout autreliquide.
• Ne pas entreposer ou utiliser l’appareil et le bloc-
piles en présence de températures ambiantes
pouvant excéder 40°C (104°F) (comme dans des
hangars ou des bâtiments métalliques l’été). Pour
préserver leur durée de vie, entreposer les blocs-piles dans
un endroit frais etsec.
REMARQUE: ne pas mettre un bloc-piles dans un
outil dont la gâchette est verrouillée en position de
marche. Ne jamais bloquer l’interrupteur en position
deMARCHE.
• Ne pas incinérer le bloc-piles même s’il est
sévèrement endommagé ou complètement usagé,
car il pourrait exploser et causer un incendie.
Pendant l’incinération des blocs-piles au lithium-ion, des
vapeurs et matières toxiques sontdégagées.
• En cas de contact du liquide de la pile avec la peau,
rincer immédiatement au savon doux et à l’eau. En
cas de contact oculaire, rincer l’œil ouvert à l’eau claire
une quinzaine de minutes ou jusqu’à ce que l’irritation
cesse. Si des soins médicaux s’avéraient nécessaires, noter
que l’électrolyte de la pile est composé d’un mélange de
carbonates organiques liquides et de sels delithium.
• Le contenu des cellules d’une pile ouverte peut
causer une irritation respiratoire. En cas d’inhalation,
exposer l’individu à l’air libre. Si les symptômes persistent,
consulter unmédecin.
AVERTISSEMENT: risques de brûlure. Le liquide de la
pile peut s’enflammer s’il est exposé à des étincelles ou
à uneflamme.
AVERTISSEMENT: risques d’incendie. Ne jamais
tenter d’ouvrir le bloc-piles pour quelque raison
que ce soit. Si le boîtier du bloc-piles est fissuré ou
endommagé, ne pas l’insérer dans un chargeur. Ne
pas écraser, laisser tomber, ou endommager les blocs-
piles. Ne pas utiliser un bloc-piles ou un chargeur
qui a reçu un choc violent, ou si l’appareil est tombé,
a été écrasé ou endommagé de quelque façon que
ce soit (p. ex. percé par un clou, frappé d’un coup
de marteau, piétiné). Les blocs-piles endommagés
doivent être renvoyés à un centre de réparation pour
y êtrerecyclés.
Directives de sécurité spécifiques aux
piles de nickel-cadmium (NiCd) ou à
l’hydrure métallique de nickel (NiMH)
• Ne pas incinérer le bloc-piles, même s’il est très
endommagé ou complètement usé, car il pourrait
exploser au contact deflammes.
• Une petite fuite de liquide peut se produire dans les
cellules du bloc-piles en cas d’utilisation extrême
ou de conditions de température. Cela n’indique pas
dedéfaillance.
Toutefois, si le joint d’étanchéité extérieur est rompu :
ʵ et que le liquide entre en contact avec la peau, laver
rapidement la zone touchée au savon et à l’eau
pendant plusieursminutes.

FRANÇAIS
15
ʵ si le liquide du bloc-piles entre en contact avec
les yeux, les rincer abondamment à l’eau propre,
pendant un minimum de 10 minutes, et consulter
immédiatement un médecin. (Note médicale : le
liquide est composé d’une solution comprenant de
25 % à 35 % d’hydroxyde depotassium).
Directives de sécurité spécifiques pour
les piles au lithium-ion (Li-Ion)
• Ne pas incinérer le bloc-piles même s’il est
sévèrement endommagé ou complètement usagé,
car il pourrait exploser et causer un incendie. Pendant
l’incinération des blocs-piles au lithium-ion, des vapeurs et
matières toxiques sontdégagées.
• En cas de contact du liquide de la pile avec la peau,
rincer immédiatement au savon doux et à l’eau. En
cas de contact oculaire, rincer l’œil ouvert à l’eau claire
une quinzaine de minutes ou jusqu’à ce que l’irritation
cesse. Si des soins médicaux s’avéraient nécessaires, noter
que l’électrolyte de la pile est composé d’un mélange de
carbonates organiques liquides et de sels delithium.
• Le contenu des cellules d’une pile ouverte peut
causer une irritation respiratoire. En cas d’inhalation,
exposer l’individu à l’air libre. Si les symptômes persistent,
consulter unmédecin.
AVERTISSEMENT: risques de brûlure. Le liquide de la
pile peut s’enflammer s’il est exposé à des étincelles ou
à uneflamme.
Témoin de Charge du Bloc-Piles
Certains blocs-piles
DeWALT
possèdent un témoin de
charge qui consiste en trois voyants Del verts indiquant le
niveau de charge du bloc-piles.
Le témoin de charge indique approximativement le niveau
de charge restant dans le bloc-piles en fonction des voyants
suivants:
Chargé de 75 à 100%
Chargé de 51 à 74%
Chargé de < 50%
Le bloc-piles doit être rechargé
Pour activer le témoin de charge, maintenez appuyé le
bouton du témoin de charge. Une combinaison des trois
voyants Del verts s’allumera indiquant le niveau de charge.
Lorsque le niveau de charge du bloc-pile atteint la limite
minimale d’utilisation, le témoin de charge reste éteint et le
bloc-piles doit êtrerechargé.
REMARQUE: le témoin de charge ne fait qu’indiquer
le niveau de charge du bloc-piles. Il ne donne aucune
indication quant au fonctionnement de l’outil. Son propre
fonctionnement pourra aussi varier en fonction des
composants produit, de la température et de l’application
d’utilisation.
Pour plus d’informations quant au témoin de charge du
bloc-piles, veuillez appeler le 1-800-4-
DeWALT
(1-800-433-
9258) ou vous rendre sur notre site www.dewalt.com.
Le sceau SRPRC®
Le sceau SRPRC® (Société de recyclage des
piles rechargeables du Canada) apposé
sur une pile au nickel-cadmium, à hydrure
métallique de nickel ou au lithium-ion
(ou un bloc-piles) indique que les coûts
de recyclage de ces derniers en fin d’utilisation ont déjà été
réglés par
DeWALT
. Dans certaines régions, la mise au rebut
ou aux ordures municipales des piles au nickel-cadmium, à
l’hydrure métallique de nickel ou au lithium-ion, est illégale;
le programme de l’Appel à Recycler® constitue donc une
solution pratique etécologique.
Appel à Recycler Canada, Inc., en collaboration avec
DeWALT
et d’autres utilisateurs de piles, a mis sur pied de
programme aux États-Unis et au Canada pour faciliter la
collecte des piles au nickel-cadmium, à l’hydrure métallique
de nickel ou au lithium-ion usagées. Aidez-nous à protéger
l’environnement et à conserver nos ressources naturelles
en renvoyant les piles au nickel-cadmium, à l’hydrure
métallique de nickel ou au lithium-ion usagées à un centre
de réparation autorisé
DeWALT
ou chez votre détaillant afin
qu’elles y soient recyclées. On peut en outre se renseigner
auprès d’un centre de recyclage local pour connaître
d’autres sites lesacceptant.
SRPRC® est une marque déposée de l’Appel à Recycler
Canada,Inc.
Utilisation du Mode Tune-UpMC
automatique (NiCd/NiMH seulement)
Le mode de Tune-UpMC automatique égalise ou équilibre
chaque cellule du bloc-piles pour lui permettre de
fonctionner à son rendement optimum. Les blocs-piles
doivent être mis au point hebdomadairement ou après
une dizaine de cycles de charges/décharges ou chaque fois
que la durée de fonctionnement du bloc-piles diminue.
Pour utiliser le mode Tune-UpMC automatique, insérez le
bloc-piles dans le chargeur et laissez-le pendant au moins 8
heures. Le chargeur passera par les modes suivants:
1. Le voyant rouge clignotera de façon continue indiquant
que le cycle de chargement d’une heure acommencé.
2. Lorsque ce dernier est terminé, le voyant restera allumé
sans clignoter. Cela indique que le bloc-piles est chargé
à plein et peut être alorsutilisé.
3. Si le bloc-piles est laissé dans le chargeur après la
charge initiale de 1 heure, le chargeur entrera en mode
automatique de mise au point. Ce mode dure jusqu’à
8 heures ou jusqu’à ce que les cellules du bloc-piles
soient équilibrées. Le bloc-piles est prêt à être utilisé et
peut être enlevé en tout temps durant le mode de mise
aupoint.

FRANÇAIS
16
4. Lorsque le mode automatique de mise au point est
terminé, le chargeur débute une charge d’entretien; le
témoin rouge demeureraallumé.
Directives de sécurité importantes
propres à tous les chargeurs de piles
AVERTISSEMENT : Lire toutes les instructions et
toutes les consignes de sécurité propres au bloc-
piles, au chargeur et à l’outil électrique. Tout
manquement aux avertissements et instructions
pose des risques de décharges électriques,
d’incendie et/ou de blessures graves.
• NE PAS tenter de charger de bloc-piles avec des
chargeurs autres que ceux décrits dans ce manuel.
Le chargeur et son bloc-piles ont été conçus tout
spécialement pour fonctionnerensemble.
• Ces chargeurs n’ont pas été conçus pour une
utilisation autre que recharger les blocs-piles
rechargeables
DeWALT
. Toute autre utilisation
comporte des risques d’incendie, de chocs électriques ou
d’électrocution.
• Protéger le chargeur de la pluie ou de laneige.
• Tirer sur la fiche plutôt que sur le cordon pour
débrancher le chargeur. Cela permet de réduire
les risques d’endommager la fiche ou le cordon
d’alimentation.
• S’assurer que le cordon est protégé de manière à
ce que personne ne marche ni ne trébuche dessus,
ou à ce qu’il ne soit ni endommagé ni soumis à
aucunetension.
• N’utiliser une rallonge qu’en cas de nécessité
absolue. L’utilisation d’une rallonge inadéquate
comporte des risques d’incendie, de chocs électriques ou
d’électrocution.
• Pour utiliser un chargeur à l’extérieur, le placer dans
un endroit sec et utiliser une rallonge conçue pour
l’extérieur. L’utilisation d’une rallonge conçue pour
l’extérieur réduit les risques de chocsélectriques.
• Pour la sécurité de l’utilisateur, utiliser une rallonge
de calibre adéquat (AWG, American Wire Gauge
[calibrage américain normalisé des fils électriques]).
Plus le calibre est petit, et plus sa capacité est grande. Un
calibre16, par exemple, a une capacité supérieure à un
calibre18. L’usage d’une rallonge de calibre insuffisant
causera une chute de tension qui entraînera perte de
puissance et surchauffe. Si plus d’une rallonge est utilisée
pour obtenir une certaine longueur, s’assurer que chaque
rallonge présente au moins le calibre de fil minimum. Le
tableau ci-dessous illustre les calibres à utiliser selon la
longueur de rallonge et l’intensité nominale indiquée sur
la plaque signalétique. En cas de doute, utiliser le calibre
suivant. Plus le calibre est petit, plus la rallonge peut
supporter decourant.
Calibre minimum pour les cordons d'alimentation
Volts Longueur totale du cordon
d'alimentation en mètre (pieds)
120 V 7,6 (25) 15,2 (50) 30,5 (100) 45,7 (150)
240 V 15,2 (50) 30,5 (100) 61,0 (200) 91,4 (300)
Ampères
AWG
Plus que Pas plus
que
0 6 18 16 16 14
610 18 16 14 12
10 12 16 16 14 12
12 16 14 12 Non recommandé
• Ne poser aucun objet sur le chargeur. Ne pas mettre
le chargeur sur une surface molle qui pourrait en
bloquer la ventilation et provoquer une surchauffe
interne. Éloigner le chargeur de toute source de chaleur.
Le chargeur dispose d’orifices d’aération sur le dessus et le
dessous duboîtier.
• Ne pas le faire fonctionner avec un cordon
d’alimentation ou une ficheendommagée.
• Ne pas utiliser le chargeur s’il a reçu un coup,
fait une chute ou a été endommagé de quelque
façon que ce soit. Le ramener dans un centre de
réparationagréé.
• Ne pas démonter le chargeur. Pour tout service
ou réparation, le rapporter dans un centre de
réparation agréé. Le fait de le réassembler de façon
incorrecte comporte des risques de chocs électriques,
d’électrocution et d’incendie.
• Débrancher le chargeur du secteur avant tout
entretien. Cela réduira tout risque de chocs
électriques. Le fait de retirer le bloc-piles ne réduira pas
cesrisques.
• NE JAMAIS tenter de connecter 2 chargeursensemble.
• Le chargeur a été conçu pour être alimenté en
courant électrique domestique standard de 120
volts. Ne pas tenter de l’utiliser avec toute autre
tension. Cela ne s’applique pas aux chargeurs de
postesmobiles.
AVERTISSEMENT: risques de chocs électriques. Ne
laisser aucun liquide pénétrer dans le chargeur, des
chocs électriques pourraient enrésulter.
AVERTISSEMENT: risques de brûlure. Ne submerger
le bloc-piles dans aucun liquide et le protéger de toute
infiltration de liquide. Ne jamais tenter d’ouvrir le
bloc-piles pour quelque raison que ce soit. Si le boîtier
plastique du bloc-piles est brisé ou fissuré, le retourner
dans un centre de réparation pour y êtrerecyclé.
ATTENTION: risques de brûlure. Pour réduire tout
risque de dommages corporels, ne recharger que des
blocs-piles rechargeables
DeWALT
. Tout autre type
de piles pourrait exploser et causer des dommages
corporels etmatériels.
AVIS: sous certaines conditions, lorsque le chargeur
est connecté au bloc d’alimentation, des matériaux
étrangers pourraient court-circuiter le chargeur. Les
corps étrangers conducteurs tels que (mais pas limité
à) poussières de rectification, débris métalliques, laine

FRANÇAIS
17
d’acier, feuilles d’aluminium, ou toute accumulation
de particules métalliques doivent être maintenus
à distance des orifices du chargeur. Débrancher
systématiquement le chargeur lorsque le bloc-piles
n’y est pas inséré. Débrancher systématiquement le
chargeur avant toutentretien.
Chargement du bloc-piles (Fig. B)
DANGER :risques d’électrocution. Une tension de
120 volts passe dans les bornes encastrées du port
de tourelle. Ne pas mettre en contact avec des objets
conducteurs. Il y a risques de chocs électriques ou
d’électrocution.
1. Branchez le chargeur dans la prise appropriée avant d’y
insérer le bloc-piles.
Fig. B
Bloc-Piles Tourelle
Li-Ion Bloc-Piles Coulissant Li-Ion
2. Insérer le bloc-piles dans le chargeur, en vous assurant
qu’il y est correctement calé. Le voyant rouge (charge)
clignotera de façon continue indiquant que le cycle de
chargement a commencé.
3. En fin de charge, le voyant rouge restera ALLUMÉ de
façon continue. Le bloc-piles est alors complètement
rechargé et peut être utilisé ou laissé dans le chargeur.
Pour retirer le bloc-piles du chargeur, appuyez sur le
bouton de libération du bloc-piles sur le bloc-piles.
REMARQUE: pour assurer des performances optimales
et une durée de vie maximale des blocs-piles, recharger
pleinement le bloc-piles avant toute utilisation initiale.
Utilisation du chargeur
Reportez-vous aux indications du tableau ci-dessous pour
consulter le statut de charge du bloc-piles.
DC9310
Bloc-piles en Cours de Chargement
Bloc-piles Chargé
Suspension de Charge Contre le Chaud/
Froid
Bloc-Pile ou Chargeur Défectueux
DCB107, DCB112, DCB113, DCB115, DCB118, DCB132
Bloc-piles en Cours de Chargement
Bloc-piles Chargé
Suspension de Charge Contre
le Chaud/Froid*
*DCB107, DCB112, DCB113, DCB115, DCB118, DCB132:
le voyant rouge ne cessera de clignoter, mais un voyant
jaune restera allumé pendant cette opération. Lorsque
le bloc-piles aura repris une température appropriée,
le voyant jaune s’éteindra et le chargeur reprendra sa
procédure de charge.
Le chargeur ne pourront recharger des blocs-piles
défectueux. Le chargeur indiquera qu’un bloc-piles est
défectueux en refusant de s’allumer ou en affichant bloc-
piles ou chargeur défectueux.
REMARQUE: cela pourra aussi indiquer un problème avec
le chargeur.
Si le problème provient du chargeur, faites vérifier le
chargeur et le bloc-piles chez un centre de réparation agréé.
Fonction de suspension de charge contre le chaud/
froid
Lorsque le chargeur détecte un bloc-piles trop chaud
ou trop froid, il démarre automatiquement la fonction
de suspension de charge contre le chaud, suspendant
le chargement jusqu’à ce que le bloc-piles ait repris une
température appropriée. Le chargeur ensuite se remettra
automatiquement en mode de chargement. Cette
caractéristique assure aux blocs-piles une durée de vie
maximale.
Un bloc-piles froid se rechargera moins vite qu’un bloc-piles
chaud. Le bloc-piles se rechargera à ce rythme plus lent tout
au cours du cycle de charge et ne retournera pas à sa vitesse
maximale de charge même s’il venait à se réchauffer.
Le chargeur DCB118 est équipé d’un ventilateur interne
destiné à refroidir le bloc-piles. Le ventilateur se mettra
automatiquement en marche chaque fois que le bloc-piles
aura besoin de se refroidir.
N’utilisez jamais le chargeur si le ventilateur ne fonctionne
pas correctement ou si ses fentes d’aération sont bloquées.
Protégez systématiquement l’intérieur du chargeur de tout
objet étranger.
Système de protection électronique
Les appareils au Li-Ion sont équipés d’un système
électronique de protection pour protéger les blocs-piles de
toute surcharge, surchauffe ou fuite importante.
L’appareil s’arrêtera automatiquement dès que le système
électronique de protection sera activé. Si c’était le cas,
placez le bloc-piles au lithium-ion sur son chargeur jusqu’à
ce qu’il soit complètement rechargé.
Installation murale
DCB107, DCB112, DCB113, DCB115, DCB118, DCB132
Ces chargeurs ont été conçus pour une installation murale
ou pour être posés sur une table ou une surface de travail.
Pour une fixation murale, installez le chargeur à proximité

FRANÇAIS
18
d’une prise électrique, et à l’écart de coins ou de toute
autre obstruction au passage de l’air. Utilisez l’arrière du
chargeur pour marquer l’emplacement des vis de montage
sur le mur. Fixez soigneusement le chargeur à l’aide de vis
autoforeuses (vendues séparément) d’au moins 25,4mm
(1po) de long, et de diamètre de tête de 7-9mm (0,28-
0,35po), que vous visserez dans le bois en laissant une
longueur optimale d’environ 5,5mm (7/32po) exposée.
Alignez les orifices à l’arrière du chargeur sur les vis exposées
et insérez à fond ces dernières dans les orifices.
Instructions d’entretien du chargeur
AVERTISSEMENT: risques de chocs électriques.
Débrancher le chargeur de la prise de courant
alternatif avant tout entretien. Éliminer toute saleté
ou graisse de la surface externe du chargeur à l’aide
d’un chiffon ou d’une brosse non métallique douce.
N’utiliser ni eau ni aucun nettoyant liquide.
Remarques importantes concernant le
chargement
1. Pour augmenter la durée de vie du bloc-piles
et optimiser son rendement, le recharger à une
température ambiante de 18° à 24°C (65°F à 75°F). NE
PAS recharger le bloc-piles à une température inférieure
à +4,5°C (+40°F) ou supérieure à +40°C (+104°F).
C’est important pour prévenir tout dommage sérieux
au bloc-piles.
2. Le chargeur et son bloc-piles peuvent devenir chauds
au toucher pendant la charge. C’est normal et ne
représente en aucun cas une défaillance du produit.
Pour faciliter le refroidissement du bloc-piles après
utilisation, éviter de laisser le chargeur ou le bloc-piles
dans un local où la température ambiante est élevée
comme dans un hangar métallique ou une remorque
nonisolée.
3. Si le bloc-piles ne se recharge pas correctement:
a. Vérifier le bon fonctionnement de la prise
en y branchant une lampe ou tout autre
appareilélectrique.
b. Vérifier que la prise n’est pas contrôlée par un
interrupteur qui coupe le courant lorsqu’on éteint
leslumières.
c. Déplacer le chargeur et le bloc-piles dans un local où
la température ambiante se trouve entre environ 18°
et 24°C (65°F et 75°F).
d. Si le problème persiste, amener l’outil, le bloc-piles et
son chargeur dans un centre de réparationlocal.
4. Recharger le bloc-piles lorsqu’il ne produit plus assez
de puissance pour effectuer un travail qu’il faisait
facilement auparavant. NE PAS CONTINUER à l’utiliser
dans ces conditions. Suivre la procédure de charge. Si
nécessaire, il est aussi possible de recharger
un bloc-piles partiellement déchargé sans effet nuisible
sur le bloc-piles.
5. Les corps étrangers conducteurs tels que (mais
pas limité à) poussières de rectification, débris
métalliques, laine d’acier, feuilles d’aluminium,
ou toute accumulation de particules métalliques
doivent être maintenus à distance des orifices du
chargeur. Débrancher systématiquement le chargeur
lorsque le bloc-piles n’y est pas inséré. Débrancher
systématiquement le chargeur avant toutentretien.
6. Ne pas congeler ou immerger le chargeur dans l’eau ou
tout autreliquide.
Recommandations de stockage
1. Le lieu idéal de rangement est un lieu frais et sec,
à l’abri de toute lumière solaire directe et de toute
températureexcessive.
2. Pour un stockage prolongé, il est recommandé
d’entreposer le bloc-piles pleinement chargé dans
un lieu frais et sec, hors du chargeur pour optimiser
lesrésultats.
REMARQUE: les blocs-piles ne devraient pas être
entreposés complètement déchargés. Il sera nécessaire de
recharger le bloc-piles avantréutilisation.
CONSERVER CES CONSIGNES POUR
UTILISATION ULTÉRIEURE
DESCRIPTION (FIG. A)
AVERTISSEMENT: ne jamais modifier l’outil
électrique ni aucun de ses composants, car il y a
risques de dommages corporels oumatériels.
Reportez-vous en figureA au début de ce manuel pour
obtenir la liste complète descomposants.
USAGE PRÉVU
Cet aspirateur a été conçu pour fonctionner uniquement
sur des blocs-piles
DeWALT
NiCd/NiHiD/Li-Ion de 18 V,
des blocs-piles Li-Ion de 20 V max*, ou sur secteur CA de
120V. Le bloc-piles et le chargeur sont vendus séparément.
L’aspirateur passera automatiquement du mode CA au
modeCC.
REMARQUE: l’alimentation CA de 120V ne pourra servir
qu’à faire fonctionner l’aspirateur et ne pourra recharger le
bloc-pilesinstallé.
L’aspirateur est conçu pour aspirer des solides ou des
liquides, et ne requiert aucun changement de pièce
pour passer de l’aspiration des solides aux liquides, ou
inversement. L’aspirateur est pour l’usage deménage.
Il est recommandé que la cuve soit vidé de son contenu
avant aspiration des liquides pour en faciliter lenettoyage.
NE PAS les utiliser en milieu ambiant humide ou en
présence de liquides ou de gazinflammables.
NE PAS le laisser à la portée des enfants. Une supervision
est nécessaire auprès de tout utilisateur nonexpérimenté.
UTILISATION
AVERTISSEMENT: pour réduire le risque de
blessures graves, éteindre l’outil et retirer le bloc-
piles avant d’effectuer tout réglage et d’enlever
ou d’installer tout accessoire. Un démarrage
accidentel peut provoquer desblessures.
Other manuals for DCV581H
2
Table of contents
Languages:
Other DeWalt Vacuum Cleaner manuals

DeWalt
DeWalt DXV30SAPTA User manual

DeWalt
DeWalt DXV10P User manual

DeWalt
DeWalt DXV20PTA User manual

DeWalt
DeWalt DCV517 User manual

DeWalt
DeWalt D27904 User manual

DeWalt
DeWalt DCV517 User manual

DeWalt
DeWalt DXV53PRO User manual

DeWalt
DeWalt DCV517M1 User manual

DeWalt
DeWalt DXV30SAPTA User manual

DeWalt
DeWalt DC500 User manual

DeWalt
DeWalt DWH161B User manual

DeWalt
DeWalt DWV902M User manual

DeWalt
DeWalt DXV23P User manual

DeWalt
DeWalt DXV12P-QTA User manual

DeWalt
DeWalt D25303DH User manual

DeWalt
DeWalt XR-LI-ION DCV582-XE User manual

DeWalt
DeWalt D27902M User manual

DeWalt
DeWalt VEC248MG Supplement

DeWalt
DeWalt D25304DH User manual

DeWalt
DeWalt DW 793 User manual