DF-models SkyWatcher LARK 4K V3 GPS User manual

HINWEIS-WARNUNG | NOTICE-WARNING | AVIS-ALERTE | AVVISO | AVISO
Vor den Erstflug, sowie nach enem Crash (harter Landung) oder Ersatzteilwechsel ist UNBEDINGT eine Kalibrierung des Modells
vorzunehmen. Siehe hierzu Seite 14/15. Nichtbeachtung führt zu Kontrollverlust und Schäden am Modell!
Before the first flight, as well as after a crash (hard landing) or replacement of spare parts, it is IMPORTANT to calibrate the model, see
page 14/15. Failure to do so will result in loss of control and damage to the model!
Avant le premier vol, ainsi qu'après un crash (atterrissage brutal) ou le remplacement de pièces détachées, il est IMPORTANT de
calibrer le modèle, voir page 14/15. Le non-respect de cette opération entraînera une perte de contrôle et des dommages au modèle !
Prima del primo volo, così come dopo un incidente (atterraggio duro) o la sostituzione di parti di ricambio, è IMPORTANTE calibrare il
modello, vedi pagina 14/15. In caso contrario, si avrà una perdita di controllo e danni al modello!
Antes del primer vuelo, así como después de un accidente (aterrizaje forzoso) o de la sustitución de piezas de recambio, es
IMPORTANTE calibrar el modelo, ver página 14/15. ¡Si no lo hace, perderá el control y dañará el modelo!

Einleitung | introductory remarks
remarques introductives | osservazioni introduttive | Introducción
Wir beglückwünschen Sie zum Kauf eines Produktes aus dem Hause DF Models | MALi Racing.
Alle Produkte werden sorgfältig auf Vollständigkeit und Funktion geprüft, um sicherzustellen, dass das Produkt frei von
Herstellungs- und Materialfehlern ist. Das Produkt ist EMV-geprüft und erfüllt die Anforderungen der geltenden europäischen und
nationalen Richtlinien. Aufgrund ständiger Weiterentwicklung und Verbesserung unserer Produkte behalten wir uns technische
Änderungen sowie Änderungen in Ausstattung und Design ohne Ankündigung vor. Ansprüche aus geringfügigen Abweichungen
des Ihnen vorliegenden Produktes gegenüber Daten und Abbildungen dieser Anleitung können daher nicht geltend gemacht
werden. Der verantwortungsvolle Umgang mit dem Produkt dient zu Ihrer eigenen Sicherheit und der Sicherheit Unbeteiligter.
Beachten Sie dazu die Sicherheitsanweisungen in dieser Anleitung. Technische- und farbliche Änderungen vorbehalten.
Congratulations on your purchase of a product from DF Models | MALi Racing.
All products are carefully checked for completeness and function to ensure that the product is free of manufacturing and material
defects. The product is EMC-tested and meets the requirements of the applicable European and national directives. Due to
constant further development and improvement of our products, we reserve the right to make technical changes and changes in
equipment and design without prior notice. Therefore, no claims can be made on the basis of minor deviations of the product you
have from the data and illustrations in these instructions. The responsible handling of the product is for your own safety and the
safety of persons not involved. Please observe the safety instructions in this manual. Subject to technical and colour changes.
Félicitations pour votre achat d'un produit de DF Models | MALi Racing.
Tous les produits sont soigneusement vérifiés pour s'assurer qu'ils sont complets et fonctionnels et qu'ils sont exempts de
défauts de fabrication et de matériaux. Le produit est testé CEM et répond aux exigences des directives européennes et
nationales en vigueur. En raison du développement et de l'amélioration constants de nos produits, nous nous réservons le droit
d'apporter des modifications techniques et des changements d'équipement et de conception sans préavis. Par conséquent,
aucune réclamation ne peut être faite sur la base d'écarts mineurs du produit que vous possédez par rapport aux données et
illustrations contenues dans ces instructions. La manipulation responsable du produit est pour votre propre sécurité et celle des
personnes non concernées. Veuillez respecter les consignes de sécurité contenues dans ce manuel. Sous réserve de modifica-
tions techniques et de couleurs.
Congratulazioni per aver acquistato un prodotto DF Models | MALi Racing.
Tutti i prodotti sono accuratamente controllati per verificarne la completezza e il funzionamento per garantire che il prodotto sia
privo di difetti di fabbricazione e di materiale. Il prodotto è testato EMC e soddisfa i requisiti delle direttive europee e nazionali
applicabili. A causa del continuo sviluppo e miglioramento dei nostri prodotti, ci riserviamo il diritto di apportare modifiche
tecniche e modifiche alle attrezzature e al design senza preavviso. Pertanto, non è possibile avanzare alcuna pretesa sulla base di
lievi scostamenti del prodotto in vostro possesso rispetto ai dati e alle illustrazioni contenute in queste istruzioni. L'uso
responsabile del prodotto è per la propria sicurezza e per la sicurezza delle persone non coinvolte. Osservare le avvertenze di
sicurezza contenute in questo manuale. Con riserva di modifiche tecniche e cromatiche.
Felicitaciones por la compra de un producto de DF Models | MALi Racing.
Todos los productos se comprueban cuidadosamente en cuanto a su integridad y funcionamiento para garantizar que el producto
no tenga defectos de fabricación ni de material. El producto está probado en cuanto a la compatibilidad electromagnética y
cumple los requisitos de las directivas europeas y nacionales aplicables. Debido al continuo desarrollo y mejora de nuestros
productos, nos reservamos el derecho de hacer cambios técnicos así como cambios en el equipo y el diseño sin previo aviso.
Por lo tanto, no se puede hacer ninguna reclamación sobre la base de desviaciones menores del producto en su posesión de los
datos e ilustraciones de este manual. El manejo responsable del producto es para su propia seguridad y la de los que no están
involucrados. Por favor, observe las instrucciones de seguridad de este manual. Sujeto a cambios técnicos y de color.
Gewährleistungs-/ Garantiebedingungen | warranty/guarantee conditions | Conditions de
garantie/garantie | Condizioni di garanzia/garanzia | Garantía/condiciones de la garantía
Die Bedienungsanleitung zu diesem Produkt ist grundsätzlicher Bestandteil des Produktes, da bei Nichtbeachtung der darin
enthaltenen Informationen zur Handhabung und zum Betrieb sowie bei Nichtbeachtung der Sicherheitsanweisungen die
Gewährleistung/ Garantie erlischt.
Bewahren Sie die Bedienungsanleitung daher auch für den Fall der Weitergabe des Produktes an Dritte sorgfältig auf. Für
Verbraucher beträgt die Gewährleistungszeit 24 Monate. Falls nicht anders im Gesetz vorgesehen, beschränkt sich die
Gewährleistung/ Garantie auf eine Reparatur mit Kosten bis zur Höhe des Kaufpreises, den Ersatz des Produktes durch ein
gleichwertiges oder die Erstattung des Kaufpreises.
Eine von Land zu Land verschiedene Geltendmachung anderer Ansprüche ist denkbar.
Die Laufzeit der Gewährleistung/Garantie bleibt durch eine Reparatur und/oder den Ersatz von Teilen unbeeinflusst. Wir
behalten uns den Einsatz aufbereiteter oder neuer Teile vor. Serviceleistungen und Reparaturen nach Ablauf der Gewährleis-
tungs-/Garantiefrist sind grundsätzlich kostenpflichtig. Unter die Gewährleistung/ Garantie fallen Fabrikations- und Materialfeh-
ler und Fehler bei normalem Gebrauch. Mechanisch belastete Teile sind nicht gewährleistungsfähig. Für Folgeschäden
übernehmen wir keine Haftung!
Von der Gewährleistung/ Garantie ausgeschlossen sind:
- Schäden durch Nichtbeachten der Sicherheitsanweisungen oder der Bedienungsanleitung
- höhere Gewalt, Karambolagen, fehlerhafte Handhabung
- außergewöhnliche Beanspruchung oder Fremdeinwirkung
- eigenmächtige Veränderungen oder Reparaturen, die von nicht autorisierten Stellen durchgeführt wurden
- Schäden, die durch Kontrollverlust über das Modell entstehen
- Blitzschlag oder anderer Einfluss von Hochspannung oder Strom
- Verschleißteile, mechanisch belastete Teile und normale Abnutzung, optische Beeinträchtigungen
- Transport-, Versand- oder Versicherungskosten
- Kosten für die fachgerechte Entsorgung des Produkts sowie vom Service vorgenommene Setup- und Wiedereinrichtungsar-
beiten

The operating instructions for this product are a basic component of the product, as non-observance of the information
contained therein on handling and operation and non-observance of the safety instructions invalidates the warranty/guarantee.
Therefore, keep the operating instructions in a safe place even if the product is passed on to third parties. The warranty period
for consumers is 24 months. Unless otherwise provided by law, the warranty/guarantee is limited to repair at the cost of the
purchase price, replacement of the product with an equivalent or refund of the purchase price.
A different assertion of other claims from country to country is conceivable.
The duration of the warranty/guarantee remains unaffected by repair and/or replacement of parts. We reserve the right to use
refurbished or new parts. Services and repairs after the warranty/guarantee period have to be paid for. The warranty/guarantee
covers manufacturing and material faults and faults in normal use. Mechanically stressed parts are not covered by the warranty.
We assume no liability for consequential damages!
are excluded from the warranty/guarantee:
- Damage caused by non-observance of the safety instructions or the operating instructions
- Force majeure, collisions, incorrect handling
- extraordinary stress or external influence
- unauthorized modifications or repairs carried out by unauthorized persons
- damage caused by loss of control of the model
- Lightning strike or other influence of high voltage or current
- Wear parts, mechanically stressed parts and normal wear and tear, optical impairments
- Transport, shipping or insurance costs
- Costs for the proper disposal of the product as well as setup and readjustment work carried out by the service department
Le mode d'emploi de ce produit est un composant de base du produit, car le non-respect des consignes de manipulation et
d'utilisation et le non-respect des consignes de sécurité annulent la garantie/garantie.
Conservez donc le mode d'emploi dans un endroit sûr, même si le produit est transmis à des tiers. La période de garantie pour
les consommateurs est de 24 mois. Sauf disposition contraire de la loi, la garantie est limitée à la réparation au prix d'achat, au
remplacement du produit par un produit équivalent ou au remboursement du prix d'achat.
Une affirmation différente d'autres revendications d'un pays à l'autre est concevable.
La durée de la garantie n'est pas affectée par la réparation et/ou le remplacement des pièces. Nous nous réservons le droit
d'utiliser des pièces neuves ou remises à neuf. Les services et réparations après la période de garantie doivent être payés. La
garantie/garantie couvre les défauts de fabrication et de matériaux ainsi que les défauts d'utilisation normale. Les pièces
soumises à des contraintes mécaniques ne sont pas couvertes par la garantie. Nous déclinons toute responsabilité pour les
dommages consécutifs!
sont exclus de la garantie :
- Dommages causés par le non-respect des consignes de sécurité ou du mode d'emploi
- Force majeure, collisions, manipulation incorrecte
- stress extraordinaire ou influence extérieure
- des modifications ou des réparations non autorisées effectuées par des personnes non autorisées
- les dommages causés par la perte de contrôle du modèle
- Coup de foudre ou autre influence de la haute tension ou du courant
- Pièces d'usure, pièces soumises à des contraintes mécaniques et usure normale, déficiences optiques
- Frais de transport, d'expédition ou d'assurance
- Coûts pour l'élimination correcte du produit ainsi que les travaux de réglage et de réajustement effectués par le service
après-vente
Le istruzioni per l'uso di questo prodotto sono parte integrante del prodotto, in quanto l'inosservanza delle informazioni ivi
contenute sull'uso e sul funzionamento e l'inosservanza delle istruzioni di sicurezza invalida la garanzia/garanzia.
Conservare quindi le istruzioni per l'uso in un luogo sicuro anche se il prodotto viene ceduto a terzi. Il periodo di garanzia per i
consumatori è di 24 mesi. Salvo diversa disposizione di legge, la garanzia/garanzia è limitata alla riparazione al costo del
prezzo di acquisto, alla sostituzione del prodotto con uno equivalente o al rimborso del prezzo di acquisto.
Si può ipotizzare un'affermazione diversa da paese a paese.
La durata della garanzia/garanzia rimane inalterata in caso di riparazione e/o sostituzione di pezzi di ricambio. Ci riserviamo il
diritto di utilizzare parti rinnovate o nuove. I servizi e le riparazioni dopo il periodo di garanzia/garanzia devono essere pagati.
La garanzia/garanzia copre i difetti di fabbricazione e di materiale e i difetti e i difetti di normale utilizzo. Le parti sottoposte a
sollecitazioni meccaniche non sono coperte da garanzia. Non ci assumiamo alcuna responsabilità per danni indiretti!
sono esclusi dalla garanzia/garanzia:
- Danni causati dalla mancata osservanza delle istruzioni di sicurezza o delle istruzioni per l'uso
- Forza maggiore, collisioni, collisioni, manipolazione scorretta
- stress straordinario o influenza esterna
- modifiche non autorizzate o riparazioni effettuate da persone non autorizzate
- danni causati dalla perdita di controllo del modello
- Colpo di fulmine o altri influssi di alta tensione o corrente
- Parti soggette a usura, parti sottoposte a sollecitazioni meccaniche e normale usura, alterazioni ottiche.
- Costi di trasporto, spedizione o assicurazione
- Costi per il corretto smaltimento del prodotto, nonché per i lavori di messa a punto e di riadeguamento effettuati dal servizio
assistenza
El manual de instrucciones de este producto es una parte fundamental del mismo, ya que la garantía caduca si no se respetan
las informaciones sobre el manejo y el funcionamiento contenidas en él y si no se siguen las instrucciones de seguridad.
Por favor, guarde el manual de instrucciones en un lugar seguro, incluso si el producto es transmitido a terceros. El período de
garantía para los consumidores es de 24 meses. A menos que la ley disponga lo contrario, la garantía se limita a la reparación
con costes hasta el importe del precio de compra, la sustitución del producto por uno equivalente o el reembolso del precio de
compra.
Es concebible una afirmación diferente de otras afirmaciones de un país a otro.
La duración de la garantía no se ve afectada por una reparación y/o sustitución de piezas.
Nos reservamos el derecho de usar partes reacondicionadas o nuevas. Los servicios y las reparaciones después de la
expiración del período de garantía siempre están sujetos a un cargo. La garantía cubre los defectos de fabricación y de material
y los defectos durante el uso normal. Las piezas mecánicas sometidas a tensión no están cubiertas por la garantía. ¡No
asumimos ninguna responsabilidad por los daños consecuentes!
están excluidos de la garantía:
- Daños debidos a la inobservancia de las instrucciones de seguridad o de las instrucciones de uso
- fuerza mayor, colisiones, manejo incorrecto
- estrés inusual o impacto externo
- modificaciones o reparaciones no autorizadas llevadas a cabo por organismos no autorizados
- Los daños causados por la pérdida de control sobre el modelo
- Los rayos u otras influencias de alto voltaje o corriente
- Las piezas de desgaste, las piezas sometidas a esfuerzo mecánico y el desgaste normal, las deficiencias ópticas
- Gastos de transporte, envío o seguro
- Los costos de la eliminación adecuada del producto, así como los trabajos de instalación y reinstalación realizados por el
servicio
Sicherheitshinweise | safety instructions
instructions de sécurité | istruzioni di sicurezza | Instrucciones de seguridad
Gehen Sie verantwortungsbewusst mit diesem Produkt um.
Als Hersteller und Vertreiber des Produktes haben wir keinen unmittelbaren Einfluss auf den korrekten Umgang und die korrekte
Bedienung des Produktes. Die nachfolgenden Sicherheitsanweisungen sollen Sie und Ihr Umfeld vor Schäden bewahren, die bei
unsachgemäßem Gebrauch entstehen können. Aber auch das Produkt selbst und Ihr Modell sollen durch die entsprechenden
Hinweise vor Beschädigung geschützt werden. Lesen Sie deshalb dieses Kapitel aufmerksam durch, bevor Sie das Produkt in
Betrieb nehmen! Für Sach- oder Personenschäden durch Nichtbeachten der Bedienungsanleitung oder Nichtbeachten der
Sicherheitsanweisungen übernehmen wir keine Haftung. In solchen Fällen erlischt auch die Gewährleistung/ Garantie. Für
Folgeschäden übernehmen wir keine Haftung! Für Kinder unter 36 Monaten nicht geeignet. Enthält Kleinteile - Erstickungsgefahr!
Das Produkt ist für Kinder unter 14 Jahren nur unter unmittelbarer Aufsicht eines Erwachsenen geeignet. Entsorgen Sie das
Verpackungsmaterial sachgerecht, da dieses für Kinder zur Gefahr werden könnte.
Use this product responsibly.
As manufacturer and distributor of the product, we have no direct influence on the correct handling and operation of the product.
The following safety instructions are intended to protect you and your environment from damage that may result from improper
use. But also the product itself and your model should be protected against damage by the corresponding instructions.
Therefore, please read this chapter carefully before putting the product into operation! We accept no liability for damage to
property or personal injury caused by non-observance of the operating instructions or the safety instructions. In such cases, the
warranty/guarantee also expires. We assume no liability for consequential damages! Not suitable for children under 36 months.
Contains small parts - danger of suffocation! The product is suitable for children under 14 years only under direct supervision of
an adult. Dispose of the packaging material properly, as it could be dangerous for children.
Utilisez ce produit de manière responsable.
En tant que fabricant et distributeur du produit, nous n'avons aucune influence directe sur la manipulation et le bon fonctionne-
ment du produit. Les consignes de sécurité suivantes ont pour but de vous protéger, vous et votre environnement, des
dommages qui pourraient résulter d'une utilisation non conforme. Mais aussi le produit lui-même et votre modèle doivent être
protégés contre les dommages par les instructions correspondantes. Veuillez donc lire attentivement ce chapitre avant de mettre
le produit en service! Nous déclinons toute responsabilité pour les dommages matériels ou corporels causés par le non-respect
du mode d'emploi ou des consignes de sécurité. Dans ce cas, la garantie/garantie expire également. Nous déclinons toute
responsabilité pour les dommages consécutifs! Ne convient pas aux enfants de moins de 36 mois. Contient de petites pièces -
danger d'étouffement! Le produit convient aux enfants de moins de 14 ans uniquement sous la surveillance directe d'un adulte.
Éliminer le matériel d'emballage de façon appropriée, car il pourrait être dangereux pour les enfants.
Utilizzare questo prodotto in modo responsabile.
In qualità di produttore e distributore del prodotto, non abbiamo alcuna influenza diretta sul corretto utilizzo e funzionamento del
prodotto. Le seguenti istruzioni di sicurezza hanno lo scopo di proteggere l'utente e l'ambiente da danni che possono derivare
da un uso improprio. Ma anche il prodotto stesso e il vostro modello devono essere protetti contro i danni dalle istruzioni
corrispondenti. Pertanto, si prega di leggere attentamente questo capitolo prima di mettere in funzione il prodotto!
Non ci assumiamo alcuna responsabilità per danni a cose o danni a persone causati dalla mancata osservanza delle istruzioni
per l'uso o delle istruzioni di sicurezza. In questi casi, anche la garanzia/garanzia scade. Non ci assumiamo alcuna responsabi-
lità per danni indiretti! Non adatto a bambini sotto i 36 mesi. Contiene piccole parti - pericolo di soffocamento!
Il prodotto è adatto a bambini sotto i 14 anni solo sotto la diretta supervisione di un adulto. Smaltire correttamente il materiale
d'imballaggio, poiché potrebbe essere pericoloso per i bambini.
Maneje este producto con responsabilidad.
Como fabricante y distribuidor del producto, no tenemos influencia directa en la correcta manipulación y funcionamiento del
producto. Las siguientes instrucciones de seguridad tienen por objeto protegerle a usted y a su entorno de los daños que
pueden producirse si el producto se utiliza de forma inadecuada. Sin embargo, el producto en sí y su modelo también deben ser
protegidos de los daños por las instrucciones correspondientes. Por esta razón, por favor lea este capítulo cuidadosamente
antes de poner el producto en funcionamiento! No aceptamos ninguna responsabilidad por daños a la propiedad o lesiones
personales que resulten del incumplimiento de las instrucciones de funcionamiento o de seguridad. En tales casos, la garantía
también expira. ¡No asumimos ninguna responsabilidad por los daños consecuentes! No es adecuado para niños menores de 36
meses. Contiene partes pequeñas - peligro de asfixia! El producto sólo es apto para niños menores de 14 años bajo la
supervisión directa de un adulto. Deshágase del material de embalaje adecuadamente, ya que podría convertirse en un peligro
para los niños.

Vor dem Start
Klären Sie mit Ihrer Versicherung, ob der Betrieb eines funkferngesteuerten Modells unter den Versicherungsschutz fällt
(Haftpflichtversicherung).
Wenn Sie noch keine Erfahrung im Steuern von RC-Modellen haben, machen Sie sich zuerst am stehenden Modell mit den
Reaktionen auf die Steuerbefehle vertraut. Wenden Sie sich ggf. an einen erfahrenen Modellsportler oder an einen
Modellbau-Club. Suchen Sie ggf. die Unterstützung eines erfahrenen Piloten/ Fahrer.
Überprüfen Sie vor der Inbetriebnahme die Fernsteueranlage und das Modell auf Funktionssicherheit und sichtbare Beschädigun-
gen, wie z. B. defekte Steckverbindungen oder beschädigte Kabel. Alle bewegten Teile müssen leichtgängig, aber ohne Lagerspiel
funktionieren. Überprüfen Sie alle Schraub- und Steckverbindungen, Radmuttern und elektrischen Kontakte auf festen Sitz, da
sich diese beim Transport, während der Fahrt oder bei kleineren Unfällen lockern oder lösen können. Befestigen Sie Überlängen
von Kabeln so, dass diese nicht in bewegte/ drehende Teile geraten können. Leitungen dürfen auch nicht geknickt werden.
Stellen Sie sicher, dass alle Akkus voll geladen und nicht beschädigt sind.
Fahren/ Fliegen
Fahren/ fliegen Sie nicht, wenn Ihre Reaktionsfähigkeit eingeschränkt ist (z. B. bei Müdigkeit, Medikamenten- oder Alkoholein-
fluss). Fehlreaktionen können schwerwiegende Personen- und Sachschäden verursachen. Fahren/ fliegen Sie auch nicht, wenn
Sie nur den geringsten Zweifel am einwandfreien, technischen Zustand Ihres Modells/ Ihrer Fernsteueranlage haben. Halten Sie
immer direkten Sichtkontakt zum Modell. Betreiben Sie das Modell nur auf privatem Gelände oder auf zu diesem Zweck
ausgewiesenen Plätzen. Beachten Sie die Auflagen und Bestimmungen für das Gelände.
Achten Sie beim Betrieb eines Modells immer darauf, dass sich niemals Körperteile oder Gegenstände im Gefahrenbereich
von Motoren oder drehenden Teilen befinden. Überprüfen Sie regelmäßig alle Schraubverbindungen und Befestigungen, da sich
diese während des Betriebes lockern oder lösen können. Beenden Sie umgehend den Betrieb Ihres Modells im Falle einer
Störung und beseitigen Sie die Ursache der Fehlfunktion, bevor Sie das Modell weiter einsetzen. Vermeiden Sie das Fahren/
Fliegen bei niedrigen Aussentemperaturen, da sich dann die Akkukapazität verringert und der Kunststoff der Karosserie an
Elastizität verliert und leicht splittert. Setzen Sie Ihr Modell und die Fernsteueranlage nicht über längere Zeit direkter Sonnenein-
strahlung, Feuchtigkeit, starker Verschmutzung oder großer Hitze/ Kälte aus. Fahren Sie nicht in Menschenansammlungen, auf
Personen oder Tiere zu, in Naturschutzgebieten, bei Nacht, unter Hochspannungsleitungen, Funkmasten oder bei Gewitter.
Elektrische Felder und atmosphärische Störungen können die Signale Ihres Fernsteuersenders beeinflussen, bei Regen oder in
feuchtem Gelände, da sonst die Elektrik Schaden nimmt. Beachten Sie, dass RC-Modelle nicht auf Gelände mit öffentlichem
Personen- und Kraftverkehr gefahren werden dürfen.
Bestimmungsgemäße Verwendung
Das Produkt ist ausschließlich für den privaten Einsatz im Modellbaubereich und mit den damit verbundenen Betriebszeiten
ausgelegt. Für einen gewerblichen oder industriellen Einsatz sowie für Dauerbetrieb ist dieses Produkt nicht zugelassen. Eine
unsachgemäße Verwendung kann zur Gefährdung von Personen sowie zur Beschädigung des Produktes und den damit
verbundenen Gefahren wie z. B. Kontrollverlust über das Modell, Kurzschluss, Brand, elektrischer Schlag etc. führen.
Beachten Sie die Sicherheitsanweisungen in dieser Bedienungsanleitung. Diese enthalten wichtige Informationen
zum Umgang mit dem Produkt. Das Produkt ist für Kinder unter 14 Jahren nur unter Aufsicht Erwachsener geeignet.
Before the start
Clarify with your insurance company whether the operation of a radio-controlled model is covered by insurance (liability
insurance).
If you are not yet experienced in controlling RC models, first familiarise yourself with the reactions to the control commands on
the standing model. If necessary, consult an experienced model athlete or a model building club. If necessary, seek the support of
an experienced pilot/driver.
Check the remote control system and the model for functional reliability and visible damage, such as defective plug connections
or damaged cables, before putting it into operation. All moving parts must function smoothly, but without bearing play. Check all
screw and plug connections, wheel nuts and electrical contacts for tightness, as these can become loose or detached during
transport, while driving or in the event of minor accidents. Fasten excess lengths of cables in such a way that they cannot get
into moving/rotating parts. Cables must also not be kinked. Make sure that all batteries are fully charged and not damaged.
Driving/ Flying
Do not drive/fly if your reactions are restricted (e.g. if you are tired or under the influence of medication or alcohol). Incorrect
reactions can cause serious personal injury and damage to property. Do not drive if you have the slightest doubt about the
perfect technical condition of your model/remote control system. Always maintain direct visual contact with the model. Operate
the model only on private property or in places designated for this purpose. Observe the conditions and regulations for the
terrain.
When operating a model, always ensure that no parts of the body or objects in the danger zone
of motors or rotating parts. Regularly check all screw connections and fastenings, as these can become loose or detached during
operation. In the event of a malfunction, stop operation of your model immediately and eliminate the cause of the malfunction
before continuing to use the model. Avoid driving in low outside temperatures, as this reduces the battery capacity and the
plastic of the bodywork loses its elasticity and splinters easily. Do not expose your model and the remote control system to direct
sunlight, moisture, heavy soiling or extreme heat/cold for long periods. Do not drive in crowded areas, towards people or animals,
in nature reserves, at night, under power lines, radio masts or during thunderstorms. Electrical fields and atmospheric
disturbances can affect the signals of your remote control transmitter, in rain or damp conditions, otherwise the electrical system
will be damaged. Please note that RC models must not be driven on terrain where there is public transport.
Intended use
The product is designed exclusively for private use in the model building sector and with the associated operating times. This
product is not approved for commercial or industrial use or for continuous operation. Improper use can lead to personal injury
and damage to the product and the associated risks such as loss of control over the model, short circuit, fire, electric shock, etc.
Follow the safety instructions in this manual. They contain important information
for handling the product. The product is suitable for children under 14 years of age only under adult supervision.

Avant le début
Précisez auprès de votre compagnie d'assurance si l'exploitation d'un modèle radiocommandé est couverte par une assurance
(assurance responsabilité civile).
Si vous n'avez pas encore d'expérience dans le contrôle des modèles RC, familiarisez-vous d'abord avec les réactions aux
commandes de contrôle sur le modèle debout. Si nécessaire, consultez un athlète modèle expérimenté ou un club de modélisme.
Si nécessaire, demandez l'aide d'un pilote/conducteur expérimenté.
Avant de mettre en service le système de télécommande et le modèle, vérifiez la fiabilité du fonctionnement et les dommages
visibles, tels que des prises défectueuses ou des câbles endommagés. Toutes les pièces mobiles doivent fonctionner sans
problème, mais sans jeu de roulement. Vérifiez que toutes les connexions à vis et à fiches, les écrous de roue et les contacts
électriques sont bien serrés, car ils peuvent se desserrer ou se détacher pendant le transport, pendant la conduite ou lors
d'accidents mineurs. Fixez les longueurs de câbles excédentaires de manière à ce qu'elles ne puissent pas entrer dans les parties
mobiles/rotatives. Les câbles ne doivent pas non plus être pliés. Assurez-vous que toutes les batteries sont complètement
chargées et qu'elles ne sont pas endommagées.
Conduire/ Voler
Ne prenez pas le volant si vos réactions sont limitées (par exemple, si vous êtes fatigué ou sous l'influence de médicaments ou
d'alcool). Des réactions incorrectes peuvent causer des blessures graves et des dommages matériels. Ne conduisez pas si vous
avez le moindre doute sur l'état technique parfait de votre modèle/télécommande. Maintenez toujours un contact visuel direct
avec le modèle. N'utiliser le modèle que sur des propriétés privées ou dans des lieux désignés à cet effet. Respectez les
conditions et les réglementations du terrain.
Lorsque vous utilisez un modèle, assurez-vous toujours qu'aucune partie du corps ou aucun objet ne se trouve dans la zone de
danger
de moteurs ou de pièces tournantes. Vérifiez régulièrement tous les raccords et fixations à vis, car ils peuvent se desserrer ou se
détacher pendant le fonctionnement. En cas de dysfonctionnement, arrêtez immédiatement le fonctionnement de votre modèle et
éliminez la cause du dysfonctionnement avant de continuer à utiliser le modèle. Évitez de conduire par basses températures
extérieures, car cela réduit la capacité des batteries et le plastique de la carrosserie perd de son élasticité et se fend facilement en
éclats. N'exposez pas votre modèle et le système de télécommande à la lumière directe du soleil, à l'humidité, aux saletés
importantes ou à une chaleur/froid extrême pendant de longues périodes. Ne conduisez pas dans des endroits bondés, en
direction de personnes ou d'animaux, dans des réserves naturelles, la nuit, sous des lignes électriques, des pylônes radio ou
pendant des orages. Les champs électriques et les perturbations atmosphériques peuvent affecter les signaux de votre émetteur
de télécommande, en cas de pluie ou d'humidité, sinon le système électrique sera endommagé. Veuillez noter que les modèles
RC ne doivent pas être conduits sur des terrains où il y a des transports publics.
Utilisation prévue
Le produit est conçu exclusivement pour un usage privé dans le secteur du modélisme et avec les temps d'utilisation associés.
Ce produit n'est pas approuvé pour une utilisation commerciale ou industrielle ou pour un fonctionnement continu. Une
utilisation incorrecte peut entraîner des blessures et des dommages au produit et les risques associés tels que la perte de
contrôle du modèle, un court-circuit, un incendie, un choc électrique, etc.
Suivez les instructions de sécurité de ce manuel. Ils contiennent des informations importantes
pour la manipulation du produit. Le produit ne convient aux enfants de moins de 14 ans que sous la surveillance d'un adulte.
Prima dell'inizio
Chiarite con la vostra compagnia di assicurazione se il funzionamento di un modello radiocomandato è coperto da assicurazione
(assicurazione di responsabilità civile).
Se non siete ancora esperti nel controllo dei modelli RC, familiarizzate prima di tutto con le reazioni ai comandi di controllo sul
modello in piedi. Se necessario, consultare un atleta modello esperto o un club di costruzione di modelli. Se necessario, cercare
il supporto di un pilota/pilota esperto.
Prima di metterlo in funzione, controllare l'affidabilità funzionale del sistema di controllo remoto e del modello e verificare che
non vi siano danni visibili, come ad esempio collegamenti a spina difettosi o cavi danneggiati. Tutte le parti mobili devono
funzionare senza problemi, ma senza gioco dei cuscinetti. Controllare la tenuta di tutti i collegamenti a vite e a spina, dei dadi
delle ruote e dei contatti elettrici, poiché questi possono allentarsi o staccarsi durante il trasporto, durante la guida o in caso di
piccoli incidenti. Fissare le lunghezze in eccesso dei cavi in modo che non possano entrare in parti mobili o rotanti. Anche i cavi
non devono essere attorcigliati. Assicurarsi che tutte le batterie siano completamente cariche e non siano danneggiate.
Guidare/volare
Non guidate o volate se le vostre reazioni sono limitate (ad es. se siete stanchi o sotto l'influenza di farmaci o alcolici). Reazioni
errate possono causare gravi lesioni personali e danni alle cose. Non guidate se avete il minimo dubbio sulle perfette condizioni
tecniche del vostro modello/sistema di controllo remoto. Mantenere sempre un contatto visivo diretto con il modello. Gestire il
modello solo su proprietà privata o in luoghi designati a tale scopo. Osservare le condizioni e le regole del terreno.
Quando si utilizza un modello, assicurarsi sempre che non vi siano parti del corpo o oggetti nella zona pericolosa
di motori o parti rotanti. Controllare regolarmente tutti i collegamenti a vite e i fissaggi, poiché questi possono allentarsi o
staccarsi durante il funzionamento. In caso di malfunzionamento, interrompere immediatamente il funzionamento del modello ed
eliminare la causa del malfunzionamento prima di continuare ad utilizzare il modello. Evitare di guidare a basse temperature
esterne, in quanto ciò riduce la capacità della batteria e la plastica della carrozzeria perde facilmente la sua elasticità e si
scheggia. Non esponete il vostro modello e il sistema di controllo remoto alla luce diretta del sole, all'umidità, alla sporcizia
pesante o al calore/freddo estremo per lunghi periodi di tempo. Non guidare in zone affollate, verso persone o animali, nelle
riserve naturali, di notte, sotto le linee elettriche, sotto i piloni della radio o durante i temporali. I campi elettrici e i disturbi
atmosferici possono influenzare i segnali del vostro trasmettitore di controllo remoto, in condizioni di pioggia o di umidità,
altrimenti l'impianto elettrico sarà danneggiato. Si prega di notare che i modelli RC non devono essere guidati su terreni dove ci
sono mezzi di trasporto pubblico.
Uso previsto
Il prodotto è concepito esclusivamente per l'uso privato nel settore della costruzione di modelli e con i relativi tempi di
funzionamento. Questo prodotto non è approvato per uso commerciale o industriale o per il funzionamento continuo. L'uso
improprio può causare lesioni personali e danni al prodotto e i rischi associati, come la perdita di controllo del modello, corto
circuito, incendio, scosse elettriche, ecc.
Seguire le istruzioni di sicurezza contenute in questo manuale. Contengono informazioni importanti
per la manipolazione del prodotto. Il prodotto è adatto a bambini di età inferiore ai 14 anni solo sotto la supervisione di un adulto.

Antes del comienzo
Aclare con su compañía de seguros si el funcionamiento de un modelo radiocontrolado está cubierto por un seguro (seguro de
responsabilidad civil).
Si aún no tiene experiencia en el control de modelos RC, primero familiarícese con las reacciones a los comandos de control en
el modelo de pie. Si es necesario, consulte a un atleta modelo con experiencia o a un club de construcción de modelos. Si es
necesario, busque el apoyo de un piloto/conductor experimentado.
Antes de ponerlo en funcionamiento, compruebe la fiabilidad del funcionamiento del sistema de control remoto y del modelo y
los daños visibles, como conexiones de enchufe defectuosas o cables dañados. Todas las partes móviles deben funcionar
suavemente, pero sin juego de rodamiento. Compruebe que todas las conexiones de tornillos y enchufes, las tuercas de las
ruedas y los contactos eléctricos estén bien apretados, ya que pueden aflojarse o desprenderse durante el transporte, la
conducción o en caso de accidentes menores. Fijar el exceso de cables de tal manera que no puedan entrar en las partes
móviles/rotativas. Los cables tampoco deben ser enroscados. Asegúrese de que todas las baterías estén completamente
cargadas y no estén dañadas.
Conducir/ Volar
No conduzca o vuele si sus reacciones son limitadas (por ejemplo, si está cansado o bajo la influencia de medicamentos o del
alcohol). Las reacciones incorrectas pueden causar graves lesiones personales y daños a la propiedad. No conduzca si tiene la
más mínima duda sobre el perfecto estado técnico de su modelo/sistema de control remoto. Mantenga siempre un contacto
visual directo con el modelo. Operar el modelo sólo en propiedad privada o en lugares designados para este fin. Observe las
condiciones y regulaciones del terreno.
Al operar un modelo, asegúrese siempre de que ninguna parte del cuerpo u objeto en la zona de peligro
de los motores o de las piezas giratorias. Revise regularmente todas las conexiones de tornillos y fijaciones, ya que pueden
soltarse o desprenderse durante la operación. En caso de mal funcionamiento, detenga el funcionamiento de su modelo
inmediatamente y elimine la causa del mal funcionamiento antes de continuar usando el modelo. Evite conducir con tempera-
turas exteriores bajas, ya que esto reduce la capacidad de la batería y el plástico de la carrocería pierde su elasticidad y se astilla
fácilmente. No exponga su modelo y el sistema de control remoto a la luz directa del sol, la humedad, la suciedad pesada o el
calor/frío extremo durante largos períodos. No conduzca en zonas concurridas, hacia personas o animales, en reservas
naturales, de noche, bajo líneas eléctricas, antenas de radio o durante tormentas eléctricas. Los campos eléctricos y las
perturbaciones atmosféricas pueden afectar a las señales de su transmisor de control remoto, en condiciones de lluvia o
humedad, de lo contrario el sistema eléctrico se dañará. Por favor, tenga en cuenta que los modelos RC no deben ser conducidos
en terrenos donde haya transporte público.
Uso previsto
El producto está diseñado exclusivamente para uso privado en el sector de la construcción de modelos y con los tiempos de
funcionamiento correspondientes. Este producto no está aprobado para uso comercial o industrial ni para funcionamiento
continuo. El uso inadecuado puede provocar lesiones personales y daños en el producto y los riesgos asociados, como la
pérdida de control del modelo, cortocircuito, incendio, descarga eléctrica, etc.
Siga las instrucciones de seguridad de este manual. Contienen información importante
para manejar el producto. El producto es adecuado para niños menores de 14 años de edad sólo bajo la supervisión de un
adulto.
Hinweise für Akkus und Batterien
Bewahren Sie Batterien/Akkus ausserhalb der Reichweite von Kindern und Haustieren auf, da diese die Batterien/ Akkus
versehentlich verschlucken können. Suchen Sie in diesem Fall umgehend einen Arzt auf!
Ausgelaufene oder beschädigte Batterien/Akkus können bei Berührung Verätzungen verursachen. Falls Haut
oder Augen mit dem Elektrolyten in Kontakt kommen, spülen Sie die Stelle sofort sorgfältig mit klarem Wasser
und suchen Sie einen Arzt auf. Benutzen Sie geeignete Schutzhandschuhe bei der Entsorgung des defekten
Akkus. Wenn Sie Auffälligkeiten wie Geruch, Verfärbung, übermäßige Erhitzung oder Verformung des Akkus bemerken, trennen
Sie den Akku sofort vom Ladegerät bzw. vom Verbraucher. Entsorgen Sie den Akku!
Herkömmliche Alkaline-Batterien (1,5V) sind nur für den einmaligen Gebrauch vorgesehen und müssen anschliessend ordnungs-
gemäß entsorgt werden. Entsorgen Sie leere Batterien bzw. defekte Akkus umweltgerecht über die autorisierten Sammelstellen.
Die Entsorgung über den Hausmüll ist untersagt!
Akkus dürfen nicht feucht oder nass werden. Vermeiden Sie auch die Entstehung von Kondenswasser. Setzen Sie die
Batterien/Akkus, das Ladegerät und das Modell niemals widrigen Umgebungsbedingungen aus (z. B. Nässe, zu hoher oder
niedriger Umgebungstemperatur, Zündquellen oder offenem Feuer, Staub, Dämpfen, Lösungsmitteln)! Vermeiden Sie auch starke
Verschmutzung sowie übermäßige mechanische Belastung des Akkus, zerren Sieauch niemals an den Anschlusskabeln! Mischen
Sie niemals Batterien und Akkus gleichzeitig in einem Gerät! Werden zur Stromversorgung des Senders keine fabrikneuen
Batterien genutzt, achten Sie auf eine ausreichende Restkapazität (Batterieprüfer). Wechseln Sie immer den kompletten Satz
Batterien aus, nicht nur einzelne Zellen. Verwenden Sie stets Batterien bzw. Akkus des gleichen Typs und Herstellers. Mischen Sie
nicht Batterien mit unterschiedlichem Ladezustand. Achten Sie beim Einlegen von Batterien bzw. Akkus in die Akkuhalterung auf
die richtige Polung. Bei Falschpolung wird nicht nur ihr Modell, sondern auch der Akku beschädigt. Batterien/ Akkus dürfen
niemals kurzgeschlossen, beschädigt, zerlegt oder in offenes Feuer geworfen werden. Es besteht Brand- und Explosionsgefahr!
Trennen Sie den Akku bei starker erwärmung sofort vom Ladegerät! Bei längerem Nichtgebrauch des Modells entnehmen Sie die
eingelegten Batterien bzw. Akkus aus der Fernsteuerung und aus dem Modell, um Schäden durch auslaufende / tiefentladene
Batterien/ Akkus zu vermeiden.
Löschmittel: Im Falle eines Brandes ist dieser per Wassersprühstrahl, Kohlendioxid oder Löschpulver-/ Schaum zu bekämpfen.
Der Wasservollstrahl ist nicht zum Löschen geeignet. Besonders empfohlen wird der Einsatz eines Feuerlöschers mit AVD-Lösch-
mittel.
Entsorgung
Entsorgen Sie das Produkt am Ende seiner Lebensdauer gemäß den geltenden
gesetzlichen Vorschriften (Nicht im Hausmüll entsorgen).
Sie als Endverbraucher sind gesetzlich (Batterieverordnung) zur Rückgabe aller gebrauchten Batterien und Akkus
verpflichtet; eine Entsorgung über den Hausmüll ist untersagt! Nebenstehende Symbole weisen auf das Verbot der Entsorgung
über den Hausmüll hin. Schadstoffhaltige Batterien/Akkus sind zusätzlich mit den Bezeichnungen für das ausschlaggebende
Schwermetall gekennzeichnet: Cd=Cadmium, Hg=Quecksilber, Pb=Blei (Bezeichnung steht auf Batterie/Akku z.B. unter den links
abgebildeten Mülltonnen-Symbolen). Ihre verbrauchten Batterien/Akkus können Sie unentgeltlich bei den Sammelstellen Ihrer
Gemeinde oder überall dort abgeben, wo Batterien/Akkus verkauft werden. Sie erfüllen damit die gesetzlichen Verpflichtungen und
leisten Ihren Beitrag zum Umweltschutz.
Notes for batteries and rechargeable batteries
Keep batteries out of the reach of children and pets as they may accidentally swallow the batteries. In this case, consult a doctor
immediately!
Leaking or damaged batteries can cause burns if touched. If skin or eyes come into contact with the electrolyte, rinse
immediately and thoroughly with clear water.
and see a doctor. Use suitable protective gloves when disposing of the defective
Batteries. If you notice any abnormal smell, discoloration, excessive heating or deformation of the battery, disconnect the battery
from the charger or consumer immediately. Dispose of the battery!
Conventional alkaline batteries (1.5V) are intended for single use only and must then be disposed of properly. Dispose of empty
batteries or defective rechargeable batteries in an environmentally friendly manner at authorised collection points. It is prohibited
to dispose of them with household waste!
Batteries must not become damp or wet. Also avoid the formation of condensation water. Never expose the batteries/rechargeab-
le batteries, the charger and the model to adverse environmental conditions (e.g. wetness, excessively high or low ambient
temperature, sources of ignition or open fire, dust, vapours, solvents)! Avoid heavy soiling and excessive mechanical stress on
the battery and never pull the connecting cables! Never mix batteries and rechargeable batteries at the same time in one device!
If no brand-new batteries are used to power the transmitter, ensure that there is sufficient residual capacity (battery tester).
Always replace the complete set of batteries, not just individual cells. Always use batteries of the same type and manufacturer.
Do not mix batteries with different charge levels. Make sure that the polarity is correct when inserting batteries into the battery
holder. If the polarity is incorrect, not only your model but also the battery will be damaged. Batteries must never be short-circui-
ted, damaged, disassembled or thrown into an open fire. There is a risk of fire and explosion!
If the battery gets hot, disconnect it from the charger immediately! If the model is not used for a longer period of time, remove the
batteries or rechargeable batteries from the remote control and from the model in order to avoid damage from leaking / deeply
discharged batteries.
Extinguishing media: In the event of a fire, it must be extinguished by water spray, carbon dioxide or extinguishing powder/foam.
The full water jet is not suitable for extinguishing. The use of a fire extinguisher with AVD extinguishing agent is particularly
recommended.
Disposal
At the end of its service life, dispose of the product in accordance with the
applicable regulations. legal regulations (do not dispose of with household waste).
You as end user are legally obliged (battery regulation) to return all used batteries and accumulators.
disposal via household waste is prohibited! The adjacent symbols refer to the prohibition of disposal with household waste.
Batteries containing harmful substances are additionally marked with the designations for the decisive heavy metal: Cd=Cadmi-
um, Hg=Mercury, Pb=Lead (the name appears on the battery/rechargeable battery, e.g. under the garbage can symbols shown on
the left). You can return your used batteries/rechargeable batteries free of charge to the collection points in your municipality or
wherever batteries/rechargeable batteries are sold. In doing so, you fulfil your legal obligations and make your contribution to
environmental protection.
Remarques concernant les piles et les accumulateurs
Gardez les piles hors de portée des enfants et des animaux domestiques,
car ils risquent de les avaler accidentellement. Dans ce cas, consultez immédiatement un médecin !
Les piles qui fuient ou qui sont endommagées peuvent causer des brûlures si on les touche. Si la peau ou si les yeux entrent en
contact avec l'électrolyte, rincer immédiatement et abondamment à l'eau claire.
et voir un médecin. Utiliser des gants de protection appropriés lors de la mise au rebut de l'appareil défectueux.
Batteries. Si vous remarquez une odeur anormale, une décoloration, un échauffement excessif ou une déformation de la batterie,
débranchez immédiatement la batterie du chargeur ou du consommateur. Jetez la batterie !
Les piles alcalines classiques (1,5 V) sont destinées à un usage unique et doivent être mises au rebut de façon appropriée.
Éliminer les piles vides ou les piles rechargeables défectueuses dans le respect de l'environnement dans les points de collecte
agréés. Il est interdit de les jeter avec les ordures ménagères !
Les batteries ne doivent pas être humides ou mouillées. Eviter également la formation d'eau de condensation. N'exposez jamais
les piles/batteries rechargeables, le chargeur et le modèle à des conditions ambiantes défavorables (par ex. humidité,
température ambiante trop élevée ou trop basse, sources d'inflammation ou feu ouvert, poussière, vapeurs, solvants) ! Evitez les
salissures importantes et les contraintes mécaniques excessives sur la batterie et ne tirez jamais sur les câbles de connexion !
Ne jamais mélanger les piles et les accumulateurs en même temps dans un seul appareil ! Si aucune pile neuve n'est utilisée
pour alimenter l'émetteur, s'assurer que la capacité résiduelle est suffisante (testeur de piles). Remplacez toujours l'ensemble
complet des piles, pas seulement les piles individuelles. Utilisez toujours des piles du même type et du même fabricant. Ne
mélangez pas des batteries ayant des niveaux de charge différents. Assurez-vous que la polarité est correcte lorsque vous
insérez les piles dans le porte-piles. Si la polarité est incorrecte, non seulement votre modèle, mais aussi la batterie seront
endommagés. Les batteries ne doivent jamais être court-circuitées, endommagées, démontées ou jetées dans un feu ouvert.
Risque d'incendie et d'explosion !
Si la batterie chauffe, débranchez-la immédiatement du chargeur ! Si le modèle n'est pas utilisé pendant une période prolongée,
retirez les piles ou les piles rechargeables de la télécommande et du modèle afin d'éviter d'endommager les piles qui
fuient/déchargent profondément.
Moyens d'extinction : En cas d'incendie, il faut l'éteindre par pulvérisation d'eau, de dioxyde de carbone ou de poudre/mousse
d'extinction. Le jet d'eau plein n'est pas adapté à l'extinction. L'utilisation d'un extincteur avec agent extincteur AVD est
particulièrement recommandée.
Élimination
A la fin de sa durée de vie, éliminer le produit conformément à la
réglementation en vigueur. prescriptions légales (ne pas jeter avec les ordures ménagères).
En tant qu'utilisateur final, vous êtes tenu par la loi (réglementation sur les piles) de restituer toutes les piles et accumulateurs
usagés.
l'élimination avec les ordures ménagères est interdite ! Les symboles ci-contre renvoient à l'interdiction d'élimination avec les
ordures ménagères. Les piles contenant des substances nocives sont en outre marquées avec les désignations du métal lourd
déterminant : Cd=Cadmium, Hg=Mercure, Pb=Lead (le nom apparaît sur la batterie/batterie rechargeable, par exemple sous les
symboles de poubelle indiqués à gauche). Vous pouvez retourner gratuitement vos piles et accumulateurs usagés aux points de
collecte de votre commune ou dans les points de vente de piles et d'accumulateurs. Ce faisant, vous remplissez vos obligations
légales et contribuez à la protection de l'environnement.
Note per batterie e batterie ricaricabili
Tenere le batterie fuori dalla portata dei bambini e degli animali domestici che potrebbero accidentalmente ingoiare le batterie. In
questo caso, consultare immediatamente un medico!
La perdita o il danneggiamento delle batterie può causare ustioni se toccate. Se la pelle
o gli occhi vengono a contatto con l'elettrolita, sciacquare immediatamente e abbondantemente con acqua pulita.
e vedere un dottore. Utilizzare guanti protettivi adeguati per lo smaltimento del prodotto difettoso.
Batterie. Se si notano odori anomali, scolorimento, eccessivo riscaldamento o deformazione della batteria, scollegare
immediatamente la batteria dal caricabatterie o dall'utenza. Smaltire la batteria!
Le batterie alcaline convenzionali (1,5V) sono monouso e devono essere smaltite correttamente. Smaltire le batterie scariche o le
batterie ricaricabili difettose in modo ecologico presso i punti di raccolta autorizzati. È vietato smaltirli con i rifiuti domestici!
Le batterie non devono diventare umide o bagnate. Evitare anche la formazione di acqua di condensa. Non esporre mai le
batterie/batterie ricaricabili, il caricabatterie e l'aeromodello a condizioni ambientali avverse (ad es. umidità, temperatura
ambiente troppo alta o bassa, fonti di accensione o fuoco aperto, polvere, vapori, solventi)! Evitare lo sporco pesante e le
sollecitazioni meccaniche eccessive sulla batteria e non tirare mai i cavi di collegamento! Non mischiare mai batterie e batterie
ricaricabili contemporaneamente in un unico apparecchio! Se non vengono utilizzate batterie nuove per alimentare il trasmettito-
re, assicurarsi che ci sia una capacità residua sufficiente (tester di batterie). Sostituire sempre il set completo di batterie, non
solo le singole celle. Utilizzare sempre batterie dello stesso tipo e dello stesso produttore. Non mescolare le batterie con livelli di
carica diversi. Accertarsi che la polarità sia corretta quando si inseriscono le batterie nel portabatterie. Se la polarità non è
corretta, non solo il modello, ma anche la batteria sarà danneggiata. Le batterie non devono mai essere cortocircuitate,
danneggiate, smontate o gettate nel fuoco aperto. Pericolo di incendio ed esplosione!
Se la batteria si scalda, scollegarla immediatamente dal caricabatterie! Se il modello non viene utilizzato per un periodo di tempo
prolungato, rimuovere le batterie o le batterie ricaricabili dal telecomando e dal modello per evitare danni dovuti a perdite o
scariche profonde.
Mezzi di estinzione: in caso di incendio, deve essere estinto con acqua nebulizzata, anidride carbonica o polvere/schiuma
estinguente. Il getto d'acqua pieno non è adatto allo spegnimento. Si raccomanda in particolare l'uso di un estintore con agente
estinguente AVD.
Smaltimento
Al termine della sua vita utile, smaltire il prodotto secondo le norme vigenti.
disposizioni di legge (non smaltire insieme ai rifiuti domestici).
L'utente finale è obbligato per legge (regolamento sulle batterie) a restituire tutte le batterie e gli accumulatori usati.
Lo smaltimento tramite i rifiuti domestici è vietato! I simboli accanto si riferiscono al divieto di smaltimento dei rifiuti domestici.
Le batterie contenenti sostanze nocive sono inoltre contrassegnate con la designazione del metallo pesante decisivo:
Cd=Cadmio, Hg=Mercurio, Pb=Capo (il nome appare sulla batteria/batteria ricaricabile, ad esempio sotto i simboli dei bidoni della
spazzatura mostrati a sinistra). È possibile restituire gratuitamente le batterie esauste/batterie ricaricabili presso i punti di
raccolta del proprio comune di residenza o nei punti vendita di batterie/batterie ricaricabili. In questo modo, adempite ai vostri
obblighi di legge e date il vostro contributo alla protezione dell'ambiente.
Instrucciones para los acumuladores y las baterías
Mantenga las pilas fuera del alcance de los niños y los animales domésticos, ya que pueden tragárselas accidentalmente. ¡En
este caso, consulte a un médico inmediatamente!
Las baterías/acumuladores con fugas o dañados pueden causar quemaduras por contacto. Si la piel
o los ojos entran en contacto con el electrolito, inmediatamente enjuague la zona a fondo con agua limpia
y ver a un médico. Utilice guantes protectores adecuados al deshacerse de los productos defectuosos.
Baterías. Si nota alguna anomalía como el olor, la decoloración, el calentamiento excesivo o la deformación de la batería,
desconecte inmediatamente la batería del cargador o de la carga. ¡Deshazte de la batería!
Las pilas alcalinas convencionales (1,5 V) están destinadas a un solo uso y deben ser eliminadas adecuadamente después.
Deshágase de las baterías vacías o de las baterías recargables defectuosas de forma respetuosa con el medio ambiente en los
puntos de recogida autorizados. ¡La eliminación con la basura doméstica está prohibida!
Las baterías no deben mojarse ni humedecerse. También evita la formación de agua de condensación. No exponga nunca las
baterías/acumuladores, el cargador y el modelo a condiciones ambientales adversas (por ejemplo, humedad, temperatura
ambiente excesivamente alta o baja, fuentes de ignición o fuego abierto, polvo, vapores, disolventes)! También evita la suciedad
pesada y la excesiva tensión mecánica en la batería y nunca tire de los cables de conexión! ¡Nunca mezcles pilas y baterías
recargables en un aparato al mismo tiempo! Si no se utilizan pilas nuevas para suministrar energía al transmisor, asegúrese de
que haya suficiente capacidad restante (comprobador de pilas). Siempre reemplace el juego completo de baterías, no sólo las
celdas individuales. Utilice siempre baterías o pilas recargables del mismo tipo y fabricante. No mezcle baterías con diferentes
niveles de carga. Al insertar las pilas o baterías recargables en el portapilas, asegúrese de que la polaridad sea la correcta. La
polaridad incorrecta dañará no sólo su modelo sino también la batería. Las baterías/baterías recargables nunca deben ser
cortocircuitadas, dañadas, desmontadas o arrojadas al fuego. ¡Hay riesgo de incendio y explosión!
Si la batería se calienta mucho, desconecte el cargador inmediatamente. Si no se va a utilizar el modelo durante un período de
tiempo prolongado, retire las pilas o baterías recargables insertadas del mando a distancia y del modelo para evitar daños por
fugas / baterías profundamente descargadas / baterías recargables.
Medios de extinción: En caso de incendio, éste debe ser extinguido con agua pulverizada, dióxido de carbono o polvo/espuma
de extinción. El chorro de agua completo no es adecuado para la extinción. Se recomienda especialmente el uso de un extintor
de incendios con agente extintor AVD.
Eliminación
Deshágase del producto al final de su vida útil de acuerdo con las
reglamentos legales (No desechar en la basura doméstica).
Usted como usuario final está legalmente obligado (regulación de la batería) a devolver todas las baterías y acumuladores
usados
la eliminación con la basura doméstica está prohibida! Los símbolos adyacentes indican que la eliminación con los desechos
domésticos está prohibida. Las baterías/acumuladores que contienen sustancias nocivas están marcados adicionalmente con
las designaciones del metal pesado decisivo: Cd=Cadmio, Hg=Mercurio, Pb=Plomo (la designación está en la batería/acumu-
lador, por ejemplo, debajo de los símbolos del cubo de basura que se muestran a la izquierda). Puede devolver las pilas o
baterías recargables usadas sin cargo alguno en los puntos de recogida de su municipio o en cualquier lugar donde se vendan
pilas o baterías recargables. De esta manera usted cumple con sus obligaciones legales y contribuye a la protección del medio
ambiente.
Outdoor verwendbar nur im Sichtbereich
fliegen
maximale Flughöhe
beachten
Fernsteuerung | remote control
Contrôle à distance | Controllo remoto | El control remoto
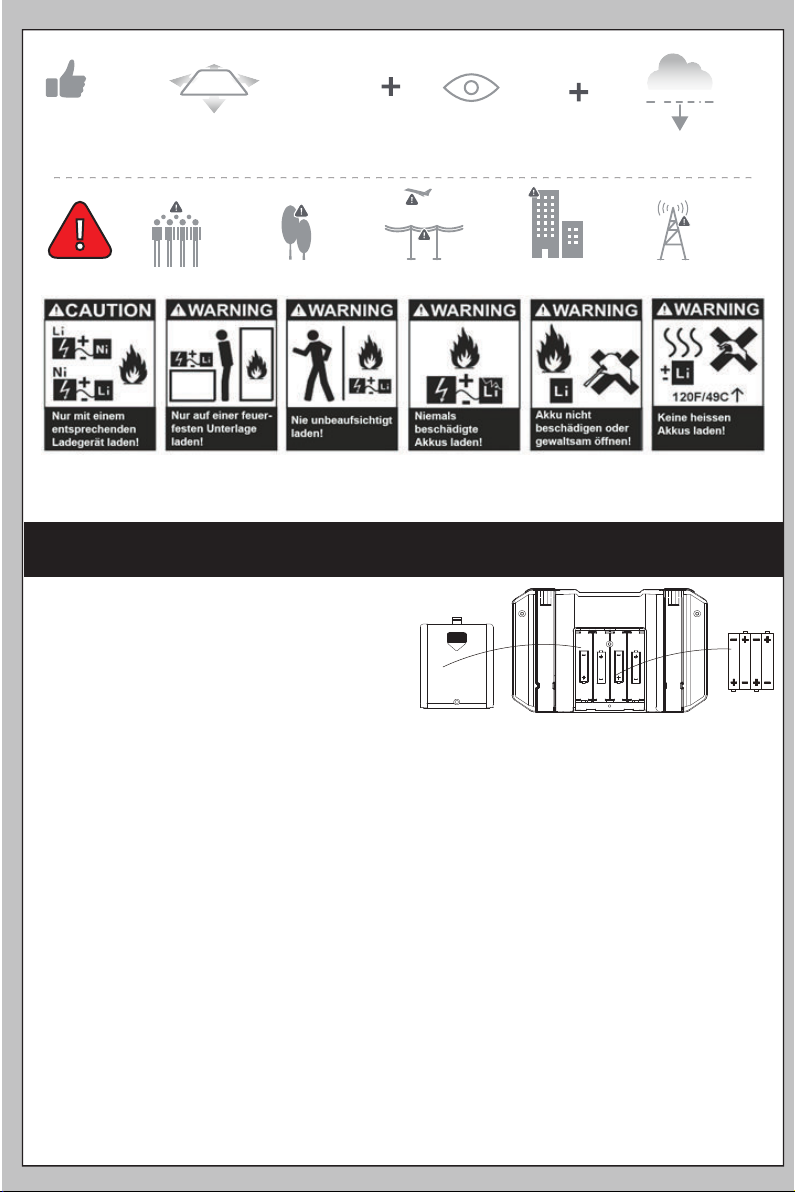
Einsetzen der Senderbatterien:
1. Schraube herausdrehen, 2. Batteriefach öffnen
Batterien (4x AAA) einsetzen, auf richtige Polung achten!
(Nicht im Lieferumfang, keine Akkus verwenden!),
Batteriefach wieder verschließen.
Wird das Modell längere Zeit nicht benutzt,Batterien aus Sender entnehmen!
Inserting the transmitter batteries:
1. Unscrew the screw, open the 2. battery compartment
Insert batteries (4x AAA) (not included, do not use rechargeable batteries!),
pay attention to correct polarity!
Close battery compartment again If the model is not used for a long time,
Remove batteries from transmitter!
Mise en place des piles de l'émetteur:
1 Dévissez la vis, ouvrez le compartiment à 2 piles
Insérer des piles (4x AAA) (ne pas utiliser de piles rechargeables !), faire attention à la polarité!
Refermer le compartiment des piles Si le modèle n'est pas utilisé pendant une longue période,
Retirez les piles de l'émetteur!
Inserimento delle batterie del trasmettitore:
1 Svitare la vite, aprire il vano delle 2 batterie
Inserire le batterie (4x AAA) (non utilizzare batterie ricaricabili!), fare attenzione alla corretta polarità!
Chiudere nuovamente il vano batterie Se il modello non viene utilizzato per un lungo periodo di tempo,
Rimuovere le batterie dal trasmettitore!
Colocar las pilas del transmisor:
1 Desenroscar el tornillo, abrir el compartimento de las 2 pilas
Inserte las pilas (4x AAA) (¡no use pilas recargables!), ¡preste atención a la polaridad correcta! cierre el compartimento de
las pilas de nuevo Si el modelo no se usa durante mucho tiempo, ¡Quita las pilas del transmisor!
4xAAA batteries
(not included)

Akku & SD-Karte einsetzen | insert battery & SD card | Insérer la batterie et la carte SD
Inserire la batteria e la scheda SD | Inserte la batería y la tarjeta SD
Akku in das Akkufach an der Rückseite des Copters stecken (Verriegelungslasche nach unten).
Nach dem Flug Akku immer aus dem Modell entnehmen!
Insert battery into the battery compartment at the back of the copter
(locking tab down).
Always remove the battery from the model after the flight!
Insérez la pile dans le compartiment à piles à l'arrière de l'hélicoptère
(languette de verrouillage vers le bas).
Retirez toujours la batterie du modèle après un vol !
Inserire la batteria nel vano batteria sul retro dell'elicottero
(linguetta di bloccaggio rivolta verso il basso).
Togliere sempre la batteria dal modello dopo un volo!
Inserte la batería en el compartimento de la batería en la parte posterior
del helicóptero (pestaña de bloqueo hacia abajo).
¡Siempre quita la batería del modelo después de un vuelo!
Flugakku laden | charging the flight battery | Recharger la batterie de vol
Caricare la batteria di volo | Cargar la batería de vuelo
Laden Sie den Akku IMMER ausserhalb des Modells, um eine Überhitzung während des Ladevorganges zu vermeiden,
verwenden Sie immer eine feuerfeste Unterlage! NIE unbeaufsichtigt laden!
Lösen Sie die Steckverbindung niemals durch ziehen an den Kabeln, immer am Stecker ziehen.
• Stecken Sie das Ladekabel (USB) an eine geeignete Stromversorgung
(USB-Netzteil, Handy-Adapter | nicht im Lieferumfang).
• Verbinden Sie nun den Akku mit dem Ladegerät (runde Buchse an der Seite des Akkus)
• Die LED am Akku leuchtet rot, der Akku wird geladen.
• Ist die LED erloschen, der Akku ist vollständig geladen.
• Trennen Sie den Akku vom USB-Ladekabel.
• Trennen Sie das USB-Ladekabel von der Stromversorgung.
• Maximale Ladezeit ca. 2-4 Stunden.
• Laden Sie NIE unbeaufsichtigt (z. B. „über Nacht“)!
• Laden Sie IMMER auf einer feuerfesten Unterlage!
• Sicherheitsbestimmungen beachten!
ALWAYS charge the battery outside the model to avoid overheating during charging, always use a fireproof base!
NEVER charge unattended!
Never disconnect by pulling on the cables, always pull on the plug.
- Plug the charging cable (USB) into a suitable power supply
(USB power supply, cell phone adapter | not included in delivery).
- Now connect the battery to the charger (round socket on the side of the battery).
- The LED on the battery lights up red, the battery is charging.
- If the LED is off, the battery is fully charged.
- Disconnect the battery from the USB charging cable.
- Disconnect the USB charging cable from the power supply.
- Maximum charging time is approximately 2-4 hours.
- NEVER charge unattended (e.g. "overnight")!
- ALWAYS charge on a fireproof base!
- Observe safety regulations!
An der Unterseite des Modells befindet sich der SD-Karten-Slot. Hier kann eine Micro-SD Karte für die Aufzeichnung von
Bildern/ Videos eingesetzt werden. Min. 4GB - max. 128GB Transmission Speed Class 10+.
The SD card slot is located at the bottom of the model. A micro-SD card can be inserted here to record images/videos.
images/videos can be inserted. Min. 4GB - max. 128GB Transmission Speed Class 10+.
La fente pour carte SD est située sur la face inférieure du modèle.
Une carte micro-SD peut être insérée ici pour l'enregistrement de photos/ vidéos.
Min. 4GB - max. 128GB Vitesse de transmission Classe 10+.
Lo slot per la scheda SD si trova sul lato inferiore del modello. Una scheda
micro-SD può essere inserita qui per la registrazione di foto/video.
Min. 4GB - max. 128GB Velocità di trasmissione Classe 10+.
La ranura para tarjetas SD se encuentra en la parte inferior del modelo.
Aquí se puede insertar una tarjeta micro-SD para la grabación de
fotos/vídeos. Mínimo 4GB - máximo 128GB Velocidad de transmisión Clase 10+.
Battery
EIN/AUS
ON/OFF

Chargez TOUJOURS la batterie à l'extérieur du modèle pour éviter toute surchauffe pendant la charge, utilisez toujours une base
ignifuge ! Ne chargez JAMAIS sans surveillance !
Ne débranchez jamais en tirant sur les câbles, tirez toujours sur la fiche.
- Branchez le câble de charge (USB) sur un bloc d'alimentation approprié.
(Le bloc d'alimentation USB et l'adaptateur pour téléphone portable ne sont pas inclus dans la livraison).
- Connectez maintenant la batterie au chargeur (prise ronde sur le côté de la batterie).
- Le voyant de la batterie s'allume en rouge, la batterie est en cours de chargement.
- Si le voyant est éteint, la batterie est entièrement chargée.
- Débranchez la batterie du câble de charge USB.
- Débranchez le câble de charge USB de l'alimentation électrique.
- Temps de charge maximum d'environ 2 à 4 heures.
- Ne chargez JAMAIS sans surveillance (par exemple, "pendant la nuit") !
- Chargez TOUJOURS sur une surface ignifugée !
- Respectez les règles de sécurité !
Caricare SEMPRE la batteria all'esterno del modello per evitare il surriscaldamento durante la carica, utilizzare sempre una base
ignifuga! Non caricare MAI incustodito!
Non scollegare mai tirando i cavi, tirare sempre la spina.
- Inserire il cavo di ricarica (USB) in un alimentatore adatto
(Alimentatore USB, adattatore per cellulare | non incluso nella consegna).
- Ora collega la batteria al caricatore (presa rotonda sul lato della batteria).
- Il LED sulla batteria si illumina di rosso, la batteria è in carica.
- Se il LED è spento, la batteria è completamente carica.
- Scollegare la batteria dal cavo di ricarica USB.
- Scollegare il cavo di ricarica USB dall'alimentazione.
- Tempo massimo di ricarica circa 2-4 ore.
- Non caricare MAI incustodito (per esempio "durante la notte")!
- Caricare SEMPRE su una superficie ignifuga!
- Rispettare le norme di sicurezza!
Cargue SIEMPRE la batería fuera del modelo para evitar el sobrecalentamiento durante la carga, ¡utilice siempre una base
ignífuga! ¡NUNCA cargue sin vigilancia!
No desconecte nunca tirando de los cables, tire siempre del enchufe.
- Conecta el cable de carga (USB) a una fuente de alimentación adecuada
(Fuente de alimentación USB, adaptador de teléfono móvil | no incluidos en la entrega).
- Ahora conecta la batería al cargador (toma redonda en el lateral de la batería).
- El LED de la batería se ilumina en rojo, la batería se está cargando.
- Si el LED está apagado, la batería está completamente cargada.
- Desconecte la batería del cable de carga USB.
- Desconecte el cable de carga USB de la fuente de alimentación.
- Tiempo máximo de carga de 2 a 4 horas aproximadamente.
- NUNCA cargue sin vigilancia (por ejemplo, "durante la noche").
- Cargue SIEMPRE en una superficie ignífuga.
- Respete las normas de seguridad.
Sender | transmitter | émetteur
trasmettitore | émetteur
1) Interrupteur marche-arrêt
2) Manche de commande gauche
3) Décollage et atterrissage
automatiques
4) Retour automatique à la maison
5) Caméra en place
6) Caméra en panne
7) Bras droit
8) Sélection de la vitesse
9) Mode normal/GPS
10) Calibrage / arrêt d'urgence
11) Photo / LED on/off
12) Vidéo / Sans tête
13) Support pour Smartphone
14) Antenne de l'émetteur
1) Interruptor de apagado
2) Palanca de control izquierda
3) Despegue y aterrizaje automáticos
4) Vuelta a casa automática
5) Cámara arriba
6) Cámara baja
7) Palo derecho
8) Selección de velocidad
9) Modo Normal/GPS
10) Calibración / parada de emergencia
11) Foto / LED encendido/apagado
12) Vídeo / Sin cabeza
13) Soporte para smartphone
14) Antena transmisora
1) Ein-Ausschalter
2) linker Steuerknüppel
3) Auto-Start & Landung
4) Auto-Return-Home
5) Kamera auf
6) Kamera ab
7) rechter Steuerknüppel
8) Speed-Select
9) Normal-/GPS-Mode
10) Kalibrieren / Not-Aus
11) Foto / LED ein/aus
12) Video / Headless
13) Smartphonehalter
14) Senderantenne
1) on-off switch
2) Left control stick
3) Auto-Start & Landing
4) Auto-Return-Home
5) Camera up
6) Camera down
7) right stick
8) Speed-Select
9) Normal-/GPS-Mode
10) Calibrate / Emergency stop
11) Photo / LED on/off
12) Video / Headless
13) Smartphone holder
14) Transmitter antenna
1) Interruttore on-off
2) Stick di controllo sinistro
3) decollo e atterraggio automatici
4) Ritorno automatico a casa
5) Macchina fotografica su
6) Macchina fotografica giù
7) Bastone destro
8) Selezione della velocità
9) Modo normale/GPS
10) Calibratura / arresto di emergenza
11) Foto / LED on/off
12) Video / Senza testa
13) Porta smartphone
14) Antenna del trasmettitore
Battery
10

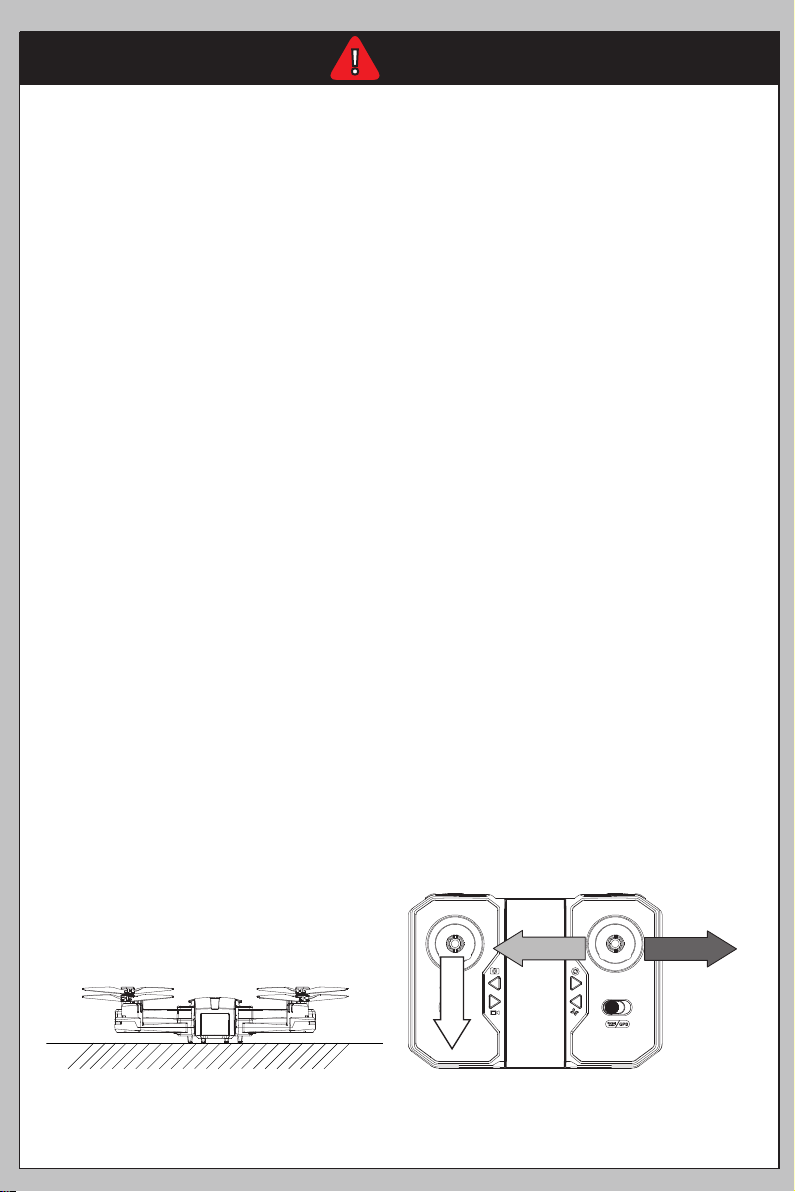
1) Sender einschalten, beide LED‘s blinken rot
2) Akku in dden Copter einsetzen (Verriegelungslasche nach unten), Modell einschalten (Schalter ca. 3 Sekunden gedrückt halten)
3) die LEDs des Copters blinken
4) Copter waagrecht abstellen
5) linken Steuerhebel langsam nach oben und dann nach unten bewegen (Sender piept), die linke LED des Senders leuchten nun
konstant grün. Sobald die hinterne LED‘s (rot) des Copters konstant leuchten ist die Bindung abgeschlossen.
Führen Sie vor jedem Flug eine Funktions- und Reichweitenkontrolle durch.
Betreiben Sie das Modell nur in Sichtweite! Fliegen Sie nicht auf Menschen/ Tiere zu! Beachten Sie die in Ihrem Land geltenden
Bestimmungen zum Betrieb von Quadrocoptern! Prüfen Sie, ob eine Haftpflichtversicherung benötigt wird!
1) Switch on the transmitter, both LED's flash red.
2) insert battery into copter (locking tab down), switch on model (hold switch for approx. 3 seconds)
3) the LEDs of the copter flash
4) put the copter down horizontally
5) move left control lever slowly up and then down (transmitter beeps), the left LED's of the transmitter now light constantly
green. As soon as the rear LED's (red) of the copter light up constantly the binding is completed.
Perform a function and range check before each flight.
Operate the model only within visual range! Do not fly towards people/animals! Observe the regulations applicable in your
country for the operation of quadrocopters! Check whether liability insurance is required!
1) Allumez l'émetteur, les deux LEDs clignotent en rouge.
2) Insérez la batterie dans le copter (languette de verrouillage vers le bas), allumez le modèle (maintenez l'interrupteur enfoncé
pendant environ 3 secondes).
3) Les LED de l'hélicoptère clignotent.
4) Garez l'hélicoptère à l'horizontale
5) déplacez lentement le levier de commande gauche vers le haut puis vers le bas (l'émetteur émet un bip), la LED gauche de
l'émetteur s'allume alors en vert constant. Dès que les LEDs arrière (rouges) du copter s'allument en permanence, la fixation
est terminée.
Effectuez un contrôle de fonctionnement et de portée avant chaque vol.
N'utilisez le modèle qu'à portée de vue ! Ne volez pas vers des personnes/animaux ! Respectez les règles d'utilisation des
quadrocoptères en vigueur dans votre pays ! Vérifiez si une assurance responsabilité civile est requise !
1) Accendere il trasmettitore, entrambi i LED lampeggiano in rosso.
2) Inserire la batteria nel copter (linguetta di bloccaggio verso il basso), accendere il modello (tenere premuto l'interruttore per
circa 3 secondi).
3) i LED dell'elicottero lampeggiano
4) Parcheggiare l'elicottero orizzontalmente
5) muovete lentamente la leva di comando sinistra verso l'alto e poi verso il basso (il trasmettitore emette un bip), il LED sinistro
del trasmettitore si accende ora costantemente di verde. Non appena il LED posteriore (rosso) del copter si accende costante-
mente, il binding è completo.
Eseguire un controllo delle funzioni e della portata prima di ogni volo.
Utilizzare il modello solo nel raggio d'azione visivo! Non volare verso persone/animali! Osservate le norme per l'utilizzo dei
quadricotteri in vigore nel vostro paese! Controllate se è richiesta un'assicurazione di responsabilità civile!
1) Encienda el transmisor, los dos LEDs parpadean en rojo.
2) Introduzca la batería en el helicóptero (con la lengüeta de bloqueo hacia abajo), encienda el modelo (mantenga el interruptor
pulsado durante unos 3 segundos).
3) los LEDs del helicóptero parpadean
4) Aparca el helicóptero en horizontal
5) mueva lentamente la palanca de control izquierda hacia arriba y luego hacia abajo (el transmisor emite un pitido), el LED
izquierdo del transmisor se encenderá ahora constantemente en verde. En cuanto los LEDs traseros (rojos) del helicóptero se
encienden constantemente, la unión está completa.
Realice una comprobación de funcionamiento y alcance antes de cada vuelo.
Utilice el modelo sólo dentro del alcance visual. ¡No vueles hacia personas/animales! Respete las normas de funcionamiento
de los cuadricópteros vigentes en su país. Compruebe si se requiere un seguro de responsabilidad civil.
Startvorbereitungen | start preparations | Commencer les préparatifs
Iniziare i preparativi | Iniciar los preparativos
Vor der ersten Nutzung, nach einem Crash oder harten Landung oder einem Ersatzteilwechsel muss unbedingt eine Kalibrierung
der Modells durchgeführt werden. Wir die Kalibrierung nicht vollständig und/ oder falsch ausgeführt kann es zum Kontrollverlust
und schweren Schäden kommen!
Before using the model for the first time, after a crash or hard landing or after changing spare parts, it is absolutely necessary to
calibrate the model. If the calibration is not performed completely and/or incorrectly, loss of control and serious damage may
occur!
Avant d'utiliser le modèle pour la première fois, après un crash ou un atterrissage brutal ou après avoir changé des pièces
détachées, il est essentiel de calibrer le modèle. Si l'étalonnage n'est pas effectué complètement et/ou incorrectement, une perte
de contrôle et de graves dommages peuvent se produire !
Prima di utilizzare il modello per la prima volta, dopo un incidente o un atterraggio duro o dopo aver cambiato dei pezzi di
ricambio, è essenziale calibrare il modello. Se la calibrazione non viene eseguita completamente e/o in modo errato, si possono
verificare perdite di controllo e gravi danni!
Antes de utilizar el modelo por primera vez, después de un choque o un aterrizaje brusco o después de cambiar las piezas de
recambio, es esencial calibrar el modelo. Si el calibrado no se realiza completamente y/o de forma incorrecta, puede producirse
una pérdida de control y daños graves.
Kalibrieren | Calibrate | Calibrer
Calibrare | Calibrar
GYRO KALIBRIEREN
Schalten Sie Ihr Modell ein, binden dies mit der Fernsteuerung und stellen es waagrecht ab. Ziehen Sie nun den linken
Steuerhebel komplett nach unten und halten diesen in dieser Position. Bewegen Sie nun den rechten Steuerknüpppel schnell
nach rechts und links bis die Fernsteuerung piept und die roten LEDs des Copters zu blinken beginnen. Lassen Sie die
Steuerknüppel wieder los und warten, bis die roten LEDs des Copters wieder konstant leuchten.
CALIBRATE GYRO
Switch on your model, bind it with the remote control and place it horizontally. Now pull the left control stick completely down and
hold it in this position. Now move the right control stick quickly to the right and left until the remote control beeps and the red
LEDs of the copter start flashing. Release the control sticks again and wait until the red LEDs of the copter light up constantly
again.
CALIBRATE GYRO
Mettez votre modèle en marche, liez-le avec la télécommande et placez-le à l'horizontale. Tirez maintenant le manche gauche
complètement vers le bas et maintenez-le dans cette position. Maintenant, déplacez rapidement le manche droit vers la droite et la
gauche jusqu'à ce que la télécommande émette un bip et que les LED rouges de l'hélicoptère commencent à clignoter. Relâchez à
nouveau les manches de commande et attendez que les LED rouges du copter s'allument à nouveau en permanence.
CALIBRAZIONE GYRO
Accendete il vostro modello, legatelo con il telecomando e mettetelo in posizione orizzontale. Ora tirate lo stick di controllo
sinistro completamente verso il basso e tenetelo in questa posizione. Ora muovi lo stick di controllo destro rapidamente a destra
e a sinistra fino a quando il telecomando emette un bip e i LED rossi dell'elicottero iniziano a lampeggiare. Rilascia di nuovo gli
stick di controllo e aspetta che i LED rossi del copter si accendano di nuovo costantemente.
CALIBRAR GYRO
Encienda su modelo, fíjelo con el mando a distancia y colóquelo en posición horizontal. Ahora tire del stick de control izquierdo
completamente hacia abajo y manténgalo en esta posición. Ahora mueva la palanca de control derecha rápidamente hacia la
derecha y hacia la izquierda hasta que el mando a distancia emita un pitido y los LED rojos del helicóptero empiecen a parpadear.
Vuelve a soltar las palancas de control y espera a que los LEDs rojos del helicóptero vuelvan a encenderse de forma constante.

GEOMAGNETIC MODUL KALIBRIEREN
Schalten Sie Ihr Modell ein, binden dies mit der Fernsteuerung und stellen es waagrecht ab. Taste 10 der Fernsteuerung drücken
und gedrückt halten, bis des Sender einen Piepton von sich gibt und die Einschalt-LED des Copters schnell grün blinkt.
Den Coter in ca. 30 cm Höhe waagrecht nach rechts um die eigene Achse drehen bis der Sender einmal piept. Die roten LEDs des
Copters blinken nun schnell. Nun den Copter in ca. 30 cm Höhe mit der Kamera nach unten halten und ebenfalls um die eigene
Achse nach rechts drehen bis der Sender 2x piept und die roten LEDs des Copters schnell blinken. Stellen Sie das Modell wieder
waagerecht ab und warten bis die LEDs konstant rot leuchten.
CALIBRATE GEOMAGNETIC MODULE
Turn on your model, bind it with the remote control and place it horizontally. Press and hold button 10 on the remote control until
the transmitter beeps and the power-on LED of the copter flashes green quickly.
Turn the coter horizontally to the right around its own axis at a height of approx. 30 cm until the transmitter beeps once. The red
LEDs of the copter will now flash rapidly. Now hold the copter at a height of approx. 30 cm with the camera pointing downwards
and also turn it around its own axis to the right until the transmitter beeps 2x and the red LEDs of the copter flash quickly. Place
the model horizontally again and wait until the LEDs are constantly red.
ÉTALONNAGE DU MODULE GÉOMAGNÉTIQUE
Mettez votre modèle en marche, liez-le avec la télécommande et placez-le à l'horizontale. Appuyez sur le bouton 10 de la
télécommande et maintenez-le enfoncé jusqu'à ce que l'émetteur émette un bip et que la LED de mise sous tension du copter
clignote rapidement en vert.
Tournez le coter horizontalement à droite autour de son axe à une hauteur d'environ 30 cm jusqu'à ce que l'émetteur émette un
bip. Les LEDs rouges de l'hélicoptère vont maintenant clignoter rapidement. Tenez maintenant le copter à une hauteur d'environ
30 cm avec la caméra dirigée vers le bas et tournez-le également autour de son axe vers la droite jusqu'à ce que l'émetteur émette
deux bips et que les LED rouges du copter clignotent rapidement. Placez à nouveau le modèle à l'horizontale et attendez que les
LED s'allument en rouge constant.
CALIBRARE IL MODULO GEOMAGNETICO
Accendete il vostro modello, legatelo con il telecomando e mettetelo in posizione orizzontale. Premi il tasto 10 sul telecomando e
tienilo premuto fino a quando il trasmettitore emette un bip e il LED di accensione dell'elicottero lampeggia rapidamente in verde.
Ruotare il coter orizzontalmente a destra intorno al proprio asse ad un'altezza di circa 30 cm fino a quando il trasmettitore emette
un segnale acustico. I LED rossi dell'elicottero ora lampeggeranno rapidamente. Ora tieni l'elicottero ad un'altezza di circa 30 cm
con la telecamera rivolta verso il basso e giralo anche intorno al proprio asse verso destra fino a quando il trasmettitore emette
due bip e i LED rossi dell'elicottero lampeggiano rapidamente. Posizionare nuovamente il modello in orizzontale e attendere che i
LED si accendano costantemente di rosso.
CALIBRACIÓN DEL MÓDULO GEOMAGNÉTICO
Encienda su modelo, fíjelo con el mando a distancia y colóquelo en posición horizontal. Pulse el botón 10 del mando a distancia y
manténgalo pulsado hasta que el transmisor emita un pitido y el LED de encendido del helicóptero parpadee rápidamente en
verde.
Gire el coterio horizontalmente hacia la derecha alrededor de su propio eje a una altura de unos 30 cm hasta que el transmisor
emita un pitido. Los LEDs rojos del helicóptero parpadearán rápidamente. Mantenga ahora el helicóptero a una altura de unos 30
cm con la cámara apuntando hacia abajo y gírelo también sobre su propio eje hacia la derecha hasta que el transmisor emita dos
pitidos y los LED rojos del helicóptero parpadeen rápidamente. Vuelva a colocar el modelo en posición horizontal y espere a que
los LEDs se enciendan constantemente en rojo.
Kalibrieren | Calibrate | Calibrer
Calibrare | Calibrar
30cm
30cm
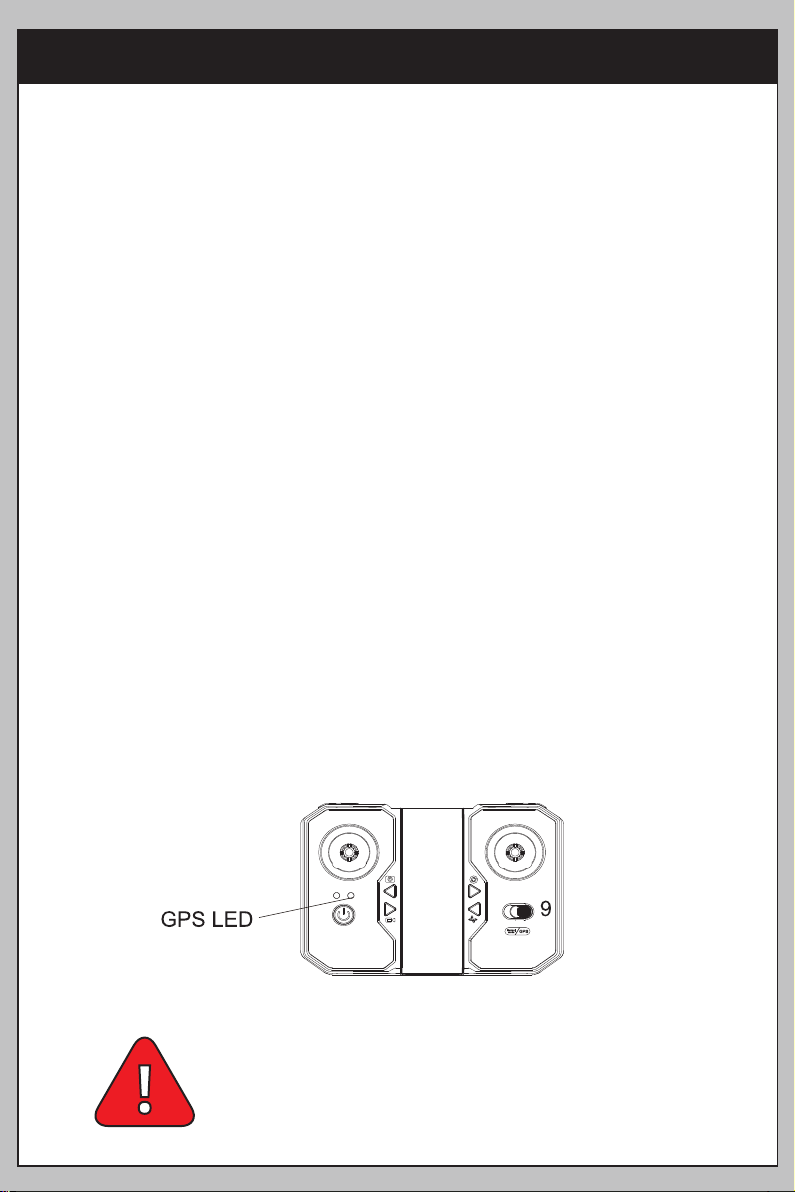
Fliegen | flying | En vol
Volare | Volando
Wird das Modell nicht benutzt IMMER den Akku aus dem Modell entnehmen!
If the model is not used ALWAYS disconnect the battery and remove it from the boat!
Si le modèle n'est pas utilisé, débranchez TOUJOURS la batterie et retirez-la du modèle!
Se il modello non viene utilizzato SEMPRE scollegare la batteria e rimuoverla dal modello!
Si el modelo no se usa, ¡desconecte SIEMPRE la batería y quítela del modelo!
Sie können Ihren neuen Copter Indoor sowie Outdoor betreiben. Für den Indoor-Flug schalten Sie das Modell mit der Taste 9 der
Fernsteuerung in den „Normal Mode“. Für den Outdoor Flug verwenden Sie bitte IMMER den GPS Modus. Im GPS Modus ist
zwingend ein Smartphone mit 5G WiFi-Technologie nötigt (APP mit systemrelevanten Daten für einen GPS Betrieb).
Beim Fliegen Im „Normal Mode“ verfügt das Modell über eine optische Positionshaltung mittels eines Sensors auf der Unterseite
des Modells. Im GPS Modus müssen Sie warten/ sicherstellen, dass der Copter mit ausreichend Sateliten verbunden ist (min. 8).
Dies sehen Sie in der App auf Ihrem Smartphone sowie an der Kontrolleuchte Ihres Senders (rechte LED oberhalb des Ein-/
Ausschalters. Leuchtet die LED grün hat das Modell Verbindung zu ausreichend Sateliten. Die Satelitensuche kann ca. 3-5
Minuten duaern. Schalten Sie den Flugmodus der Taste 9 NIEMALS während des Fluges um, dies führt zu Fehlfunktionen!
You can operate your new copter both indoors and outdoors. For indoor flight, switch the model to "Normal Mode" by pressing
button 9 on the remote control. For outdoor flight, please ALWAYS use the GPS mode. In GPS mode, a smartphone with 5G WiFi
technology is mandatory (APP with system relevant data for GPS operation).
When flying In "Normal Mode" the model has an optical position keeping by means of a sensor on the bottom side of the model.
In GPS mode, you need to wait/make sure the copter is connected to enough satellites (min 8). You can see this in the app on your
smartphone as well as on the control light of your transmitter (right LED above the on/off switch. If the LED is green, the model is
connected to sufficient satellites. The satellite search can take about 3-5 minutes. NEVER switch the flight mode of the key 9
during the flight, this leads to malfunctions!
Vous pouvez utiliser votre nouvel hélicoptère à l'intérieur comme à l'extérieur. Pour le vol en intérieur, passez le modèle en "Mode
normal" avec le bouton 9 de la télécommande. Pour les vols en extérieur, utilisez TOUJOURS le mode GPS. En mode GPS, un
smartphone doté de la technologie WiFi 5G est nécessaire (APP avec données pertinentes pour le fonctionnement du GPS).
Lorsqu'il vole en "mode normal", le modèle dispose d'un système de positionnement optique au moyen d'un capteur situé sur la
face inférieure du modèle. En mode GPS, vous devez attendre et vous assurer que le copter est connecté à suffisamment de
satellites (min. 8). Vous pouvez le voir dans l'application sur votre smartphone et sur le voyant de contrôle de votre émetteur (LED
de droite au-dessus de l'interrupteur marche/arrêt). Si le voyant est vert, le modèle est connecté à un nombre suffisant de
satellites. La recherche par satellite peut prendre environ 3 à 5 minutes. Ne changez JAMAIS le mode de vol du bouton 9 pendant
le vol, cela entraînerait des dysfonctionnements !
Puoi far funzionare il tuo nuovo elicottero sia all'interno che all'esterno. Per il volo al chiuso, passare il modello alla "Modalità
normale" con il pulsante 9 del telecomando. Per il volo all'aperto, usate SEMPRE la modalità GPS. In modalità GPS, è necessario
uno smartphone con tecnologia WiFi 5G (APP con dati rilevanti per il sistema per il funzionamento GPS).
Quando si vola in "Normal Mode", il modello ha un sistema di posizionamento ottico per mezzo di un sensore sul lato inferiore del
modello. In modalità GPS devi aspettare/assicurarti che l'elicottero sia collegato a un numero sufficiente di satelliti (min. 8). Lo
puoi vedere nell'app sul tuo smartphone e sulla luce di controllo del tuo trasmettitore (LED di destra sopra l'interruttore on/off). Se
il LED è verde, il modello è collegato a un numero sufficiente di satelliti. La ricerca satellitare può durare circa 3-5 minuti. Non
cambiare MAI la modalità di volo del pulsante 9 durante il volo, questo porterà a malfunzionamenti!
Puedes manejar tu nuevo helicóptero tanto en interiores como en exteriores. Para el vuelo en interiores, ponga el modelo en
"Modo Normal" con el botón 9 del mando a distancia. Para el vuelo en exteriores, utilice SIEMPRE el modo GPS. En el modo GPS,
se requiere un smartphone con tecnología WiFi 5G (APP con datos relevantes del sistema para el funcionamiento del GPS).
Cuando se vuela en "Modo Normal", el modelo dispone de un sistema de posicionamiento óptico mediante un sensor en la parte
inferior del modelo. En el modo GPS tienes que esperar/ asegurarte de que el helicóptero está conectado a suficientes satélites
(mínimo 8). Puedes verlo en la aplicación de tu smartphone y en la luz de control de tu emisora (el LED derecho sobre el
interruptor de encendido/apagado). Si el LED está verde, el modelo está conectado a suficientes satélites. La búsqueda por
satélite puede durar unos 3-5 minutos. NUNCA cambie el modo de vuelo del botón 9 durante el vuelo, ya que esto provocará un
mal funcionamiento.
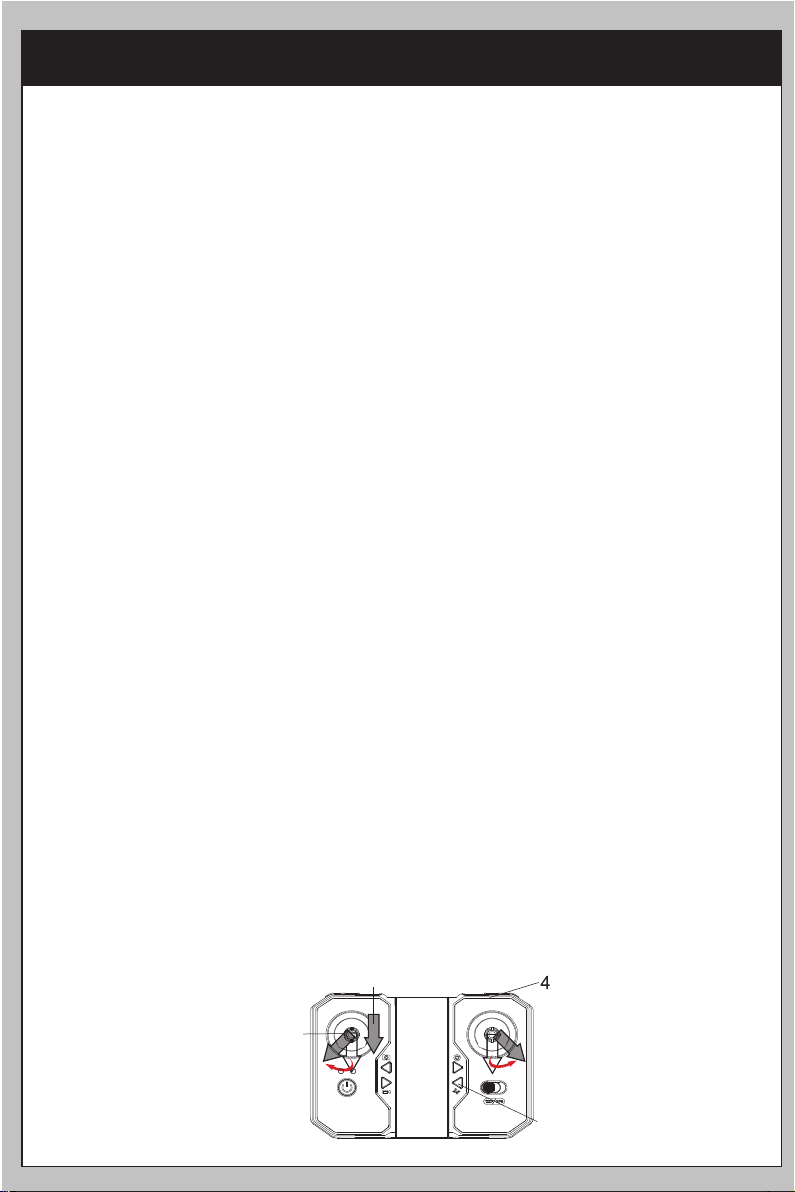
Ihnen stehen zwei Start- / Landemethoden zur Verfügung. Methode eins ist die automatische Start-Landefunktion. Durch drücken
der Taste 3 (ca. 2-3 Sekunden gedrückt halten) er Fernsteuerung startet Ihr Modell selbständig, steigt auf eine Höhe von ca. 1,5-2
Metern und hält dann diese Höhe. Durch erneutes Drücken der Taste 3 (ca. 2-3 Sekunden gedrückt halten) landet das Modell
selbständig (an der Position an der sich das Modell aktuell befindet). Durch Drücken der Taste 4 (ca. 2-3 Sekunden gedrückt
halten) der Fernsteuerung (NUR im aktivierten GPS Modus!) kommt das Modell selbständig zu seinem Startpunkt zurück und
landet an diesem Ort.
Die zweite Methode ist ein manueller Start/ Landung. Drücken Sie beide Steuerknüppel der Fernsteuerung gleichzeitig in die
jeweils äußere untere Ecke und halten diese Position der Knüppel bis die Motoren zu laufen beginnen. Drücken Sie nun den
linken Steuerhebl nach oben und das Modell hebt ab. Das Modell steigt so lange bis Sie den Hebel loslassen. Zum Landen ziehen
Sie einfach den linken Steuerhebel nach unten, das Modell beginnt an seiner aktuellen Position nun mit dem Sinkflug. Halten Sie
den Hebel so lange unten, bis das Modell auf dem Boden aufgesetzt hat und die Motoren nicht mehr laufen.
There are two takeoff / landing methods available to you. Method one is the automatic take-off/landing function. By pressing
button 3 (hold for 2-3 seconds) on the remote control, your model will take off automatically, climb to an altitude of approx. 1.5-2
meters and then maintain this altitude. By pressing button 3 again (hold it down for 2-3 seconds), the model will land automatical-
ly (at the position where the model is currently located). By pressing button 4 (hold down for approx. 2-3 seconds) on the remote
control (ONLY in activated GPS mode!) the model will return to its starting point independently and land at this location.
The second method is a manual takeoff/landing. Push both control sticks of the remote control simultaneously into the respective
outer lower corner and hold this position of the sticks until the motors start to run. Push the left stick up and the model will take
off. The model will continue to climb until you release the lever. To land, simply pull the left control lever down, the model will now
start descending at its current position. Keep the lever down until the model has touched down on the ground and the motors
stop running.
VDeux méthodes de décollage/atterrissage sont à votre disposition. La première méthode est la fonction de décollage/atterrissa-
ge automatique. En appuyant sur le bouton 3 (maintenez-le enfoncé pendant 2 à 3 secondes) de la télécommande, votre modèle
décolle automatiquement, monte jusqu'à une altitude d'environ 1,5 à 2 mètres et maintient ensuite cette altitude. En appuyant à
nouveau sur le bouton 3 (en le maintenant enfoncé pendant environ 2 à 3 secondes), le modèle atterrira automatiquement (à
l'endroit où il se trouve actuellement). En appuyant sur le bouton 4 (maintenez-le enfoncé pendant environ 2 à 3 secondes) de la
télécommande (UNIQUEMENT en mode GPS activé !), le modèle retourne indépendamment à son point de départ et atterrit à cet
endroit.
La deuxième méthode est un décollage/atterrissage manuel. Poussez les deux bâtons de la télécommande simultanément dans le
coin inférieur extérieur respectif et maintenez cette position des bâtons jusqu'à ce que les moteurs commencent à tourner.
Poussez maintenant le manche gauche vers le haut et le modèle décolle. Le modèle continuera à monter jusqu'à ce que vous
relâchiez le levier. Pour atterrir, il suffit de tirer le levier de commande gauche vers le bas et le modèle commencera à descendre à
sa position actuelle. Maintenez le levier vers le bas jusqu'à ce que le modèle ait touché le sol et que les moteurs cessent de
tourner.
Ci sono due metodi di decollo/atterraggio a vostra disposizione. Il primo metodo è la funzione di decollo/atterraggio automatico.
Premendo il tasto 3 (tenerlo premuto per circa 2-3 secondi) sul telecomando, il vostro modello decollerà automaticamente, salirà
ad un'altitudine di circa 1,5-2 metri e poi manterrà questa altitudine. Premendo nuovamente il pulsante 3 (tenerlo premuto per
circa 2-3 secondi), il modello atterrerà automaticamente (nella posizione in cui si trova attualmente). Premendo il tasto 4 (tenere
premuto per circa 2-3 secondi) sul telecomando (SOLO in modalità GPS attivata!) il modello tornerà autonomamente al suo punto
di partenza e atterrerà in questa posizione.
Il secondo metodo è un decollo/atterraggio manuale. Spingete entrambi gli stick di controllo del telecomando simultaneamente
nel rispettivo angolo inferiore esterno e mantenete questa posizione degli stick finché i motori non iniziano a funzionare. Ora
spingete lo stick sinistro verso l'alto e il modello decollerà. Il modello continuerà a salire fino a quando non rilascerete la leva. Per
atterrare, basta tirare la leva di comando sinistra verso il basso e il modello inizierà a scendere nella sua posizione attuale. Tenere
la leva abbassata fino a quando il modello ha toccato il suolo e i motori smettono di funzionare.
Tiene a su disposición dos métodos de despegue y aterrizaje. El primer método es la función de despegue/aterrizaje automático.
Pulsando el botón 3 (manteniéndolo pulsado durante 2-3 segundos) del mando a distancia, su modelo despegará automáticamen-
te, subirá a una altitud de aproximadamente 1,5-2 metros y luego mantendrá esta altitud. Pulsando de nuevo el botón 3
(manteniéndolo pulsado durante unos 2-3 segundos), el modelo aterrizará automáticamente (en la posición en la que se
encuentre el modelo). Pulsando el botón 4 (manteniéndolo pulsado durante aprox. 2-3 segundos) del mando a distancia (¡SÓLO
en modo GPS activado!) el modelo volverá de forma independiente a su punto de partida y aterrizará en este lugar.
El segundo método es un despegue/aterrizaje manual. Empuje ambos palos de control del mando a distancia simultáneamente en
la esquina inferior externa respectiva y mantenga esta posición de los palos hasta que los motores comiencen a funcionar. Ahora
empuja el stick izquierdo hacia arriba y el modelo despegará. El modelo seguirá subiendo hasta que suelte la palanca. Para
aterrizar, simplemente tire de la palanca de control izquierda hacia abajo y el modelo comenzará a descender en su posición
actual. Mantenga la palanca abajo hasta que el modelo haya tocado el suelo y los motores dejen de funcionar.
Fliegen | flying | En vol
Volare | Volando
Take off method 1
Take off method 2
Landing method 1
Landing Method 2
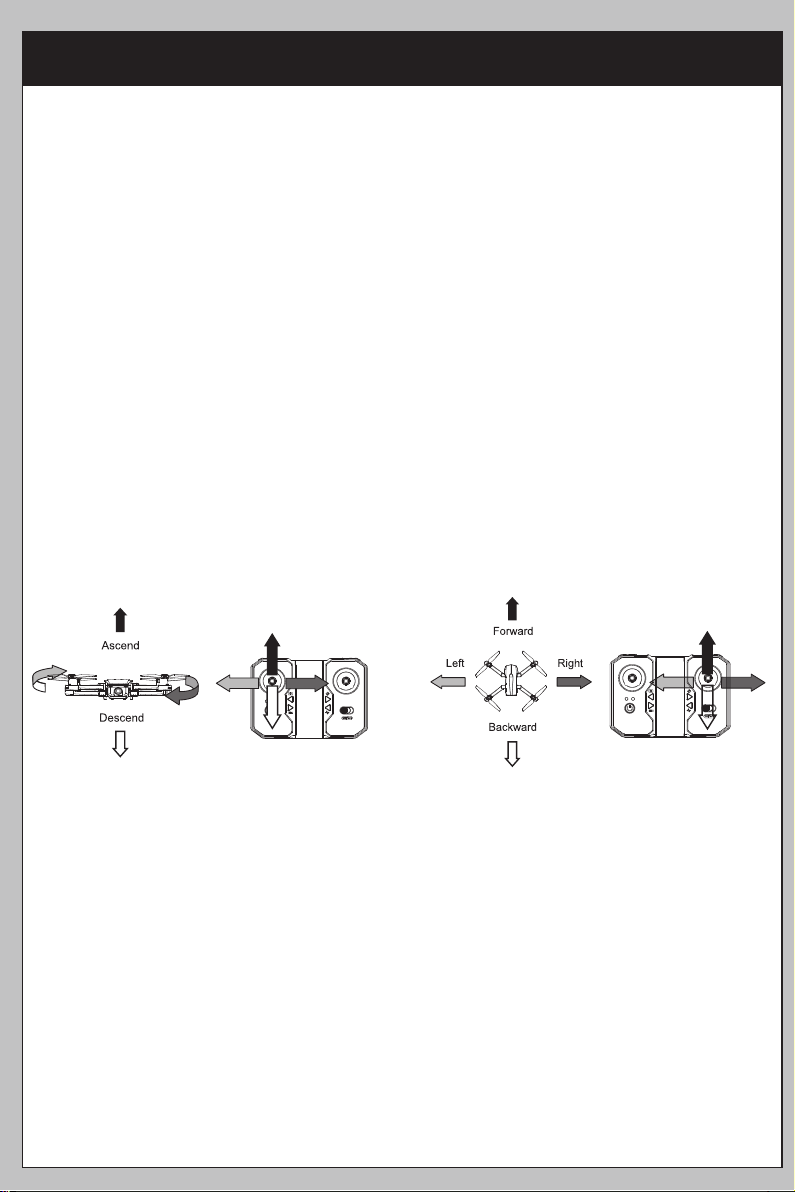
Fliegen | flying | En vol
Volare | Volando
Das Modell verfügt über eine automatische Höhenstabilisierung (Höhenhaltung), d. h. Ihr Modell hält selbständig die vorgegebe-
ne Höhe. Solange Sie den linken Hebel der Fernsteuerung nach oben gedrückt halten, steigt das Modell nach oben. Ziehen Sie
den Hebel nach unten sinkt das Modell. Sobald Sie den Hebel los lassen hält das Modell die aktuelle Höhe von selbst.
The model has an automatic height stabilisation (altitude hold), i.e. your model automatically holds the specified height. As long
as you hold the left-hand lever of the remote control pressed upwards, the model will climb upwards. If you pull the lever
downwards, the model sinks. As soon as you release the lever, the model maintains the current height by itself.
Le modèle dispose d'une stabilisation automatique de la hauteur (maintien de l'altitude), c'est-à-dire que votre modèle maintient
automatiquement la hauteur spécifiée. Tant que vous maintenez le levier gauche de la télécommande enfoncé vers le haut, le
modèle monte vers le haut. Si vous tirez le levier vers le bas, le modèle coule. Dès que vous relâchez le levier, le modèle
maintient la hauteur actuelle par lui-même.
Il modello ha una stabilizzazione automatica dell'altezza (mantenimento dell'altezza), cioè il vostro modello mantiene
automaticamente l'altezza specificata. Finché si tiene premuta verso l'alto la leva sinistra del telecomando, il modello sale verso
l'alto. Se si tira la leva verso il basso, il modello affonda. Non appena si rilascia la leva, il modello mantiene l'altezza attuale da
solo.
El modelo tiene una estabilización automática de la altura (altitude hold), es decir, su modelo mantiene automáticamente la
altura especificada. Mientras mantengas la palanca izquierda del mando a distancia presionada hacia arriba, el modelo subirá.
Si tiras de la palanca hacia abajo, el modelo se hunde. Tan pronto como sueltas la palanca, el modelo mantiene la altura actual
por sí mismo.
Drücken des rechten Steuerhebels nach hinten/ unten bewirkt einen Rückwärtsflug des Modells. Drücken des Hebels nach
vorne/ oben bewirkt einen Vorwärtsflug.
Drücken Sie den Hebel nach rechts, fliegt das Modell nach rechts. Die Steuerung des Hebels nach links lässt das Modell nach
links fliegen.
Pressing the right control lever backward/down causes the model to fly backward. Pressing the lever forward/up causes the
model to fly forward.
Pressing the lever to the right causes the model to fly to the right. Controlling the lever to the left causes the model to fly to the
left.
En appuyant sur le levier de commande droit en arrière/en bas, le modèle vole en arrière. En appuyant sur le levier vers
l'avant/vers le haut, le modèle vole vers l'avant.
En appuyant sur le levier vers la droite, le modèle vole vers la droite. En contrôlant le levier vers la gauche, le modèle vole vers
la gauche.
Premendo la leva di comando destra all'indietro/giù, il modello vola all'indietro. Premendo la leva in avanti/su, il modello vola in
avanti.
Premendo la leva a destra, il modello vola a destra. Controllando la leva a sinistra, il modello vola a sinistra.
Al pulsar la palanca de control derecha hacia atrás/abajo, el modelo vuela hacia atrás. Presionando la palanca hacia adelante/ar-
riba, el modelo vuela hacia adelante.
Presionando la palanca hacia la derecha, el modelo vuela hacia la derecha. Controlar la palanca hacia la izquierda hace que el
modelo vuele hacia la izquierda.
Drücken des linken Steuerhebels nach links/ rechts bewirkt einen Drehbewegung des Modells um die eigene Achse.
Pressing the left control lever to the left/right causes the model to rotate around its own axis.
En appuyant sur le levier de commande gauche vers la gauche/droite, le modèle tourne autour de son propre axe.
Premendo la leva di comando sinistra a sinistra/destra il modello ruota intorno al proprio asse.
Presionando la palanca de control izquierda a la izquierda/derecha hace que el modelo gire alrededor de su propio eje.

Not-Aus | emergency stop | Arrêt d'urgence
Arresto di emergenza | Parada de emergencia
NUR im Notfall anwenden.
Das Modell kann dabei Schaden nehmen!
Sollte eine gefährliche, nicht mehr kontrollierbare Situation entstehen, können Sie das Modell mittels Not-Aus komplett
abschalten. Drücken Sie hierzu die Tasten “10” und halten diese gedrückt. Es werden nun die Motoren des Modell komplett
abgeschalten. Das Modell kann bei eventuellen Abstürzen Schaden nehmen!
If a dangerous, uncontrollable situation should arise you can switch off
the model completely using the emergency stop.
To do this, press and hold the button "10".
Now the motors of the model are switched off completely.
The model can be damaged in the event of a crash!
En cas de situation dangereuse qui ne peut plus être contrôlée, vous
pouvez éteindre complètement le modèle en utilisant l'arrêt d'urgence.
Pour ce faire, appuyez sur les touches "10" et maintenez-les enfoncées.
Les moteurs du modèle sont maintenant complètement éteints.
Le modèle peut être endommagé en cas de collision !
In caso di situazione di pericolo non più controllabile, è possibile spegnere completamente il modello con l'arresto d'emergenza.
Per fare ciò, tenere premuti i tasti "10". I motori del modello sono ora completamente spenti. Il modello può essere danneggiato in
caso di incidente!
En caso de que se produzca una situación peligrosa que ya no se pueda controlar, se puede apagar el modelo completamente
usando la parada de emergencia. Para ello, mantenga pulsadas las teclas "10". Los motores del modelo están ahora
completamente apagados. ¡El modelo puede ser dañado en caso de accidente!
Use ONLY in an emergency.
The model can be damaged!
A utiliser UNIQUEMENT en cas d'urgence.
Le modèle peut être endommagé !
Utilizzare SOLO in caso di emergenza.
Il modello può essere danneggiato!
Usar SOLO en una emergencia.
¡El modelo puede ser dañado!
Fernsteuerung Mode umstellen | Change the mode of the remote control | Changer le mode de la
télécommande | Cambiare la modalità del telecomando | Cambiar el modo del mando a distancia
Als Standard ist bei Ihrem Modell „MODE 2“ aktivert (Gas/ Pitch auf dem linken Steuerknüppel). Sie können jedoch den
Steuermodus auch umstellen, damit Gas/ Pitch sich auf dem rechten Steuerknüppel befinden.
Drücken und halten Sie hierzu die Taste 6 der Fernsteuerung und schalten diese dabei ein. Bewegen Sie nun den rechten
Steuerhebel nach oben und danach nach unten und Sie haben den Model umgestellt. Wollen Sie wieder den Model auf die
Standard-Einstellung zurücksetzen (Gas/ Pitch links) drücken und halten Sie die Taste 5 der Fernsteuerung und schalten diese
dabei ein. Bewegen Sie nun den linken Steuerhebel nach oben und dann nach unten.
By default, your model is set to "MODE 2" (throttle/pitch on the left stick). However, you can also change the control mode so that
throttle/pitch is on the right control stick.
To do this, press and hold button 6 on the remote control while turning it on. Now move the right control stick up and then down
and you have changed the model. If you want to reset the model to the standard setting (throttle/pitch left), press and hold button
5 of the remote control and switch it on. Now move the left control lever up and then down.
Par défaut, votre modèle est réglé sur le "MODE 2" (manette des gaz/pitch sur le manche gauche). Cependant, vous pouvez aussi
changer le mode de contrôle de façon à ce que les gaz et le tangage soient sur le manche droit.
Pour ce faire, appuyez sur le bouton 6 de la télécommande et maintenez-le enfoncé tout en l'allumant. Déplacez maintenant le
manche de droite vers le haut puis vers le bas et vous avez changé de modèle. Si vous souhaitez réinitialiser le modèle au réglage
standard (gaz/pitch à gauche), maintenez le bouton 5 de la télécommande enfoncé et allumez-la. Déplacez maintenant le levier de
commande gauche vers le haut, puis vers le bas.
Per impostazione predefinita, il modello è impostato su "MODE 2" (throttle/pitch sullo stick sinistro). Tuttavia, puoi anche
cambiare la modalità di controllo in modo che il throttle/pitch sia sullo stick destro.
Per farlo, tenete premuto il tasto 6 del telecomando mentre lo accendete. Ora muovi lo stick di controllo destro verso l'alto e poi
verso il basso e hai cambiato il modello. Se volete resettare il modello all'impostazione standard (gas/pitch a sinistra), tenete
premuto il tasto 5 del telecomando e accendetelo. Ora muovi la leva di comando sinistra verso l'alto e poi verso il basso.
Por defecto, su modelo está configurado en el "MODO 2" (acelerador/pitch en el stick izquierdo). Sin embargo, también puedes
cambiar el modo de control para que el acelerador/inclinación esté en el stick derecho.
Para ello, mantenga pulsado el botón 6 del mando a distancia mientras lo enciende. Ahora mueve el stick de control derecho
hacia arriba y luego hacia abajo y habrás cambiado el modelo. Si desea restablecer el modelo a la configuración estándar
(acelerador/tono izquierdo), mantenga pulsado el botón 5 del mando a distancia y enciéndalo. Ahora mueva la palanca de control
izquierda hacia arriba y luego hacia abajo.
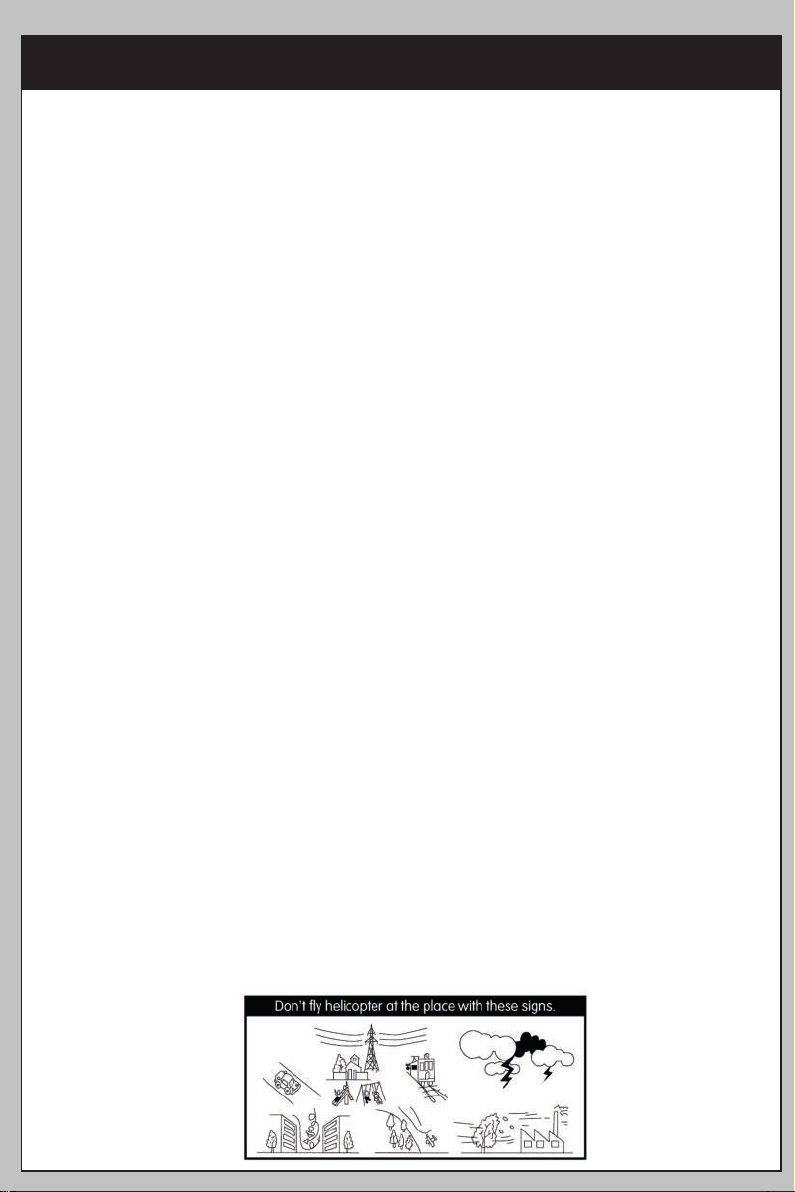
weitere Funktionen | other functions | autres fonctions
altre funzioni | otras funciones
Weiter Funktionen der Fernsteuerungstasten.
4) Auto-Return-Home (Coming Home), Modell fleigt zurück zu seinem Startpunkt und landet hier (siehe Seite 17)
5/6) Auf-/ abschwenken der Kamera
8) Speed Select: Ihr Modell hat 2 Geschwindigkeisstufen die Sie durch drücken der Taste 8 umschalten können
10) Kalibrieren des Modells siehe Seite 15 / Not-Aus siehe Seite 19
11) Einmaliges drücken löst eine Fotoaufnahme aus, langes Drücken schaltet die LED Belauchtung des Modells ein/aus
12) Einmaliges drücken startet/ beendet eine Videoaufnahme, Langes drücken schaltet das Modell in den Headless-Modus (Nach
Drücken der Taste ist der Headless-Modus aktiviert. Das Modell fliegt nun immer in die gesteuerte Richtung, egal in
welcher Fluglage es sich gerade befindet. Durch erneutes Drücken kehren Sie zum normalen Modus zurück.)
13) Smartphonehalter zum herausklappen
14) Senderantenne(n) müssen bei jedem Flug ausgeklappt werden!
Further functions of the remote control buttons.
4) Auto-Return-Home (Coming Home), model flew back to its starting point and landed here (see page 17).
5/6) Pan up/down the camera
8) Speed Select: Your model has 2 speed levels which you can switch by pressing the 8 button.
10) Calibration of the model see page 15 / Emergency stop see page 19
11) Press once to take a photo, press and hold to turn the model's LED light on/off.
12) Press once to start/stop video recording, long press to switch model to headless mode ( After pressing the button the
headless mode is activated. The model flies now always in the controlled direction, no matter in which in whichever flight attitude
it is at the moment. Press again to return to normal mode.)
13) Smartphone holder to fold out
14) Transmitter antenna(s) must be unfolded for each flight!
Autres fonctions des touches de la télécommande.
4) Auto-Return-Home (retour à la maison), le modèle revient à son point de départ et atterrit ici (voir page 17).
5/6) Pivoter la caméra vers le haut/bas
8) Sélection de la vitesse : Votre modèle possède 2 niveaux de vitesse que vous pouvez changer en appuyant sur le bouton 8.
10) Calibrage du modèle voir page 15 / Arrêt d'urgence voir page 19
11) Appuyez une fois pour prendre une photo, appuyez et maintenez pour allumer/éteindre la lumière LED du modèle.
12) Appuyez une fois pour démarrer/arrêter un enregistrement vidéo, appuyez et maintenez pour faire passer le modèle en mode
sans tête (Après avoir appuyé sur le bouton, le mode sans tête est activé. Le modèle vole maintenant toujours dans la direction
contrôlée, quelle que soit la position de vol dans laquelle il se trouve.
quelle que soit l'attitude de vol dans laquelle il se trouve actuellement. Appuyez à nouveau pour revenir au mode normal).
13) Support de smartphone à déplier
14) La ou les antennes de l'émetteur doivent être dépliées pour chaque vol !
Altre funzioni dei pulsanti del telecomando.
4) Auto-Return-Home (Ritorno a casa), il modello è tornato al punto di partenza ed è atterrato qui (vedi pagina 17).
5/6) Inclinare la telecamera su/giù
8) Selezione della velocità: Il tuo modello ha 2 livelli di velocità che puoi cambiare premendo il pulsante 8.
10) Taratura del modello vedi pagina 15 / Arresto di emergenza vedi pagina 19
11) Premere una volta per scattare una foto, tenere premuto per accendere/spegnere la luce LED del modello.
12) Premere una volta per avviare/fermare una registrazione video, tenere premuto per passare il modello alla modalità senza
testa (Dopo aver premuto il pulsante la modalità senza testa è attivata. Il modello ora vola sempre nella direzione controllata, non
importa in quale posizione di volo si trovi.
in qualsiasi atteggiamento di volo si trovi attualmente. Premere di nuovo per tornare alla modalità normale).
13) Porta smartphone da ripiegare
14) L'antenna o le antenne del trasmettitore devono essere spiegate per ogni volo!
Otras funciones de los botones del mando a distancia.
4) Auto-Retorno a Casa (Coming Home), el modelo voló de vuelta a su punto de partida y aterrizó aquí (ver página 17).
5/6) Pivotar la cámara hacia arriba/abajo
8) Selección de velocidad: Su modelo tiene 2 niveles de velocidad que puede cambiar pulsando el botón 8.
10) Calibración del modelo ver página 15 / Parada de emergencia ver página 19
11) Pulse una vez para tomar una foto, mantenga pulsado para encender/apagar la luz LED del modelo.
12) Pulse una vez para iniciar/detener una grabación de vídeo, mantenga pulsado para cambiar el modelo al modo sin cabeza
(Después de pulsar el botón se activa el modo sin cabeza. El modelo ahora siempre vuela en la dirección controlada, sin importar
en qué posición de vuelo se encuentre.
en cualquier actitud de vuelo en la que se encuentre. Pulse de nuevo para volver al modo normal).
13) Soporte para smartphone desplegable
14) ¡La(s) antena(s) de la emisora debe(n) estar desplegada(s) en cada vuelo!
This manual suits for next models
1
Other DF-models Drone manuals


Popular Drone manuals by other brands


Autonomous Quadrotor Project
Autonomous Quadrotor Project Anzhelka user manual

Cobra RC Toys
Cobra RC Toys RC Micro Drone 2.0 instruction manual

World Tech Toys
World Tech Toys MARVEL ULTIMATE SPIDER-MAN MICRO DRONE instruction manual

Radio Shack
Radio Shack Surveyor Drone user guide

Xiaomi
Xiaomi Mi Drone user guide

Nikko Air
Nikko Air RACE VISION 220 FPV manual