DHS Fitness DHS 3309 User manual

BICICLETĂ ELIPTICĂ DHS 3309
MANUALUL UTILIZATORULUI
IMPORTANT!
Citiți cu atenție toate instrucțiunile înainte de a utiliza acest produs.
Păstrați acest manual pentru consultări ulterioare.
Specificațiile acestui produs pot varia ușor față de ilustrații și pot fi modificate fără notificare.

2
Înainte de a începe
Vă mulțumim pentru achiziționarea bicicletei fitness DHS 2729! Pentru siguranța și beneficiile dvs., citiți
cu atenție acest manual înainte de a utiliza aparatul.
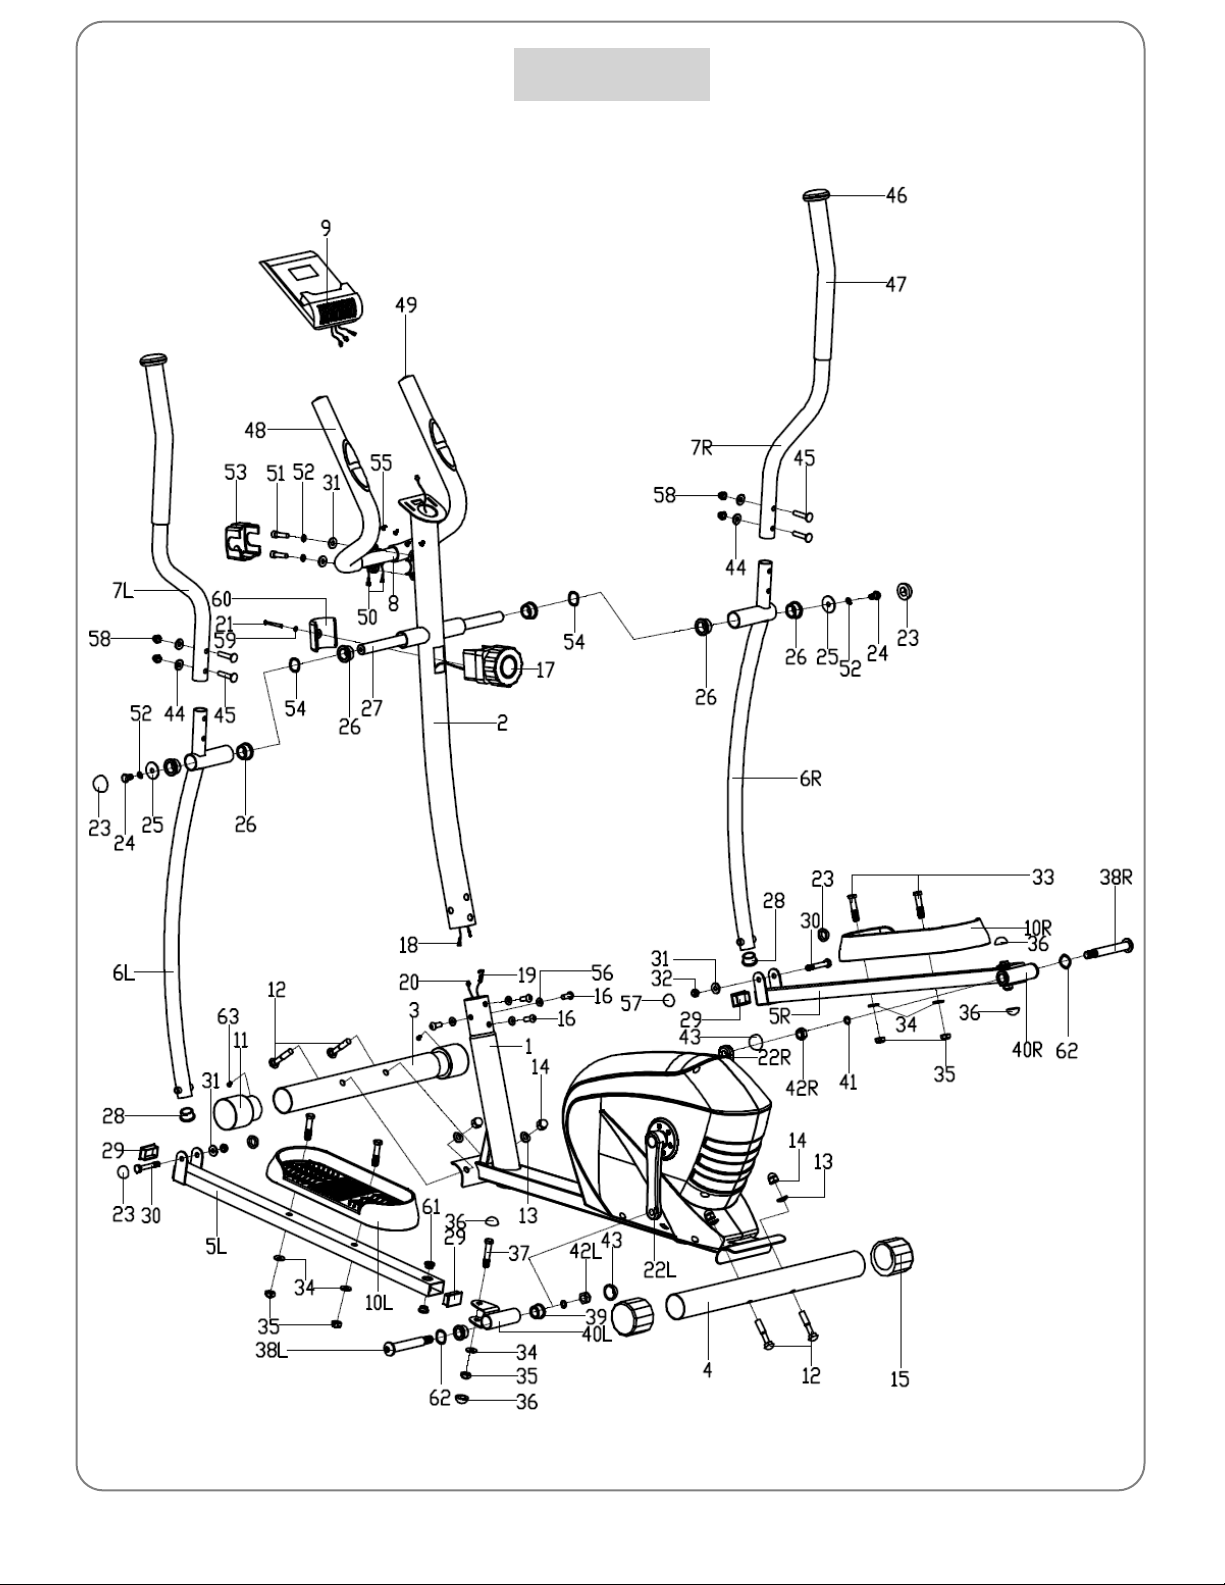
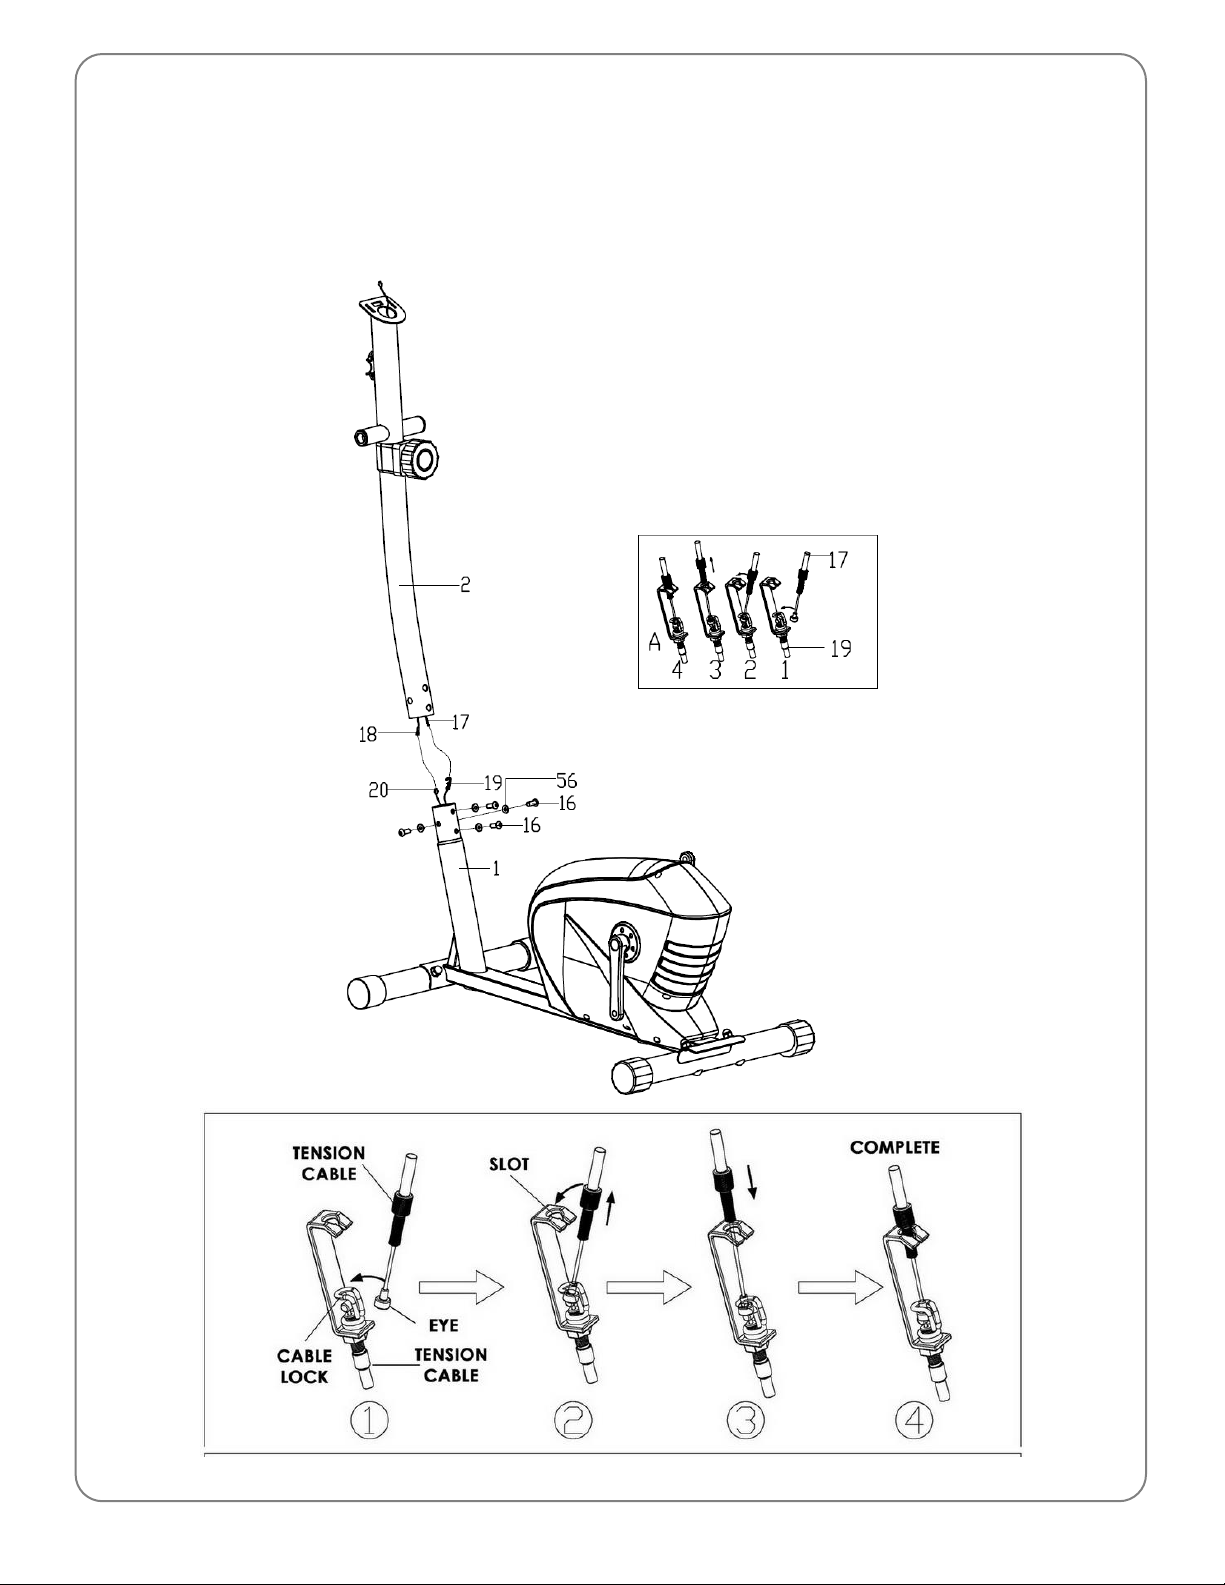
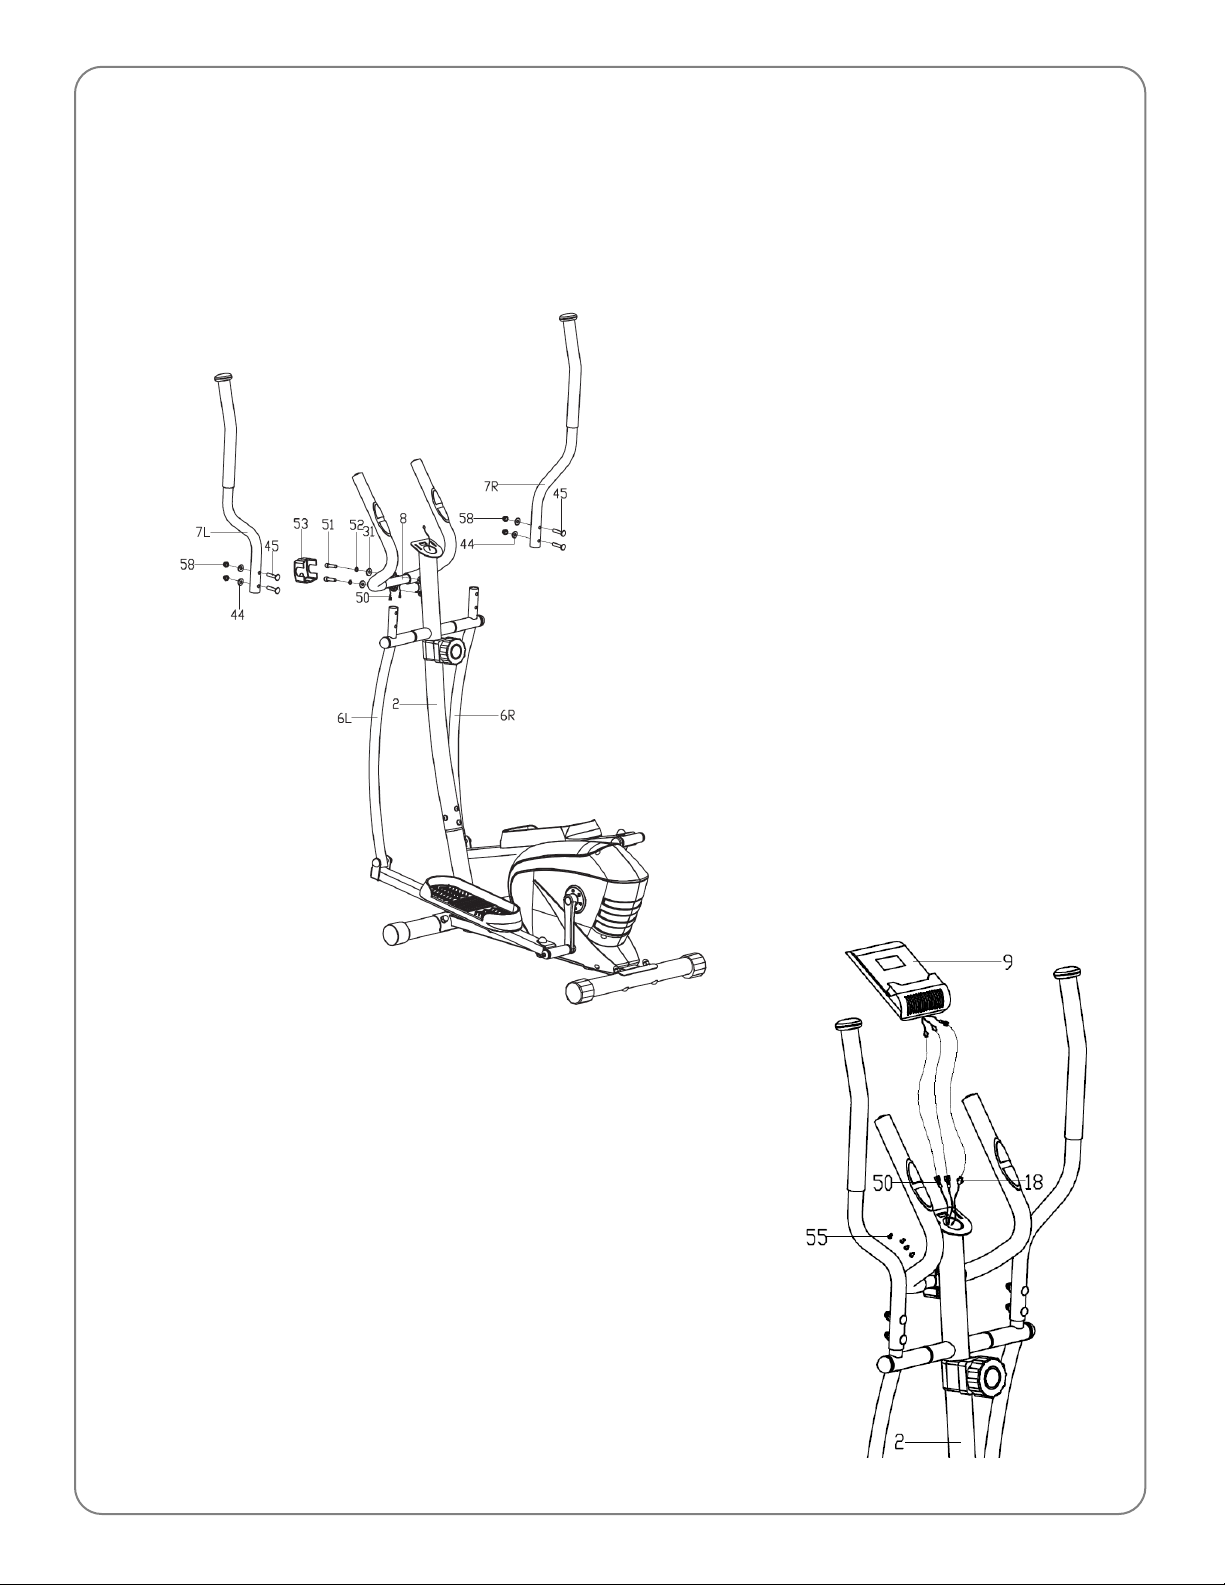
Înainte de asamblare, scoateți componentele din cutie și verificați dacă au fost furnizate toate piesele
listate. Instrucțiunile de montaj sunt descrise în următorii pași și ilustrații.
MĂSURI DE SIGURANȚĂ
ATENȚIE
ASIGURAȚI-VĂ CĂ CITIȚI TOT MANUALUL ÎNAINTE DE A ASAMBLA SAU UTILIZA BICICLETA. ÎN SPECIAL,
ATENȚIE LA URMĂTOARELE MĂSURILE DE SIGURANȚĂ:
01-Verificați toate șuruburile, piulițele și conexiunile înainte de a utiliza bicicleta pentru prima data, și
asigurați-vă că aparatul este în condiții bune.
02-Asamblați bicicleta într-un loc uscat ferită de umiditate și apă.
03-Bicicleta fitness trebuie montată pe o suprafață plană. Pentru protecție așezați sub un covor de
cauciuc sau ceva asemănător.
04-Înainte de a începe antrenamentul, pentru siguranța dumneavoastră, îndepărtați toate obiectele
aflate la o rază de 2 metri de bicicleta fitness.
05-NU folosiți substanțe de curățare agresive. Utilizați numai uneltele adecvate/furnizate pentru
asamblarea aparatului sau pentru repararea oricărei părți componente. Îndepărtați urmele de
transpirație imediat după terminarea antrenamentului.
06-Sănătatea dvs. poate fi afectată de un antrenament incorect sau excesiv. Consultați un medic
înainte de a începe un program de exerciții. El poate defini setarea maximă (Puls, Watt/Putere,
Timp etc.) la care vă puteți antrena și puteți obține informații precise în timpul antrenamentului.
07-Efectuați antrenamentul pe aparat atunci când acesta functioneaza corect. Folosiți numai piese de
schimb originale pentru orice reparații necesare.
08-Acest aparat este destinat utilizării de către o singură persoana/sesiune de antrenament.
09-Purtați haine și încălțăminte potrivite pentru antrenamentul de fitness.
10-Dacă aveți senzație de amețeală, senzație de rău sau alte simptome anormale, vă rugăm să opriți
antrenamentul și să consultați un medic cât mai curând posibil.
11-Copiii și persoanele cu dizabilități, ar trebui să folosească aparatul numai în prezența altei persoane
care poate oferi ajutor și sfaturi.
12-Pentru a reduce riscul de electrocutare, arsuri, incendiu sau alte leziuni posibile, este important să
citiți și să respectați indicațiile din acest manual și măsurile de precauție înainte de folosire.
ATENȚIE: ÎNAINTE DE ÎNCEPUTUL ORICĂRUI PROGRAM DE ANTRENAMENT, CONSULTAȚI MEDICUL. Acest
lucru este deosebit de important pentru persoanele cu vârsta peste 35 de ani sau persoane cu probleme
de sănătate preexistente. CITIȚI TOATE INSTRUCȚIUNILE ÎNAINTE DE UTILIZAREA UNUI ECHIPAMENT DE
FITNESS. Greutatea maximă a utilizatorului: 125Kg.

3
DIAGRAMĂ

4
PĂRȚI COMPONENTE
NO.
DESCRIPTION
QTY
NO.
DESCRIPTION
QTY
1
Cadru principal
1
33
Șurub M10×45
4
2
Suport ghidon
1
34
Șaibă plată d10×1.5
6
3
Picior față
1
35
Piulițe M10
6
4
Picior spate
1
36
Capac piulițe S16
4
5L/R
Suport Pedal (L/R)
1/1
37
Șurub M10×50
2
6L/R
Braț (L/R)
1/1
38L/R
Șurub pedală (L/R)
1pr.
7L/R
Ghidon (L/R)
1/1
39
Bucșe Φ24×20×Φ16.1
4
8
Ghidon mic
1
40L/R
Conexiune pedală (L/R)
1/1
9
Computer
1
41
Șaibă Φ13×B2
2
10L/R
Pedală(L/R)
1/1
42L/R
Piulițe (L/R)
1pr.
11
Capac/protecție față
2
43
Capac piulițe S19
2
12
Șurub M10×57
4
44
Șaibe Φ20×d8×2×R16
4
13
Șaibă Φ10×1.5×Φ25×R28
4
45
Șurub M8×40
4
14
Piulițe M10
4
46
Capac sferic
2
15
Capac/protecție spate
2
47
Grip burete pt ghidon
2
16
Șurub M8×16
4
48
Grip burete pt sprijinire mână
2
17
Regulator tensiune
1
49
Capac rotund Φ25×1.5
2
18
Cablu extensie
1
50
Cablu senzor puls
2
19
Cablu tensiune
1
51
Șurub cilindric M8×30
2
20
Cablu senzor
1
52
Șaibe D8
4
21
Șurub cruce M5×45
1
53
Capac ghidon față
1
22L/R
Ax
1pr.
54
Șaibe Φ20×Φ28×0.3
2
23
Capac S14
4
55
Șurub cruce
4
24
Șurub M8×15
2
56
Șaibă Φ20×d8.5×R25
4
25
Șaibă plată Φ8.2×Φ32×2
2
57
Capac piulițe S13
2
26
Bucșe Φ32×2.5
6
58
Piulițe M8
4
27
Suport mic ghidon
1
59
Șaibă plată D5
1
28
Capac rotund Φ28×1.5
2
60
Capac regulator tensiune
1
29
Capac patrat □40×X25×1.5
4
61
Bucșe metal Φ14×10×Φ10.1
4
30
Șurub M8×55
2
62
Șaibe D17×0.3
2
31
Șaibă plată d8×1.5
4
63
Șurub cruce ST3×10
2
32
Piulițe M8
2
NOTĂ:
Majoritatea pieselor enumerate sunt ambalate separat, însă unele elemente sunt preinstalate în părțile
componente ale ansamblului. Dacă este cazul, pur și simplu demontați ansamblu dacă este necesar.
Consultați etapele de asamblare și notați toate componentele preinstalate.

5
Este important să vă asamblați produsul într-o zonă curată și liberă. Acest lucru vă va permite să mișcați
liber în jurul produsul în timp ce montați componente și veți reduce posibilitatea de a vă răni în timpul
asamblării.
Poate fi mai eficient, mai sigur și mai ușor de asamblat acest produs cu ajutorul unei alte persoane,
deoarece unele dintre componente pot fi mari, grele sau incomode pentru a vă descurca singur
INSTRUCȚIUNI DE ASAMBLARE
PASUL-1:
Prindeți piciorul din față (3) și cel din spate (4) de cadrul principal(1) cu șuruburile (12) și șaibele (13) și
piulițele (14) .

6
PASUL-2:
Conectați cablul pentru senzor (20) de cablul de extensie (18), apoi instalați Cablul Tensiune (19) cu cablul
de reglare tensiune (17) ca in imaginea de mai jos.
Fixați stâlpul pentru ghidon (2) de cadrul principal(1) cu șuruburile (16) și șaibele (56).

7
PASUL-3:
A. Atașați brațul stang (6L) pe suportul ghidonului (2) cu șuruburi (24), șaibe(52), șaibe plate (25), șaibe
(54) și pe suport (27). NU strângeți șuruburile tare până acest ansamblu este complet.
B. Atașați suport pedală stângă(5L) pe ax (22L) folosind șuruburi (38L), șaibe (62), șaibe (41), și piulițe (42L).
NU strângeți șuruburile tare până acest ansamblu este complet.
C. Atașați brațul stâng (6L) la suport pedală stâng(5L) cu ajutorul șuruburilor (30), șaibe plate (3) si piulițe
(32). Strângeți șuruburile menționate mai sus (24&30) și piulițele (42L) apoi puneti protecția (23, 57, 43
& 36).
D. Repetați operațiunea și pentru partea dreaptă la fel ca mai sus: fixați suport pedală (5R) și braț drept
(6R) pe axul (22R) si pe support ghidon (2). Rotind ușor axul se poate să vă ajute la asamblare.
E. Prindeți pedala (10L/R) pe suport pedală (5L/R) cu ajutorul șuruburilor (33), șaibelor plate (34) și a
piulițelor (35).

8
PASUL-4:
A. Introduceți Senzorul de puls (50) prin gaura suportului de ghidon (2) și scoateți-l pe sus. Prindeți ghidon
mic (8) pe suport ghidon (2) cu șurubul cylindric (51), cu șaibele (52) și cu șaibele plate (31). Apoi
acoperiți cu protecția (53).
B. Atașați Ghidonul (7L/R) pe brațele (6L/R) folosind șuruburile (45), șaibele (44) și piulițele (58).
PASUL-5:
Conectați Firul Puls (50) precum și firul extensie (18) la firele de la
computer (9), apoi atașați computerul (9) pe suportul computer de pe
suportul ghidon (2) cu ajutorul șuruburior cap cruce (55).

9
ÎNCĂLZIREA și RECUPERAREA
Un program de antrenament de succes constă într-un exercițiu de încălzire, aerobic și o relaxare. Faceți
întregul program cu cel puțin două și, de preferință, de trei ori pe săptămână, odihnindu-vă pentru o zi
între antrenamente. După câteva luni, vă puteți mări numărul antrenamentelor de patru sau cinci ori pe
săptămână.
ÎNCĂLZIREA
Scopul încălzirii este de a vă pregăti corpul pentru exerciții și minimalizarea eventualelor răniri. Încălziți-vă
timp de două până la cinci minute înainte de antrenamentul de forță sau de aerobic. Efectuați activități
care vă ridică ritmul cardiac și calmează mușchii. Activitățile pot include mersul pe jos, jogging-ul,
săriturile/coarda de sărituri și alergatul pe loc.
ÎNTINDEREA UȘOARĂ
Întinderea ușoară după o încălzire adecvată și din nou după o sesiunea de antrenament de forță sau
aerobic, este foarte importantă. Mușchii se întind mai ușor în aceste momente datorită temperaturii lor
ridicate, ceea ce reduce foarte mult riscul de rănire. Durata de timp în care trebuie susținută întinderea
este de 15 până la 30 de secunde. VĂ RUGĂM NU EFECTUAȚI SĂRITURI PENTRU ÎNTIDEREA MUȘCHILOR.
Amintiți-vă întotdeauna să consultați medicul înainte de a începe orice program de exerciții fizice.

10
EXERCIȚIILE
Aceasta este etapa în care depuneți efort.
După un antrenament regulat, mușchii din
picioare vor deveni mai flexibili. Lucrați după
propriul ritm și asigurați-vă că îl mențineți
constant. Exercițiul ar trebui să fie suficient
pentru a ridica pulsul în zona țintă
prezentată în graficul alăturat..
Amintiți-vă întotdeauna să consultați
medicul înainte de a începe orice program de
exerciții fizice.
RELAXAREA
Scopul relaxării este de a readuce corpul la starea de repaus normală sau aproape normală la sfârșitul
fiecărei sesiuni de exerciții fizice. O bună relaxare încetinește ritmul cardiac și permite sângelui să se
întoarcă normal la inimă.

11
Elliptical Bike
OWNER’S MANUAL
IMPORTANT!
Please read all instructions carefully before using this product.
Retain this manual for future reference.
The specifications of this product may vary slightly from the illustrations and are subject to
change without notice.

12
Before You Start
Thank you for purchasing this Exercise Bike! For your safety and benefit, read this manual carefully
before using the machine.
Prior to assembly, remove components from the box and verify that all the listed parts were supplied.
Assembly instructions are described in the following steps and illustrations.
IMPORTANT SAFETY NOTICE
PRECAUTIONS
BE SURE TO READ THE ENTIRE MANUAL BEFORE YOU ASSEMBLE OR OPERATE YOUR
MACHINE. IN PARTICULAR, NOTE THE FOLLOWING SAFETY PRECAUTIONS:
1. Check all the screws, nuts and other connections before using the machine for the first time and ensure
that the trainer is in the safe condition.
2. Set up the machine in a dry level place and leave it away from moisture and water.
3. Place a suitable base (e.g. rubber mat, wooden board etc.) beneath the machine in the area of assembly
to avoid dirt and etc..
4. Before beginning training, remove all objects within a radius of 2 meters from the machine.
5. DO NOT use aggressive cleaning articles to clean the machine, Only use the supplied tools or suitable tools
of your own to assemble the machine or repair any parts of machine. Remove drops of sweat from the
machine immediately after finishing training.
6. Your health can be affected by incorrect or excessive training. Consult a doctor before beginning a training
program. He can define the maximum setting (Pulse. Watts. Duration of training etc) to which you may
train yourself and can get precise information during training. This machine is not suitable for therapeutic
purpose.
7. Only do training on the machine when it is in correct working way. Use only original spare parts for any
necessary repairs.
8. This machine can be used for only one person’s training at a time.
9. Wear training clothes and shoes which are suitable for fitness training with the machine. Your training
shoes should be appropriate for the trainer.
10. If you have a feeling of dizziness, sickness or other abnormal symptoms, please stop training and consult
a doctor asap.
11. People such as children and handicapped persons should only use the machine in the presence of another
person who can give aid and advice.
12. The power of the machine increases with increasing the speed, and the reverse. The machine is equipped
with adjustable knob which can adjust the resistance. Reduce the resistance by turning the adjusting knob
for the resistance setting towards stage 1. Increase the resistance by turning the adjusting knob for the
resistance setting towards stage 8.
WARNING: BEFORE BEGINNING ANY EXERCISE PROGRAM, CONSULT YOUR PHYSICIAN. THIS IS
ESPECIALLY IMPORTANT FOR INDIVIDUALS OVER THE AGE OF 35 OR PERSONS WITH PRE-
EXISTING HEALTH PROBLEMS. READ ALL INSTRUCTIONS BEFORE USING ANY FITNESS
EQUIPMENT.
SAVE THESE INSTRUCTIONS / Maximum user’s weight: 100KG

13
EXPLODED DIAGRAM

14
PARTS LIST
NO.
DESCRIPTION
QTY
NO.
DESCRIPTION
QTY
1
Main frame
1
33
Hex bolt M10×45
4
2
Handlebar post
1
34
Flat washer d10×1.5
6
3
Front stabilizer
1
35
Nylon nut M10
6
4
Rear stabilizer
1
36
Nut cap S16
4
5L/R
Pedal support (L/R)
1/1
37
Hex bolt M10×50
2
6L/R
Swing bar (L/R)
1/1
38L/R
Pedal hinge bolt (L/R)
1pr.
7L/R
Handlebar (L/R)
1/1
39
Axle bushing Φ24×20×Φ16.1
4
8
Armrest
1
40L/R
Connecting pedal joint (L/R)
1/1
9
Computer
1
41
Spring washer Φ13×B2
2
10L/R
Pedal (L/R)
1/1
42L/R
Nylon nut (L/R)
1pr.
11
Front end cap
2
43
Nut cap S19
2
12
Carriage bolt M10×57
4
44
Arc washer Φ20×d8×2×R16
4
13
Arc washer Φ10×1.5×Φ25×R28
4
45
Carriage bolt M8×40
4
14
Acorn nut M10
4
46
Mushroom end cap
2
15
Rear end cap
2
47
Handlebar foam grip
2
16
Allen screw M8×16
4
48
Armrest foam grip
2
17
Tension controller
1
49
Round end cap Φ25×1.5
2
18
Extension wire
1
50
Pulse sensor wire
2
19
Tension cable
1
51
Allen cylindrical bolt M8×30
2
20
Sensor wire
1
52
Spring washer D8
4
21
Cross screw M5×45
1
53
Handlebar clamp cover
1
22L/R
Crank
1pr.
54
Waved washer Φ20×Φ28×0.3
2
23
Nut cap S14
4
55
Cross screw
4
24
Hex bolt M8×15
2
56
Arc washer Φ20×d8.5×R25
4
25
Flat washer Φ8.2×Φ32×2
2
57
Nut cap S13
2
26
Axle bushing Φ32×2.5
6
58
Acorn nut M8
4
27
Long shaft
1
59
Flat washer D5
1
28
Round end cap Φ28×1.5
2
60
Tension controller cover
1
29
Square end cap □40×X25×1.5
4
61
Alloy bushing Φ14×10×Φ10.1
4
30
Hex bolt M8×55
2
62
Waved washer D17×0.3
2
31
Flat washer d8×1.5
4
63
Cross tapping screw ST3×10
2
32
Nylon nut M8
2
NOTE:
Most of the listed assembly hardware has been packaged separately, but some hardware
items have been preinstalled in the identified assembly parts. In these instances, simply
remove and reinstall the hardware as assembly is required.
Please reference the individual assembly steps and make note of all preinstalled hardware.

15
PREPARATION:
Before assembling, make sure that you will have enough space around the item; Use the
present tooling for assembling;
Before assembling please check whether all needed parts are available.
Attention:
Please follow these assembly instructions step by step to assemble this machine.
It is strongly recommended this machine to be assembled by two or more people to avoid
possible injury.
ASSEMBLY INSTRUCTION
Step 1:
Fix the Front stabilizer (3) and Rear stabilizer (4) to the Main frame (1) with the Carriage bolts (12), Arc
washers (13) and Acorn nuts (14) as shown.

16
Step 2:
Connect the Sensor wire (20) with the Extension wire (18) and then install the Tension cable (19)
properly with the cable from Tension controller (17) as shown.
Fix the Handlebar post (2) onto the Main frame (1) with the Allen bolts (16) and Arc washers (56) as
shown.

17
Step 3:
A: Fix the left Swing bar (6L) onto the Handlebar post (2) with the Hex bolt (24), Spring washer (52), Flat
washer (25), Waved washer (54) and Long shaft (27) as shown. DO NOT tighten till now.
B: Attach the left Pedal Support (5L) to the left Crank (22L) by using the left Pedal hinge bolt (38L), Waved
washer (62), Spring washer (41) and left Nylon nut (42L) as shown. DO NOT tighten till now.
C: Mount the left Swing bar (6L) with the Pedal support (5L) using the Hex bolt (30), Flat washer (31) and
Nylon nut (32). Tighten the above mentioned Hex bolts (24 & 30) and Nylon nut (42L), and then put
on the Nut caps (23, 57, 43 & 36) as shown.
D: Fix the right Pedal support (5R) and Swing bar (6R) to the right Crank (22R) and Handlebar post (2) in
the same way. Slightly turning the Crank might help via your assembly.
E: Fix the Pedal (10L/R) onto the Pedal support (5L/R) with the Hex bolts (33), Flat washers (34) and Nylon
nuts (35).

18
Step 4:
A: Feed the Pulse sensor wires (50) through the Handlebar post (2) and out from the hole of the computer
bracket. Fix the Armrest (8) to the Handlebar post (2) with the Allen cylindrical bolts (51), Spring
washers (52) and Flat washers (31) and then cover the Handlebar clamp cover (53) in place.
B: Attach the Handlebar (7L/R) to the Swing bar (6L/R) respectively using the Carriage bolts (45), Arc
washers (44) and Acorn nuts (58).
Step 5:
Connect the Pulse sensor wires (50) and Extension wire (18) to the
wires coming from the Computer (9) properly, and then fix the
Computer (9) onto the computer bracket of the Handlebar post (2)
with the Cross screws (55) as shown.

19
USING YOUR ELLIPTICAL BIKE
Using your Elliptical will provide you with several benefits. It will improve your physical fitness, tone your
muscles and in conjunction with a calorie controlled diet, help you lose weight.
WARM-UP PHASE
The purpose of warming up is to prepare your body for exercise and to minimize injuries. Warm up for
two to five minutes before strength-training or aerobic exercising. Perform activities that raise your
heart rate and warm the working muscles. Activities may include brisk walking, jogging, jumping jacks,
jump rope, and running in place.
STRETCHING
Stretching while your muscles are warm after a proper warm-up and again after your strength or aerobic
training session is very important. Muscles stretch more easily at these times because of their elevated
temperature, which greatly reduces the risk of injury. Stretches should be held for 15 to 30 seconds. DO
NOT BOUNCE.
Remember always to check with your physician before starting any exercise program.

20
EXERCISE PHASE
This is the stage where you put the
effort in. After regular use, the
muscles in your legs will become more
flexible. Work at your own pace and
be sure to maintain a steady
tempo throughout. The rate of work
should be sufficient to raise your
heartbeat into the target zone
shown on the graph below.
COOL-DOWN PHASE
The purpose of cooling down is to return the body to its normal or near normal, resting state at the end
of each exercise session. A proper cool-down slowly lowers your heart rate and allows blood to return to
the heart.
This manual suits for next models
1
Table of contents
Languages:
Other DHS Fitness Exercise Bike manuals

DHS Fitness
DHS Fitness DHS8508 User manual

DHS Fitness
DHS Fitness DHS 2912S User manual

DHS Fitness
DHS Fitness 3615 User manual

DHS Fitness
DHS Fitness DHS 2615 User manual

DHS Fitness
DHS Fitness 8607 User manual

DHS Fitness
DHS Fitness DHS2729 User manual

DHS Fitness
DHS Fitness DHS 2301 User manual

DHS Fitness
DHS Fitness 8912 User manual

DHS Fitness
DHS Fitness HIPERFLEX 004 User manual

DHS Fitness
DHS Fitness DHS 3802 User manual