Di-Li 900 User manual

Di-Li
DIGITAL-Mikroskope
Zum Bornberg 1-3, 67659 Kaiserslautern
Telefon: 0631-78319, Fax: 0631-78399, E-Mail:info@di-li.eu
www.di-li.eu
Ausgezeichnet beim Industriepreis + Innovationspreis
Bedienungsanleitung
Stereomikroskop
Di-Li 900 + Di-Li 900-T
Danke, dass Sie sich für ein Di-Li Stereomikroskop entschieden haben. Di-Li Mikroskope
sind Präzisionsinstrumente. Vor der Auslieferung werden Sie einer genauen Prüfung
unterzogen. Sie sind einfach zu bedienen und bieten umfangreiche Funktionen.
Stereomikroskope werden dazu verwendet, dreidimensionale Objekte zu untersuchen, kleine
Teile anzuschauen oder biologische Proben zu präparieren. Mit ihnen können auch Proben
auf Objektträgern betrachtet werden.
Bitte diese Anleitung vor Gebrauch sorgfältig lesen.

Entnehmen und handhaben Sie alle Komponenten des Mikroskops mit großer
Vorsicht.
Vermeiden Sie die Berührung der Linsen. Vermeiden Sie auch den Kontakt mit Staub,
Wasser oder anderen verunreinigenden Substanzen, da die Linsenoberflächen
verschmutzen oder beschädigen und die Qualität des Bildes beeinträchtigen können.
1. Vorbereitungen
Die Einzelteile vorsichtig auspacken..
Packliste:
1. Mikroskopkopf
2. Stativ mit Säule und Kopfhalter
3. 2 Stück Okulare mit Okularmuscheln
4. Ringleuchte (Ist außen am Styropor befestigt)
2. Montage
•Den Fuß des Mikroskops aufrecht auf eine gerade Oberfläche stellen
•
Mikroskopkopf einsetzen, Feststellschraube für Kopfhalter festdrehen
•
Ringleuchte unten am Objektiv festschrauben.
3. Inbetriebnahme
•Objektivabdeckung abschrauben abziehen
•Okulare einsetzen
•Beleuchtung einschalten
•Objektabstand etwa 90mm.
•
Mit dem Fokussierknopf kann jetzt die Schärfe eingestellt werden.
Gegebenenfalls die Höhe des Kopfhalters korrigieren und mit dem Haltering
sichern.
5. Technische Eigenschaften
Stereo-Zoom-Mikroskop:
Stereo-Kopf: 45° Schrägeinblick, 360° drehbar, einstellbarer Augenabstand von 54-74
mm
Ständer: Flachsockel 250 x 170 mm
Vergrößerung: 7x – 45x
Okulare: Weitfeld 10 x, Okulartubus mit Okularmuscheln
Objektive: 0,7 – 4,5 Scharfstellung: beidseitig
Stativ: Stabiles Metallstativ, Säulenlänge 240 mm,
schwarz-weiße Kunststoffplatte für Auflicht.
Beleuchtung: LED-Ringlicht für schattenfreies Auflicht, Montage am Objektiv

6. Zubehör
• Kreuztisch Di-Li 1050
Aufsetzbarer Präzisions-Kreuztisch, Tischp atte
180 x 155 mm. Bewegung mitte s horizonta
montierten, koaxia en Triebknöpfen. Mit Tei ung.
Passend für a e Stative.
Mikroskopieren
1. Das Objekt auf die Tischein age
auf egen.
2. Den Augenabstand einste en.
3. Die Dioptrien am Oku ar einste en.
4. Den Zoom-Trieb auf die k einste
Vergrößerungsstufe einste en und
den Fokustrieb drehen, um das Objekt
scharfzuste en.
5. Den Zoom-Trieb auf die gewünschte
Vergrößerungsstufe einste en
und den Fokustrieb drehen, um das
Objekt exakt scharfzuste en.

Einstellen der Gängigkeit des Fokustriebs
Diese Einste ung bewirkt, dass die Drehung der
Triebe er eichtert und g eichzeitig ein spontanes
Absenken des Mikroskopstativs verhindert
wird. Es wird empfoh en, die Gängigkeit etwas
schwerer einzuste en a s an der Ste e, an der ein
spontanes Absenken stattfindet.
· Die inken und rechten Fokustriebe mit beiden
Händen fassen, den inken Trieb festha ten und
den rechten Trieb drehen. Die Gängigkeit
der Triebe wird je nach Drehrichtung des rechten
Triebs schwerer oder eichter.
Einstellen des Augen bst nds
Den inken und den rechten Oku arstutzen @ mit
beiden Händen fassen, durch die Oku are b icken
und den Oku arabstand einste en, bis das inke
und das rechte Sehfe d vo ständig zur Deckung
gebracht sind.
Verwendungszweck
Dieses Gerät dient der Darste ung vergrößerter Bi der von Objekten in Routine- und
Forschungsanwendungen.
Das Gerät darf aussch ieß ich für den vorgesehenen Zweck verwendet werden.

Di-Li
®
DIGITAL-Microscopes
Zum Bornberg 1-3, D-67659 K isersl utern
www.di-li.eu
STEREO ZOOM MICROSCOPE Di-Li 900 + Di-Li 900-T
Manual Instruction


ˍ
Thank you for your purchasing.
This inst ruct ion m anual is writ ten for the users of St ereo Zoom Mult iple
Microscopes.
To ensure correct usage, read t his m anual carefully before operat ing the
instrum ent s
zOur Exclusive Distributors are authorized to reproduce or transmit this manual according to
his/her Markets demands.
zThe contents of this manual are subject to change without notice.
zAlthough every effort has been made to ensure the accuracy of this manual, if you note any
points that are unclear or incorrect, contact us please.
zSome of the products described in this manual may not be included in the set you have
purchased.
We are indicated to provide you with the utmost safety during use. Incorrect usage or disregard of
the instructions may cause personal injury or property damage. For your own Safety, read the
instruction manual carefully and thoroughly before using the product. Do not discard this manual.
Always keep it near the product for easy reference. Be sure to follow the instructions marked
with these symbols for your safety.
Be sure to always follow the below Rules:
Warning
1. Intended use of this product
This product is intended only for microscope. Do not use it for any other purpose.
2. Do not disassemble
Disassembly may result in damage to the instrument.
Never disassemble any part except as described in this operation manual. Contact us if you
notice any malfunction of this instrument.
3. Check the input voltage
When using an illuminator, check that the input voltage displayed on the power supply of the
illuminator matches the operating voltage. Contact us if the displayed voltage does not match
the operating voltage. Use of an improperly matched illuminator may result in damage to
equipment.
4. Power cord
Always turn the power switch off and unplug the power cord when replacing the lamp of an
illuminator as failure to do so may result in electric shock or equipment damage.
5. Heat from the light source
When using an illuminator, do not place cloth or paper or highly flammable materials, such as
gasoline, benzene, thinner or alcohol, near the lamp as there is a danger of fire.
Always use lamps that are of the specified rating only. For the lamp rating, please refer to the
operation manual.

IV. Assembly
1 Place the stand on the level surface.
2 Mount the stage plate.
Fit the stage plate into the stand base in the direction shown by the arrow in the illustration.
3 The stand arm can be Raised or lowered. (If you do not need to lower the arm, jump to
step 4.)
Use the hexagonal wrench (large – supplied with the focusing stand) to loosen the arm fixing
screw. Assemble the arm again using the screw hole at the lower side of the vertical slider.
The arm will become 55 mm lower than its original position. Before tightening the screw, make
sure that the two pins on the arm fit in the grooves on the vertical slider.
4 Mount the zooming body.
Lightly tighten the zooming body clamp screw to hold the zooming body on the arm.
Note) Do not over-tighten the zooming body clamp screw since it may cause damage to the
instrument.
5 Insert the eyepieces into the eyepiece sleeves.
Be sure that it is inserted all the way until it touches the end of the sleeve.
Note:When inserting the 10X eyepiece, assure that it touches the end of the sleeve, because the
rubber cover of the 10X eyepiece will obstruct the view of the sleeve end. When inserting, hold
the rubber cover not the diopter ring. If not, a failure could result.
6 The hexagonal wrenches can be stored in the rear of the pillar.
(Refer to the diagram of the foregoing structure)
V. Usage
1. Preparation for Observation
Adjust the torque of the focus knob.
Adjust the torque of the focus knob so as not to fall down the zooming body on its own weight.
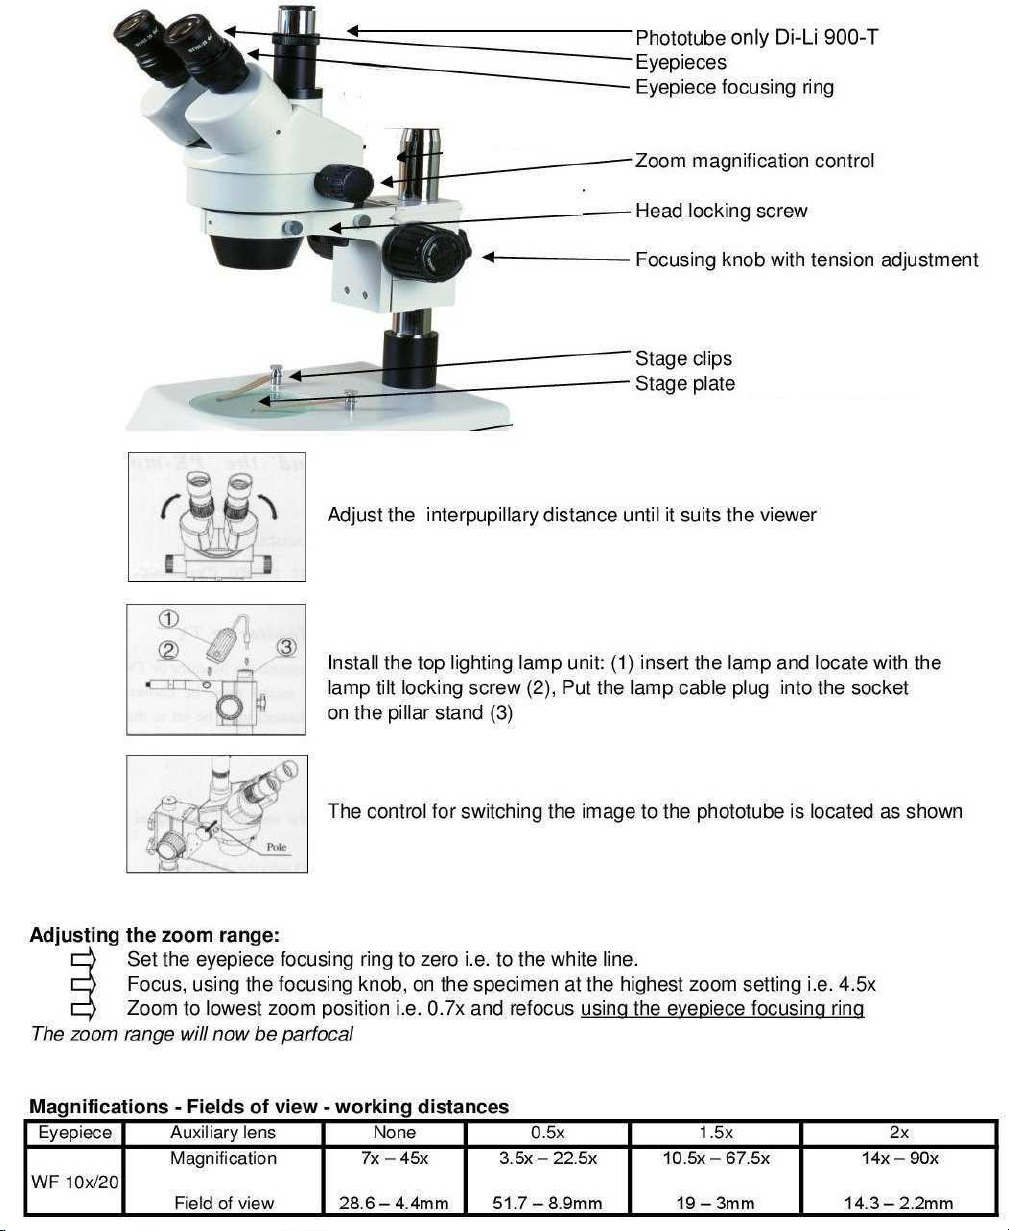
2.Adjust the interpupillary distance.
This adjustment should be performed every time the observer is changed since the interpupillary
distance differs between individuals. Adjust the interpupillary distance so that the view field for
each eye is merged into one. Move while holding each sleeve with both hands.
3. Adjust the diopter.
This adjustment should be performed every time the observer is changed since the eyesight
differs between individuals.
1.Turn the diopter rings on both eyepieces to set them at the 0 position
(match the 0 line with the index line).
2.Turn the zooming knob to 5X. Focus on the sample using the focus knob. (Refer to “2.
Focusing”.)
3.Turn the zooming knob to 0.8X. Peering through the left eyepiece with the left eye, focus on
the sample using the diopter ring on the left eyepiece. Then, peer through the right eyepiece
with your right eye and focus on the sample using the diopter ring on the right eyepiece.
4 Repeat steps 2 and 3 until the image is kept focused even though the zooming magnification is

changed. This adjustment ensures sharp image throughout the zooming range. Increasing the
torque. (To reduce the torque, turn the knob in the direction opposite to the arrow.)
5. Focusing
1)Check the working distance.
The distance between the focus plane and the bottom surface of the zooming body is called “the
working distance”. Since the working distance is 115 mm, the focusing will become
easier if you set the zooming body at the position where its bottom surface is 115 mm
apart from the sample surface. Refer to the Table 1 () for the changes in working distances when
the auxiliary objective is attached.
2)Focus on the sample.
Turning the left and right focus knobs in the same direction will move the arm (on which the
zooming body is mounted) up and down. Thus you can focus on the sample.
6. Zoom
Change the zooming magnification.
Turning the zooming knobs on the left and right side of the zooming body will change the
magnification of the sample image.
■Total Magnification
The zooming knob on the right has the indication of the zooming magnification. Total
magnification can be calculated by multiplying the eyepiece magnification by the zooming
magnification.
Note:When the auxiliary objective is attached, multiply its magnification as well.
7. If You Cannot Focus On The Sample Though The Zooming Body Is At The Highest
Position.
When you use the 0.5X auxiliary objective or observe a tall sample, you may not be able to focus
on the sample though turning the focus knob to raise the zooming body to its highest position. In
this case, use the C- auxiliary adapter available as an option.
Note:Attach the auxiliary objective first to the zooming body, and then mount the zooming body
on the auxiliary adapter. for the sample heights which may be viewed.
VI. Using Accessories
Auxiliary Objective
Using auxiliary objective allows you to continuously change the eye level through a 40 mm range.
Rotate the focus knobs on the focusing stand to raise or lower the zooming body to set to the
height best suited for viewing.

˔
Đ. Maintaining
1. Installation location
Note the following points when installing the stereoscopic microscope.
Install the microscope in a location with the temperature between 0° and 40°C, and humidity of
less than 80%. If installed in a hot and humid location, mold may form on the lenses or
condensation may occur inside, resulting in reduced performance or damage to the microscope.
Do not install the microscope in a location subject to direct sunlight.
Install the microscope in a location that is not subject to vibration.
Install the microscope in a location that is free from dust and dirt.
2. Handle the microscope carefully
The stereoscopic microscope is a precision optical instrument. Handle it carefully and do not
subject it to impact. Shock from impact during transportation or operation as well as forcible
operations may cause damage to the instrument.
3. Cleaning the lenses
Do not let dust, fingerprints, etc. to get on the lenses. Dirt on the lenses will adversely affect the
view of the image. If any lenses become dirty, clean them as described below. Use an air blower
to blow dust away. If this does not suffice, brush away the dust with a soft brush or gently wipe it
away with a piece of gauze. Only if the lenses become dirty with fingerprints or grease stains,
slightly dampen a piece of soft, clean cotton cloth with absolute\alcohol (ethyl alcohol or methyl
alcohol) and gently wipe away the dirt. Do not use the same part of the cloth more than once.
Since absolute alcohol is highly flammable, be careful in handling it so that it does not ignite.
Observe the manufacturer’s handling instructions when handling absolute alcohol.
4. Cleaning painted or plastic parts
Use of silicon cloth is recommended when cleaning painted parts, plastic parts and printed parts.
If such a part becomes excessively dirty, wipe it gently with gauze dampened in a mild detergent
solution. Do not use organic solvents (such as alcohol, ether, or paint thinner) as this may result
in deformation of the part or remove of lettering.
5. Storage
Store the microscope in a location with low humidity where mold is unlikely to form. Do not store
the microscope in a location subject to direct sunlight or high temperature and humidity. During
storage, place a plastic cover over the equipment to prevent dust accumulation.
6. Regular inspections
Regular inspections are recommended in order to maintain peak performance.
This manual suits for next models
1
Other Di-Li Microscope manuals
Popular Microscope manuals by other brands

MshOt
MshOt MF53-N user manual

Ken A Vision
Ken A Vision Comparison Scope T-1924C instruction manual

JONARD TOOLS
JONARD TOOLS FIM-200 Operation manual

Omano
Omano OM113-1LP instruction manual

Western
Western Surgical Vision 2000 user manual

southern science supply
southern science supply MicroSight 1.3MP user manual