manuals.online logo
Brands
  1. Home
  2. •
  3. Brands
  4. •
  5. Di-soric
  6. •
  7. Industrial Equipment
  8. •
  9. Di-soric USGT 40/13 IU-B4 User manual

Di-soric USGT 40/13 IU-B4 User manual

USGT 40/13 IU-B4
Ultraschall-Gabelschranke
Ultrasonic fork barrier
Fourche à ultrasons
di-soric GmbH & Co. KG
Steinbeisstraße 6
DE-73660 Urbach
Germany
Tel: +49 (0) 7181/9879-0
[email protected] ∙ www.di-soric.com
213498
Stand 10.08.22, Änderungen vorbehalten
As of 08/10/22, subject to change
État 10.08.22, sous réserve de modifications
Funktion / Function / Fonction
IND. CONT. EQ.
29W7
Enclosure Type 1 Supply Class 2
NFPA 79 Applications only. For ad-
apters providing field wiring me-
ans refer to product information or
customer support.
. . .
1) Teach bedämpft / Teach dampened / Apprentissage amorti
2) Teach unbedämpft / Teach undampened / Apprentissage non
amorti
3) Höhenschlag +/- 0.1 mm innerhalb 30 mm / Radial run-out +/-
0.1 mm within 30 mm / Tolérance d’excentricité radiale +/- 0.1
mm sur 30 mm mm
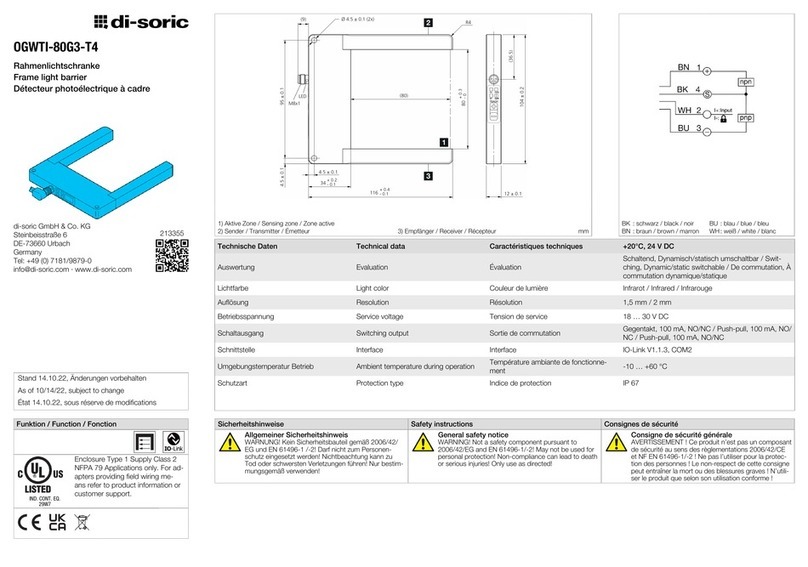
Technische Daten Technical data Caractéristiques techniques +20°C, 24 V DC
Funktionsprinzip Operating principle Principe de fonctionnement Ultraschall-Einwegschranke / Ultrasonic through-
beam sensor / Détecteur par barrage à ultrasons
Gabelweite Fork opening Largeur de fourche 40mm
Messbereich Measuring range Plage de mesure 13mm (typ.)
Reproduzierbarkeit Reproducibility Reproductibilité ± 0,1 mm
Betriebsspannung Service voltage Tension de service 12 … 30V DC
Analogausgang Spannung Analog output voltage Sortie analogique tension 0 … 10V
Analogausgang Strom Analog output current Sortie analogique courant 4 … 20mA
Umgebungstemperatur Betrieb Ambient temperature during operation Température ambiante de fonctionne-
ment 0 … +60°C
Schutzart Protection type Indice de protection IP 67
Sicherheitshinweise Safety instructions Consignes de sécurité
Allgemeiner Sicherheitshinweis
WARNUNG! Kein Sicherheitsbauteil gemäß 2006/42/
EG und EN 61496-1 /-2! Darf nicht zum Personen-
schutz eingesetzt werden! Nichtbeachtung kann zu
Tod oder schwersten Verletzungen führen! Nur bestim-
mungsgemäß verwenden!
General safety notice
WARNING! Not a safety component pursuant to
2006/42/EG and EN 61496-1/-2! May not be used for
personal protection! Non-compliance can lead to death
or serious injuries! Only use as directed!
Consigne de sécurité générale
AVERTISSEMENT! Ce produit n’est pas un composant
de sécurité au sens des règlementations 2006/42/CE
et NFEN61496-1/-2! Ne pas l’utiliser pour la protec-
tion des personnes! Le non-respect de cette consigne
peut entraîner la mort ou des blessures graves! N’utili-
ser le produit que selon son utilisation conforme!
USGT 40/13 IU-B4
超声波槽型光电开关
di-soric GmbH & Co. KG
Steinbeisstraße 6
DE-73660 Urbach
Germany
Tel: +49 (0) 7181/9879-0
[email protected] ∙ www.di-soric.com
213498
版本 22.08.10,保留变更权
功能
IND. CONT. EQ.
29W7
Enclosure Type 1 Supply Class 2
NFPA 79 Applications only. For ad-
apters providing field wiring me-
ans refer to product information or
customer support.
. . .
1) 示教阻尼
2) 示教非阻尼 3) 径跳 +/- 0.1 mm 在 30 mm 之内 mm
技术数据 +20°C, 24 V DC
工作原理 超声波对射式光电开关
槽口宽度 40mm
测量范围 13mm (典型)
再现性 ± 0,1 mm
工作电压 12 … 30V DC
模拟量输出端,电压 0 … 10V
模拟量输出端,电流 4 … 20mA
工作环境温度 0 … +60°C
防护等级 IP 67
安全提示
一般安全提示
警告!没有符合 2006/42/EU 和 EN 61496-1 /-2 标准
的安全结构件!不得用于人身安全保护!不遵守规定
会导致死亡或重伤危险!仅按规定使用!
Deutsch English Français
6 x OK
Objekt detektieren:
Zu detektierendes Objekt einführen:
Taste A drücken bis alle drei LEDs leuchten.
Detecting an object:
Insert object to be detected:
Press button A until all three LEDs are shining.
Détection d‘un objet :
Introduire l‘objet à détecter :
Appuyer sur la touche A jusqu‘à ce que les trois DEL luisent.
6 x OK
Objekt aus dem Erfassungsbereich entfernen.
Taste B drücken bis alle drei LEDs leuchten.
Remove object from detection area.
Press button B until all three LEDs are shining.
Retirer l‘objet de la zone de détection.
Appuyer sur la touche B jusqu‘à ce que les trois DEL luisent.
Der Teach-Vorgang ist erfolgreich abgeschlossen wenn bei
eingelegtem Objekt der Spannungsausgang 0V beträgt.
The teach process is completed successfully if the voltage
output is 0 V when an object is inserted.
L‘opération Teach est terminée avec succès lorsque la
tension de sortie est de 10 V ou 0 V (inversée) lorsque l‘objet
est introduit.
OK
5 Sek.
Invertierung des Signals:
Tasten A und B gleichzeitig 5 Sek. drücken, bis LED bei A
(gelb) leuchtet. Tasten A und B loslassen.
Quittierung erfolgt durch Blinken (6x) aller 3 LEDs.
Inverting the signal:
Press buttons A and B at the same time for 5 seconds until
the LED for A (yellow) lights up. Release buttons A and B.
Acknowledgement is signalled by all 3 LEDs flashing (6
times).
Inversion du signal :
Appuyer simultanément sur les touches A et B pendant 5
secondes jusqu‘à ce que la DEL A (jaune) s‘allume. Relâcher
les touches A et B. La validation est signalée par le clignote-
ment (6 fois) des 3 DEL.
OK
10 Sek.
Rücksetzen auf Werkseinstellung:
Tasten A und B gleichzeitig 10 Sek. drücken, bis LED (grün)
leuchtet. Tasten A und B loslassen.
Quittierung erfolgt durch Blinken (6x) aller 3 LEDs.
Resetting to factory setting:
Press buttons A and B at the same time for 10 seconds until
the LED (green) lights up. Release buttons A and B.
Acknowledgement is signalled by all 3 LEDs flashing (6
times).
Réinitialisation des réglages d‘usine :
Appuyer simultanément sur les touches A et B pendant 10
secondes jusqu‘à ce que la DEL (verte) s‘allume. Relâcher les
touches A et B. La validation est signalée par le clignotement
(6 fois) des 3 DEL.
OK
15 Sek.
Tastensperre:
Tasten A und B gleichzeitig 15 Sek. drücken, bis LED bei B
(gelb) leuchtet. Tasten A und B loslassen.
Quittierung erfolgt durch Blinken (6x) aller 3 LEDs.
Entsperren der Tasten auf dieselbe Weise.
Button lock:
Press buttons A and B at the same time for 15 seconds until
the LED for B (yellow) lights up. Release buttons A and B.
Acknowledgement is signalled by all 3 LEDs flashing (6
times).
The buttons are unlocked in the same way.
Verrouillage des touches :
Appuyer simultanément sur les touches A et B pendant 15
secondes jusqu‘à ce que la DEL B (jaune) s‘allume. Relâcher
les touches A et B. La validation est signalée par le clignote-
ment (6 fois) des 3 DEL.
Déverrouillage des touches de la même manière.
OK
6x
20 Sek.
Wechseln der Ausgangsfunktion U/I:
„Tasten A und B gleichzeitig 20 Sek. drücken, bis alle 3 LEDs
leuchten. Tasten A und B loslassen.
Quittierung erfolgt durch Blinken (6x) aller 3 LEDs. Zurück-
setzen des Analogenausgangs auf U (Werkseinstellung), auf
dieselbe Weise.“
Change of the output function U/I:
„Press buttons A and B at the same time for 20 seconds
until all 3 LEDs light up. Release buttons A and B.
Acknowledgement is signaled by all 3 LEDs flashing (6
times).
Reset the analog output to U (factory setting) in the same
way.“
Changement de la fonction de sortie :
„Appuyer simultanément sur les touches A et B pendant 20
secondes jusqu‘à les 3 DEL s‘allumes. Relâcher les touches
A et B. La validation est signalée par le clignotement (6 fois)
des 3 DEL.
Remettez la sortie analogique sur U (réglage d‘usine), de la
même manière.“
Other Di-soric Industrial Equipment manuals

Di-soric OGWTI-80G3-T4 User manual

Di-soric

Di-soric OGWTI-80G3-T4 User manual

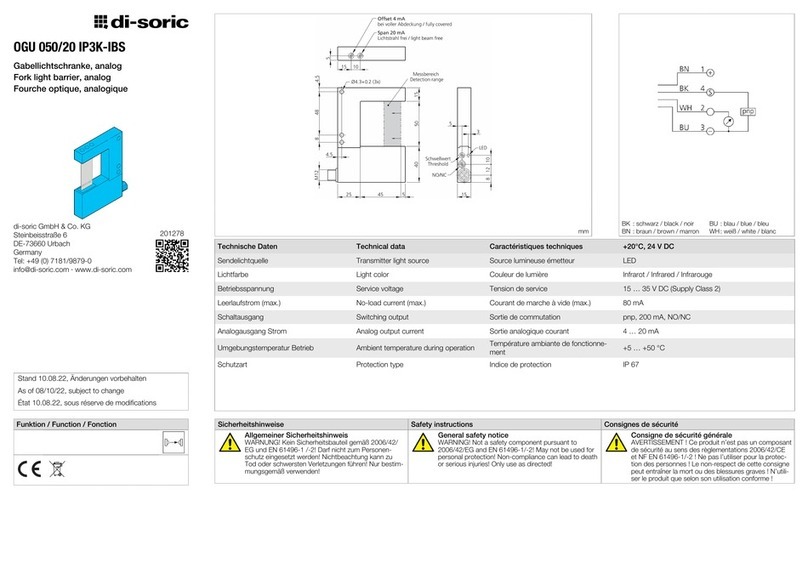
Di-soric OGU 050/20 IP3K-IBS User manual

Di-soric

Di-soric OGU 050/20 IP3K-IBS User manual

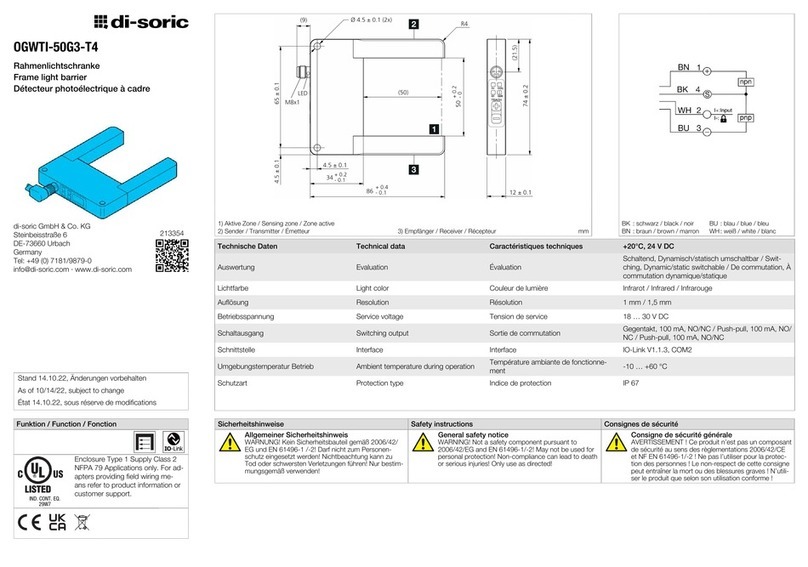
Di-soric OGWTI-50G3-T4 User manual

Di-soric

Di-soric OGWTI-50G3-T4 User manual

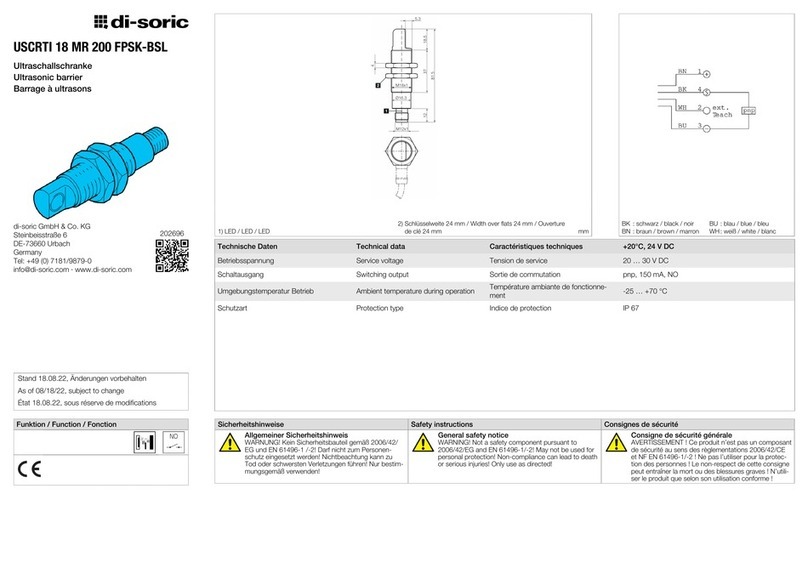
Di-soric USCRTI 18 MR 200 FPSK-BSL User manual

Di-soric

Di-soric USCRTI 18 MR 200 FPSK-BSL User manual

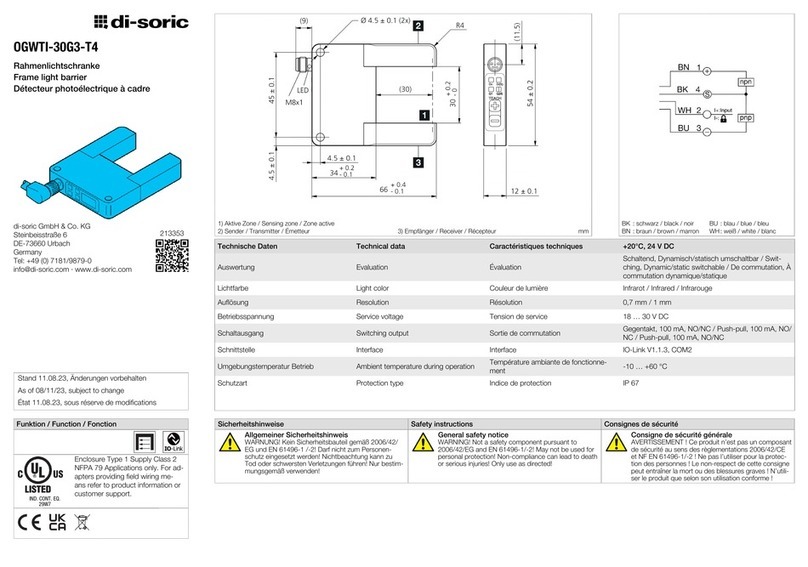
Di-soric OGWTI-30G3-T4 User manual

Di-soric

Di-soric OGWTI-30G3-T4 User manual

Di-soric OGWTI-100G3-T4 User manual

Di-soric

Di-soric OGWTI-100G3-T4 User manual

Popular Industrial Equipment manuals by other brands

CleaverBrooks CRE Series Operation manual

CleaverBrooks

CleaverBrooks CRE Series Operation manual

Blue Diamond 127006 Operation and maintenance manual

Blue Diamond

Blue Diamond 127006 Operation and maintenance manual

AutomationDirect CLICK PLUS C2-03CPU-2 quick start guide

AutomationDirect

AutomationDirect CLICK PLUS C2-03CPU-2 quick start guide

Midwest V4 Installation & operation manual

Midwest

Midwest V4 Installation & operation manual

woodmizer LT70H AH Safety, Setup, Operation & Maintenance Manual

woodmizer

woodmizer LT70H AH Safety, Setup, Operation & Maintenance Manual

OEM Tools 24950 Operating instructions and parts manual

OEM Tools

OEM Tools 24950 Operating instructions and parts manual

AME 15925 instruction manual

AME

AME 15925 instruction manual

Alfalaval LeviMag instruction manual

Alfalaval

Alfalaval LeviMag instruction manual

Alfalaval M15 instruction manual

Alfalaval

Alfalaval M15 instruction manual

System air PAW-200W5APAC Installation and maintenance manual

System air

System air PAW-200W5APAC Installation and maintenance manual

Little Giant BS2448PBHP-K owner's manual

Little Giant

Little Giant BS2448PBHP-K owner's manual

Oki ES9465 Procedure for the Installation

Oki

Oki ES9465 Procedure for the Installation

Gema PS02 Operating instructions and spare parts list

Gema

Gema PS02 Operating instructions and spare parts list

EGAmaster 57664 operating instructions

EGAmaster

EGAmaster 57664 operating instructions

Nordson EFD E series quick start guide

Nordson EFD

Nordson EFD E series quick start guide

woodmizer SLAB-MIZER MB200AF Installation

woodmizer

woodmizer SLAB-MIZER MB200AF Installation

Alfalaval ThinkTop D30 instruction manual

Alfalaval

Alfalaval ThinkTop D30 instruction manual

woodmizer LASTEC 621ER Product information bulletin

woodmizer

woodmizer LASTEC 621ER Product information bulletin

manuals.online logo
manuals.online logoBrands
  • About & Mission
  • Contact us
  • Privacy Policy
  • Terms and Conditions

Copyright 2025 Manuals.Online. All Rights Reserved.