Diagnosis Optilet Mini User manual

INSTRUCTIONS FOR USE
Read the instructions for use before blood sampling.
PRICKER
Optilet Mini is a safe and comfortable pricker which is used for the
collection of capillary blood samples in order to determine the level of
glucose. Due to the adjustable tip the puncture depth can be adjusted to
most of the kinds of skin. Before the puncture always wash your hands with
soap and warm water and dry them thoroughly.
The appliance has 6 puncture depth settings (from 1 to 6), intended for
various kinds of skin. The smaller values are intended for shallower
punctures; however, the higher values are intended for deeper punctures.
The shallower punctures are appropriate for children and most of adults.
The deeper punctures are appropriate for persons with thicker or calloused
skin. The puncture can be also made in the alternative sites (apart from a
fingertip); a special adapter is used for this purpose.
Release
button
Lancet
carrier
Lancet
ejector
Lancet
Adjustable pricker tip
Pricker adapter
Protective
lancet
cover
Slide-on
sleeve
Puncture
depth
indicator
The transparent adapter is used for the collection
of blood samples from the alternative site testing
(AST) other than a fingertip. Do not use the
transparent adapter for taking blood samples
from the fingertip.
PRICKER PREPARATION
1. Remove the pricker adapter
Remove carefully the adapter from the pricker.
2. Place the lancet
Place the lancet in the carrier; press it to the end.
3. Remove the protective lancet cover
Twist the protective lancet cover to separate it
from the lancet.
Keep the protective cover; it will be needed
during the removal of the lancet.
4. Install the pricker adapter
Put the adapter on the appliance and tighten it
securely.
Be careful not to touch the uncovered needle of
the lancet.
6. Pull the slide-on sleeve away from the
pricker
Pull the sleeve away until the click is heard.
1. Wash your hands
Wash the hands and puncture site with soap and
water before the collection of blood sample.
Rinse and dry the hands thoroughly.
5. Adjust the puncture depth
Select the desired puncture depth to collect the
proper blood sample with the least possible
discomfort. Adjust the depth twisting the pricker
tip.
The appliance has 6 depth settings:
1, 2 for delicate skin
3, 4 for normal skin
5, 6 for thick or calloused skin
2. Collect a drop of blood
In order to achieve a sufficient blood sample,
massage vigorously the collection site. Apply the
pricker to the finger from which the blood
sample is to be collected. Press the release
button to make the puncture. Put the pricker
aside and follow the instructions for use of
glucose meter.
PRICKING THE FINGERTIP
FOR USE ONLY BY A SINGLE PATIENT.
This appliance may not be used for the collection of blood samples by
healthcare personnel in care homes, clinics and healthcare centres, or shared
with other persons, including family members.
DO NOT REUSE THE LANCET.
The reuse of the same needle by third persons is connected with the
increased microbiological risk; the user may become infected inter alia by
hepatitis B virus, hepatitis C virus and HIV.
In order to reduce the infection risk:
źWash the puncture site with soap and water before the collection of
blood sample.
źKeep the appliance clean. Cosmetic product, oils, contaminants, dust
can cause its improper operation.
źKeep the appliance out of the reach of children. The pricker, adapter,
lancets and pricker cover present the risk of suffocation.
źUse always a new, clean lancet. The lancets are for a single use.
NOTE:
5
ENGLISH
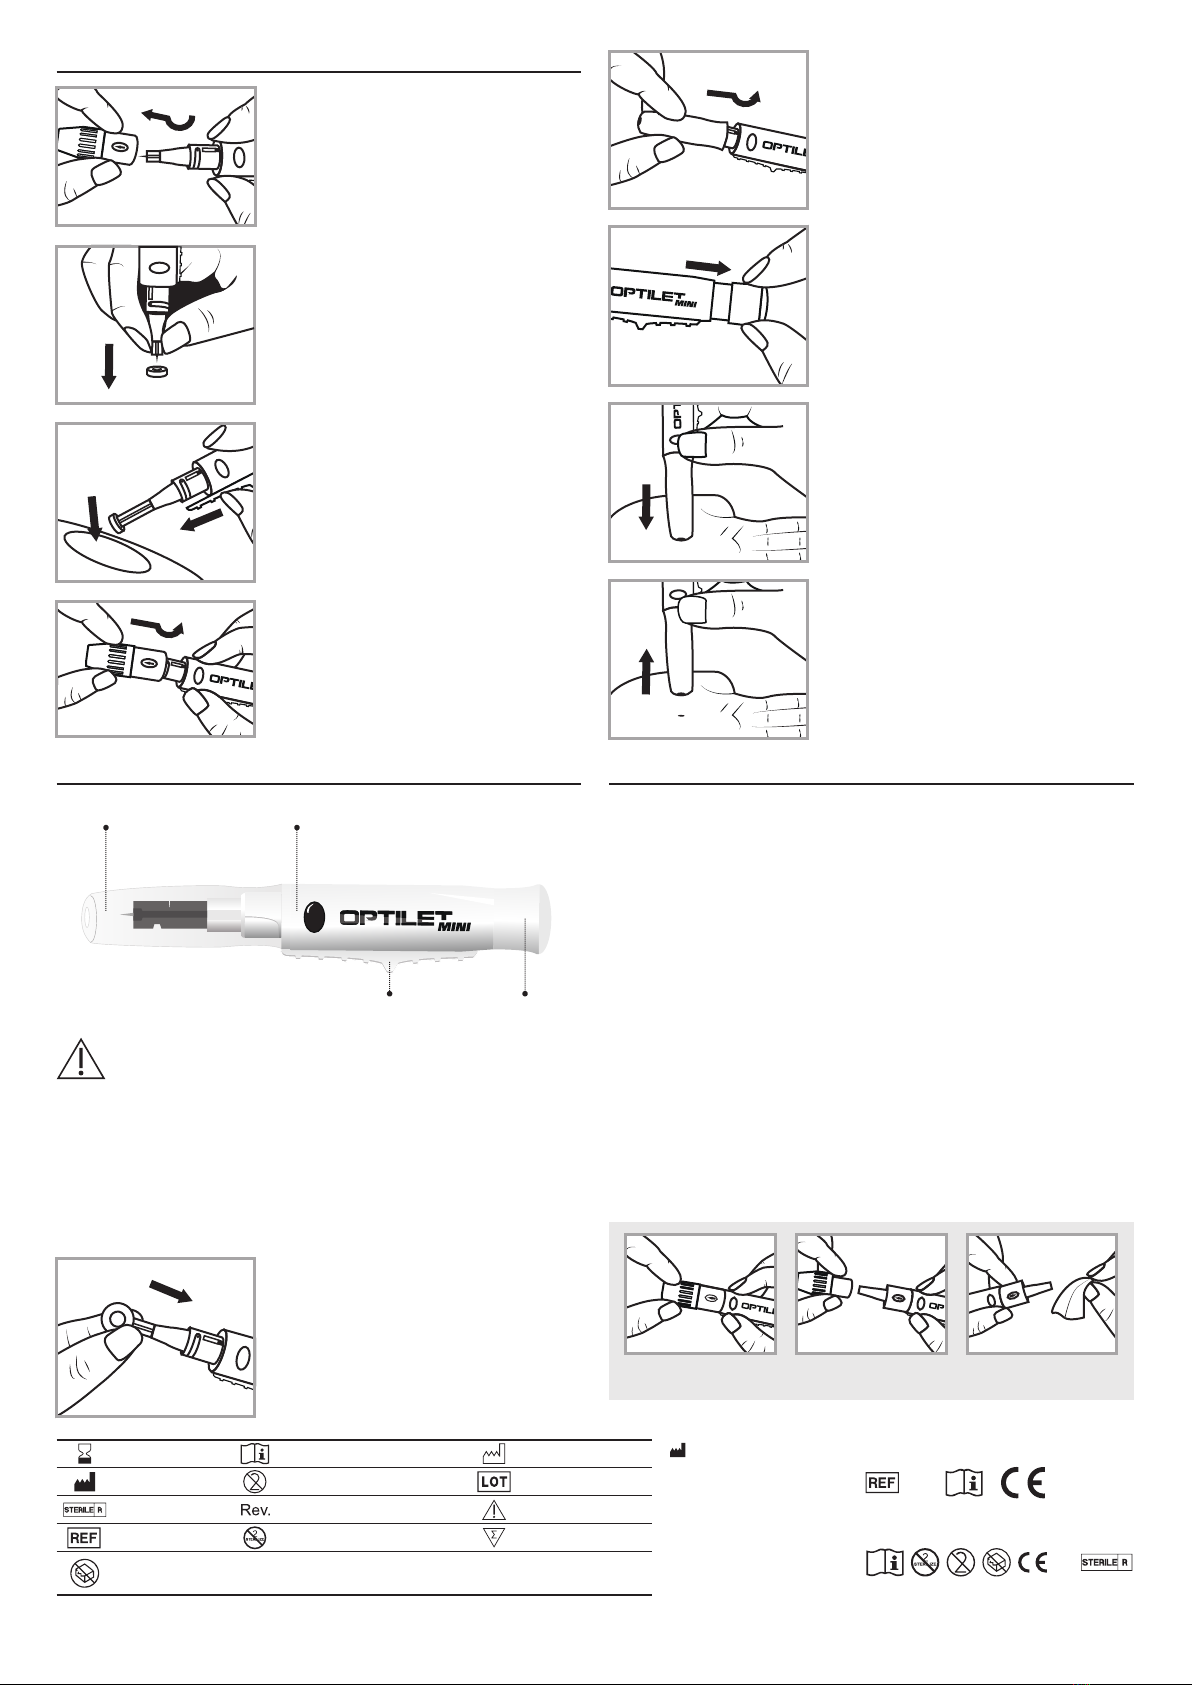
REMOVING THE USED LANCET
CLEANING AND DISINFECTION OF THE PRICKERPRICKING IN THE ALTERNATIVE SITE
1. Remove the pricker adapter
Remove carefully the adapter from the
pricker. Be careful not to touch the
uncovered lancet.
1. Place the lancet
Place the lancet in lancet carrier; press it to
the end inside the appliance.
2. Install the transparent adapter for the
alternative site testing (AST).
Install the transparent adapter for the
alternative site testing (AST) in place of the
pricker adapter.
The adjustment of the puncture depth is not
required if the (AST) adapter is used.
3. Pull the sleeve
Pull the slide-on sleeve forward until the
click is heard.
4. Hold down the transparent adapter on
the skin
Press down the pricker stably and then
press the release button until the sufficient
blood volume appears in the adapter.
5. Lift up carefully the pricker vertically.
Be careful not to spread the blood sample at
the puncture site. Apply a drop of blood on
the test strip.
2. Put the cover on the lancet
Before the removal of the lancet, put the
protective lancet cover on the hard surface,
then stab carefully the lancet in it.
3. Remove the lancet
Slide the lancet ejector forward until the
lancet pulls out of the pricker. Remove the
used lancet.
4. Install the adapter
Reinstall the pricker adapter on the
appliance.
IMPORTANT: If you consider the use of the other puncture
site than the fingertip, consult a physician.
The transparent adapter for pricking in the alternative sites
(forearm or palm of the hand) is designed for the use with
Optilet Mini in order to collect a blood sample for measuring
the concentration of glucose.
For use only by a single patient.
Read the instructions for use of glucose meter in relation to the
collection of blood samples from the alternative sites.
In order to clean the pricker, wipe the elements with a soft cloth wet
with water and mild detergent. Do not submerge the appliance in any
liquid. In order to disinfect the elements, prepare a solution of
household bleach and water in the ratio 1:9. Wipe the appliance with
a soft cloth wet with this solution. Submerge only the adapter in this
solution for 30 minutes. After disinfection, rinse and let it dry in the
air.
FUNCTION OF PRECISE CLEANING
If blood enters the interior of the pricker adapter, turn the
transparent pricker tip to the position "↑" (Fig. A);
Remove the transparent pricker tip (Fig. B) and wipe it with a soft
cloth wet with the afore-mentioned solution for disinfection (Fig. C).
REMEMBER: While reinstalling the transparent pricker tip, check if
the depth indicator is set in the position "↑" (Fig. A), then set the
puncture depth appropriate for yourself.
Transparent adapter for
alternative site testing
(AST)
Release button
Lancet
ejector
Slide-on
sleeve
Expiry date Read the instructions for use
Producer
Date of last revision
Not intended for re-sterilisation
Catalogue number
Lot number
Sterile product
For single use
Number of pieces in set
Do not use if the package is damaged
Warning
Date of production
Diagnosis S.A.
ul. Gen. W. Andersa 38A
15-113 Białystok, POLAND
Marking for OPTILET mini
Marking for OPTILETS
5221
0197
Rev. 2018.01.03 /EN
A B C
Other Diagnosis Medical Equipment manuals

Popular Medical Equipment manuals by other brands


Getinge
Getinge Arjohuntleigh Nimbus 3 Professional Instructions for use

Mettler Electronics
Mettler Electronics Sonicator 730 Maintenance manual

Pressalit Care
Pressalit Care R1100 Mounting instruction

Denas MS
Denas MS DENAS-T operating manual

bort medical
bort medical ActiveColor quick guide

AccuVein
AccuVein AV400 user manual


